reset MERCEDES-BENZ R-CLASS MPV 2008 User Guide
[x] Cancel search | Manufacturer: MERCEDES-BENZ, Model Year: 2008, Model line: R-CLASS MPV, Model: MERCEDES-BENZ R-CLASS MPV 2008Pages: 373, PDF Size: 6.75 MB
Page 84 of 373
Seats
81
i
When the door is unlocked, opened or the
key is in position 1in the ignition lock, the
setting of the lumbar support is automati-
cally checked and if necessary the individ-
ual setting is reset. Adjusting seats in the 2nd and 3rd
rows
G
Risk of injury
After adjusting the seats, make sure that
the outer seats in the 2nd row are locked,
and that the backrests in the 2nd and 3rd
rows of seats are locked and in the upright
position.
The outer seats in the 2nd row are only
locked if the lock verification indicator is
folded in and the indicator area is barely
visible (see the "Easy-entry/exit feature for
the 3rd row of seats" section).
If the backrests are not locked in position:
R Sharp braking
R A sudden change of direction
R An accident
could cause the backrests to fold forwards
and not provide the intended level of restraint, thereby resulting in additional
serious or even fatal injury.
Seat fore-and-aft adjustment (outer
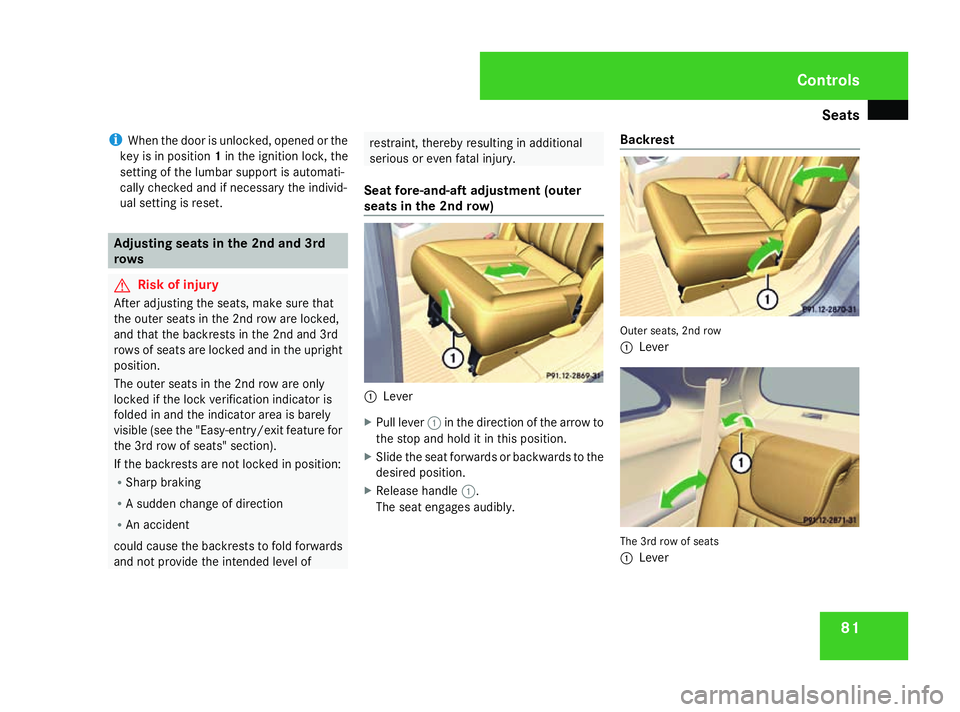
seats in the 2nd row) 1
Lever
X Pull lever 1in the direction of the arrow to
the stop and hold it in this position.
X Slide the seat forwards or backwards to the
desired position.
X Release handle 1.
The seat engages audibly. Backrest Outer seats, 2nd row
1
Lever The 3rd row of seats
1
Lever Controls
251_AKB; 5; 7, en-GB
wobuchh,
Version: 2.10.6 2008-05-11T14:51:51+02:00 - Seite 81 ZDateiname: 6515_1825_02_buchblock.pdf; preflight
Page 94 of 373

Mirrors
91
ror is set in a way which provides you with
a good overview of traffic conditions.
Folding the exterior mirrors in or out
electrically* 1
To fold the exterior mirrors in or out
X Make sure that the key is in position 1or
2 in the ignition lock.
X Briefly press button 1.
Both exterior mirrors fold in or out.
i If you are driving faster than 47 km/h, you
can no longer fold in the exterior mirrors.
Make sure that the exterior mirrors are
always folded out fully while the vehicle is
in motion; otherwise, they may vibrate. Resetting the exterior mirrors If the battery has been disconnected or has
become discharged, the exterior mirrors
must be reset. Otherwise, they will not fold in
when you select the function "Fold in mirrors
when locking" in the on-board computer
(Y
page 135).
X Make sure that the key is in position 1in
the ignition lock.
X Briefly press button 1.
Folding the exterior mirrors in or out
automatically* If the "Fold in mirrors when locking" function
is activated in the on-board computer
(Y
page 135):
R The exterior mirrors fold in automatically as
soon as you lock the vehicle from the out-
side.
R The exterior mirrors fold out again auto-
matically as soon as you unlock the vehicle
and then open the driver's or front-
passenger door.
i If you have activated this function and fold
in the exterior mirrors using button 1, they
will not be folded out automatically. You can then only fold out the exterior mirrors
using button 1. Automatic anti-dazzle mirrors*
The rear-view mirror and the exterior mirror
on the driver's side automatically go into anti-
dazzle mode if the ignition is switched on and
incident light from headlamps strikes the sen-
sor in the rear-view mirror.
The mirrors do not go into anti-dazzle mode if
reverse gear is engaged or the interior lighting
is switched on. G
Risk of accident
If incident light from headlamps cannot
strike the sensor in the rear-view mirror, for
instance if the safety net is fitted, the mir-
ror's automatic anti-dazzle function will not
work.
Incident light could then dazzle you. This
may distract you from the traffic conditions,
and you may thereby cause an accident. In
this case, adjust the rear-view mirror man-
ually. Controls
* optional
251_AKB; 5; 7, en-GB
wobuchh,
Version: 2.10.6 2008-05-11T14:51:51+02:00 - Seite 91 ZDateiname: 6515_1825_02_buchblock.pdf; preflight
Page 95 of 373

Memory functions*
92 Memory functions*
Storing settings
You can store up to three different settings
using the memory button.
The following settings are stored as a single
memory preset:
R position of the seat, backrest and head
restraint
R driver's side: steering-wheel position
R driver's side: position of the exterior mir-
rors on the driver's and front-passenger
sides G
Risk of injury
The memory function can still be used when
the key has been removed. For this reason,
children should never be left unsupervised
in the vehicle. They could otherwise
become trapped when moving the seat or
the steering wheel. G
Risk of accident
Only use the memory function on the
driver’s side when the vehicle is stationary.
You could otherwise be distracted from the
traffic conditions by the steering wheel and seat moving of their own accord, and cause
an accident.
M
Memory button
1, 2, 3 Storage position switches
X Adjust the seat ( Ypage 77).
X On the driver's side, also adjust the steer-
ing wheel (Y page 88) and the mirrors
(Y page 90).
X Press the Mmemory button.
X Press one of storage position switches 1,
2 or 3within three seconds.
The settings are stored in the selected pre-
set position. A tone sounds when the set-
tings have been completed. Calling up a stored setting
G
Risk of accident
Only use the memory function on the
driver’s side when the vehicle is stationary.
You could otherwise be distracted from the
traffic conditions by the steering wheel and
seat moving of their own accord, and cause
an accident.
X Press and hold the relevant storage posi-
tion switch 1,2or 3until the seat, steering
wheel and mirrors are in the stored posi-
tion.
i The setting procedure is interrupted as
soon as you release the storage position
switch. Controls
* optional
251_AKB; 5; 7, en-GB
wobuchh
, Version: 2.10.6
2008-05-11T14:51:51+02:00 - Seite 92 Dateiname: 6515_1825_02_buchblock.pdf; preflight
Page 96 of 373

Memory functions*
93Passenger side exterior mirror park-
ing position
To make it easier to park, you can set and
store the front-passenger side exterior mirror
position in such a way that you can see the
rear wheel on that side as soon as you engage
reverse gear.
Adjusting and storing the exterior mir-
ror parking position 1
Adjustment button
2 Exterior mirror on the front-passenger
side
3 Exterior mirror on the driver's side X
Make sure that the vehicle is stationary and
that the key is in position 2in the ignition
lock.
X Press button 2for the exterior mirror on
the front-passenger side.
X Engage reverse gear.
The exterior mirror on the front-passenger
side moves to the preset parking position.
X Use adjustment button 1to adjust the
exterior mirror to a position which allows
you to see the rear wheel and the kerb.
The parking position is stored.
i When you shift the automatic transmis-
sion into another gear, the exterior mirror
on the front-passenger side returns to the
driving position.
Calling up a stored parking position set-
ting X
With the key in position 2in the ignition
lock and with exterior mirror on the front-
passenger side activated, engage reverse
gear.
Exterior mirror on the front-passenger
moves to the stored parking position.
The exterior mirror on the front-passenger
side moves back to its original position: R
as soon as you exceed a speed of
10 km/h
R about ten seconds after you have disen-
gaged reverse gear
R if you press button 3for the exterior mir-
ror on the driver's side Controls
* optional
251_AKB; 5; 7, en-GB
wobuchh,
Version: 2.10.6 2008-05-11T14:51:51+02:00 - Seite 93 ZDateiname: 6515_1825_02_buchblock.pdf; preflight
Page 105 of 373

Lights
102 Position Load
2 All seats occupied and lug-
gage compartment loaded up
to the maximum permissible
rear axle load
3 Driver’s seat occupied and
luggage compartment loaded
up to the maximum permissi-
ble rear axle load
X
Turn thumbwheel 1to the position which
corresponds to the load in your vehicle. Headlamp cleaning system*
The headlamps are cleaned automatically if
the "Wipe with windscreen washer fluid" func-
tion is operated five times while the lights are
on and the engine is running. When you
switch off the ignition, the automatic head-
lamp cleaning system is reset and counting is
resumed from 0. Cornering light function* (vehicles
with bi-xenon headlamps*)
Specially designed headlamps light up the
area into which you are driving when turning
corners.
If you are driving at speeds below 40 km/h,
the cornering light function is activated either
by the turn signals or when the steering wheel
is turned. If you are driving at speeds above
40 km/h the cornering light function is deac-
tivated.
Activating X
Start the engine.
X Switch on the dipped-beam headlamps.
X Switch off the foglamps.
X Switch on the turn signal.
The cornering lamp on the same side as the
turn signal comes on, even if you turn the
steering wheel in the opposite direction
after indicating.
or
X Turn the steering wheel in the desired
direction.
When in a forwards gear: the cornering
lamp on the inside of the bend comes on. When in reverse gear: the cornering lamp
on the outside of the bend comes on.
Deactivating X
Turn the steering wheel back to the straight
ahead position.
The turn signal goes off. The cornering lamp
may remain lit for a short time.
or
X Switch off the turn signal.
The cornering lamp may remain lit for a
short time.
The cornering light will go out after a maxi-
mum of three minutes. Controls
* optional
251_AKB; 5; 7, en-GB
wobuchh,
Version: 2.10.6 2008-05-11T14:51:51+02:00 - Seite 102Dateiname: 6515_1825_02_buchblock.pdf; preflight
Page 110 of 373
Side windows
107
X
Make sure that the key is in position 2in
the ignition lock.
i When the key is turned to position 0or
removed from the ignition lock, it is still
possible to operate the windows until the
driver's or front-passenger door is opened,
but for no longer than five minutes.
X To open/close: press the switch down or
pull it up beyond the pressure point and
hold it until the corresponding window is in
the desired position.
X To open/close fully: press the switch
down or pull it up beyond the pressure point
and release it.
X To stop: briefly press the corresponding
switch down or pull it up.
Closing with increased force and without
the anti-entrapment feature G
Risk of injury
Make sure that nobody can become trap-
ped and possibly be seriously or fatally
injured as you close a side window with
increased force or without the anti-entrap-
ment feature. If a side window locks up during closing and
has reopened again slightly:
X
Immediately after the window locks up, pull
the switch upwards until the window is
closed.
The side window is closed with more force.
If a side window locks up again during closing
and has reopened again slightly:
X Immediately after the window locks up, pull
the switch upwards until the window is
closed.
The side window is closed without the anti-
entrapment feature. Resetting the windows
You must reset each side window if:
R the battery has been disconnected or has
become discharged
R the side window no longer opens or closes
fully
R the side windows open again slightly after
being closed fully
X Close all the doors.
X Make sure that the key is in position 2in
the ignition lock. X
Pull the corresponding switch upwards
until the window is closed.
X Hold the switch for an additional second.
If the side window opens again slightly:
X Pull the corresponding switch up again
immediately and hold it for approximately
one second. Opening and closing the hinged side
windows*
You can operate the hinged side windows
electrically. G
Risk of injury
Make sure that nobody can become trap-
ped as you close the hinged side windows.
If there is a risk of becoming trapped,
release the switch immediately or push the
switch again to reopen the side window.
i It is also possible to open and close the
hinged side windows from the outside
using the "Summer open-
ing" (Y page 108) or "Convenience clos-
ing" (Y page 108) features respectively. Controls
* optional
251_AKB; 5; 7, en-GB
wobuchh,
Version: 2.10.6 2008-05-11T14:51:51+02:00 - Seite 107 ZDateiname: 6515_1825_02_buchblock.pdf; preflight
Page 122 of 373

Instrument cluster
119Activating the multi-function display
X Switch on the ignition. 1
To dim the instrument cluster lighting
2 Reset button
3 To brighten the instrument cluster lighting
The multi-function display is also activated
when you:
R switch on the lights
R press reset button 2
R open a front door Adjusting the instrument cluster
lighting
X Brighter: press and hold down button 3.
X Dimmer: press and hold down button 1. Resetting the trip meter
X Select the standard display menu
(Y page 125).
X Press and hold reset button 2until the trip
meter is reset. Clock
On vehicles with Audio 20, you can set the
time using the on-board computer
(Y page 131). Speedometer with segments
The segments in the speedometer indicate
which speed range is available.
Distronic* mode:
One or two segments around the stored
speed light up. Rev counter
The red band in the rev counter indicates the
engine's overrevving range. The fuel supply is
interrupted to protect the engine when the
red band is reached.
! Do not drive in the overrevving range.
Doing so will damage the engine. H
Environmental note
Avoid driving at high engine speeds, as this
increases your vehicle's consumption
unnecessarily and pollutes the environ-
ment through increased emissions. Cont
rols
* optional
251_AKB; 5; 7, en-GB
wobuchh
,V ersion: 2.10.6
2008-05-11T14:51:51+02:00 - Seite 119 ZDateiname: 6515_1825_02_buchblock.pdf; preflight
Page 127 of 373
On-board computer
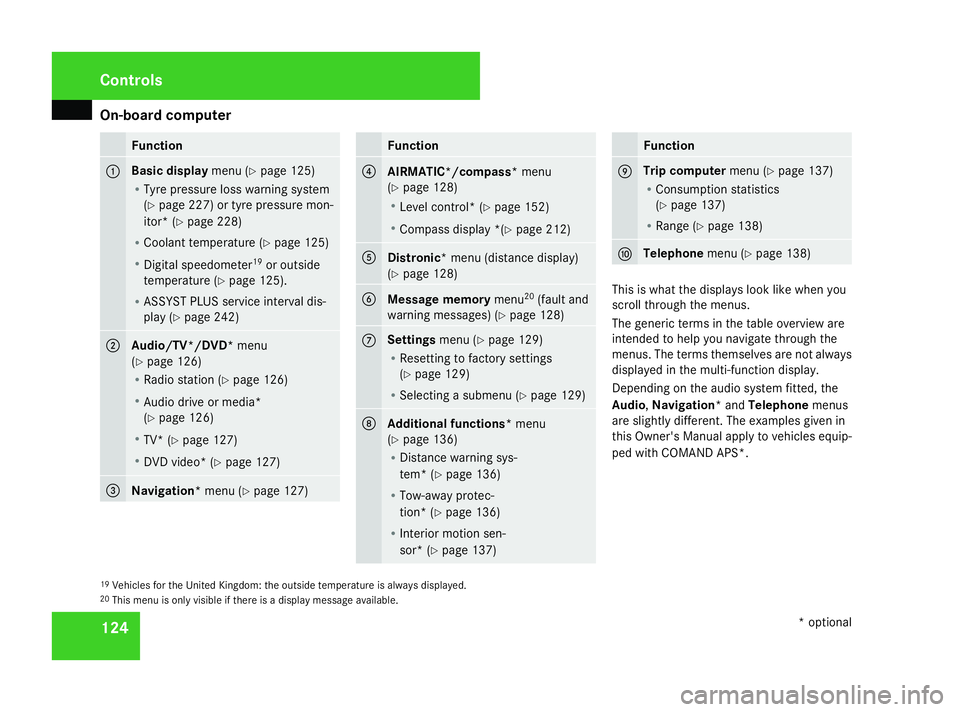
124 Function
1 Basic display
menu (Ypage 125)
R Tyre pressure loss warning system
(Y page 227) or tyre pressure mon-
itor* (Y page 228)
R Coolant temperature (Y page 125)
R Digital speedometer 19
or outside
temperature (Y page 125).
R ASSYST PLUS service interval dis-
play (Y page 242) 2
Audio/TV*/DVD*
menu
(Y page 126)
R Radio station ( Ypage 126)
R Audio drive or media*
(Y page 126)
R TV* (Y page 127)
R DVD video* (Y page 127) 3
Navigation*
menu (Ypage 127) Function
4
AIRMATIC*/compass*
menu
(Y page 128)
R Level control* (Y page 152)
R Compass display *(Y page 212) 5
Distronic
* menu (distance display)
(Y page 128) 6
Message memory
menu20
(fault and
warning messages) (Y page 128) 7 Settings
menu (Ypage 129)
R Resetting to factory settings
(Y page 129)
R Selecting a submenu (Y page 129) 8
Additional functions*
menu
(Y page 136)
R Distance warning sys-
tem* (Y page 136)
R Tow-away protec-
tion* (Y page 136)
R Interior motion sen-
sor* (Y page 137) Function
9 Trip computer
menu (Ypage 137)
R Consumption statistics
(Y page 137)
R Range (Y page 138) a Telephone
menu (Ypage 138) This is what the displays look like when you
scroll through the menus.
The generic terms in the table overview are
intended to help you navigate through the
menus. The terms themselves are not always
displayed in the multi-function display.
Depending on the audio system fitted, the
Audio,
Navigation* and Telephonemenus
are slightly different. The examples given in
this Owner's Manual apply to vehicles equip-
ped with COMAND APS*.
19 Vehicles for the United Kingdom: the outside temperature is always displayed.
20 This menu is only visible if there is a display message available. Controls
* optional
251_AKB; 5; 7, en-GB
wobuchh,
Version: 2.10.6 2008-05-11T14:51:51+02:00 - Seite 124Dateiname: 6515_1825_02_buchblock.pdf; preflight
Page 129 of 373
On-board computer
126 Audio/TV*/DVD* menu
Use the functions in the Audio/TV/DVD
menu to operate the audio equipment or
COMAND APS*. If the audio equipment or
COMAND APS* is switched off, the multi-
function display shows the message AUDIO
off.
i Menu overview: (Y page 123).
Use the buttons on the multi-function steer-
ing wheel.
Selecting a radio station You can only store new stations using the
audio systemor COMAND APS
*.Please refer
to the separate operating instructions for
notes on how to do this.
X Switch on the audio equipment or
COMAND APS* and select Radio (see the
separate operating instructions).
X Use the èor· button to select the
Audio/TV/DVD menu. X
To select a stored station: briefly press
the j ork button.
X To select a channel from the channel
list: press and hold the jork but-
ton.
X To select a station using the station
search (only if no station list is being
received): press and hold the jor
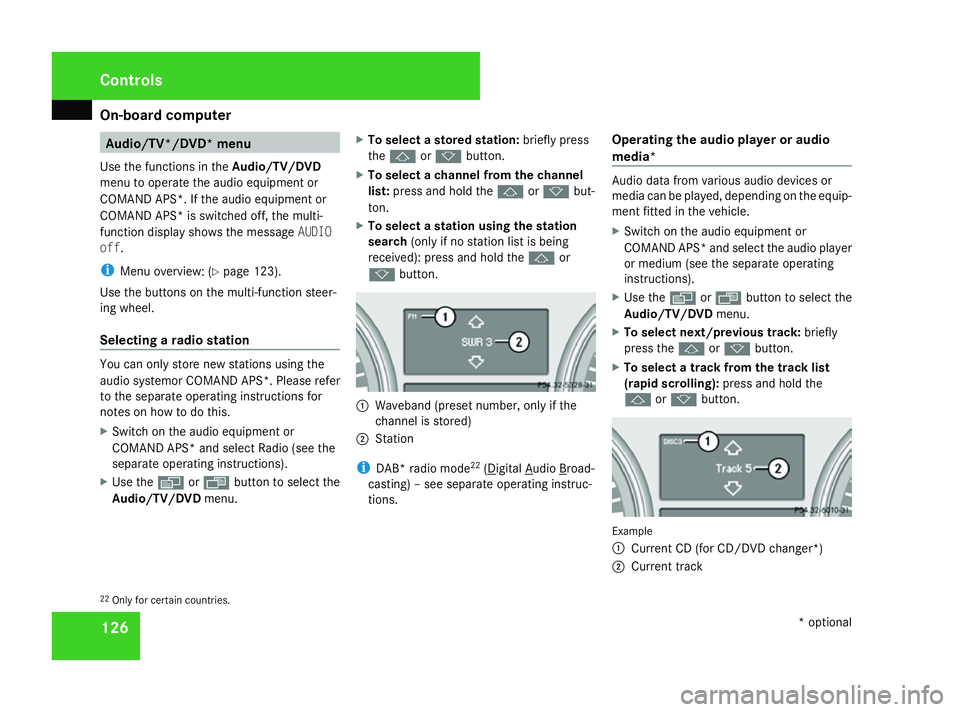
k button. 1
Waveband (preset number, only if the
channel is stored)
2 Station
i DAB* radio mode 22
( Digital Audio Broad-
casting) – see separate operating instruc-
tions. Operating the audio player or audio
media* Audio data from various audio devices or
media can be played, depending on the equip-
ment fitted in the vehicle.
X
Switch on the audio equipment or
COMAND APS* and select the audio player
or medium (see the separate operating
instructions).
X Use the èor· button to select the
Audio/TV/DVD menu.
X To select next/previous track: briefly
press the jork button.
X To select a track from the track list
(rapid scrolling): press and hold the
j ork button. Example
1
Current CD (for CD/DVD changer*)
2 Current track
22 Only for certain countries. Controls
* optional
251_AKB; 5; 7, en-GB
wobuchh,
Version: 2.10.6 2008-05-11T14:51:51+02:00 - Seite 126Dateiname: 6515_1825_02_buchblock.pdf; preflight
Page 130 of 373
On-board computer
127
In audio AUX mode, the current track is not
displayed.
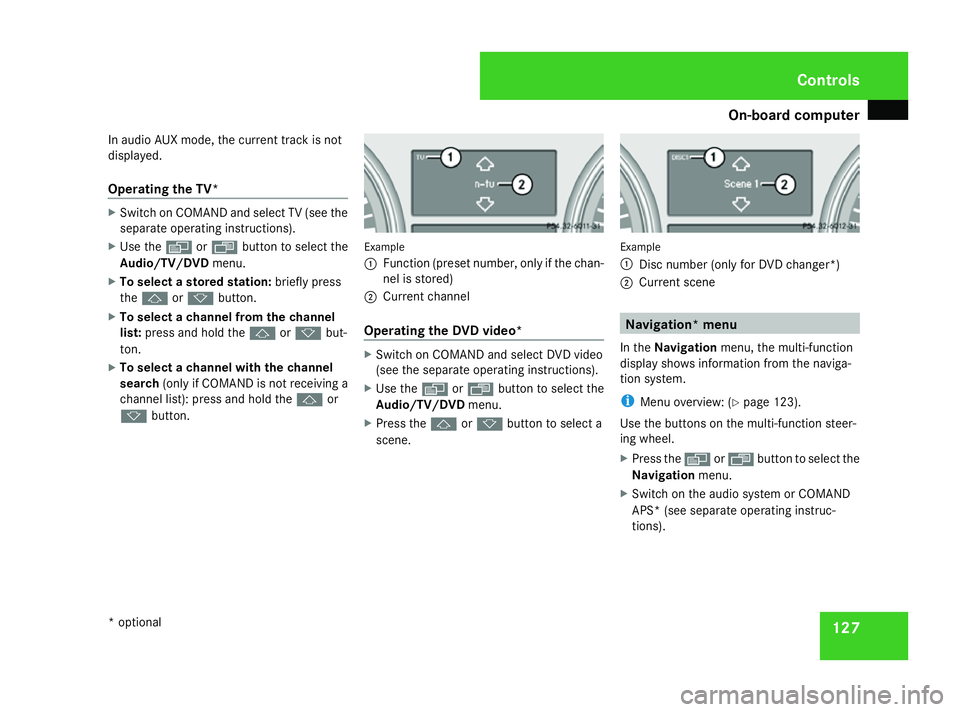
Operating the TV* X
Switch on COMAND and select TV (see the
separate operating instructions).
X Use the èor· button to select the
Audio/TV/DVD menu.
X To select a stored station: briefly press
the j ork button.
X To select a channel from the channel
list: press and hold the jork but-
ton.
X To select a channel with the channel
search (only if COMAND is not receiving a
channel list): press and hold the jor
k button. Example
1
Function (preset number, only if the chan-
nel is stored)
2 Current channel
Operating the DVD video* X
Switch on COMAND and select DVD video
(see the separate operating instructions).
X Use the èor· button to select the
Audio/TV/DVD menu.
X Press the jork button to select a
scene. Example
1
Disc number (only for DVD changer*)
2 Current scene Navigation* menu
In the Navigation menu, the multi-function
display shows information from the naviga-
tion system.
i Menu overview: (Y page 123).
Use the buttons on the multi-function steer-
ing wheel.
X Press the èorÿ button to select the
Navigation menu.
X Switch on the audio system or COMAND
APS* (see separate operating instruc-
tions). Controls
* optional
251_AKB; 5; 7, en-GB
wobuchh,
Version: 2.10.6 2008-05-11T14:51:51+02:00 - Seite 127 ZDateiname: 6515_1825_02_buchblock.pdf; preflight