reset MERCEDES-BENZ R-CLASS MPV 2008 Owner's Guide
[x] Cancel search | Manufacturer: MERCEDES-BENZ, Model Year: 2008, Model line: R-CLASS MPV, Model: MERCEDES-BENZ R-CLASS MPV 2008Pages: 373, PDF Size: 6.75 MB
Page 233 of 373

Tyres and wheels
230
X
Press the jork button to select the
Tyre pressure function or wait until the
following message appears:
Tyre pressure displayed only after
driving for a few minutes
X Press the reset button on the left of the
multi-function steering wheel
(Y page 242).
The Restart Tyre pressure monitor
Yes Cancel message appears in the multi-
function display.
X Press the æbutton.
The following message appears in the
multi-function display:
Tyre pressure monitor restarted
The tyre pressure monitor has stored the
pressure of the tyres as a new reference
value.
If you wish to cancel the restart:
X Press the çbutton. Interchanging the wheels
G
Risk of accident
Interchange the front and rear wheels only
if they have the same dimensions: for exam-
ple size, offset, etc.
After every wheel interchange/change,
have the tightening torque checked at a
qualified specialist workshop that has the
necessary specialist knowledge and tools
to carry out the work required. Mercedes-
Benz recommends that you use a
Mercedes-Benz Service Centre for this pur-
pose. In particular, work relevant to safety
or on safety-related systems must be car-
ried out at a qualified specialist workshop.
The wheels could work loose if they are not
tightened to a torque of 150 Nm.
For safety reasons, Mercedes-Benz recom-
mends that you only use wheel bolts of the
correct size which have been approved for
Mercedes-Benz vehicles.
The wear patterns on the front and rear tyres
differ depending on the operating conditions.
Interchange the wheels before a clear wear
pattern has formed on the tyres. Front tyres
typically wear more on the shoulders and the
rear tyres in the centre. Interchange the wheels every 5,000 km to
10,000 km depending on the degree of tyre
wear, provided that the vehicle has the same
size front and rear tyres. Do not reverse the
direction of tyre rotation.
Clean the contact surfaces of the wheel and
the brake disc thoroughly every time a wheel
is interchanged. Check the tyre pressure and,
if necessary, restart the tyre pressure loss
warning system or the tyre pressure moni-
tor*.
! On vehicles fitted with a tyre pressure
monitor*, electronic components are loca-
ted in the wheel.
Tyre fitting tools should not be applied in
the area of the valve, as this could damage
the electronic components.
Always have the wheels interchanged/
changed at a qualified specialist workshop,
e.g. a Mercedes-Benz Service Centre.
i Vehicles with a tyre pressure monitor*
If the positions of the wheels on the vehicle
are changed, the tyre pressure may be tem-
porarily displayed at the wrong position.
This is rectified after a few minutes of driv-
ing, and the tyre pressures are displayed
for the correct positions. Operation
* optional
251_AKB; 5; 7, en-GB
wobuchh
,V ersion: 2.10.6
2008-05-11T14:51:51+02:00 - Seite 230 Dateiname: 6515_1825_02_buchblock.pdf; preflight
Page 245 of 373

Service
242
Fitting the adapter
1
Connector with lug
2 Socket with groove
X Open the socket cover.
X Insert the connector with lug 1into
groove 2on the socket and turn the con-
nector clockwise to the stop.
X Make the cover engage.
X If you are using an adapter cable, secure
the cable to the trailer with cable ties.
! Make sure that there is sufficient cable
play so that the cable cannot become
detached when cornering. Service
ASSYST PLUS service interval display
ASSYST PLUS, the service interval display,
tells you when the next service is due. When-
ever a service is due, the following message
appears in the multi-function display:
Service A due in .. days
Service A due in .. km
Service A due now The letter indicates how much time the work-
shop will require to carry out the service work.
The letters displayed range from
Afor a short
service duration to Hfor a long service dura-
tion.
The service interval display ASSYST PLUS
does not record any periods of time during
which the battery is disconnected. In order to
maintain the time-dependent service sched-
ule, you should call up the service due date
and make a note of it before disconnecting
the battery. The alternative is to subtract the battery disconnection periods from the
service date shown on the display. Fading out the service message
1
Reset button
X Press the 1reset button on top of the
instrument cluster.
The service message goes out. Operation
251_AKB; 5; 7, en-GB
wobuchh,
Version: 2.10.6 2008-05-11T14:51:51+02:00 - Seite 242Dateiname: 6515_1825_02_buchblock.pdf; preflight
Page 246 of 373

Care
243Exceeding the service due date
One of the following messages appears in the
multi-function display:
Service A .. days overdue
Service A overdue by .. km
You will also hear a warning tone.
A qualified specialist workshop, e.g. a
Mercedes-Benz Service Centre, will reset the
ASSYST PLUS service interval indicator after
the necessary service work has been carried
out.
i If you fail to have the service performed
by the specified date, you may be violating
applicable laws. Your warranty may be inva-
lidated and goodwill settlements may be
refused. Calling up the service due date
Use the buttons on the multi-function steer-
ing wheel.
X Switch on the ignition.
X Press èorÿ to select the Basic
display menu (Y page 125).
X Press the jork button to select the
service information.
The 9 service symbol and the service
due date are displayed. Care
Notes on care
Regular and proper care maintains the value
of your vehicle.
i It is advisable to use Mercedes-Benz care
products.
Scratches, corrosive deposits, areas affected
by corrosion and damage caused by inade-
quate care cannot always be completely
repaired. In such cases, visit a qualified spe-
cialist workshop immediately, e.g. a
Mercedes-Benz Service Centre.
Repair damage caused by loose chippings
and remove the following substances imme-
diately, whilst avoiding rubbing too hard:
R Soak insect remains with insect remover
and rinse off afterwards.
R Soak bird droppings with water and rinse
off afterwards.
R Remove tree resin, oils, fuels and greases
by rubbing gently with a cloth soaked in
petroleum ether or lighter fluid.
R Use silicone remover to remove wax.
R Use tar remover to remove tar stains. Operation
251_AKB; 5; 7, en-GB
wobuchh,
Version: 2.10.6 2008-05-11T14:51:51+02:00 - Seite 243 ZDateiname: 6515_1825_02_buchblock.pdf; preflight
Page 252 of 373

249
Where will I find...?
...........................250
Display messages ............................. 255
Troubleshooting ................................ 278
Locking/unlocking in an emer-
gency ................................................. 302
Resetting triggered NECK-PRO
head restraints .................................. 304
Changing the batteries .....................304
Changing the bulbs ...........................306
Replacing the wiper blades ..............311
Flat tyre ............................................. 313
Battery ............................................... 323
Jump-starting .................................... 329
Towing and tow-starting ..................330
Fuses .................................................. 333 Practical advice
251_AKB; 5; 7, en-GB
wobuchh,
Version: 2.10.6
2008-05-11T14:51:51+02:00 - Seite 249 Dateiname: 6515_1825_02_buchblock.pdf; preflight
Page 290 of 373

Troubleshooting
287Problem Possible cause/consequence Suggested solutions
You hear a warning tone.
G
Risk of injury
The driver or front passenger has
not fastened their seat belt. X
Fasten your seat belt (Y page 94).Accident
Problem Possible cause/consequence Suggested solutions
Fuel is leaking from the vehicle.
G
Risk of fire
The fuel line or the fuel tank has
been damaged. The leaking fuel
creates a risk of fire or explosion. X
Switch off the ignition immediately.
X Remove the ignition key.
Do not restart the engine under any circumstances. The leaking fuel
creates a risk of fire or explosion.
X Consult a qualified specialist workshop. You are unable to determine the
extent of the damage. X
Consult a qualified specialist workshop. You cannot detect any damage. X
Start the engine as normal. The NECK-PRO head restraints
on the driver's and front-
passenger seats have been trig-
gered. Your vehicle has been involved in
a rear-end collision. X
Reset the NECK-PRO head restraints (Y page 304). Practical advice
251_AKB; 5; 7, en-GB
wobuchh
,V ersion: 2.10.6
2008-05-11T14:51:51+02:00 - Seite 287 ZDateiname: 6515_1825_02_buchblock.pdf; preflight
Page 307 of 373

Changing the batteries
304 Resetting triggered NECK-PRO head
restraints
If the NECK-PRO head restraints are triggered
in an accident, you must reset the head
restraints on the driver's and front-passenger
seats. Otherwise, the additional protection
will not be available in the event of another
rear-end collision. You can recognise when
head restraints have been triggered by the
fact that they have been moved forwards and
can no longer be adjusted.
Mercedes-Benz recommends that you have
NECK-PRO head restraints checked at a quali-
fied specialist workshop, e.g. a Mercedes-
Benz Service Centre, following a rear-end
collision.
i This work requires a lot of strength. If you
have difficulty resetting the head
restraints, have this work carried out at a
qualified specialist workshop, e.g. a
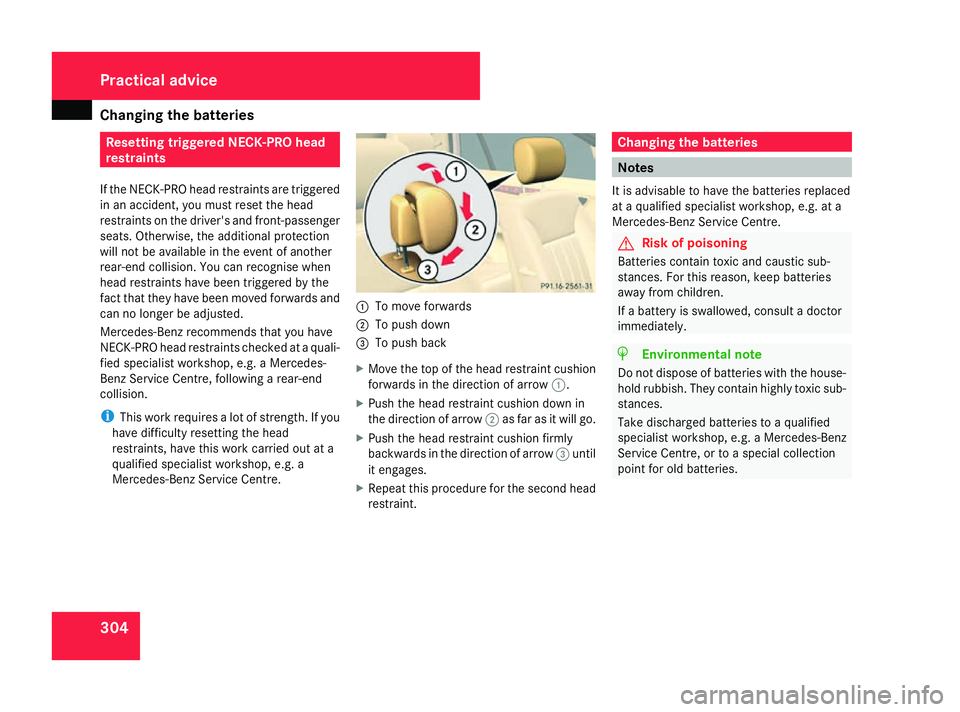
Mercedes-Benz Service Centre. 1
To move forwards
2 To push down
3 To push back
X Move the top of the head restraint cushion
forwards in the direction of arrow 1.
X Push the head restraint cushion down in
the direction of arrow 2as far as it will go.
X Push the head restraint cushion firmly
backwards in the direction of arrow 3until
it engages.
X Repeat this procedure for the second head
restraint. Changing the batteries
Notes
It is advisable to have the batteries replaced
at a qualified specialist workshop, e.g. at a
Mercedes-Benz Service Centre. G
Risk of poisoning
Batteries contain toxic and caustic sub-
stances. For this reason, keep batteries
away from children.
If a battery is swallowed, consult a doctor
immediately. H
Environmental note
Do not dispose of batteries with the house-
hold rubbish. They contain highly toxic sub-
stances.
Take discharged batteries to a qualified
specialist workshop, e.g. a Mercedes-Benz
Service Centre, or to a special collection
point for old batteries. Practical advice
251_AKB; 5; 7, en-GB
wobuchh,
Version: 2.10.6
2008-05-11T14:51:51+02:00 - Seite 304 Dateiname: 6515_1825_02_buchblock.pdf; preflight
Page 331 of 373

Battery
328
!
Only charge the installed battery with a
battery charger which has been tested and
approved by Mercedes-Benz. These battery
chargers allow the battery to be charged
while it is still installed. Otherwise, the vehi-
cle's electronic system may be damaged.
! Only use battery chargers with a maxi-
mum charging voltage of 14.8 V.
X Charge the battery. Observe the notes in
the operating instructions for your battery
charger.
X Refit the charged battery.
To do this, follow the steps described in
"Removing the battery" (Y page 327) in
reverse order.
i You can charge the battery using the
jump-start terminals. These are located on
the right when viewed in the direction of
travel.
X Open the bonnet (Y page 220). Jump-start terminals
1
Body earth point (negative terminal)
2 Positive terminal (under cover)
3 Cover Reconnecting the battery
! Always reconnect the battery in the
sequence described below. Never swap the
terminal clamps. You may otherwise dam-
age the vehicle electronics.
X Switch off all electrical consumers.
X Connect the positive terminal clamp and
secure the cover.
X Connect the negative terminal clamp.
X Connect the breather hose. Make sure that
a cell cap is fitted is fitted on the side. i
If the battery power supply has been inter-
rupted (e.g. if it has been reconnected), you
must carry out the following tasks:
R Set the time (Y page 132).
On vehicles with COMAND and a naviga-
tion system*, the clock is set automati-
cally
R Reset the sliding/tilting sun-
roof* (Y page 180).
R Reset the panorama sliding/tilting sun-
roof (Y page 183).
R Reset the function for folding the exterior
mirrors in/out automatically* by folding
the mirrors out once ( Ypage 91).
R Reset the side windows (Y page 107)Practical advice
* optional
251_AKB; 5; 7, en-GB
wobuchh
, Version: 2.10.6
2008-05-11T14:51:51+02:00 - Seite 328 Dateiname: 6515_1825_02_buchblock.pdf; preflight