change time MERCEDES-BENZ S-Class 2011 W221 User Guide
[x] Cancel search | Manufacturer: MERCEDES-BENZ, Model Year: 2011, Model line: S-Class, Model: MERCEDES-BENZ S-Class 2011 W221Pages: 524, PDF Size: 22.53 MB
Page 143 of 524
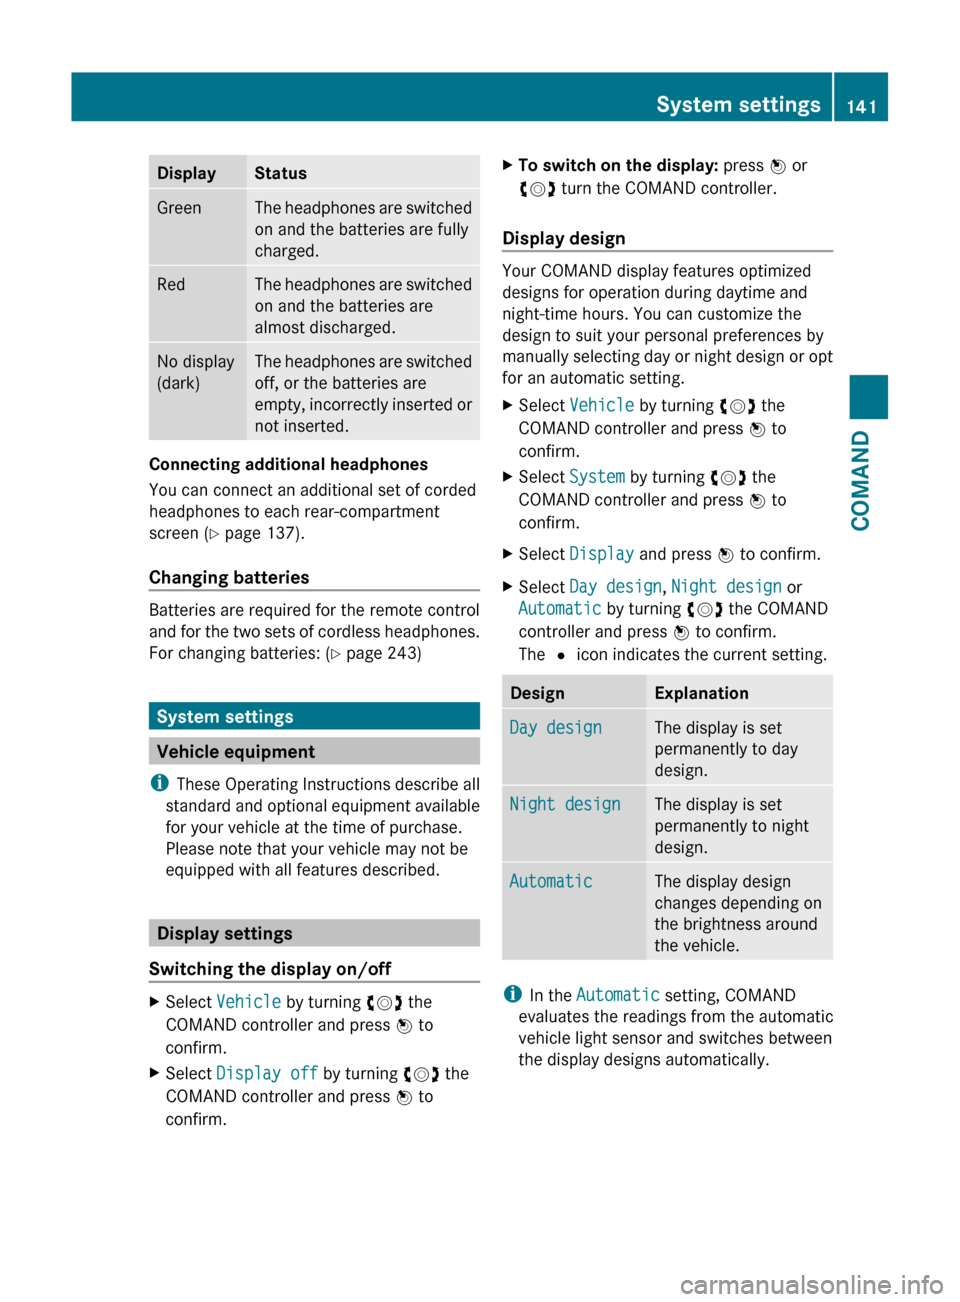
DisplayStatusGreenThe headphones are switched
on and the batteries are fully
charged.RedThe headphones are switched
on and the batteries are
almost discharged.No display
(dark)The headphones are switched
off, or the batteries are
empty, incorrectly inserted or
not inserted.
Connecting additional headphones
You can connect an additional set of corded
headphones to each rear-compartment
screen ( Y page 137).
Changing batteries
Batteries are required for the remote control
and for the two sets of cordless headphones.
For changing batteries: ( Y page 243)
System settings
Vehicle equipment
i These Operating Instructions describe all
standard and optional equipment available
for your vehicle at the time of purchase.
Please note that your vehicle may not be
equipped with all features described.
Display settings
Switching the display on/off
XSelect Vehicle by turning cVd the
COMAND controller and press W to
confirm.XSelect Display off by turning cVd the
COMAND controller and press W to
confirm.XTo switch on the display: press W or
cVd turn the COMAND controller.
Display design
Your COMAND display features optimized
designs for operation during daytime and
night-time hours. You can customize the
design to suit your personal preferences by
manually selecting day or night design or opt
for an automatic setting.
XSelect Vehicle by turning cVd the
COMAND controller and press W to
confirm.XSelect System by turning cVd the
COMAND controller and press W to
confirm.XSelect Display and press W to confirm.XSelect Day design , Night design or
Automatic by turning cVd the COMAND
controller and press W to confirm.
The # icon indicates the current setting.DesignExplanationDay designThe display is set
permanently to day
design.Night designThe display is set
permanently to night
design.AutomaticThe display design
changes depending on
the brightness around
the vehicle.
i In the Automatic setting, COMAND
evaluates the readings from the automatic
vehicle light sensor and switches between
the display designs automatically.
System settings141COMANDZ
Page 144 of 524
Time settings
General information
If COMAND is equipped with a navigation
system and has GPS reception, COMAND
automatically sets the time and date. You can
also adjust the time yourself in 30-minute
increments, but the date cannot be changed.
iIf you set the time in 30-minute
increments, any time zone settings and
settings for changing between summer and
standard time are lost (Y page 142).
iThe following navigation system functions
require the time, time zone and summer/
standard time to be set correctly in order
to work properly:
Rroute guidance on routes with time-
dependent traffic guidance
Rcalculation of expected time of arrival
Setting the time
XSelect Vehicle in the main function bar by
turning cVd the COMAND controller and
press W to confirm.
XSelect System by turning cVd the
COMAND controller and press W to
confirm.
XSelect Time by turning cVd the COMAND
controller and press W to confirm.
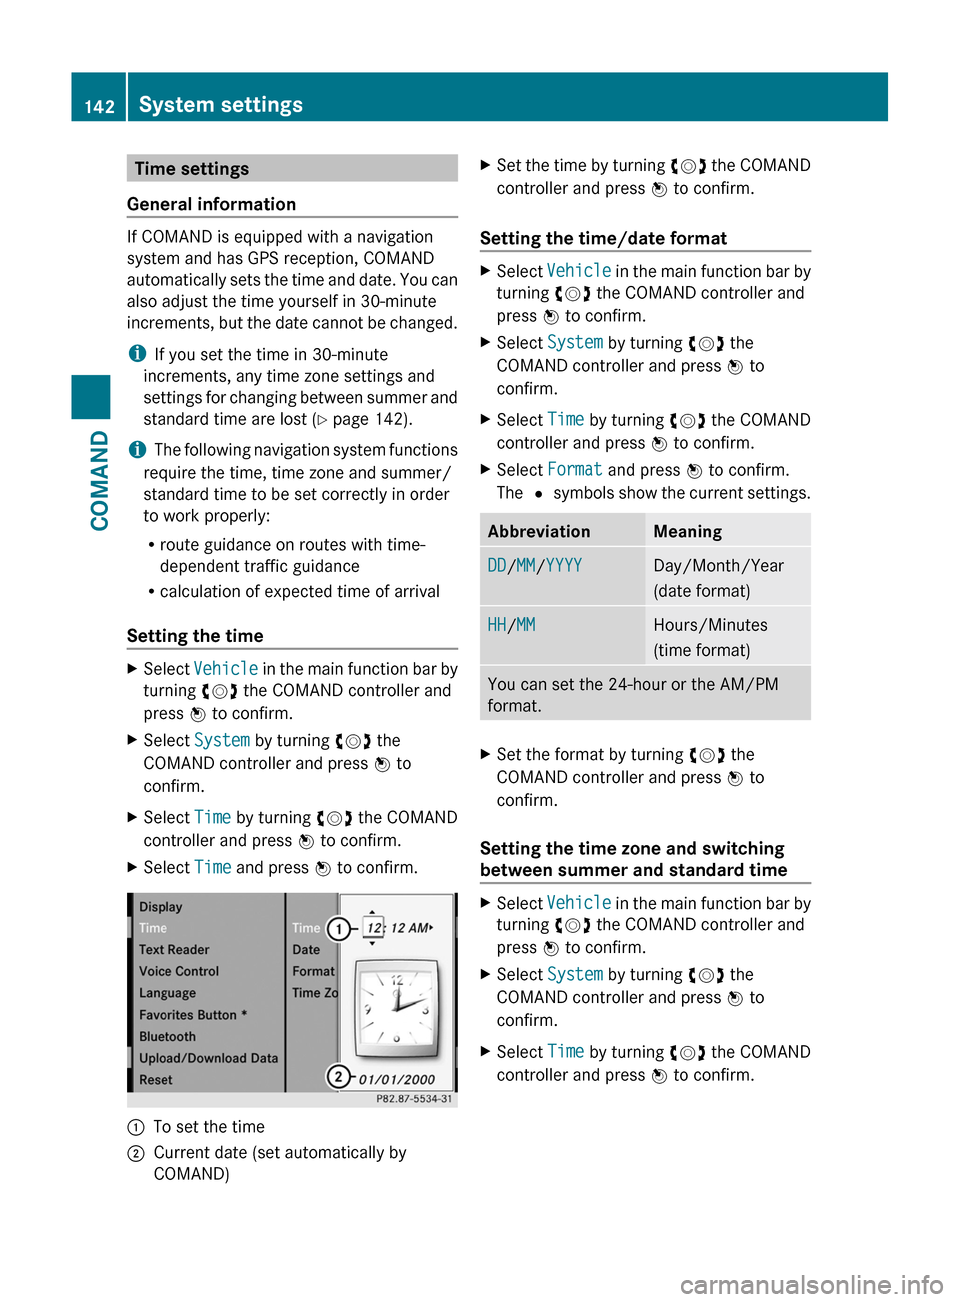
XSelect Time and press W to confirm.:To set the time;Current date (set automatically by
COMAND)
XSet the time by turning cVd the COMAND
controller and press W to confirm.
Setting the time/date format
XSelect Vehicle in the main function bar by
turning cVd the COMAND controller and
press W to confirm.
XSelect System by turning cVd the
COMAND controller and press W to
confirm.
XSelect Time by turning cVd the COMAND
controller and press W to confirm.
XSelect Format and press W to confirm.
The # symbols show the current settings.
AbbreviationMeaningDD/MM/YYYYDay/Month/Year
(date format)
HH/MMHours/Minutes
(time format)
You can set the 24-hour or the AM/PM
format.
XSet the format by turning cVd the
COMAND controller and press W to
confirm.
Setting the time zone and switching
between summer and standard time
XSelect Vehicle in the main function bar by
turning cVd the COMAND controller and
press W to confirm.
XSelect System by turning cVd the
COMAND controller and press W to
confirm.
XSelect Time by turning cVd the COMAND
controller and press W to confirm.
142System settingsCOMAND
Page 145 of 524
XSelect Time zone and press W to confirm.
A list of time zones appears. The # dot
indicates the current setting.
XSelect the time zone and press W to
confirm.
XTo switch automatic changeover on/
off: select Automatic summer/winter
time changeover or Automatic summer/
winter time changeover by turning
cVd the COMAND controller and press
W to confirm.
The # dot indicates the current setting.
Read-aloud settings
Setting the text reader speed
XSelect Vehicle by turning cVd the
COMAND controller and press W to
confirm.
XSelect System and press W to confirm.XSelect Text reader and press W to
confirm.
XSelect Set text reader speed and press
W to confirm.
A list appears. The # dot indicates the
current setting.
XSelect a setting by turning cVd the
COMAND controller and press W to
confirm.
Voice Control System settings
Opening/closing the help window
The help window shows you additional
information during individualization and voice
control operation.
XSelect Vehicle in the main function bar by
turning cVd the COMAND controller and
press W to confirm.
XSelect System by turning cVd the
COMAND controller and press W to
confirm.
XSelect Voice Control by turning cVd the
COMAND controller and press W to
confirm.
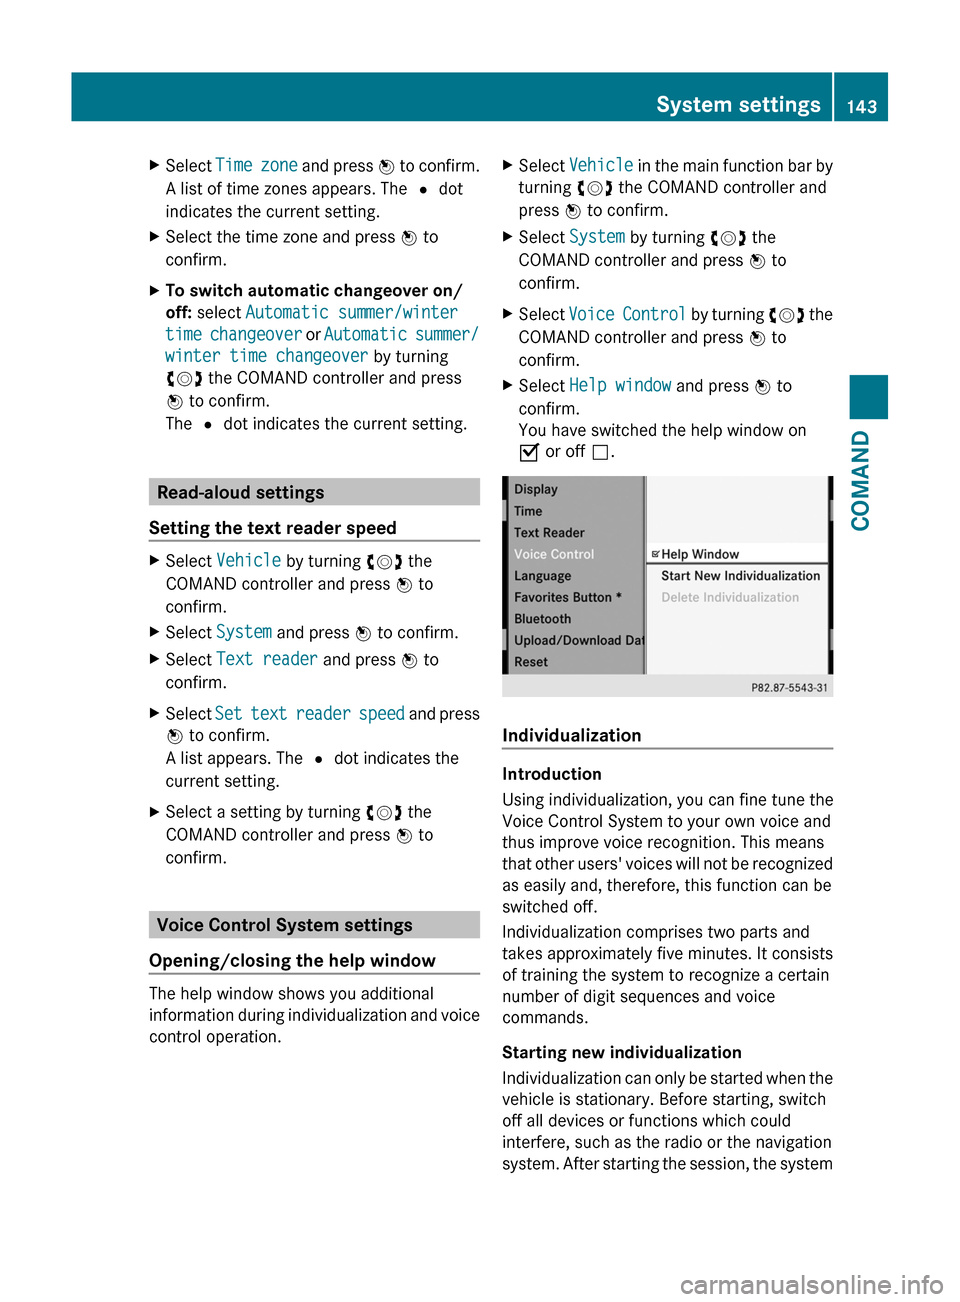
XSelect Help window and press W to
confirm.
You have switched the help window on
O or off ª.
Individualization
Introduction
Using individualization, you can fine tune the
Voice Control System to your own voice and
thus improve voice recognition. This means
that other users' voices will not be recognized
as easily and, therefore, this function can be
switched off.
Individualization comprises two parts and
takes approximately five minutes. It consists
of training the system to recognize a certain
number of digit sequences and voice
commands.
Starting new individualization
Individualization can only be started when the
vehicle is stationary. Before starting, switch
off all devices or functions which could
interfere, such as the radio or the navigation
system. After starting the session, the system
System settings143COMANDZ
Page 147 of 524
XSelect Yes or No and press W to confirm.
If you select No, the process will be aborted.
If you select Yes, the individualization is
deleted. You will see a message to this
effect.
Bluetooth® settings
General information about Bluetooth®
Bluetooth® technology is the standard for
short-range wireless data transmission of up
to approximately 10 meters. Bluetooth®
allows, for example, the exchange of vCards.
Bluetooth® is a registered trademark of
Bluetooth Special Interest Group (SIG) Inc.
Requirements for a Bluetooth®
connection
You can connect mobile phones and
notebooks with COMAND.
To do so, the following conditions need to be
met:
RBluetooth®-capable devices, e.g. mobile
phones, must comply with a certain profile
in order to be connected to COMAND.
Every Bluetooth® device has its own
specific Bluetooth® name.
RBluetooth® must be activated in COMAND
and on the respective Bluetooth® device;
see the separate operating instructions.
Rthe Bluetooth® device must be "visible" to
COMAND in order for COMAND to find and
display it. For the setting procedures,
please see the operating instructions for
the Bluetooth® device.
iOnce a mobile phone has been
connected, reception and transmission
volume may change.
Activating/deactivating Bluetooth®
XSelect Vehicle in the main function bar by
turning cVd the COMAND controller and
press W to confirm.
XSelect System by turning cVd the
COMAND controller and press W to
confirm.
XSelect Bluetooth by turning cVd the
COMAND controller and press W to
confirm.
XSelect Bluetooth activated and press
W to confirm.
This switches Bluetooth® on O or off ª.
Connecting Bluetooth® devices
General information
Before using your Bluetooth® device with
COMAND for the first time, you will need to
connect it.
Connecting is comprised of:
Rsearching for a Bluetooth® device and
Rsubsequently authorizing it
iYou can connect up to ten devices to
COMAND.
For more information on suitable mobile
phones and on connecting a Bluetooth®-
capable mobile phone to COMAND, visit
http://www.mbusa-mobile.com or call
the Mercedes-Benz Customer Assistance
Center at
1-800-FOR-MERCedes(1-800-367-6372)
(US) or Customer Service at
1-800-387-0100 (Canada).
System settings145COMANDZ
Page 150 of 524
System language settings
This function allows you to determine the
language for the menu displays and the
navigation announcements. The selected
language affects the characters available for
entry.
If you change the system language, the
language for Voice Control System will be
also be changed. If the selected language is
not supported by Voice Control System,
"English" will be selected.XSelect Vehicle by turning cVd the
COMAND controller and press W to
confirm.XSelect System and press W to confirm.XSelect Language and press W to confirm.
You see the language list. The # dot
indicates the current setting.XSelect the language by turning cVd the
COMAND controller and press W to
confirm.
COMAND loads the selected language and
sets it.
i In Arabic as well as some other countries,
the selection option English (Arabic
map) is available when setting the system
language. This language setting shows the
menus and input data in COMAND in
English and the map in Arabic for certain
countries. The destination is entered in
English.
Reset function
You can reset COMAND to the factory
settings. Amongst other things, this will
delete all personal data (e.g. station presets,
address book entries, entries in the
destination memory and in the list of previous
destinations in the navigation system).
Resetting is recommended before selling or
transferring ownership of your vehicle, for
example.
XSelect Vehicle in the main function bar by
turning cVd the COMAND controller and
press W to confirm.XSelect System by turning cVd the
COMAND controller and press W to
confirm.XSelect Reset and press W to confirm.
A prompt appears asking whether you wish
to reset.XSelect Yes or No and press W to confirm.
If you select No, the process will be aborted.
If you select Yes, another prompt appears
asking whether you really wish to reset.XSelect Yes or No and press W to confirm.
If you select Yes, a message will be shown.
COMAND is reset and restarted.
If you select No, the process will be aborted.
Navigation
Vehicle equipment
i These Operating Instructions describe all
standard and optional equipment available
for your vehicle at the time of purchase.
Please note that your vehicle may not be
equipped with all features described.
Introduction
Important safety notes
GWarning
For safety reasons, only enter a destination
when the vehicle is stationary. When the
vehicle is in motion, a passenger should enter
the destination. Study manual and select
route before driving.
Bear in mind that at a speed of just 30 mph
(approximately 50 km/h), your vehicle is
covering a distance of 44 feet (approximately
14 m) every second.
148NavigationCOMAND
Page 152 of 524
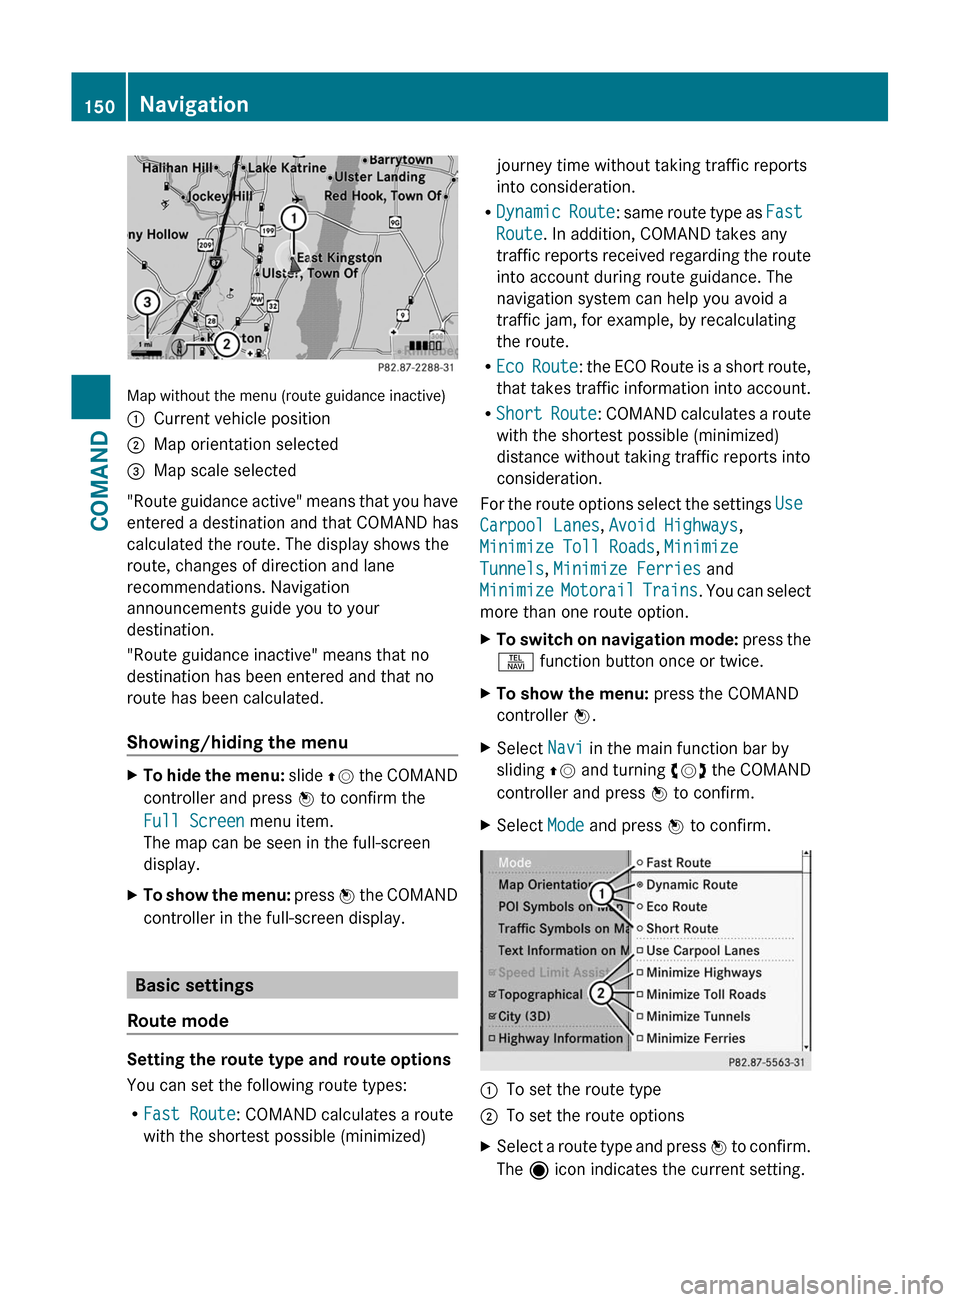
Map without the menu (route guidance inactive)
:Current vehicle position;Map orientation selected=Map scale selected
"Route guidance active" means that you have
entered a destination and that COMAND has
calculated the route. The display shows the
route, changes of direction and lane
recommendations. Navigation
announcements guide you to your
destination.
"Route guidance inactive" means that no
destination has been entered and that no
route has been calculated.
Showing/hiding the menu
XTo hide the menu: slide ZV the COMAND
controller and press W to confirm the
Full Screen menu item.
The map can be seen in the full-screen
display.
XTo show the menu: press W the COMAND
controller in the full-screen display.
Basic settings
Route mode
Setting the route type and route options
You can set the following route types:
RFast Route: COMAND calculates a route
with the shortest possible (minimized)
journey time without taking traffic reports
into consideration.
RDynamic Route: same route type as Fast
Route. In addition, COMAND takes any
traffic reports received regarding the route
into account during route guidance. The
navigation system can help you avoid a
traffic jam, for example, by recalculating
the route.
REco Route: the ECO Route is a short route,
that takes traffic information into account.
RShort Route: COMAND calculates a route
with the shortest possible (minimized)
distance without taking traffic reports into
consideration.
For the route options select the settings Use
Carpool Lanes, Avoid Highways,
Minimize Toll Roads, Minimize
Tunnels, Minimize Ferries and
Minimize Motorail Trains. You can select
more than one route option.
XTo switch on navigation mode: press the
S function button once or twice.
XTo show the menu: press the COMAND
controller W.
XSelect Navi in the main function bar by
sliding ZV and turning cVd the COMAND
controller and press W to confirm.
XSelect Mode and press W to confirm.:To set the route type;To set the route optionsXSelect a route type and press W to confirm.
The ä icon indicates the current setting.
150NavigationCOMAND
Page 166 of 524
Route guidance
General information
GWarning
COMAND calculates the route to the
destination without taking into account the
following, for example:
RTraffic lights
RStop and right-of-way signs
RLane merging
RParking or stopping prohibited areas
ROther road and traffic rules and regulations
RNarrow bridges
COMAND may give incorrect navigation
commands if the data in the digital map does
not correspond with the actual road/ traffic
situation. For example, if the traffic routing
has been changed or the direction of a one-
way road has been reversed.
For this reason, you must always observe
applicable road and traffic rules and
regulations during your journey. Road and
traffic rules and regulations always have
priority over the navigation commands
generated by the system.
Route guidance begins once a route has been
calculated (Y page 154).
COMAND guides you to your destination by
means of navigation commands in the form
of audible navigation announcements and
route guidance displays.
The route guidance displays can only be seen
if the display is switched to navigation mode.
If you do not follow the navigation
announcements or if you leave the calculated
route, COMAND automatically calculates a
new route to the destination.
If the digital map contains the corresponding
information, the following applies:
Rwhen selecting a route, COMAND tries to
avoid roads that only have limited access,
e.g. roads closed to through traffic and non-
residents.
Rroads that have time restrictions (e.g.
closed on Sundays and public holidays) are
avoided for route guidance.
Changing direction
Introduction
Changes of direction have three phases:
RPreparation phase
RAnnouncement phase
RChange-of-direction phase
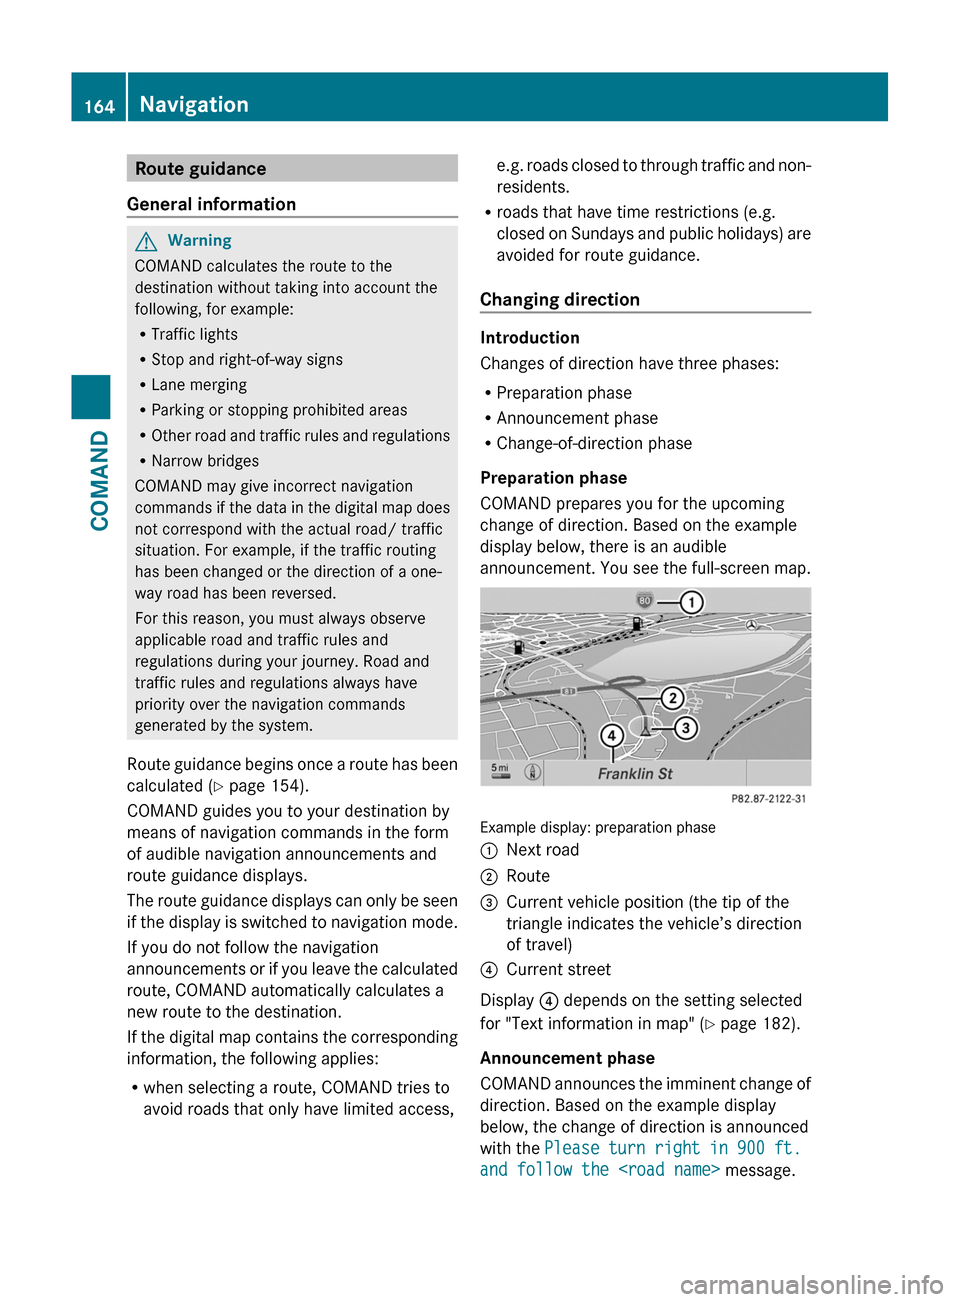
Preparation phase
COMAND prepares you for the upcoming
change of direction. Based on the example
display below, there is an audible
announcement. You see the full-screen map.
Example display: preparation phase
:Next road;Route=Current vehicle position (the tip of the
triangle indicates the vehicle’s direction
of travel)
?Current street
Display ? depends on the setting selected
for "Text information in map" (Y page 182).
Announcement phase
COMAND announces the imminent change of
direction. Based on the example display
below, the change of direction is announced
with the Please turn right in 900 ft.
and follow the
164NavigationCOMAND
Page 178 of 524
If no home address has been stored yet, you
can now assign an address book entry. If a
home address already exists, it is displayed
and you can alter it.
i If you select New Entry, you are also
offered the option of entering the home
address for the first time. You can then
save the home address without starting
route guidance.XTo enter the home address for the first
time: select Assign Address Book
Entry and press W to confirm.XSelect Home or Work and press W to
confirm.XTo change the home address: select
Change and press W to confirm.XSelect Assign Address Book Entry and
press W to confirm.
i
If you select New Entry, you are also
offered the option of changing the home
address by entering an address. You can
then save the home address without having
to start route guidance.
XSelect Home or Work and press W to
confirm.
In both cases, you will see the address book
either with the character bar or as a
selection list.XTo select an address book entry:
proceed as described in the "Searching for
an address book entry" section
( Y page 201).XTo confirm the selection: press W the
COMAND controller.
If no home address has been stored,
COMAND saves the entry. You will see a
message and then the address menu with
the selected address. Start is highlighted
automatically.
If a home address has already been stored,
you will see a prompt asking you whether
the My Address entry should be
overwritten.XSelect Yes or No and press W to confirm.
If you select Yes, COMAND overwrites the
destination. You will see a message and
then the address menu with the selected
address. Start is highlighted
automatically.
If you select No, the list will reappear.
Selecting the home address for route
guidance
XProceed as described in the "Selecting a
destination from the destination memory"
section ( Y page 156).
Saving a destination in the destination
memory
Note
This function also stores the destination in
the address book.
After destination entry
XThe destination has been entered and is
shown in the address entry menu
( Y page 154).XSelect Save by sliding VÆ and turning
cVd the COMAND controller and press
W to confirm.
You can now select storage options
( Y page 177).
During route guidance
XTo show the menu: press W the COMAND
controller.XSelect Destination in the navigation
menu bar by turning cVd the COMAND
controller and press W to confirm.XSelect Save Destination and press W to
confirm.
You can now select storage options
( Y page 177).
From the list of previous destinations
XTo show the menu: press W the COMAND
controller.176NavigationCOMAND
Page 219 of 524
Using the multifunction steering wheelXUse = or ; to select the Audio
menu.
XPress 9 or : briefly.
Displaying information
XSelect Info in the submenu bar by turning
cVd the COMAND controller and press
W to confirm.
Information on the currently received
program is displayed.
XTo return to the SatRadio main display:
slide XVY the COMAND controller.
Displaying service information
If you have any questions or require version
information, you can call the provider's
customer service center at any time.
XSelect Sat. Radio in the submenu bar by
turning cVd the COMAND controller and
press W to confirm.
XSelect Service and press W to confirm.
The provider's details appear.
XTo return to the SatRadio main display:
slide XVY the COMAND controller.
Updating the channel list
When receiving a new channel list, the display
shows the Updating channel... message.
The station last selected is muted until the
update has been completed. Satellite radio
mode is not available during the update
process.
When the update has been completed, the
satellite radio main menu appears. The
station last selected is played.
Sound settings
You will find details on the sound settings in
the "At a glance" section (Y page 133).
Audio CD/DVD and MP3 mode
Important safety notes
GWarning!
COMAND is classified as a Class 1 laser
product. You must not open the casing. If you
open the casing, or if the casing is faulty or
damaged, there is a risk of exposure to
invisible laser radiation. This may damage
your eyes, or those of others.
COMAND does not contain any parts that can
be serviced by the user. For safety reasons,
all maintenance work must be carried out by
qualified aftersales technicians.
GWarning!
Only when the vehicle is stationary should
you:
Rload a disc
Reject a disc
There is a risk of being distracted from the
road and traffic conditions if this is done while
the vehicle is in motion.
Inserting/ejecting CDs/DVDs
DVD changer
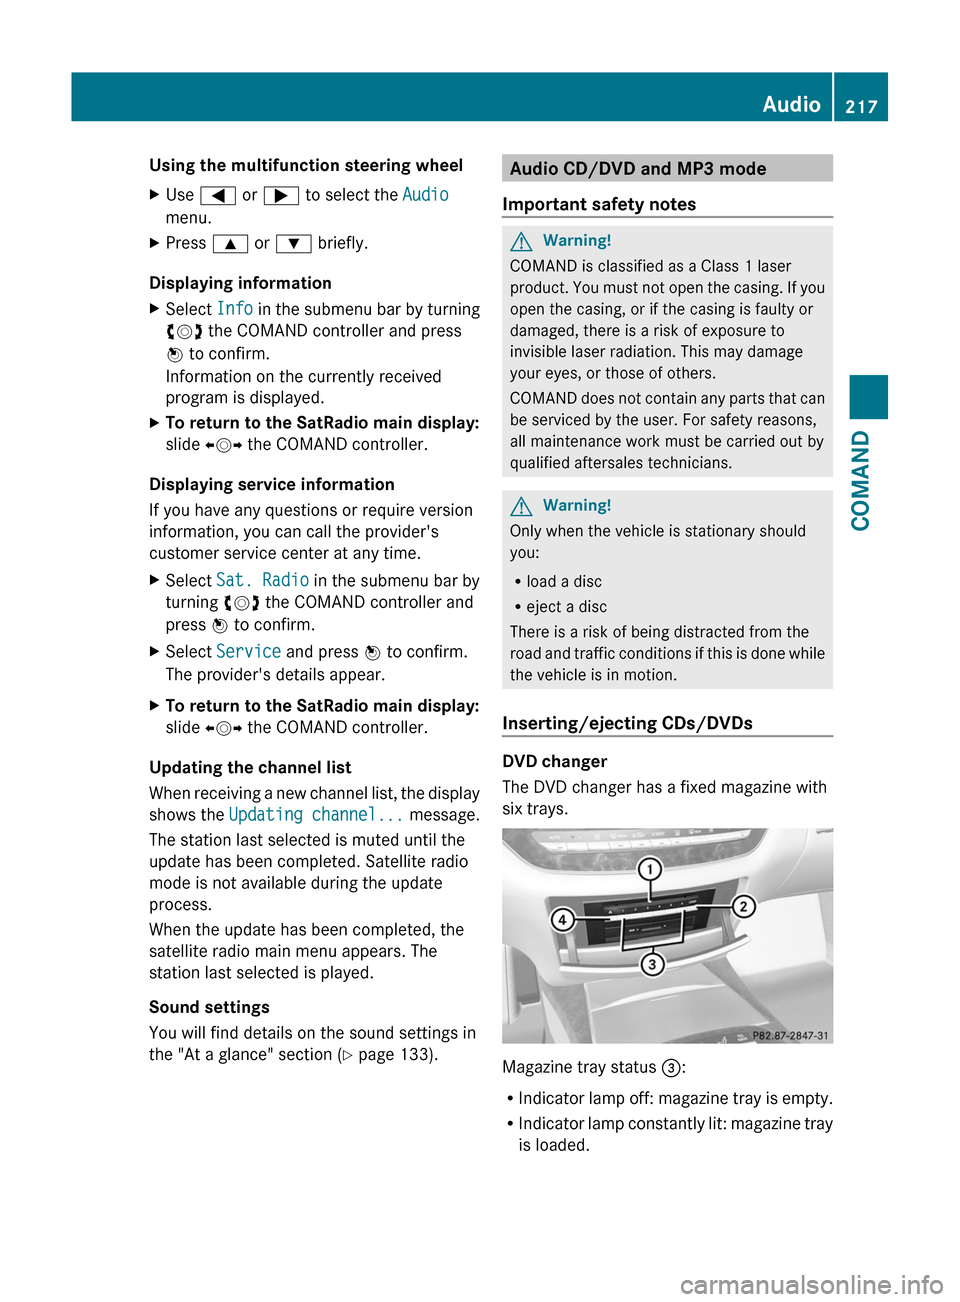
The DVD changer has a fixed magazine with
six trays.
Magazine tray status =:
RIndicator lamp off: magazine tray is empty.
RIndicator lamp constantly lit: magazine tray
is loaded.
Audio217COMANDZ
Page 222 of 524
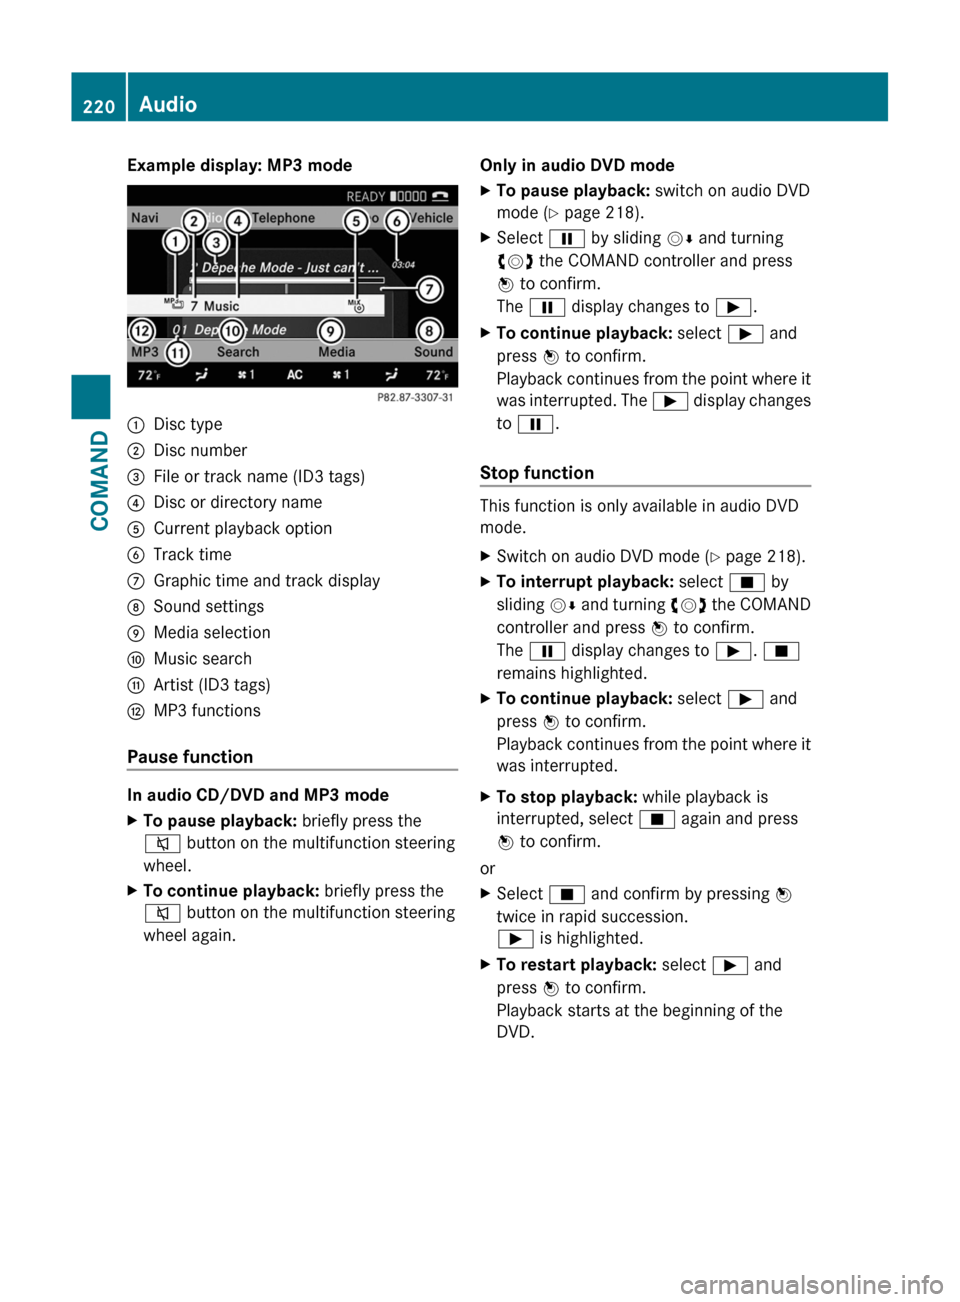
Example display: MP3 mode:Disc type;Disc number=File or track name (ID3 tags)?Disc or directory nameACurrent playback optionBTrack timeCGraphic time and track displayDSound settingsEMedia selectionFMusic searchGArtist (ID3 tags)HMP3 functions
Pause function
In audio CD/DVD and MP3 mode
XTo pause playback: briefly press the
8 button on the multifunction steering
wheel.XTo continue playback: briefly press the
8 button on the multifunction steering
wheel again.Only in audio DVD modeXTo pause playback: switch on audio DVD
mode ( Y page 218).XSelect Ë by sliding VÆ and turning
cVd the COMAND controller and press
W to confirm.
The Ë display changes to Ì.XTo continue playback: select Ì and
press W to confirm.
Playback continues from the point where it
was interrupted. The Ì display changes
to Ë .
Stop function
This function is only available in audio DVD
mode.
XSwitch on audio DVD mode ( Y page 218).XTo interrupt playback: select É by
sliding VÆ and turning cVd the COMAND
controller and press W to confirm.
The Ë display changes to Ì. É
remains highlighted.XTo continue playback: select Ì and
press W to confirm.
Playback continues from the point where it
was interrupted.XTo stop playback: while playback is
interrupted, select É again and press
W to confirm.
or
XSelect É and confirm by pressing W
twice in rapid succession.
Ì is highlighted.XTo restart playback: select Ì and
press W to confirm.
Playback starts at the beginning of the
DVD.220AudioCOMAND