change time MERCEDES-BENZ S-Class 2011 W221 Owner's Guide
[x] Cancel search | Manufacturer: MERCEDES-BENZ, Model Year: 2011, Model line: S-Class, Model: MERCEDES-BENZ S-Class 2011 W221Pages: 524, PDF Size: 22.53 MB
Page 223 of 524
Selecting CD/audio DVD/MP3 discs
Selecting via the media list
XIn CD/audio DVD and MP3 mode: select
Media by sliding VÆ or turning cVd the
COMAND controller and press W to
confirm.
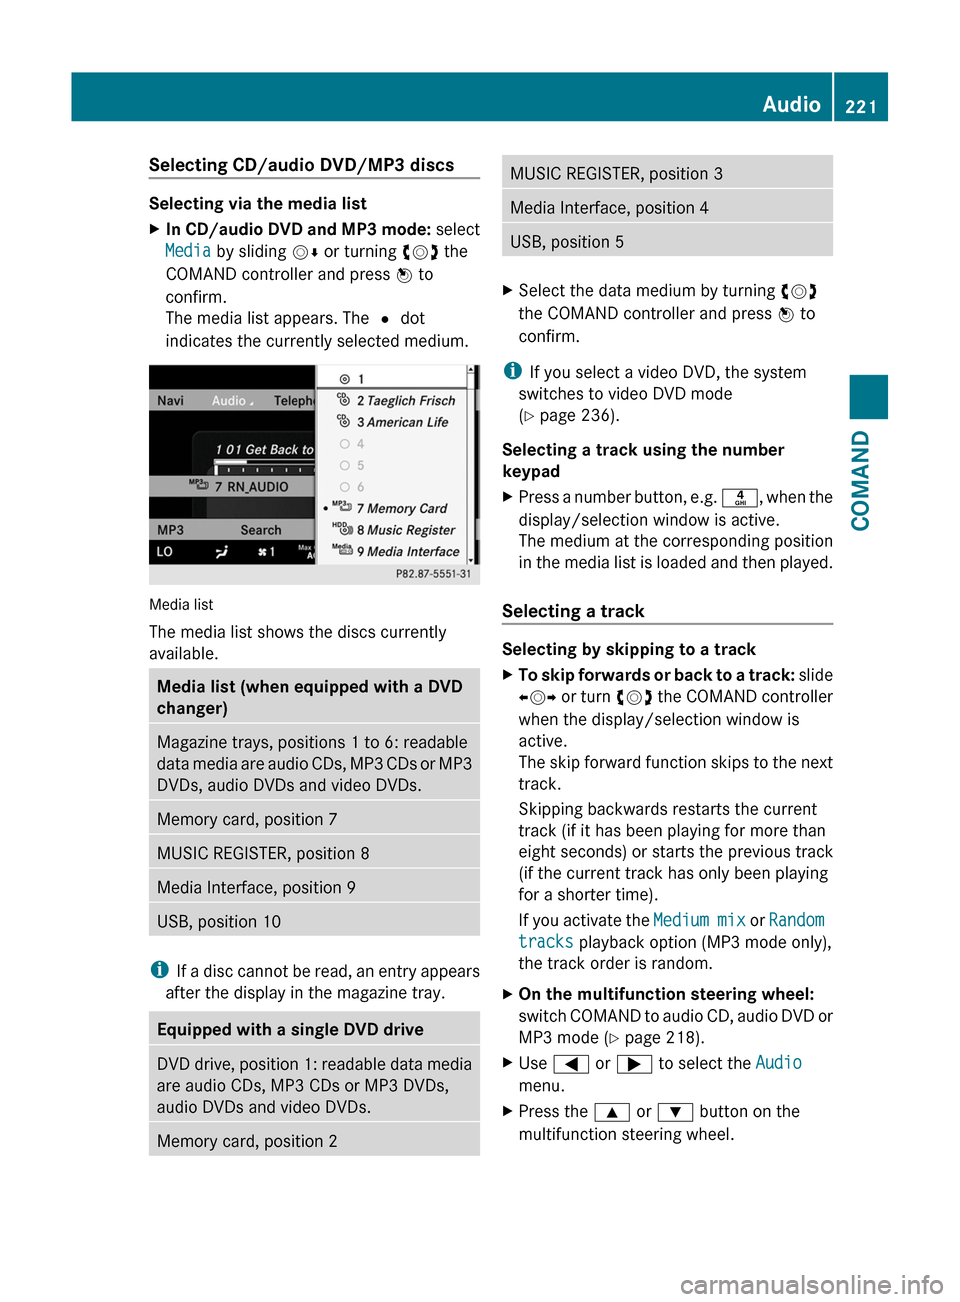
The media list appears. The # dot
indicates the currently selected medium.
Media list
The media list shows the discs currently
available.
Media list (when equipped with a DVD
changer)
Magazine trays, positions 1 to 6: readable
data media are audio CDs, MP3 CDs or MP3
DVDs, audio DVDs and video DVDs.
Memory card, position 7MUSIC REGISTER, position 8Media Interface, position 9USB, position 10
iIf a disc cannot be read, an entry appears
after the display in the magazine tray.
Equipped with a single DVD driveDVD drive, position 1: readable data media
are audio CDs, MP3 CDs or MP3 DVDs,
audio DVDs and video DVDs.
Memory card, position 2MUSIC REGISTER, position 3Media Interface, position 4USB, position 5XSelect the data medium by turning cVd
the COMAND controller and press W to
confirm.
iIf you select a video DVD, the system
switches to video DVD mode
(Y page 236).
Selecting a track using the number
keypad
XPress a number button, e.g. n, when the
display/selection window is active.
The medium at the corresponding position
in the media list is loaded and then played.
Selecting a track
Selecting by skipping to a track
XTo skip forwards or back to a track: slide
XVY or turn cVd the COMAND controller
when the display/selection window is
active.
The skip forward function skips to the next
track.
Skipping backwards restarts the current
track (if it has been playing for more than
eight seconds) or starts the previous track
(if the current track has only been playing
for a shorter time).
If you activate the Medium mix or Random
tracks playback option (MP3 mode only),
the track order is random.
XOn the multifunction steering wheel:
switch COMAND to audio CD, audio DVD or
MP3 mode (Y page 218).
XUse = or ; to select the Audio
menu.
XPress the 9 or : button on the
multifunction steering wheel.
Audio221COMANDZ
Page 228 of 524
If you insert thicker discs, e.g. those that
contain data on both sides (DVD on one
side and audio data on the other), they
cannot be ejected and can damage the
drive.
Do not use discs with a diameter of 8 cm,
even with an adapter. Only use round discs
with a diameter of 12 cm.
iCOMAND is able to play back audio CDs
in multichannel audio format.
MUSIC REGISTER
General notes
You can store music files in MP3 or WMA
format in the MUSIC REGISTER. The memory
has a capacity of approximately 7 GB.
! Retain the original music files in a secure
location. An error in COMAND might result
in the loss of the music files stored in the
MUSIC REGISTER. Mercedes-Benz is not
liable for any loss of data.
Switching on the MUSIC REGISTER
XSelect Audio in the main function bar by
sliding ZV and turning cVd the COMAND
controller and press W to confirm.
If MUSIC REGISTER was the last mode
selected, it is now switched on.
If another audio source is switched on, you
can now switch on the MUSIC REGISTER in
the audio menu.
XSelect Music Register and press W to
confirm.
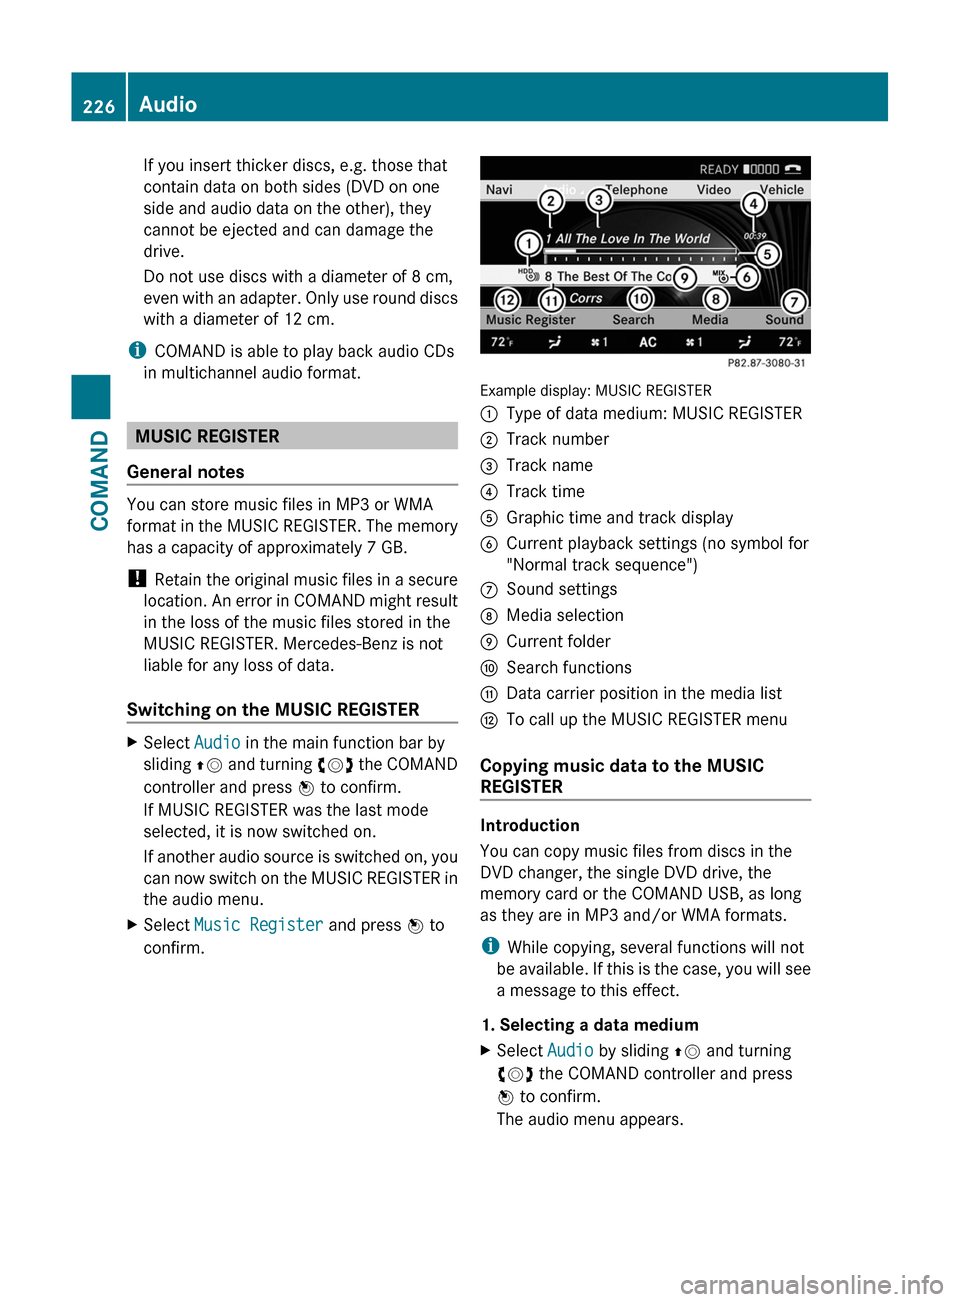
Example display: MUSIC REGISTER
:Type of data medium: MUSIC REGISTER;Track number=Track name?Track timeAGraphic time and track displayBCurrent playback settings (no symbol for
"Normal track sequence")
CSound settingsDMedia selectionECurrent folderFSearch functionsGData carrier position in the media listHTo call up the MUSIC REGISTER menu
Copying music data to the MUSIC
REGISTER
Introduction
You can copy music files from discs in the
DVD changer, the single DVD drive, the
memory card or the COMAND USB, as long
as they are in MP3 and/or WMA formats.
iWhile copying, several functions will not
be available. If this is the case, you will see
a message to this effect.
1. Selecting a data medium
XSelect Audio by sliding ZV and turning
cVd the COMAND controller and press
W to confirm.
The audio menu appears.
226AudioCOMAND
Page 239 of 524
DVD playback conditions
If video DVDs do not correspond to the NTSC
or PAL TV playback standards, there may be
picture/sound interference or other playback
problems.
COMAND can play back video DVDs
produced according to the following
standards:
Rregion code 1 or region code 0 (no region
code)
iIf you insert a video DVD with a different
region code, you will see a message to this
effect.
RPAL or NTSC standard
You will generally find the relevant details
either on the DVD itself or on the DVD case.
iCOMAND is set to region code 1 at the
factory. This setting can be changed at an
authorized Mercedes-Benz Center. This will
allow you to play video DVDs with a
different region code, provided that they
are produced in accordance with the PAL
or NTSC standard. The region code can be
changed a maximum of five times.
Function restrictions
Depending on the DVD, it is possible that
certain functions or actions will be
temporarily blocked or may not function at all.
As soon as you try to activate these functions
or actions, you will see the K symbol in the
display.
Inserting and removing DVDs
XProceed as described in the "Inserting and
ejecting CDs and DVDs" section
(Y page 217).
Activating video DVD mode
Option 1
XInsert a video DVD.
COMAND loads the medium inserted and
starts to play it.
Option 2
XSelect Video in the main function bar by
sliding ZV and turning cVd the COMAND
controller and press W to confirm.
Video DVD mode is switched on.
Hiding/showing the control menu
XTo show: turn cVd or slide ZVÆ the
COMAND controller.
iThis function is not available while the
DVD's own menu (Y page 240) is being
displayed.
XTo hide: slide ZVÆ the COMAND
controller.
or
XWait for approximately eight seconds.
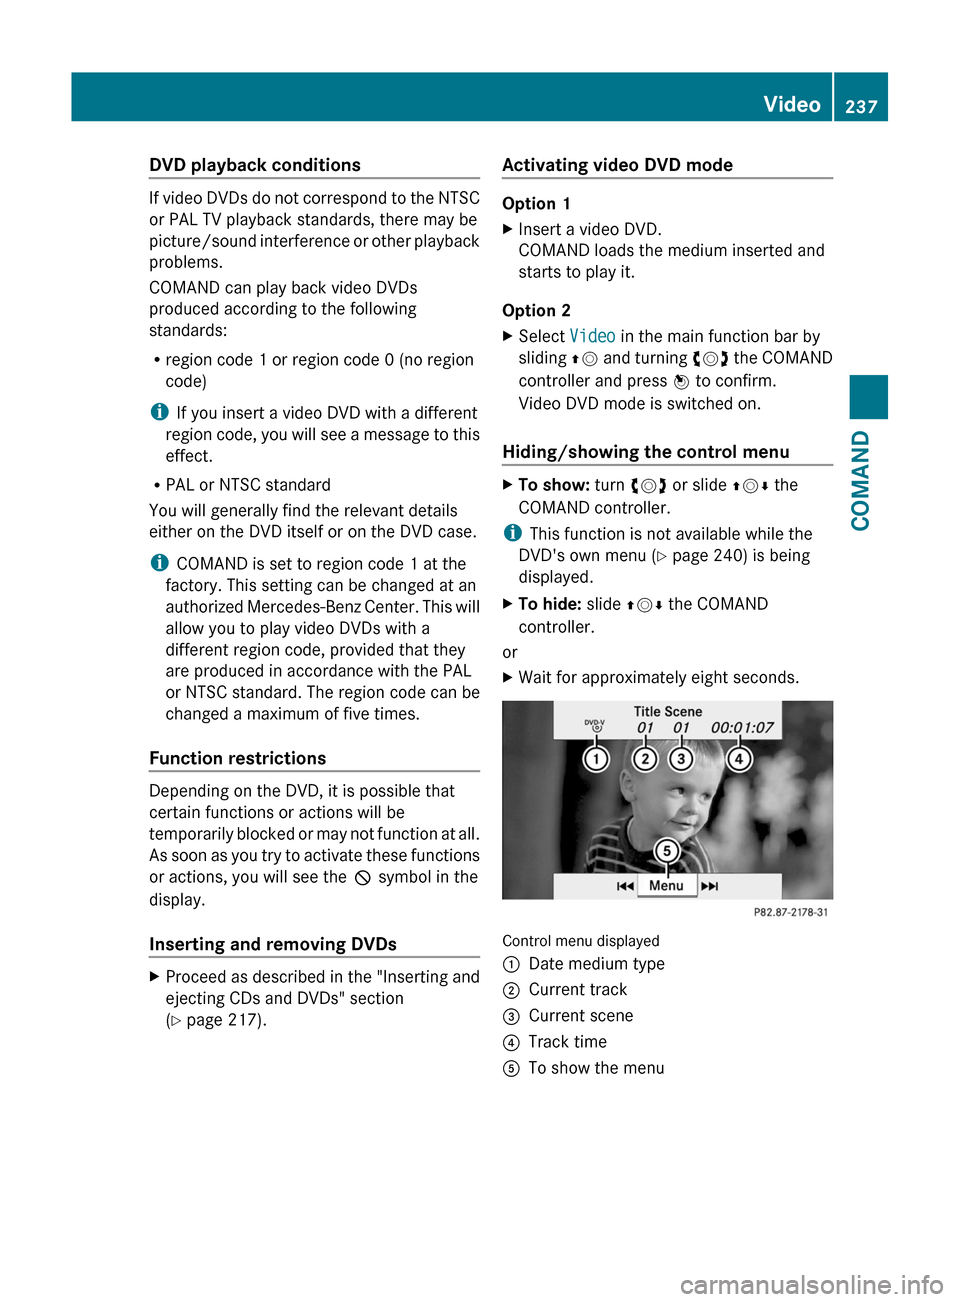
Control menu displayed
:Date medium type;Current track=Current scene?Track timeATo show the menuVideo237COMANDZ
Page 280 of 524
Switch the reading lamp off=Interior lighting
Interior lighting control
Important notes
In order to prevent the vehicle's battery from
discharging, the interior lighting functions are
automatically deactivated after some time
except for when the key is in position 2 in the
ignition lock.
Automatic interior lighting control
XTo switch on/off: press the | button.
The OFF indicator lamp shows whether the
automatic interior lighting control is
deactivated (indicator lamp on) or
activated (indicator lamp off).
The interior lighting automatically switches
on if you:
R unlock the vehicle
R open a door
R remove the key from the ignition lock
The interior light is activated for a short while
when the key is removed from the ignition
lock. You can activate this delayed switch-off
using COMAND ( Y page 259).
Manual interior lighting control
XTo switch the front interior lighting on/
off: press the c button.XTo switch the rear interior lighting on/
off: press the u button.XTo switch the reading lamps on/off:
press the p button.Changing bulbs
Important safety notes
Xenon bulbs
If your vehicle is equipped with Xenon bulbs,
you can recognize this by the following: the
cone of light from the Xenon bulbs moves
from the top to the bottom and back again
when you start the engine. For this to be
observed, the lights must be switched on
before starting the engine.
GWarning
Xenon bulbs carry a high voltage. You could
get an electric shock and be seriously or even
fatally injured if you touch the electric
contacts on Xenon bulbs. Therefore, never
remove the cover from Xenon bulbs.
Do not change Xenon bulbs yourself, but have
them replaced at a qualified specialist
workshop which has the necessary specialist
knowledge and tools to carry out the work
required.
Mercedes-Benz recommends that you use an
authorized Mercedes-Benz Center for this
purpose. In particular, work relevant to safety
or on safety-related systems must be carried
out at a qualified specialist workshop.
Bulbs and lamps are an important aspect of
vehicle safety. You must therefore make sure
that these function correctly at all times.
Have the headlamp setting checked regularly.
Other bulbs
GWarning!
Bulbs and lamps can be very hot. You should
therefore allow them to cool down before you
change them. Otherwise, you could be burned
if you touch them.
Keep bulbs out of the reach of children.
Otherwise, they could damage the bulbs, for
example, and injure themselves.
278Changing bulbsLights and windshield wipers
Page 281 of 524
Never use a bulb which has been dropped.
Such a bulb may break or even explode and
injure you.
Halogen bulbs are pressurized and can
explode when you change them, particularly
if they are very hot. You should therefore wear
eye protection and gloves when you are
changing them.
There are bulbs other than the Xenon bulbs
that you cannot replace. Replace only the
bulbs listed (Y page 279). Have the bulbs that
you cannot replace yourself changed at a
qualified specialist workshop.
Mercedes-Benz recommends that you use an
authorized Mercedes-Benz Center for this
purpose. In particular, work relevant to safety
or on safety-related systems must be carried
out at a qualified specialist workshop.
If you require assistance changing bulbs,
consult a qualified specialist workshop.
Do not touch the glass tube of new bulbs with
your bare hands. Even minor contamination
can burn into the glass surface and reduce
the service life of the bulbs. Always use a lint-
free cloth or only touch the base of the bulb
when installing.
Only use bulbs of the correct type.
If the new bulb still does not light up, consult
a qualified specialist workshop.
Bulbs and lamps are an important aspect of
vehicle safety. You must therefore make sure
that these function correctly at all times.
Have the headlamp setting checked regularly.
Overview: changing bulbs/bulb types
You can change the following bulbs. The bulb
type can be found in the legend.
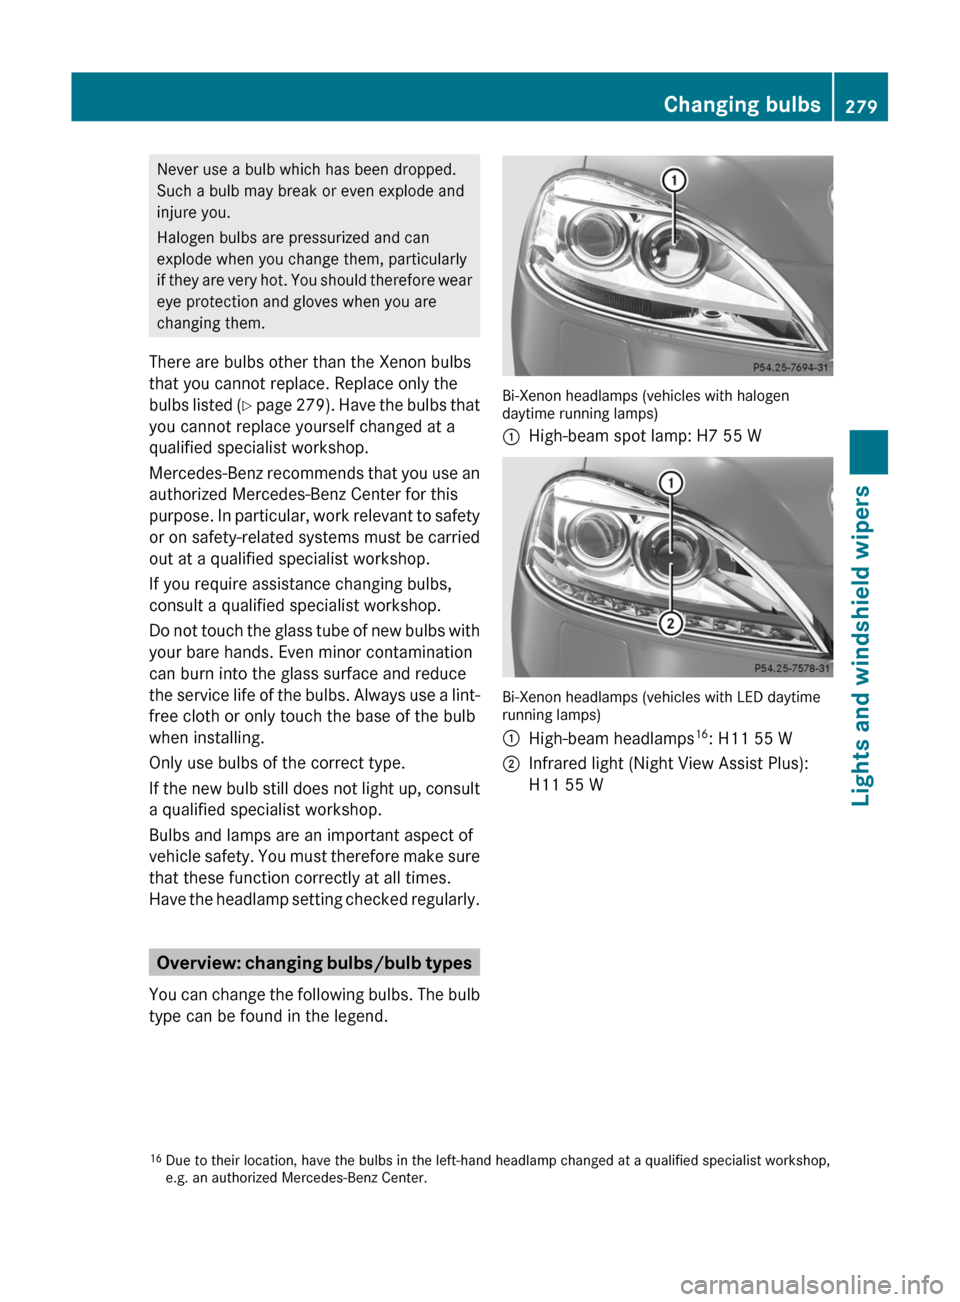
Bi-Xenon headlamps (vehicles with halogendaytime running lamps)
:High-beam spot lamp: H7 55 W
Bi-Xenon headlamps (vehicles with LED daytimerunning lamps)
:High-beam headlamps16: H11 55 W;Infrared light (Night View Assist Plus):
H11 55 W16Due to their location, have the bulbs in the left-hand headlamp changed at a qualified specialist workshop,e.g. an authorized Mercedes-Benz Center.
Changing bulbs279Lights and windshield wipersZ
Page 282 of 524
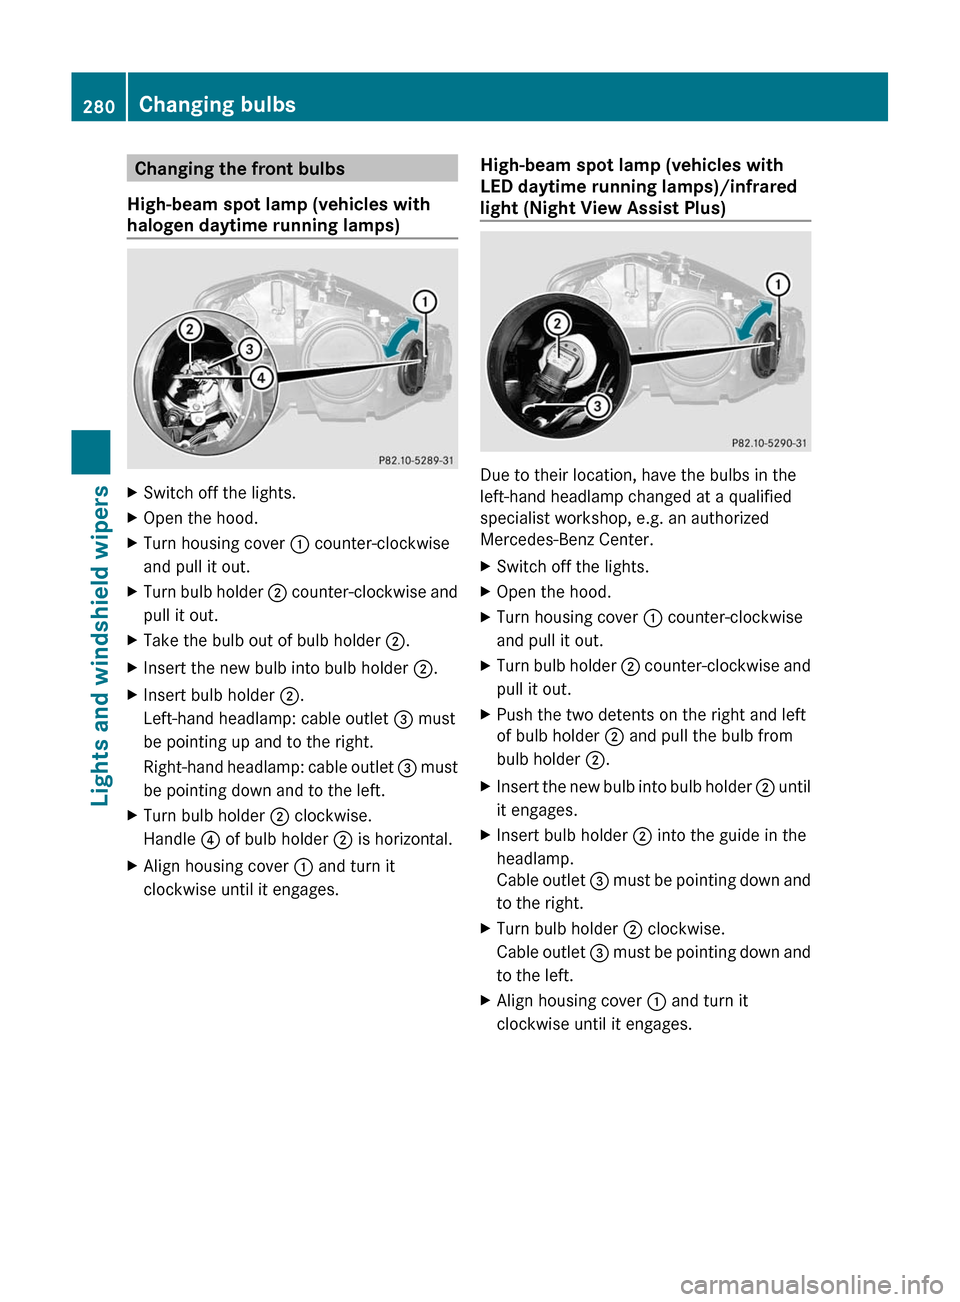
Changing the front bulbs
High-beam spot lamp (vehicles with
halogen daytime running lamps)
XSwitch off the lights.XOpen the hood.XTurn housing cover : counter-clockwise
and pull it out.
XTurn bulb holder ; counter-clockwise and
pull it out.
XTake the bulb out of bulb holder ;.XInsert the new bulb into bulb holder ;.XInsert bulb holder ;.
Left-hand headlamp: cable outlet = must
be pointing up and to the right.
Right-hand headlamp: cable outlet = must
be pointing down and to the left.
XTurn bulb holder ; clockwise.
Handle ? of bulb holder ; is horizontal.
XAlign housing cover : and turn it
clockwise until it engages.
High-beam spot lamp (vehicles with
LED daytime running lamps)/infrared
light (Night View Assist Plus)
Due to their location, have the bulbs in the
left-hand headlamp changed at a qualified
specialist workshop, e.g. an authorized
Mercedes-Benz Center.
XSwitch off the lights.XOpen the hood.XTurn housing cover : counter-clockwise
and pull it out.
XTurn bulb holder ; counter-clockwise and
pull it out.
XPush the two detents on the right and left
of bulb holder ; and pull the bulb from
bulb holder ;.
XInsert the new bulb into bulb holder ; until
it engages.
XInsert bulb holder ; into the guide in the
headlamp.
Cable outlet = must be pointing down and
to the right.
XTurn bulb holder ; clockwise.
Cable outlet = must be pointing down and
to the left.
XAlign housing cover : and turn it
clockwise until it engages.
280Changing bulbsLights and windshield wipers
Page 300 of 524
Vehicle equipment
i This manual describes all the standard
and optional equipment of your vehicle
which was available at the time of
purchase. Country-specific differences are
possible. Bear in mind that your vehicle
may not feature all functions described
here. This also refers to safety-related
systems and functions.
Notes on breaking in a new vehicle
The first 1000 miles (1500 km)
The more you look after the engine when it is
new, the happier you will be with its
performance in the future.
R Drive at varying vehicle speeds and engine
speeds for the first 1000 miles (1500 km)
for this reason.
R Avoid overstraining the vehicle during this
period, e.g. driving at full throttle.
R Change gear in good time, at the latest
when the tachometer needle is 2
/ 3 of the
way to the red area in the tachometer
display.
R Do not manually shift to a lower gear to
brake the vehicle.
R If possible, do not depress the accelerator
pedal past the point of resistance
(kickdown).
R Only select shift ranges 3, 2 or 1 when
driving slowly, e.g. in mountainous terrain.
R Ideally, drive program E (on AMG vehicles:
drive program C) should be selected for
driving the first 1000 miles (1500 km).
After 1000 miles (1500 km) you may
gradually bring the vehicle up to full road and
engine speeds.
Additional breaking-in notes for AMG
vehicles:
R For the first 1000 miles (1500 km), do not
exceed a speed of 85 mph (140 km/h).
R Only allow the engine to briefly reach a
maximum engine speed of 4500 rpm.
R Shift gears in good time.
i Also observe these breaking-in notes
when the vehicle's engine or axle gear have
been replaced.
i Always observe the respective limit
speeds.
Driving
Important safety notes
GWarning
Make sure absolutely no objects are
obstructing the pedals' range of movement.
Keep the driver's footwell clear of all
obstacles. If there are any floormats or
carpets in the footwell, make sure the pedals
still have sufficient clearance.
During sudden driving or braking maneuvers
the objects could get caught between the
pedals. You could then no longer brake or
accelerate. This could lead to accidents and
injury.
GWarning
On slippery road surfaces, never downshift in
order to obtain braking action. This could
result in drive wheel slip and reduced vehicle
control. Your vehicle's ABS will not prevent
this type of loss of control.
GWarning
It is dangerous to shift AUTOTRONIC out of
parking position P or neutral position N if the
engine speed is higher than idle speed. If your
foot is not firmly on the brake pedal, the
vehicle could accelerate quickly forward or in
reverse. You could lose control of the vehicle
and hit someone or something. Only shift into
298DrivingDriving and parking
Page 303 of 524
Starting the engine
Important safety notesGWarning
Inhalation of exhaust gas is hazardous to your
health. All exhaust gas contains carbon
monoxide (CO), and inhaling it can cause
unconsciousness and possible death.
Do not run the engine in confined areas (such
as a garage) which are not properly ventilated.
If you think that exhaust gas fumes are
entering the vehicle while driving, have the
cause determined and corrected
immediately. If you must drive under these
conditions, drive only with at least one
window fully open at all times.
! Do not depress the accelerator pedal
when starting the engine.
Automatic transmission
XShift the transmission to position P.
i
The transmission position display in the
multifunction display shows P.
Starting procedure with the SmartKey
XTurn the SmartKey to position 3 in the
ignition lock (Y page 299) and release it as
soon as the engine is running.
Using KEYLESS-GO to start the engine
GWarning!
As long as the SmartKey is in your vehicle, the
vehicle can be started. Therefore, never leave
children unattended in the vehicle, as they
could otherwise accidentally start the engine.
When leaving the vehicle, always take the
SmartKey with you and lock the vehicle. Do
not leave children unattended in the vehicle,
or with access to an unlocked vehicle. A
child's unsupervised access to a vehicle could
result in an accident and/or serious personal
injury.
i The Start/Stop button can be used to
start the vehicle without inserting the
SmartKey in the ignition lock. The
SmartKey must be in the vehicle.XThe Start/Stop button must be inserted in
the ignition lock.
i To start the engine with the SmartKey
instead of with KEYLESS-GO, remove the
Start/Stop button from the ignition lock.
XDepress the brake pedal and keep it
depressed.XPress the Start/Stop button once
( Y page 299).
The engine starts.
Pulling away
Automatic transmission
GWarning
It is dangerous to shift AUTOTRONIC out of
parking position P or neutral position N if the
engine speed is higher than idle speed. If your
foot is not firmly on the brake pedal, the
vehicle could accelerate quickly forward or in
reverse. You could lose control of the vehicle
and hit someone or something. Only shift into
gear when the engine is idling normally and
when your right foot is firmly on the brake
pedal.
i It is only possible to shift the transmission
from position P to the desired position if
you depress the brake pedal. Only then is
the parking lock released. If you do not
depress the brake pedal, you can move the
DIRECT SELECT selector lever but the
parking lock remains engaged.
XDepress the brake pedal and keep it
depressed.XShift the transmission to position D or R.XWait until the gear change is completed
before pulling away.Driving301Driving and parkingZ
Page 312 of 524
Working on the vehicleGWarning!
When working on the vehicle, engage the
electronic parking brake and shift the
automatic transmission into park position P.
Otherwise the vehicle could roll away which
could result in an accident and/or serious
personal injury.
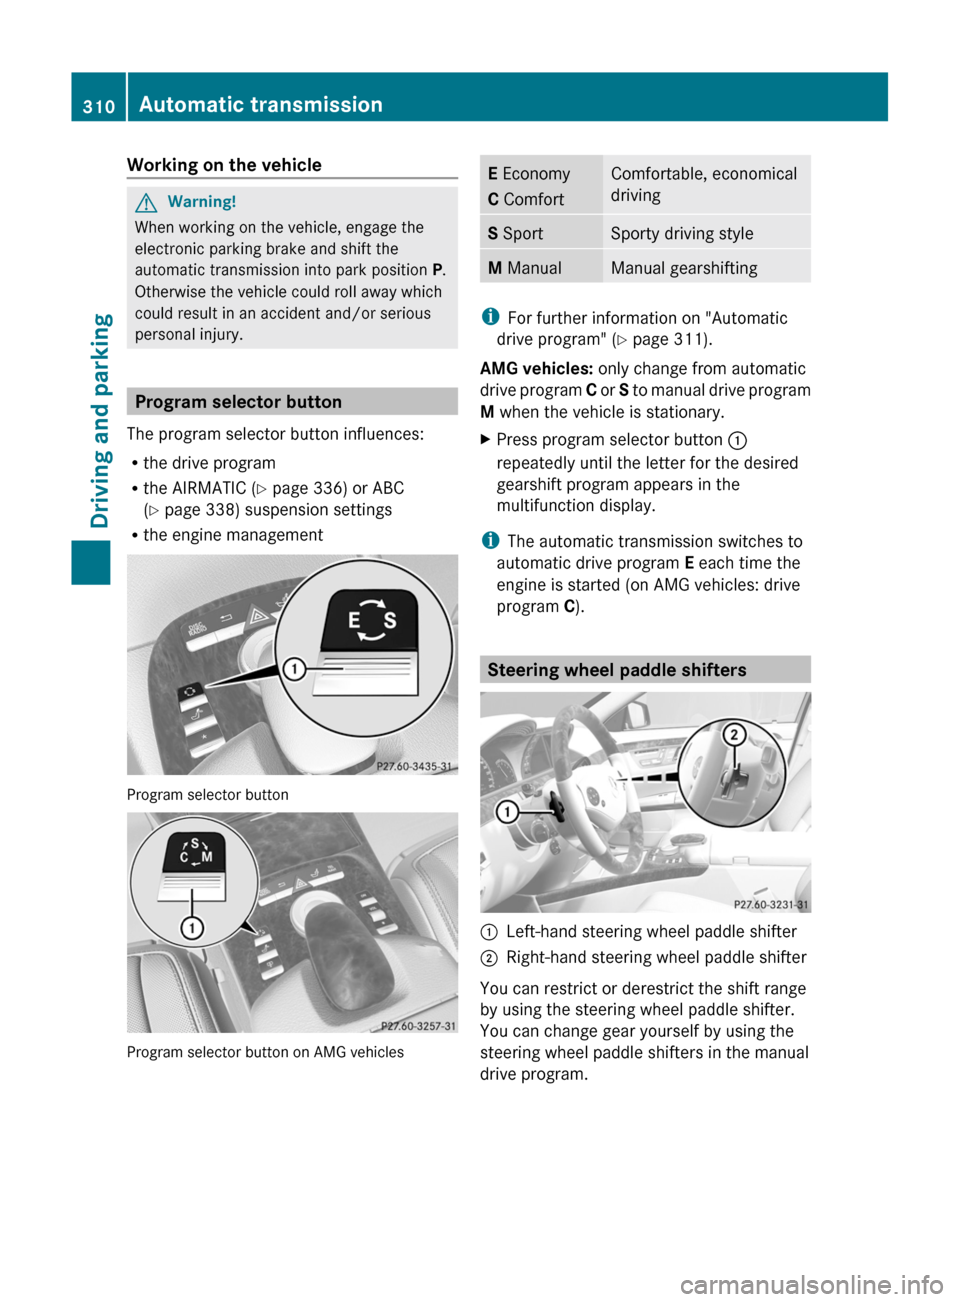
Program selector button
The program selector button influences:
Rthe drive program
Rthe AIRMATIC (Y page 336) or ABC
(Y page 338) suspension settings
Rthe engine management
Program selector button
Program selector button on AMG vehicles
E Economy
C Comfort
Comfortable, economical
driving
S SportSporty driving styleM ManualManual gearshifting
iFor further information on "Automatic
drive program" (Y page 311).
AMG vehicles: only change from automatic
drive program C or S to manual drive program
M when the vehicle is stationary.
XPress program selector button :
repeatedly until the letter for the desired
gearshift program appears in the
multifunction display.
iThe automatic transmission switches to
automatic drive program E each time the
engine is started (on AMG vehicles: drive
program C).
Steering wheel paddle shifters
:Left-hand steering wheel paddle shifter;Right-hand steering wheel paddle shifter
You can restrict or derestrict the shift range
by using the steering wheel paddle shifter.
You can change gear yourself by using the
steering wheel paddle shifters in the manual
drive program.
310Automatic transmissionDriving and parking
Page 322 of 524
During sudden driving or braking maneuvers,
the objects could get caught between the
pedals. You could then no longer brake or
accelerate. This could lead to accidents and
injury.
Coasting with the engine switched offGWarning!
There is no power assistance for the steering
and the brake when the engine is not running.
Steering and braking requires significantly
more effort and you could lose control of the
vehicle and cause an accident as a result.
Do not turn off the engine while the vehicle is
in motion.
Exhaust check
GWarning
Inhalation of exhaust gas is hazardous to your
health. All exhaust gas contains carbon
monoxide (CO), and inhaling it can cause
unconsciousness and possible death.
Do not run the engine in confined areas (such
as a garage) which are not properly ventilated.
If you think that exhaust gas fumes are
entering the vehicle while driving, have the
cause determined and corrected
immediately. If you must drive under these
conditions, drive only with at least one
window fully open at all times.
Certain engine systems are designed to keep
the level of poisonous components in exhaust
fumes within legal limits.
These systems only work optimally if they are
maintained exactly in accordance with the
manufacturer's specifications. For this
reason, all work on the engine must be carried
out by qualified and authorized Mercedes-
Benz technicians.
The engine settings must not be changed in
any circumstances. Furthermore, all specific
service work must be carried out at regular
intervals and in accordance with the
Mercedes-Benz service requirements. Details
can be found in the Service Booklet.
Brakes
Important safety notes
GWarning
On slippery road surfaces, never downshift in
order to obtain braking action. This could
result in drive wheel slip and reduced vehicle
control. Your vehicle's ABS will not prevent
this type of loss of control.
GWarning
Make sure that you do not endanger other
road users when you apply the brakes.
Downhill gradients
! On long and steep gradients, you must
reduce the cargo on the brakes by shifting
to a lower gear in good time. This allows
you to take advantage of engine braking
and helps you to avoid overheating the
brakes and wearing them out excessively.
When you take advantage of engine
braking, a drive wheel may not turn for
some time, e.g. on a slippery road surface.
This could cause damage to the drive train.
Such damage is not covered by the
Mercedes-Benz warranty.
Heavy and light loads
GWarning
Depressing the brake pedal constantly results
in excessive and premature wear to the brake
pads.
It may also cause the brakes to overheat,
seriously impairing their effectiveness. It may
then not be possible to stop the vehicle in
sufficient time to avoid an accident.
If the brakes have been subjected to a heavy
cargo, do not stop the vehicle immediately,
320Driving tipsDriving and parking