tow MERCEDES-BENZ S-Class 2015 W222 User Guide
[x] Cancel search | Manufacturer: MERCEDES-BENZ, Model Year: 2015, Model line: S-Class, Model: MERCEDES-BENZ S-Class 2015 W222Pages: 502, PDF Size: 9.59 MB
Page 31 of 502
G
WARNING
If you connect equipment to the diagnostics
connection in the vehicle, it may affect the
operation of the vehicle systems. As a result, the operating safety of the vehicle could be
affected. There is a risk of an accident.
Do not connect any equipment to a diagnos-
tics connection in the vehicle. G
WARNING
Objects in the driver's footwell can restrict the pedal travel or obstruct a depressed pedal.
The operating and road safety of the vehicle is
jeopardized. There is a risk of an accident.
Make sure that all objects in the vehicle are
stowed correctly, and that they cannot enter
the driver's footwell. Install the floormats
securely and as specified in order to ensure
sufficient clearance for the pedals. Do not use loose floormats and do not place floormats on
top of one another.
! If the engine is switched off and equip-
ment on the diagnostics connection is
used, the starter battery may discharge.
Connecting equipment to the diagnostics
connection can lead to emissions monitoring information being reset, for example. This
may lead to the vehicle failing to meet the
requirements of the next emissions test dur-
ing the main inspection. Qualified specialist workshop
An authorized Mercedes-Benz Center is a
qualified specialist workshop. It has the nec-
essary specialist knowledge, tools and quali-
fications to correctly carry out the work
required on your vehicle. This is especially the case for work relevant to safety.
Observe the notes in the Maintenance Book-
let. Always have the following work carried out at
an authorized Mercedes-Benz Center:
R work relevant to safety
R service and maintenance work
R repair work
R alterations, installation work and modifica-
tions
R work on electronic components
R work on the hybrid system Correct use
If you remove any warning stickers, you or
others could fail to recognize certain dangers.
Leave warning stickers in position.
Observe the following information when driv- ing your vehicle:
R the safety notes in this manual
R the Technical Data section in this manual
R traffic rules and regulations
R laws and safety standards pertaining to
motor vehicles Problems with your vehicle
If you should experience a problem with your
vehicle, particularly one that you believe may
affect its safe operation, we urge you to con- tact an authorized Mercedes-Benz Center
immediately to have the problem diagnosed
and rectified. If the problem is not resolved to
your satisfaction, please discuss the problem
again with a Mercedes-Benz Center or con-
tact us at one of the following addresses.
In the USA
Customer Assistance Center
Mercedes-Benz USA, LLC
One Mercedes Drive
Montvale, NJ 07645-0350
In Canada
Customer Relations Department
Mercedes-Benz Canada, Inc.
98 Vanderhoof Avenue Introduction
29 Z
Page 45 of 502
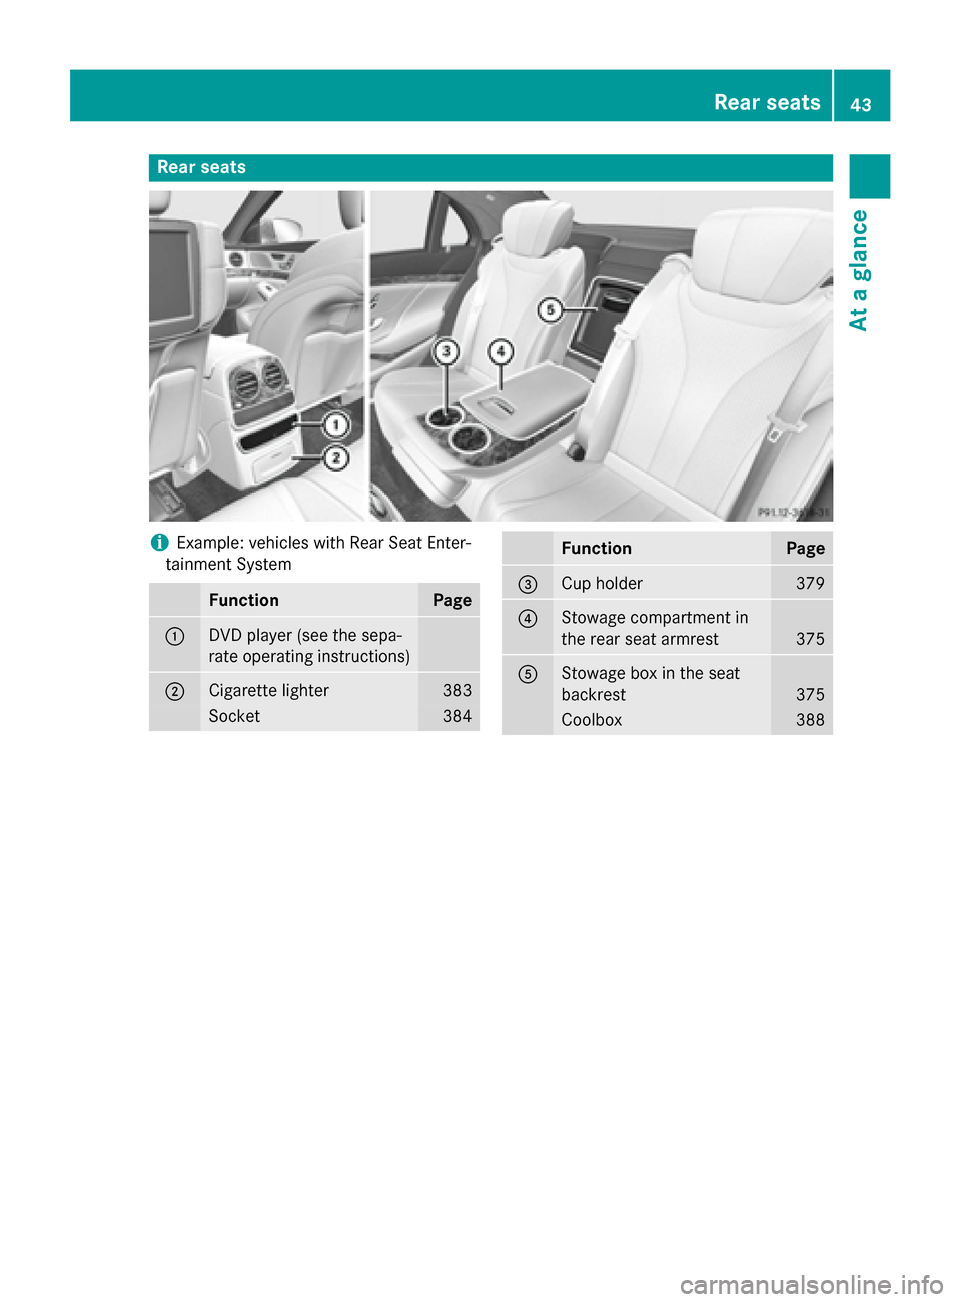
Rear seats
i
Example: vehicles with Rear Seat Enter-
tainment System Function Page
:
DVD player (see the sepa-
rate operating instructions)
;
Cigarette lighter 383
Socket 384 Function Page
=
Cup holder 379
?
Stowage compartment in
the rear seat armrest
375
A
Stowage box in the seat
backrest
375
Coolbox 388Rear seats
43At a glance
Page 48 of 502
Useful information
i This Operator's Manual describes all
models and all standard and optional equip- ment of your vehicle available at the time of
publication of the Operator's Manual.
Country-specific differences are possible.
Please note that your vehicle may not be
equipped with all features described. This
also applies to safety-related systems and
functions.
i Read the information on qualified special-
ist workshops (Y page 29). Hybrid vehicles
General notes
Hybrid technology combines a fuel efficient
internal combustion engine with a powerful
electric motor. Important safety notes
Danger of electric shock G
DANGER
The vehicle's high voltage electrical system is under high voltage. If you modify components
in the vehicle's high-voltage electrical system or touch damaged components, you may be
electrocuted. The components in the vehi-
cle's high-voltage electrical system may be
damaged in an accident, although the damage
is not visible. There is a risk of fatal injury.
Following an accident, do not touch any high- voltage components and never modify the
vehicle's high-voltage electrical system. Have
the vehicle towed away after an accident and the vehicle's high-voltage electrical system
checked by a qualified specialist workshop. When towing a vehicle after an accident, be
sure to observe the following sections:
R Transporting the vehicle (Y page 437)
R Towing the vehicle with the rear axle raised
(Y page 437)
R Towing a vehicle with both axles on the
ground (Y page 436)
Read the safety instructions on towing and
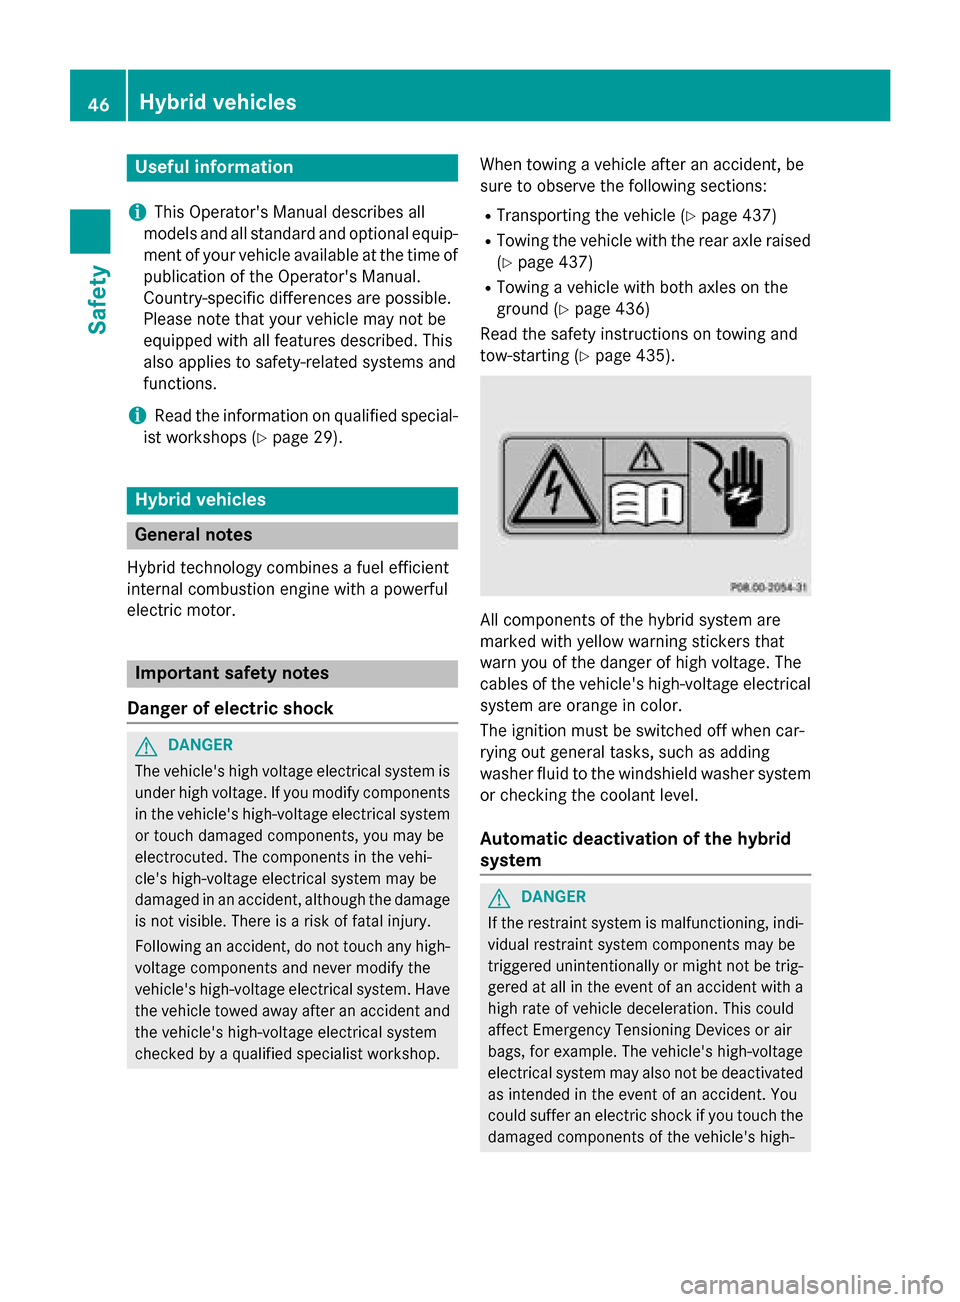
tow-starting (Y page 435). All components of the hybrid system are
marked with yellow warning stickers that
warn you of the danger of high voltage. The
cables of the vehicle's high-voltage electrical
system are orange in color.
The ignition must be switched off when car-
rying out general tasks, such as adding
washer fluid to the windshield washer system or checking the coolant level.
Automatic deactivation of the hybrid
system G
DANGER
If the restraint system is malfunctioning, indi- vidual restraint system components may be
triggered unintentionally or might not be trig-
gered at all in the event of an accident with a high rate of vehicle deceleration. This could
affect Emergency Tensioning Devices or air
bags, for example. The vehicle's high-voltage
electrical system may also not be deactivated
as intended in the event of an accident. You
could suffer an electric shock if you touch the damaged components of the vehicle's high- 46
Hybrid vehiclesSafety
Page 49 of 502
voltage electrical system. This poses an
increased risk of injury or even fatal injury.
Have the restraint system checked and
repaired immediately at a qualified specialist
workshop. Immediately switch off the ignition and remove the SmartKey from the ignition
lock after an accident.
If components of the restraint system are
activated during an accident, the hybrid sys-
tem is automatically deactivated.
The hybrid system is not activated when the
vehicle is started if:
R a short circuit is detected in the hybrid sys-
tem.
R one of the hybrid system’s electrical con-
nections is disconnected.
This ensures that you do not come into con-
tact with high voltage.
Manual deactivation of the hybrid sys-
tem The hybrid system can be deactivated man-
ually using the high voltage switch-off device.
! To prevent damage to the hybrid system
please observe the following instructions:
R only deactivate the hybrid system man-
ually in the following situations.
R work on the hybrid system may only be
carried out at a qualified specialist work-
shop, even when it has been deactivated
manually.
R if the 6 restraint system warning lamp
in the instrument cluster lights up after an
accident.
R if the vehicle is badly damaged, e.g. after an
accident, and the restraint system compo-
nents were not activated.
R if the vehicle is badly damaged and has to
be towed or transported. X
If possible, move the vehicle out of the
danger zone: shift the automatic transmis-
sion into position N.
X Release the electric parking brake.
X Roll the vehicle to a safe place and park it
safely.
Get assistance from others if necessary.
i The vehicle is locked automatically when
the ignition is switched on and the wheels
are turning. There is therefore a risk of
being locked out if the vehicle is being
pushed or tested on a dynamometer.
X Switch the ignition off.
X Shift the automatic transmission to park
position P(Y page 197).
Depress the electric parking brake
(Y page 222).
Secure the vehicle against rolling away
(Y page 466).
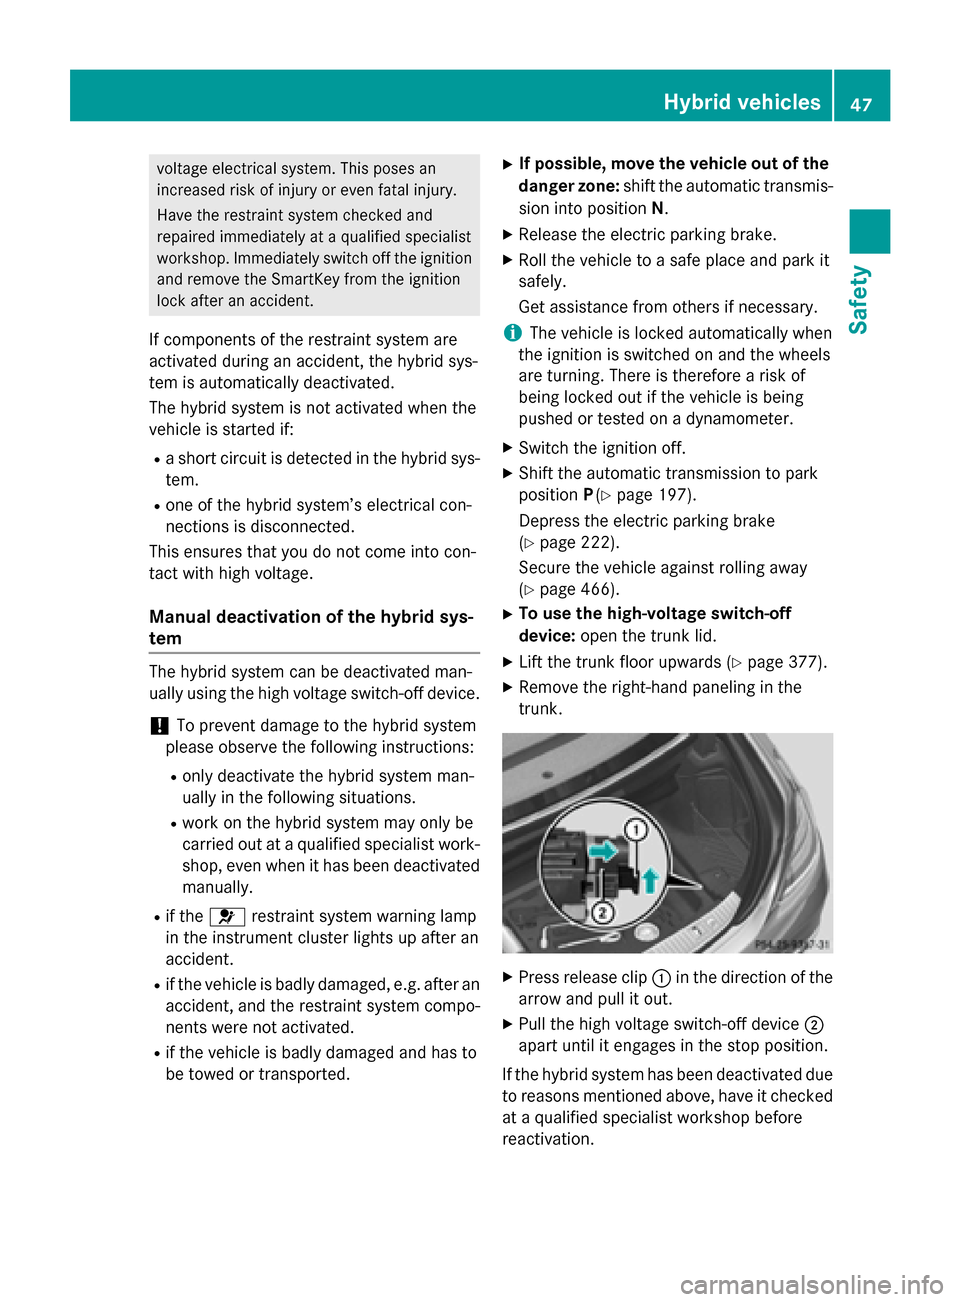
X To use the high-voltage switch-off
device: open the trunk lid.
X Lift the trunk floor upwards (Y page 377).
X Remove the right-hand paneling in the
trunk. X
Press release clip :in the direction of the
arrow and pull it out.
X Pull the high voltage switch-off device ;
apart until it engages in the stop position.
If the hybrid system has been deactivated due to reasons mentioned above, have it checked
at a qualified specialist workshop before
reactivation. Hybrid vehicles
47Safety Z
Page 57 of 502
Rear seat belt buckle extenders
The seat belt extender is an integral part of
the PRE-SAFE ®
convenience function. It is
used on the outer rear seats.
Always ensure that it is possible to move the
belt buckle freely. Always stow objects in the
vehicle correctly.
To assist you in finding the seat belt buckle
and fastening the seat belt:
R the belt buckle moves forwards to a con-
venient position
R the belt buckle is illuminated
After the seat belt is fastened, the belt buckle returns to its normal position. The seat belt
then lies tight across the lap and thorax areas.
Incorporation into the PRE-SAFE ®
system:
the belt buckle is lowered quickly in certain
hazardous situations. This pre-tensions the
seat belt.
Incorporation into the automatic meas-
ures after the accident: in this situation, the
belt buckle is illuminated and extended after
a rear door is opened.
Releasing seat belts !
Make sure that the seat belt is fully rolled
up. Otherwise, the seat belt or belt tongue
will be trapped in the door or in the seat
mechanism. This could damage the door,
the door trim panel and the seat belt. Dam- aged seat belts can no longer fulfill their
protective function and must be replaced.
Visit a qualified specialist workshop. X
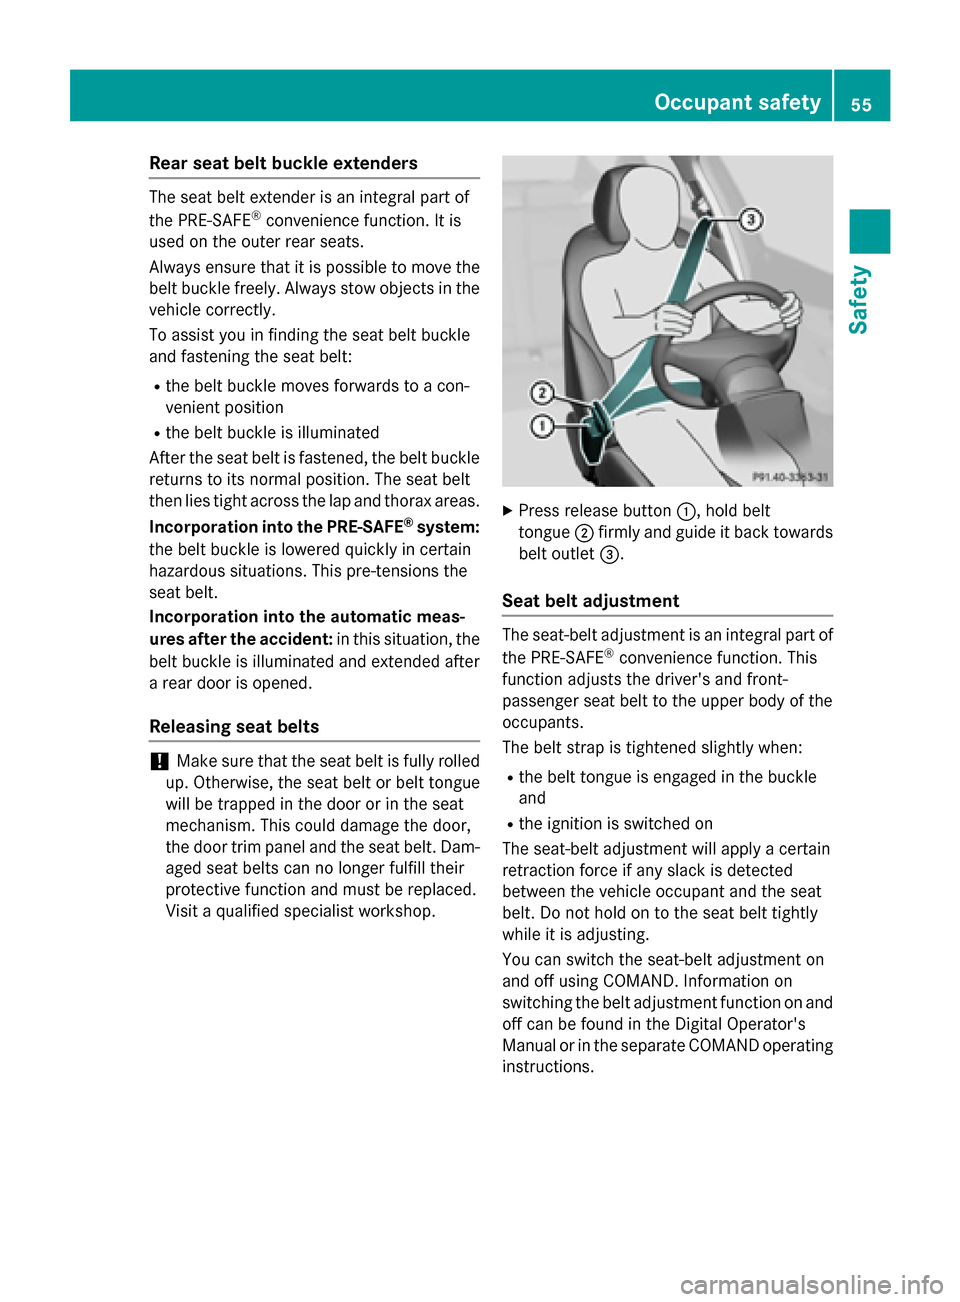
Press release button :, hold belt
tongue ;firmly and guide it back towards
belt outlet =.
Seat belt adjustment The seat-belt adjustment is an integral part of
the PRE-SAFE ®
convenience function. This
function adjusts the driver's and front-
passenger seat belt to the upper body of the
occupants.
The belt strap is tightened slightly when:
R the belt tongue is engaged in the buckle
and
R the ignition is switched on
The seat-belt adjustment will apply a certain
retraction force if any slack is detected
between the vehicle occupant and the seat
belt. Do not hold on to the seat belt tightly
while it is adjusting.
You can switch the seat-belt adjustment on
and off using COMAND. Information on
switching the belt adjustment function on and off can be found in the Digital Operator's
Manual or in the separate COMAND operating
instructions. Occupant safety
55Safety Z
Page 67 of 502
Deployment of Emergency Tensioning
Devices and air bags
Important safety notes G
WARNING
The air bag parts are hot after an air bag has
been deployed. There is a risk of injury.
Do not touch the air bag parts. Have a
deployed air bag replaced at a qualified spe-
cialist workshop as soon as possible. G
WARNING
A deployed air bag no longer offers any pro-
tection and cannot provide the intended pro-
tection in an accident. There is an increased
risk of injury.
Have the vehicle towed to a qualified special- ist workshop in order to have a deployed air
bag replaced.
It is important for your safety and that of your
passenger to have deployed air bags replaced and to have any malfunctioning air bags
repaired. This will help to make sure the air
bags continue to perform their protective
function for the vehicle occupants in the
event of a crash. G
WARNING
Pyrotechnic Emergency Tensioning Devices
that have been deployed are no longer opera- tional and are unable to perform their inten-
ded protective function. This poses an
increased risk of injury or even fatal injury.
Therefore, have pyrotechnic Emergency Ten-
sioning Devices which have been triggered
immediately replaced at a qualified specialist workshop.
An electric motor is used by PRE-SAFE ®
to
trigger the tightening of the seat belt in haz-
ardous situations. This procedure is reversi-
ble.
If Emergency Tensioning Devices are trig-
gered or air bags are deployed, you will hear a bang, and a small amount of powder may also be released. The
6restraint system warn-
ing lamp lights up.
Only in rare cases will the bang affect your
hearing. The powder that is released gener-
ally does not constitute a health hazard, but it may cause short-term breathing difficulties in
people with asthma or other respiratory prob-
lems. To avoid this, you may wish to get out of
the vehicle or open the windows as soon as it is safe to do so.
Air bags and pyrotechnic Emergency Tension-
ing Devices (ETDs) contain perchlorate mate-
rial, which may require special handling and
regard for the environment. National guide-
lines must be observed during disposal. In
California, see www.dtsc.ca.gov/
HazardousWaste/Perchlorate/
index.cfm .
Method of operation During the first stage of a collision, the
restraint system control unit evaluates impor-
tant physical data relating to vehicle deceler-
ation or acceleration, such as:
R duration
R direction
R intensity
Based on the evaluation of this data, the
restraint system control unit triggers the
Emergency Tensioning Devices during a fron-
tal or rear collision.
An Emergency Tensioning Device can only be triggered, if:
R the ignition is switched on
R the components of the restraint system are
operational; see "Restraint system warning lamp" (Y page 50)
R the belt tongue is engaged in the buckle on
the respective front-passenger seat
The Emergency Tensioning Devices in the
rear compartment are triggered independ-
ently of the lock status of the seat belts. Occupant safety
65Safety Z
Page 72 of 502
Stop the vehicle immediately, paying atten-
tion to road and traffic conditions. Reactivate the special seat belt retractor and secure the
child restraint system properly.
All seat belts except the driver's seat belt are equipped with a special seat belt retractor.
When activated, the special seat belt retrac-
tor ensures that the seat belt will not slacken
once the child restraint system has been
secured.
Installing a child restraint system:
X Always comply with the child restraint sys-
tem manufacturer's installation instruc-
tions.
X Pull the seat belt smoothly from the belt
outlet.
X Engage the seat belt tongue in the belt
buckle.
Activating the special seat belt retractor:
X Pull the seat belt out fully and let the inertia
reel retract it again.
While the seat belt is retracting, you should
hear a ratcheting sound. The special seat
belt retractor is activated.
X Push the child seat restraint system down
so that the seat belt is tight and does not
loosen.
Removing a child restraint system/deactivat-
ing the special seat belt retractor:
X Always comply with the child restraint sys-
tem manufacturer's installation instruc-
tions.
X Press the release button on the belt buckle,
hold the belt tongue firmly and guide it back
towards the belt outlet.
The special seat belt retractor is deactiva-
ted. Child restraint system
The use of seat belts and child restraint sys-
tems is required by law in:
R all 50 states
R the U.S. territories
R the District of Columbia
R all Canadian provinces
You can obtain further information about the correct child restraint system from any
authorized Mercedes-Benz Center. G
WARNING
If the child restraint system is installed incor- rectly on a suitable seat, it cannot protect as
intended. The child cannot then be restrained in the event of an accident, heavy braking or
sudden changes of direction. There is an
increased risk of injury, possibly even fatal.
Make sure that you observe the child restraint
system manufacturer's installation instruc-
tions and the notes on use. Please ensure,
that the base of the child restraint system is
always resting completely on the seat cush-
ion. Never place objects, e.g. cushions, under or behind the child restraint system. Only use
child restraint systems with the original cover
designed for them. Only replace damaged
covers with genuine covers. G
WARNING
If the child restraint system is installed incor- rectly or is not secured, it can come loose in
the event of an accident, heavy braking or a
sudden change in direction. The child
restraint system could be thrown about, strik- ing vehicle occupants. There is an increased
risk of injury, possibly even fatal.
Always install child restraint systems prop-
erly, even if they are not being used. Make
sure that you observe the child restraint sys-
tem manufacturer's installation instructions.
You will find further information on stowing
objects, luggage or loads under "Loading
guidelines" (Y page 372).70
Children in the vehicleSafety
Page 84 of 502
If ESP
®
detects that the vehicle is deviating
from the direction desired by the driver, one
or more wheels are braked to stabilize the
vehicle. The engine output is also modified to keep the vehicle on the desired course within
physical limits. ESP ®
assists the driver when
pulling away on wet or slippery roads. ESP ®
can also stabilize the vehicle during braking.
ETS/4ETS (Electronic Traction System) i
Observe the "Important safety notes" sec-
tion (Y page 76).
ETS traction control is part of ESP ®
. On vehi-
cles with 4MATIC, 4ETS is part of ESP ®
.
Traction control brakes the drive wheels indi-
vidually if they spin. This enables you to pull
away and accelerate on slippery surfaces, for
example if the road surface is slippery on one side. In addition, more drive torque is trans-
ferred to the wheel or wheels with traction.
Traction control remains active, even if you
deactivate ESP ®
.
Important safety notes G
WARNING
If ESP ®
is malfunctioning, ESP ®
is unable to
stabilize the vehicle. Additionally, further driv- ing safety systems are deactivated. This
increases the risk of skidding and an accident.
Drive on carefully. Have ESP ®
checked at a
qualified specialist workshop.
Vehicles without 4MATIC: observe the notes
on ESP ®
(Y page 437) when towing the vehi-
cle with a raised rear axle.
ESP ®
is only deactivated if the åwarning
lamp is lit continuously.
If the ÷ warning lamp lights up continu-
ously, ESP ®
is not available due to a malfunc-
tion.
Observe the information on warning lamps
(Y page 360) and display messages which
may be shown in the instrument cluster
(Y page 317). Only use wheels with the recommended tire
sizes. Only then will ESP ®
function properly.
Characteristics of ESP ® General information
If the
÷ ESP warning lamp goes out before
beginning the journey, ESP ®
is automatically
active.
If ESP ®
intervenes, the ÷ESP®
warning
lamp flashes in the instrument cluster.
If ESP ®
intervenes:
X Do not deactivate ESP ®
under any circum-
stances.
X Only depress the accelerator pedal as far as
necessary when pulling away.
X Adapt your driving style to suit the prevail-
ing road and weather conditions.
ECO start/stop function
The ECO start/stop function switches the
engine off automatically when the vehicle
stops moving. The engine starts automati-
cally when the driver wants to pull away again. ESP ®
remains in its previously selected sta-
tus. Example: if ESP®
was deactivated before
the engine was switched off, ESP ®
remains
deactivated when the engine is switched on
again.
Deactivating/activating ESP ® Important safety notes
i Observe the "Important safety notes" sec-
tion (Y page 76).
You can select between the following states
of ESP ®
:
R ESP ®
is activated.
R ESP ®
is deactivated. G
WARNING
If you deactivate ESP ®
, ESP ®
no longer sta-
bilizes the vehicle. There is an increased risk
of skidding and an accident. 82
Driving safety systemsSafety
Page 100 of 502
If the driver's door is open, the door stays
unlocked.
Meanwhile, the fuel filler flap will not be
locked or unlocked.
You cannot unlock the vehicle centrally from
the inside if the vehicle has been locked with the SmartKey or KEYLESS-GO.
The doors can be opened from the inside. You
can only open the rear doors from inside the
vehicle if they are not secured by the child-
proof locks (Y page 75).
If the vehicle has been locked with the Smart-
Key or with KEYLESS-GO, opening a door from the inside will trigger the anti-theft alarm sys-
tem. Switch off the alarm (Y page 86).
i If a locked door is opened from the inside,
the previous unlock status of the vehicle
will be taken into consideration if:
R the vehicle was locked using the locking
button for the central locking, or
R if the vehicle was locked automatically
The vehicle will be fully unlocked if it had
previously been fully unlocked. If only the
driver's door had been previously
unlocked, only the door which has been
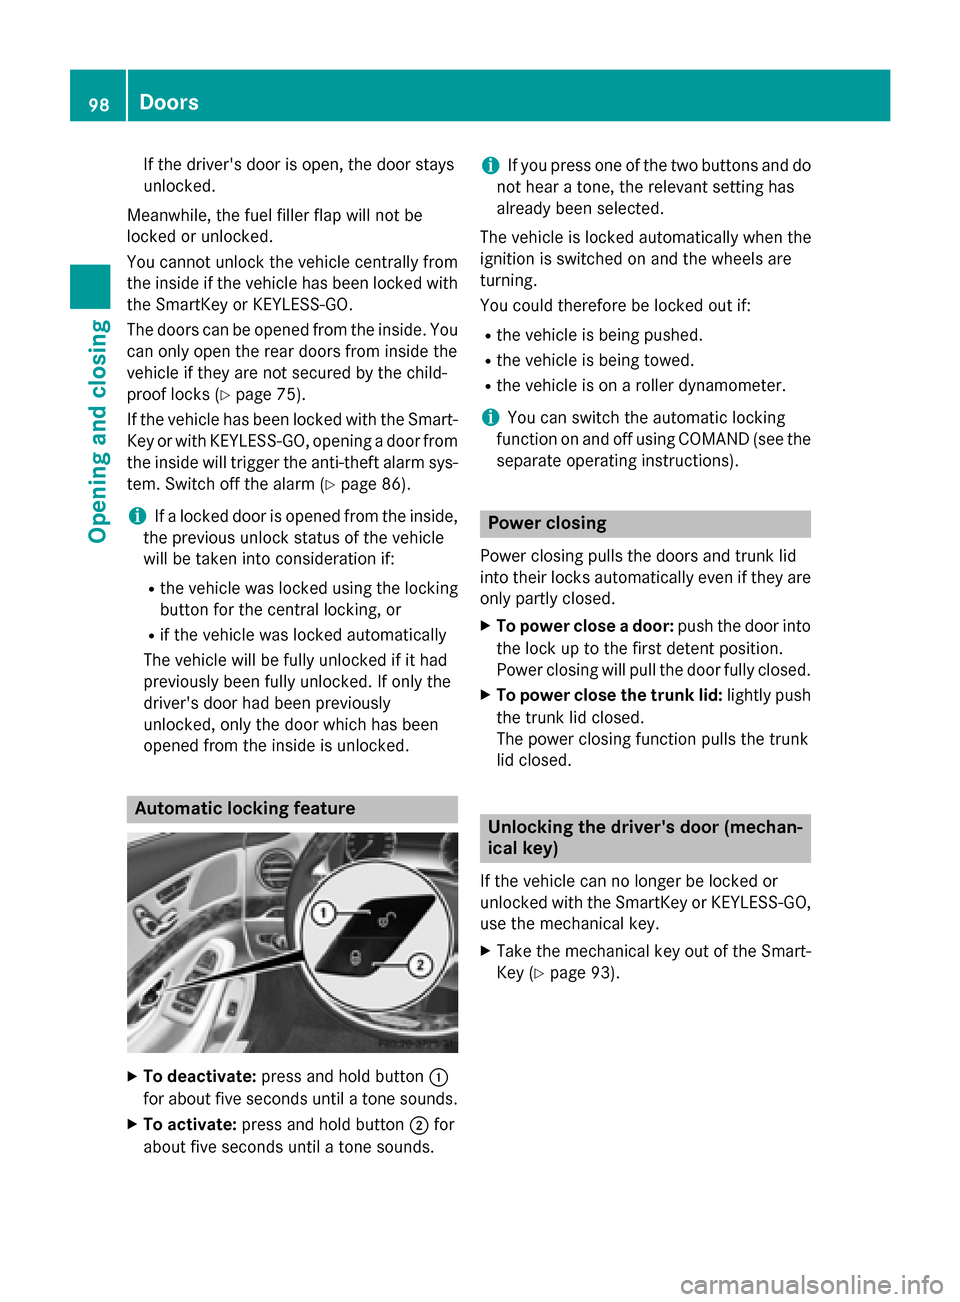
opened from the inside is unlocked. Automatic locking feature
X
To deactivate: press and hold button :
for about five seconds until a tone sounds.
X To activate: press and hold button ;for
about five seconds until a tone sounds. i
If you press one of the two buttons and do
not hear a tone, the relevant setting has
already been selected.
The vehicle is locked automatically when the
ignition is switched on and the wheels are
turning.
You could therefore be locked out if:
R the vehicle is being pushed.
R the vehicle is being towed.
R the vehicle is on a roller dynamometer.
i You can switch the automatic locking
function on and off using COMAND (see the
separate operating instructions). Power closing
Power closing pulls the doors and trunk lid
into their locks automatically even if they are only partly closed.
X To power close a door: push the door into
the lock up to the first detent position.
Power closing will pull the door fully closed.
X To power close the trunk lid: lightly push
the trunk lid closed.
The power closing function pulls the trunk
lid closed. Unlocking the driver's door (mechan-
ical key)
If the vehicle can no longer be locked or
unlocked with the SmartKey or KEYLESS-GO,
use the mechanical key.
X Take the mechanical key out of the Smart-
Key (Y page 93). 98
DoorsOpening and closing
Page 190 of 502
Useful information
i This Operator's Manual describes all
models and all standard and optional equip- ment of your vehicle available at the time of
publication of the Operator's Manual.
Country-specific differences are possible.
Please note that your vehicle may not be
equipped with all features described. This
also applies to safety-related systems and
functions.
i Read the information on qualified special-
ist workshops (Y page 29). Notes on breaking-in a new vehicle
Important safety notes
The sensor system of some driving and driv-
ing safety systems adjusts automatically
while a certain distance is being driven after
the vehicle has been delivered or after
repairs. Full system effectiveness is not
reached until the end of this teach-in proce-
dure.
New and replaced brake pads and discs only
reach their optimum braking effect after sev-
eral hundred kilometers of driving. Compen-
sate for this by applying greater force to the
brake pedal. The first 1000 miles (1500 km)
The more you look after the engine when it is
new, the more satisfied you will be with its
performance in the future.
R You should therefore drive at varying vehi-
cle and engine speeds for the first
1000 miles (1500 km).
R Avoid heavy loads, e.g. driving at full throt-
tle, during this period.
R When shifting gears manually, upshift in
good time, before the tachometer needle
reaches Ôof the way to the red area of the
tachometer. R
Do not manually shift to a lower gear to
brake the vehicle.
R Try to avoid depressing the accelerator
pedal beyond the point of resistance (kick-
down).
R All vehicles (except AMG vehicles): ide-
ally, for the first 1,000 miles (1,500 km),
drive in program E.
Additional breaking-in notes for AMG vehi-
cles:
R Do not drive faster than 85 mph
(140 km/ h)for the first 1,000 miles
(1,500 km).
R Only allow the engine to reach a maximum
engine speed of 4,500 rpm briefly.
R Change gear in good time.
R Ideally, for the first 1,000 miles (1,500 km),
drive in program C.
After 1000 mile s(1500 km), you can increase
the engine speed gradually and accelerate
the vehicle to full speed.
You should also observe these notes on
breaking in if the engine or parts of the drive
train on your vehicle have been replaced.
Always observe the respective speed limits. Driving
Important safety notes
G
WARNING
Objects in the driver's footwell can restrict the pedal travel or obstruct a depressed pedal.
The operating and road safety of the vehicle is
jeopardized. There is a risk of an accident.
Make sure that all objects in the vehicle are
stowed correctly, and that they cannot enter
the driver's footwell. Install the floormats
securely and as specified in order to ensure
sufficient clearance for the pedals. Do not use loose floormats and do not place floormats on
top of one another. 188
DrivingDriving and parking