towing MERCEDES-BENZ S-Class 2015 W222 Owner's Manual
[x] Cancel search | Manufacturer: MERCEDES-BENZ, Model Year: 2015, Model line: S-Class, Model: MERCEDES-BENZ S-Class 2015 W222Pages: 502, PDF Size: 9.59 MB
Page 8 of 502
Brake force distribution, elec-
tronic
see EBD (electronic brake force
distribution)
Brake lamps
Display message ............................ 334
Brake pedal
Pedal resistance/pedal travel .......... 48
Brakes
ABS .................................................. 76
Adaptive Brake Assist ...................... 81
BAS .................................................. 77
BAS PLUS with Cross-Traffic
Assist ............................................... 77
Brake fluid (notes) ......................... 492
Display message ............................ 317
EBD .................................................. 83
High-performance brake system .... 227
Hill start assist ............................... 192
HOLD function ............................... 242
Important safety notes .................. 226
Maintenance .................................. 226
Parking brake ................................ 222
RBS warning lamp .......................... 366
Recuperative Brake System ............. 48
Riding tips ...................................... 226
Warning lamp ................................. 357
Breakdown
see Flat tire
see Towing away
Brightness control (instrument
cluster lighting) ................................... 37
Buttons on the steering wheel ......... 295C
California Important notice for retail cus-
tomers and lessees .......................... 26
Calling up a malfunction
see Display messages
Camera
see 360° camera
Car
see Vehicle
Car key
see SmartKey Care
360° camera ................................. 416
Car wash ........................................ 411
Carpets .......................................... 419
Display ........................................... 417
Exhaust pipe .................................. 417
Exterior lights ................................ 415
Gear or selector lever .................... 418
Interior ........................................... 417
Matte finish ................................... 414
Night View Assist Plus ................... 417
Note s............................................. 411
Paint .............................................. 413
Plastic trim .................................... 418
Power washer ................................ 413
Rear view camera .......................... 416
Roof lining ...................................... 419
Seat belt ........................................ 419
Seat cove r..................................... 418
Sensors ......................................... 415
Steering wheel ............................... 418
Trim pieces .................................... 418
Washing by hand ........................... 413
Wheels ........................................... 414
Windows ........................................ 415
Wiper blades .................................. 415
Wooden trim .................................. 418
CD player/CD changer (on-board
computer) .......................................... 304
Center console
Overview .......................................... 39
Stowage space .............................. 373
Center console in the rear com-
partment
Stowage compartment .................. 375
Central locking
Locking/unlocking (SmartKey )........ 91
Charging
see Charging the high-voltage bat-tery (important safety notes)
Charging cable
Connecting .................................... 214
Controls ......................................... 213
Important safety notes .................. 212
Indicator lamp ................................ 214
Removing ....................................... 215
Storing ........................................... 212
Warming up ................................... 211 6
Index
Page 23 of 502
Structure and characteristics
(definition) ..................................... 463
Summer tires in winter .................. 444
Temperature .................................. 459
TIN (Tire Identification Number)
(definition) ..................................... 465
Tire bead (definition) ...................... 465
Tire pressure (definition) ................ 464
Tire pressures (recommended) ...... 463
Tire size (data )............................... 471
Tire size designation, load-bearing capacity, speed rating .................... 459
Tire tread ....................................... 443
Tire tread (definition) ..................... 465
Total load limit (definition) ............. 465
Traction ......................................... 458
Traction (definition) ....................... 465
Tread wear ..................................... 458
Uniform Tire Quality Grading
Standards ...................................... 458
Uniform Tire Quality Grading
Standards (definition) .................... 463
Wear indicator (definition) ............. 465
Wheel and tire combination ........... 473
Wheel rim (definition) .................... 463
see Flat tire
Top Tether ............................................ 73
Tow-starting
Emergency engine starting ............ 438
Important safety notes .................. 435
Towing away
Important safety guidelines ........... 435
Installing the towing eye ................ 436
Notes for 4MATIC vehicles ............ 438
Removing the towing eye ............... 436
With both axles on the ground ....... 436
With the rear axle raised ................ 437
Towing eye ......................................... 422
Transfer case ..................................... 205
Transmission
see Automatic transmission
Transporting the vehicle .................. 437
Trim pieces (cleaning instruc-
tions) .................................................. 418
Trip computer (on-board com-
puter) .................................................. 300 Trip odometer
Calling up ....................................... 299
Resetting (on-board computer) ...... 301
Trunk
Emergency release ........................ 105
Important safety notes .................. 100
Locking separately ......................... 104
Opening/closing (automatically
from inside) ................................... 104
Opening/closing (automatically
from outside) ................................. 101
Opening/closing (from outside,
HANDS-FREE ACCESS) .................. 102
Opening/closing (manually from
outside) ......................................... 101
Power closing .................................. 98
Trunk lid
Display message ............................ 352
Obstacle recognition ...................... 100
Opening dimensions ...................... 495
Opening/closing ............................ 100
Trunk load (maximum) ...................... 495
Turn signals
Display message ............................ 333
Switching on/of f........................... 152
Two-way radio
Windshield (infrared reflective) ...... 401
Type identification plate
see Vehicle identification plate U
Unlocking Emergency unlocking ....................... 98
From inside the vehicle (central
unlocking button) ............................. 97 V
Vanity mirror (in the sun visor) ........ 381
Vehicle
Correct use ...................................... 29
Data acquisition ............................... 30
Display message ............................ 351
Equipment ....................................... 25
Individual settings .......................... 308
Limited Warranty ............................. 30
Loading .......................................... 453
Locking (in an emergency) ............... 99 Index
21
Page 24 of 502
Locking (SmartKey) .......................... 91
Lowering ........................................ 470
Maintenance .................................... 26
Operating safety .............................. 27
Parking for a long period ................ 223
Pulling away ................................... 192
Raising ........................................... 467
Reporting problems ......................... 29
Securing from rolling away ............ 466
Towing away .................................. 435
Transporting .................................. 437
Unlocking (in an emergency) ........... 98
Unlocking (SmartKey) ...................... 91
Vehicle data ................................... 495
Vehicle dimensions ........................... 495
Vehicle emergency locking ................ 99
Vehicle Homepage
Data protection .............................. 219
Functions ....................................... 220
General information ....................... 219
Internet connection ....................... 220
Vehicle identification number
see VIN
Vehicle identification plate .............. 488
Vehicle level
Active Body Control ABC ............... 244
Display message ............................ 341
Vehicle maintenance
see ASSYST PLUS
Vehicle tool kit .................................. 422
Video
Operating the DVD ......................... 305
VIN ...................................................... 488 W
Warning Stickers ........................................... 46
Warning and indicator lamps
ABS ................................................ 358
Brakes ........................................... 357
Check Engine ................................. 363
Coolant .......................................... 364
Distance warning ........................... 367
ESP ®
.............................................. 360
ESP ®
OFF ....................................... 361
Fuel tank ........................................ 363
Hybrid system ................................ 366 Overview .......................................... 36
Parking brake ................................ 362
PASSENGER AIR BAG ...................... 50
RBS (Recuperative Brake Sys-
tem) ............................................... 366
Reserve fue
l................................... 363
Restraint system ............................ 362
Seat belt ........................................ 355
Steering ......................................... 369
Tire pressure monitor .................... 368
Warranty .............................................. 25
Washer fluid
Display message ............................ 353
Wheel and tire combination
see Tires
Wheel bolt tightening torque ........... 470
Wheel chock ...................................... 466
Wheels
Changing a whee l.......................... 465
Checking ........................................ 443
Cleaning ......................................... 414
Important safety notes .................. 442
Interchanging/changing ................ 465
Mounting a new whee l................... 470
Mounting a whee l.......................... 466
Removing a whee l.......................... 469
Storing ........................................... 466
Tightening torque ........................... 470
Wheel size/tire size ....................... 471
Window curtain air bag
Operation ......................................... 59
Windows
see Side windows
Windshield
Defrosting ...................................... 175
Infrared reflective .......................... 401
Windshield washer fluid
see Windshield washer system
Windshield washer system
Adding washer fluid ....................... 409
Notes ............................................. 494
Windshield wipers
Problem (malfunction) ................... 161
Replacing the wiper blades ............ 158
Switching on/of f........................... 157
Winter driving
Important safety notes .................. 444
Slippery road surfaces ................... 228 22
Index
Page 48 of 502
Useful information
i This Operator's Manual describes all
models and all standard and optional equip- ment of your vehicle available at the time of
publication of the Operator's Manual.
Country-specific differences are possible.
Please note that your vehicle may not be
equipped with all features described. This
also applies to safety-related systems and
functions.
i Read the information on qualified special-
ist workshops (Y page 29). Hybrid vehicles
General notes
Hybrid technology combines a fuel efficient
internal combustion engine with a powerful
electric motor. Important safety notes
Danger of electric shock G
DANGER
The vehicle's high voltage electrical system is under high voltage. If you modify components
in the vehicle's high-voltage electrical system or touch damaged components, you may be
electrocuted. The components in the vehi-
cle's high-voltage electrical system may be
damaged in an accident, although the damage
is not visible. There is a risk of fatal injury.
Following an accident, do not touch any high- voltage components and never modify the
vehicle's high-voltage electrical system. Have
the vehicle towed away after an accident and the vehicle's high-voltage electrical system
checked by a qualified specialist workshop. When towing a vehicle after an accident, be
sure to observe the following sections:
R Transporting the vehicle (Y page 437)
R Towing the vehicle with the rear axle raised
(Y page 437)
R Towing a vehicle with both axles on the
ground (Y page 436)
Read the safety instructions on towing and
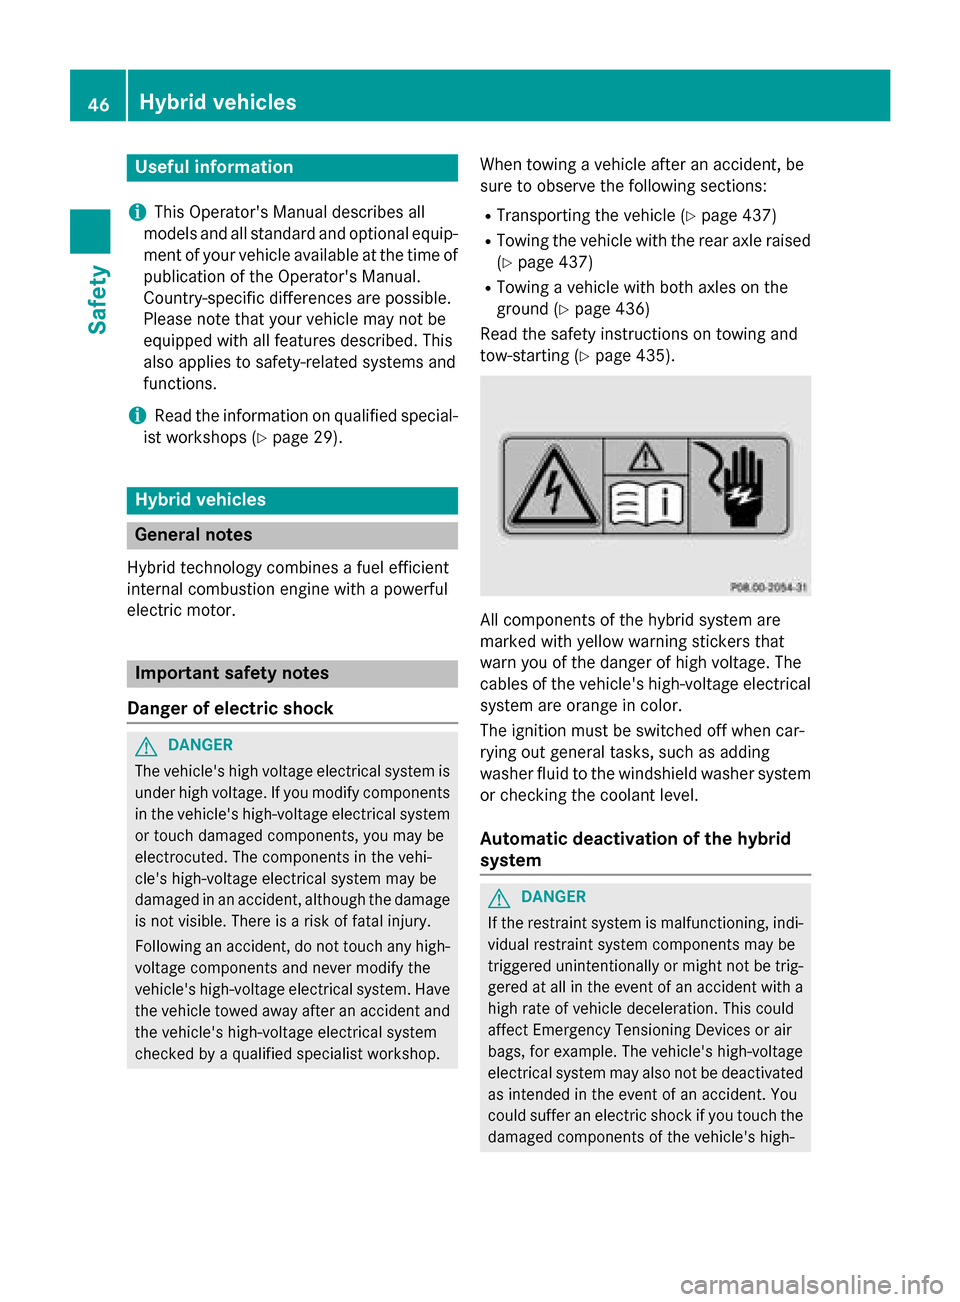
tow-starting (Y page 435). All components of the hybrid system are
marked with yellow warning stickers that
warn you of the danger of high voltage. The
cables of the vehicle's high-voltage electrical
system are orange in color.
The ignition must be switched off when car-
rying out general tasks, such as adding
washer fluid to the windshield washer system or checking the coolant level.
Automatic deactivation of the hybrid
system G
DANGER
If the restraint system is malfunctioning, indi- vidual restraint system components may be
triggered unintentionally or might not be trig-
gered at all in the event of an accident with a high rate of vehicle deceleration. This could
affect Emergency Tensioning Devices or air
bags, for example. The vehicle's high-voltage
electrical system may also not be deactivated
as intended in the event of an accident. You
could suffer an electric shock if you touch the damaged components of the vehicle's high- 46
Hybrid vehiclesSafety
Page 72 of 502
Stop the vehicle immediately, paying atten-
tion to road and traffic conditions. Reactivate the special seat belt retractor and secure the
child restraint system properly.
All seat belts except the driver's seat belt are equipped with a special seat belt retractor.
When activated, the special seat belt retrac-
tor ensures that the seat belt will not slacken
once the child restraint system has been
secured.
Installing a child restraint system:
X Always comply with the child restraint sys-
tem manufacturer's installation instruc-
tions.
X Pull the seat belt smoothly from the belt
outlet.
X Engage the seat belt tongue in the belt
buckle.
Activating the special seat belt retractor:
X Pull the seat belt out fully and let the inertia
reel retract it again.
While the seat belt is retracting, you should
hear a ratcheting sound. The special seat
belt retractor is activated.
X Push the child seat restraint system down
so that the seat belt is tight and does not
loosen.
Removing a child restraint system/deactivat-
ing the special seat belt retractor:
X Always comply with the child restraint sys-
tem manufacturer's installation instruc-
tions.
X Press the release button on the belt buckle,
hold the belt tongue firmly and guide it back
towards the belt outlet.
The special seat belt retractor is deactiva-
ted. Child restraint system
The use of seat belts and child restraint sys-
tems is required by law in:
R all 50 states
R the U.S. territories
R the District of Columbia
R all Canadian provinces
You can obtain further information about the correct child restraint system from any
authorized Mercedes-Benz Center. G
WARNING
If the child restraint system is installed incor- rectly on a suitable seat, it cannot protect as
intended. The child cannot then be restrained in the event of an accident, heavy braking or
sudden changes of direction. There is an
increased risk of injury, possibly even fatal.
Make sure that you observe the child restraint
system manufacturer's installation instruc-
tions and the notes on use. Please ensure,
that the base of the child restraint system is
always resting completely on the seat cush-
ion. Never place objects, e.g. cushions, under or behind the child restraint system. Only use
child restraint systems with the original cover
designed for them. Only replace damaged
covers with genuine covers. G
WARNING
If the child restraint system is installed incor- rectly or is not secured, it can come loose in
the event of an accident, heavy braking or a
sudden change in direction. The child
restraint system could be thrown about, strik- ing vehicle occupants. There is an increased
risk of injury, possibly even fatal.
Always install child restraint systems prop-
erly, even if they are not being used. Make
sure that you observe the child restraint sys-
tem manufacturer's installation instructions.
You will find further information on stowing
objects, luggage or loads under "Loading
guidelines" (Y page 372).70
Children in the vehicleSafety
Page 84 of 502
If ESP
®
detects that the vehicle is deviating
from the direction desired by the driver, one
or more wheels are braked to stabilize the
vehicle. The engine output is also modified to keep the vehicle on the desired course within
physical limits. ESP ®
assists the driver when
pulling away on wet or slippery roads. ESP ®
can also stabilize the vehicle during braking.
ETS/4ETS (Electronic Traction System) i
Observe the "Important safety notes" sec-
tion (Y page 76).
ETS traction control is part of ESP ®
. On vehi-
cles with 4MATIC, 4ETS is part of ESP ®
.
Traction control brakes the drive wheels indi-
vidually if they spin. This enables you to pull
away and accelerate on slippery surfaces, for
example if the road surface is slippery on one side. In addition, more drive torque is trans-
ferred to the wheel or wheels with traction.
Traction control remains active, even if you
deactivate ESP ®
.
Important safety notes G
WARNING
If ESP ®
is malfunctioning, ESP ®
is unable to
stabilize the vehicle. Additionally, further driv- ing safety systems are deactivated. This
increases the risk of skidding and an accident.
Drive on carefully. Have ESP ®
checked at a
qualified specialist workshop.
Vehicles without 4MATIC: observe the notes
on ESP ®
(Y page 437) when towing the vehi-
cle with a raised rear axle.
ESP ®
is only deactivated if the åwarning
lamp is lit continuously.
If the ÷ warning lamp lights up continu-
ously, ESP ®
is not available due to a malfunc-
tion.
Observe the information on warning lamps
(Y page 360) and display messages which
may be shown in the instrument cluster
(Y page 317). Only use wheels with the recommended tire
sizes. Only then will ESP ®
function properly.
Characteristics of ESP ® General information
If the
÷ ESP warning lamp goes out before
beginning the journey, ESP ®
is automatically
active.
If ESP ®
intervenes, the ÷ESP®
warning
lamp flashes in the instrument cluster.
If ESP ®
intervenes:
X Do not deactivate ESP ®
under any circum-
stances.
X Only depress the accelerator pedal as far as
necessary when pulling away.
X Adapt your driving style to suit the prevail-
ing road and weather conditions.
ECO start/stop function
The ECO start/stop function switches the
engine off automatically when the vehicle
stops moving. The engine starts automati-
cally when the driver wants to pull away again. ESP ®
remains in its previously selected sta-
tus. Example: if ESP®
was deactivated before
the engine was switched off, ESP ®
remains
deactivated when the engine is switched on
again.
Deactivating/activating ESP ® Important safety notes
i Observe the "Important safety notes" sec-
tion (Y page 76).
You can select between the following states
of ESP ®
:
R ESP ®
is activated.
R ESP ®
is deactivated. G
WARNING
If you deactivate ESP ®
, ESP ®
no longer sta-
bilizes the vehicle. There is an increased risk
of skidding and an accident. 82
Driving safety systemsSafety
Page 200 of 502
X
If the transmission is in position Dor N:
push the DIRECT SELECT lever up past the first point of resistance.
X If the transmission is in position P: depress
the brake pedal and push the DIRECT
SELECT lever up past the first point of
resistance.
The ECO start/stop function is not available
when reverse gear is engaged. Further infor-
mation on the ECO start/stop function
(Y page 193).
Shifting to neutral N G
WARNING
If children are left unsupervised in the vehicle, they could:
R open the doors, thus endangering other
people or road users.
R get out and disrupt traffic.
R operate the vehicle's equipment.
Additionally, children could set the vehicle in
motion if, for example, they:
R release the parking brake.
R shifting the automatic transmission out of
park position P
R Start the engine.
There is a risk of an accident and injury.
When leaving the vehicle, always take the
SmartKey with you and lock the vehicle. Never
leave children or animals unattended in the
vehicle. Always keep the SmartKey out of
reach of children.
X If the transmission is in position Dor R:
push the DIRECT SELECT lever up or down to the first point of resistance.
X If the transmission is in position P: depress
the brake pedal and push the DIRECT
SELECT lever up or down to the first point of
resistance.
If the engine has been switched off, the auto- matic transmission automatically shifts to N.If the automatic transmission is to remain in
neutral
N, e.g. for washing the vehicle in car
washes with a towing device, please observe
the following instructions:
Using the SmartKey:
R Make sure that the ignition is switched on.
R When the vehicle is stationary, depress the
brake pedal and keep it depressed.
R Shift to neutral N.
R Release the brake pedal.
R If the electric parking brake is engaged,
release it.
R Switch off the ignition and leave the Smart-
Key in the ignition lock.
With the Start/Stop button:
R Make sure that the ignition is switched on.
R When the vehicle is stationary, depress the
brake pedal and keep it depressed.
R Engage park position P.
R Release the brake pedal.
R Pull the Start/Stop button out of the igni-
tion.
R Insert the SmartKey into the ignition lock.
R Switch on the ignition.
R Depress the brake pedal and keep it
depressed.
R Shift to neutral N.
R Release the brake pedal.
R If the electric parking brake is engaged,
release it.
R Switch off the ignition and leave the Smart-
Key in the ignition lock.
Engaging drive position D X
If the transmission is in position Ror N:
push the DIRECT SELECT lever down past
the first point of resistance.
X If the transmission is in position P: depress
the brake pedal and push the DIRECT
SELECT lever down past the first point of
resistance. 198
Automatic transmissionDriving and parking
Page 214 of 502
The charging cable and connector will only
heat up within the permissible limiting values,
provided that:
R the power supply and the charging cable
are not damaged
R the instructions for handling the charging
cable and controls on the charging cable
are observed
If the charging cable or plug get too hot, have the mains power supply checked.
Protection device against overvoltage !
Overvoltage in the mains supply may
damage the vehicle. For this reason, the
vehicle is equipped with a protection device
against overvoltage in the mains supply.
This device may be triggered during severe thunderstorms, for example, and may lead
to the building's fuse being tripped and an
interruption in the power supply. These
functions protect the vehicle. After the
building fuse is switched on again, the
charging process resumes automatically.
Following an interruption in the power sup-
ply or tripping of the building's fuse, it may take up to 10 minutes for charging to
resume automatically.
Switch on the building's fuse again after it has
been triggered. Otherwise, the charging proc-
ess cannot be continued.
General information about the charging
procedure Pay attention to the important safety notes
(Y
page 209).
If you unlock/lock the vehicle from the out-
side, the charge socket flap also unlocks/
locks.
The charge socket flap is behind the bumper
on the right-hand side below the rear lamp
cluster. Charging the high-voltage battery via
the electrical outlet
Charging cable for mains sockets Important safety notes
! Only use the charging cable to charge the
high-voltage battery. Do not use the charg-
ing cable for other purposes. It may other-
wise be damaged.
A charging cable for connection to the mains
socket is included with the vehicle. Only use
the charging cable included with the vehicle
or charging cables that have been approved
for the vehicle.
i If you use the supplied 12 A charging
cable to charge a high-voltage battery:
R the charge time increases considerably
R electrical consumption increases consid-
erably
Where possible, charge the high-voltage
battery at a charging station (Y page 216).
Only then can certified electrical energy
consumption levels be reached.
i The charging process can vary depending
on the power supply. Therefore, always
observe the local information.
i For short charge times (charging with
16A), connect the fast-charging cable to
the wallbox/charging station. You can also
use the optionally available charging cable
with the CE plug.
Information about charging from a wallbox
can be found at (Y page 215).
Information about charging at a charging sta-
tion can be found at (Y page 216).
Stowing the charging cable
The charging cable can be stowed in the bag
supplied in the trunk of the vehicle and held in place with the Velcro fastener. 212
Charging the high-voltage battery (plug-in hybrid vehicles)Driving and parking
Page 235 of 502
!
If DISTRONIC PLUS or the HOLD function
is activated, the vehicle brakes automati-
cally in certain situations. To prevent dam-
age to the vehicle, deactivate DISTRONIC
PLUS and the HOLD function in the follow-
ing or other similar situations:
R when towing the vehicle
R in the car wash
If you fail to adapt your driving style,
DISTRONIC PLUS can neither reduce the risk
of accident nor override the laws of physics.
DISTRONIC PLUS cannot take into account
the road, traffic and weather conditions.
DISTRONIC PLUS is only an aid. You are
responsible for the distance to the vehicle in
front, for vehicle speed, for braking in good
time and for staying in your lane.
Do not use DISTRONIC PLUS:
R in road and traffic conditions which do not
allow you to maintain a constant speed e.g.
in heavy traffic or on winding roads
R on slippery road surfaces. Braking or accel-
erating could cause the drive wheels to lose traction and the vehicle could then skid
R when there is poor visibility, e.g. due to fog,
heavy rain or snow
DISTRONIC PLUS may not detect narrow
vehicles driving in front, e.g. motorcycles, or
vehicles driving on a different line.
In particular, the detection of obstacles can
be impaired if:
R there is dirt on the sensors or anything else
covering the sensors
R there is snow or heavy rain
R there is interference by other radar sources
R there are strong radar reflections, for
example, in parking garages
If DISTRONIC PLUS no longer detects a vehi- cle in front, DISTRONIC PLUS may unexpect-
edly accelerate the vehicle to the stored
speed. This speed may:
R be too high if you are driving in a filter lane
or an exit lane
R be so high in the right lane that you pass
vehicles driving on the left (left-hand drive
countries)
R be so high in the left lane that you pass
vehicles driving on the right (right-hand
drive countries)
If there is a change of drivers, advise the new driver of the speed stored.
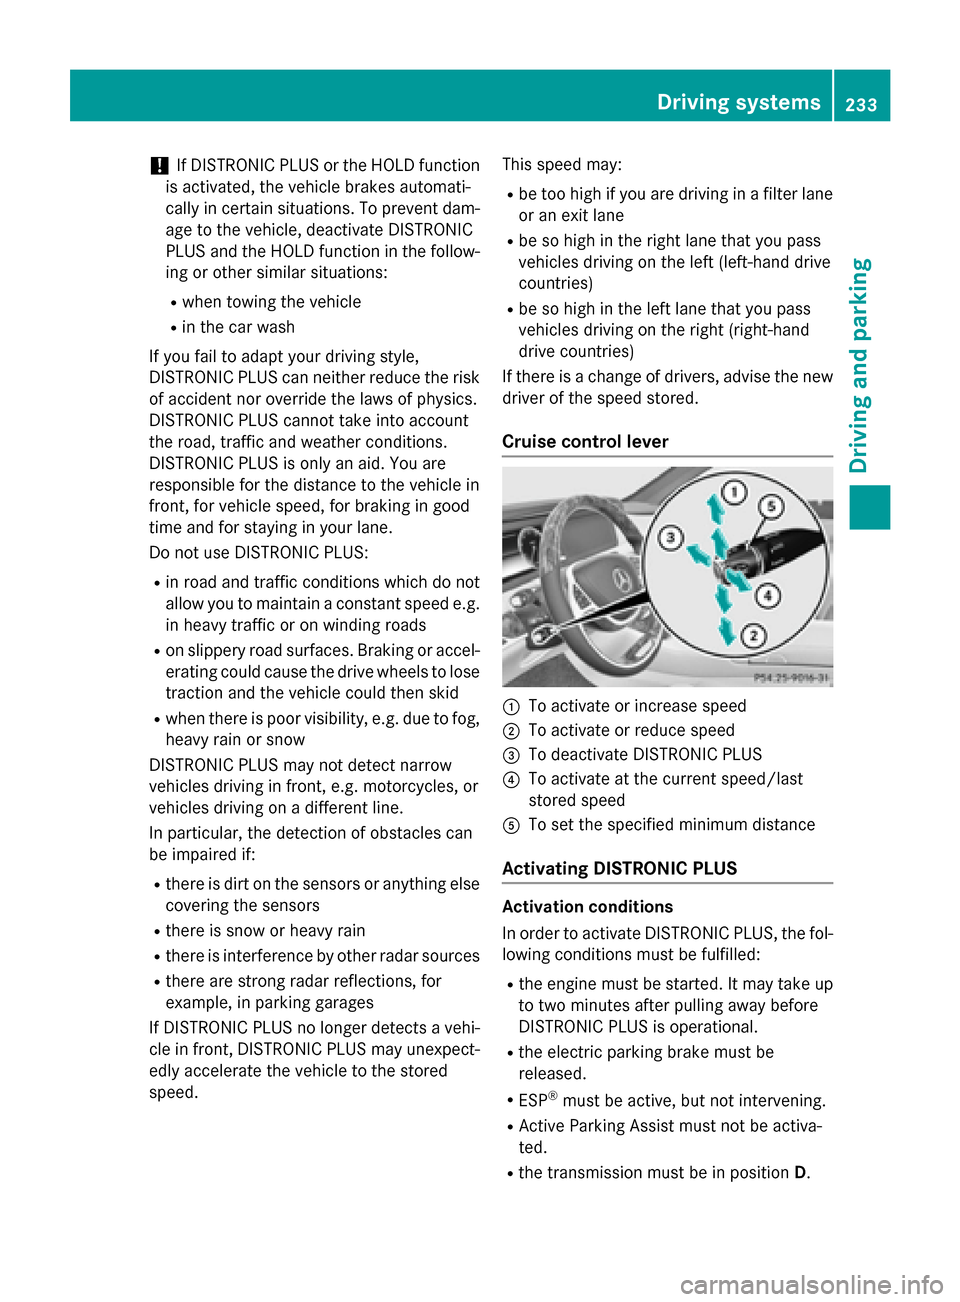
Cruise control lever :
To activate or increase speed
; To activate or reduce speed
= To deactivate DISTRONIC PLUS
? To activate at the current speed/last
stored speed
A To set the specified minimum distance
Activating DISTRONIC PLUS Activation conditions
In order to activate DISTRONIC PLUS, the fol-
lowing conditions must be fulfilled:
R the engine must be started. It may take up
to two minutes after pulling away before
DISTRONIC PLUS is operational.
R the electric parking brake must be
released.
R ESP ®
must be active, but not intervening.
R Active Parking Assist must not be activa-
ted.
R the transmission must be in position D. Driving systems
233Driving and parking Z
Page 244 of 502
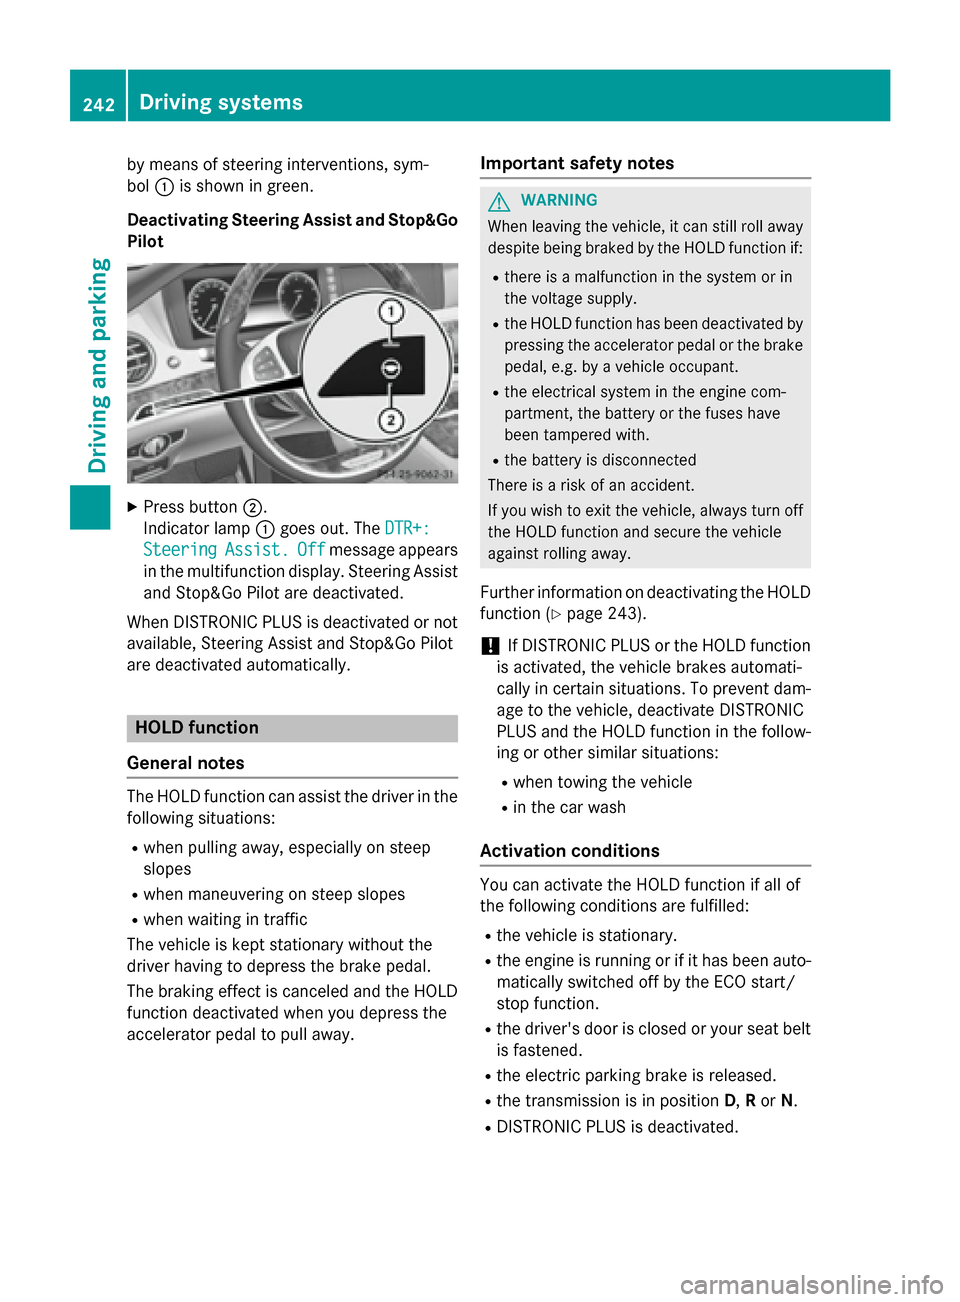
by means of steering interventions, sym-
bol :is shown in green.
Deactivating Steering Assist and Stop&Go
Pilot X
Press button ;.
Indicator lamp :goes out. The DTR+:
DTR+:
Steering
Steering Assist.
Assist.Off
Offmessage appears
in the multifunction display. Steering Assist
and Stop&Go Pilot are deactivated.
When DISTRONIC PLUS is deactivated or not available, Steering Assist and Stop&Go Pilot
are deactivated automatically. HOLD function
General notes The HOLD function can assist the driver in the
following situations:
R when pulling away, especially on steep
slopes
R when maneuvering on steep slopes
R when waiting in traffic
The vehicle is kept stationary without the
driver having to depress the brake pedal.
The braking effect is canceled and the HOLD
function deactivated when you depress the
accelerator pedal to pull away. Important safety notes G
WARNING
When leaving the vehicle, it can still roll away despite being braked by the HOLD function if:
R there is a malfunction in the system or in
the voltage supply.
R the HOLD function has been deactivated by
pressing the accelerator pedal or the brake
pedal, e.g. by a vehicle occupant.
R the electrical system in the engine com-
partment, the battery or the fuses have
been tampered with.
R the battery is disconnected
There is a risk of an accident.
If you wish to exit the vehicle, always turn off the HOLD function and secure the vehicle
against rolling away.
Further information on deactivating the HOLD
function (Y page 243).
! If DISTRONIC PLUS or the HOLD function
is activated, the vehicle brakes automati-
cally in certain situations. To prevent dam-
age to the vehicle, deactivate DISTRONIC
PLUS and the HOLD function in the follow-
ing or other similar situations:
R when towing the vehicle
R in the car wash
Activation conditions You can activate the HOLD function if all of
the following conditions are fulfilled:
R the vehicle is stationary.
R the engine is running or if it has been auto-
matically switched off by the ECO start/
stop function.
R the driver's door is closed or your seat belt
is fastened.
R the electric parking brake is released.
R the transmission is in position D,Ror N.
R DISTRONIC PLUS is deactivated. 242
Driving systemsDriving and parking