tow MERCEDES-BENZ S-Class 2015 W222 Owner's Guide
[x] Cancel search | Manufacturer: MERCEDES-BENZ, Model Year: 2015, Model line: S-Class, Model: MERCEDES-BENZ S-Class 2015 W222Pages: 502, PDF Size: 9.59 MB
Page 200 of 502
X
If the transmission is in position Dor N:
push the DIRECT SELECT lever up past the first point of resistance.
X If the transmission is in position P: depress
the brake pedal and push the DIRECT
SELECT lever up past the first point of
resistance.
The ECO start/stop function is not available
when reverse gear is engaged. Further infor-
mation on the ECO start/stop function
(Y page 193).
Shifting to neutral N G
WARNING
If children are left unsupervised in the vehicle, they could:
R open the doors, thus endangering other
people or road users.
R get out and disrupt traffic.
R operate the vehicle's equipment.
Additionally, children could set the vehicle in
motion if, for example, they:
R release the parking brake.
R shifting the automatic transmission out of
park position P
R Start the engine.
There is a risk of an accident and injury.
When leaving the vehicle, always take the
SmartKey with you and lock the vehicle. Never
leave children or animals unattended in the
vehicle. Always keep the SmartKey out of
reach of children.
X If the transmission is in position Dor R:
push the DIRECT SELECT lever up or down to the first point of resistance.
X If the transmission is in position P: depress
the brake pedal and push the DIRECT
SELECT lever up or down to the first point of
resistance.
If the engine has been switched off, the auto- matic transmission automatically shifts to N.If the automatic transmission is to remain in
neutral
N, e.g. for washing the vehicle in car
washes with a towing device, please observe
the following instructions:
Using the SmartKey:
R Make sure that the ignition is switched on.
R When the vehicle is stationary, depress the
brake pedal and keep it depressed.
R Shift to neutral N.
R Release the brake pedal.
R If the electric parking brake is engaged,
release it.
R Switch off the ignition and leave the Smart-
Key in the ignition lock.
With the Start/Stop button:
R Make sure that the ignition is switched on.
R When the vehicle is stationary, depress the
brake pedal and keep it depressed.
R Engage park position P.
R Release the brake pedal.
R Pull the Start/Stop button out of the igni-
tion.
R Insert the SmartKey into the ignition lock.
R Switch on the ignition.
R Depress the brake pedal and keep it
depressed.
R Shift to neutral N.
R Release the brake pedal.
R If the electric parking brake is engaged,
release it.
R Switch off the ignition and leave the Smart-
Key in the ignition lock.
Engaging drive position D X
If the transmission is in position Ror N:
push the DIRECT SELECT lever down past
the first point of resistance.
X If the transmission is in position P: depress
the brake pedal and push the DIRECT
SELECT lever down past the first point of
resistance. 198
Automatic transmissionDriving and parking
Page 202 of 502
A Neutral
Do not shift the transmission to
N
while driving. Otherwise, the auto-
matic transmission could be dam-
aged.
No power is transmitted from the
engine to the drive wheels.
Releasing the brakes will allow you
to move the vehicle freely, e.g. to
push it or tow it.
If ESP ®
is deactivated or faulty:
shift the transmission to position N
if the vehicle is in danger of skid-
ding, e.g. on icy roads.
! Rolling in neutral
Ncan damage
the drive train. 7 Drive
The automatic transmission
changes gear automatically. All
forward gears are available.
Driving tips
Changing gear The automatic transmission shifts to the indi-
vidual gears automatically when it is in trans-
mission position D. This automatic gear shift-
ing behavior is determined by:
R the selected drive program (Y page 200)
R the position of the accelerator pedal
(Y page 200)
R the road speed
Accelerator pedal position Your style of driving influences how the auto-
matic transmission shifts gear:
R little throttle: early upshifts
R more throttle: late upshifts Kickdown Use kickdown for maximum acceleration.
X Depress the accelerator pedal beyond the
pressure point.
The automatic transmission shifts to a
lower gear depending on the engine speed.
X Ease off the accelerator pedal once the
desired speed is reached.
The automatic transmission shifts back up.
Rocking the vehicle free Rocking the vehicle free by shifting back and
forth between transmission positions Dand R
can help to free a vehicle that has become
stuck in mud or snow. The vehicle's engine
management restricts switching between
transmission positions Dand Rto speeds up
to a maximum of 5 mph (9 km/h). To shift
back and forth between transmission posi-
tions Dand R, move the DIRECT SELECT lever
up and down past the point of resistance. Program selector button
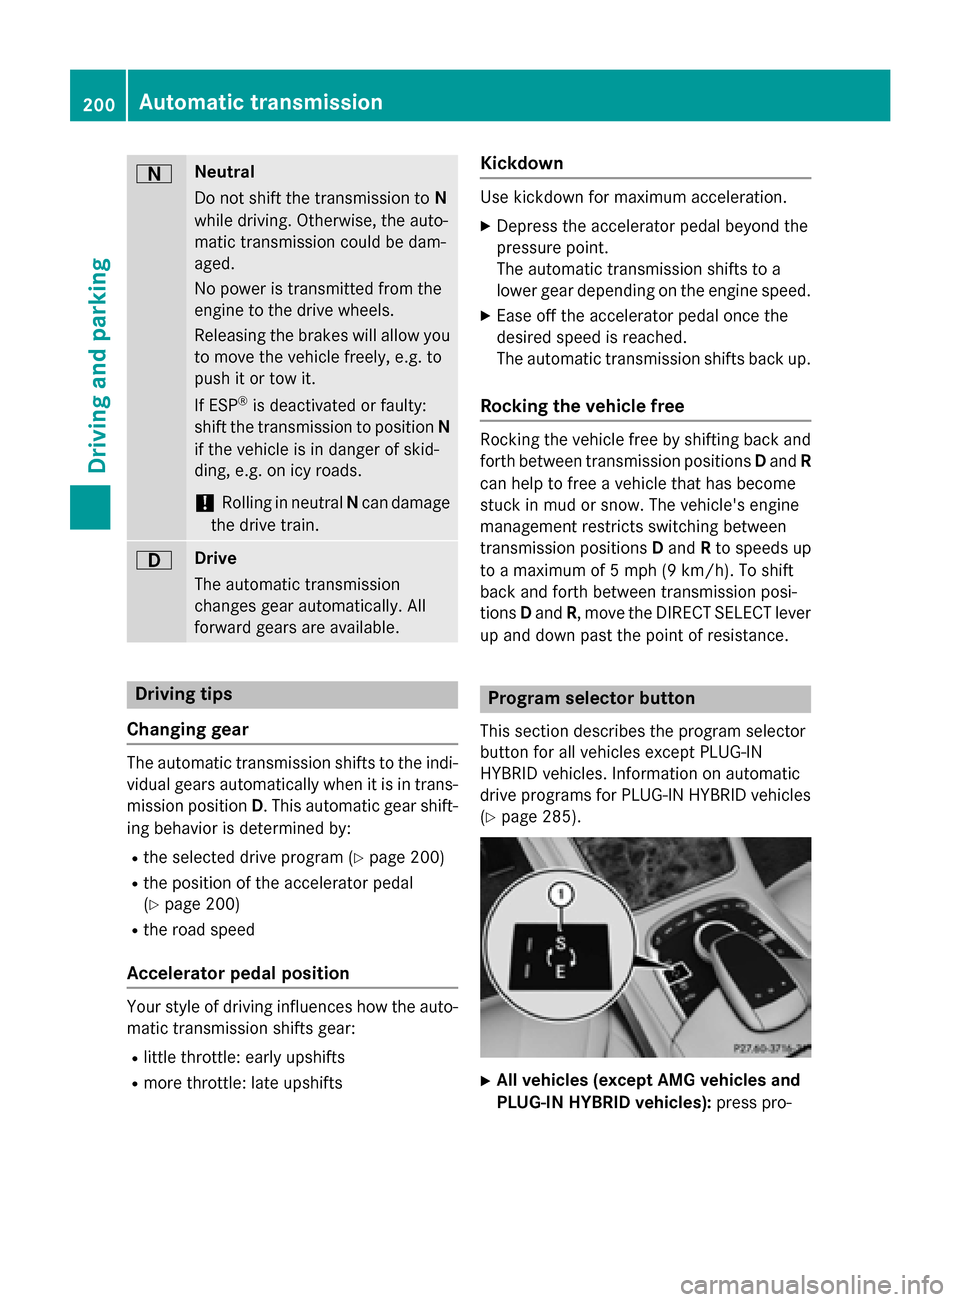
This section describes the program selector
button for all vehicles except PLUG-IN
HYBRID vehicles. Information on automatic
drive programs for PLUG-IN HYBRID vehicles (Y page 285). X
All vehicles (except AMG vehicles and
PLUG-IN HYBRID vehicles): press pro-200
Automatic transmissionDriving an
d parking
Page 207 of 502
Problems with the transmission
Problem
Possible causes/consequences and
M
MSolutions The transmission has
problems shifting gear. The transmission is losing oil.
X Have the transmission checked at a qualified specialist work-
shop immediately. The acceleration ability
is deteriorating.
The transmission no
longer changes gear. The transmission is in emergency mode.
It is only possible to shift into
secondgear and reverse gear.
X Stop the vehicle.
X Shift the transmission to position P.
X Switch off the engine.
X Wait at least ten seconds before restarting the engine.
X Shift the transmission to position Dor R.
If D is selected, the transmission shifts into secondgear; ifRis
selected, the transmission shifts into reverse gear.
X Have the transmission checked at a qualified specialist work-
shop immediately. Problems with PLUG-IN HYBRID operation (Y
page 290).Transfer case
! Performance tests may only be carried
out on a 2-axle dynamometer. The brake
system or transfer case could otherwise be
damaged. Contact a qualified specialist
workshop for a performance test.
! To prevent ESP ®
from intervening, the
ignition must be switched off (SmartKey or
the Start/Stop button in position 0or 1) if:
R the electric parking brake is being tested
on a brake dynamometer.
R the vehicle is being towed with only one
axle raised (not permitted for vehicles
with 4MATIC).
The brake system could otherwise be dam-
aged.
! Vehicles with 4MATIC must not be towed
with either the front or the rear axle raised,
as doing so will damage the transmission. This section is only valid for vehicles with 4-
wheel drive (4MATIC). Power is always trans-
mitted to both axles. Refueling
Important safety notes
G
WARNING
Fuel is highly flammable. If you handle fuel
incorrectly, there is a risk of fire and explo-
sion.
You must avoid fire, open flames, creating
sparks and smoking. Switch off the engine
and, if applicable, the auxiliary heating before refueling. G
WARNING
Fuel is poisonous and hazardous to health.
There is a risk of injury.
You must make sure that fuel does not come into contact with your skin, eyes or clothing Refueling
205Driving and parking
Z
Page 211 of 502
Problems with fuel and the fuel tank
Problem
Possible causes/consequences and
M
MSolutions Fuel is leaking from the
vehicle. G
WARNING
The fuel line or the fuel tank is faulty.
Risk of explosion or fire. X Apply the electric parking brake.
X Switch off the engine.
X Open the driver's door.
The on-board electronics now have status 0. This is the same as
the SmartKey having been removed.
or, if the SmartKey is inserted in the ignition lock:
X Remove the SmartKey from the ignition lock.
X Do not restart the engine under any circumstances.
X Consult a qualified specialist workshop. The fuel filler flap can-
not be opened. The fuel filler flap is not unlocked.
or
The SmartKey battery is discharged.
X Unlock the vehicle (Y page 91).
or X Unlock the vehicle using the mechanical key (Y page 93).The fuel filler flap is unlocked, but the opening mechanism is jam-
med.
X Consult a qualified specialist workshop. Charging the high-voltage battery
(plug-in hybrid vehicles) Important safety notes
G
DANGER
The vehicle's high voltage electrical system is under high voltage. If you modify components
in the vehicle's high-voltage electrical system or touch damaged components, you may be
electrocuted. The components in the vehi-
cle's high-voltage electrical system may be
damaged in an accident, although the damage
is not visible. There is a risk of fatal injury.
Following an accident, do not touch any high- voltage components and never modify the vehicle's high-voltage electrical system. Have
the vehicle towed away after an accident and
the vehicle's high-voltage electrical system
checked by a qualified specialist workshop. G
WARNING
In the event of a vehicle fire, the internal pres- sure of the high-voltage battery can exceed a
critical value. In this case flammable gas
escapes through a ventilation valve on the
underbody. The gas can ignite. There is a risk of injury.
Leave the danger zone immediately. Secure
the danger area at a suitable distance, whilst
observing legal requirements. Charging the high-voltage battery (plug-in hybrid vehicles)
209Driving and parking Z
Page 214 of 502
The charging cable and connector will only
heat up within the permissible limiting values,
provided that:
R the power supply and the charging cable
are not damaged
R the instructions for handling the charging
cable and controls on the charging cable
are observed
If the charging cable or plug get too hot, have the mains power supply checked.
Protection device against overvoltage !
Overvoltage in the mains supply may
damage the vehicle. For this reason, the
vehicle is equipped with a protection device
against overvoltage in the mains supply.
This device may be triggered during severe thunderstorms, for example, and may lead
to the building's fuse being tripped and an
interruption in the power supply. These
functions protect the vehicle. After the
building fuse is switched on again, the
charging process resumes automatically.
Following an interruption in the power sup-
ply or tripping of the building's fuse, it may take up to 10 minutes for charging to
resume automatically.
Switch on the building's fuse again after it has
been triggered. Otherwise, the charging proc-
ess cannot be continued.
General information about the charging
procedure Pay attention to the important safety notes
(Y
page 209).
If you unlock/lock the vehicle from the out-
side, the charge socket flap also unlocks/
locks.
The charge socket flap is behind the bumper
on the right-hand side below the rear lamp
cluster. Charging the high-voltage battery via
the electrical outlet
Charging cable for mains sockets Important safety notes
! Only use the charging cable to charge the
high-voltage battery. Do not use the charg-
ing cable for other purposes. It may other-
wise be damaged.
A charging cable for connection to the mains
socket is included with the vehicle. Only use
the charging cable included with the vehicle
or charging cables that have been approved
for the vehicle.
i If you use the supplied 12 A charging
cable to charge a high-voltage battery:
R the charge time increases considerably
R electrical consumption increases consid-
erably
Where possible, charge the high-voltage
battery at a charging station (Y page 216).
Only then can certified electrical energy
consumption levels be reached.
i The charging process can vary depending
on the power supply. Therefore, always
observe the local information.
i For short charge times (charging with
16A), connect the fast-charging cable to
the wallbox/charging station. You can also
use the optionally available charging cable
with the CE plug.
Information about charging from a wallbox
can be found at (Y page 215).
Information about charging at a charging sta-
tion can be found at (Y page 216).
Stowing the charging cable
The charging cable can be stowed in the bag
supplied in the trunk of the vehicle and held in place with the Velcro fastener. 212
Charging the high-voltage battery (plug-in hybrid vehicles)Driving and parking
Page 217 of 502
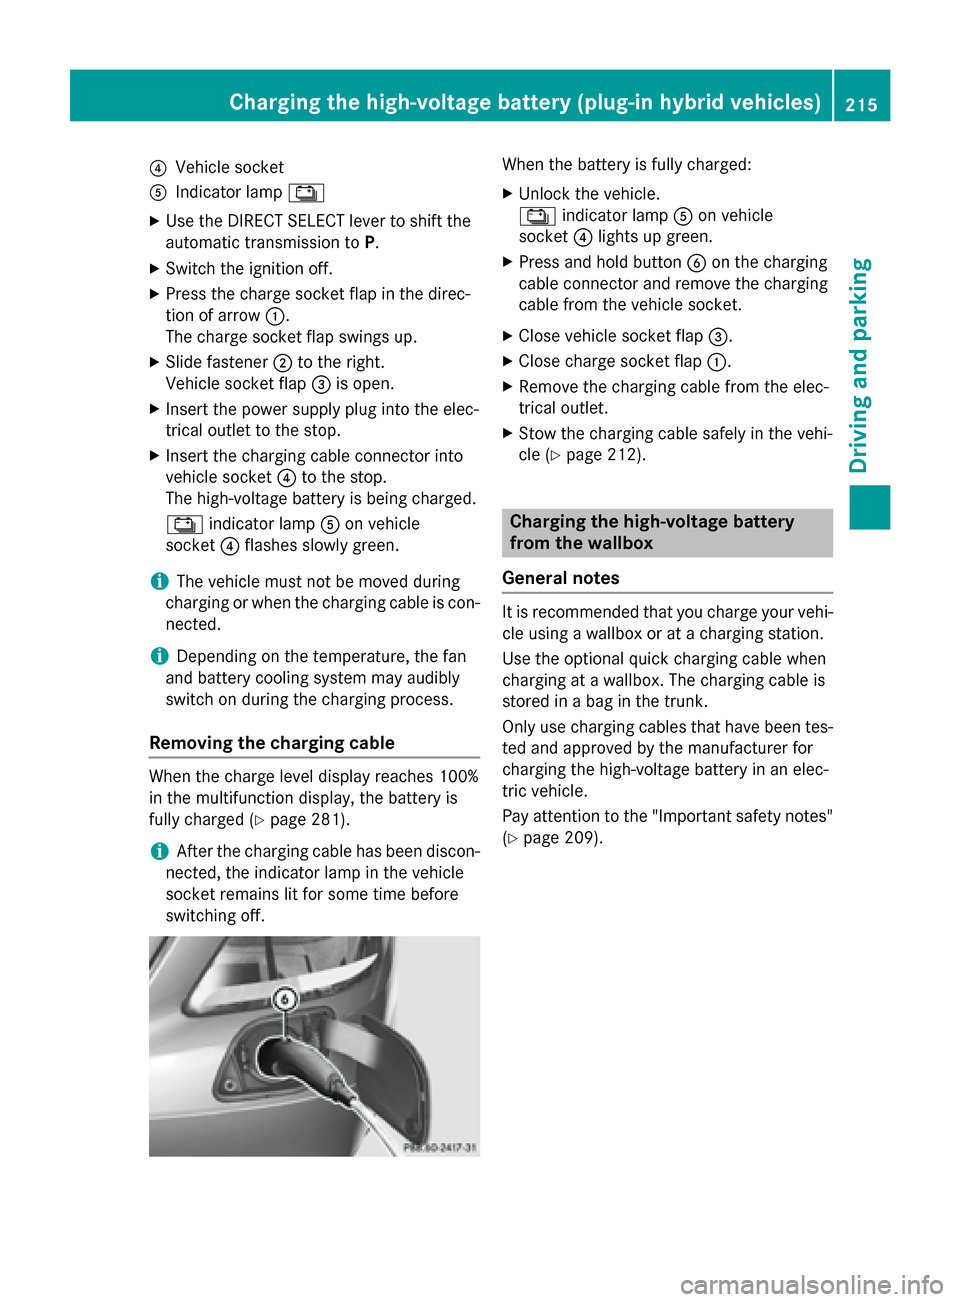
?
Vehicle socket
A Indicator lamp Ý
X Use the DIRECT SELECT lever to shift the
automatic transmission to P.
X Switch the ignition off.
X Press the charge socket flap in the direc-
tion of arrow :.
The charge socket flap swings up.
X Slide fastener ;to the right.
Vehicle socket flap =is open.
X Insert the power supply plug into the elec-
trical outlet to the stop.
X Insert the charging cable connector into
vehicle socket ?to the stop.
The high-voltage battery is being charged.
Ý indicator lamp Aon vehicle
socket ?flashes slowly green.
i The vehicle must not be moved during
charging or when the charging cable is con- nected.
i Depending on the temperature, the fan
and battery cooling system may audibly
switch on during the charging process.
Removing the charging cable When the charge level display reaches 100%
in the multifunction display, the battery is
fully charged (Y page 281).
i After the charging cable has been discon-
nected, the indicator lamp in the vehicle
socket remains lit for some time before
switching off. When the battery is fully charged:
X Unlock the vehicle.
Ý indicator lamp Aon vehicle
socket ?lights up green.
X Press and hold button Bon the charging
cable connector and remove the charging
cable from the vehicle socket.
X Close vehicle socket flap =.
X Close charge socket flap :.
X Remove the charging cable from the elec-
trical outlet.
X Stow the charging cable safely in the vehi-
cle (Y page 212). Charging the high-voltage battery
from the wallbox
General notes It is recommended that you charge your vehi-
cle using a wallbox or at a charging station.
Use the optional quick charging cable when
charging at a wallbox. The charging cable is
stored in a bag in the trunk.
Only use charging cables that have been tes- ted and approved by the manufacturer for
charging the high-voltage battery in an elec-
tric vehicle.
Pay attention to the "Important safety notes"
(Y page 209). Charging the high-voltage battery (plug-in hybrid vehicles)
215Driving and parking Z
Page 223 of 502
R
the front wheels must be turned towards
the curb on steep uphill or downhill gradi-
ents.
R the empty vehicle must be secured at the
front axle with a wheel chock or similar, for
example, on uphill or downhill gradients.
R a laden vehicle must also be secured at the
rear axle with a wheel chock or similar, for
example, on uphill or downhill gradients. Switching off the engine
Important safety notes G
WARNING
The automatic transmission switches to neu-
tral position Nwhen you switch off the engine.
The vehicle may roll away. There is a risk of an
accident.
After switching off the engine, always switch
to parking position P. Prevent the parked vehi-
cle from rolling away by applying the parking
brake.
If the engine cannot be switched off as descri-
bed here, see "Emergency engine cutoff"
(Y page 440).
Using the SmartKey X
Apply the electric parking brake.
X Shift the transmission to position P.
X Turn the SmartKey to position 0in the igni-
tion lock and remove it.
The immobilizer is activated.
If you switch the engine off with the trans-
mission in position Ror D, the automatic
transmission shifts to Nautomatically.
If you then open the driver's door or the
front-passenger door or remove the Smart-
Key from the ignition, the automatic trans-
mission shifts to Pautomatically.
If you shift the automatic transmission to N
before switching off the engine, the auto-
matic transmission remains in Neven if the driver's door or the front-passenger door is
opened.
Using the Start/Stop button X
Apply the electric parking brake.
X Shift the transmission to position P.
X Press the Start/Stop button (Y page 189).
The engine stops and all the indicator
lamps in the instrument cluster go out.
When the driver's door is closed, this cor-
responds to key position 1. When the driv-
er's door is open, this corresponds to key
position 0: "Key removed".
If you turn off the engine with the Start/
Stop button, the automatic transmission
shifts to N. If you then open one of the front
doors, the automatic transmission shifts to P.
If you drive through a car wash with a con-
veyor, you can:
R switch on the ignition using the Start/
Stop button and shift the transmission to
N
R insert the SmartKey into the ignition
lock, switch on the ignition and shift the
transmission to N
In the event of an emergency, the engine can
be turned off while the vehicle is in motion by
pressing and holding the Start/Stop button
for three seconds. This function operates
independently of the ECO start/stop auto-
matic engine switch-off function. Parking
221Driving an d parking Z
Page 229 of 502
a 2-axle dynamometer. If you wish to oper-
ate the vehicle on such a dynamometer,
please consult an authorized Mercedes-
Benz Center in advance. You could other-
wise damage the drive train or the brake
system.
! Vehicles with 4MATIC:
the ESP®
system
operates automatically. The engine and the
ignition must therefore be switched off (the
SmartKey must be in position 0or 1in the
ignition lock or the Start/Stop button must
be in position 0or 1) if the electric parking
brake is tested on a brake dynamometer.
Braking triggered automatically by ESP ®
may cause severe damage to the brake
system.
! Vehicles without 4MATIC:
the ESP®
system operates automatically. The engine
and the ignition must therefore be switched
off (the SmartKey must be in position 0or 1
in the ignition lock or the Start/Stop button
must be in position 0or 1) if:
R the electric parking brake is tested using
a brake dynamometer.
R the vehicle is towed with one axle raised.
Braking triggered automatically by ESP ®
may cause severe damage to the brake
system.
All checks and maintenance work on the
brake system must be carried out at a quali-
fied specialist workshop. Consult a qualified
specialist workshop to arrange this.
Have brake pads installed and brake fluid
replaced at a qualified specialist workshop.
If the brake system has only been subject to
moderate loads, you should test the function-
ality of your brakes at regular intervals.
Information on BAS (Brake Assist) (Y page 77)
and BAS PLUS (Brake Assist PLUS)
(Y page 77). For safety reasons, Mercedes-Benz recom-
mends only installing the following brake
disks and brake pads/linings:
R brake disks that have been approved by
Mercedes-Benz
R brake pads/linings that have been
approved by Mercedes-Benz or that are of
an equivalent standard of quality
Other brake disks or brake pads/linings can
compromise the safety of your vehicle.
Always replace all brake disks and brake
pads/linings on an axle at the same time.
Always install new brake pads/linings when
replacing brake disks.
The vehicle is equipped with lightweight
brake disks to which the wheel assembly with rim and threaded connection is matched.
The use of brake disks other than those
approved by Mercedes-Benz can change the
track width and is subject to approval, if appli-
cable.
Shock-type loads when handling the brake
disks, such as when changing wheels, can
lead to a reduction in comfort when driving
with lightweight brake disks. Avoid shock-
type loads on the lightweight brake disks,
particularly on the brake plate.
Mercedes-Benz recommends that you only
use brake fluid that has been specially
approved for your vehicle by Mercedes-Benz,
or which corresponds to an equivalent quality standard. Brake fluid which has not been
approved for Mercedes-Benz vehicles or
which is not of an equivalent quality could
affect your vehicle's operating safety.
AMG high-performance and ceramic
brakes The high-performance brake system is only
available on AMG vehicles. Driving tips
227Driving and parking Z
Page 231 of 502
Have your vehicle winterproofed at a qualified
specialist workshop at the onset of winter.
Drive particularly carefully on slippery road
surfaces. Avoid sudden acceleration, steering
and braking maneuvers. Do not use the cruise
control or DISTRONIC PLUS.
If the vehicle threatens to skid or cannot be
stopped when moving at low speed:
X Shift the transmission to position N.
The outside temperature indicator is not
designed to serve as an ice-warning device
and is therefore unsuitable for that purpose.
Changes in the outside temperature are dis-
played after a short delay.
Indicated temperatures just above the freez-
ing point do not guarantee that the road sur-
face is free of ice. The road may still be icy,
especially in wooded areas or on bridges.
You should pay special attention to road con-
ditions when temperatures are around freez-
ing point.
For more information on driving with snow
chains, see (Y page 445).
For more information on driving with summer tires, see (Y page 444).
Observe the notes in the "Winter operation"
section (Y page 444). Driving systems
Mercedes-Benz Intelligent Drive
Mercedes-Benz Intelligent Drive stands for
innovative driver assistance and safety sys-
tems which enhance comfort and support the
driver in critical situations. With these intelli-
gent co-ordinated systems Mercedes-Benz
has set a milestone on the path towards
autonomous driving.
Mercedes-Benz Intelligent Drive embraces all elements of active and passive safety in one
well thought out system – for the safety of the
vehicle occupants and that of other road
users. Further information on driving safety systems
(Y page 76). Cruise control
General notes Cruise control maintains a constant road
speed for you. It brakes automatically in order
to avoid exceeding the set speed. Change into a lower gear in good time on long and steep
downhill gradients. This is especially impor-
tant if the vehicle is laden. By doing so, you
will make use of the braking effect of the
engine. This relieves the load on the brake
system and prevents the brakes from over-
heating and wearing too quickly.
Use cruise control only if road and traffic con-
ditions make it appropriate to maintain a
steady speed for a prolonged period. You can store any road speed above 20 mph
(30 km/h).
Important safety notes If you fail to adapt your driving style, cruise
control can neither reduce the risk of an acci-
dent nor override the laws of physics. Cruise
control cannot take into account the road,
traffic and weather conditions. Cruise control is only an aid. You are responsible for the dis-
tance to the vehicle in front, for vehicle speed,
for braking in good time and for staying in
your lane.
Do not use cruise control:
R in road and traffic conditions which do not
allow you to maintain a constant speed e.g.
in heavy traffic or on winding roads
R on slippery road surfaces. Braking or accel-
erating could cause the drive wheels to lose
traction and the vehicle could then skid
R when there is poor visibility, e.g. due to fog,
heavy rain or snow
If there is a change of drivers, advise the new
driver of the speed stored. Driving systems
229Driving and parking Z
Page 232 of 502
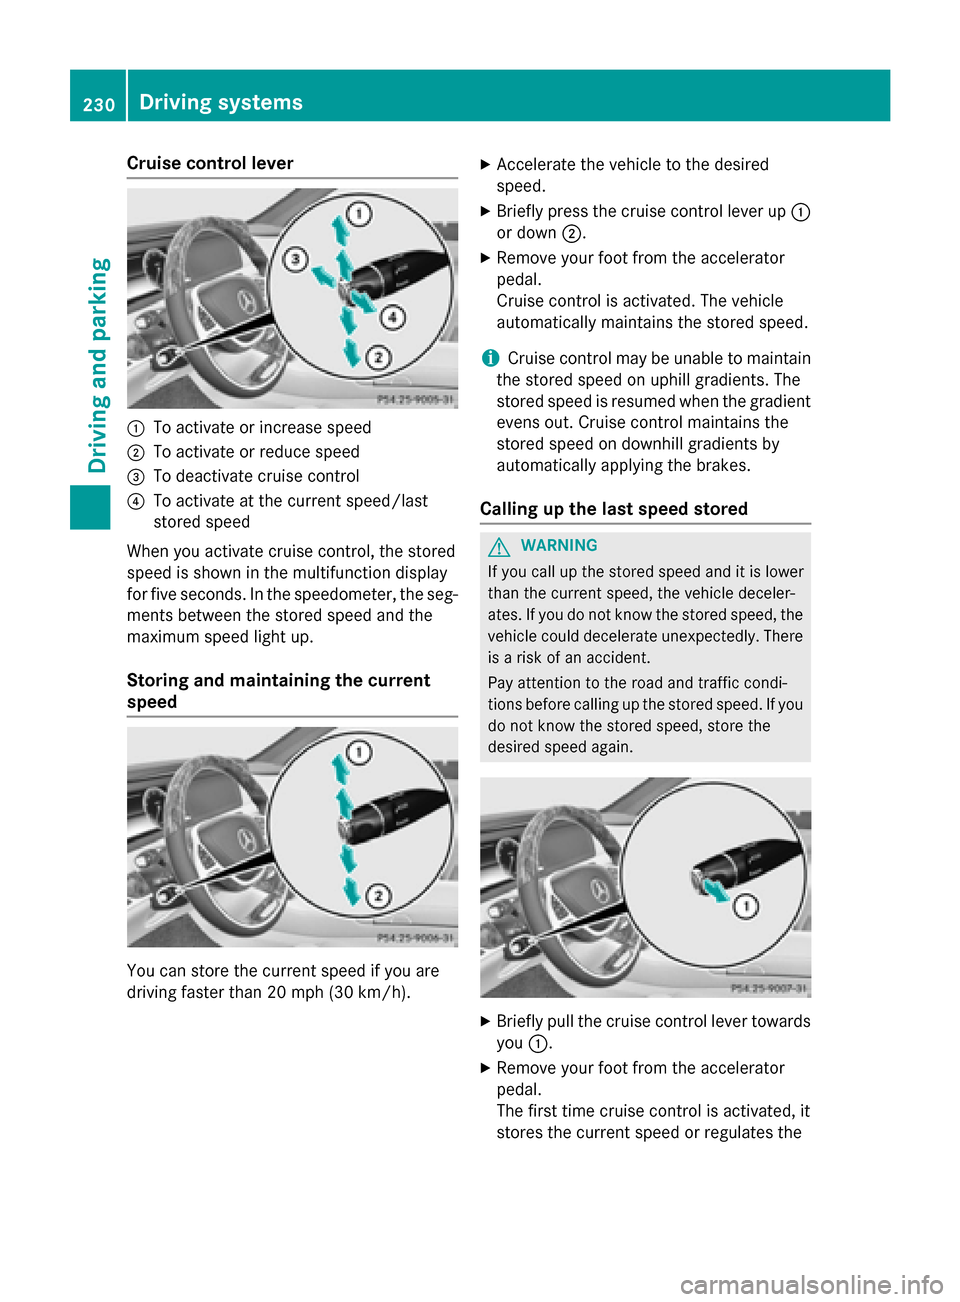
Cruise control lever
:
To activate or increase speed
; To activate or reduce speed
= To deactivate cruise control
? To activate at the current speed/last
stored speed
When you activate cruise control, the stored
speed is shown in the multifunction display
for five seconds. In the speedometer, the seg- ments between the stored speed and the
maximum speed light up.
Storing and maintaining the current
speed You can store the current speed if you are
driving faster than 20 mph
(30 km/h). X
Accelerate the vehicle to the desired
speed.
X Briefly press the cruise control lever up :
or down ;.
X Remove your foot from the accelerator
pedal.
Cruise control is activated. The vehicle
automatically maintains the stored speed.
i Cruise control may be unable to maintain
the stored speed on uphill gradients. The
stored speed is resumed when the gradient evens out. Cruise control maintains the
stored speed on downhill gradients by
automatically applying the brakes.
Calling up the last speed stored G
WARNING
If you call up the stored speed and it is lower
than the current speed, the vehicle deceler-
ates. If you do not know the stored speed, the vehicle could decelerate unexpectedly. There
is a risk of an accident.
Pay attention to the road and traffic condi-
tions before calling up the stored speed. If you do not know the stored speed, store the
desired speed again. X
Briefly pull the cruise control lever towards
you :.
X Remove your foot from the accelerator
pedal.
The first time cruise control is activated, it
stores the current speed or regulates the 230
Driving systemsDriving an
d parking