MERCEDES-BENZ S-Class COUPE 2017 C217 Owner's Manual
Manufacturer: MERCEDES-BENZ, Model Year: 2017, Model line: S-Class COUPE, Model: MERCEDES-BENZ S-Class COUPE 2017 C217Pages: 338, PDF Size: 8.16 MB
Page 251 of 338
XSelect007BRoute Settings.
XSelect a route type.
Notes for route types:
REco Route
Calculates an economic route.
RDynamic Traffic Route
Traffic reports on the route for the route guid-
ance are taken into account (only available in
the USA).
RCalculate Alternative Routes
Different routes are being calculated. Instead
of Start, select the Continuemenu item.
XTo avoid/use route options: selectAvoid
Options.
XSelect a route option.
XWhenUseTollRoadsis selected, select the
payment type.
Notes for route options:
RUse Toll Roads
The route calculation includes roads which
require you to pay a usage fee (toll).
RUse Carpool Lanes(only available in the
USA)
Prerequisite: your vehicle meets the access
conditions for carpool lanes.
Carpool lanes will be included if the carpool
lanes option is activated.
Entering an address
Multimedia system:
XSelect Navi007BNavigation.
The map shows the vehicle's current position.
XSlide 6the controller.
XSelect Destination007BAddress Entry.
Enter an address, e.g. as follows:
Rcity or ZIP code, street, house number
Rcountry, city or ZIP code
Rcity or ZIP code, center
Rstreet, city or ZIP code, intersection
XSelect City.
The city in which the vehicle is currently loca-
ted (current vehicle position) is at the top.
Below this, you will see locations for which
route guidance has already been carried out.
XEnter the city.
The 0043symbol: the location is contained on
the digital map multiple times.
XTo switch to the list: slide the5control-
ler.
XSelect the location.
If available, the ZIP code is shown. If there are
different ZIP codes available for the location,
the corresponding digits are displayed with an
X
.
XEnter the street and house number.
The address is in the menu.
Further options for destination entry:
Rsearch for free destination search
The free destination search finds destinations
using fragments of words.
Rselect the last destination
Rselect a contact
Rselect a POI
You can search for a POI by location, name or
telephone number.
Rselect destination on the map
Renter intermediate destination
You can map the route to the destination
yourself with up to four intermediate destina-
tions.
Rselect destinations from Mercedes-Benz
Apps
Rselect geo-coordinates
Calculating the route
Prerequisite: the address has been entered and
is in the menu.
XSelect StartorContinue.
The route is calculated with the selected route
type and the selected route options.
If route guidance has already been activated,
a prompt will appear asking whether you wish
to end the current route guidance.
XSelect YesorSet as Intermediate Des‐tination.
Yescancels the current route guidance and
starts route calculation to the new destina-
tion.
Set as Intermediate Destination
adds
the new destination in addition to the existing
destination and opens the intermediate des-
tinations list.
Operating system249
Multimedia system
Z
Page 252 of 338
Connecting a mobile phone
Requirements
For telephony via the Bluetooth®interface, you
require a Bluetooth®-capable mobile phone. The
mobile phone must support Hands-Free Profile
1.0 or above. You can also connect your mobile phone via NFC (N earField Communication) with
the multimedia system. For more information
(see the Digital Operator's Manual).
Multimedia system:
XSelect Vehicle007BSystem Set‐tings007BActivate Bluetooth.
XActivate Bluetooth®0073.
Mobile phone:
XActivate Bluetooth®and, if necessary, Blue-
tooth®visibility for other devices (see the
manufacturer's operating instructions).
The Bluetooth
®device names for all of one man-
ufacturer's products might be identical. To
make it possible to clearly identify your mobile
phone, change the device name (see the man-
ufacturer's operating instructions).
If the mobile phone supports the PBAP (Phone
B ook Access Profile) and MAP (M essage
Access Profile) Bluetooth
®profiles, the follow-
ing information will be transmitted after you
connect:
RPhone book
RCall lists
RMessages
iFurther information on suitable mobile
phones can be found at: http://
www.mercedes-benz.com/connect
iIn the USA, you can get in touch with the
Mercedes-Benz Customer Assistance Center
on 1-800-FOR-MERCedes (1-800-367-6372 ).
In Canada, you can get in touch with the Cus-
tomer Relations Center on 1-800-387-0100.
Searching for and authorizing a mobile
phone
Before using your mobile phone without NFC
with the multimedia system, you will need to
search for the phone and then authorize it.
Depending on the mobile phone, authorization
either takes place by means of Secure Simple Pairing or by entering a passkey. The multimedia
system automatically makes the procedure that
is relevant for your mobile phone available. The
mobile phone is always connected automati-
cally after authorization. Further information on
using a mobile phone with the multimedia sys-
tem (see the Digital Operator's Manual).
If the multimedia system does not detect your
mobile phone, this may be due to particular
security settings on your mobile phone (see the
manufacturer's operating instructions).
Only one mobile phone can be connected to the
multimedia system at any one time.
Searching for a mobile phone
Multimedia system:
XSelect
Phone007BConnect Device.
XSelectSearch for Phones.
XSelectStart Search.
The available mobile phones are displayed in
the device list.
Symbols in the device list
Sym-
bolExplanation
00D3New mobile phone found, not yet
authorized.
00DCMobile phone is authorized, but is
not connected
0036Mobile phone is authorized and
connected
Connecting a mobile phone
Authorization using Secure Simple Pairing:
XSelect mobile phone.
A code is displayed in the multimedia system
and on the mobile phone.
XIf codes match: selectYeson the multimedia
system.
XConfirm code on the mobile phone. Depend-
ing on the mobile phone used, confirm the
connection to the multimedia system and for
the PBAP and MAP Bluetooth
®profiles. The
prompt to confirm may take up to two
minutes to be displayed (see the manufactur-
er's operating instructions).
XIf the codes are different: selectNoon the
multimedia system.
The process is canceled.
Repeat authorization.
250Operating system
Multimedia system
Page 253 of 338
Authorization by entering a passkey (pass-
code):
XSelect mobile phone.
The input menu for the passkeyis displayed.
XChoose a one to sixteen-digit number co mbi-
nation as a passkey.
XEnter the passkey on the multimedia system.
XSelect0070.
XEnter and confirm the passkey on the mob ile
phone. Dependin g on the mobilephone used,
confirm the connection to the multimed iasys-
tem and for the PBAP and MAP Bluetooth
®
profile s. The prompt to confirm may take up
to two minutes to be displayed (see the man-
ufacturer's operating instructions).
Switching between mobile phones
If you have authorized more than one mob ile
phone, you can switch between the ind ividual
phones.
Multimedia system:
XSelectPhone007BConnect Device.
XSelect mob ilephone.
Media mode
General notes
If you wish toplay external media sources, the
default display must already beturned on. Fur-
ther information on media mode (see the Digital
Operator's Manual).
The foll owing external media sources can be
used:
RAp ple®devices (e.g. iPhone®)
RUSB devices (e.g. USB stick, MP3 player)
RCD
RDVD video
RSDcards
RAUX cable
Rvia devices connected byBluetooth®
iInformation on the DVD changer or single
DVD drive (see the Digital Operator's Man-
ual).
Using the device list
Multimedia system:
XSelect Media007BDevices.
The available media sources willbe shown.
The 003Bdot indicates the current setting.
XSelect the media source.
Playable files are played.
Inserting and removing an SD card
Important safety notes
GWARNING
SD cardsare small parts. They can beswal-
lowed and cause choking. This poses an
increased risk of injury or even fatal injury.
Keep the SDcard out of the reach of ch ildren.
If a SD card is swallowed, seek medical atten-
tion immediately.
!If you are no longer using the SDcard,you
should remove it and store itoutside the vehi-
cle. High temperatures can damage the card.
Inserting an SD card
The SD card slot islocated in the stowage com-
partment under the armrest.
XIn sert the SDcard into the SDcard slot until
the SDcard engages. The side with the con-
tacts must face downwards.
XSelect the media source (Ypage 251).
Removing an SD card
XPress the memory card.
The memory card isejected.
XRemove the memory card.
Connecting USB devices
Operating system251
Multimedia system
Z
Page 254 of 338
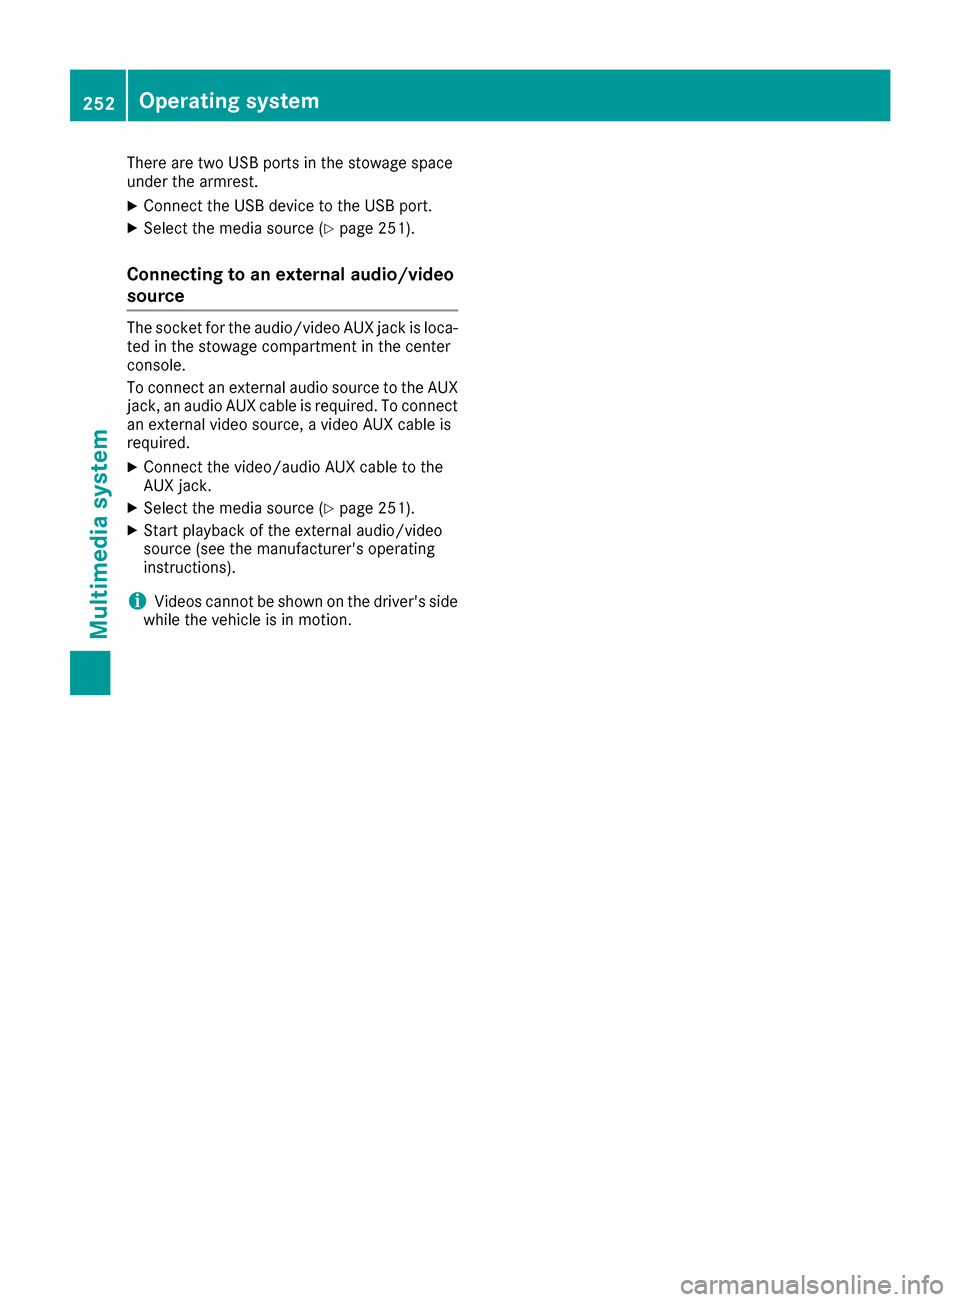
There are two USB ports in the stowage space
under the armrest.
XConnect the USB device to the USB port.
XSelect the media source (Ypage 251).
Connecting to an external audio/video
source
The socket for the audio/video AUX jack is loca-
ted in the stowage compartment in the center
console.
To connect an external audio source to the AUX
jack, an audio AUX cable is required. To connect
an external video source, a video AUX cable is
required.
XConnect the video/audio AUX cable to the
AUX jack.
XSelect the media source (Ypage 251).
XStart playback of the external audio/video
source (see the manufacturer's operating
instructions).
iVideos cannot be shown on the driver's side
while the vehicle is in motion.
252Operating system
Multimedia system
Page 255 of 338
Stowage areas
Loading guidelines
GWARNING
Combustion engines emit poisonous exhaust
gases such as carbon monoxide. Exhaust
gases can enter the vehicle interior if the
trunk lid is open when the engine is running,
especially if the vehicle is in motion. There is a
risk of poisoning.
Always switch off the engine before opening
the trunk lid. Never drive with the trunk lid
open.
GWARNING
If objects, luggage or loads are not secured or
not secured sufficiently, they could slip, tip
over or be flung around and thereby hit vehicle
occupants. There is a risk of injury, particu-
larly in the event of sudden braking or a sud-
den change in direction.
Always store objects so that they cannot be
flung around. Secure objects, luggage or
loads against slipping or tipping before the
journey.
GWARNING
The exhaust tail pipe and tail pipe trim can
become very hot. If you come into contact
with these parts of the vehicle, you could burn
yourself. There is a risk of injury.
Always be particularly careful around the
exhaust tail pipe and the tail pipe trim. Allow
these components to cool down before touch-
ing them.
The handling characteristics of a laden vehicle
are dependent on the distribution of the load
within the vehicle. For this reason, you should
observe the following notes when transporting a
load:
RNever exceed the maximum permissible
gross vehicle mass or the gross axle weight
rating for the vehicle (including occupants).
The values are specified on the vehicle iden- tification plate on the B-pillar of the driver's
door.
RThe trunk is the preferred place to carry
objects.
RPosition heavy loads as far forwards as pos-
sible and as low down in the trunk as possible.
RThe load must not protrude above the upper
edge of the seat backrests.
RAlways place the load behind unoccupied
seats if possible.
RSecure the load with sufficiently strong and
wear-resistant tie-downs. Pad sharp edges for
protection.
Stowage spaces
Important safety notes
GWARNING
If objects in the passenger compartment are
stowed incorrectly, they can slide or be
thrown around and hit vehicle occupants. In
addition, cupholders, open stowage spaces
and mobile phone brackets cannot always
retain all objects they contain. There is a risk of injury, particularly in the event of sudden
braking or a sudden change in direction.
RAlways stow objects so that they cannot be
thrown around in such situations.
RAlways make sure that objects do not pro-
trude from stowage spaces, parcel nets or
stowage nets.
RClose the lockable stowage spaces before
starting a journey.
RAlways stow and secure heavy, hard, poin-
ted, sharp-edged, fragile or bulky objects in
the trunk.
Observe the loading guidelines (
Ypage 253).
Stowage areas253
Stowage and features
Z
Page 256 of 338
Stowage compartments in the front
Glove box
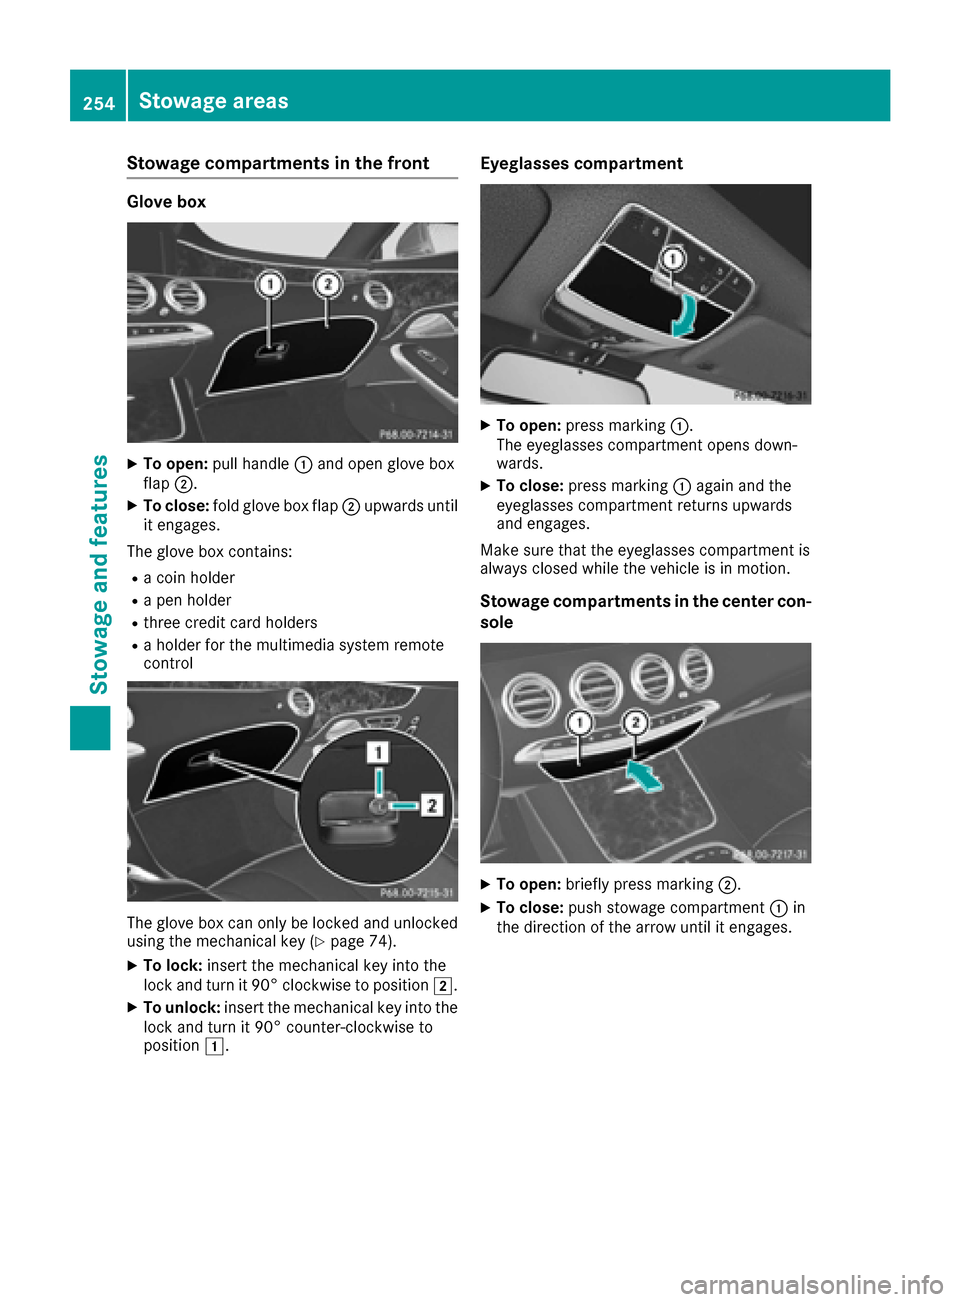
XTo open:pull handle 0043and open glove box
flap 0044.
XTo close: fold glove box flap 0044upwards until
it engages.
The glove box contains:
Ra coin holder
Ra pen holder
Rthree credit card holders
Ra holder for the multimedia system remote
control
The glove box can only be locked and unlocked
using the mechanical key (Ypage 74).
XTo lock: insert the mechanical key into the
lock and turn it 90° clockwise to position 0048.
XTo unlock:insert the mechanical key into the
lock and turn it 90° counter-clockwise to
position 0047.
Eyeglasses compartment
XTo open: press marking 0043.
The eyeglasses compartment opens down-
wards.
XTo close: press marking 0043again and the
eyeglasses compartment returns upwards
and engages.
Make sure that the eyeglasses compartment is
always closed while the vehicle is in motion.
Stowage compartments in the center con-
sole
XTo open: briefly press marking 0044.
XTo close:push stowage compartment 0043in
the direction of the arrow until it engages.
254Stowage areas
Stowage and features
Page 257 of 338
Stowage compartment under the armrest
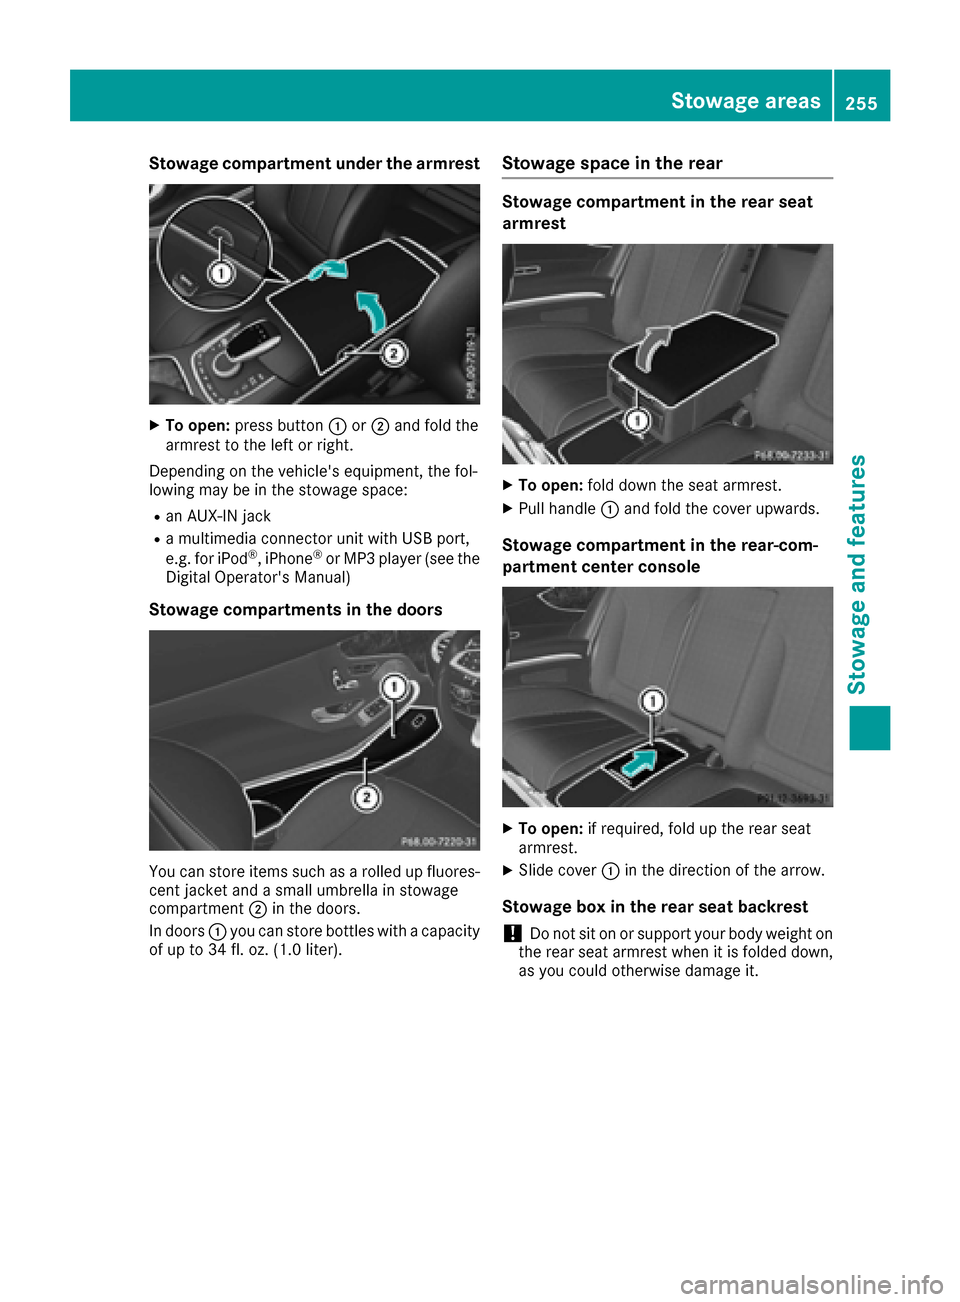
XTo open:press button 0043or0044 and fold the
armrest to the left or right.
Depending on the vehicle's equipment, the fol-
lowing may be in the stowage space:
Ran AUX-IN jack
Ra multimedia connector unit with USB port,
e.g. for iPod®, iPhone®or MP3 player (see the
Digital Operator's Manual)
Stowage compartments in the doors
You can store items such as a rolled up fluores-
cent jacket and a small umbrella in stowage
compartment 0044in the doors.
In doors 0043you can store bottles with a capacity
of up to 34 fl. oz. (1.0 liter).
Stowage space in the rear
Stowage compartment in the rear seat
armrest
XTo open: fold down the seat armrest.
XPull handle 0043and fold the cover upwards.
Stowage compartment in the rear-com-
partment center console
XTo open: if required, fold up the rear seat
armrest.
XSlide cover 0043in the direction of the arrow.
Stowage box in the rear seat backrest
!Do not sit on or support your body weight on
the rear seat armrest when it is folded down,
as you could otherwise damage it.
Stowage areas255
Stowage and features
Z
Page 258 of 338
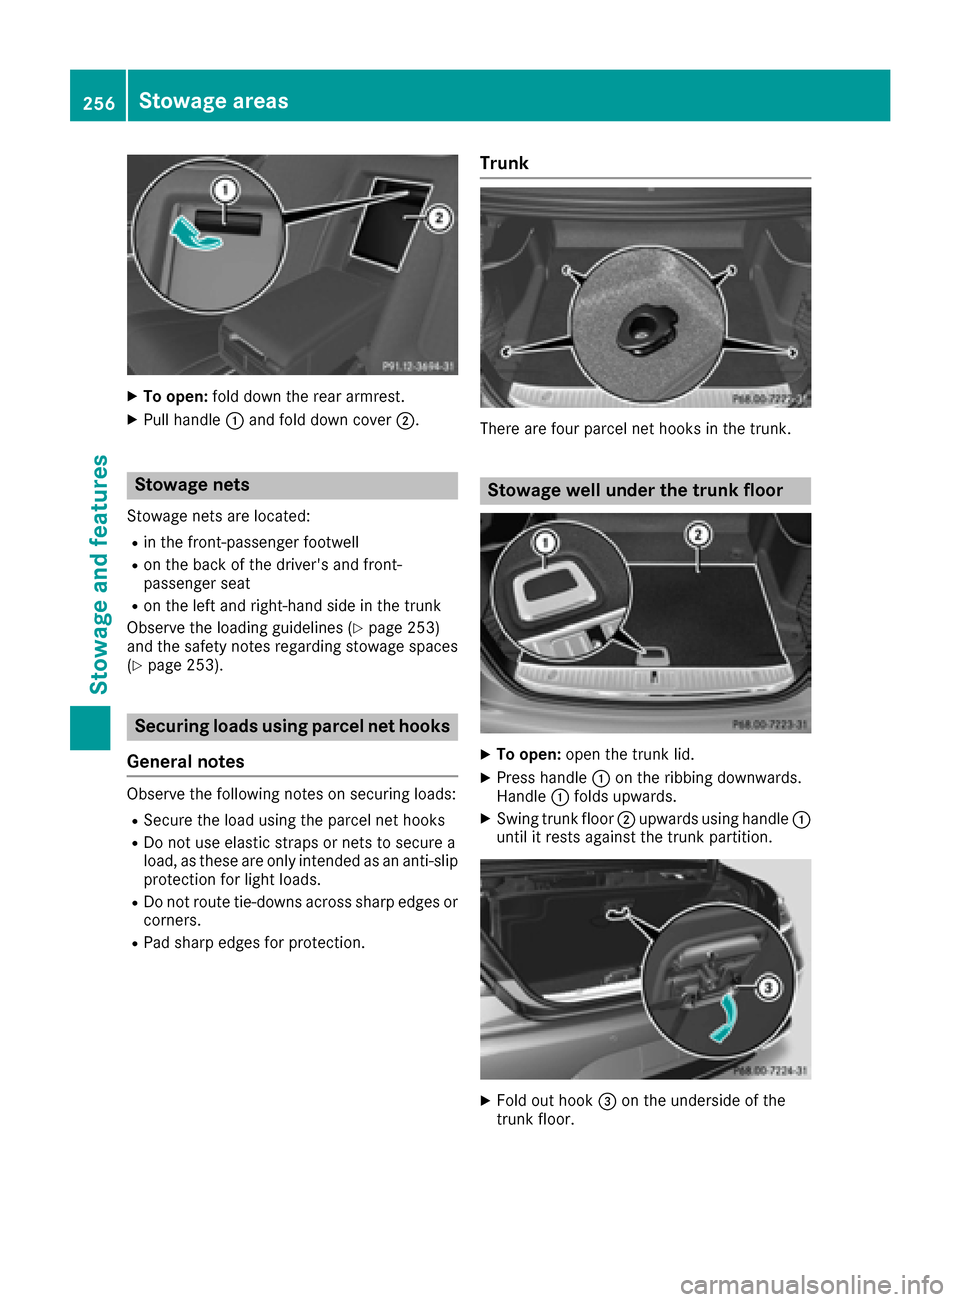
XTo open:fold down the rear armrest.
XPull handle 0043and fold down cover 0044.
Stowage nets
Stowage nets are located:
Rin the front-passenger footwell
Ron the back of the driver's and front-
passenger seat
Ron the left and right-hand side in the trunk
Observe the loading guidelines (
Ypage 253)
and the safety notes regarding stowage spaces
(
Ypage 253).
Securing loads using parcel net hooks
General notes
Observe the following notes on securing loads:
RSecure the load using the parcel net hooks
RDo not use elastic straps or nets to secure a
load, as these are only intended as an anti-slip protection for light loads.
RDo not route tie-downs across sharp edges or
corners.
RPad sharp edges for protection.
Trunk
There are four parcel net hooks in the trunk.
Stowage well under the trunk floor
XTo open: open the trunk lid.
XPress handle 0043on the ribbing downwards.
Handle 0043folds upwards.
XSwing trunk floor 0044upwards using handle 0043
until it rests against the trunk partition.
XFold out hook 0087on the underside of the
trunk floor.
256Stowage areas
Stowag ean d features
Page 259 of 338
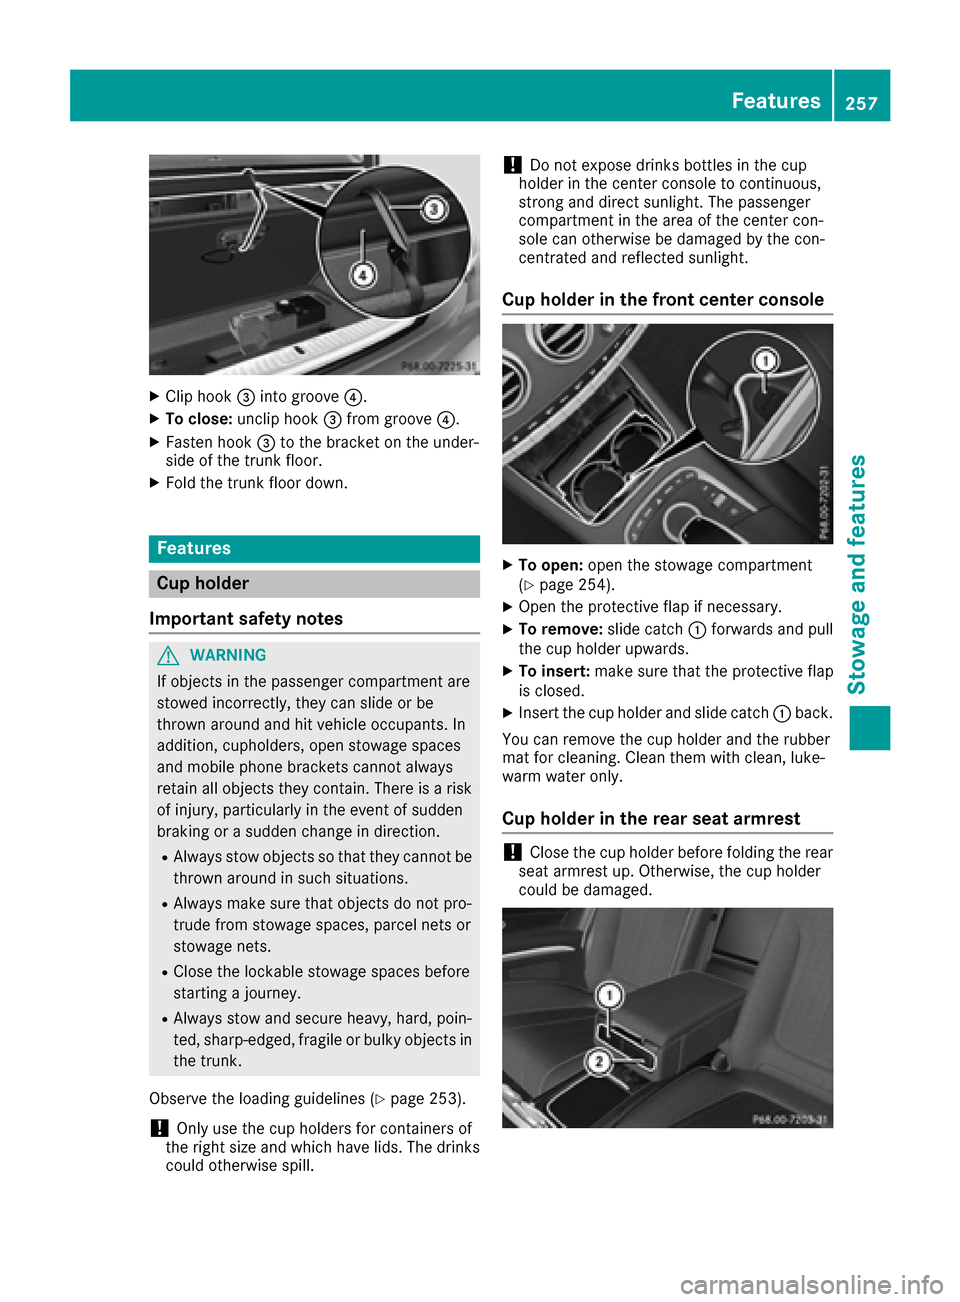
XCliphook 0087into groove 0085.
XTo close:uncliphook 0087from groove 0085.
XFasten hook 0087to the bracket on the under-
side of the trunk floor.
XFold the trunk floor down.
Features
Cup holder
Important safety notes
GWAR NING
If objects inthe passenger compartment are
stowed incorrectly, they can slideorbe
thrown around and hit veh icleoccupants. In
addit ion, cupholders, open stowage spaces
and mob ilephone brackets cannot always
retain all objects they contain. There isa risk
of injury, particular ly inthe event of sudden
braking or a sudden change in direction.
RAlways stow objects so that they cannot be
thrown around insuch situations.
RAlwa ys make sure that objects donot pro-
trude from stowage spaces, parcel nets or
stowage nets.
RClose the lockab lestowage spaces before
starting a journey.
RAlwa ys stow and secure heavy, hard, poin-
te d, sharp-edged, fragile or bulky objects in
the trunk.
Observe the loading guidelines (
Ypage 253).
!Onlyuse the cup holders for containers of
the right size and which have lids.Thedrinks
could otherwise spill.
!Do not expose drinks bottles in the cup
holder in the center console to continuous,
strong and direct sunlight. The passenger
compartment in the area of the center con-
sole can otherwise bedamaged by the con-
centrated and reflected sunlight.
Cup holder in the front center console
XTo open: open the stowage compartment
(Ypage 254).
XOpen the protective flap ifnecessary.
XTo remove: slide catch0043forwards and pull
the cup holder upwards.
XTo insert: make sure that the protective flap
is closed.
XInsert the cup holder and slide catch 0043back.
You can remove the cup holder and the rubber
mat for cleaning. Clean them with clean, luke-
warm water only.
Cup holder in the rear seat armrest
!Close the cup holder before folding the rear
seat armrest up. Otherwise, the cup holder
could bedamaged.
Features257
Stowage and features
Z
Page 260 of 338
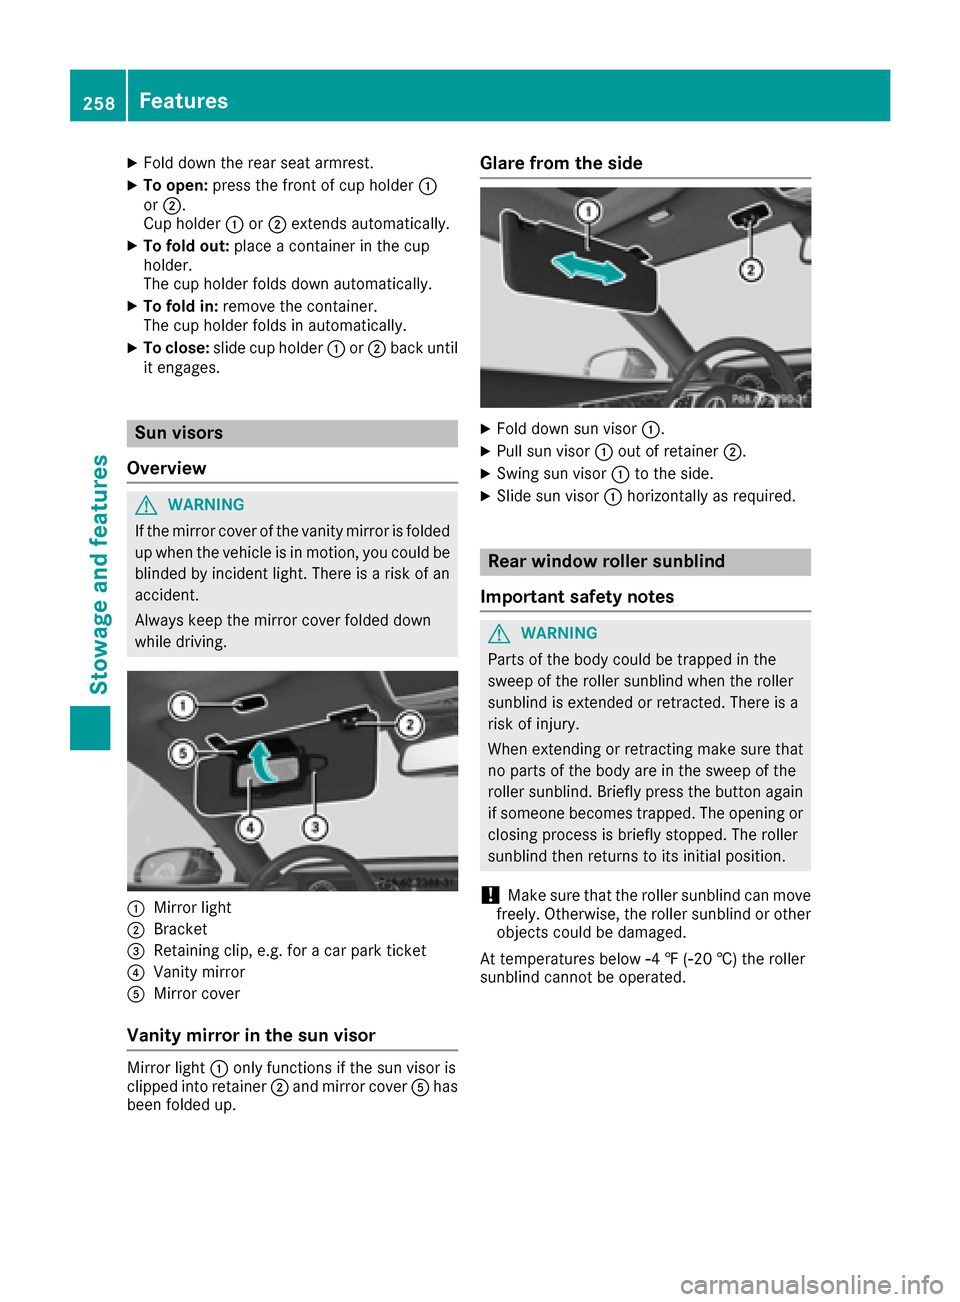
XFold down the rear seat armrest.
XTo open:press the front of cup holder 0043
or 0044.
Cup holder 0043or0044 extends automatically.
XTo fold out: place a container in the cup
holder.
The cup holder folds down automatically.
XTo fold in: remove the container.
The cup holder folds in automatically.
XTo close: slide cup holder 0043or0044 back until
it engages.
Sun visors
Overview
GWARNING
If the mirror cover of the vanity mirror is folded
up when the vehicle is in motion, you could be
blinded by incident light. There is a risk of an
accident.
Always keep the mirror cover folded down
while driving.
0043Mirror light
0044Bracket
0087Retaining clip, e.g. for a car park ticket
0085Vanity mirror
0083Mirror cover
Vanity mirror in the sun visor
Mirror light 0043only functions if the sun visor is
clipped into retainer 0044and mirror cover 0083has
been folded up.
Glare from the side
XFold down sun visor 0043.
XPull sun visor0043out of retainer 0044.
XSwing sun visor 0043to the side.
XSlide sun visor 0043horizontally as required.
Rear window roller sunblind
Important safety notes
GWARNING
Parts of the body could be trapped in the
sweep of the roller sunblind when the roller
sunblind is extended or retracted. There is a
risk of injury.
When extending or retracting make sure that
no parts of the body are in the sweep of the
roller sunblind. Briefly press the button again
if someone becomes trapped. The opening or
closing process is briefly stopped. The roller
sunblind then returns to its initial position.
!Make sure that the roller sunblind can move
freely. Otherwise, the roller sunblind or other
objects could be damaged.
At temperatures below 00F84 ‡ (00F820 †) the roller
sunblind cannot be operated.
258Features
Stowage and features