MERCEDES-BENZ S-CLASS SEDAN 2012 Owners Manual
Manufacturer: MERCEDES-BENZ, Model Year: 2012, Model line: S-CLASS SEDAN, Model: MERCEDES-BENZ S-CLASS SEDAN 2012Pages: 536, PDF Size: 39.39 MB
Page 121 of 536
Useful information ............................120
Introduction ...................................... 120
At a glance ......................................... 122
System settings ................................ 147
Navigation ......................................... 154
Telephone .......................................... 197
Audio .................................................. 215
Video .................................................. 244
Rear Seat Entertainment System ....251
Vehicle ............................................... 265119COMAND
Page 122 of 536
Useful information
i This Operator's Manual describes all
models and all standard and optional
equipment of your vehicle available at the
time of publication of the Operator's
Manual. Country-specific differences are
possible. Please note that your vehicle may
not be equipped with all features
described. This also applies to safety-
related systems and functions.
i Please read the information on qualified
specialist workshops ( Y page 31).
Introduction
Operating safety
Important safety notes
GWARNING
Vehicles with HYBRID: ensure that you read
the "HYBRID" supplement. You may otherwise
fail to recognize dangers.
GWARNING
Making alterations to electronic components
can cause malfunctions.
Radio, satellite radio, amplifier, DVD changer,
navigation module, phone and voice control
are networked. If one component is not
functional or if it has been incorrectly
removed/replaced, this could impair the
operation of other components.
This could seriously jeopardize the
operational safety of your vehicle.
We recommend that you always have
maintenance work on electronic components
carried out at an authorized Mercedes-Benz
Center.
GWARNING
In order to avoid distraction which could lead
to an accident, the driver should enter system
settings while the vehicle is at a standstill, and
operate the system only when permitted by
road, weather and traffic conditions.
Bear in mind that at a speed of just 30 mph
(approximately 50 km/h), your car covers a
distance of 44 feet (approximately 14 m) every
second.
COMAND supplies you with information to
help you select your route more easily and
guide you conveniently and safely to your
destination. For safety reasons, we
encourage the driver to stop the vehicle in a
safe place before answering or placing a call,
or consulting the COMAND screen to read
navigational maps, instructions, or
downloaded information.GWARNING
While the navigation system provides
directional assistance, the driver must remain
focused on safe driving behavior, especially
attention to traffic and street signs, and
should utilize the system's audio cues while
driving.
The navigation system does not supply any
information on stop signs, yield signs, traffic
regulations or traffic safety rules. Their
observance always remains in the driver's
personal responsibility. DVD maps do not
cover all areas nor all routes within an area.
GWARNING
This equipment complies with FCC radiation
exposure limits set forth for uncontrolled
equipment and meets the FCC radio
frequency (RF) Exposure Guidelines in
Supplement C to OET65.
This equipment has very low levels of RF
energy that is deemed to comply without
maximum permissive exposure evaluation
(MPE). But it is desirable that it should be
installed and operated with at least 8 inches
(20 cm) and more between the radiator and a
person's body (excluding extremities: hands,
wrists, feet and legs.)
120IntroductionCOMAND
Page 123 of 536
Declarations of conformity
Vehicle components which receive and/
or transmit radio waves
USA only: The wireless devices of this vehicle
comply with Part 15 of the FCC Rules.
Operation is subject to the following two
conditions: 1) These devices may not cause
harmful interference, and 2) These devices
must accept any interference received,
including interference that may cause
undesired operation.
Changes or modifications not expressly
approved by the party responsible for
compliance could void the user’s authority to
operate the equipment.
Canada only: The wireless devices of this
vehicle comply with Industry Canada license-
exempt RSS standard(s). Operation is subject
to the following two conditions: (1) These
devices may not cause interference, and (2)
These devices must accept any interference,
including interference that may cause
undesired operation of the device.
Correct use
Observe the following information when using
COMAND:
R the safety notes in this manual
R national road traffic regulations
i Work improperly carried out on electronic
components or systems (e.g. radio, DVD
changer) and associated software could
cause them to cease functioning. Even
systems that have not been modified could
be affected because the electronic
systems are connected. Electronic
malfunctions can seriously jeopardize the
operational safety of your vehicle.
i Therefore, have all work on or
modifications to electronic components
carried out at a qualified specialist
workshop.
i Protection against theft: this device is
equipped with technical provisions to
protect it against theft. You can obtain
further information about protecting
against theft from a qualified specialist
workshop.
Function restrictions
For safety reasons, some COMAND functions
are restricted or unavailable while the vehicle
is in motion. You will notice this, for example,
because you will not be able to select certain
menu items. In some cases, COMAND will
also display a message to this effect.
To protect the integrated hard drive against
damage, COMAND deactivates it at very high
temperatures. The following functions will be
temporarily unavailable:
R navigation
R the Voice Control System
R the address book
R MUSIC REGISTER
Introduction121COMANDZ
Page 124 of 536
At a glance
COMAND operating system
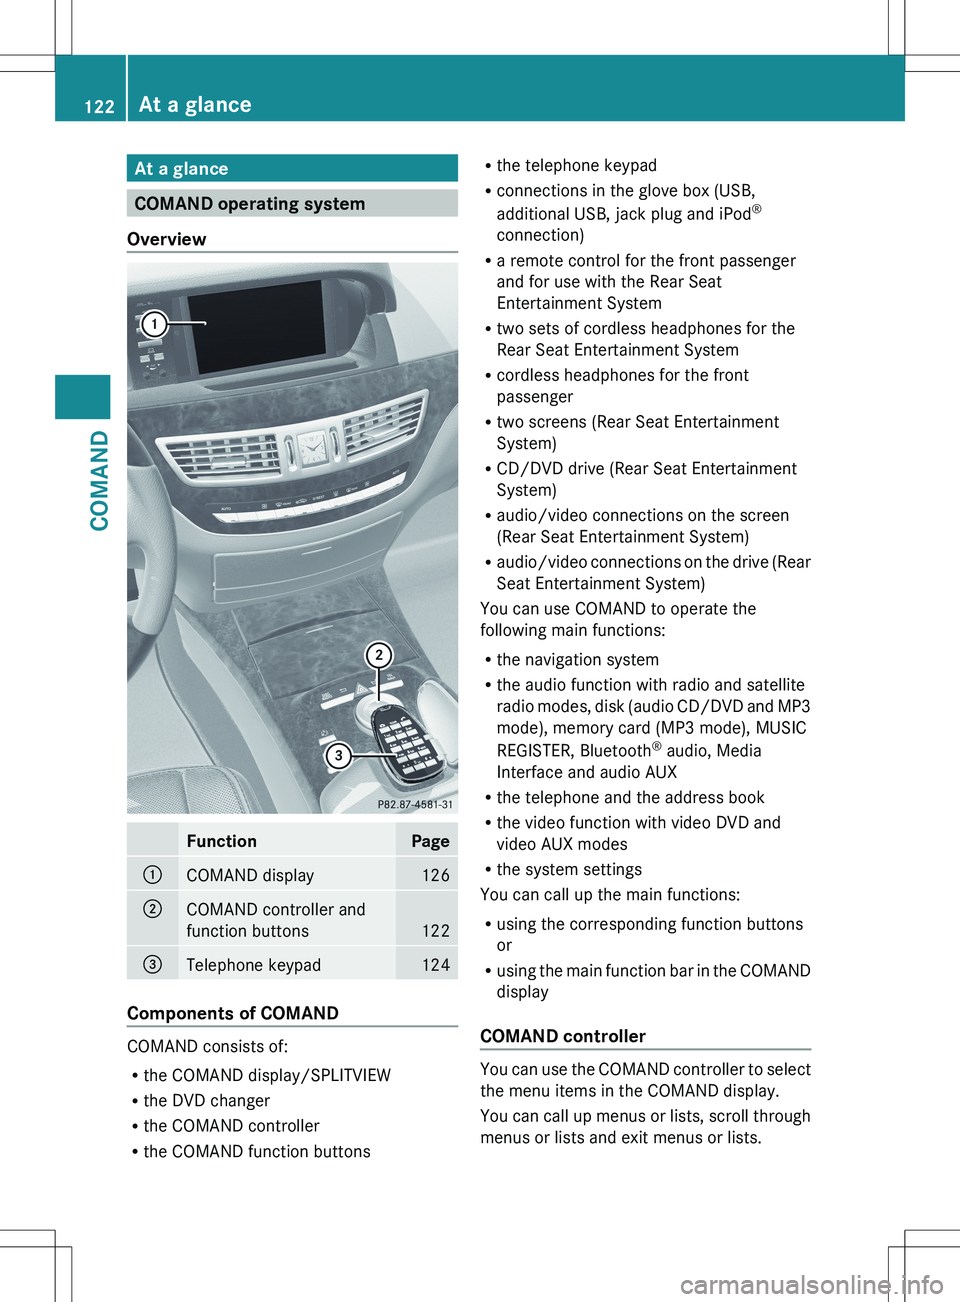
Overview
FunctionPage:COMAND display126;COMAND controller and
function buttons
122
=Telephone keypad124
Components of COMAND
COMAND consists of:
R the COMAND display/SPLITVIEW
R the DVD changer
R the COMAND controller
R the COMAND function buttons
R
the telephone keypad
R connections in the glove box (USB,
additional USB, jack plug and iPod ®
connection)
R a remote control for the front passenger
and for use with the Rear Seat
Entertainment System
R two sets of cordless headphones for the
Rear Seat Entertainment System
R cordless headphones for the front
passenger
R two screens (Rear Seat Entertainment
System)
R CD/DVD drive (Rear Seat Entertainment
System)
R audio/video connections on the screen
(Rear Seat Entertainment System)
R audio/video connections on the drive (Rear
Seat Entertainment System)
You can use COMAND to operate the
following main functions:
R the navigation system
R the audio function with radio and satellite
radio modes, disk (audio CD/DVD and MP3
mode), memory card (MP3 mode), MUSIC
REGISTER, Bluetooth ®
audio, Media
Interface and audio AUX
R the telephone and the address book
R the video function with video DVD and
video AUX modes
R the system settings
You can call up the main functions:
R using the corresponding function buttons
or
R using the main function bar in the COMAND
display
COMAND controller
You can use the COMAND controller to select
the menu items in the COMAND display.
You can call up menus or lists, scroll through
menus or lists and exit menus or lists.
122At a glanceCOMAND
Page 125 of 536
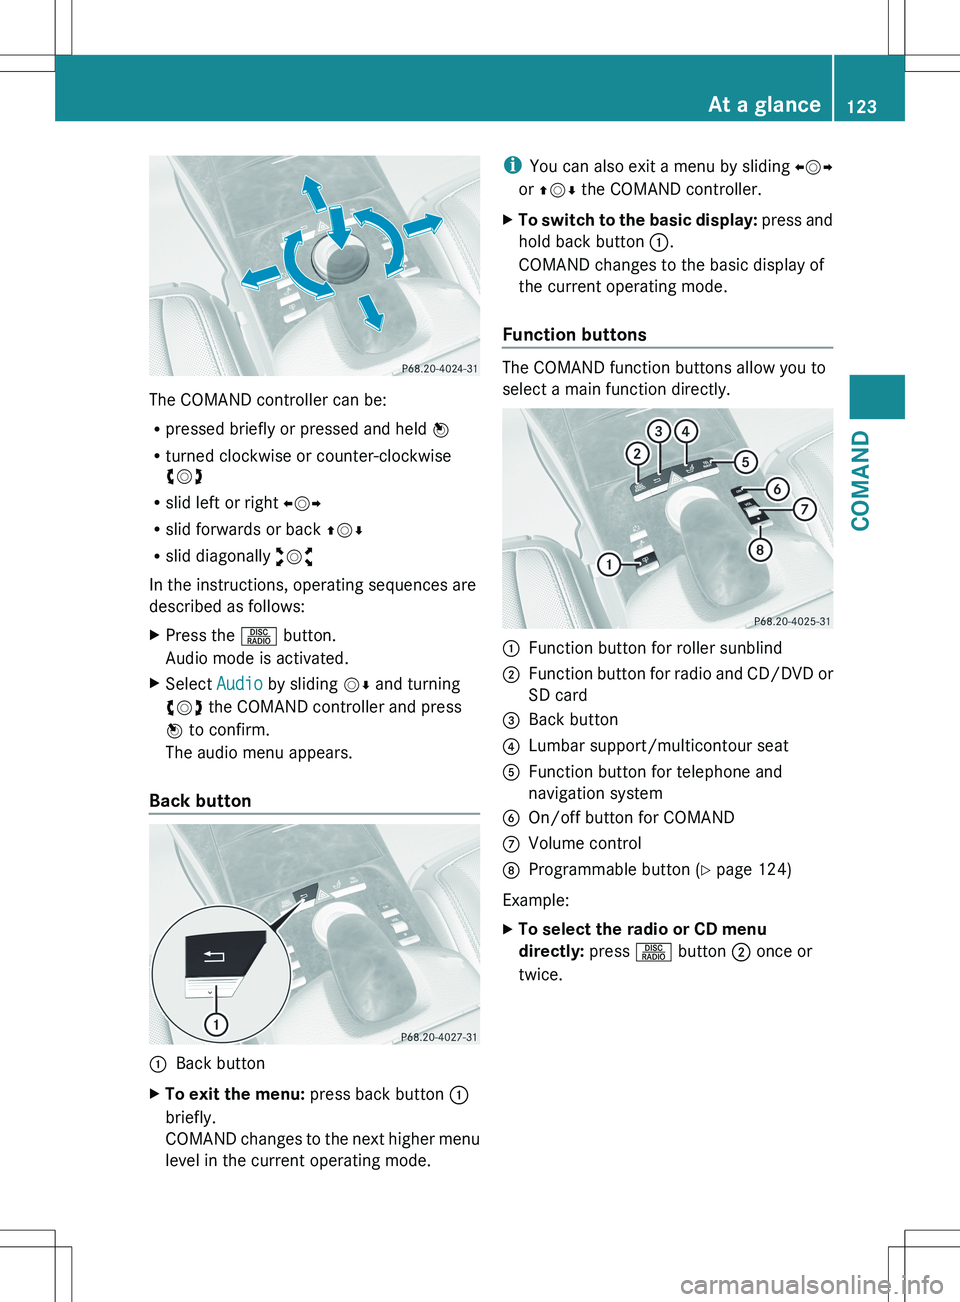
The COMAND controller can be:
R pressed briefly or pressed and held W
R turned clockwise or counter-clockwise
cVd
R slid left or right XVY
R slid forwards or back ZVÆ
R slid diagonally aVb
In the instructions, operating sequences are
described as follows:
XPress the R button.
Audio mode is activated.XSelect Audio by sliding VÆ and turning
cVd the COMAND controller and press
W to confirm.
The audio menu appears.
Back button
:Back buttonXTo exit the menu: press back button :
briefly.
COMAND changes to the next higher menu
level in the current operating mode.i You can also exit a menu by sliding XVY
or ZV Æ the COMAND controller.XTo switch to the basic display: press and
hold back button :.
COMAND changes to the basic display of
the current operating mode.
Function buttons
The COMAND function buttons allow you to
select a main function directly.
:Function button for roller sunblind;Function button for radio and CD/DVD or
SD card=Back button?Lumbar support/multicontour seatAFunction button for telephone and
navigation systemBOn/off button for COMANDCVolume controlDProgrammable button ( Y page 124)
Example:
XTo select the radio or CD menu
directly: press R button ; once or
twice.At a glance123COMANDZ
Page 126 of 536
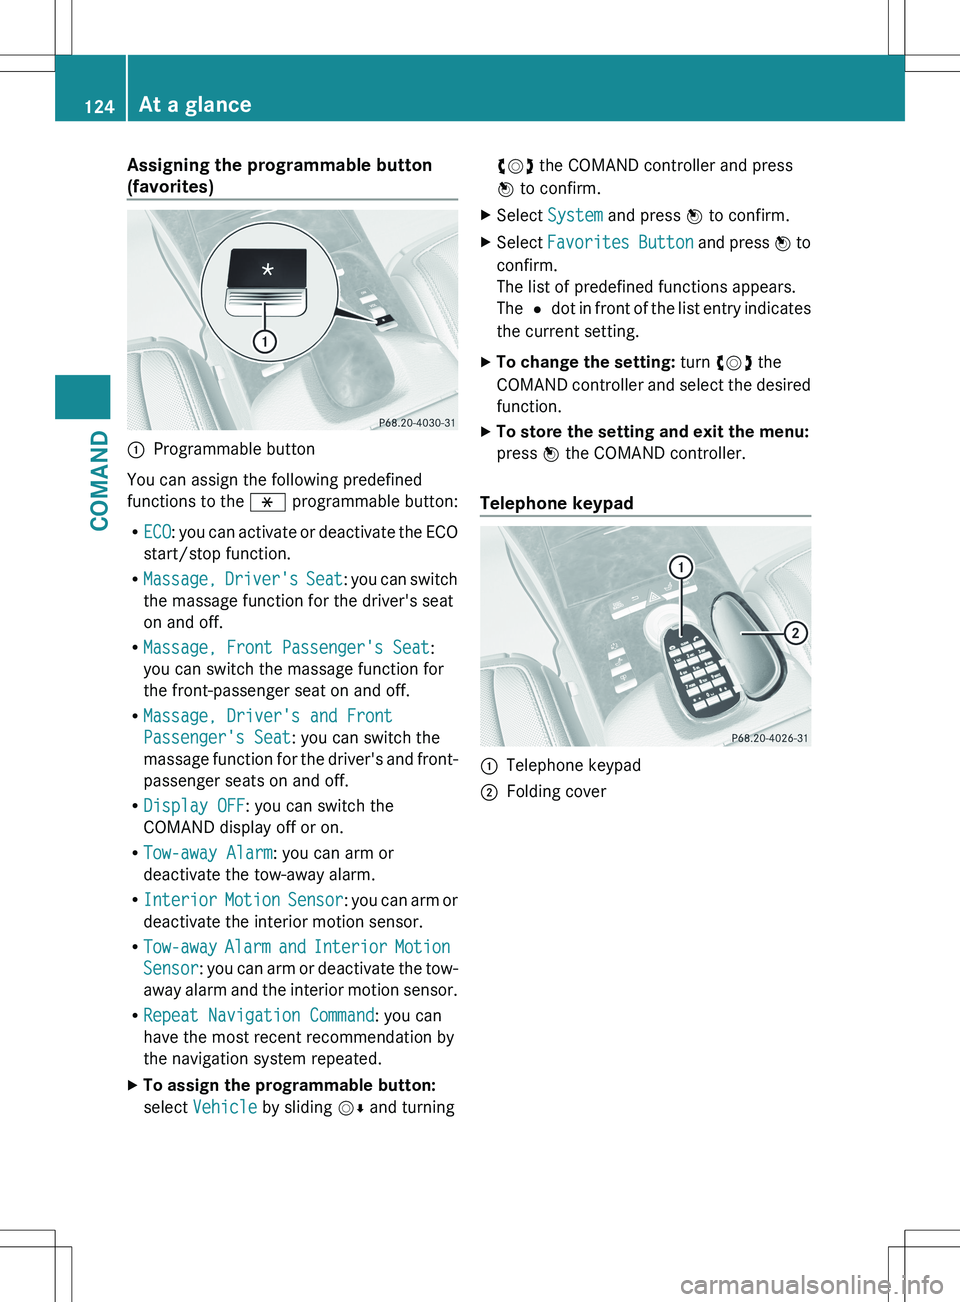
Assigning the programmable button
(favorites):Programmable button
You can assign the following predefined
functions to the h programmable button:
R ECO : you can activate or deactivate the ECO
start/stop function.
R Massage, Driver's Seat : you can switch
the massage function for the driver's seat
on and off.
R Massage, Front Passenger's Seat :
you can switch the massage function for
the front-passenger seat on and off.
R Massage, Driver's and Front
Passenger's Seat : you can switch the
massage function for the driver's and front-
passenger seats on and off.
R Display OFF : you can switch the
COMAND display off or on.
R Tow-away Alarm : you can arm or
deactivate the tow-away alarm.
R Interior Motion Sensor : you can arm or
deactivate the interior motion sensor.
R Tow-away Alarm and Interior Motion
Sensor : you can arm or deactivate the tow-
away alarm and the interior motion sensor.
R Repeat Navigation Command : you can
have the most recent recommendation by
the navigation system repeated.
XTo assign the programmable button:
select Vehicle by sliding VÆ and turningcVd the COMAND controller and press
W to confirm.XSelect System and press W to confirm.XSelect Favorites Button and press W to
confirm.
The list of predefined functions appears.
The # dot in front of the list entry indicates
the current setting.XTo change the setting: turn cVd the
COMAND controller and select the desired
function.XTo store the setting and exit the menu:
press W the COMAND controller.
Telephone keypad
:Telephone keypad;Folding cover124At a glanceCOMAND
Page 127 of 536
COMAND display
Display overview
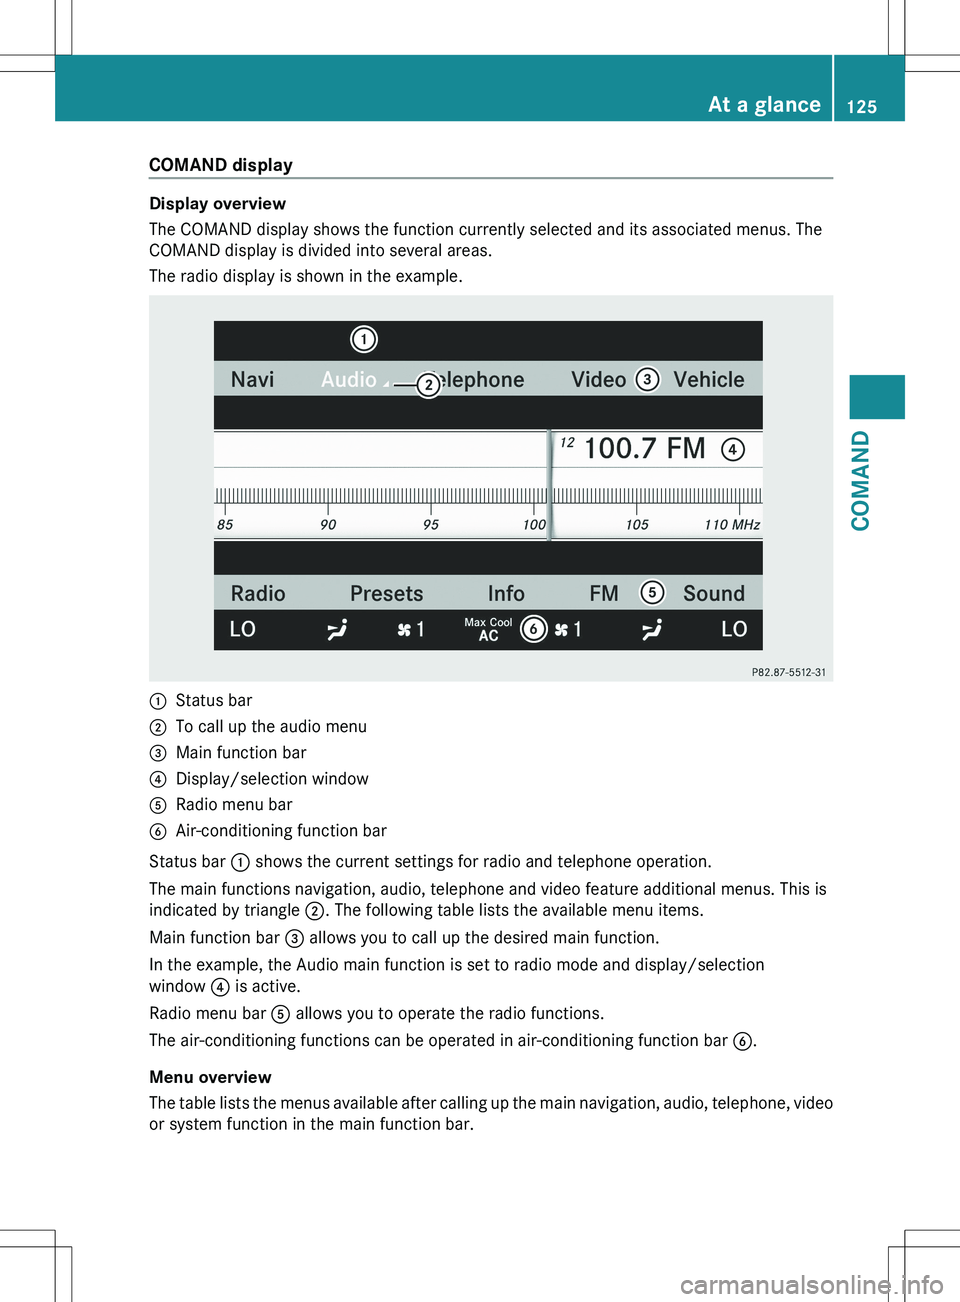
The COMAND display shows the function currently selected and its associated menus. The
COMAND display is divided into several areas.
The radio display is shown in the example.
:Status bar;To call up the audio menu=Main function bar?Display/selection windowARadio menu barBAir-conditioning function bar
Status bar : shows the current settings for radio and telephone operation.
The main functions navigation, audio, telephone and video feature additional menus. This is
indicated by triangle ;. The following table lists the available menu items.
Main function bar = allows you to call up the desired main function.
In the example, the Audio main function is set to radio mode and display/selection
window ? is active.
Radio menu bar A allows you to operate the radio functions.
The air-conditioning functions can be operated in air-conditioning function bar B.
Menu overview
The table lists the menus available after calling up the main navigation, audio, telephone, video
or system function in the main function bar.
At a glance125COMANDZ
Page 128 of 536
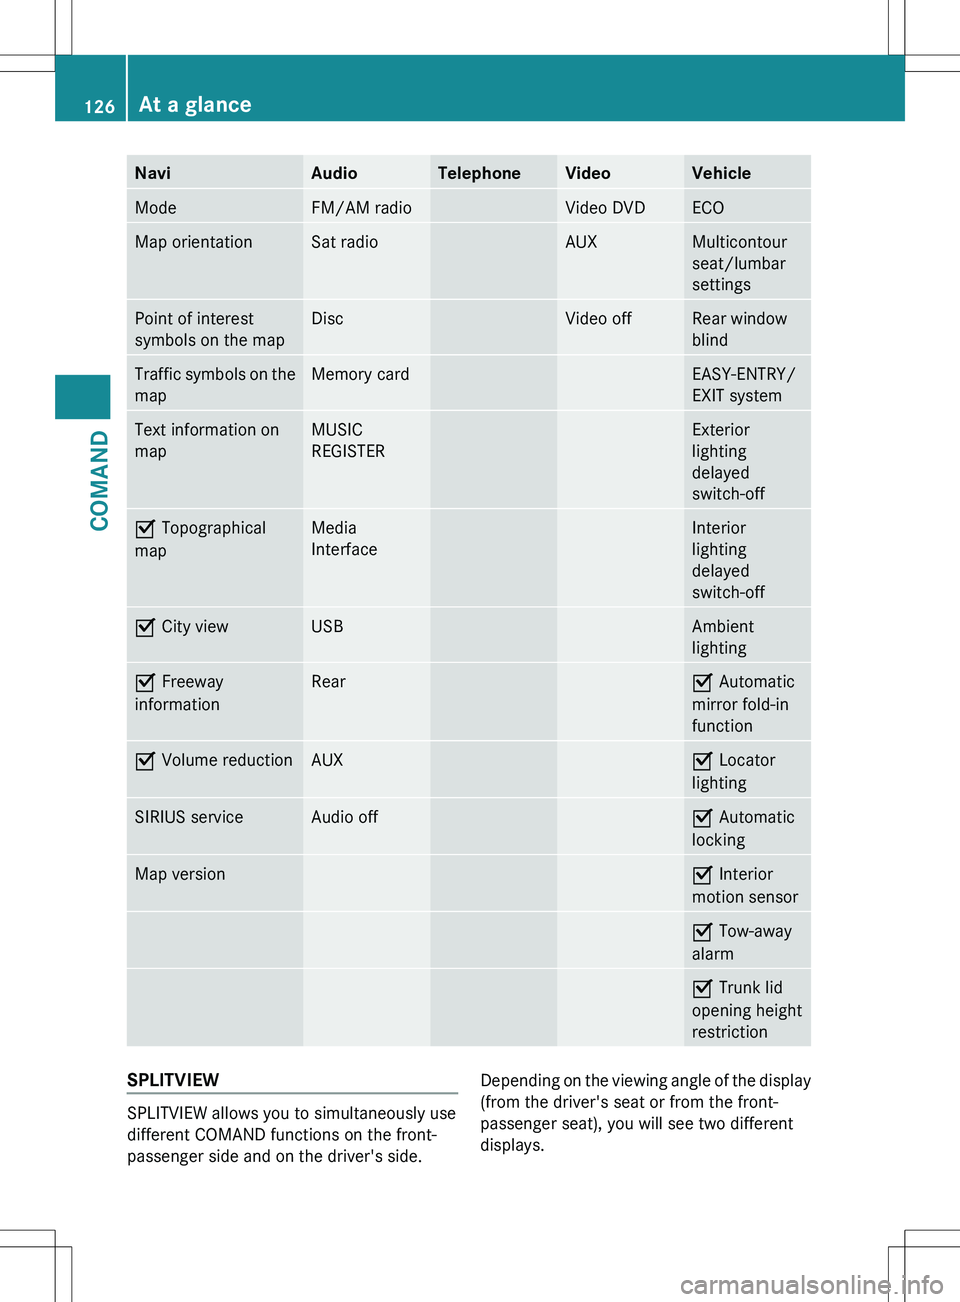
NaviAudioTelephoneVideoVehicleModeFM/AM radioVideo DVDECOMap orientationSat radioAUXMulticontour
seat/lumbar
settingsPoint of interest
symbols on the mapDiscVideo offRear window
blindTraffic symbols on the
mapMemory cardEASY-ENTRY/
EXIT systemText information on
mapMUSIC
REGISTERExterior
lighting
delayed
switch-offO Topographical
mapMedia
InterfaceInterior
lighting
delayed
switch-offO City viewUSBAmbient
lightingO Freeway
informationRearO Automatic
mirror fold-in
functionO Volume reductionAUXO Locator
lightingSIRIUS serviceAudio offO Automatic
lockingMap versionO Interior
motion sensorO Tow-away
alarmO Trunk lid
opening height
restrictionSPLITVIEW
SPLITVIEW allows you to simultaneously use
different COMAND functions on the front-
passenger side and on the driver's side.
Depending on the viewing angle of the display
(from the driver's seat or from the front-
passenger seat), you will see two different
displays.126At a glanceCOMAND
Page 129 of 536
For example, the "Navi" function can be used
from the driver's side while the "Video"
function is used on the front-passenger side.
Use the remote control to operate COMAND
from the front-passenger side with
SPLITVIEW.
Please bear the following in mind
R Your vehicle may be equipped with
SPLITVIEW, depending on its date of
production. The use of SPLITVIEW is
currently not permitted in the following
states: AL, AZ, CO, IL, LA, MA, MD, NH, PA,
VA, VT, WA, WI, and WV or in the Canadian
provinces of Manitoba, Newfoundland,
New Brunswick, and Prince Edward Island.
It is the driver's responsibility to observe
ALL regional legally prescribed regulations.
If your vehicle is registered in a state or
province in which SPLITVIEW is not
approved, this function must be
deactivated. Please contact an authorized
specialist dealer to check whether
SPLITVIEW is approved in your state or
province.
R Volume adjustment for the cordless
headphones can be carried out on the
headphones. Before putting on the
headphones, make sure that the volume
has not been set too high.
R The remote control can be used for the
volume adjustment of corded headphones.
R You can only use media from the driver's
and front-passenger sides separately if the
media are from different sources. Example:
on the driver's side, an audio CD is being
played by the DVD changer. This means
that on the front-passenger side, the DVD
changer cannot be used to play a different
disc type, for instance a video DVD.
However, other media can be used at the
same time on the front-passenger side,
including radio, memory card, MUSIC
REGISTER, Media Interface, USB or AUX.
R If you use the same medium on both sides,
settings for this medium can be carried out
from either side.R There must be intervisibility between the
headphones and the display so that
COMAND can optimally transmit music and
speech via the infrared signal on the front-
passenger's headphones. For this reason,
please also observe that the headphones
have left and right sides, and use them
correctly.
R Only entertainment functions, i.e. audio
and video, can be used separately via
SPLITVIEW.
R The multifunction steering wheel can only
be used for functions which relate to the
driver's side.
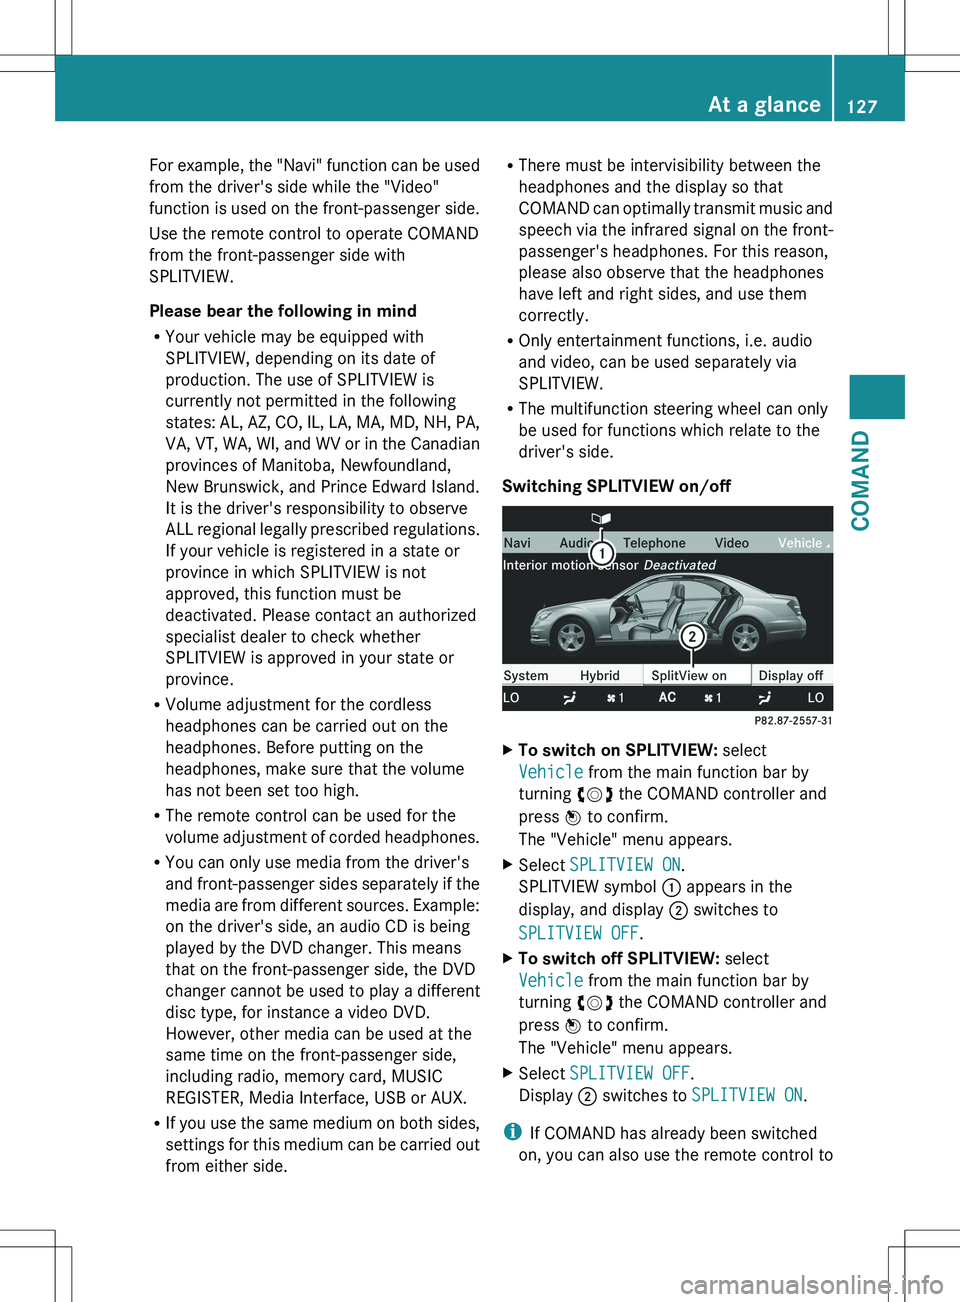
Switching SPLITVIEW on/offXTo switch on SPLITVIEW: select
Vehicle from the main function bar by
turning cVd the COMAND controller and
press W to confirm.
The "Vehicle" menu appears.XSelect SPLITVIEW ON .
SPLITVIEW symbol : appears in the
display, and display ; switches to
SPLITVIEW OFF .XTo switch off SPLITVIEW: select
Vehicle from the main function bar by
turning cVd the COMAND controller and
press W to confirm.
The "Vehicle" menu appears.XSelect SPLITVIEW OFF .
Display ; switches to SPLITVIEW ON .
i
If COMAND has already been switched
on, you can also use the remote control to
At a glance127COMANDZ
Page 130 of 536
switch SPLITVIEW on and off
( Y page 129).
The SPLITVIEW screen remains on for
approximately 30 minutes after the SmartKey
has been turned to position 0 in the ignition
lock. After this time or after the SmartKey has
been removed, the settings on the front-
passenger side are saved for approximately
30 minutes longer. After this period,
reactivation on the front-passenger side
means that the settings from the driver's side
will be used.
Cordless headphones for the front
passenger
There are different cordless headphones for
the front passenger and the rear
compartment.
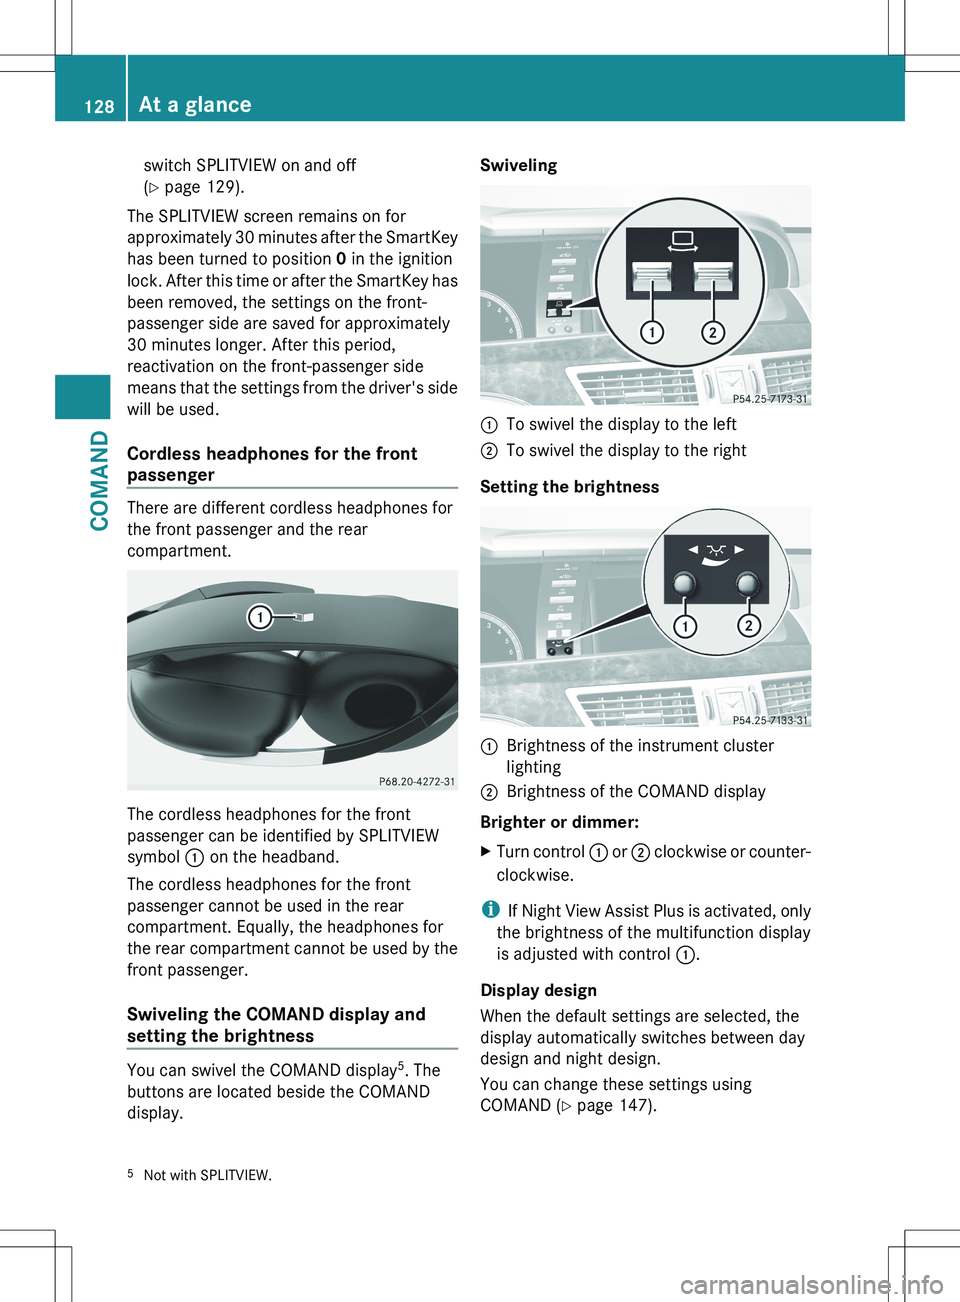
The cordless headphones for the front
passenger can be identified by SPLITVIEW
symbol : on the headband.
The cordless headphones for the front
passenger cannot be used in the rear
compartment. Equally, the headphones for
the rear compartment cannot be used by the
front passenger.
Swiveling the COMAND display and
setting the brightness
You can swivel the COMAND display 5
. The
buttons are located beside the COMAND
display.
Swiveling:To swivel the display to the left;To swivel the display to the right
Setting the brightness
:Brightness of the instrument cluster
lighting;Brightness of the COMAND display
Brighter or dimmer:
XTurn control : or ; clockwise or counter-
clockwise.
i If Night View Assist Plus is activated, only
the brightness of the multifunction display
is adjusted with control :.
Display design
When the default settings are selected, the
display automatically switches between day
design and night design.
You can change these settings using
COMAND ( Y page 147).
5
Not with SPLITVIEW.128At a glanceCOMAND