height MERCEDES-BENZ S-CLASS SEDAN 2012 Owners Manual
[x] Cancel search | Manufacturer: MERCEDES-BENZ, Model Year: 2012, Model line: S-CLASS SEDAN, Model: MERCEDES-BENZ S-CLASS SEDAN 2012Pages: 536, PDF Size: 39.39 MB
Page 19 of 536

Selecting a destination from the
destination memory .......................163
Selecting a destination from the
list of last destinations ................... 163
Selecting your home address ........163
Setting route options (avoiding:
highways, toll roads, tunnels,
ferries) ........................................... 156
Setting the route type (short
route, fast route, dynamic route or
economic route) ............................ 156
Showing/hiding the menu .............156
Starting route calculation ..............160
Switching announcements on/off . 174
Switching to ................................... 155
Traffic report .................................. 178
Troubleshooting ............................. 196
NECK-PRO head restraints
Operation ......................................... 59
Resetting after being triggered ........60
NECK-PRO luxury head restraints
Operation ......................................... 59
Resetting after being triggered ........60
New aluminum style carrier bars
see Separate installation instructions
Night View Assist Plus
Activating/deactivating .................360
Cleaning ......................................... 471
Display message ............................ 410
Function/notes ............................. 360
Problem (malfunction) ...................363
North orientation (navigation) ......... 188
Notes on breaking-in a new
vehicle ................................................ 306
Number keypad ................................. 133
O
Occupant Classification System
(OCS) Faults ............................................... 58
Operation ......................................... 54
System self-test ............................... 57
Occupant safety
Children in the vehicle .....................66
System overview .............................. 48
OCS
Faults ............................................... 58
Operation ......................................... 54
System self-test ............................... 57
Odometer ........................................... 378
see Trip odometer
Off-road .............................................. 177
Oil see Engine oil
On-board computer
AMG menu ..................................... 381
Assistance menu ........................... 385
Audio menu ................................... 380
Displaying a service message ........465
Display messages ..........................390
DISTRONIC PLUS ........................... 343
Important safety notes ..................374
Menu overview .............................. 377
Message memory .......................... 390
Navigation menu ............................ 379
Operation ....................................... 375
RACETIMER ................................... 382
Service menu ................................. 387
Settings menu ............................... 387
Standard display ............................ 378
Telephone menu ............................ 384
Trip menu ...................................... 378
Video DVD operation .....................381
Opening height restriction for
trunk lid .............................................. 269
Operating safety Diagnostics connection ...................31
Operating system
see On-board computer
Outside lighting
Delayed switch-off (COMAND) .......267
Outside temperature display ........... 375
Overhead control panel ...................... 42
Override feature Rear side windows ...........................71
Own address (navigation)
see Home address
P
Paint code number ............................ 523
Paintwork (cleaning instructions) ... 468
Panic alarm .......................................... 72
Index17
Page 22 of 536
 .... 29
Roller blind see Roller sunblind
Roller sunblind
Panorama roof with power tilt/
sliding panel ..............................")
Roadside Assistance (breakdown) .... 29
Roller blind see Roller sunblind
Roller sunblind
Panorama roof with power tilt/
sliding panel .................................. 100
Rear side windows ...........................96
Rear window .................................. 441
Rear window (COMAND) ................266
Roller sunblind of the panorama
roof with power tilt/sliding panel Operating (front roller sunblind) ....101
Operating (rear roller sunblind) ......101
Roof carrier ........................................ 438
Roof lining and carpets (cleaning
guidelines) ......................................... 472
Roof load (maximum) ........................ 531
Route (navigation) Displaying the distance to the
destination ..................................... 176
Route overview .............................. 176
Selecting an alternative route ........175
Setting route options (avoiding:
highways, toll roads, tunnels,
ferries) ........................................... 156
Setting the route type (short
route, fast route, dynamic route or
economic route) ............................ 156
Starting calculation ........................160
see Route guidance (navigation)
Route guidance
Canceling ....................................... 173
Continuing ..................................... 173
Destination reached ......................174
Lane recommendations .................172
Off-road ......................................... 177
Traffic reports ................................ 178
Route guidance (navigation) ............ 379
Route guidance (on-board
computer) .......................................... 379
Route information see Dynamic route guidance/TMC
S
Safety Children in the vehicle .....................66
Child restraint systems ....................66
Occupant Classification System
(OCS) ............................................... 54
Overview of occupant safety
systems ........................................... 48
Safety notes
Audio CD/DVD and MP3 mode .....225
Operating safety ............................ 120
Video DVD mode ........................... 245
Safety systems
see Driving safety systems
SatRadio ............................................. 221
Displaying information ...................224
Registering .................................... 221
Selecting a category ......................222
Screen
Selecting for remote control (Rear
Seat Entertainment System) ..........144
Switching on/off (Rear Seat
Entertainment System) ..................129
see Display
SD memory card
Loading .......................................... 226
Seat belts
Adjusting the driver's and front-
passenger seat belt .........................64
Adjusting the height ......................... 64
Automatic comfort-fit feature ..........66
Belt force limiters ............................ 65
Cleaning ......................................... 472
Correct usage .................................. 62
Emergency Tensioning Devices ........ 65
Fastening ......................................... 63
Important safety guidelines .............61
Releasing ......................................... 64
Safety guidelines ............................. 49
Special seat belt retractor ...............68
Switching belt adjustment on/off
(on-board computer) ......................388
Warning lamp ................................. 422
Warning lamp (function) ................... 64
Seats
Active multicontour seat ........ 112, 276
Adjusting (electrically) ...................108
Adjusting (rear compartment) ........108
Adjusting lumbar support ..............112
Adjusting the head restraint ..........110
Cleaning the cover .........................472
Correct driver's seat position ........10620Index
Page 27 of 536
 ....................512
Unladen weight (definition) ............513
Wear indicator (definition) .............514
Wheel rim (definition) ........")
Uniform Tire Quality Grading
Standards (definition) ....................512
Unladen weight (definition) ............513
Wear indicator (definition) .............514
Wheel rim (definition) ....................512
see Flat tire
Tonal properties
see Sound settings
Top Tether ............................................ 69
Towing Important safety guidelines ...........485
Installing the towing eye ................485
Removing the towing eye ...............486
With the rear axle raised ................486
Towing away
With both axles on the ground .......486
Tow-starting
Emergency engine starting ............487
Important safety notes ..................485
Track
Selecting (CD, DVD, MP3) .............. 229
Traffic Announcements (TA)
Switching off .................................. 138
Traffic jam function ........................... 175
Traffic jam message see Dynamic route guidance/TMC
Traffic reports
Real-time traffic report ..................181
Switching on/off ........................... 178
Transfer case ..................................... 321
Transmission see Automatic transmission
Transporting the vehicle .................. 487
Treble, adjusting (sound) .................. 139
Trim pieces (cleaning instructions) . 472
Trip computer (on-board
computer) .......................................... 378
Trip meter see Trip odometer
Trip odometer
Calling up ....................................... 378
Resetting (on-board computer) ......379
Trunk
Emergency release ....................94, 95
Important safety notes ....................91
Limiting the opening angle ............. 269
Locking separately ...........................94Opening/closing (automatically
from inside) ...................................... 93
Opening/closing (automatically
from outside) ................................... 93
Trunk lid
Display message ............................ 420
Opening/closing .............................. 91
Power closing feature ......................90
Trunk lid opening height
restriction .......................................... 269
Turn signals Display message ............................ 403
Switching on/off ........................... 283
TV
Automatic picture shutoff ..............244
Picture settings .............................. 244
Type identification plate
see Vehicle identification plate
U
Unlocking Emergency unlocking .......................90
From inside the vehicle (central
unlocking button) ............................. 89
USB
see Media Interface
V
Vanity mirror (in the sun visor) ........ 440
Vehicle Correct use ...................................... 31
Data acquisition ............................... 32
Display message ............................ 419
Emergency unlocking ................. 90, 91
Equipment ....................................... 28
Individual settings ..........................387
Limited Warranty ............................. 32
Loading .......................................... 502
Locking (in an emergency) ...............91
Locking (SmartKey) .......................... 82
Lowering ........................................ 479
Maintenance .................................... 29
Parking for a long period ................ 329
Pulling away ................................... 309
Raising ........................................... 476
Reporting problems .........................32
Index25
Page 64 of 536

be replaced and their anchoring points must
also be checked.
Only use seat belts which have been approved
by Mercedes-Benz.
Do not make any modifications to the seat
belts. This can lead to unintended activation
of the ETDs or to their failure to activate when
necessary.
Do not bleach or dye seat belts as this may
severely weaken them. In a crash they may
not be able to provide adequate protection.
Have all work carried out only by qualified
technicians. Contact an authorized
Mercedes-Benz Center.
Correct use of the seat beltsGWARNING
USE SEAT BELTS PROPERLY
R Seat belts can only work when used
properly. Never wear seat belts in any other
way than as described in this section, as
that could result in serious injuries in the
event of an accident.
R Each occupant should wear their seat belt
at all times, because seat belts help reduce
the likelihood of and potential severity of
injuries in accidents, including rollovers.
The integrated restraint system includes
SRS (driver front air bag, front-passenger
front air bag, side impact air bags, window
curtain air bags for the side windows),
Emergency Tensioning Devices, seat belt
force limiters, and front seat knee bolsters.
The system is designed to enhance the
protection offered to properly belted
occupants in certain frontal (front air bags
and ETDs) and side (side impact air bags,
window curtain air bags, and ETDs) impacts
which exceed preset deployment
thresholds and in certain rollovers (window
curtain air bags and ETDs).
R Never wear the shoulder belt under your
arm, across your neck or off your shoulder.
In a frontal crash, your body would move
too far forward. That would increase the
chance of head and neck injuries. The seat
belt would also apply too much force to the
ribs or abdomen, which could severely
injure internal organs such as your liver or
spleen.
Adjust the seat belt so that the shoulder
section is located as close as possible to
the middle of the shoulder. It should not
touch the neck. Never pass the shoulder
portion of the seat belt under your arm. For
this purpose, you can adjust the height of
the seat belt outlet.
R Position the lap belt as low as possible on
your hips and not across the abdomen. If
the lap belt is positioned across your
abdomen, it could cause serious injuries in
a crash.
R Never wear seat belts over rigid or
breakable objects in or on your clothing,
such as eyeglasses, pens, keys etc., as
these might cause injuries.
R Make sure the seat belt is always routed
snugly. Take special care of this when
wearing loose clothing.
R Never use a seat belt for more than one
person at a time. Do not fasten a seat belt
around a person and another person or
other objects at the same time.
R Seat belts should not be worn twisted. In a
crash, you would not have the full width of
the seat belt to distribute impact forces.
The twisted seat belt against your body
could cause injuries.
R Pregnant women should also always use a
lap-shoulder belt. The lap belt portion
should be positioned as low as possible on
the hips to avoid any possible pressure on
the abdomen.
R Place the seat backrest in a position that is
as upright as possible.
R Check your seat belt during travel to make
sure it is properly positioned.
R Never place your feet on the instrument
panel, dashboard, or on the seat. Always62Occupant safetySafety
Page 65 of 536

keep both feet on the floor in front of the
seat.
R When using a seat belt to secure infant
restraints, toddler restraints, or children in
booster seats, always follow the child seat
manufacturer's instructions.GWARNING
Do not pass seat belts over sharp edges. They
could tear.
Do not allow the seat belt to get caught in the
door or in the seat adjustment mechanism.
This could damage the seat belt.
Never attempt to make modifications to seat
belts. This could impair the effectiveness of
the seat belts.
Fastening seat belts
GWARNING
According to accident statistics, children are
safer when properly restrained on the rear
seats than on the front-passenger seat. Thus,
we strongly recommend that children be
placed in the rear seat whenever possible.
Regardless of seating position, children 12
years old and under must be seated and
properly secured in an appropriately sized
child restraint system or booster seat
recommended for the size and weight of the
child. For additional information, see the
"Children in the vehicle" section.
A child's risk of serious or fatal injuries is
significantly increased if the child restraints
are not properly secured in the vehicle and/
or the child is not properly secured in the child
restraint.
XAdjust the seat and move the backrest to
an almost vertical position ( Y page 106).XPull the seat belt smoothly through belt
sash guide :.XWithout twisting it, guide the shoulder
section of the seat belt across the middle
of your shoulder and the lap section across
your hips.XEngage belt tongue ; in buckle =.
Seat-belt adjustment: if necessary, the
driver's and front-passenger seat belts
automatically adjust to the upper body
( Y page 64).XIf necessary, adjust the seat belt to the
appropriate height ( Y page 64).XIf necessary, pull upwards on the shoulder
section of the seat belt to tighten the belt
across your body.
All seat belts except the driver's seat belt are
equipped with a special seat belt retractor to
securely fasten child restraint systems in the
vehicle. For further information about special
seat belt retractors, see ( Y page 68).
Occupant safety63SafetyZ
Page 66 of 536
For more information about releasing the seat
belt with release button ?, see "Releasing
seat belts" ( Y page 64).
Seat belt adjustment
The seat-belt adjustment function adjusts the
driver's and front-passenger seat belt to the
upper body of the occupants.
The belt strap is tightened slightly when:
R you engage the belt tongue in the belt
buckle and you then turn the SmartKey to
position 2 in the ignition lock.
R the SmartKey is in position 2 in the ignition
lock and you then engage the belt tongue
in the buckle.
The seat-belt adjustment will apply a
retraction force if any slack is detected
between the occupant and the seat belt. Do
not hold on to the seat belt tightly while it is
adjusting. You can switch the seat-belt
adjustment on and off in the on-board
computer ( Y page 388).
The seat-belt adjustment is an integral part of
the PRE-SAFE ®
convenience function. More
information about PRE-SAFE ®
can be found
in the "PRE-SAFE ®
(preventative occupant
protection)" section ( Y page 59).
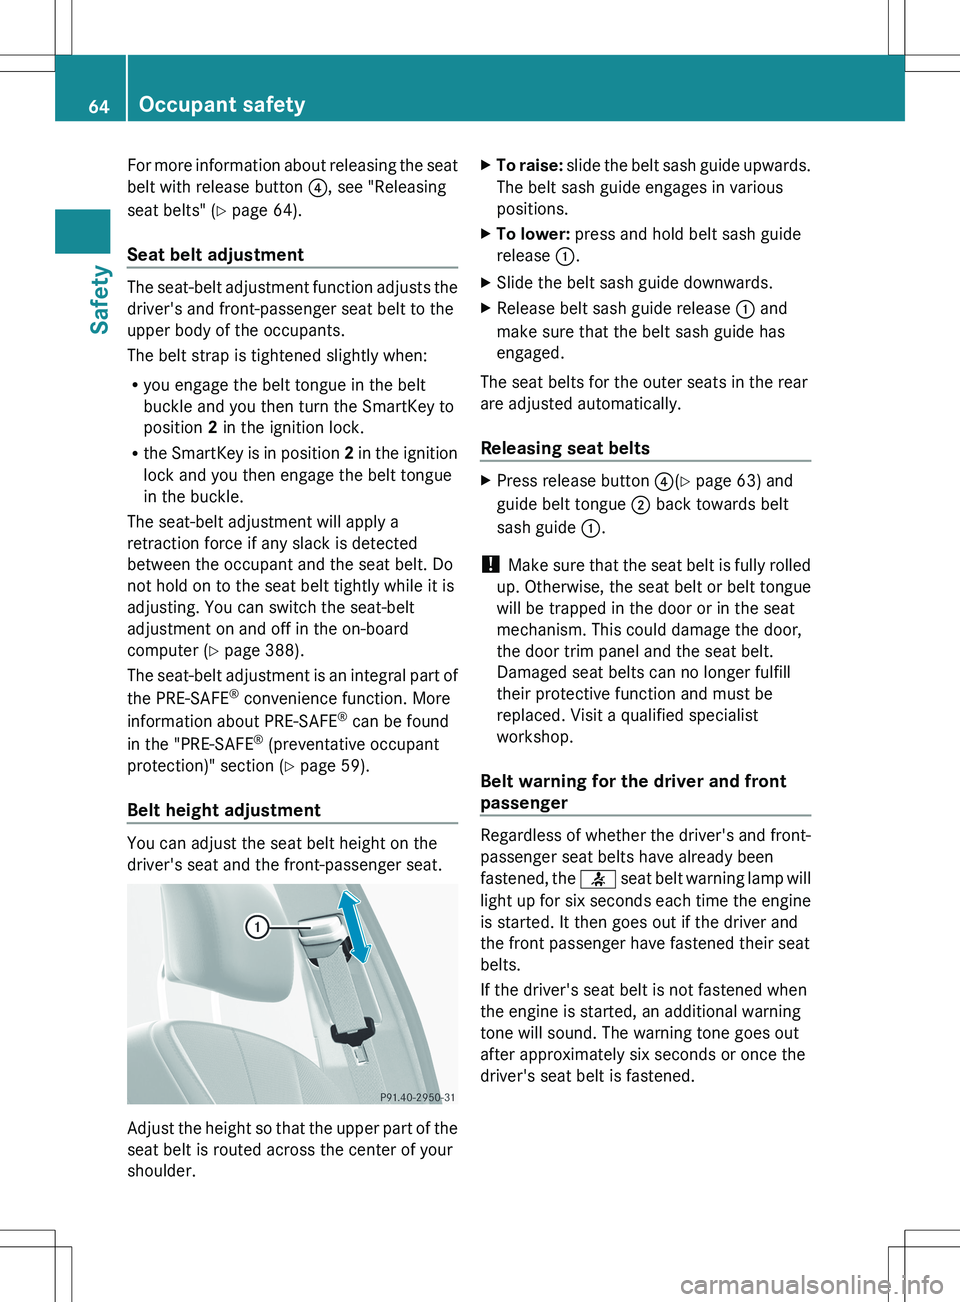
Belt height adjustment
You can adjust the seat belt height on the
driver's seat and the front-passenger seat.
Adjust the height so that the upper part of the
seat belt is routed across the center of your
shoulder.
XTo raise: slide the belt sash guide upwards.
The belt sash guide engages in various
positions.XTo lower: press and hold belt sash guide
release :.XSlide the belt sash guide downwards.XRelease belt sash guide release : and
make sure that the belt sash guide has
engaged.
The seat belts for the outer seats in the rear
are adjusted automatically.
Releasing seat belts
XPress release button ?(Y page 63) and
guide belt tongue ; back towards belt
sash guide :.
!
Make sure that the seat belt is fully rolled
up. Otherwise, the seat belt or belt tongue
will be trapped in the door or in the seat
mechanism. This could damage the door,
the door trim panel and the seat belt.
Damaged seat belts can no longer fulfill
their protective function and must be
replaced. Visit a qualified specialist
workshop.
Belt warning for the driver and front
passenger
Regardless of whether the driver's and front-
passenger seat belts have already been
fastened, the 7 seat belt warning lamp will
light up for six seconds each time the engine
is started. It then goes out if the driver and
the front passenger have fastened their seat
belts.
If the driver's seat belt is not fastened when
the engine is started, an additional warning
tone will sound. The warning tone goes out
after approximately six seconds or once the
driver's seat belt is fastened.
64Occupant safetySafety
Page 69 of 536

Children can be killed or seriously injured by
an inflating air bag. Note the following
important information when circumstances
require you to place a child in the front-
passenger seat:
R Your vehicle is equipped with air bag
technology designed to deactivate the
front-passenger front air bag in your vehicle
when the system senses the weight of a
typical 12-month-old child or less along
with the weight of a standard appropriate
child restraint on the front-passenger seat.
R A child in a rear-facing child restraint on the
front-passenger seat will be seriously
injured or even killed if the front-passenger
front air bag inflates in a collision which
could occur under some circumstances,
even with the air bag technology installed
in your vehicle. The only means to eliminate
this risk completely is never to place a child
in a rear-facing child restraint in the front-
passenger seat. We therefore strongly
recommend that you always place a child
in a rear-facing child restraint on the rear
seat.
R If you install a rear-facing child restraint on
the front-passenger seat, make sure the
42 indicator lamp is
illuminated, indicating that the front-
passenger front air bag is deactivated.
Should the 42 indicator lamp
not illuminate or go out while the restraint
is installed, please check installation.
Periodically check the 42
indicator lamp while driving to make sure
the 42 indicator lamp is
illuminated. If the 42 indicator
lamp goes out or remains out, do not
transport a child on the front-passenger
seat until the system has been repaired.
A child in a rear-facing child restraint on the
front-passenger seat will be seriously
injured or even killed if the front-passenger
front air bag inflates.R If you place a child in a forward-facing child
restraint on the front-passenger seat:
- move the seat as far back as possible
- use the proper child restraint
recommended for the age, size and
weight of the child
- secure child restraint with the vehicle's
seat belt according to the child seat
manufacturer's instructions
R For children larger than a typical 12-month-
old child, the front-passenger front air bag
can be activated or deactivated.GWARNING
Infants and small children should never share
a seat belt with another occupant. In the event
of an accident, they could be crushed
between the occupant and seat belt.
A child's risk of serious or fatal injuries is
significantly increased if the child restraints
are not properly secured in the vehicle and/
or the child is not properly secured in the child
restraint.
Children that are too large for a child restraint
must travel in seats using normal seat belts.
Position the shoulder belt across the chest
and shoulder, not face or neck. A booster seat
may be necessary to achieve proper seat belt
positioning for children over 41 lb (18 kg) until
they reach a height where a lap-shoulder belt
fits properly without a booster.
When the child restraint is not in use, remove
it from the vehicle or secure it with the seat
belt to prevent the child restraint from
becoming a projectile in the event of an
accident.
If an infant or child is traveling in the vehicle:
XSecure the infant or child with an
appropriate infant or child restraint
recommended for the child's age and
weight.XMake sure that the infant or child is
properly secured at all times while the
vehicle is in motion.Children in the vehicle67SafetyZ
Page 70 of 536

GWARNING
When leaving the vehicle, always remove the
SmartKey from the ignition lock. Always take
the SmartKey with you and lock the vehicle.
Do not leave children unattended in the
vehicle, even if they are secured in a child
restraint system, or with access to an
unlocked vehicle. A child's unsupervised
access to a vehicle could result in an accident
and/or serious personal injury. The children
could:
R injure themselves on parts of the vehicle
R be seriously or fatally injured through
excessive exposure to extreme heat or cold
R injure themselves or cause an accident with
vehicle equipment that can be operated
even if the SmartKey is removed from the
ignition lock or removed from the vehicle,
such as seat adjustment, steering wheel
adjustment, or the memory function
If children open a door, they could injure other
persons or get out of the vehicle and injure
themselves or be injured by following traffic.
Do not expose the child restraint system to
direct sunlight. The child restraint system's
metal parts, for example, could become very
hot, and the child could be burned on these
parts.
GWARNING
Do not carry heavy or hard objects in the
passenger compartment or trunk unless they
are firmly secured in place.
Unsecured or improperly positioned cargo
increases a child's risk of injury in the event
of
R strong braking maneuvers
R sudden changes of direction
R an accident
Special seat belt retractor
All seat belts except the driver's seat belt are
equipped with a special seat belt retractor.
When activated, the special seat belt
retractor ensures the seat belt will not
slacken once the child restraint system has
been secured.
Installing a child restraint system:XAlways comply with the manufacturer's
installation instructions.XPull the seat belt smoothly from the inertia
reel.XEngage the seat belt tongue in the belt
buckle.
Activating the special seat belt retractor:
XPull the seat belt out fully and let the inertia
reel retract it again.
While the seat belt is retracting, you should
hear a ratcheting sound. The special seat
belt retractor is enabled.XPush down on the child restraint system to
take up any slack.
Removing a child restraint system/
deactivating the special seat belt retractor:
XAlways comply with the manufacturer's
installation instructions.XPress the seat belt release button and
guide the belt tongue to the belt outlet.
The special seat belt retractor is
deactivated.GWARNING
Never release the seat belt buckle while the
vehicle is in motion, since the special seat belt
retractor will be deactivated.
LATCH-type (ISOFIX) child seat anchors
in the rear
GWARNING
Children that are too large for a child restraint
must travel in seats using normal seat belts.
Position shoulder belt across the chest and
shoulder, not face or neck.
A booster seat may be necessary to achieve
proper seat belt positioning for children over
41 lb (18 kg) until they reach a height where
68Children in the vehicleSafety
Page 94 of 536

gases may enter the vehicle interior resulting
in unconsciousness and death.
! The trunk lid swings upwards when
opened. Therefore, make sure that there is
sufficient clearance above the trunk lid.
You can limit the opening angle of the trunk
lid. This could be useful, for example, if there
is insufficient space above the trunk lid. You
can switch the Trunk Opening-height
Restriction function on or off via COMAND
( Y page 269).
To open the trunk lid completely, a minimum
clearance of 5.90 ft (1.80 m) above the
ground is necessary.
Vehicles without trunk lid remote closing
feature: the trunk lid can be:
R opened and closed manually from outside
R opened automatically from outside
R opened automatically from inside
R locked separately
R unlocked with the mechanical key
R opened with the emergency release button
Vehicles with trunk lid remote closing
feature: the trunk lid can be:
R opened and closed manually from outside
R opened and closed automatically from
outside
R opened and closed automatically from
inside
R locked separately
R unlocked with the mechanical key
R opened with the emergency release button
Opening and closing manually
Opening
XPress the % button on the SmartKey.XPull handle :.XRaise the trunk lid.
Closing
GWARNING
To prevent possible personal injury, always
keep hands and fingers away from the trunk
opening when closing the trunk lid. Be
especially careful when small children are
around.
XPull the trunk lid down using recess :.XIf necessary, lock the vehicle with
the & button on the SmartKey
( Y page 82) or with KEYLESS-GO
( Y page 83).
i
If a KEYLESS-GO key is detected in the
trunk, the trunk lid cannot be locked and
then opens again.
92TrunkOpening/closing
Page 110 of 536

Do not drive the vehicle without the seat head
restraints. Head restraints are intended to
help reduce injuries during an accident.
! To avoid damage to the seats and the seat
heating, observe the following information:
R keep liquids from spilling on the seats. If
liquid is spilled on the seats, dry them as
soon as possible.
R if the seat covers are damp or wet, do not
switch on the seat heating. The seat
heating should also not be used to dry
the seats.
R clean the seat covers as recommended;
see the "Interior care" section.
R do not transport heavy loads on the
seats. Do not place sharp objects on the
seat cushions, e.g. knives, nails or tools.
The seats should only be occupied by
passengers, if possible.
R when the seat heating is in operation, do
not cover the seats with insulating
materials, e.g. blankets, coats, bags,
seat covers, child seats or booster seats.
! Make sure that there are no objects in the
footwell or behind the seats when resetting
the seats. There is a risk that the seats
and/or the objects could be damaged.
i The head restraints in the front seats are
equipped with the NECK-PRO system. For
this reason, it is not possible to remove the
head restraints from the front seats.
For design reasons, the rear-compartment
head restraints cannot be removed.
For more information, contact a qualified
specialist workshop.Adjusting the seats:Head restraint height;Seat height=Seat cushion angle?Seat cushion lengthASeat fore-and-aft adjustmentBBackrest angle
i If PRE-SAFE ®
has been activated, the
front-passenger seat and the electrically
adjustable rear seats are moved into a
more favorable position.
i You can store the seat settings using the
memory function ( Y page 118).
i To ensure the largest possible range of
seat settings, certain seat adjustment
functions will automatically activate other
seat adjustment functions.
i Depending on the seat fore-and-aft
setting, the head restraint height is
adjusted automatically.
Adjusting the rear seat electrically
You can only adjust the outer seats in the rear
electrically.
108SeatsSeats, steering wheel and mirrors