fuel type MERCEDES-BENZ S-COUPE 2015 Owners Manual
[x] Cancel search | Manufacturer: MERCEDES-BENZ, Model Year: 2015, Model line: S-COUPE, Model: MERCEDES-BENZ S-COUPE 2015Pages: 286, PDF Size: 29.85 MB
Page 31 of 286
QR codes for the rescue card
The QR code is secured in the fuel filler flap
and on the opposite side on the B-pillar. In the
event of an accident, rescue services can use the QR code to quickly find the appropriate
rescue card for your vehicle. The current res-
cue card contains the most important infor-
mation about your vehicle in a compact form, e.g. the routing of the electric cables.
You can find more information at https://
portal.aftersales.i.daimler.com.
Data stored in the vehicle
Data recording
This vehicle is capable of recording diagnostic information relating to vehicle operation, mal-
functions, and user settings. This may include information about the performance or status
of various systems, including but not limited
to, engine, throttle, steering or brake sys-
tems, that is stored and can be read out with
suitable devices, particularly when the vehi-
cle is serviced. The data obtained is used to
properly diagnose and service your vehicle or to further optimize and develop vehicle func-
tions.
COMAND/mbrace
If the vehicle is equipped with COMAND or
mbrace, additional data about the vehicle’s
operation, the use of the vehicle in certain
situations, and the location of the vehicle maybe compiled through COMAND or the mbrace
system.
For additional information please refer to the
COMAND User Manual and/or the mbrace
Terms and Conditions.
Event data recorders
This vehicle is equipped with an event data
recorder (EDR). The main purpose of an EDR is to record data that will assist in under-
standing how a vehicle’s systems performed
in certain crash or near crash-like situations,
such as during air bag deployment or when
hitting a road obstacle. The EDR is designed
to record data related to vehicle dynamics
and safety systems for a short period of time,
typically 30 seconds or less.
The EDR in this vehicle is designed to record
such data as:
R how various systems in your vehicle areoperating
R whether or not the driver and passenger
seat belts are fastened
R how far (if at all) the driver is depressing the
accelerator and/or brake pedal and
R how fast the vehicle is traveling
This data can help provide a better under-
standing of the circumstances in which
crashes and injuries occur. NOTE: EDR data is recorded by your vehicle only if a non-trivial
crash situation occurs; no data is recorded by
the EDR under normal driving conditions and no personal data (e.g., name, gender, age,
and crash location) are recorded. However,
other parties, such as law enforcement, can
combine the EDR data with the type of per-
sonal identification data routinely acquired
during a crash investigation.
To read data recorded by an EDR, special
equipment is required, and access to the vehi- cle or the EDR is needed. In addition to the
vehicle manufacturer, other parties that have
the special equipment, such as law enforce-
ment, can read the information by accessing
the vehicle or the EDR.
EDR data may be used in civil and criminal
matters as a tool in accident reconstruction,
accident claims, and vehicle safety. Since the Crash Data Retrieval CDR tool that is used to
extract data from the EDR is commercially
available, Mercedes-Benz USA, LLC
("MBUSA") expressly disclaims any and all lia- bility arising from the extraction of this infor-
mation by unauthorized Mercedes-Benz per-
sonnel.
Introduction29
Z
Page 62 of 286
ous situations, PRE-SAFE®
PLUS takes pre-
emptive measures to protect the vehicle
occupants.
Important safety notes
The intervention of PRE-SAFE ®
PLUS cannot
prevent an imminent collision.
The driver is not warned when PRE-SAFE ®
PLUS intervenes.
PRE-SAFE ®
PLUS does not intervene if the
vehicle is backing up.
PRE-SAFE ®
PLUS does not perform braking
actions while the vehicle is in motion or when
Parking Guidance is active.
Function
PRE-SAFE ®
PLUS intervenes in certain situa-
tions if the radar sensor system detects an
imminent head-on or rear-end collision.
PRE-SAFE ®
PLUS takes the following meas-
ures depending on the hazardous situation
detected:
R if the radar sensor system detects that a
head-on collision is imminent, the seat
belts are pre-tensioned.
R if the radar sensor system detects that a
rear-end collision is imminent:
- the brake pressure is increased if the
driver applies the brakes when the vehi-
cle is stationary.
- the seat belts are pre-tensioned.
The PRE-SAFE ®
PLUS braking application is
canceled:
R if the accelerator pedal is depressed when
a gear is engaged
R if the risk of a collision passes or is no lon-
ger detected
R if DISTRONIC PLUS indicates an intention
to pull away
If the hazardous situation passes without
resulting in an accident, the original settings
are restored.
Automatic measures after an acci- dent
Immediately after an accident, the following
measures are implemented, depending on
the type and severity of the impact:
R the hazard warning lamps are activated
R the emergency lighting is activated
R the vehicle doors are unlocked
R the front side windows are lowered
R the electrically adjustable steering wheel is
raised
R the engine is switched off and the fuel sup-
ply is cut off
R vehicles with mbrace: automatic emer-
gency call
Children in the vehicle
Important safety notes
Accident statistics show that children
secured in the rear seats are safer than chil-
dren secured in the front-passenger seat. For
this reason, Mercedes-Benz strongly advises
that you install a child restraint system on a
rear seat. Children are generally better pro-
tected there.
If a child younger than 12 years and under 5 ft
(1.50 m) in height is traveling in the vehicle:
R always secure the child in a child restraint
system suitable for Mercedes-Benz vehi-
cles. The child restraint system must be
appropriate to the age, weight and size of
the child
R be sure to observe the instructions and
safety notes in this section in addition to
the child restraint system manufacturer's
installation instructions
R be sure to observe the instructions and
safety notes on the "Occupant classifica-
tion system (OCS)" ( Ypage 51)
60Children in the vehicle
Safety
Page 125 of 286
clean water. Seek medical assistance with-out delay.
R If fuel is swallowed, seek medical assis-
tance without delay. Do not induce vomit-ing.
R Immediately change out of clothing which
has come into contact with fuel.
GWARNING
Electrostatic buildup can create sparks and
ignite fuel vapors. There is a risk of fire and
explosion.
Always touch the vehicle body before opening
the fuel filler flap or touching the fuel pump
nozzle. Any existing electrostatic buildup is
thereby discharged.
Do not get into the vehicle again during the
refueling process. Otherwise, electrostatic
charge could build up again.
!Do not use diesel to refuel vehicles with a
gasoline engine. Do not switch on the igni-
tion if you accidentally refuel with the
wrong fuel. Otherwise, the fuel will enter
the fuel system. Even small amounts of the wrong fuel could result in damage to the
fuel system and the engine. Notify a quali-
fied specialist workshop and have the fuel
tank and fuel lines drained completely.
!Overfilling the fuel tank could damage the
fuel system.
!Take care not to spill any fuel on painted
surfaces. You could otherwise damage the
paintwork.
!Use a filter when refueling from a fuel can.
Otherwise, the fuel lines and/or injection
system could be blocked by particles from
the fuel can.
If you overfill the fuel tank, fuel could spray
out when the fuel pump nozzle is removed.
For further information on fuel and fuel quality
( Y page 276).
Refueling
General information
Pay attention to the important safety notes ( Y page 122).
If you unlock/lock the vehicle from the out-
side, the fuel filler flap also unlocks/locks.
The position of the fuel filler cap is displayed 8 in the instrument cluster. The arrow
next to the filling pump indicates the side of
the vehicle.
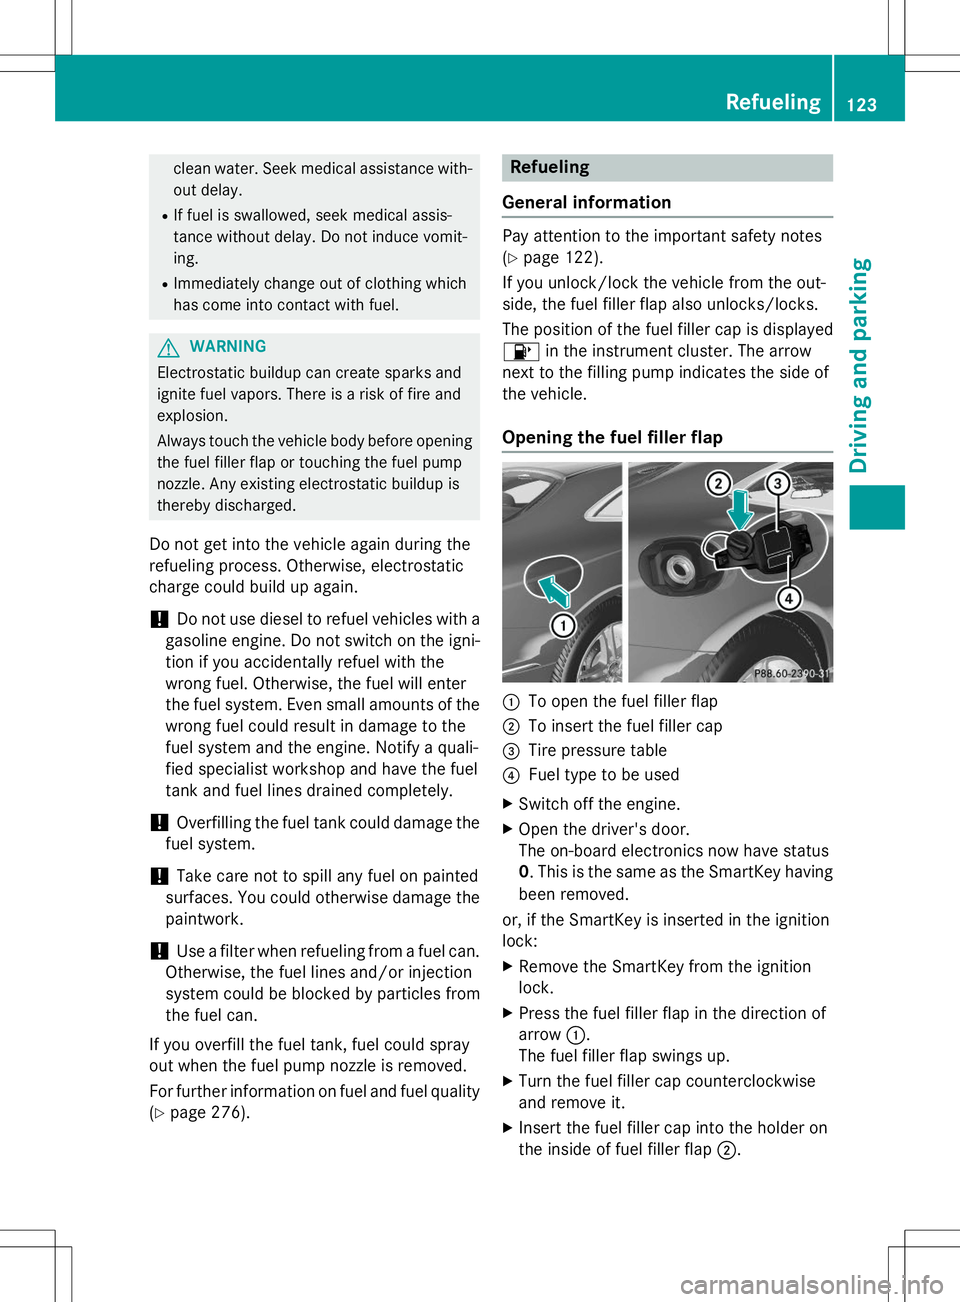
Opening the fuel filler flap
:To open the fuel filler flap
;To insert the fuel filler cap
=Tire pressure table
?Fuel type to be used
X Switch off the engine.
X Open the driver's door.
The on-board electronics now have status0. This is the same as the SmartKey having
been removed.
or, if the SmartKey is inserted in the ignitionlock:
X Remove the SmartKey from the ignitionlock.
X Press the fuel filler flap in the direction of
arrow :.
The fuel filler flap swings up.
X Turn the fuel filler cap counterclockwise
and remove it.
X Insert the fuel filler cap into the holder on
the inside of fuel filler flap ;.
Refueling123
Driving and parking
Z
Page 242 of 286

Useful information
iThis Operator's Manual describes all
models and all standard and optional equip- ment of your vehicle available at the time of
publication of the Operator's Manual.
Country-specific differences are possible.
Please note that your vehicle may not be
equipped with all features described. This
also applies to safety-related systems and
functions.
iRead the information on qualified special-
ist workshops ( Ypage 27).
Important safety notes
GWARNING
If wheels and tires of the wrong size are used,
the wheel brakes or suspension components
may be damaged. There is a risk of an acci-
dent.
Always replace wheels and tires with those
that fulfill the specifications of the originalpart.
When replacing wheels, make sure to use the
correct:
R designation
R model
When replacing tires, make sure to use the
correct:
R designation
R manufacturer
R model
GWARNING
A flat tire severely impairs the driving, steer-
ing and braking characteristics of the vehicle.
There is a risk of accident.
Tires without run-flat characteristics:
R do not drive with a flat tire.
R immediately replace the flat tire with your
emergency spare wheel or spare wheel, or
consult a qualified specialist workshop.
Tires with run-flat characteristics:
R pay attention to the information and warn-
ing notices on MOExtended tires (tires with
run-flat characteristics).
Accessories that are not approved for your
vehicle by Mercedes-Benz or that are not
being used correctly can impair operating
safety.
Before purchasing and using non-approved
accessories, visit a qualified specialist work-
shop and inquire about: R suitability
R legal stipulations
R factory recommendations
Information on the dimensions and types of
wheels and tires for your vehicle can be found in the "Wheel/tire combinations" section( Y page 266).
Information on air pressure for the tires on
your vehicle can be found:
R on the vehicle's Tire and Loading Informa-
tion placard on the B-pillar ( Ypage 249)
R on the tire pressure label on the fuel filler
flap ( Ypage 123)
R under "Tire pressure" ( Ypage 243)
Operation
Information on driving
If the vehicle is heavily loaded, check the tire
pressures and correct them if necessary.
While driving, pay attention to vibrations,
noises and unusual handling characteristics,
e.g. pulling to one side. This may indicate that the wheels or tires are damaged. If you sus-
pect that a tire is defective, reduce your
speed immediately. Stop the vehicle as soon
as possible to check the wheels and tires for
damage. Hidden tire damage could also be
causing the unusual handling characteristics.
If you find no signs of damage, have the tires and wheels checked at a qualified specialist
workshop.
240Operation
Wheels and tires
Page 251 of 286
uation on the Tire and Loading Information
placard on the driver's side
B-pillar ( Ypage 243).
Additional tire pressure values for different loads can also be found on the tire pressure
table on the inside of the fuel filler flap( Y page 243).
X Make sure that the tire pressure is correct
on all four wheels.
X Make sure that the SmartKey is in position
2 in the ignition lock.
X Use ò on the steering wheel to call up
the list of menus.
X Press the 9or: button on the steer-
ing wheel to select the
Servicemenu.
X Press the abutton.
X Press the 9or: button to select
Tire Pressure.
X Press the abutton.
The multifunction display shows the cur-
rent tire pressure for the individual tires or
the
Tirepressurewillbedisplayed
after driving a few minutesmes-
sage.
X Press the :button.
The
Use Current Pressures as New
Reference Valuesmessage appears in
the multifunction display.
If you wish to confirm the restart: X Press the abutton.
The
Tire Press. Monitor Restarted
message appears in the multifunction dis- play.
After driving for a few minutes, the system checks whether the current tire pressures
are within the specified range. The new tire
pressures are then accepted as reference
values and monitored.
If you wish to cancel the restart: X Press the %button.
The tire pressure values stored at the last
restart will continue to be monitored.
Radio type approval for the tire pres-
sure monitor
In certain countries, a radio type approval for
the tire pressure monitor may be required.
The radio type approval number for the tire
pressure monitor can be found in the "Wheels
and tires" section of the Digital Operator's
Manual.
Loading the vehicle
Instruction labels for tires and loads
GWARNING
Overloaded tires can overheat, causing a
blowout. Overloaded tires can also impair the steering and driving characteristics and lead
to brake failure. There is a risk of accident.
Observe the load rating of the tires. The load
rating must be at least half of the GAWR of
your vehicle. Never overload the tires by
exceeding the maximum load.
Two instruction labels on your vehicle show
the maximum possible load.
(1) The Tire and Loading Information placard is on the B-pillar on the driver's side. The
Tire and Loading Information placard
shows the maximum permissible number
of occupants and the maximum permis-
sible vehicle load. It also contains details
of the tire sizes and corresponding pres-
sures for tires mounted at the factory.
(2) The vehicle identification plate is on the B-pillar on the driver's side. The vehicle
identification plate informs you of the
gross vehicle weight rating. It is made up
of the vehicle weight, all vehicle occu-
pants, the fuel and the cargo. You can
also find information about the maximum gross axle weight rating on the front and
rear axle.
The maximum gross axle weight rating is the maximum weight that can be carried
by one axle (front or rear axle). Never
exceed the maximum load or the maxi-
Loading the vehicle249
Wheels and ti res
Z
Page 269 of 286
These tires have been specially adapted foruse with the control systems, such as ABS
or ESP ®
, and are marked as follows:
R MO = Mercedes-Benz Original
R MOE = Mercedes-Benz Original Extended
(tires featuring run-flat characteristics)
R MO1 = Mercedes-Benz Original (only cer-
tain AMG tires)
Mercedes-Benz Original Extended tires
may only be used on wheels that have been
specifically approved by Mercedes-Benz.
Only use tires, wheels or accessories tes-
ted and approved by Mercedes-Benz. Cer-
tain characteristics, e.g. handling, vehicle
noise emissions or fuel consumption, may
otherwise be adversely affected. In addi-
tion, when driving with a load, tire dimen-
sion variations could cause the tires to
come into contact with the bodywork and
axle components. This could result in dam- age to the tires or the vehicle.
Mercedes-Benz accepts no liability for
damage resulting from the use of tires,
wheels or accessories other than those tes-
ted and approved.
Information on tires, wheels and approved
combinations can be obtained from any
qualified specialist workshop.
Overview of abbreviations used in the follow- ing tire tables: R BA: both axles
R FA: front axle
R RA: rear axle
The recommended pressures for various
operating conditions can be found:
R on the Tire and Loading Information placard
with the recommended tire pressures on
the B-pillar on the driver's side
R in the tire pressure table on the inside of the
fuel filler flap
Observe the notes on recommended tire
pressures under various operating conditions ( Y page 243). Check tire pressures regularly, and only when
the tires are cold. Comply with the mainte-
nance recommendations of the tire manufac-
turer in the vehicle document wallet.
Notes on the vehicle equipment – always
equip the vehicle with:
R tires of the same size on a given axle (left/
right)
R the same type of tires at a given time (sum-
mer tires, winter tires, MOExtended tires)
Exception: it is permissible to install a dif-
ferent type or make in the event of a flat
tire. Observe the "MOExtended tires (tires
with run-flat characteristics" section( Y page 221).
Vehicles equipped with MOExtended tires are
not equipped with a TIREFIT kit at the factory.
It is therefore recommended that you addi-
tionally equip your vehicle with a TIREFIT kit if you mount tires that do not feature run-flat
properties, e.g. winter tires. A TIREFIT kit may
be obtained from a qualified specialist work-shop.
iNot all wheel and tire combinations are
available at the factory for all countries.
iOn the following pages, you can find infor-
mation on approved wheel rims and tire
sizes for equipping your vehicle with winter tires. Winter tires are not available at the
factory as standard equipment or optional
extras.
If you would like to equip your vehicle with
approved winter tires, you may also, in cer-
tain circumstances, require rims of the
appropriate size. The size of the approved
winter tires may deviate from that of the
standard tires. This is dependent on the
model and the equipment installed at the
factory.
The tires and wheel rims, as well as further information, can be obtained at a qualified
specialist workshop.
Wheel and tire combinations267
Wheels and tires
Z