steering wheel MERCEDES-BENZ S430 2002 W220 User Guide
[x] Cancel search | Manufacturer: MERCEDES-BENZ, Model Year: 2002, Model line: S430, Model: MERCEDES-BENZ S430 2002 W220Pages: 430, PDF Size: 20.81 MB
Page 100 of 430
97 Restraint systems
Te ch n i c a l
data Instruments
and controlsOperationDrivingInstrument
cluster displayPractical hints Car care Index Safety guidelines for the seat belt, emergency
tensioning retractor and airbag
If you believe that, even with the use of these
guidelines, it would be safer for your rear seat
occupants to have both rear door mounted side
airbags deactivated, then deactivation can be
accomplished upon your written election to do so at
your authorized Mercedes-Benz Center at an
additional cost. Please contact your local
authorized Mercedes-Benz Center or call our
Customer Assistance Center at 1-800-FOR-
MERCedes (1-800-367-6372) for details.Wa r n i n g !
• Damaged seat belts or belts that were highly
stressed in an accident must be replaced and
their anchoring points must also be checked.
Use only belts installed or supplied by an
authorized Mercedes-Benz Center.• Airbags and “ETR’s” are designed to function
on a one-time-only basis. An airbag or
emergency tensioning retractor (ETR) that was
activated must be replaced.• Do not pass belts over sharp edges.
• Do not make any modification that could
change the effectiveness of the belts.• No modifications of any kind may be made to
any components or wiring of the “SRS”. This
includes changing or removing any component
or part of the “SRS”, the installation of
additional trim material, badges etc. over the
steering wheel hub, front passenger airbag
cover, door trim panels, or door frame trims,
and installation of additional electrical /
electronic equipment on or near “SRS”
components and wiring. Keep area between
airbags and occupants free from objects (e.g.
packages, purses, umbrellas, etc.).• Do not hang items such as coat hangers from
the coat hooks or handles over the door. These
items may turn into projectiles and cause head
and other injuries when curtain airbag is
deployed.• An airbag system component within the
steering wheel gets hot after the airbag has
inflated. Do not touch.
Page 105 of 430
102 Steering wheel adjustment
Te ch n i c a l
data Instruments
and controlsOperationDrivingInstrument
cluster displayPractical hints Car care Index
Steering wheel adjustment
To adjust the steering wheel position, turn the electronic
key in starter switch to position 1 or 2. With the driver’s
door open, the steering wheel can also be operated with
the electronic key removed or in starter switch
position 0. However any adjustment will be cancelled
and the steering wheel will return to it’s position stored
in memory if the driver’s door is closed or the electronic
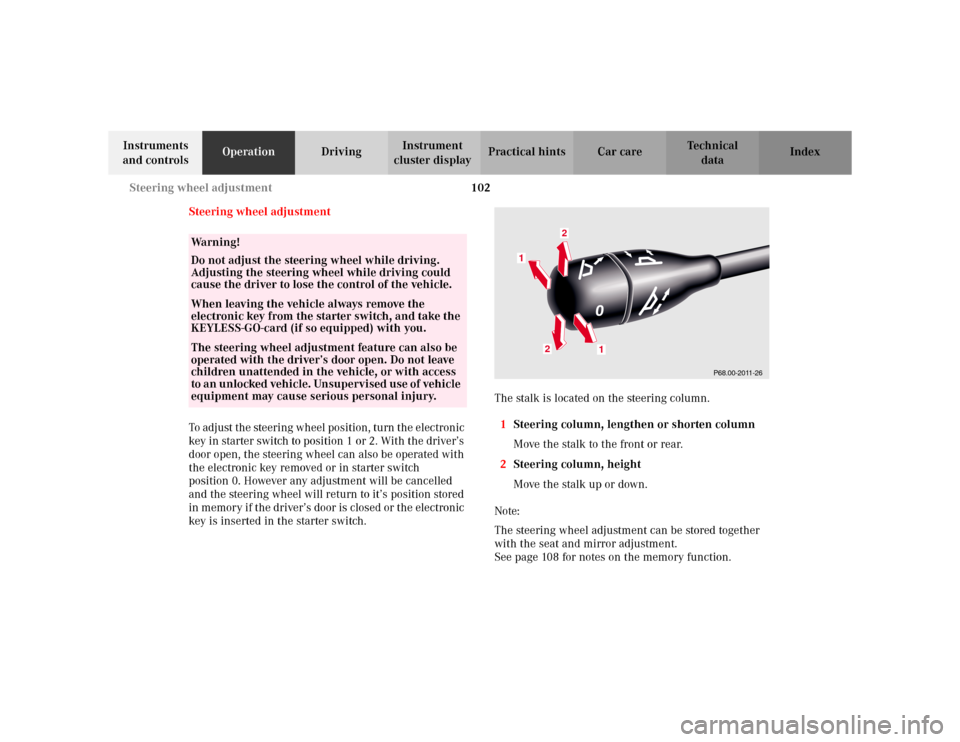
key is inserted in the starter switch.The stalk is located on the steering column.
1Steering column, lengthen or shorten column
Move the stalk to the front or rear.
2Steering column, height
Move the stalk up or down.
Note:
The steering wheel adjustment can be stored together
with the seat and mirror adjustment.
See page 108 for notes on the memory function.
Wa r n i n g !
Do not adjust the steering wheel while driving.
Adjusting the steering wheel while driving could
cause the driver to lose the control of the vehicle.When leaving the vehicle always remove the
electronic key from the starter switch, and take the
KEYLESS-GO-card (if so equipped) with you. The steering wheel adjustment feature can also be
operated with the driver’s door open. Do not leave
children unattended in the vehicle, or with access
to an unlocked vehicle. Unsupervised use of vehicle
equipment may cause serious personal injury.
P68.00-2011-26
1
1
2
2
Page 106 of 430
103 Rear view mirrors
Te ch n i c a l
data Instruments
and controlsOperationDrivingInstrument
cluster displayPractical hints Car care Index Rear view mirrors
Inside rear view mirror
Manually adjust the inside rear view mirror.
Storing inside rear view mirror positions
The inside rear view mirror positions are stored in
memory with the seat / steering wheel / exterior rear
view mirror positions and can be recalled when
necessary. See page 108 for notes on the memory
function.
Inside rear view mirror, automatic antiglare
Antiglare mode:
With the electronic key in starter switch position 2, the
mirror reflection brightness responds to changes in
light sensitivity.
With the gear selection lever in position “R”, or with the
interior light switched on, the mirror brightness does
not respond to changes in light sensitivity.Note:
The automatic antiglare function does not react, if
incoming light is not aimed directly at sensors in the
inside rear view mirror.
The automatic antiglare function will not react for
example, if the rear window sun shade is in the raised
position.
Wa r n i n g !
In the case of an accident liquid electrolyte may
escape the mirror housing when the mirror glass
breaks.Electrolyte has an irritating effect. Do not allow the
liquid to come into contact with eyes, skin,
clothing, or respiratory system. In cases it does,
immediately flush affected area with water, and
seek medical help if necessary.
Page 107 of 430
104 Rear view mirrors
Te ch n i c a l
data Instruments
and controlsOperationDrivingInstrument
cluster displayPractical hints Car care Index
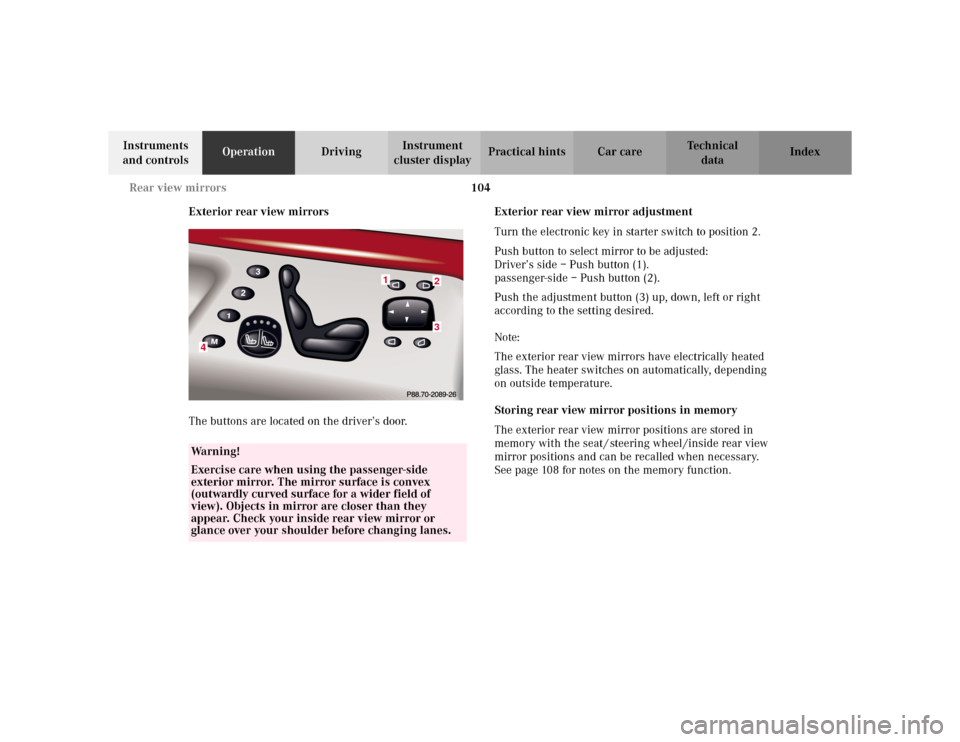
Exterior rear view mirrors
The buttons are located on the driver’s door.Exterior rear view mirror adjustment
Turn the electronic key in starter switch to position 2.
Push button to select mirror to be adjusted:
Driver’s side – Push button (1).
passenger-side – Push button (2).
Push the adjustment button (3) up, down, left or right
according to the setting desired.
Note:
The exterior rear view mirrors have electrically heated
glass. The heater switches on automatically, depending
on outside temperature.
Storing rear view mirror positions in memory
The exterior rear view mirror positions are stored in
memory with the seat / steering wheel /inside rear view
mirror positions and can be recalled when necessary.
See page 108 for notes on the memory function.
Wa r n i n g !
Exercise care when using the passenger-side
exterior mirror. The mirror surface is convex
(outwardly curved surface for a wider field of
view). Objects in mirror are closer than they
appear. Check your inside rear view mirror or
glance over your shoulder before changing lanes.
23
4
1
Page 111 of 430
108 Memory function
Te ch n i c a l
data Instruments
and controlsOperationDrivingInstrument
cluster displayPractical hints Car care Index
Memory function
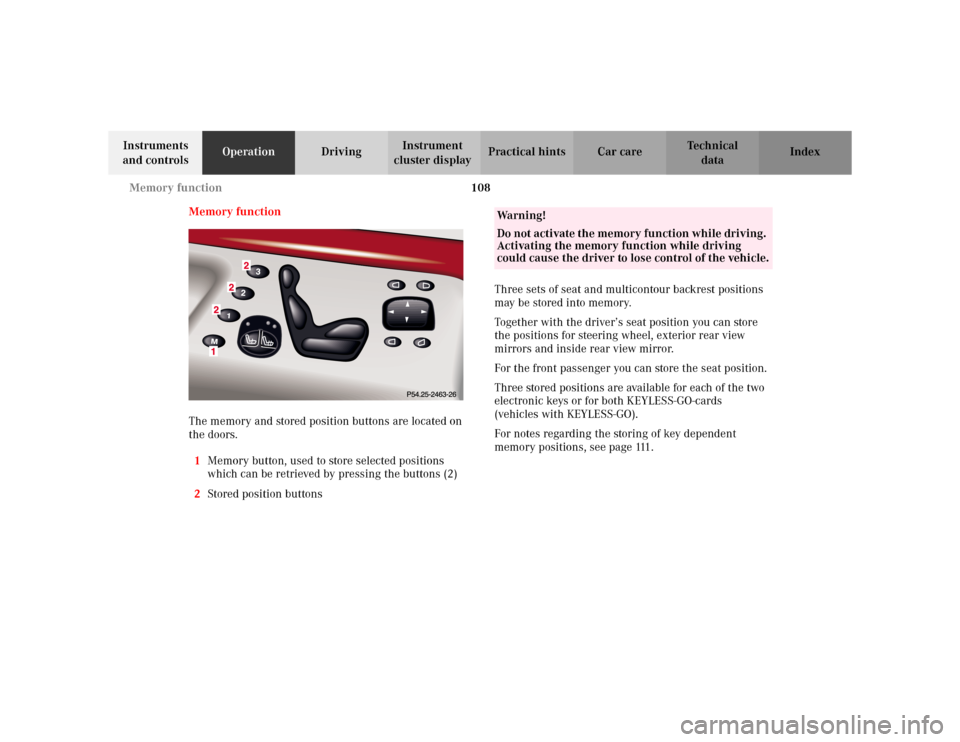
The memory and stored position buttons are located on
the doors.
1Memory button, used to store selected positions
which can be retrieved by pressing the buttons (2)
2Stored position buttonsThree sets of seat and multicontour backrest positions
may be stored into memory.
Together with the driver’s seat position you can store
the positions for steering wheel, exterior rear view
mirrors and inside rear view mirror.
For the front passenger you can store the seat position.
Three stored positions are available for each of the two
electronic keys or for both KEYLESS-GO-cards
(vehicles with KEYLESS-GO).
For notes regarding the storing of key dependent
memory positions, see page 111.
Wa r n i n g !
Do not activate the memory function while driving.
Activating the memory function while driving
could cause the driver to lose control of the vehicle.
Page 112 of 430
109 Memory function
Te ch n i c a l
data Instruments
and controlsOperationDrivingInstrument
cluster displayPractical hints Car care Index Storing positions into memory
Driver’s seat: with the electronic key in starter switch
position 1 or 2 or with the driver’s door open.
Front passenger seat and rear seats: with electronic key
in starter switch position 1 or 2 or the relevant doors
open.
Adjust the seat and multicontour backrest to the desired
position. You can also adjust the steering wheel, the
exterior rear view mirrors electrically and the inside
rear view mirror by hand for the driver’s seat. See
page 104 for exterior rear view mirror adjustment and
page 102 for steering wheel adjustment.
Push memory button “M”, release and push a stored
position button “1”, “2” or “3” within 3 seconds.Recalling positions from memory
To recall a seat / steering wheel and rear view mirror
position, push and hold button “1”, “2” or “3” until seat /
steering wheel and rear view mirror movement has
stopped.
The seat / steering wheel and rear view mirror
movement stops when the button is released.
Caution!
Do not operate the power seats using the memory
button if the seat backrest is in an excessively reclined
position. Doing so could cause damage to front or rear
seats.
First move backrest to an upright position.
Page 113 of 430
110 Memory function
Te ch n i c a l
data Instruments
and controlsOperationDrivingInstrument
cluster displayPractical hints Car care Index
Important!
Prior to operating the vehicle, the driver should check
and adjust if necessary the seat height, seat position
fore and aft, and backrest angle to insure adequate
control, reach and comfort. The head restraint should
also be adjusted for proper height. See also airbag
section for proper seat positioning.
In addition, also adjust the steering wheel to ensure
adequate control, reach, operation and comfort. Both the
inside and outside rear view mirrors should be adjusted
for adequate rearward vision.
Fasten seat belts. Infants and small children should be
seated in a properly secured restraint system that
complies with U.S. Federal Motor Vehicle Safety
Standard 213 and Canadian Motor Vehicle Safety
Standard 213.
All seat, head restraint, steering wheel, and rear view
mirror adjustments as well as fastening of seat belts
should be done before the vehicle is put into motion.
Wa r n i n g !
Children 12 years old and under must never ride in
the front seat, except in a Mercedes-Benz
authorized BabySmart
TM compatible child seat,
which operates with the BabySmart
TM system
installed in the vehicle to deactivate the passenger-
side front airbag when it is properly installed.
Otherwise they will be struck by the airbag when it
inflates in a crash. If this happens, serious or fatal
injury can result.
According to accident statistics, children are safer
when properly restrained in the rear seating
positions than in the front seating positions.
Infants and small children must ride in back seats
and be seated in an appropriate infant or child
restraint system, which is properly secured with
the vehicle’s seat belt, fully in accordance with the
child seat manufacturer’s instructions.A child’s risk of serious or fatal injuries is
significantly increased if the child restraints are
not properly secured in the vehicle and the child is
not properly secured in the child restraint.
Page 120 of 430
117 Instrument cluster
Te ch n i c a l
data Instruments
and controlsOperationDrivingInstrument
cluster displayPractical hints Car care Index Trip odometer (13)
To reset to “0” miles / km:
Activate the instrument cluster if it is not already
activated by pressing theJbutton on the instrument
cluster.
Press the è or ÿ button on the multifunction
steering wheel repeatedly until the trip odometer
appears if it is not displayed. See page 122.
Press button Jon the instrument cluster until the trip
odometer is reset.Tachometer (16)
The red marking on the tachometer denotes excessive
engine speed.
Avoid this engine speed, as it may result in serious
engine damage that is not covered by the
Mercedes-Benz Limited Warranty.
To help protect the engine, the fuel supply is interrupted
if the engine is operated within the red marking.
Page 121 of 430
118 Multifunction steering wheel, multifunction display
Te ch n i c a l
data Instruments
and controlsOperationDrivingInstrument
cluster displayPractical hints Car care Index
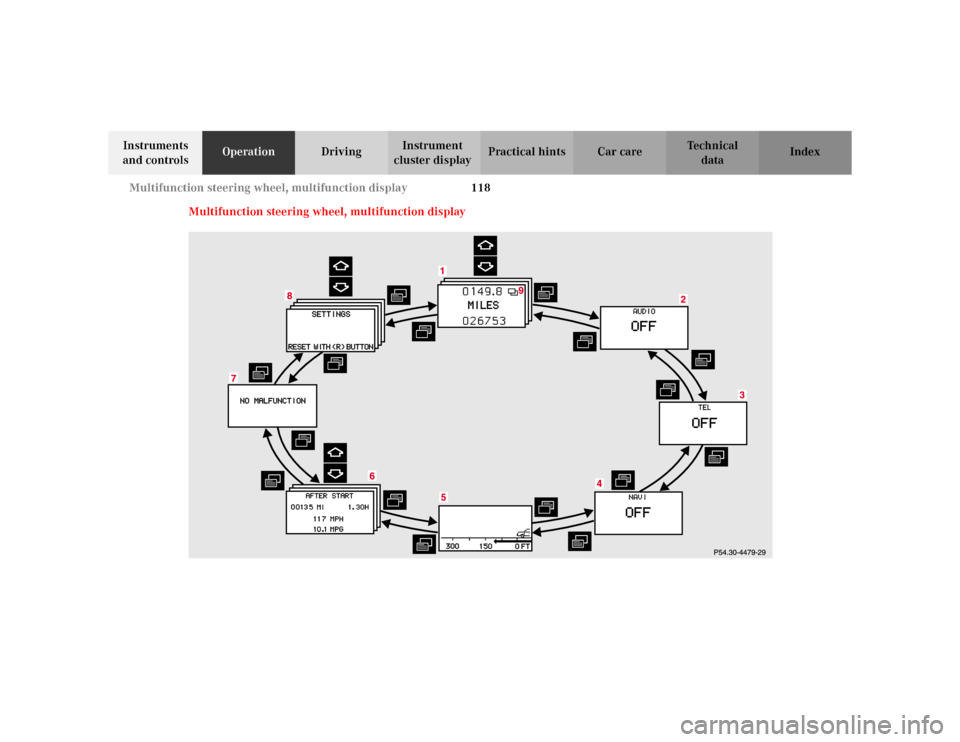
Multifunction steering wheel, multifunction display
Page 122 of 430
119 Multifunction steering wheel, multifunction display
Te ch n i c a l
data Instruments
and controlsOperationDrivingInstrument
cluster displayPractical hints Car care Index Depending on your vehicle’s equipment, you may use
the buttons on the multifunction steering wheel to call
up, control and set the following systems in the
multifunction display:
1Trip and main odometer, see page 122
Flexible service system (FSS), see page 149
Tire inflation pressure monitor, see page 152
Engine oil level indicator, see page 156
2Audio systems, see page 124
Radio, seepage124
CD player, see page 125
Cassette player, see page 126
3Telephone, see page 1274Navigation system, see page 132
5Distronic (DTR), see page 133
6Trip computer, see page 134
After start
After reset
Range
7Malfunction message memory, see page 136
8Individual settings, see page 138
9Malfunction messages are stored in memory (7), see
page 136.
Press the è or ÿ button repeatedly until the
required system is displayed.
The display advances by one system each time the
button is pressed.
You may call up additional displays within some of these
categories by pressing the j or k button.