MERCEDES-BENZ S600 2010 W221 Owner's Manual
Manufacturer: MERCEDES-BENZ, Model Year: 2010, Model line: S600, Model: MERCEDES-BENZ S600 2010 W221Pages: 548, PDF Size: 12.48 MB
Page 181 of 548
Such damages are not covered by the
Mercedes-Benz Limited Warranty.
Only use round discs with a diameter of
12 cm.
Notes about handling CDs/DVDs
ROnly hold discs by the edge.
RHandle discs carefully to prevent playback
problems.
RAvoid getting scratches, fingerprints and
dust on discs.
RClean discs from time to time with a
commercially-available cleaning cloth. Do
not wipe them with a circular motion, but
only in straight lines from the center
outwards.
ROnly use a pen designed for such a purpose
to label discs.
RPlace discs back in their boxes after use.
RProtect discs from heat and direct sunlight.
Inserting/ejecting CDs and DVDs
GObserve Safety notes, see page 176.
iIf the CD/DVD has a printed side, this
must face upwards when the CD/DVD is
inserted. If neither side is printed, the side
to be played should face downwards.
DVD changer
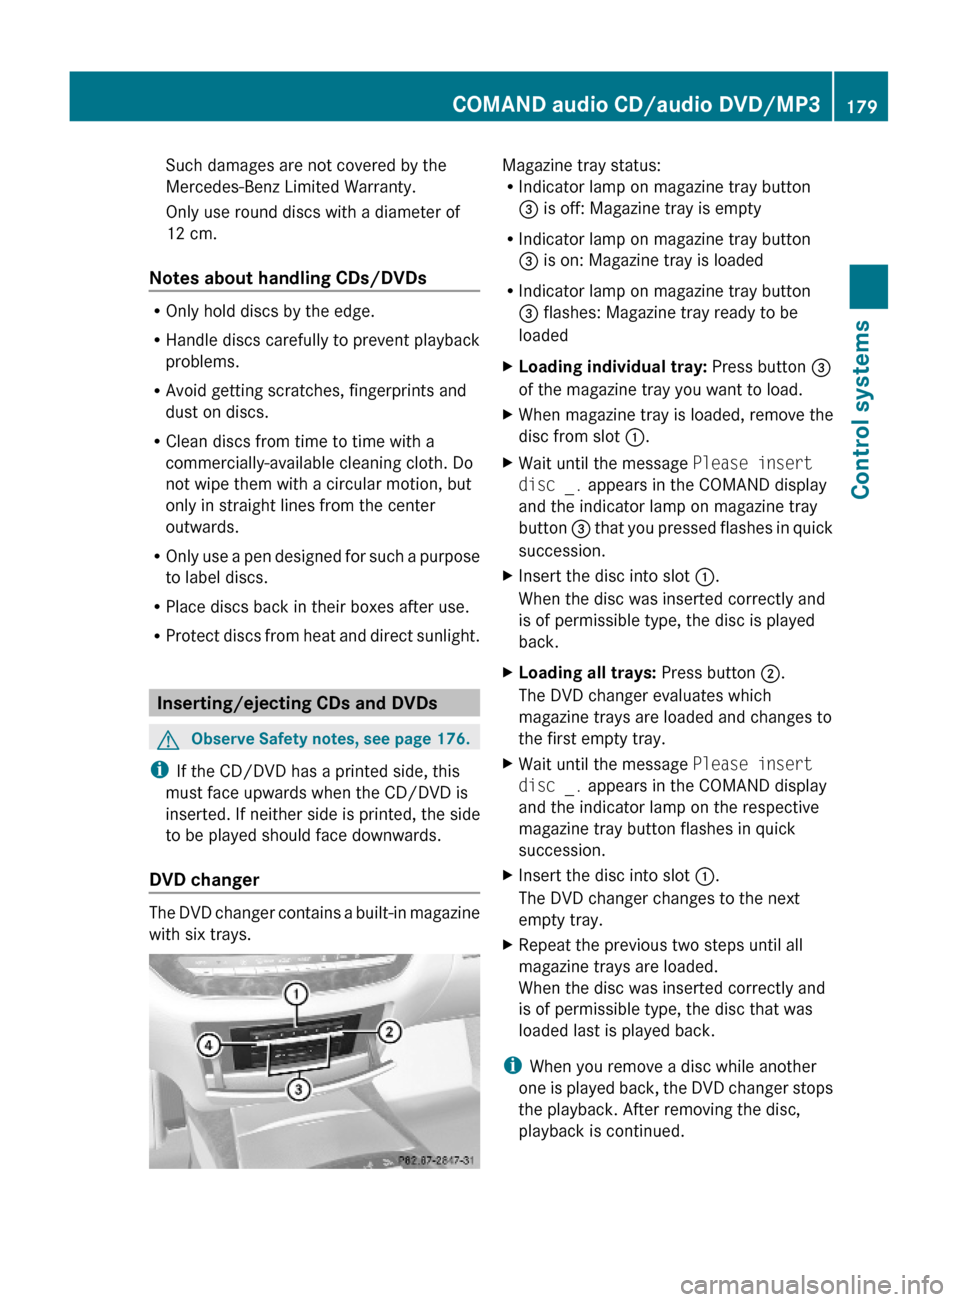
The DVD changer contains a built-in magazine
with six trays.
Magazine tray status:RIndicator lamp on magazine tray button
= is off: Magazine tray is empty
RIndicator lamp on magazine tray button
= is on: Magazine tray is loaded
RIndicator lamp on magazine tray button
= flashes: Magazine tray ready to be
loaded
XLoading individual tray: Press button =
of the magazine tray you want to load.
XWhen magazine tray is loaded, remove the
disc from slot :.
XWait until the message Please insert
disc _. appears in the COMAND display
and the indicator lamp on magazine tray
button = that you pressed flashes in quick
succession.
XInsert the disc into slot :.
When the disc was inserted correctly and
is of permissible type, the disc is played
back.
XLoading all trays: Press button ;.
The DVD changer evaluates which
magazine trays are loaded and changes to
the first empty tray.
XWait until the message Please insert
disc _. appears in the COMAND display
and the indicator lamp on the respective
magazine tray button flashes in quick
succession.
XInsert the disc into slot :.
The DVD changer changes to the next
empty tray.
XRepeat the previous two steps until all
magazine trays are loaded.
When the disc was inserted correctly and
is of permissible type, the disc that was
loaded last is played back.
iWhen you remove a disc while another
one is played back, the DVD changer stops
the playback. After removing the disc,
playback is continued.
COMAND audio CD/audio DVD/MP3179Control systems221_AKB; 6; 20, en-USd2ugruen,Version: 2.11.8.12009-09-24T13:28:17+02:00 - Seite 179Z
Page 182 of 548
XRemoving a disc: Press desired magazine
tray button =.
XRemove the disc from slot :.
If you do not remove the disc from slot :,
the DVD changer will automatically pull it
back in after a short time.
XRemoving all discs: Press button ?.
The DVD changer ejects the disc from the
currently selected magazine tray.
XRemove the disc from slot :.
The DVD changer changes to the next
loaded magazine tray and ejects the disc.
XRepeat the last step until all magazine trays
are empty.
CD/DVD drive (vehicles with Rear Seat
Entertainment System)
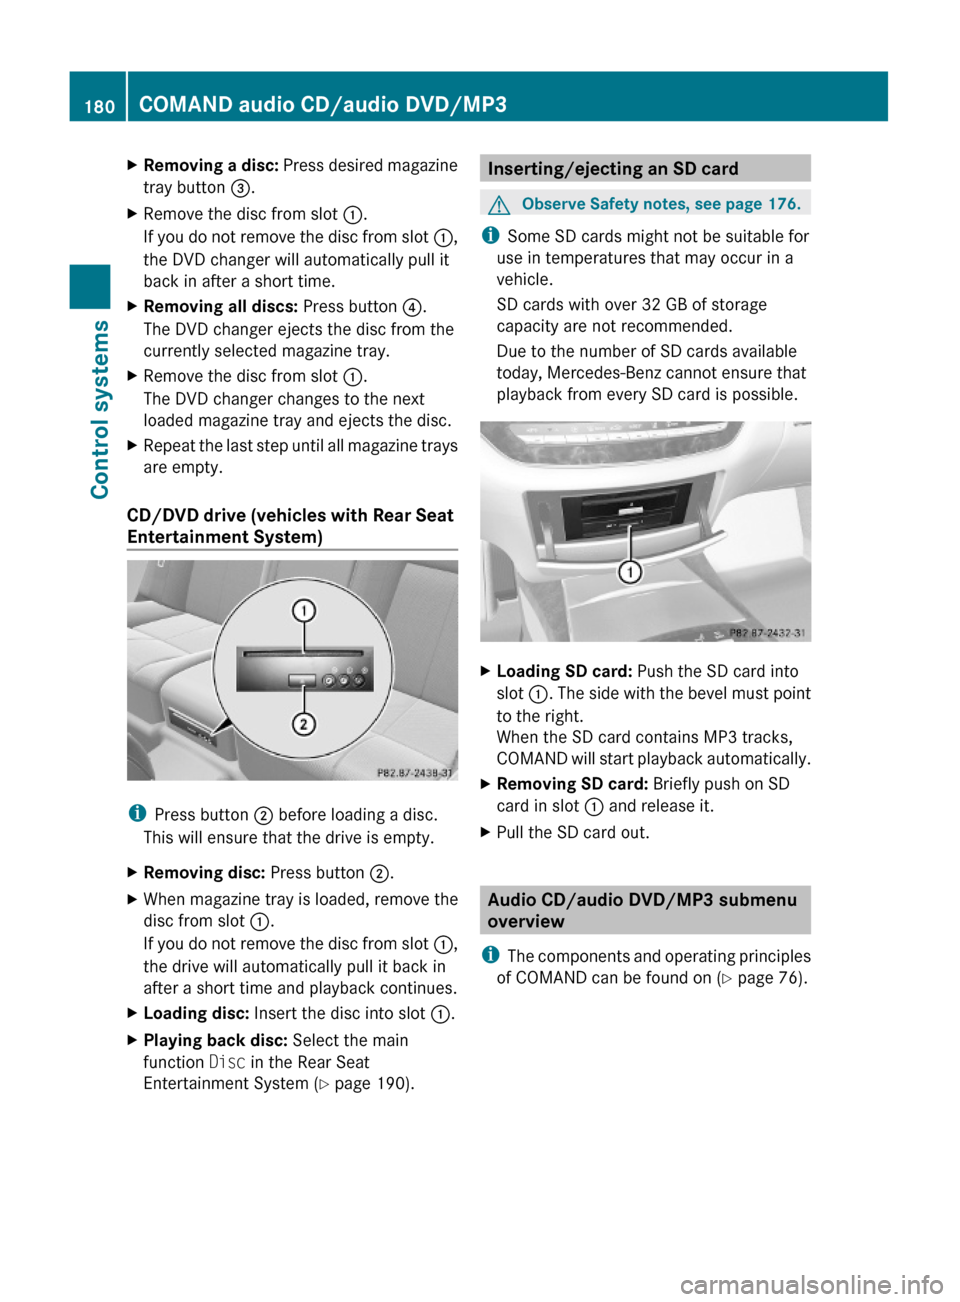
iPress button ; before loading a disc.
This will ensure that the drive is empty.
XRemoving disc: Press button ;.XWhen magazine tray is loaded, remove the
disc from slot :.
If you do not remove the disc from slot :,
the drive will automatically pull it back in
after a short time and playback continues.
XLoading disc: Insert the disc into slot :.XPlaying back disc: Select the main
function Disc in the Rear Seat
Entertainment System (Y page 190).
Inserting/ejecting an SD cardGObserve Safety notes, see page 176.
iSome SD cards might not be suitable for
use in temperatures that may occur in a
vehicle.
SD cards with over 32 GB of storage
capacity are not recommended.
Due to the number of SD cards available
today, Mercedes-Benz cannot ensure that
playback from every SD card is possible.
XLoading SD card: Push the SD card into
slot :. The side with the bevel must point
to the right.
When the SD card contains MP3 tracks,
COMAND will start playback automatically.
XRemoving SD card: Briefly push on SD
card in slot : and release it.
XPull the SD card out.
Audio CD/audio DVD/MP3 submenu
overview
iThe components and operating principles
of COMAND can be found on (Y page 76).
180COMAND audio CD/audio DVD/MP3Control systems
221_AKB; 6; 20, en-USd2ugruen,Version: 2.11.8.12009-09-24T13:28:17+02:00 - Seite 180
Page 183 of 548
CD, DVD-A,
MP3II/ ¯ /M
(audio DVD
mode only)REC (audio CD
mode only)SearchMediaSoundGroup
(audio DVD
mode only)Pausing
playback IICopying audio
data to hard diskCurrent
Track ListSelecting
mediumTrebleNormal
Track
SequenceStopping
playback ¯FolderBassMedium MixRestarting
playback MKeyword
SearchBalance/
FaderTrack List
Mix (MP3
mode only)Playlists3D SoundGracenote
Media
Database
(audio CD
mode only)ArtistsActive
Source for
RearAlbumsRear OFFTrackª Show
Track
Information
(MP3 mode
only)GenresComposersYearSwitching to audio CD, audio DVD or
MP3 modeXLoad CD/DVD ( Y page 179) or SD card
( Y page 180).
or
XConnect a USB device to the USB socket in
the glove box.orXSelect Audio Q Media , then select Disc,
Memory Card , Music Register , USB 26
,
Media Interface ... .
or
XPress shortcut button R once or twice.26
Selects the built-in USB socket in the glove box.COMAND audio CD/audio DVD/MP3181Control systems221_AKB; 6; 20, en-USd2ugruen,Version: 2.11.8.12009-09-24T13:28:17+02:00 - Seite 181Z
Page 184 of 548
iShortcut button R takes you directly
to the previously set disc mode (audio CD/
DVD, MP3-CD/DVD, video DVD). The
number of times you have to press the
shortcut button depends on the previously
set mode.
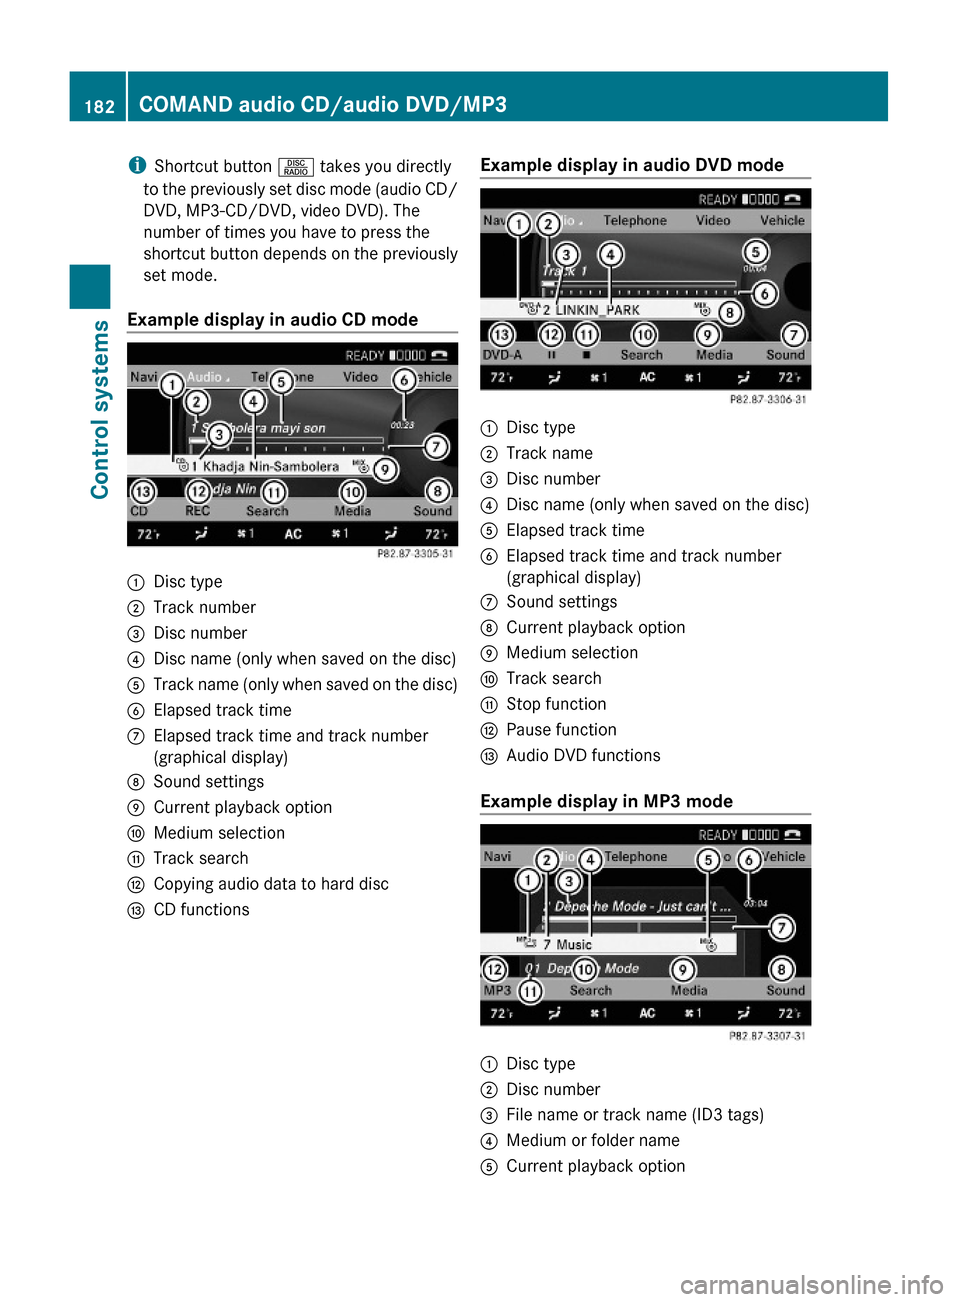
Example display in audio CD mode
:Disc type;Track number=Disc number?Disc name (only when saved on the disc)ATrack name (only when saved on the disc)BElapsed track timeCElapsed track time and track number
(graphical display)
DSound settingsECurrent playback optionFMedium selectionGTrack searchHCopying audio data to hard discICD functionsExample display in audio DVD mode:Disc type;Track name=Disc number?Disc name (only when saved on the disc)AElapsed track timeBElapsed track time and track number
(graphical display)
CSound settingsDCurrent playback optionEMedium selectionFTrack searchGStop functionHPause functionIAudio DVD functions
Example display in MP3 mode
:Disc type;Disc number=File name or track name (ID3 tags)?Medium or folder nameACurrent playback option182COMAND audio CD/audio DVD/MP3Control systems
221_AKB; 6; 20, en-USd2ugruen,Version: 2.11.8.12009-09-24T13:28:17+02:00 - Seite 182
Page 185 of 548
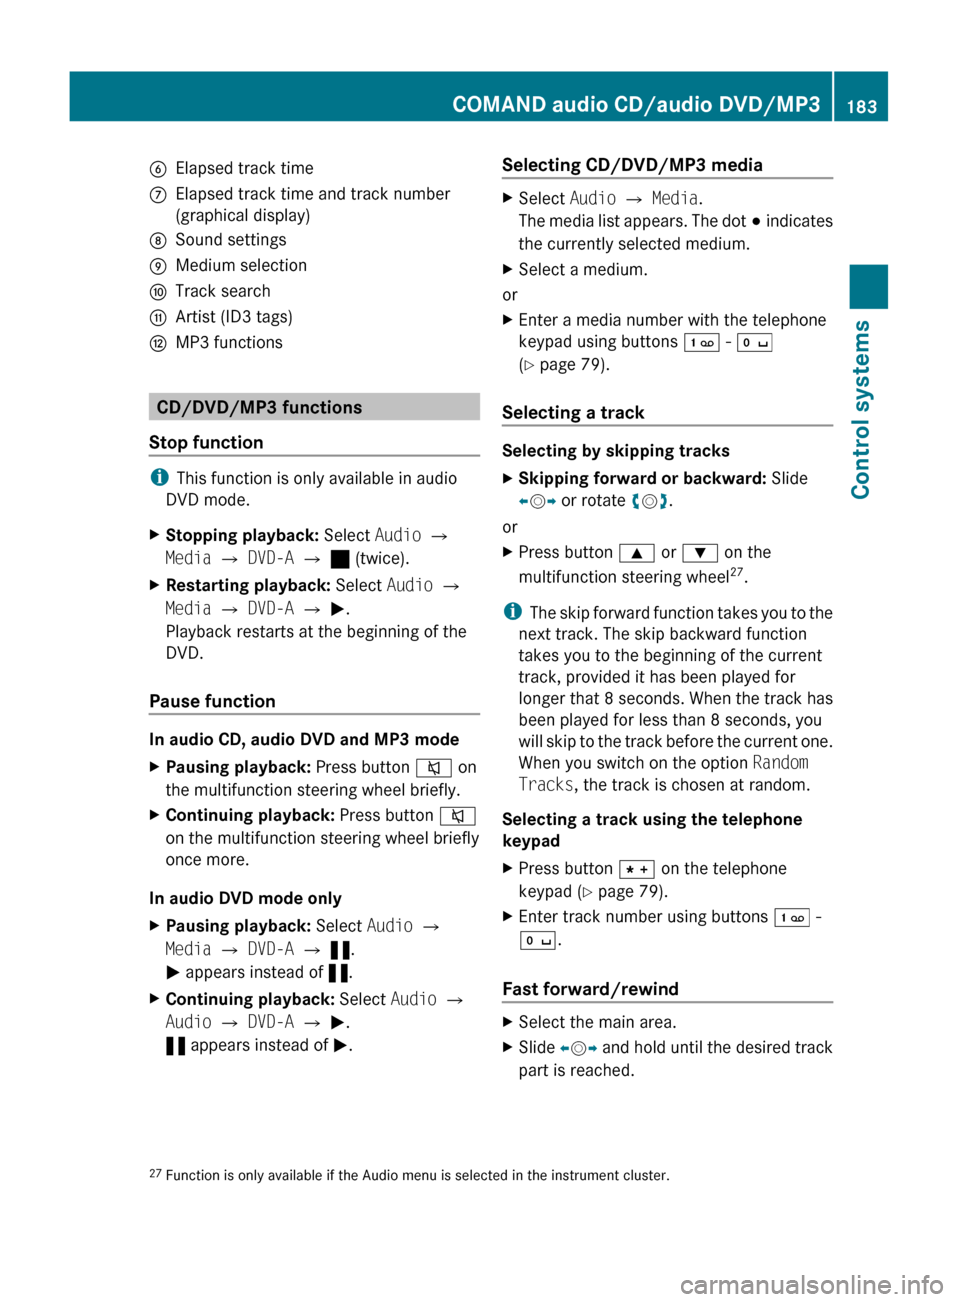
BElapsed track timeCElapsed track time and track number
(graphical display)DSound settingsEMedium selectionFTrack searchGArtist (ID3 tags)HMP3 functions
CD/DVD/MP3 functions
Stop function
i This function is only available in audio
DVD mode.
XStopping playback: Select Audio Q
Media Q DVD-A Q ± (twice).XRestarting playback: Select Audio Q
Media Q DVD-A Q M .
Playback restarts at the beginning of the
DVD.
Pause function
In audio CD, audio DVD and MP3 mode
XPausing playback: Press button 8 on
the multifunction steering wheel briefly.XContinuing playback: Press button 8
on the multifunction steering wheel briefly
once more.
In audio DVD mode only
XPausing playback: Select Audio Q
Media Q DVD-A Q « .
M appears instead of «.XContinuing playback: Select Audio Q
Audio Q DVD-A Q M .
« appears instead of M.Selecting CD/DVD/MP3 media XSelect Audio Q Media .
The media list appears. The dot # indicates
the currently selected medium.XSelect a medium.
or
XEnter a media number with the telephone
keypad using buttons ´ - Å
( Y page 79).
Selecting a track
Selecting by skipping tracks
XSkipping forward or backward: Slide
X V Y or rotate cV d.
or
XPress button 9 or : on the
multifunction steering wheel 27
.
i The skip forward function takes you to the
next track. The skip backward function
takes you to the beginning of the current
track, provided it has been played for
longer that 8 seconds. When the track has
been played for less than 8 seconds, you
will skip to the track before the current one.
When you switch on the option Random
Tracks , the track is chosen at random.
Selecting a track using the telephone
keypad
XPress button à on the telephone
keypad ( Y page 79).XEnter track number using buttons ´ -
Å .
Fast forward/rewind
XSelect the main area.XSlide XV Y and hold until the desired track
part is reached.27 Function is only available if the Audio menu is selected in the instrument cluster.COMAND audio CD/audio DVD/MP3183Control systems221_AKB; 6; 20, en-USd2ugruen,Version: 2.11.8.12009-09-24T13:28:17+02:00 - Seite 183Z
Page 186 of 548
Track search
You can use the following criteria to search
for tracks:
RCurrent Track List
RFolder
RKeyword Search
RPlaylists
RArtists
RAlbums
RTracks
RGenres
RComposers
RYear
XPress W during playback while the main
area is selected.
or
XSelect Audio Q Search.
The list of search criteria appears.
XSelect a search criteria and press W.
The track list appears.
XSelect a track and press W.
Copying audio data to hard disk (audio
CD mode only)
You can copy audio data to the internal hard
disk while in audio CD mode using the REC
function.
XSelect Audio Q Media.XSelect an audio CD.XSelect REC.
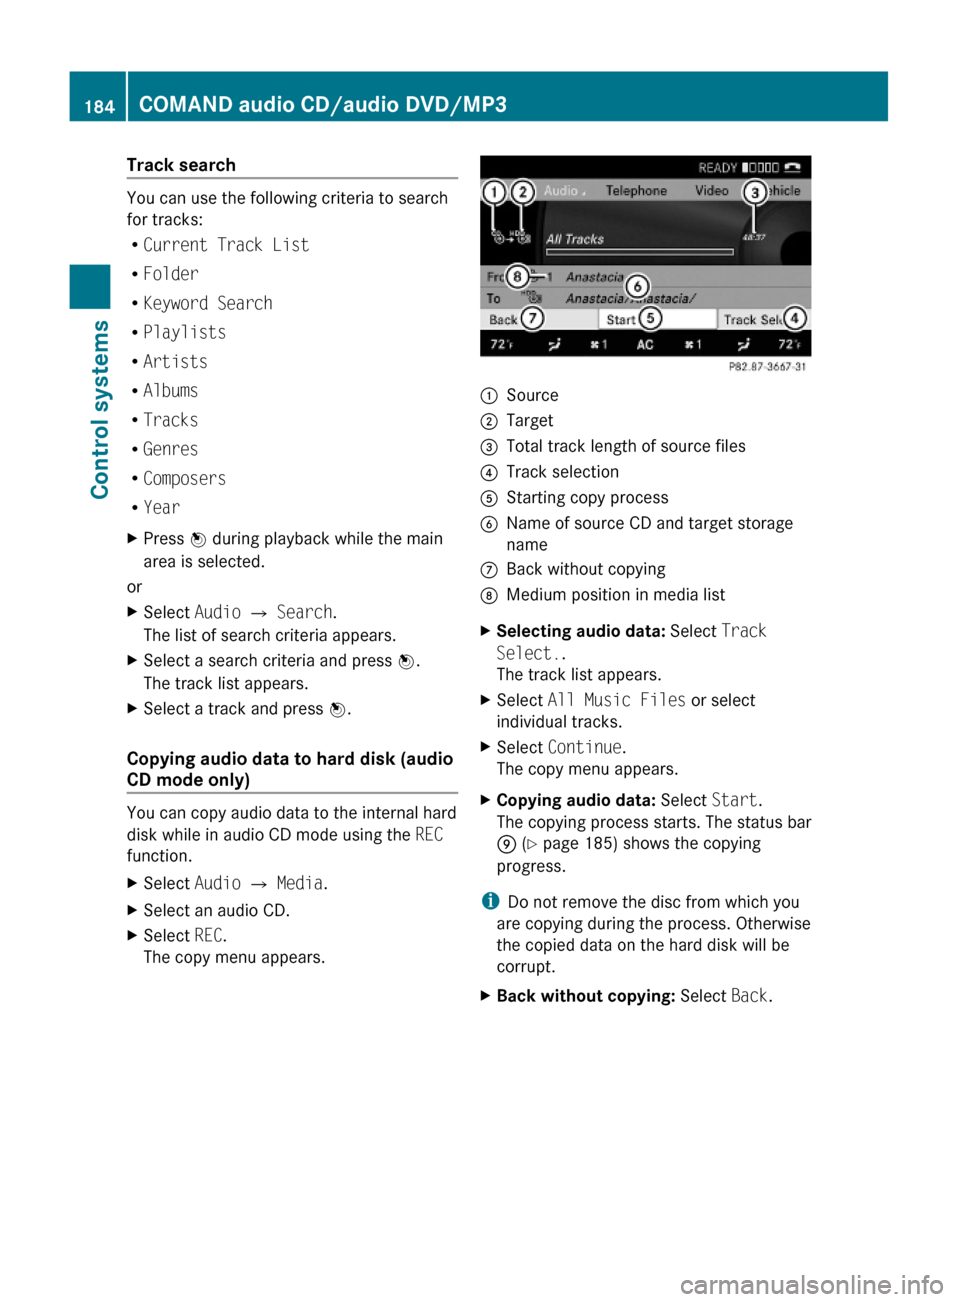
The copy menu appears.:Source;Target=Total track length of source files?Track selectionAStarting copy processBName of source CD and target storage
name
CBack without copyingDMedium position in media listXSelecting audio data: Select Track
Select..
The track list appears.
XSelect All Music Files or select
individual tracks.
XSelect Continue.
The copy menu appears.
XCopying audio data: Select Start.
The copying process starts. The status bar
E (Y page 185) shows the copying
progress.
iDo not remove the disc from which you
are copying during the process. Otherwise
the copied data on the hard disk will be
corrupt.
XBack without copying: Select Back.184COMAND audio CD/audio DVD/MP3Control systems
221_AKB; 6; 20, en-USd2ugruen,Version: 2.11.8.12009-09-24T13:28:17+02:00 - Seite 184
Page 187 of 548
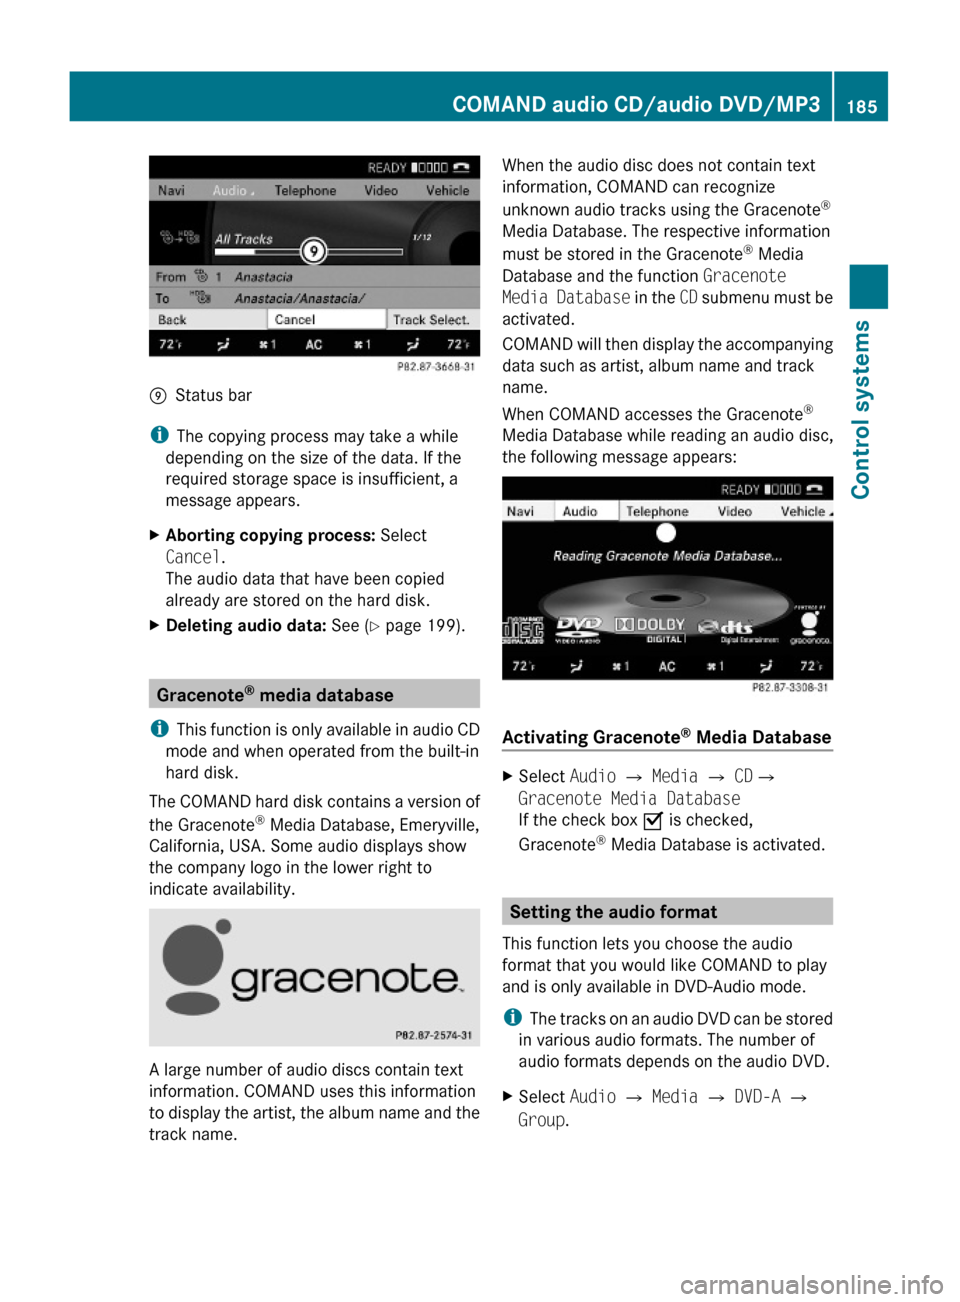
EStatus bar
iThe copying process may take a while
depending on the size of the data. If the
required storage space is insufficient, a
message appears.
XAborting copying process: Select
Cancel.
The audio data that have been copied
already are stored on the hard disk.
XDeleting audio data: See (Y page 199).
Gracenote® media database
iThis function is only available in audio CD
mode and when operated from the built-in
hard disk.
The COMAND hard disk contains a version of
the Gracenote® Media Database, Emeryville,
California, USA. Some audio displays show
the company logo in the lower right to
indicate availability.
A large number of audio discs contain text
information. COMAND uses this information
to display the artist, the album name and the
track name.
When the audio disc does not contain text
information, COMAND can recognize
unknown audio tracks using the Gracenote®
Media Database. The respective information
must be stored in the Gracenote® Media
Database and the function Gracenote
Media Database in the CD submenu must be
activated.
COMAND will then display the accompanying
data such as artist, album name and track
name.
When COMAND accesses the Gracenote®
Media Database while reading an audio disc,
the following message appears:
Activating Gracenote® Media Database
XSelect Audio £ Media £ CD£
Gracenote Media Database
If the check box Ç is checked,
Gracenote® Media Database is activated.
Setting the audio format
This function lets you choose the audio
format that you would like COMAND to play
and is only available in DVD-Audio mode.
iThe tracks on an audio DVD can be stored
in various audio formats. The number of
audio formats depends on the audio DVD.
XSelect Audio Q Media Q DVD-A Q
Group.
COMAND audio CD/audio DVD/MP3185Control systems221_AKB; 6; 20, en-USd2ugruen,Version: 2.11.8.12009-09-24T13:28:17+02:00 - Seite 185Z
Page 188 of 548
iThe Group menu item cannot be selected
if only one audio format is saved on the
DVD.
The list of available audio formats appears. A
dot # indicates the format currently
selected.XChanging setting: Slide ZV Æ or rotate
c V d.XExiting menu: Slide XV Y.
Playback options
The following options are available:
R Normal Track Sequence : Tracks are
played back in the order in which they are
stored on the disc, e.g. track 1, 2, 3, etc.
R Medium Mix : Tracks are played back in
random order, e.g. track 3, 8, 5, etc.
R Track List Mix (MP3 mode only): Tracks
of the current folder and its subfolders are
played back in random order.
XSelecting an option: Select Audio.XSelect CD, DVD-A or MP3 .
The option list appears. A dot # indicates
which option is switched on.XSelect an option and press W.
The option is switched on. For all options
except Normal Track Sequence , you will
see a corresponding indicator in the main
area.
i The Normal Track Sequence option is
automatically activated when you select a
different medium. If an option is activated,
it remains activated after COMAND is
switched on/off.
Audio AUX and video AUX
You can play back external audio or video
sources via the systems installed in your
vehicle.
The sockets for external audio and video
sources (AUX) are located
R in the glove box (COMAND)
R on the CD/DVD drive in the rear passenger
compartment
R on the head restraints
i For operation of the external audio and
video sources, refer to the operating
instructions of the respective device. You
may have to adjust the proper video
standard on the external audio and video
source to ensure proper replay.
Do not leave external devices in the vehicle.
Proper function of the device could be
impaired due to excessive temperatures,
for example when exposing to direct
sunlight or when the outside temperature
is extremely low. Mercedes-Benz does not
assume liability for damage to external
devices.GWarning!
Operating an external audio source while the
vehicle is in motion will distract you. You may
not notice changing road and/or traffic
conditions which may cause an accident.
Bear in mind that at a speed of just 30 mph
(approximately 50 km/h), your vehicle is
covering a distance of 44 feet (approximately
14 m) every second.
For your safety and the safety of others, pull
over to a safe location and stop before
operating an external audio source.
GWarning!
Due to the different volumes of the external
audio sources, system messages of the
vehicle may be much louder. You may need to
disable these system messages or adjust the
volume of these messages manually.
i The volume of external audio sources is
extremely variable. It is possible that a
device connected as an external audio
source will sound quieter or louder in the
186Audio AUX and video AUXControl systems
221_AKB; 6; 20, en-USd2ugruen,Version: 2.11.8.12009-09-24T13:28:17+02:00 - Seite 186
Page 189 of 548
vehicle or that the usual maximum volume
cannot be achieved. On certain devices the
volume can be set separately. In this case,
start at a moderate volume and increase it
slowly. In this way, you can determine
whether the system is capable of playback
without distortion, even at high volume.
XConnect external audio and video sources
as described in the following sections.
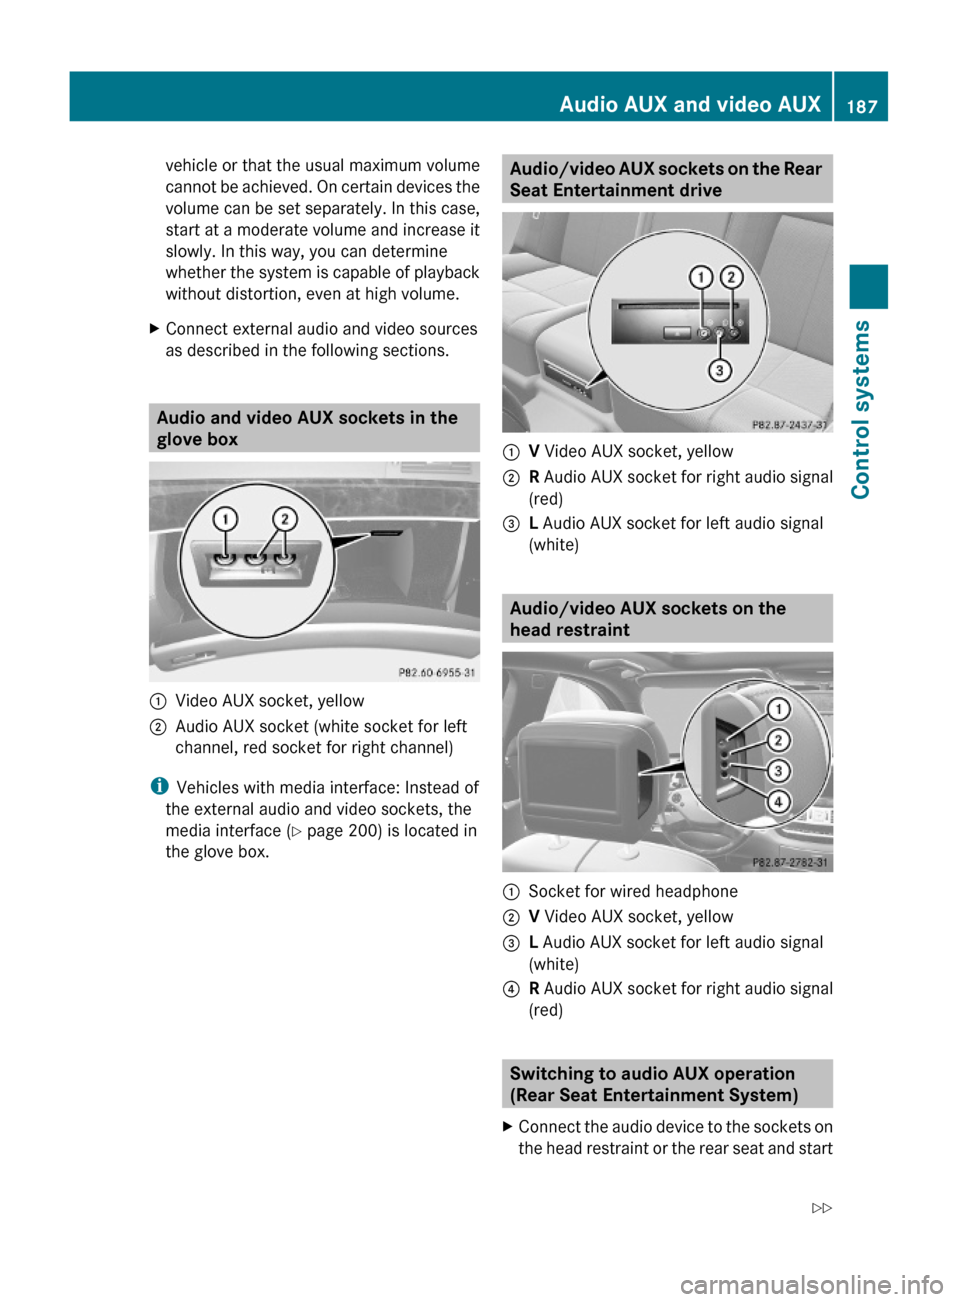
Audio and video AUX sockets in the
glove box
:Video AUX socket, yellow;Audio AUX socket (white socket for left
channel, red socket for right channel)
iVehicles with media interface: Instead of
the external audio and video sockets, the
media interface (Y page 200) is located in
the glove box.
Audio/video AUX sockets on the Rear
Seat Entertainment drive
:V Video AUX socket, yellow;R Audio AUX socket for right audio signal
(red)
=L Audio AUX socket for left audio signal
(white)
Audio/video AUX sockets on the
head restraint
:Socket for wired headphone;V Video AUX socket, yellow=L Audio AUX socket for left audio signal
(white)
?R Audio AUX socket for right audio signal
(red)
Switching to audio AUX operation
(Rear Seat Entertainment System)
XConnect the audio device to the sockets on
the head restraint or the rear seat and start
Audio AUX and video AUX187Control systems221_AKB; 6; 20, en-USd2ugruen,Version: 2.11.8.12009-09-24T13:28:17+02:00 - Seite 187Z
Page 190 of 548
playback. Refer to operating instructions of
the external device.XSelecting main function: Select Aux.XPress button ! on the remote control.XSelect Source .XSelect Display Aux for playback via the
connections in the head restraint.
or
XSelect Disk Drive Aux for playback via
the connections in the rear seat.
Switching to audio AUX operation
(COMAND)
XSelect Audio Q AUX .
The Audio AUX menu appears. You will hear
the medium in the external audio source
provided it is connected and set to
playback.
You can adjust the following during audio AUX
operation:
R Volume ( Y page 88)
R Balance and fader ( Y page 88)
R Treble and Bass (Y page 88)
R 3D Sound (Y page 89)
Switching to video AUX operation
(Rear Seat Entertainment System)
XConnect the video device to the sockets on
the head restraint or the rear seat and start
playback. Refer to operating instructions of
the external device.XSelecting main function: Select Aux.XPress button ! on the remote control.XSelect Source .XSelect Display Aux for playback via the
connections in the head restraint.
or
XSelect Disk Drive Aux for playback via
the connections in the rear seat.XSwitching from full screen to menu
system: Press button ! on the remote
control.XScreen settings: Select Display Aux .
A list appears.XProceed as described in the section
“Screen settings” ( Y page 194).
Switching to video AUX operation
(COMAND)
XSelect Video Q AUX .
The video AUX menu appears. You will hear
and see the medium in the external audio
source provided it is connected and set to
playback.
i For operation of the external video
source, refer to the operating instructions
of the respective device.
You can adjust the following during video AUX
operation:
R Brightness , Contrast and Color
( Y page 194)
R Picture format ( Y page 194)
R Volume ( Y page 88)
R Balance and fader ( Y page 88)
R Treble and Bass (Y page 88)
R 3D Sound (Y page 89)
188Audio AUX and video AUXControl systems
221_AKB; 6; 20, en-USd2ugruen,Version: 2.11.8.12009-09-24T13:28:17+02:00 - Seite 188