MERCEDES-BENZ S600 2010 W221 Owner's Manual
Manufacturer: MERCEDES-BENZ, Model Year: 2010, Model line: S600, Model: MERCEDES-BENZ S600 2010 W221Pages: 548, PDF Size: 12.48 MB
Page 201 of 548
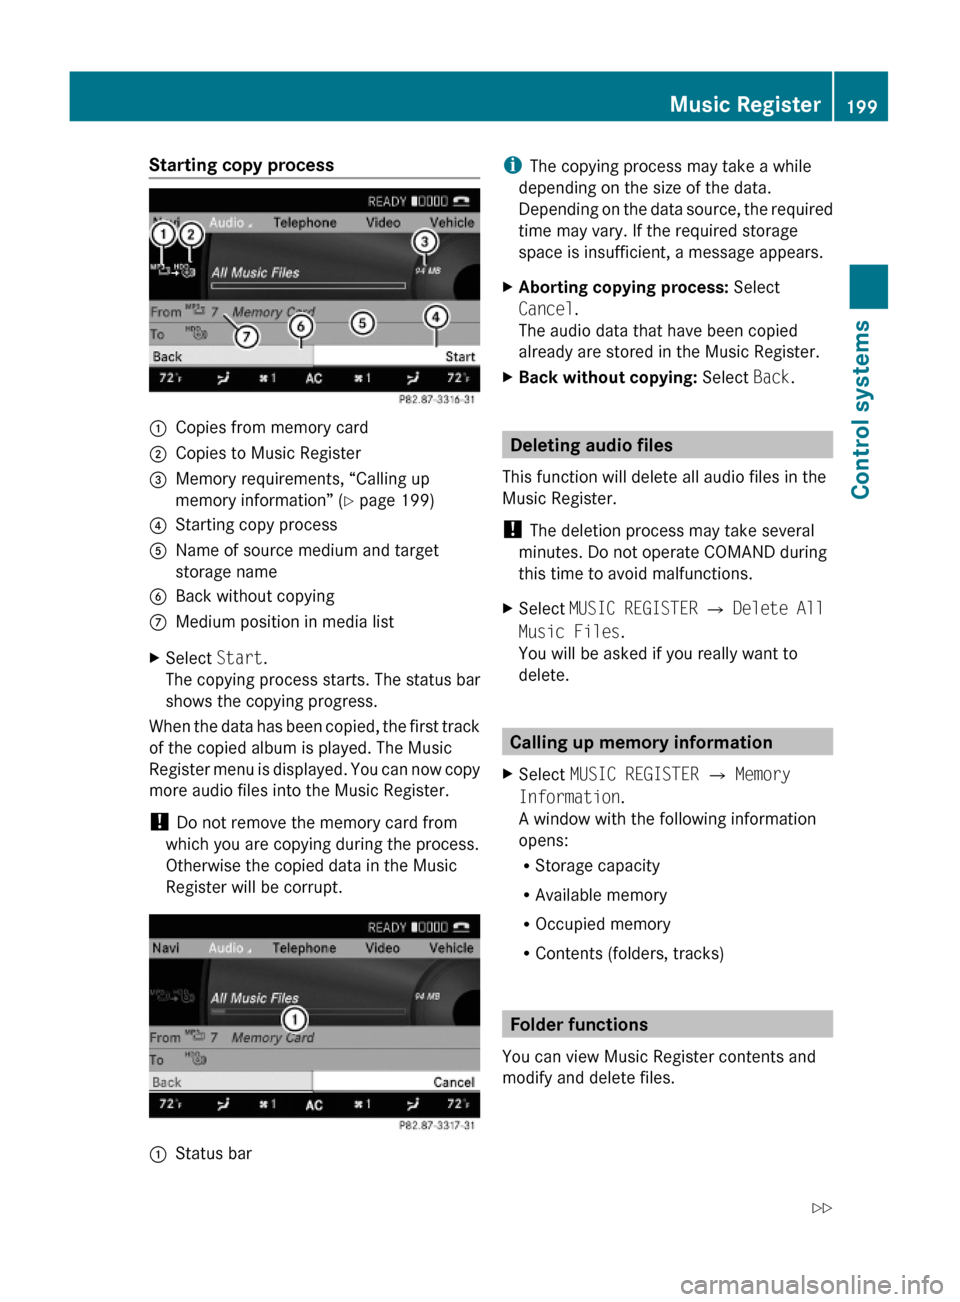
Starting copy process:Copies from memory card;Copies to Music Register=Memory requirements, “Calling up
memory information” (Y page 199)
?Starting copy processAName of source medium and target
storage name
BBack without copyingCMedium position in media listXSelect Start.
The copying process starts. The status bar
shows the copying progress.
When the data has been copied, the first track
of the copied album is played. The Music
Register menu is displayed. You can now copy
more audio files into the Music Register.
! Do not remove the memory card from
which you are copying during the process.
Otherwise the copied data in the Music
Register will be corrupt.
:Status bariThe copying process may take a while
depending on the size of the data.
Depending on the data source, the required
time may vary. If the required storage
space is insufficient, a message appears.
XAborting copying process: Select
Cancel.
The audio data that have been copied
already are stored in the Music Register.
XBack without copying: Select Back.
Deleting audio files
This function will delete all audio files in the
Music Register.
! The deletion process may take several
minutes. Do not operate COMAND during
this time to avoid malfunctions.
XSelect MUSIC REGISTER Q Delete All
Music Files.
You will be asked if you really want to
delete.
Calling up memory information
XSelect MUSIC REGISTER Q Memory
Information.
A window with the following information
opens:
RStorage capacity
RAvailable memory
ROccupied memory
RContents (folders, tracks)
Folder functions
You can view Music Register contents and
modify and delete files.
Music Register199Control systems221_AKB; 6; 20, en-USd2ugruen,Version: 2.11.8.12009-09-24T13:28:17+02:00 - Seite 199Z
Page 202 of 548
XSelect MUSIC REGISTER Q Rename/
Delete Files.
or
XPress W when the main area is highlighted.
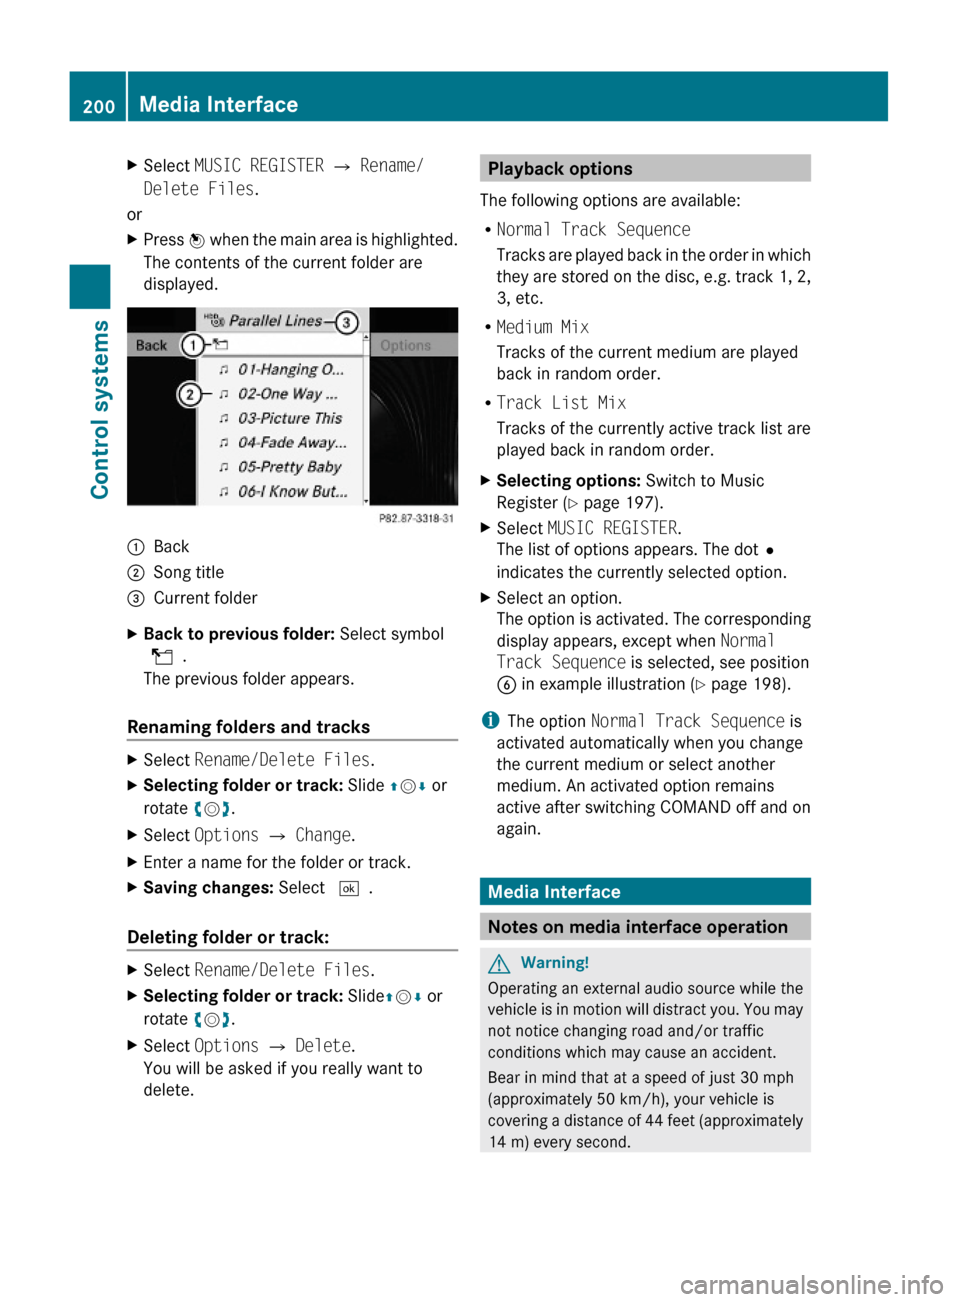
The contents of the current folder are
displayed.
:Back;Song title=Current folderXBack to previous folder: Select symbol
U.
The previous folder appears.
Renaming folders and tracks
XSelect Rename/Delete Files.XSelecting folder or track: Slide ZVÆ or
rotate cVd.
XSelect Options Q Change.XEnter a name for the folder or track.XSaving changes: Select ¬.
Deleting folder or track:
XSelect Rename/Delete Files.XSelecting folder or track: SlideZVÆ or
rotate cVd.
XSelect Options Q Delete.
You will be asked if you really want to
delete.
Playback options
The following options are available:
RNormal Track Sequence
Tracks are played back in the order in which
they are stored on the disc, e.g. track 1, 2,
3, etc.
RMedium Mix
Tracks of the current medium are played
back in random order.
RTrack List Mix
Tracks of the currently active track list are
played back in random order.
XSelecting options: Switch to Music
Register (Y page 197).
XSelect MUSIC REGISTER.
The list of options appears. The dot#
indicates the currently selected option.
XSelect an option.
The option is activated. The corresponding
display appears, except when Normal
Track Sequence is selected, see position
B in example illustration (Y page 198).
iThe option Normal Track Sequence is
activated automatically when you change
the current medium or select another
medium. An activated option remains
active after switching COMAND off and on
again.
Media Interface
Notes on media interface operation
GWarning!
Operating an external audio source while the
vehicle is in motion will distract you. You may
not notice changing road and/or traffic
conditions which may cause an accident.
Bear in mind that at a speed of just 30 mph
(approximately 50 km/h), your vehicle is
covering a distance of 44 feet (approximately
14 m) every second.
200Media InterfaceControl systems
221_AKB; 6; 20, en-USd2ugruen,Version: 2.11.8.12009-09-24T13:28:17+02:00 - Seite 200
Page 203 of 548
For your safety and the safety of others, pull
over to a safe location and stop before
operating an external audio source.
Connections
iAlways store the devices in a safe place.
Only use genuine Mercedes-Benz
connector cables.
Suitable connector cables are located in
the vehicle or can be purchased at any
authorized Mercedes-Benz Center.
The media interface allows for connection of
the following media to the COMAND:
RiPod®
RUSB devices
RMP3 player
iFor further information on compatible
multimedia devices
Rvisit www.mbusa-mobile.com
Rcall the Mercedes-Benz Customer
Assistance Center at
1-800-FOR-MERCedes
(1-800-367-6372) (in the USA)
Rcall Customer Service at
1-800-387-0100 (in Canada)
Supported USB devices
The following USB devices are supported:
RUSB flash drives
RUSB hard drives (1", 1.8", and 2.5") with a
starting/steady current not to exceed
800 mA (separate power supply may be
necessary)
Rselected MP3 players
iThe media interface supports USB
storage devices of “USB Device
Subclass 6”. Information on “USB Device
Subclass 6” is available from the
manufacturer of the respective device.
Supported file formats on USB devices
The following file formats are supported:
RMP3: CBR, VBR (up to 320 kbit/s)
RWMA: CBR, VBR (up to 320 kbit/s)
Special characteristics of USB devices
RDo not store data other than audio data on
a USB device. Doing so will increase the
time required to initialize the USB device.
RA maximum of 8 directory levels with up to
1000 tracks each are supported.
RDo not use USB extensions or adapters.
They could impair functionality.
RPlaylists on the USB device will be searched
for in the background. Playlists that were
found will be available in separate
categories among the folders. The
initialization of large USB storage devices
that contain a large number of files may
take several minutes.
iFiles that are protected via DRM
(Digital Rights Management) are not
supported by the media interface.
Connecting external devices
The media interface is located in the glove
box.
Only connect one device at a time. Otherwise
you will not be able to operate the external
device. For more information contact an
authorized Mercedes-Benz Center.
Media Interface201Control systems221_AKB; 6; 20, en-USd2ugruen,Version: 2.11.8.12009-09-24T13:28:17+02:00 - Seite 201Z
Page 204 of 548
iDo not leave external devices in the
vehicle. Proper function of the device could
be impaired due to excessive
temperatures, for example when exposing
to direct sunlight or when the outside
temperature is extremely low. Mercedes-
Benz does not assume liability for damage
to external devices.
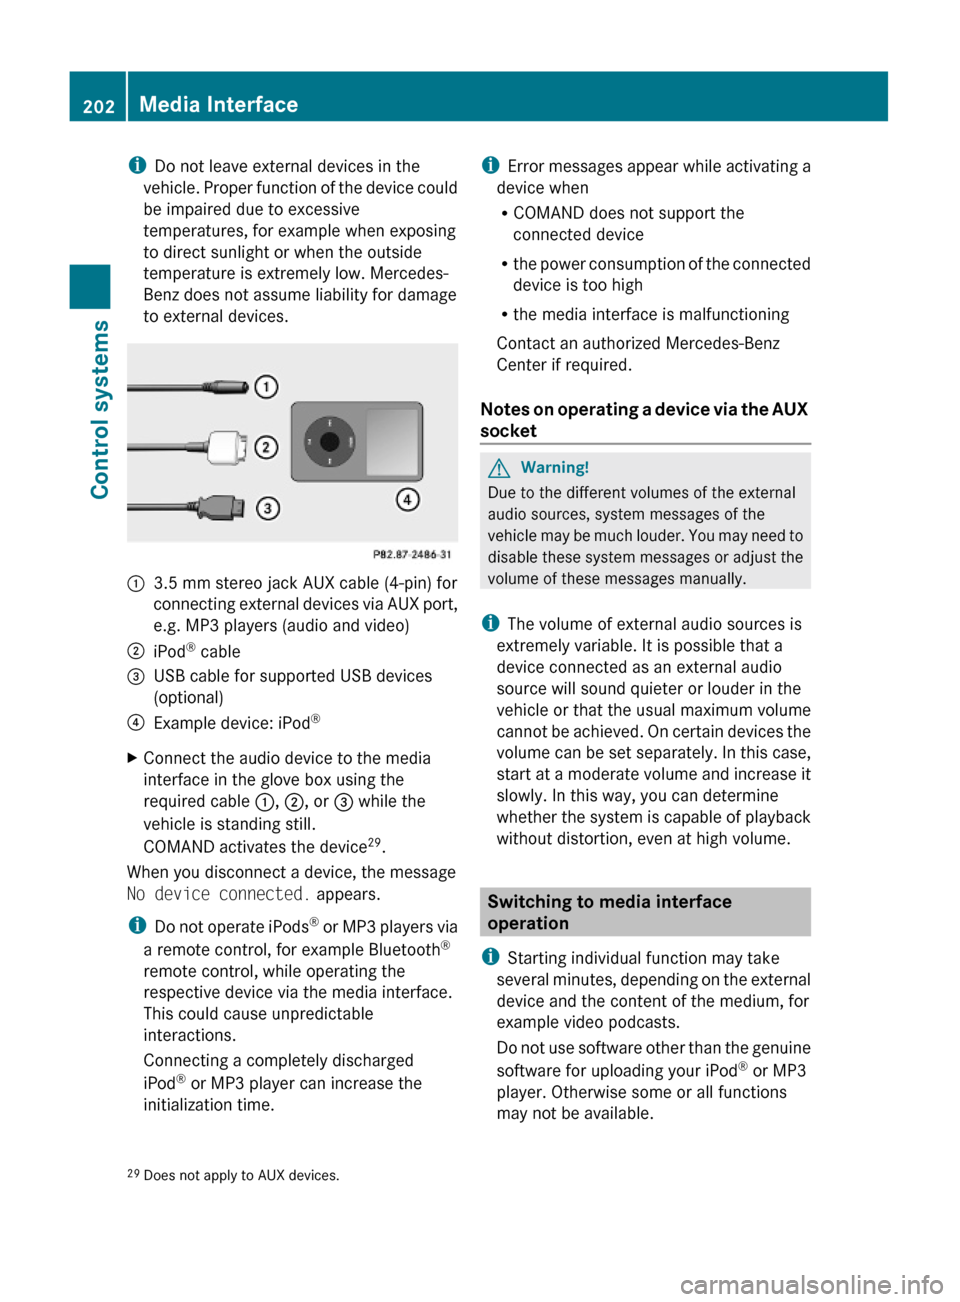
:3.5 mm stereo jack AUX cable (4-pin) for
connecting external devices via AUX port,
e.g. MP3 players (audio and video)
;iPod® cable=USB cable for supported USB devices
(optional)
?Example device: iPod®XConnect the audio device to the media
interface in the glove box using the
required cable :, ;, or = while the
vehicle is standing still.
COMAND activates the device29.
When you disconnect a device, the message
No device connected. appears.
iDo not operate iPods® or MP3 players via
a remote control, for example Bluetooth®
remote control, while operating the
respective device via the media interface.
This could cause unpredictable
interactions.
Connecting a completely discharged
iPod® or MP3 player can increase the
initialization time.
iError messages appear while activating a
device when
RCOMAND does not support the
connected device
Rthe power consumption of the connected
device is too high
Rthe media interface is malfunctioning
Contact an authorized Mercedes-Benz
Center if required.
Notes on operating a device via the AUX
socket
GWarning!
Due to the different volumes of the external
audio sources, system messages of the
vehicle may be much louder. You may need to
disable these system messages or adjust the
volume of these messages manually.
iThe volume of external audio sources is
extremely variable. It is possible that a
device connected as an external audio
source will sound quieter or louder in the
vehicle or that the usual maximum volume
cannot be achieved. On certain devices the
volume can be set separately. In this case,
start at a moderate volume and increase it
slowly. In this way, you can determine
whether the system is capable of playback
without distortion, even at high volume.
Switching to media interface
operation
iStarting individual function may take
several minutes, depending on the external
device and the content of the medium, for
example video podcasts.
Do not use software other than the genuine
software for uploading your iPod® or MP3
player. Otherwise some or all functions
may not be available.
29Does not apply to AUX devices.202Media InterfaceControl systems
221_AKB; 6; 20, en-USd2ugruen,Version: 2.11.8.12009-09-24T13:28:17+02:00 - Seite 202
Page 205 of 548
From another main functionXPress shortcut button R.
COMAND activates the last selected disc
mode.
iWhen media interface operation was
selected before, it is now activated.
XSelect MediaQ Media Interface.
The media list appears. The dot #
indicates the currently played medium.
iWhen no device is connected, Media
Interface instead of the device name
appears.
If COMAND does not support the
connected device, the message Device
incompatible. appears. The device will
be listed in the media list as Not
Available. When two devices are
connected, the message Please ensure
that only one device is connected.
appears.
XConfirm with W.
COMAND activates a connected device. A
corresponding message appears.
Afterwards, the basic display appears.
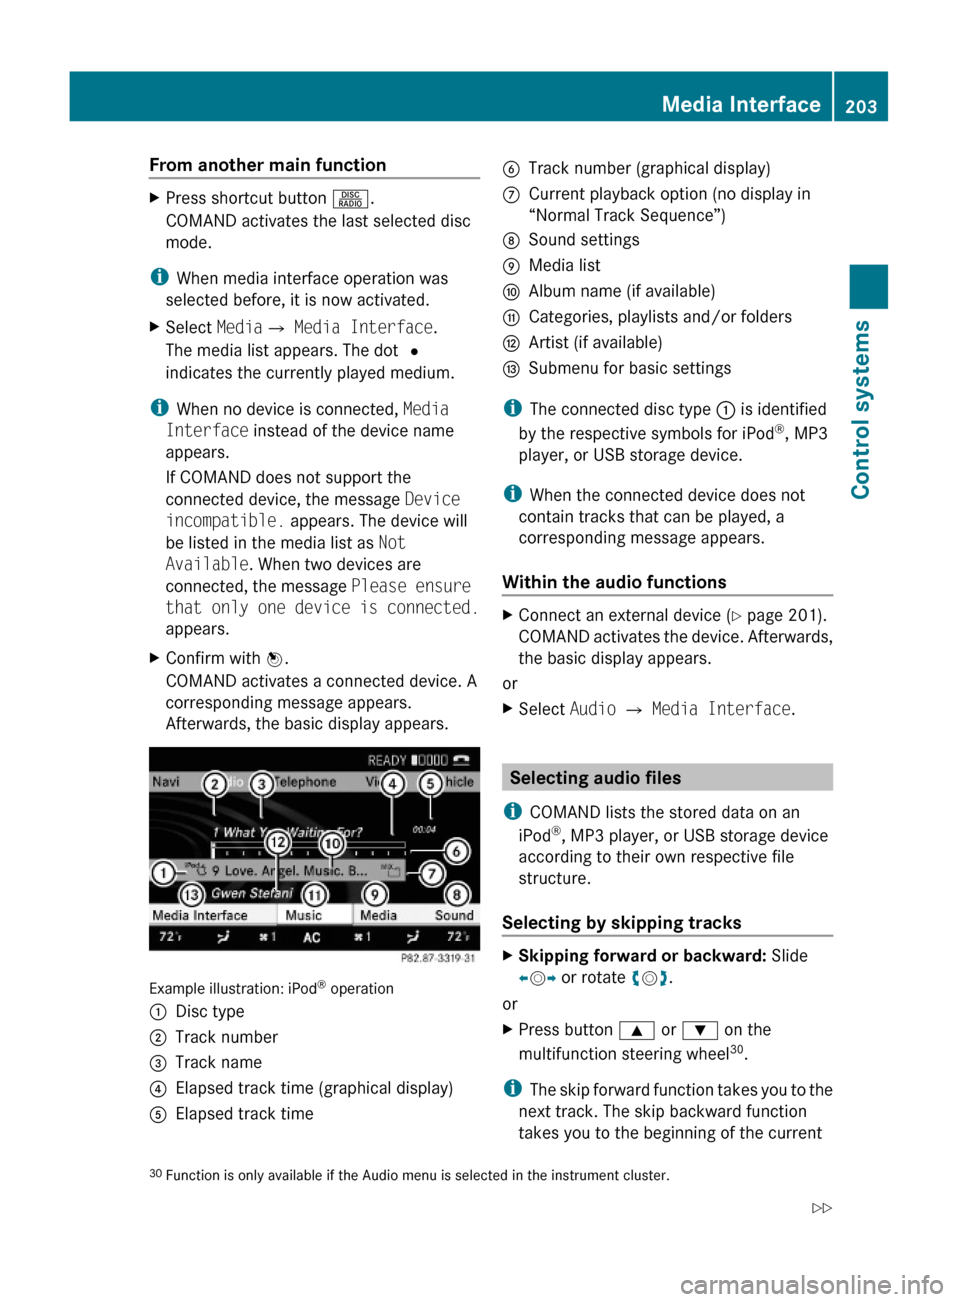
Example illustration: iPod® operation
:Disc type;Track number=Track name?Elapsed track time (graphical display)AElapsed track timeBTrack number (graphical display)CCurrent playback option (no display in
“Normal Track Sequence”)
DSound settingsEMedia listFAlbum name (if available)GCategories, playlists and/or foldersHArtist (if available)ISubmenu for basic settings
iThe connected disc type : is identified
by the respective symbols for iPod®, MP3
player, or USB storage device.
iWhen the connected device does not
contain tracks that can be played, a
corresponding message appears.
Within the audio functions
XConnect an external device (Y page 201).
COMAND activates the device. Afterwards,
the basic display appears.
or
XSelect Audio Q Media Interface.
Selecting audio files
iCOMAND lists the stored data on an
iPod®, MP3 player, or USB storage device
according to their own respective file
structure.
Selecting by skipping tracks
XSkipping forward or backward: Slide
XVY or rotate cVd.
or
XPress button 9 or : on the
multifunction steering wheel30.
iThe skip forward function takes you to the
next track. The skip backward function
takes you to the beginning of the current
30Function is only available if the Audio menu is selected in the instrument cluster.Media Interface203Control systems221_AKB; 6; 20, en-USd2ugruen,Version: 2.11.8.12009-09-24T13:28:17+02:00 - Seite 203Z
Page 206 of 548
track, provided it has been played for
longer that 8 seconds. When the track has
been played for less than 8 seconds, you
will skip to the track before the current one.
When you select an option other than
Normal Track Sequence , the track is
chosen at random.
Selecting via telephone keypadXInitiating entry: Press button Ä.
The input menu appears. The number of
digits you can enter depends on the
number of stored tracks.XEntering track number: Press a button,
for example Á.
The number on the button you have
pressed is the first digit in the input line.
i COMAND ignores invalid digits and does
not display them.
XEnter more digits as desired.XConfirming entry: Press W.
or
XHold down the last digit button of the
desired track number (e.g. track 108, press
´ , Å , then hold Â).
The selected track is played back.
Fast forward/rewind
XWith the main area active: Slide XV Y and
hold until the desired track part is reached.
i With iPods ®
, the fast-rewind function
works within the current track only.
Selecting category/playlist/folder
iPod ®
and selected MP3 player
You can select tracks via categories and
folders.
Categories, for example, can be:
R Current Track List
R Playlists
R Artists
R Albums
R Track
R Podcasts
R Genres
R Composers
R Audiobooks
i Some categories contain the entry All.
When selecting this entry, the entire
content of the respective category is
played back.
USB devices
You can select folders and playlists (if
available). COMAND can display the
respective album name and artist, the so-
called metadata, during playback when the
metadata have been read into the system.
Playlists are indicated in the display by a
special symbol. When you open a playlist, the
related tracks are opened and playback starts
by selecting a track.
For USB storage devices, you can determine
whether the metadata from the tags of coded
audio data or the file name and folder is to be
displayed during playback.
XDisplaying album name and artist:
Select Media Interface Q Display
Metadata .
Selecting category and opening folder
XOpening category/folder list: Press W
when the window is selected.
or
XSelect Music.
The available categories or the folder
content, e.g. subfolders, are displayed.204Media InterfaceControl systems
221_AKB; 6; 20, en-USd2ugruen,Version: 2.11.8.12009-09-24T13:28:17+02:00 - Seite 204
Page 207 of 548
iThe menu option Music is not available
yet while the device is being activated.
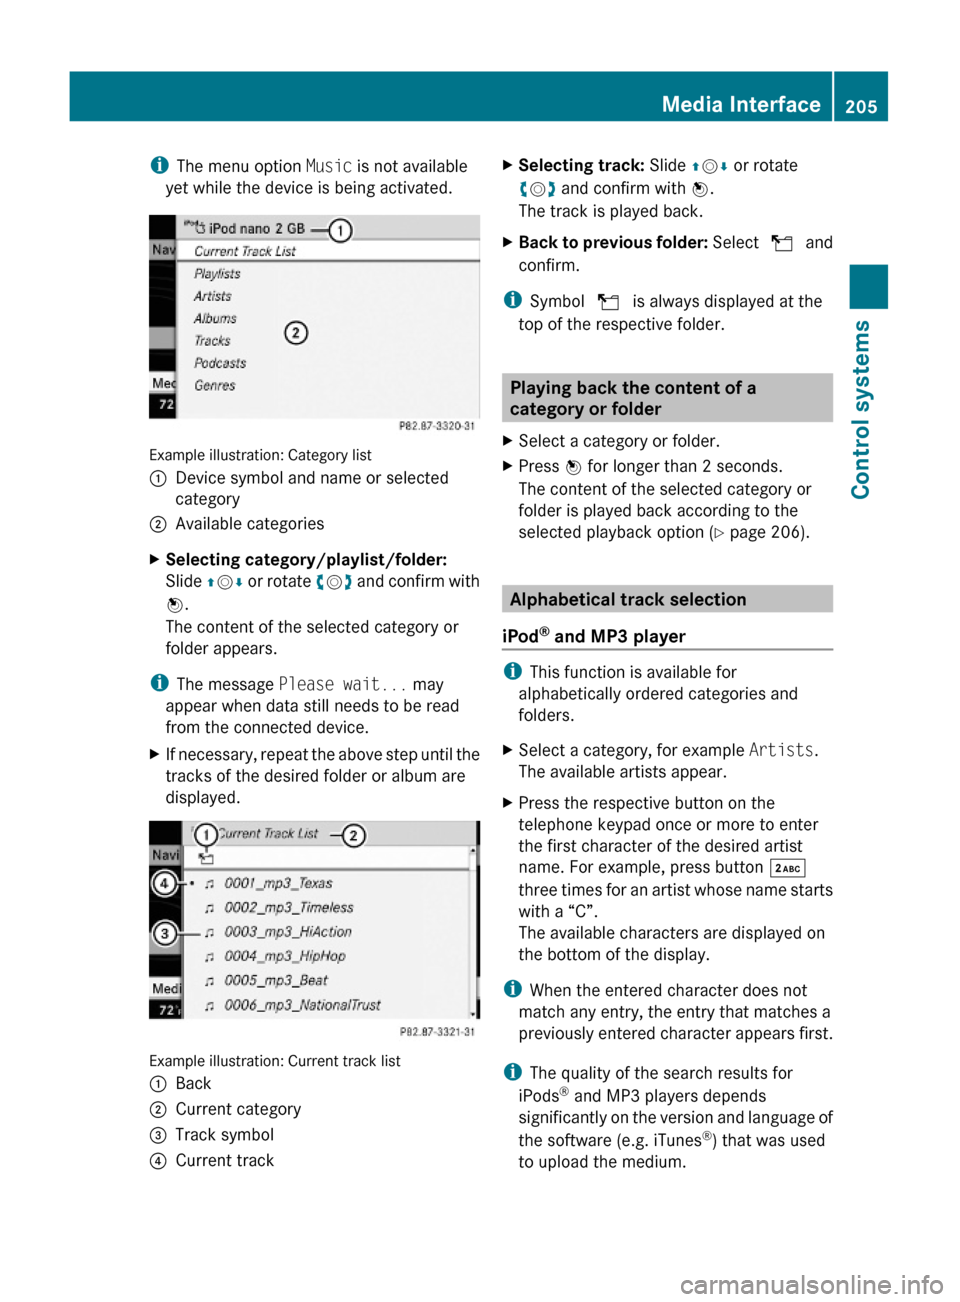
Example illustration: Category list
:Device symbol and name or selected
category
;Available categoriesXSelecting category/playlist/folder:
Slide ZVÆ or rotate cVd and confirm with
W.
The content of the selected category or
folder appears.
iThe message Please wait... may
appear when data still needs to be read
from the connected device.
XIf necessary, repeat the above step until the
tracks of the desired folder or album are
displayed.
Example illustration: Current track list
:Back;Current category=Track symbol?Current trackXSelecting track: Slide ZVÆ or rotate
cVd and confirm with W.
The track is played back.
XBack to previous folder: Select U and
confirm.
iSymbol U is always displayed at the
top of the respective folder.
Playing back the content of a
category or folder
XSelect a category or folder.XPress W for longer than 2 seconds.
The content of the selected category or
folder is played back according to the
selected playback option (Y page 206).
Alphabetical track selection
iPod® and MP3 player
iThis function is available for
alphabetically ordered categories and
folders.
XSelect a category, for example Artists.
The available artists appear.
XPress the respective button on the
telephone keypad once or more to enter
the first character of the desired artist
name. For example, press button ·
three times for an artist whose name starts
with a “C”.
The available characters are displayed on
the bottom of the display.
iWhen the entered character does not
match any entry, the entry that matches a
previously entered character appears first.
iThe quality of the search results for
iPods® and MP3 players depends
significantly on the version and language of
the software (e.g. iTunes®) that was used
to upload the medium.
Media Interface205Control systems221_AKB; 6; 20, en-USd2ugruen,Version: 2.11.8.12009-09-24T13:28:17+02:00 - Seite 205Z
Page 208 of 548

USB storage device
iThis function is available for
alphabetically ordered directories. The
function is not available within playlists for
example.
XWithin a folder, press the respective button
on the telephone keypad once or more to
enter the first character of the desired
artist name. For example, press button
l three times for an artist whose name
starts with a “C”.
The available characters are displayed on
the bottom of the display.
When the directory contains folders only,
COMAND will search for folders.
Selecting active partition (USB
storage devices only)
You can select this function with USB storage
devices when the storage space is
partitioned. The system supports up to 4
partitions (primary or logical, FAT formatted).
i The Windows formatting program
supports FAT partitions of up to 32 gigabyte
by default.
XSelect Media Interface Q Select
Active Partition .
Playback options
The following options are available:
R Normal Track Sequence
Tracks are played back in regular order (e.g.
in numerical or in alphabetical order).
R Random Tracks
All available tracks on the current medium
are played back in random order.
R Category Mix or Random Folder (with
USB devices when Folder was selected)
Tracks of the currently active category or
folder and its subfolders are played back in
random order.XSelecting playback options: Select
Media Interface in the basic display.
The list of options appears. The dot #
indicates the currently selected option.XSelect an option.
COMAND vehicle menu
Introduction
GWarning!
HYBRID vehicles: It is imperative that you read
the HYBRID Supplemental Operating
Instructions included in your vehicle literature
portfolio. You may otherwise not receive all
necessary safety information and warning for
the operation of your vehicle.
In this menu, you can program the following
vehicle functions:
FunctionMulti-function Contour Seat
Settings (Y page 216)Rear Window Sunshade (Y page 207)Easy Entry/Exit Feature
( Y page 208)Exterior Lighting Delayed Shut-off
( Y page 208)Interior Lighting Delayed Shut-off
( Y page 208)Ambient Lighting (Y page 209)Automatic Mirror Folding
( Y page 209)Locator Lighting (Y page 210)206COMAND vehicle menuControl systems
221_AKB; 6; 20, en-USd2ugruen,Version: 2.11.8.12009-09-24T13:28:17+02:00 - Seite 206
Page 209 of 548
FunctionAutomatic Locking (Y page 210)Trunk Opening-height Restriction
(Y page 210)
You can select the individual vehicle
functions in two ways.
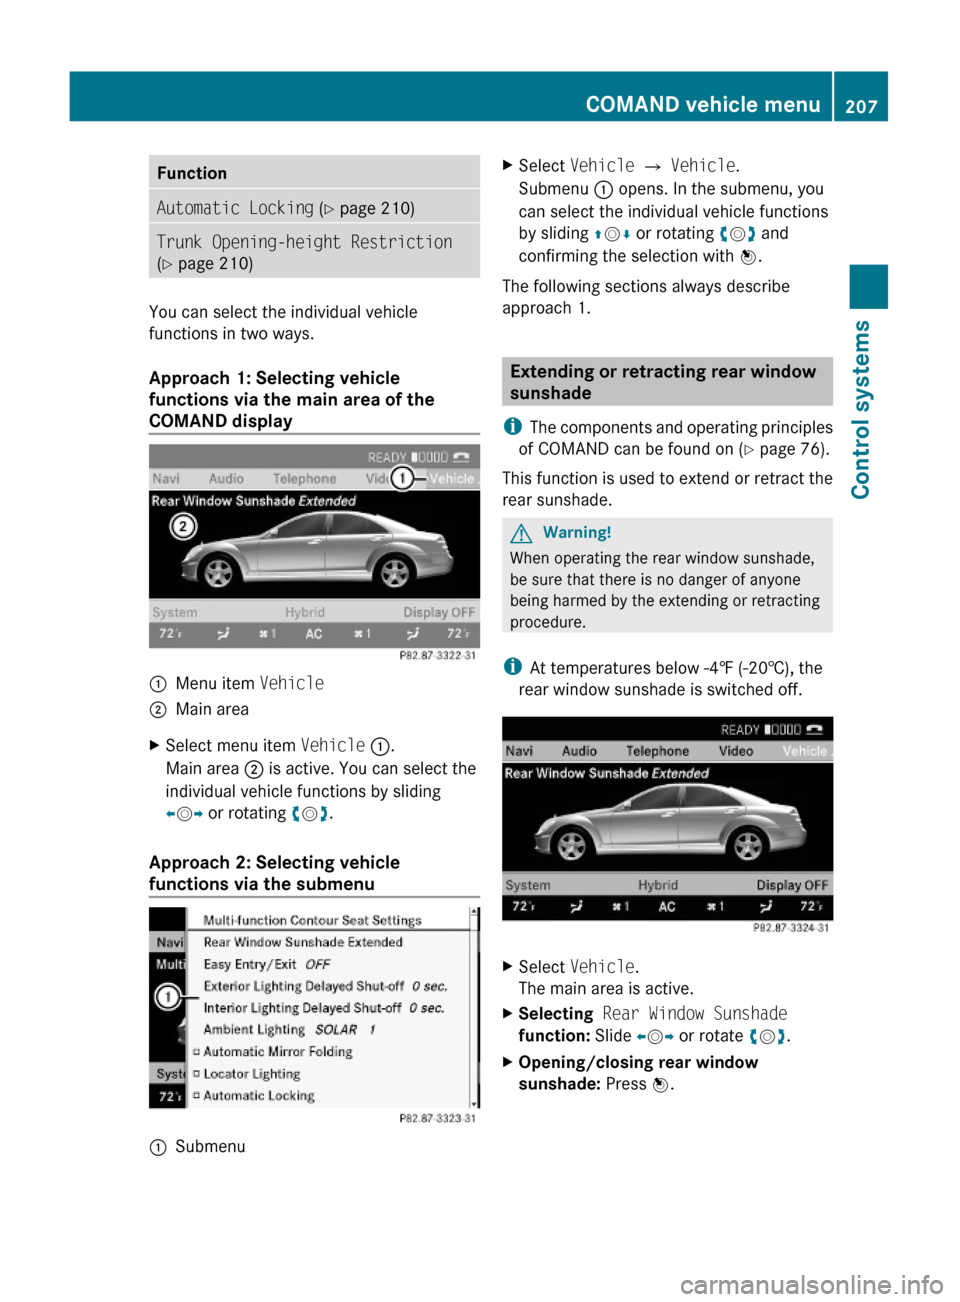
Approach 1: Selecting vehicle
functions via the main area of the
COMAND display
:Menu item Vehicle;Main areaXSelect menu item Vehicle :.
Main area ; is active. You can select the
individual vehicle functions by sliding
XVY or rotating cVd.
Approach 2: Selecting vehicle
functions via the submenu
:SubmenuXSelect Vehicle Q Vehicle.
Submenu : opens. In the submenu, you
can select the individual vehicle functions
by sliding ZVÆ or rotating cVd and
confirming the selection with W.
The following sections always describe
approach 1.
Extending or retracting rear window
sunshade
iThe components and operating principles
of COMAND can be found on (Y page 76).
This function is used to extend or retract the
rear sunshade.
GWarning!
When operating the rear window sunshade,
be sure that there is no danger of anyone
being harmed by the extending or retracting
procedure.
iAt temperatures below -4‡ (-20†), the
rear window sunshade is switched off.
XSelect Vehicle.
The main area is active.
XSelecting Rear Window Sunshade
function: Slide XVY or rotate cVd.
XOpening/closing rear window
sunshade: Press W.
COMAND vehicle menu207Control systems221_AKB; 6; 20, en-USd2ugruen,Version: 2.11.8.12009-09-24T13:28:17+02:00 - Seite 207Z
Page 210 of 548
Setting easy-entry/exit feature
iThe components and operating principles
of COMAND can be found on (Y page 76).
GWarning!
You must make sure no one can become
trapped or injured by the moving steering
wheel and driver’s seat when the easy-entry/
exit feature is activated.
To stop seat/steering wheel movement, do
one of the following:
RPress seat adjustment switch.
RMove steering wheel adjustment stalk.
RPress one of the memory position buttons
or the memory button M.
Do not leave children unattended in the
vehicle, or with access to an unlocked vehicle.
Children could open the driver’s door and
unintentionally activate the easy-entry/exit
feature, which could result in an accident
and/or serious personal injury.
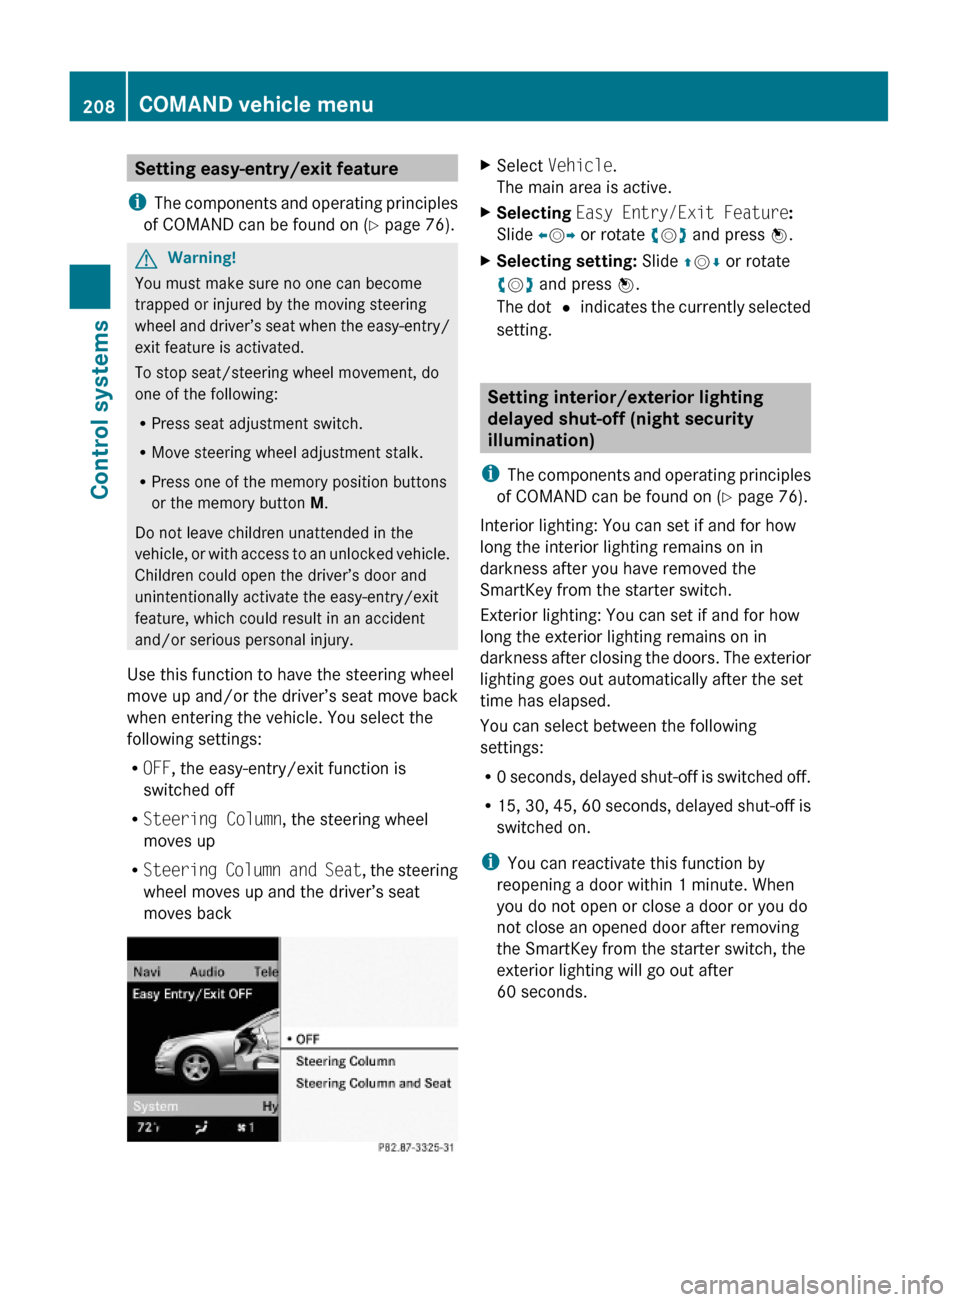
Use this function to have the steering wheel
move up and/or the driver’s seat move back
when entering the vehicle. You select the
following settings:
ROFF, the easy-entry/exit function is
switched off
RSteering Column, the steering wheel
moves up
RSteering Column and Seat, the steering
wheel moves up and the driver’s seat
moves back
XSelect Vehicle.
The main area is active.
XSelecting Easy Entry/Exit Feature:
Slide XVY or rotate cVd and press W.
XSelecting setting: Slide ZVÆ or rotate
cVd and press W.
The dot # indicates the currently selected
setting.
Setting interior/exterior lighting
delayed shut-off (night security
illumination)
iThe components and operating principles
of COMAND can be found on (Y page 76).
Interior lighting: You can set if and for how
long the interior lighting remains on in
darkness after you have removed the
SmartKey from the starter switch.
Exterior lighting: You can set if and for how
long the exterior lighting remains on in
darkness after closing the doors. The exterior
lighting goes out automatically after the set
time has elapsed.
You can select between the following
settings:
R0 seconds, delayed shut-off is switched off.
R15, 30, 45, 60 seconds, delayed shut-off is
switched on.
iYou can reactivate this function by
reopening a door within 1 minute. When
you do not open or close a door or you do
not close an opened door after removing
the SmartKey from the starter switch, the
exterior lighting will go out after
60 seconds.
208COMAND vehicle menuControl systems
221_AKB; 6; 20, en-USd2ugruen,Version: 2.11.8.12009-09-24T13:28:17+02:00 - Seite 208