ESP MERCEDES-BENZ S63AMG 2010 W221 Workshop Manual
[x] Cancel search | Manufacturer: MERCEDES-BENZ, Model Year: 2010, Model line: S63AMG, Model: MERCEDES-BENZ S63AMG 2010 W221Pages: 548, PDF Size: 12.48 MB
Page 176 of 548
XSelect station preset and briefly press W.
or
XEnter a position number with the telephone
keypad using buttons ´ - Ã
( Y page 79).
COMAND tunes in the corresponding
channel as long as it is included in your
subscription and is still available.
i Vehicles with rear multicontour seats:
Rear occupants can also select a channel
using the buttons on the rear armrest
( Y page 80).
If the channel is not included in your
subscription, you will see the message
described in the section “Satellite radio
service is not activated” ( Y page 171).
If the channel is no longer available, you will
see the message Invalid Channel .
XClosing message: Press W.
Tuning in channels using manual
channel number entry
i If you try to tune in a channel when the
satellite radio service is not activated, you
will see the screen described in the section
“Satellite radio service is not activated”
( Y page 171).
Entering the channel number using the
COMAND controller
XSelect Audio Q Audio Q Sat. Radio
Q Sat. Radio Q Channel Entry .
The menu for manual channel number entry
appears.XExiting menu without making an entry:
Press back button % in the center
console ( Y page 87).XIncrease or decreasing number: Slide
Z V Æ or rotate cV d.XSelecting next number: Slide XV Y.XConfirming channel entry: Press W.
Further operation depends on whether the
selected channel number is valid or if the
channel is included in your subscription.
Entering the channel number using the
telephone keypad
XPress button à on the telephone
keypad ( Y page 79).XEnter channel number using buttons Å
- Ã .
Further operation depends on whether the
selected channel number is valid or if the
channel is included in your subscription.
Channel number is valid and channel is
included in subscription
COMAND tunes in the channel entered.
Channel number is invalid
You will see the message Invalid Channel.
XClosing message: Press W.
Channel number is valid but channel is
not included in subscription
You will see the screen described in the
section “Satellite radio service is not
activated” ( Y page 171).
XClosing display: Press W.
Tuning in channels using the channel
list
XSelect Audio Q Audio Q Sat. Radio
Q Sat. Radio Q Channel List .
The channel list appears. The dot # in
front of a list entry indicates the currently
selected channel.XSelect channel by rotating cV d or sliding
Z V Æ and press W.
i
The contents of the channel list depends
on which channels are included in your
subscription and which program category
you have selected (Y page 173). If satellite
174COMAND satellite radioControl systems
221_AKB; 6; 20, en-USd2ugruen,Version: 2.11.8.12009-09-24T13:28:17+02:00 - Seite 174
Page 179 of 548
File structure on a disc
When you create an audio disc, the tracks can
be organized in folders. A disc may contain a
maximum of 4000 tracks.
The directory depth may not exceed a
maximum of 8 levels. The system will ignore
files in lower levels.
Notes on USB storage media
Do not store data other than audio data on a
USB storage medium. Doing so will increase
the time required to initialize the USB storage
medium.
A maximum of 8 directory levels with up to
4000 tracks each are supported.
For information on connecting USB storage
media to the built-in USB socket in the glove
box see ( Y page 80).
Track and folder names
When you create an audio medium, you can
assign names to the tracks and folders.
COMAND uses these names for the
corresponding display. Empty folders or
folders which contain data other than MP3/
WMA tracks are not displayed by COMAND.
If MP3/WMA files are saved in the root
directory itself (uppermost directory on
storage medium), the root directory will also
be treated as a folder. COMAND will then
show the name of the root directory as the
folder name.
You must observe the following when
assigning track names:
R Track names must have at least one
character.
R Track names must have the extension
“mp3” or “wma”.
R There must be a period between the track
name and the extension.
Example of a correct track name:
Track1.mp3
Compatible file systems and
compression methods
COMAND supports the following formats:
R MPEG1 Audio Layer 3 (MP3) 25
R Microsoft Windows Media Audio (WMA) V2,
V7, V8 or V9 that are not copy-proof
Bit and sampling rates
MP3
COMAND supports MP3 files of the following
types:
R Fixed and variable bit rates from
32 kbit/s up to 320 kbit/s
R Sampling rates of 24 kHz to 48 kHz
WMA (Windows Media ®
Audio)
Windows Media ®
Audio (WMA) is an audio
data compression technology developed by
Microsoft ®
.
COMAND supports WMA files of the following
types:
R Fixed and variable bit rates from 5 kbit/s
up to 384 kbit/s
R Sampling rates of 8 kHz to 48 kHz
COMAND does not support WMA files of the
following types:
R DRM (Digital Rights Management) coded
files
R variable bit rates
R Losless Settings
R WMA Pro
R 5.1-Surround
i Only use tracks with a bit rate of above
128 kbit/s and a sampling rate of above
44.1 kHz. Lower rates will cause an audible
25 MPEG Layer 3 audio-coding technology under license of Fraunhofer-Institut for Integrated Circuits (IIS) and
ThomsonCOMAND audio CD/audio DVD/MP3177Control systems221_AKB; 6; 20, en-USd2ugruen,Version: 2.11.8.12009-09-24T13:28:17+02:00 - Seite 177Z
Page 181 of 548
Such damages are not covered by the
Mercedes-Benz Limited Warranty.
Only use round discs with a diameter of
12 cm.
Notes about handling CDs/DVDs
ROnly hold discs by the edge.
RHandle discs carefully to prevent playback
problems.
RAvoid getting scratches, fingerprints and
dust on discs.
RClean discs from time to time with a
commercially-available cleaning cloth. Do
not wipe them with a circular motion, but
only in straight lines from the center
outwards.
ROnly use a pen designed for such a purpose
to label discs.
RPlace discs back in their boxes after use.
RProtect discs from heat and direct sunlight.
Inserting/ejecting CDs and DVDs
GObserve Safety notes, see page 176.
iIf the CD/DVD has a printed side, this
must face upwards when the CD/DVD is
inserted. If neither side is printed, the side
to be played should face downwards.
DVD changer
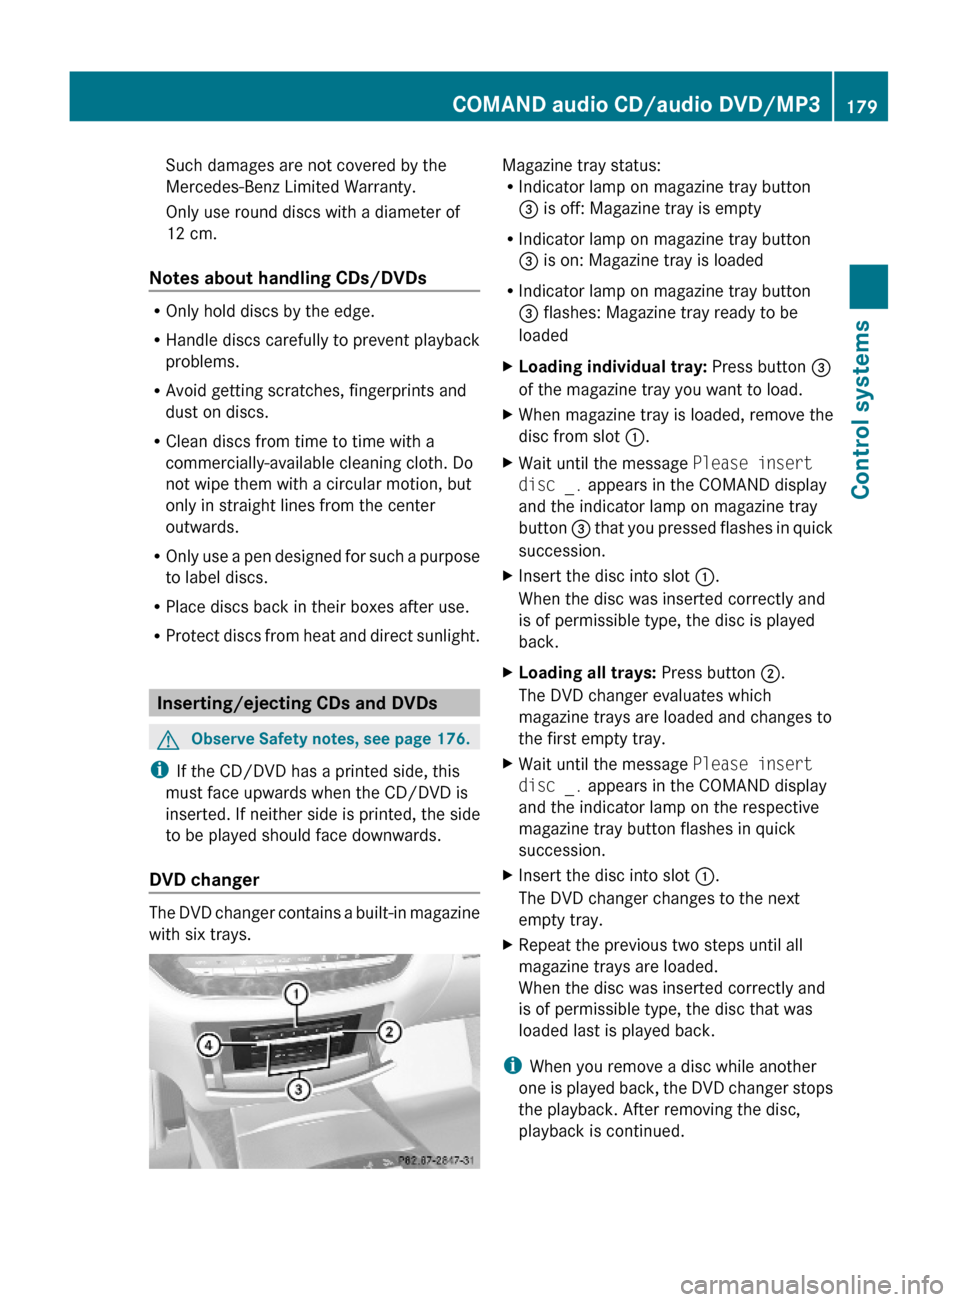
The DVD changer contains a built-in magazine
with six trays.
Magazine tray status:RIndicator lamp on magazine tray button
= is off: Magazine tray is empty
RIndicator lamp on magazine tray button
= is on: Magazine tray is loaded
RIndicator lamp on magazine tray button
= flashes: Magazine tray ready to be
loaded
XLoading individual tray: Press button =
of the magazine tray you want to load.
XWhen magazine tray is loaded, remove the
disc from slot :.
XWait until the message Please insert
disc _. appears in the COMAND display
and the indicator lamp on magazine tray
button = that you pressed flashes in quick
succession.
XInsert the disc into slot :.
When the disc was inserted correctly and
is of permissible type, the disc is played
back.
XLoading all trays: Press button ;.
The DVD changer evaluates which
magazine trays are loaded and changes to
the first empty tray.
XWait until the message Please insert
disc _. appears in the COMAND display
and the indicator lamp on the respective
magazine tray button flashes in quick
succession.
XInsert the disc into slot :.
The DVD changer changes to the next
empty tray.
XRepeat the previous two steps until all
magazine trays are loaded.
When the disc was inserted correctly and
is of permissible type, the disc that was
loaded last is played back.
iWhen you remove a disc while another
one is played back, the DVD changer stops
the playback. After removing the disc,
playback is continued.
COMAND audio CD/audio DVD/MP3179Control systems221_AKB; 6; 20, en-USd2ugruen,Version: 2.11.8.12009-09-24T13:28:17+02:00 - Seite 179Z
Page 187 of 548
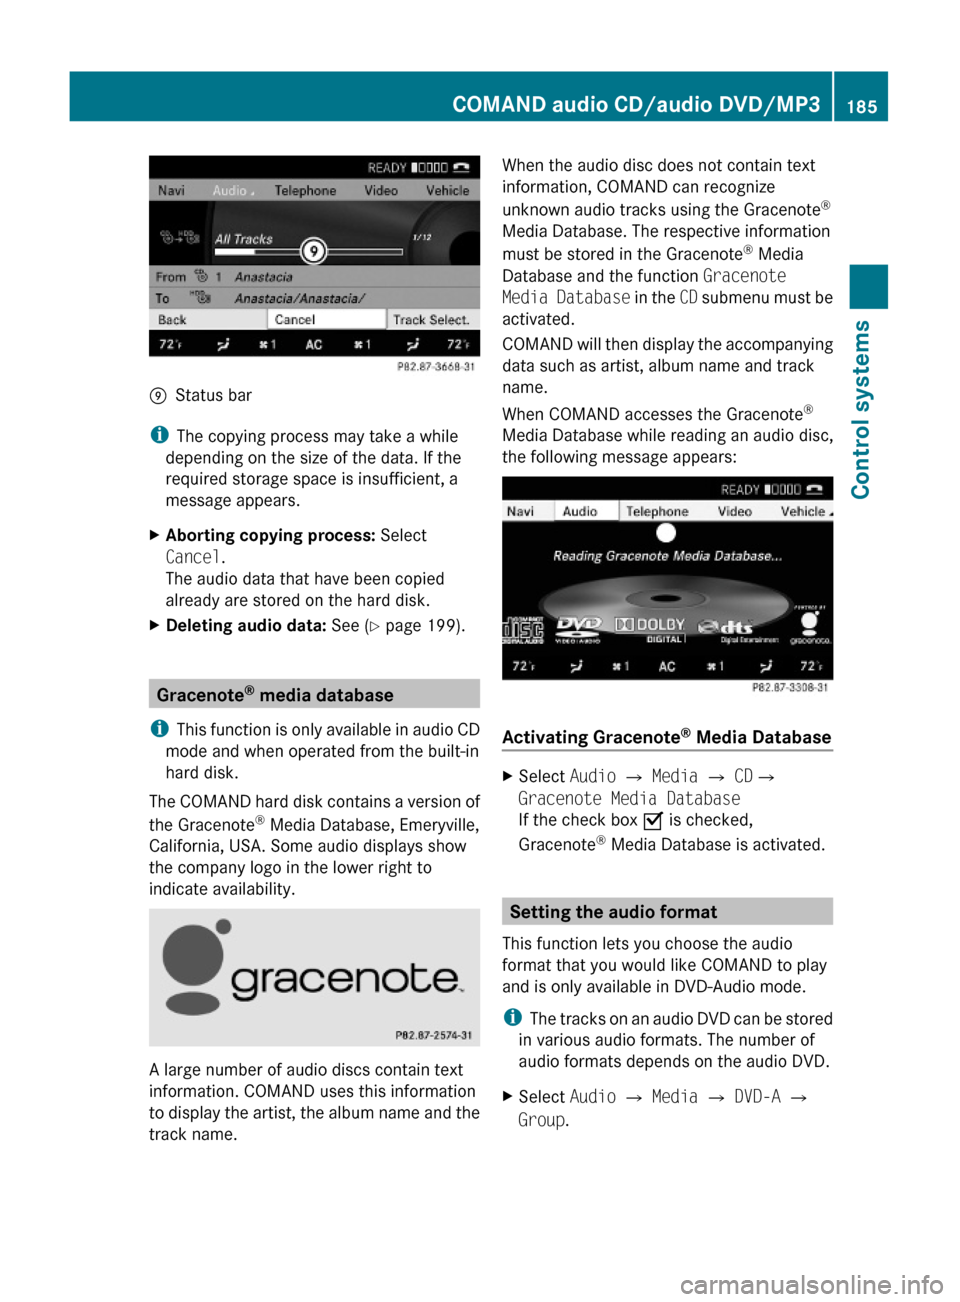
EStatus bar
iThe copying process may take a while
depending on the size of the data. If the
required storage space is insufficient, a
message appears.
XAborting copying process: Select
Cancel.
The audio data that have been copied
already are stored on the hard disk.
XDeleting audio data: See (Y page 199).
Gracenote® media database
iThis function is only available in audio CD
mode and when operated from the built-in
hard disk.
The COMAND hard disk contains a version of
the Gracenote® Media Database, Emeryville,
California, USA. Some audio displays show
the company logo in the lower right to
indicate availability.
A large number of audio discs contain text
information. COMAND uses this information
to display the artist, the album name and the
track name.
When the audio disc does not contain text
information, COMAND can recognize
unknown audio tracks using the Gracenote®
Media Database. The respective information
must be stored in the Gracenote® Media
Database and the function Gracenote
Media Database in the CD submenu must be
activated.
COMAND will then display the accompanying
data such as artist, album name and track
name.
When COMAND accesses the Gracenote®
Media Database while reading an audio disc,
the following message appears:
Activating Gracenote® Media Database
XSelect Audio £ Media £ CD£
Gracenote Media Database
If the check box Ç is checked,
Gracenote® Media Database is activated.
Setting the audio format
This function lets you choose the audio
format that you would like COMAND to play
and is only available in DVD-Audio mode.
iThe tracks on an audio DVD can be stored
in various audio formats. The number of
audio formats depends on the audio DVD.
XSelect Audio Q Media Q DVD-A Q
Group.
COMAND audio CD/audio DVD/MP3185Control systems221_AKB; 6; 20, en-USd2ugruen,Version: 2.11.8.12009-09-24T13:28:17+02:00 - Seite 185Z
Page 188 of 548
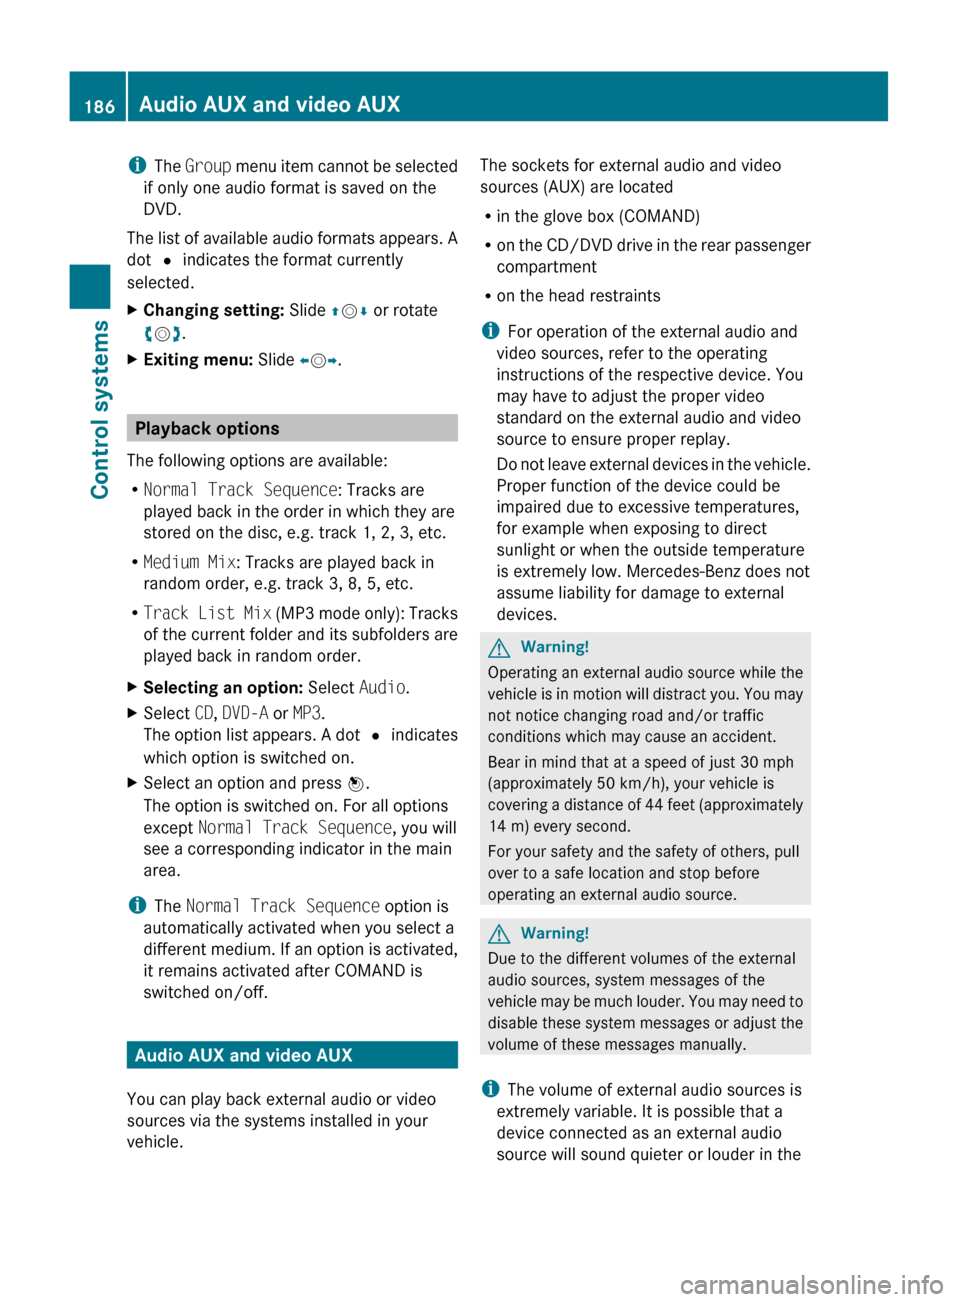
iThe Group menu item cannot be selected
if only one audio format is saved on the
DVD.
The list of available audio formats appears. A
dot # indicates the format currently
selected.XChanging setting: Slide ZV Æ or rotate
c V d.XExiting menu: Slide XV Y.
Playback options
The following options are available:
R Normal Track Sequence : Tracks are
played back in the order in which they are
stored on the disc, e.g. track 1, 2, 3, etc.
R Medium Mix : Tracks are played back in
random order, e.g. track 3, 8, 5, etc.
R Track List Mix (MP3 mode only): Tracks
of the current folder and its subfolders are
played back in random order.
XSelecting an option: Select Audio.XSelect CD, DVD-A or MP3 .
The option list appears. A dot # indicates
which option is switched on.XSelect an option and press W.
The option is switched on. For all options
except Normal Track Sequence , you will
see a corresponding indicator in the main
area.
i The Normal Track Sequence option is
automatically activated when you select a
different medium. If an option is activated,
it remains activated after COMAND is
switched on/off.
Audio AUX and video AUX
You can play back external audio or video
sources via the systems installed in your
vehicle.
The sockets for external audio and video
sources (AUX) are located
R in the glove box (COMAND)
R on the CD/DVD drive in the rear passenger
compartment
R on the head restraints
i For operation of the external audio and
video sources, refer to the operating
instructions of the respective device. You
may have to adjust the proper video
standard on the external audio and video
source to ensure proper replay.
Do not leave external devices in the vehicle.
Proper function of the device could be
impaired due to excessive temperatures,
for example when exposing to direct
sunlight or when the outside temperature
is extremely low. Mercedes-Benz does not
assume liability for damage to external
devices.GWarning!
Operating an external audio source while the
vehicle is in motion will distract you. You may
not notice changing road and/or traffic
conditions which may cause an accident.
Bear in mind that at a speed of just 30 mph
(approximately 50 km/h), your vehicle is
covering a distance of 44 feet (approximately
14 m) every second.
For your safety and the safety of others, pull
over to a safe location and stop before
operating an external audio source.
GWarning!
Due to the different volumes of the external
audio sources, system messages of the
vehicle may be much louder. You may need to
disable these system messages or adjust the
volume of these messages manually.
i The volume of external audio sources is
extremely variable. It is possible that a
device connected as an external audio
source will sound quieter or louder in the
186Audio AUX and video AUXControl systems
221_AKB; 6; 20, en-USd2ugruen,Version: 2.11.8.12009-09-24T13:28:17+02:00 - Seite 186
Page 190 of 548
playback. Refer to operating instructions of
the external device.XSelecting main function: Select Aux.XPress button ! on the remote control.XSelect Source .XSelect Display Aux for playback via the
connections in the head restraint.
or
XSelect Disk Drive Aux for playback via
the connections in the rear seat.
Switching to audio AUX operation
(COMAND)
XSelect Audio Q AUX .
The Audio AUX menu appears. You will hear
the medium in the external audio source
provided it is connected and set to
playback.
You can adjust the following during audio AUX
operation:
R Volume ( Y page 88)
R Balance and fader ( Y page 88)
R Treble and Bass (Y page 88)
R 3D Sound (Y page 89)
Switching to video AUX operation
(Rear Seat Entertainment System)
XConnect the video device to the sockets on
the head restraint or the rear seat and start
playback. Refer to operating instructions of
the external device.XSelecting main function: Select Aux.XPress button ! on the remote control.XSelect Source .XSelect Display Aux for playback via the
connections in the head restraint.
or
XSelect Disk Drive Aux for playback via
the connections in the rear seat.XSwitching from full screen to menu
system: Press button ! on the remote
control.XScreen settings: Select Display Aux .
A list appears.XProceed as described in the section
“Screen settings” ( Y page 194).
Switching to video AUX operation
(COMAND)
XSelect Video Q AUX .
The video AUX menu appears. You will hear
and see the medium in the external audio
source provided it is connected and set to
playback.
i For operation of the external video
source, refer to the operating instructions
of the respective device.
You can adjust the following during video AUX
operation:
R Brightness , Contrast and Color
( Y page 194)
R Picture format ( Y page 194)
R Volume ( Y page 88)
R Balance and fader ( Y page 88)
R Treble and Bass (Y page 88)
R 3D Sound (Y page 89)
188Audio AUX and video AUXControl systems
221_AKB; 6; 20, en-USd2ugruen,Version: 2.11.8.12009-09-24T13:28:17+02:00 - Seite 188
Page 197 of 548
Calling up the DVD menuXSelect Video Q Video DVD.XShow the menu system, if necessary
(Y page 193).
XSelect DVD-V Q DVD Functions Q
Menu.
The DVD menu appears.
Selecting menu items in the DVD menu
XSlide ZVÆ or XVY.XConfirming the selection: Press W.
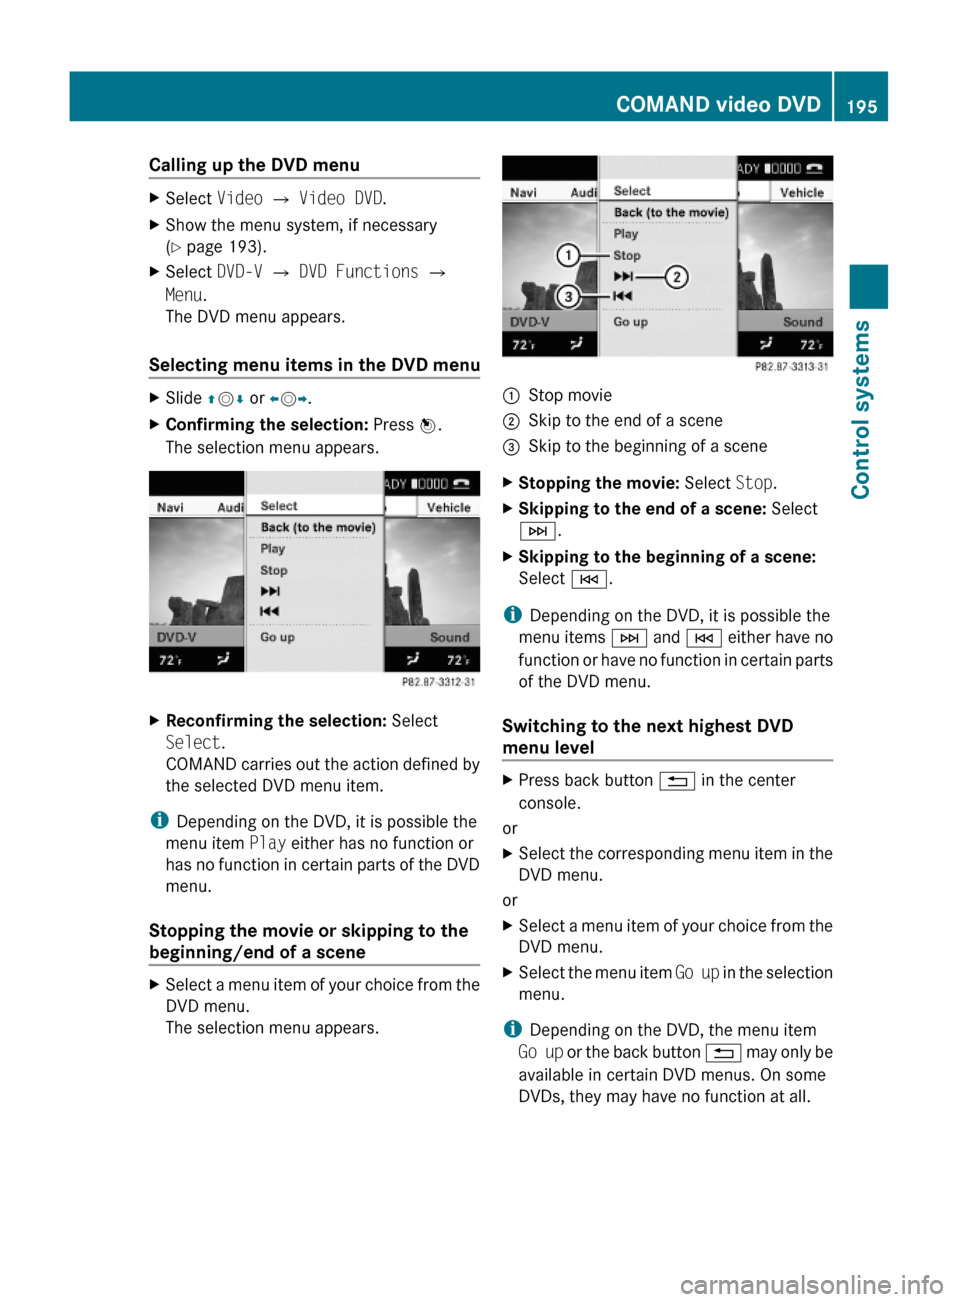
The selection menu appears.
XReconfirming the selection: Select
Select.
COMAND carries out the action defined by
the selected DVD menu item.
iDepending on the DVD, it is possible the
menu item Play either has no function or
has no function in certain parts of the DVD
menu.
Stopping the movie or skipping to the
beginning/end of a scene
XSelect a menu item of your choice from the
DVD menu.
The selection menu appears.
:Stop movie;Skip to the end of a scene=Skip to the beginning of a sceneXStopping the movie: Select Stop.XSkipping to the end of a scene: Select
F.
XSkipping to the beginning of a scene:
Select E.
iDepending on the DVD, it is possible the
menu items F and E either have no
function or have no function in certain parts
of the DVD menu.
Switching to the next highest DVD
menu level
XPress back button % in the center
console.
or
XSelect the corresponding menu item in the
DVD menu.
or
XSelect a menu item of your choice from the
DVD menu.
XSelect the menu item Go up in the selection
menu.
iDepending on the DVD, the menu item
Go up or the back button % may only be
available in certain DVD menus. On some
DVDs, they may have no function at all.
COMAND video DVD195Control systems221_AKB; 6; 20, en-USd2ugruen,Version: 2.11.8.12009-09-24T13:28:17+02:00 - Seite 195Z
Page 198 of 548
Back to the movieXPress back button % until you can see
the movie.
or
XSelect the corresponding menu item in the
DVD menu.
or
XSelect a menu item of your choice from the
DVD menu.XSelect the menu item Back (to the
movie) in the selection menu.
i
Depending on the DVD, the menu item
Back (to the movie) or the back button
% may be without function.
Setting the language
i This function is not available for all DVDs.
If it is available, you can set the language
for the DVD menu and the audio language.
The number of settings you can make is
determined by the content of the DVD. It
may also be possible to make the settings
in the DVD menu ( Y page 194).
XSelect Video Q Video DVD .XShow the menu system, if necessary
( Y page 193).XSelect DVD-V Q DVD Functions .XSelect Audio Language .
In both cases a selection list will appear.
The dot # in front of an entry indicates the
current language.XChanging the setting: Slide ZV Æ or turn
c V d, until you reach the desired setting.XSaving a setting: Press W.XExiting the menu: Slide XV Y.
Subtitles and camera angles
i This function is not available for all DVDs.
The number of settings you can make is
determined by the content of the DVD. It
may also be possible to make the settings
in the DVD menu ( Y page 194).XSelect Video Q Video DVD .XShow the menu system, if necessary
( Y page 193).XSelect DVD-V Q DVD Functions .XSelect Subtitles or Camera Angle .
In both cases a selection list will appear.
The dot # in front of an entry indicates the
current language.XChanging the setting: Slide ZV Æ or turn
c V d, until you reach the desired setting.XSaving a setting: Press W.XExiting the menu: Slide XV Y.
Interactive content
i DVDs may include interactive content
(e.g. a video game). In a video game you can
control the play by selecting and initiating
actions. The type and number of actions
depends on the DVD.
XSelecting an action: Slide ZV Æ or XV Y,
or turn cV d, until you reach the desired
setting.XInitiating an action: Press W.
A menu appears, the first entry Select is
highlighted.XPress W.
Music Register
GObserve Safety notes, see page 76.
You can save MP3 or WMA audio files in the
Music Register. The storage capacity is
approximately 7 gigabyte.
! Keep your original music files in a safe
place. A fault with the COMAND may cause
the music files stored in the Music Register
196Music RegisterControl systems
221_AKB; 6; 20, en-USd2ugruen,Version: 2.11.8.12009-09-24T13:28:17+02:00 - Seite 196
Page 199 of 548
to be lost. Mercedes-Benz USA, LLC is not
liable for any loss of data.
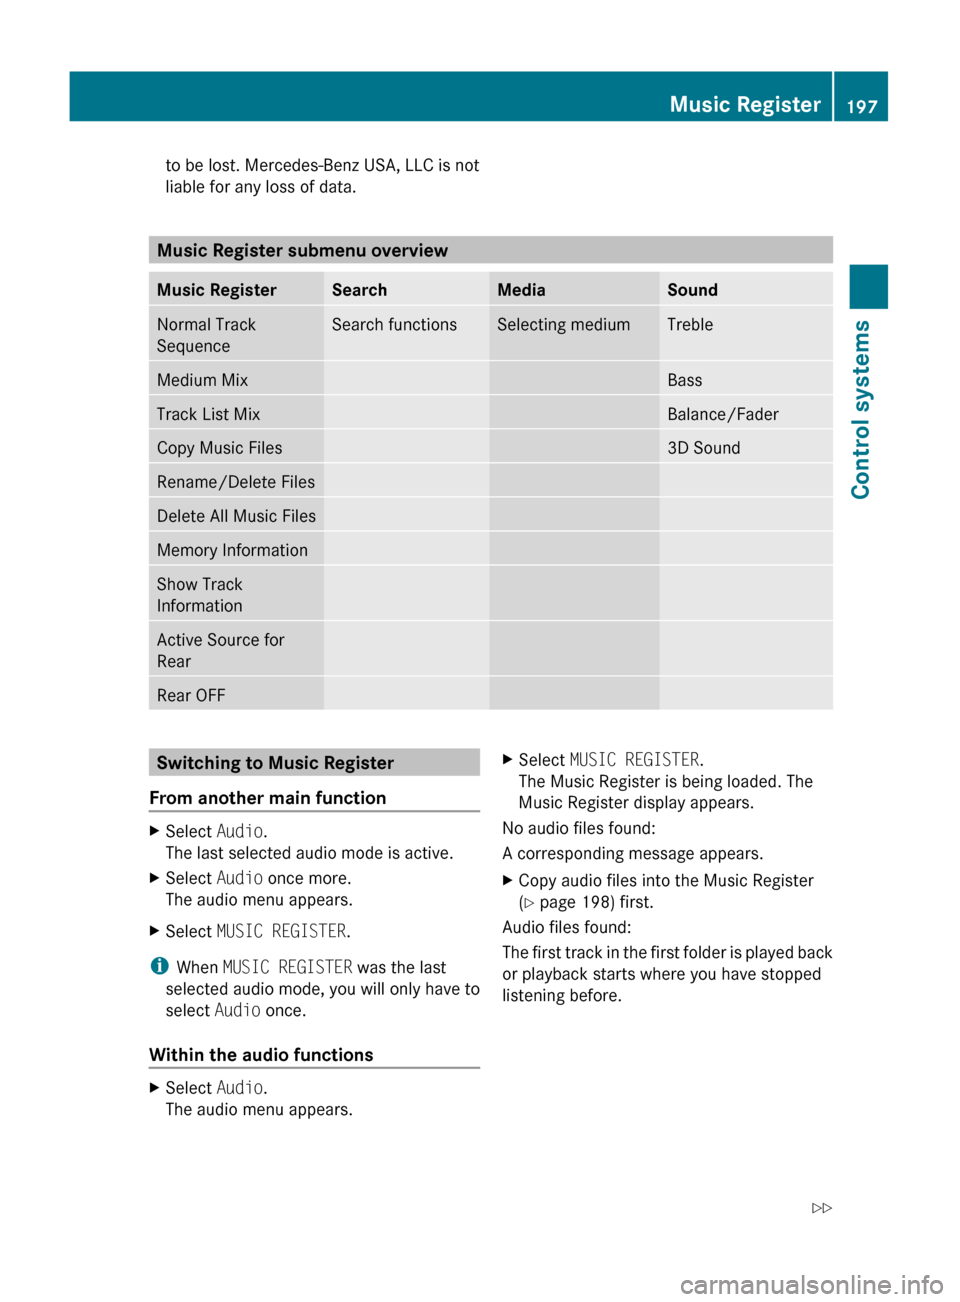
Music Register submenu overview
Music RegisterSearchMediaSoundNormal Track
SequenceSearch functionsSelecting mediumTrebleMedium MixBassTrack List MixBalance/FaderCopy Music Files3D SoundRename/Delete FilesDelete All Music FilesMemory InformationShow Track
InformationActive Source for
RearRear OFFSwitching to Music Register
From another main functionXSelect Audio.
The last selected audio mode is active.XSelect Audio once more.
The audio menu appears.XSelect MUSIC REGISTER .
i
When MUSIC REGISTER was the last
selected audio mode, you will only have to
select Audio once.
Within the audio functions
XSelect Audio.
The audio menu appears.XSelect MUSIC REGISTER .
The Music Register is being loaded. The
Music Register display appears.
No audio files found:
A corresponding message appears.
XCopy audio files into the Music Register
( Y page 198) first.
Audio files found:
The first track in the first folder is played back
or playback starts where you have stopped
listening before.
Music Register197Control systems221_AKB; 6; 20, en-USd2ugruen,Version: 2.11.8.12009-09-24T13:28:17+02:00 - Seite 197Z
Page 200 of 548
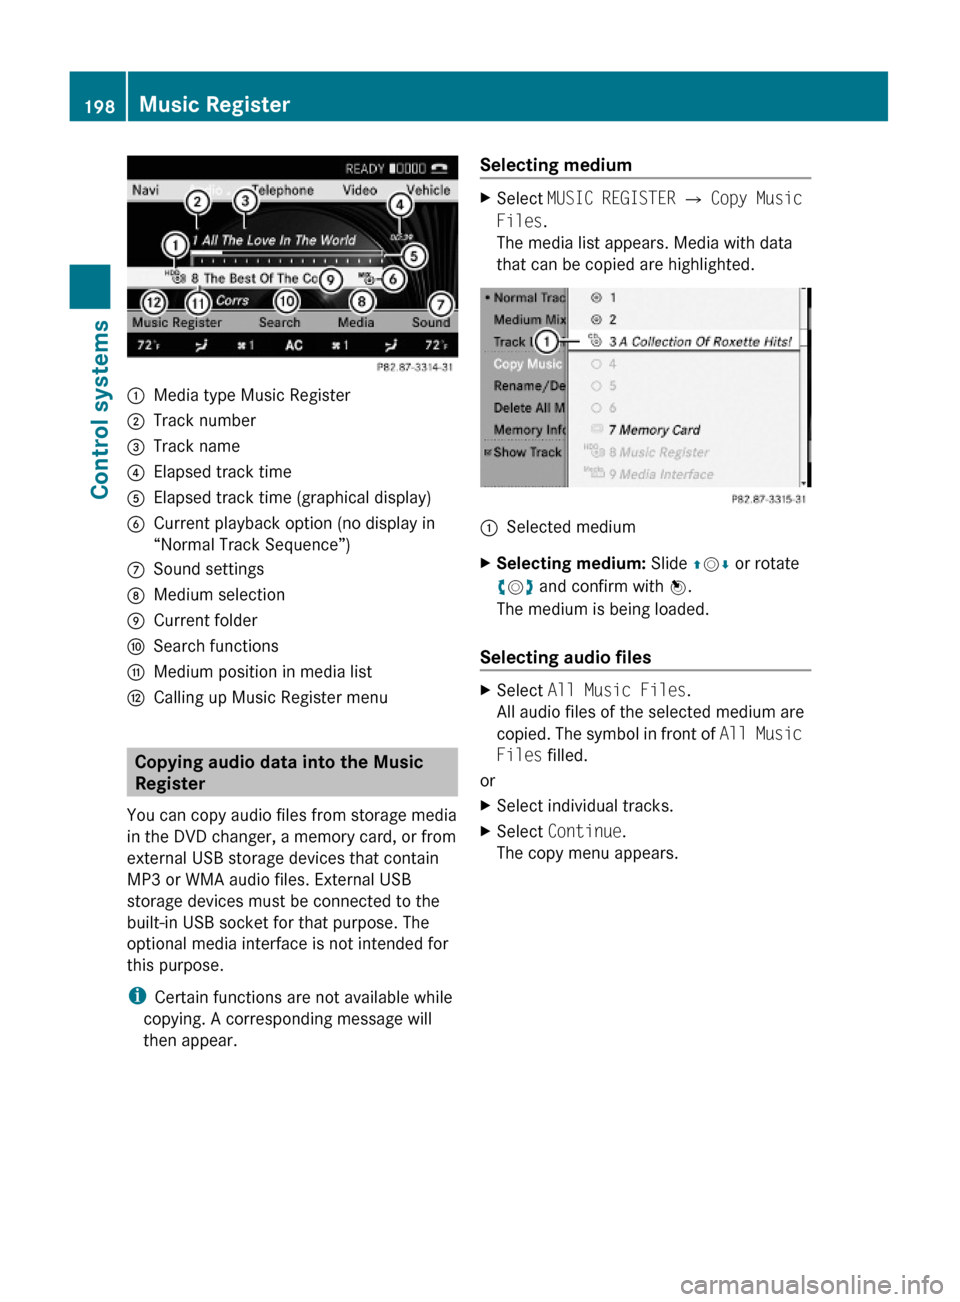
:Media type Music Register;Track number=Track name?Elapsed track timeAElapsed track time (graphical display)BCurrent playback option (no display in
“Normal Track Sequence”)
CSound settingsDMedium selectionECurrent folderFSearch functionsGMedium position in media listHCalling up Music Register menu
Copying audio data into the Music
Register
You can copy audio files from storage media
in the DVD changer, a memory card, or from
external USB storage devices that contain
MP3 or WMA audio files. External USB
storage devices must be connected to the
built-in USB socket for that purpose. The
optional media interface is not intended for
this purpose.
iCertain functions are not available while
copying. A corresponding message will
then appear.
Selecting mediumXSelect MUSIC REGISTER Q Copy Music
Files.
The media list appears. Media with data
that can be copied are highlighted.
:Selected mediumXSelecting medium: Slide ZVÆ or rotate
cVd and confirm with W.
The medium is being loaded.
Selecting audio files
XSelect All Music Files.
All audio files of the selected medium are
copied. The symbol in front of All Music
Files filled.
or
XSelect individual tracks.XSelect Continue.
The copy menu appears.
198Music RegisterControl systems
221_AKB; 6; 20, en-USd2ugruen,Version: 2.11.8.12009-09-24T13:28:17+02:00 - Seite 198