buttons MERCEDES-BENZ SL-Class 2013 R131 Owner's Manual
[x] Cancel search | Manufacturer: MERCEDES-BENZ, Model Year: 2013, Model line: SL-Class, Model: MERCEDES-BENZ SL-Class 2013 R131Pages: 590, PDF Size: 9.73 MB
Page 8 of 590
AUX (audio)
Notes/socke t................................ 466
Switching to ................................... 467
AUX (video)
Setting the volume and sound .......474
Showing/hiding the menu .............474
Switching to ................................... 474
Avoiding an area ................................ 369B
Back button ....................................... 292
Balance, adjusting .............................295
BAS (Brake Assist System) .................74
BAS PLUS (Brake Assist System
PLUS) .................................................... 74
Bass, setting ...................................... 295
Battery (SmartKey) Checking .......................................... 87
Important safety notes ....................87
Replacing ......................................... 87
Battery (vehicle)
Charging ........................................ 533
Display message ............................ 255
Important safety notes ..................531
Jump starting ................................. 534
Overview ........................................ 531
Bird's-eye view (navigation) .............363
Blin dSpot Assist
see Active Blind Spot Assist
Bluetooth ®
Activating/deactivating .................306
Activating audio mode ...................458
Conditions (telephone ).................. 377
Connecting another mobile phone .381
Connecting audio devices ..............455
Device lis t...................................... 456
Entering the passcode ...................380
External authorization ....................381
General information .......................305
Interface ........................................ 376
Introduction ................................... 376
Reconnecting an audio device .......457
Searching for a mobile phone ........379
Settings ......................................... 305
Telephone basic menu ...................383
Telephony ...................................... 377
Telephony notes ............................ 376Bluetooth
®
audio basic display ........458
Bottle holder ...................................... 495
Brake Assist see BAS (Brake Assist System)
Brake fluid
Display message ............................ 246
Notes ............................................. 582
Brake lamps
Display message ............................ 252
Brakes
ABS .................................................. 73
BAS .................................................. 74
BAS PLUS ........................................ 74
Brake fluid (notes) .........................582
Display message ............................ 241
Driving tips .................................... 179
High-performance brake system ....180
Important safety notes ..................179
Maintenance .................................. 180
Parking brake ................................ 176
Warning lamp ................................. 271
Breakdown
see Flat tire
see Towing away
Brightness, setting (TV, video) .........468
Buttons on the COMAND controller 292 C
California Important notice for retail
customers and lessees ....................35
Call
Accepting/ending/rejecting .......... 384
Connecting .................................... 384
see Telephone
Calling up a malfunction
see Display messages
Call lists
Displaying details ........................... 392
Opening and selecting an entry .....392
Saving an entry in the address
book .............................................. 392
Car
see Vehicle
Care
Carpets .......................................... 524
Car wash ........................................ 517 6
Index
Page 23 of 590
Setting the night design
...................303
Setting the text reader speed ..........305
Setting the volume Telephone call s.............................. 295
Video AUX ..................................... 474
SETUP (on-board computer) .............237
Side impact air bag .............................57
Side windows Cleaning ......................................... 520
Convenience closing feature .......... 101
Important safety information ...........99
Opening/closing (all) .....................100
Opening/closing (front) .................100
Opening/closing (rear) ..................100
Overview .......................................... 99
Problem (malfunction) ...................103
Resetting ....................................... 102
SIRIUS weather display
5-day forecast ................................ 478
Daily forecast ................................. 477
Detail information ..........................478
Information chart ........................... 477
Selecting the area for the weather
forecast ......................................... 478
Switching on/off ........................... 477
Weather map ................................. 481
SmartKey
Changing the battery .......................87
Changing the programming .............85
Checking the battery .......................87
Convenience opening feature ........101
Display message ............................ 268
Door central locking/unlocking .......84
Important safety notes ....................84
Loss ................................................. 89
Mechanical key ................................ 86
Opening/closing the roof ..............105
Overview .......................................... 84
Positions (ignition lock) .................155
Problem (malfunction) .....................89
Starting the engine ........................157
Snow chains ...................................... 547
Sockets Front-passenger footwell ...............497
General notes ................................ 496
Trunk ............................................. 497
Under the armrest .........................497Sound
Switching on/off ........................... 294
Soun dmenu ....................................... 295
Sound mode ...................................... .298
Soun dsettings
Calling up the sound men u............ 295
Surround sound ............................. 296
Treble and bas s............................. 295
Specialist workshop ............................ 38
Special seat bel tretractor .................. 72
Speed ,controlling
see Cruise control
Speed dial list
Storing a phone book entry in the
speed dial list ................................ 394
Speedometer
Digita l............................................ 226
In the Instrument cluster .................43
Segments ...................................... 223
Selecting the unit of measurement 232
SPORT handling mode
Activating/deactivating (AMG
vehicles) .......................................... 77
Warning lamp ................................. 274
SRS (Supplemental Restraint
System)
Display message ............................ 248
Introduction ..................................... 53
Warning lamp ................................. 276
Warning lamp (function) ................... 53
Standing lamps
Display message ............................ 252
Switching on/off ........................... 128
Start/stop function
see ECO start/stop function
Starting (engine) ................................ 157
Station search ................................... 428
STEE RCONTROL .................................. 80
Steering (display message) ..............267
Steering wheel Adjusting (electrically). ..................120
Button overview ............................... 45
Buttons (on-board computer) ......... 223
Cleaning ......................................... 522
Important safety notes ..................120
Paddle shifters ............................... 168
Storing settings (memory function) 124 Index
21
Page 34 of 590
X
Switching functions from the Digital
Operator's Manual to COMAND using
the COMAND function buttons: press the
0006, 0012,0009or0014 button in
COMAND.
The desired menu opens.
X To go back to the Digital Operator's
Manual: use the COMAND controller to
select the 000Csymbol in the menu bar and
press 0039to confirm.
The last page called up in the Digital
Operator's Manual is opened.
i For safety reasons, the "Digital Operator's
Manual" function is switched off while you
are driving. 32
Digital Operator's Manual
Page 51 of 590
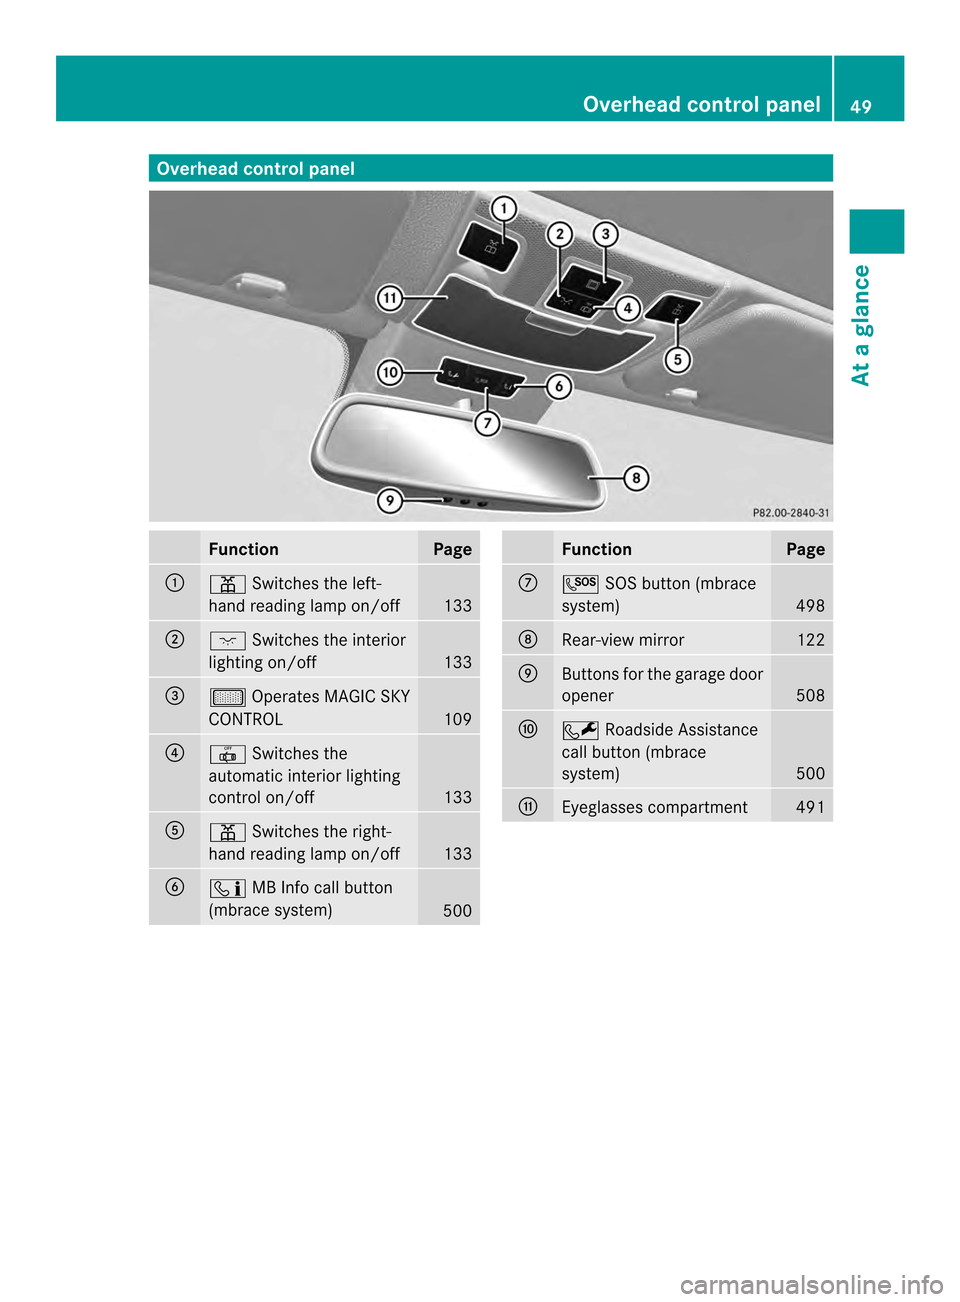
Overhea
dcontrol panel Function Page
0002
0010
Switches the left-
hand reading lamp on/off 133
0003
0003
Switches the interior
lighting on/off 133
0027
000A
Operates MAGIC SKY
CONTROL 109
0026
0019
Switches the
automatic interio rlighting
control on/off 133
0024
0010
Switches the right-
hand reading lamp on/off 133
0025
0008
MB Info call button
(mbrace system) 500 Function Page
0016
0007
SOS button (mbrace
system) 498
0017
Rear-view mirror 122
0018
Buttons for the garage door
opener
508
0019
0006
Roadside Assistance
call button (mbrace
system) 500
001A
Eyeglasses compartment 491Overhead control panel
49At a glance
Page 88 of 590

X
To change the setting: press and hold
down the 000Eand000D buttons
simultaneously for approximately six
seconds until the battery check lamp
flashes twice (Y page 87).
i If the setting of the locking system is
changed withi nthe signal range of the
vehicle, pressing the 000Dor000E button:
R locks or
R unlocks the vehicle
The SmartKey now functions as follows:
X To unlock the driver's door: press the
000E button once.
X To unlock centrally: press the000E
button twice.
X To lock centrally: press the000Dbutton.
The KEYLESS-GO function is changed as
follows:
X To unlock the driver's door: touch the
inner surface of the door handle on the
driver's door.
X To unlock centrally: touch the inner
surface of the front-passenger door handle.
X To lock centrally: touch the outer sensor
surface on one of the door handles.
X To restore the factory settings: press
and hold down the 000Eand000D buttons
simultaneously for approximately six
seconds until the battery check lamp
flashes twice (Y page 87). Mechanical key
General notes If the vehicle can no longer be locked or
unlocked with the SmartKey, use the
mechanical key.
If you use the mechanical key to unlock and
open the driver's door or the trunk lid, the
anti-theft alarm system will be triggered
(Y page 81). There are several ways to turn off the alarm:
X
To turn the alarm off with the
SmartKey: press the000Eor000D button
on the SmartKey.
or
X Insert the SmartKey into the ignition lock.
or
X To deactivate the alarm with KEYLESS-
GO: press the Start/Stop button in the
ignition lock. The SmartKey must be in the
vehicle.
or
X Lock or unlock the vehicle using KEYLESS-
GO. The SmartKey must be outside the
vehicle.
If you unlock the vehicle using the mechanical
key, the fuel filler flap will not be unlocked
automatically.
X To unlock the fuel filler flap: insert the
SmartKey into the ignition lock.
Removing the mechanical key X
Push release catch 0002in the direction of
the arrow and at the same time, remove
mechanical key 0003from the SmartKey. 86
SmartKeyOpening and closing
Page 90 of 590
X
Repeatedly tap the SmartKey against your
palm until battery 0027falls out.
X Inser tthe new battery with the positive
terminal facing upwards. Use a lint-free
cloth to do so.
X Make sure that the surface of the battery is
free of lint, grease and other contaminants.
X Insert the front tabs of battery
compartment cover 0002into the housing
first and then press to close it.
X Insert mechanical key 0003into the
SmartKey.
X Check the function of all SmartKey buttons
on the vehicle. 88
SmartKeyOpening and closing
Page 94 of 590
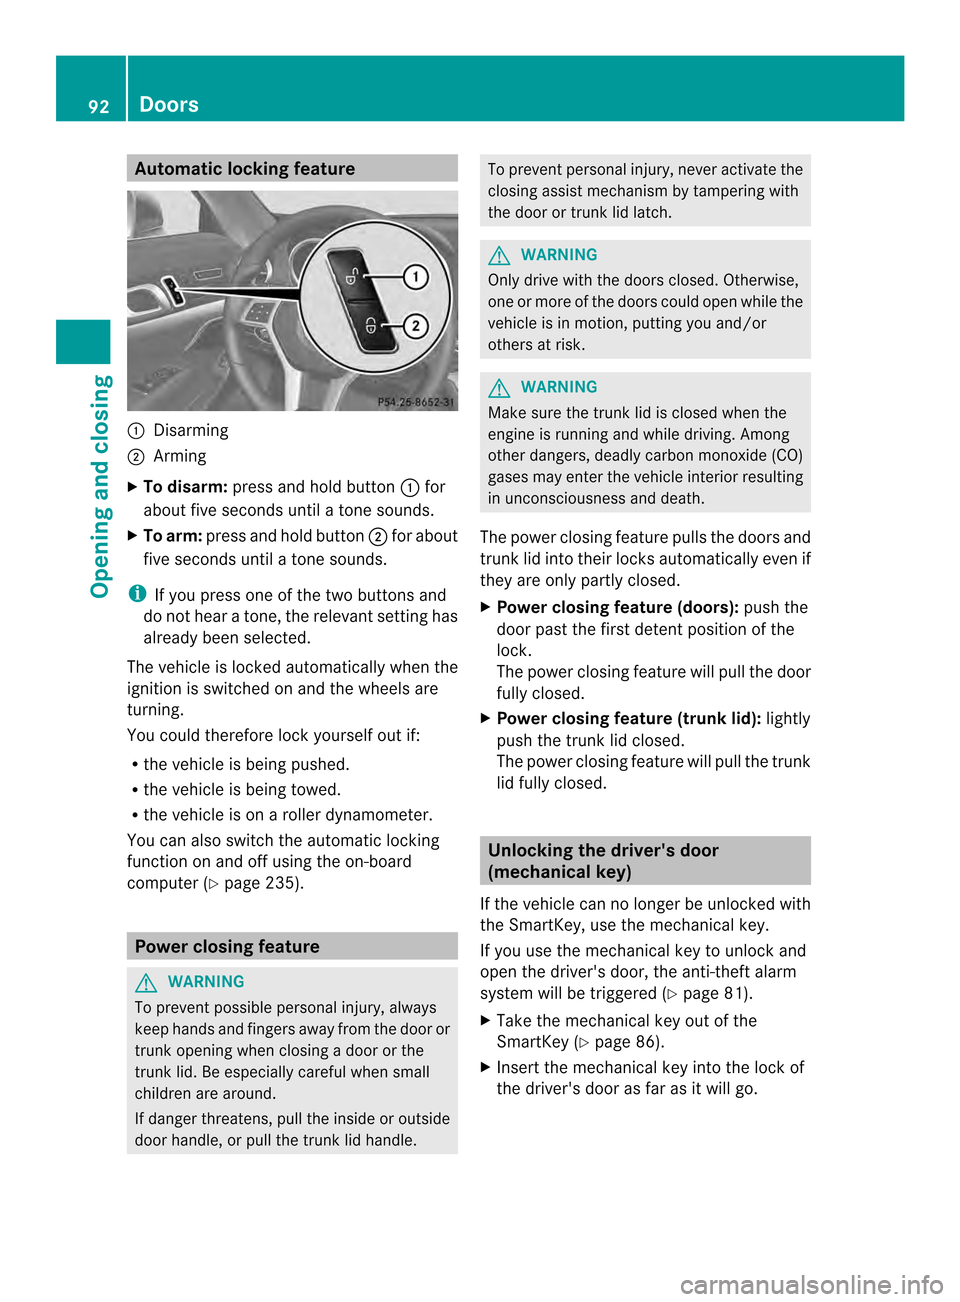
Automatic locking feature
0002
Disarming
0003 Arming
X To disarm: press and hold button 0002for
about five seconds until a tone sounds.
X To arm: press and hold button 0003for about
five seconds until a tone sounds.
i If you press one of th etwo buttons and
do not hear a tone, the relevant setting has
already been selected.
The vehicle is locked automatically when the
ignitio nis switched on and the wheels are
turning.
You could therefore lock yourselfo ut if:
R the vehicle is being pushed.
R the vehicle is being towed.
R the vehicle is on a roller dynamometer.
You can also switch the automatic locking
function on and off using the on-board
computer (Y page 235). Power closing feature
G
WARNING
To preven tpossible personal injury, always
keep hands and fingers away from the door or
trunk opening when closing a door or the
trunk lid. Be especially careful when small
children are around.
If danger threatens, pull the inside or outside
door handle, or pull the trunk lid handle. To prevent personal injury, never activate the
closing assist mechanism by tampering with
the door or trunk lid latch. G
WARNING
Only drive with the doors closed. Otherwise,
one or more of the doors could open while the
vehicle is in motion, putting you and/or
others at risk. G
WARNING
Make sure the trunk lid is closed when the
engine is running and while driving. Among
other dangers, deadly carbon monoxide (CO)
gases may enter the vehicle interior resulting
in unconsciousness and death.
The power closing feature pulls the doors and
trunk lid into their locks automatically even if
they are only partly closed.
X Power closing feature (doors): push the
door past the first detent position of the
lock.
The power closing feature will pull the door
fully closed.
X Power closing feature (trunk lid): lightly
push the trunk lid closed.
The power closing feature will pull the trunk
lid fully closed. Unlocking the driver's door
(mechanical key)
If the vehicle can no longer be unlocked with
the SmartKey, use the mechanical key.
If you use the mechanical key to unlock and
open the driver's door, the anti-theft alarm
system will be triggered (Y page 81).
X Take the mechanical key out of the
SmartKey (Y page 86).
X Insert the mechanical key into the lock of
the driver's door as far as it will go. 92
DoorsOpening and closing
Page 121 of 590
The three red indicator lamps in the button
indicate the heating level you have selected.
The system automatically switches down
from level 3to level 2after approximately
eight minutes.
The system automatically switches down
from level 2to level 1after approximately ten
minutes.
The system automatically switches off
approximately 20 minutes after it is set to
level 1.
You can set the distribution of the heated
sections of the seat cushion and backrest
using COMAND (Y page 312).
X Make sure that the SmartKey is in position
1 or 2in the ignition lock.
X To switch on: press button0002repeatedly
until the desired heating level is set.
X To switch off: press button0002repeatedly
until all the indicator lamps go out.
i If the battery voltage is too low, the seat
heating may switch off.
Problems with the seat heating The seat heating has switched off
prematurely or cannot be switched on. The
vehicle's electrical system voltage is too low
because too many electrical consumers are
switched on.
X Switch off electrical consumers that you do
not need, such as the rear window
defroster or interior lighting.
X Once the battery is sufficiently charged,
switch on the seat heating again. Switching the seat ventilation on/off
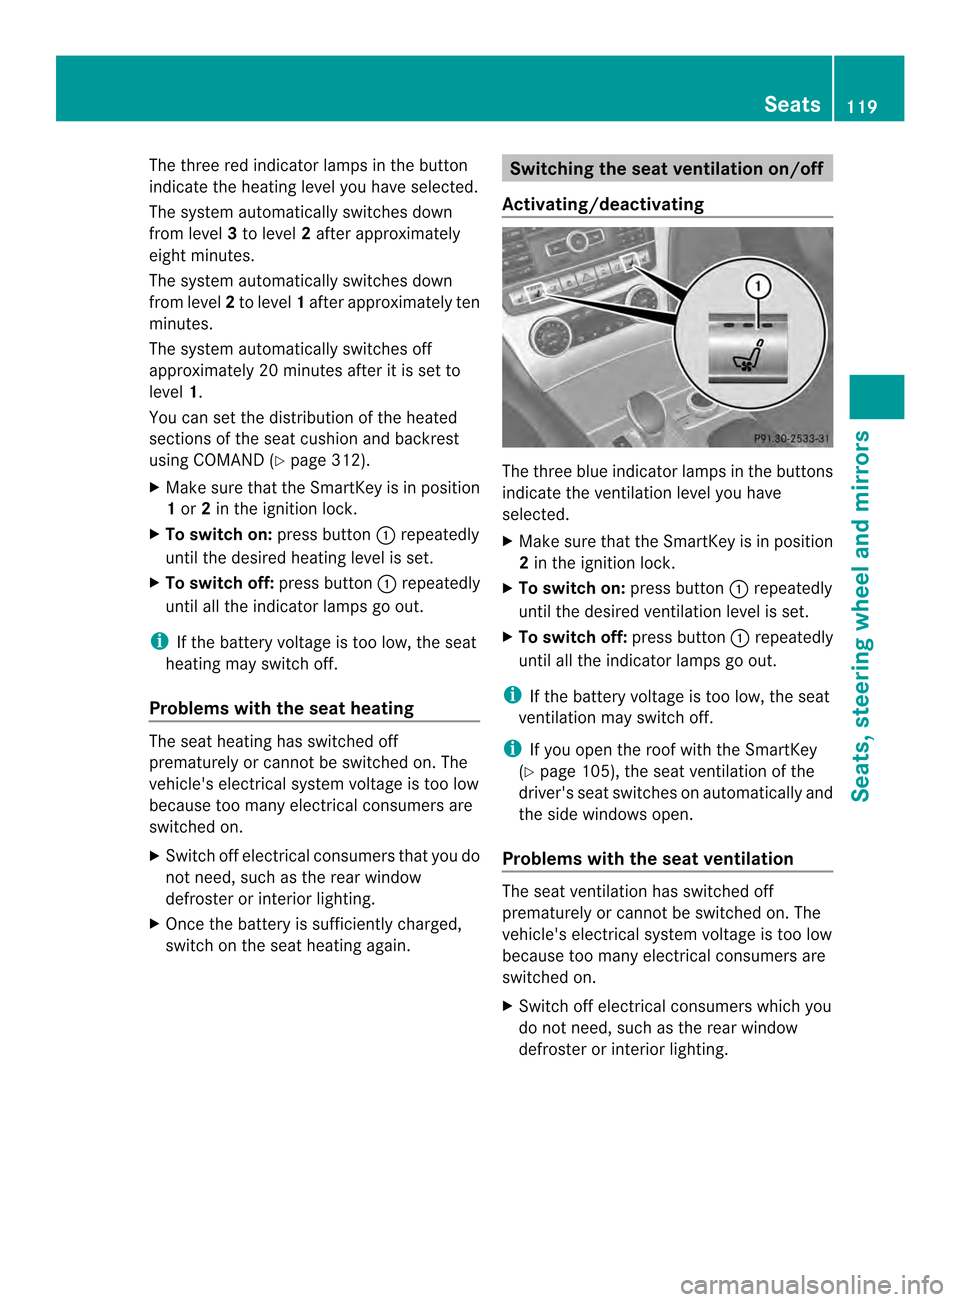
Activating/deactivating The three blue indicator lamps in the buttons
indicate the ventilation level you have
selected.
X
Make sure that the SmartKey is in position
2in the ignition lock.
X To switch on: press button0002repeatedly
until the desired ventilation level is set.
X To switch off: press button0002repeatedly
until all the indicator lamps go out.
i If the battery voltage is too low, the seat
ventilation may switch off.
i If you open the roof with the SmartKey
(Y page 105), the seat ventilation of the
driver's seat switches on automatically and
the side windows open.
Problems with the seat ventilation The seat ventilation has switched off
prematurely or cannot be switched on. The
vehicle's electrical system voltage is too low
because too many electrical consumers are
switched on.
X
Switch off electrical consumers which you
do not need, such as the rear window
defroster or interior lighting. Seats
119Seats, steering wheel and mirrors Z
Page 123 of 590
EASY-ENTRY/EXIT feature
Important safety notes G
WARNING
Make sure that nobody can become trapped
when you activate the EASY-ENTRY/EXIT
feature.
If there is a risk of someone becoming
trapped, stop the adjustmen tprocedure. To
haltt he procedure:
R press the steering column adjustment
button.
R press one of the memory function position
buttons.
The steering column stops moving
immediately.
Do not keep the memory function position
button pressed as this will start the memory
function and set the steering wheel and seat
in motion.
Do not leave children unattended in the
vehicle. They could open the driver's door and
thereby unintentionally activate the EASY-
ENTRY/EXIT feature and become trapped. G
WARNING
Let the system complete the adjustment
procedure before setting the vehicle in
motion. All steering wheel adjustment must
be completed before setting the vehicle in
motion. Driving off with the steering wheel
still adjusting could cause the driver to lose
control of the vehicle.
The EASY-ENTRY/EXIT feature makes getting
in and out of your vehicle easier.
You can activate and deactivate the EASY-
ENTRY/EXIT feature in the on-board
computer (Y page 235). Position of the steering wheel when the
EASY-ENTRY/EXIT featurei
s active The steering wheel swings upwards when
you:
R
remove the SmartKey from the ignition lock
R open the driver's door and KEYLESS-GO is
in position 1
R open the driver's door and the SmartKey is
in position 0or 1in the ignition lock
i The steering wheel only moves upwards if
it has not already reached the upper end
stop.
Position of the steering wheel for
driving The steering wheel is moved to the last
selected position when:
R
the driver's door is closed.
R you insert the SmartKey into the ignition
lock.
or
R you press the Start/Stop button once on
vehicles with KEYLESS-GO.
When you close the driver's door with the
ignition switched on, the steering wheel is
also automatically moved to the previously
set position.
The last position of the steering wheel is
stored when you switch off the ignition or
when you store the setting with the memory
function (Y page 124).
Crash-responsive EASY-EXIT feature If the crash-responsive EASY-EXIT feature is
triggered in an accident, the steering column
will move upwards when the driver's door is
opened. This occurs irrespective of the
position of the SmartKey in the ignition lock.
This makes it easier to exit the vehicle and
rescue the occupants.
The crash-responsive EASY-EXIT feature is
only operational if the EASY-EXIT/ENTRY
feature is activated in the on-board computer. Steering wheel
121Seats, steering wheel and mirrors Z
Page 126 of 590
the exterior mirror, the rea
rwheel and the
curb should be visible.
X Press memory button M0026 and one of the
arrows on adjustment button 0027within
three seconds.
The parking position is stored if the exterior
mirror does not move.
X If the mirror moves out of position, repeat
the steps.
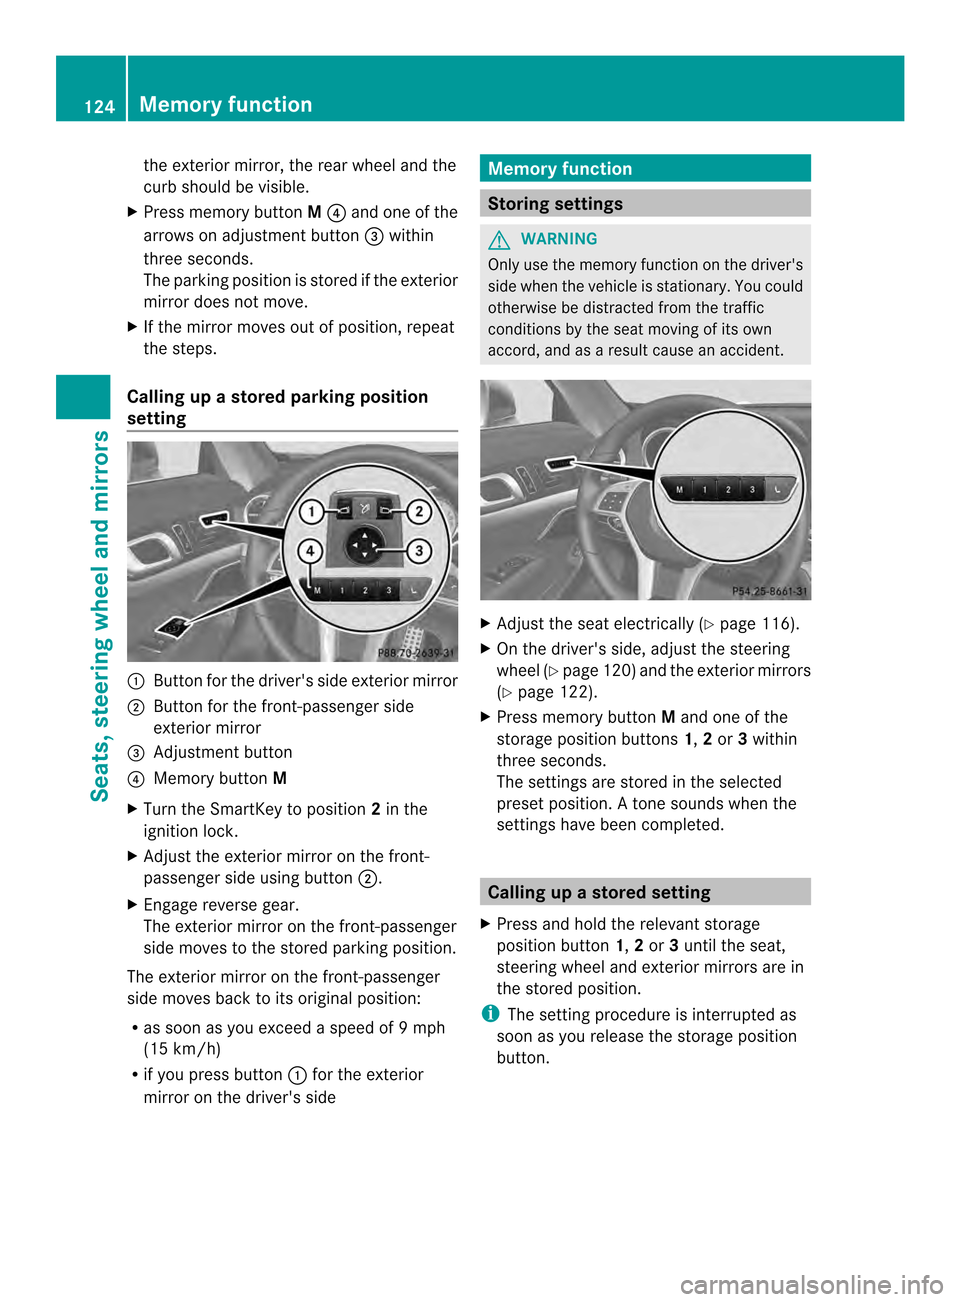
Calling up a stored parking position
setting 0002
Button for the driver's side exterior mirror
0003 Button for the front-passenger side
exterior mirror
0027 Adjustment button
0026 Memory button M
X Turn the SmartKey to position 2in the
ignition lock.
X Adjust the exterior mirror on the front-
passenger side using button 0003.
X Engage reverse gear.
The exterior mirror on the front-passenger
side moves to the stored parking position.
The exterior mirror on the front-passenger
side moves back to its original position:
R as soon as you exceed a speed of 9mph
(15 km/h)
R if you press button 0002for the exterior
mirror on the driver's side Memory function
Storing settings
G
WARNING
Only use the memory function on the driver's
side when the vehicle is stationary. You could
otherwise be distracted from the traffic
conditions by the seat moving of its own
accord, and as a result cause an accident. X
Adjust the seat electrically (Y page 116).
X On the driver's side, adjust the steering
wheel (Y page 120 )and the exterio rmirrors
(Y page 122).
X Press memory button Mand one of the
storage position buttons 1,2or 3within
three seconds.
The settings are stored in the selected
prese tposition. Atone sounds when the
settings have been completed. Calling up
astore dsetting
X Press and hold the relevant storage
position button 1,2or 3until the seat,
steering wheel and exterio rmirrors are in
the stored position.
i The setting procedure is interrupted as
soon as you release the storage position
button. 124
Memory functionSeats, steering wheel and mirrors