weight MERCEDES-BENZ SL-Class 2015 R131 Owner's Manual
[x] Cancel search | Manufacturer: MERCEDES-BENZ, Model Year: 2015, Model line: SL-Class, Model: MERCEDES-BENZ SL-Class 2015 R131Pages: 610, PDF Size: 12.21 MB
Page 27 of 610

Text messages (SMS) .................... 398
Toggling ......................................... 390
Using the telephone ....................... 387
see Bluetooth
®
Telephone basic menu Bluetooth ®
interface ......................3 85
Telephone mode
Redialing ........................................ 388
Telephone number
Entering ......................................... 387
Temperature
Coolant .......................................... 222
Coolant (on-board computer) ......... 236
Engine oil (on-board computer) ...... 236
Outside temperature ..................... .223
Setting (climate control) ................ 142
Text messages (SMS)
Calling the sender .......................... 400
Deleting ......................................... 400
Inbox .............................................. 399
Information and requirements ....... 398
Reading .......................................... 399
Reading aloud ................................ 399
Storing sender in address book ..... 400
Storing the sender as a new
address book entry ........................ 400
Time
Setting .......................................... .307
Setting summer/standard time ..... 307
Setting the forma t......................... 306
Setting the time ............................. 306
Setting the time/date format ........ 306
Setting the time manually .............. 306
Setting the time zone ..................... 307
Timing (RACETIMER) ......................... 237
TIREFIT kit .......................................... 550
Tire pressure Calling up (on-board computer) ..... 575
Checking manually ........................ 575
Display message ............................ 263
Important safety notes .................. 575
Maximum ....................................... 574
Notes ............................................. 573
Not reached (TIREFIT) .................... 552
Reached (TIREFIT) .......................... 552
Recommended ............................... 572 Tire pressure monitor
Radio type approval for the tire
pressure monitor ........................... 578
Tire pressure monitoring system
Checking the tire pressure elec-
tronically ........................................ 577
Function/note s............................. 575
General notes ................................ 575
Important safety notes .................. 575
Restarting ...................................... 577
Warning lamp ................................. 280
Warning message .......................... 577
Tires
Aspect ratio (definition) ................. 587
Average weight of the vehicle
occupants (definition) .................... 586
Bar (definition) ............................... 586
Changing a whee l.......................... 588
Characteristics .............................. 586
Checking ........................................ 569
Curb weight (definition) ................. 587
Definition of terms ......................... 586
Direction of rotation ...................... 589
Display message ............................ 263
Distribution of the vehicle occu-
pants (definition) ............................ 588
DOT, Tire Identification Number
(TIN) ............................................... 585
DOT (Department of Transporta-
tion) (definition) ............................. 586
GAWR (Gross Axle Weight Rating)
(definition) ..................................... 587
GVW (Gross Vehicle Weight) (def-
inition) ........................................... 587
GVWR (Gross Vehicle Weight Rat-
ing) (definition) .............................. 587
Important safety notes .................. 568
Increased vehicle weight due to
optional equipment (definition) ...... 587
Kilopascal (kPa) (definition) ........... 587
Labeling (overview) ........................ 582
Load bearing index (definition) ...... 588
Load index ..................................... 585
Load index (definition) ................... 587
M+S tire s....................................... 570
Maximum loaded vehicle weight
(definition) ..................................... 587 Index
25
Page 28 of 610
Maximum load on a tire (defini-
tion) ............................................... 587
Maximum permissible tire pres-
sure (definition) ............................. 587
Maximum tire load .........................5 85
Maximum tire load (definition) ....... 587
MOExtended tires .......................... 570
Optional equipment weight (defi-
nition) ............................................ 588
Overview ........................................ 568
PSI (pounds per square inch) (def-
inition) .......................................... .587
Replacing ....................................... 588
Service life ..................................... 570
Sidewall (definition) ....................... 588
Speed rating (definition) ................ 587
Storing .......................................... .589
Structure and characteristics
(definition) ..................................... 586
Summer tires ................................. 570
Temperature .................................. 582
TIN (Tire Identification Number)
(definition) ..................................... 588
Tire bead (definition) ..................... .588
Tire pressure (definition) ................ 587
Tire pressures (recommended) ...... 586
Tire size (data) ............................... 593
Tire size designation, load-bearing capacity, speed rating .................... 582
Tire tread ....................................... 569
Tire tread (definition) ..................... 588
Total load limit (definition) ............. 588
Traction ......................................... 581
Traction (definition) ....................... 588
Tread wea r..................................... 581
Uniform Tire Quality Grading
Standards ...................................... 581
Uniform Tire Quality Grading
Standards (definition) .................... 586
Wear indicator (definition) ............. 588
Wheel and tire combination ........... 596
Wheel rim (definition) .................... 587
see Flat tire
Tone settings
Balance and fader .......................... 296
Towing
Important safety guidelines ........... 559
Installing the towing eye ................ 560 Removing the towing eye ............... 561
With the rear axle raised ................ 561
Towing away
With both axles on the ground ....... 561
Tow-starting
Emergency engine starting ............ 562
Important safety notes .................. 559
Track
Selecting (CD, MP3) ....................... 447
Selecting using the number key-
pad ................................................ 448
Track information .............................. 492
Traffic jam function ........................... 349
Traffic reports Calling up a list .............................. 357
Reading out on route ..................... 359
Real-time traffic report .................. 358
Transmission
Selector lever ................................ 159
see Automatic transmission
Transporting the vehicle .................. 562
Treble, adjusting (sound) .................. 296
Trim pieces (cleaning instruc-
tions) .................................................. 545
Trip computer (on-board com-
puter) .................................................. 225
Trip odometer Calling up ....................................... 225
Resetting (on-board computer) ...... 226
True Image™ ...................................... 298
Trunk Emergency release .......................... 95
Important safety notes .................... 91
Locking separately ........................... 95
Opening/closing (automatically
from inside) ...................................... 95
Opening/closing (automatically
from outside) ................................... 92
Opening/closing (from outside,
HANDS-FREE ACCESS) .................... 93
Opening/closing (manually from
outside) ............................................ 92
Overview .......................................... 91
Power closing .................................. 90 26
Index
Page 32 of 610
Protection of the environment
General notes
H
Environmental note
Daimler's declared policy is one of compre-
hensive environmental protection.
The objectives are for the natural resources
that form the basis of our existence on this
planet to be used sparingly and in a manner
that takes the requirements of both nature
and humanity into account.
You too can help to protect the environment
by operating your vehicle in an environmen-
tally responsible manner.
Fuel consumption and the rate of engine,
transmission, brake and tire wear are affected by these factors:
R operating conditions of your vehicle
R your personal driving style
You can influence both factors. You should
bear the following in mind:
Operating conditions:
R avoid short trips as these increase fuel con-
sumption.
R always make sure that the tire pressures
are correct.
R do not carry any unnecessary weight.
R remove roof racks once you no longer need
them.
R a regularly serviced vehicle will contribute
to environmental protection. You should
therefore adhere to the service intervals.
R always have service work carried out at a
qualified specialist workshop.
Personal driving style:
R do not depress the accelerator pedal when
starting the engine.
R do not warm up the engine when the vehicle
is stationary.
R drive carefully and maintain a safe distance
from the vehicle in front.
R avoid frequent, sudden acceleration and
braking. R
change gear in good time and use each gear
only up to 00C3of its maximum engine speed.
R switch off the engine in stationary traffic.
R keep an eye on the vehicle's fuel consump-
tion. Environmental concerns and recom-
mendations
Wherever the operating instructions require
you to dispose of materials, first try to regen-
erate or re-use them. Observe the relevant
environmental rules and regulations when
disposing of materials. In this way you will
help to protect the environment. Genuine Mercedes-Benz parts
H
Environmental note
Daimler AG also supplies reconditioned major
assemblies and parts which are of the same
quality as new parts. They are covered by the same Limited Warranty entitlements as new
parts.
! Air bags and Emergency Tensioning Devi-
ces, as well as control units and sensors for these restraint systems, may be installed inthe following areas of your vehicle:
R doors
R door pillars
R door sills
R seats
R cockpit
R instrument cluster
R center console
Do not install accessories such as audio
systems in these areas. Do not carry out
repairs or welding. You could impair the
operating efficiency of the restraint sys-
tems.
Have aftermarket accessories installed at a qualified specialist workshop. 30
Introduction
Page 55 of 610
G
WARNING
If the seat belt is incorrectly fastened, it can-
not protect as intended. Furthermore, an
incorrectly fastened seat belt can cause addi- tional injury, for example, in an accident, dur-
ing braking or when abruptly changing direc-
tion. This poses an increased risk of injury or
even fatal injury.
Make sure that all vehicle occupants are
seated properly with a correctly fastened seat belt. G
WARNING
The seat belt does not offer the intended level of protection if you have not moved the back-
rest to an almost vertical position. When brak-
ing or in the event of an accident, you could
slide underneath the seat belt and sustain
abdomen or neck injuries, for example. This
poses an increased risk of injury or even fatal injury.
Adjust the seat properly before beginning
your journey. Always ensure that the backrest
is in an almost vertical position and that the
shoulder section of your seat belt is routed
across the center of your shoulder. G
WARNING
Persons under 5 ft (1.50 m) in height cannot
fasten the seat belt correctly without an addi- tional suitable restraint system. If the seat
belt is incorrectly fastened, it cannot protect
as intended. Furthermore, an incorrectly fas-
tened seat belt can cause additional injury, for
example, in an accident, during braking or an
abrupt change of direction. This poses an
increased risk of injury or even fatal injury.
For this reason, always secure persons under
5 ft (1.50 m) in height in suitable restraint
systems.
If a child younger than 12 years and under 5 ft
(1.50 m) in height is traveling in the vehicle:
R always secure the child in a child restraint
system suitable for this Mercedes-Benz
vehicle. The child restraint system must be appropriate to the age, weight and size of
the child
R always observe the instructions and safety
notes in the "Children in the vehicle" sec-
tion of this Operator's Manual
(Y page 68) in addition to the child
restraint system manufacturer's installa-
tion instructions
R be sure to observe the instructions and
safety notes on the "Occupant classifica-
tion system (OCS)" (Y page 59) G
WARNING
The seat belts may not perform their intended protective function if:
R they are damaged, modified, extremely
dirty, bleach or dyed
R the seat belt buckle is damaged or
extremely dirty
R the Emergency Tensioning Devices, belt
anchorages or inertia reels have been modi-
fied
Seat belts may be damaged in an accident,
although the damage may not be visible, e.g.
due to splinters of glass. Modified or damaged
seat belts may tear or fail, e.g. in an accident. Modified Emergency Tensioning Devices
could accidentally trigger or fail to deploy
when necessary. This poses an increased risk
of injury or even fatal injury.
Never modify the seat belts, Emergency Ten-
sioning Devices, belt anchorages or inertia
reels. Make sure that the seat belts are
undamaged, not worn out and clean. Follow-
ing an accident, have the seat belts checked
immediately at a qualified specialist work-
shop.
Only use seat belts that have been approved
for your vehicle by Mercedes-Benz. Any such modifications could invalidate the vehicle's
general operating permit. Occupant safety
53Safety Z
Page 61 of 610

Occupant Classification System
(OCS)
Introduction The Occupant Classification System (OCS)
categorizes the person in the front-passenger
seat. Depending on that result, the front-
passenger front air bag and front-passenger
knee bag are either enabled or deactivated.
The system does not deactivate:
R the side impact air bag
R the front-passenger head bag
R the Emergency Tensioning Devices
Prerequisites To be classified correctly, the front passenger
must sit:
R with the seat belt fastened correctly
R in an almost upright position with their
back against the seat backrest
R with their feet resting on the floor, if possi-
ble
If the front passenger does not observe these
conditions, OCS may produce a false classi-
fication, e.g. because the front passenger:
R transfers their weight by supporting them-
selves on a vehicle armrest
R sits in such a way that their weight is raised
from the seat cushion
If you install a child restraint system on the
front-passenger seat, be sure to observe the
correct positioning of the child restraint sys-
tem. Never place objects under or behind the
child restraint system, e.g. cushions. The
entire base of the child restraint system must always rest on the seat cushion of the front-
passenger seat. The backrest of the forwards-
facing child restraint system must, as far as
possible, be resting on the backrest of the
front-passenger seat.
The child restraint system must not touch the
roof or be put under strain by the head
restraint. Adjust the angle of the seat back- rest and the head restraint position accord-
ingly.
Only then can OCS be guaranteed to function correctly. Always observe the child restraint
system manufacturer's installation instruc-
tions.
Occupant Classification System opera-
tion (OCS) 0043
PASSENGER AIR BAG OFF indicator lamp
0044 PASSENGER AIR BAG ON indicator lamp
PASSENGER AIR BAG OFF indicator lamp 0043
informs you whether the front-passenger
front air bag is deactivated.
X Turn the SmartKey to position 1or 2in the
ignition lock, or press the Start/Stop but-
ton once or twice on vehicles with KEY-
LESS-GO.
The system carries out a self-diagnosis.
The PASSENGER AIR BAG ON indicator lamp
is inoperative. It lights up briefly when the
ignition is switched on and then goes out
again.
The PASSENGER AIR BAG OFF indicator lamp
must light up for approximately six seconds.
The PASSENGER AIR BAG OFF indicator lamp
then displays the status of the front-
passenger front air bag. If the status of the
front-passenger front air bag changes while
the vehicle is in motion, an air bag display
message may appear in the instrument clus-
ter (Y page 250). When the front-passenger
seat is occupied, always pay attention to the
PASSENGER AIR BAG OFF indicator lamp. Be Occupant safety
59Safety Z
Page 65 of 610

Problems with the Occupant Classification System (OCS)
Be sure to observe the notes on "System self-test" (Y
page 61).Problem
Possible causes/consequences and
0050
0050Solutions The PASSENGER AIR
BAG OFF indicator
lamp lights up and
remains lit, even
though the front-
passenger seat is occu-
pied by an adult or a
person of a stature cor-
responding to that of an
adult. The classification of the person on the front-passenger seat is
incorrect.
X Make sure the conditions for a correct classification of the per-
son on the front-passenger seat are met (Y page 59).
X If the PASSENGER AIR BAG OFF indicator lamp remains lit, the
front-passenger seat may not be used.
X Have OCS checked as soon as possible at an authorized
Mercedes-Benz Center. The PASSENGER AIR
BAG OFF indicator
lamp does not light up
and/or does not stay
on.
The front-passenger
seat is:
R unoccupied
R occupied by the
weight of a child up
to 12 months old in a
child restraint sys-
tem OCS is malfunctioning.
X Make sure there is nothing between the seat cushion and the
child seat.
X Make sure that the entire base of the child restraint system rests
on the seat cushion of the front-passenger seat. The backrest of
the forwards-facing child restraint system must, as far as pos-
sible, be resting on the backrest of front-passenger seat. If nec- essary, adjust the position of the front-passenger seat.
X Make sure that the seat cushion length is fully retracted.
X When installing the child restraint system, make sure that the
seat belt is tight. Do not pull the seat belt tight with the front-
passenger seat adjustment. This could result in the seat belt and the child restraint system being pulled too tightly.
X Check the installation of the child restraint system.
Make sure that the head restraint does not apply a load to the
child restraint system. If necessary, adjust the head restraint
accordingly.
X Make sure that no objects are applying additional weight onto
the seat.
X If the PASSENGER AIR BAG OFF indicator lamp remains off, do
not install a child restraint system on the front-passenger seat.
X Have OCS checked as soon as possible at an authorized
Mercedes-Benz Center. Roll bar
G
DANGER
If the roll bar has developed a malfunction, it
may not function, e.g. in the event of an acci- dent. The roll bars may then not protect the
vehicle occupants as intended. This poses an
increased risk of injury or even fatal injury.
Have roll bars checked immediately at a quali-
fied specialist workshop. Occupant safety
63Safety Z
Page 70 of 610
If the seat belt pre-tensioning is not reduced:
X Move the seat backrest or seat back
slightly when the vehicle is stationary.
The seat belt pre-tensioning is reduced and the locking mechanism is released.
The seat-belt adjustment is an integral part of
the PRE-SAFE ®
convenience function. Infor-
mation about the convenience function can
be found under "Belt adjustment"
(Y page 55). Automatic measures after an acci-
dent
Immediately after an accident, the following
measures are implemented, depending on
the type and severity of the impact:
R by activating the hazard warning lamps
R the emergency lighting is activated
R the vehicle doors are unlocked
R the front side windows are lowered
R the electrically adjustable steering wheel is
raised
R the engine is switched off
R vehicles with mbrace: automatic emer-
gency call Children in the vehicle
Important safety notes
If a child younger than 12 years and under 5 ft
(1.50 m) in height is traveling in the vehicle:
R always secure the child in a child restraint
system suitable for Mercedes-Benz vehi-
cles. The child restraint system must be
appropriate to the age, weight and size of
the child
R be sure to observe the instructions and
safety notes in this section in addition to the child restraint system manufacturer's
installation instructions
R be sure to observe the instructions and
safety notes on the "Occupant classifica-
tion system (OCS)" (Y page 59) G
WARNING
If you leave children unsupervised in the vehi- cle, they could set it in motion by, for example:
R release the parking brake.
R shift the automatic transmission out of the
parking position P.
R start the engine.
In addition, they may operate vehicle equip-
ment and become trapped. There is a risk of
an accident and injury.
When leaving the vehicle, always take the
SmartKey with you and lock the vehicle. Never
leave children unsupervised in the vehicle. G
WARNING
If persons, particularly children are subjected to prolonged exposure to extreme heat or
cold, there is a risk of injury, possibly even
fatal. Never leave children unattended in the
vehicle. G
WARNING
If the child restraint system is subjected to
direct sunlight, parts may get very hot. Chil-
dren may burn themselves on these parts,
particularly on the metal parts of the child
restraint system. There is a risk of injury.
If you leave the vehicle, taking the child with
you, always ensure that the child restraint
system is not exposed to direct sunlight. Pro- tect it with a blanket, for example. If the childrestraint system has been exposed to direct
sunlight, let it cool down before securing the
child in it. Never leave children unattended in the vehicle.
Always ensure that all vehicle occupants have
their seat belts fastened correctly and are sit- ting properly. Particular attention must be
paid to children. 68
Children in the vehicleSafety
Page 251 of 610
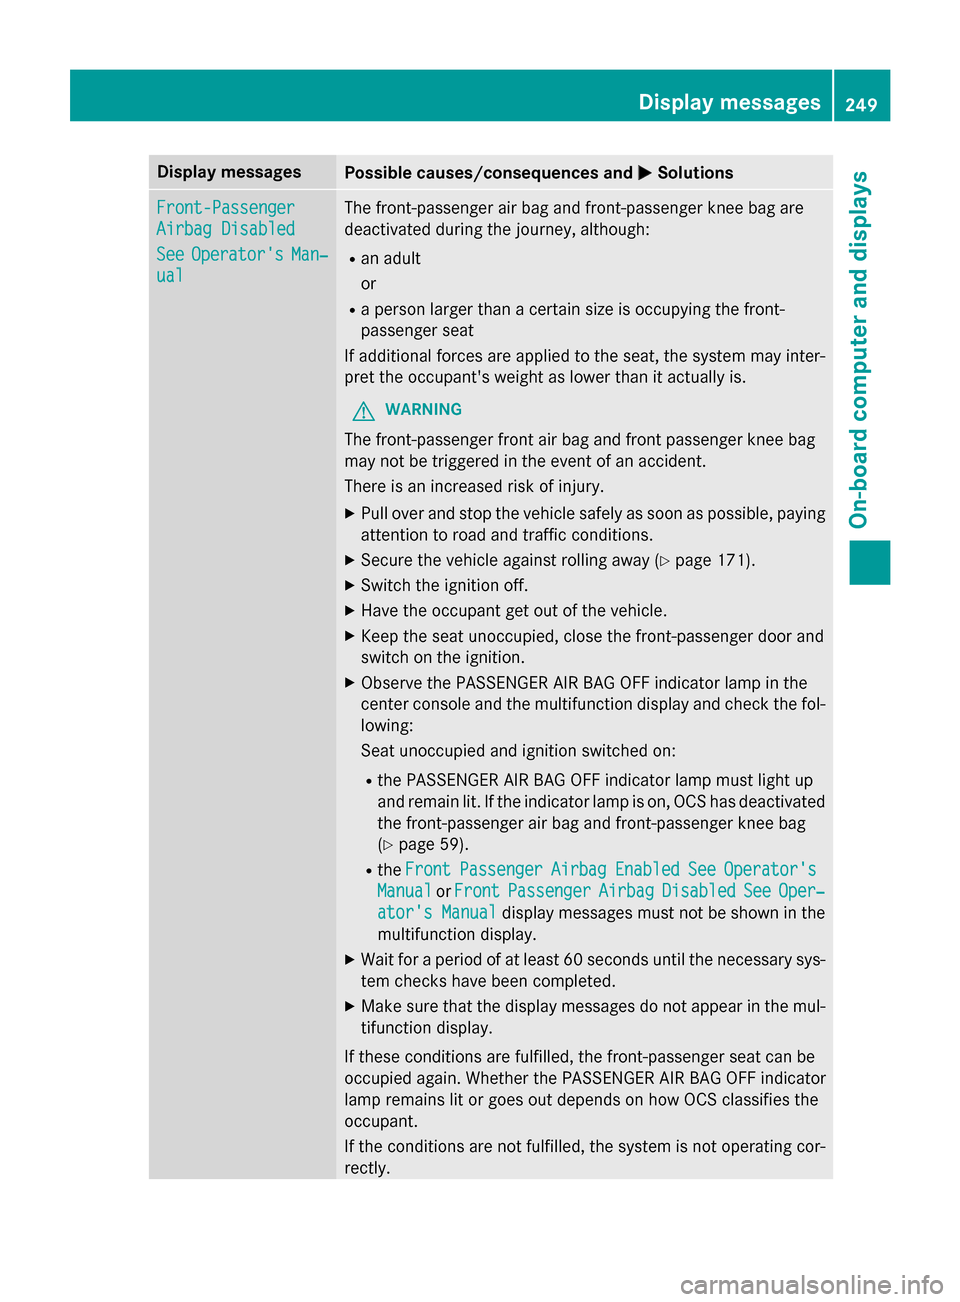
Display messages
Possible causes/consequences and
0050
0050Solutions Front-Passenger
Front-Passenger
Airbag Disabled Airbag Disabled
See See
Operator's
Operator's Man‐
Man‐
ual
ual The front-passenger air bag and front-passenger knee bag are
deactivated during the journey, although:
R an adult
or
R a person larger than a certain size is occupying the front-
passenger seat
If additional forces are applied to the seat, the system may inter-
pret the occupant's weight as lower than it actually is.
G WARNING
The front-passenger front air bag and front passenger knee bag
may not be triggered in the event of an accident.
There is an increased risk of injury.
X Pull over and stop the vehicle safely as soon as possible, paying
attention to road and traffic conditions.
X Secure the vehicle against rolling away (Y page 171).
X Switch the ignition off.
X Have the occupant get out of the vehicle.
X Keep the seat unoccupied, close the front-passenger door and
switch on the ignition.
X Observe the PASSENGER AIR BAG OFF indicator lamp in the
center console and the multifunction display and check the fol-
lowing:
Seat unoccupied and ignition switched on:
R the PASSENGER AIR BAG OFF indicator lamp must light up
and remain lit. If the indicator lamp is on, OCS has deactivated
the front-passenger air bag and front-passenger knee bag
(Y page 59).
R the Front
Front Passenger Passenger Airbag
AirbagEnabled
Enabled See
See Operator's
Operator's
Manual
Manual orFront
Front Passenger
Passenger Airbag
AirbagDisabled
Disabled See
SeeOper‐
Oper‐
ator's Manual
ator's Manual display messages must not be shown in the
multifunction display.
X Wait for a period of at least 60 seconds until the necessary sys-
tem checks have been completed.
X Make sure that the display messages do not appear in the mul-
tifunction display.
If these conditions are fulfilled, the front-passenger seat can be
occupied again. Whether the PASSENGER AIR BAG OFF indicator
lamp remains lit or goes out depends on how OCS classifies the
occupant.
If the conditions are not fulfilled, the system is not operating cor- rectly. Display
messages
249On-board computer and displays Z
Page 252 of 610
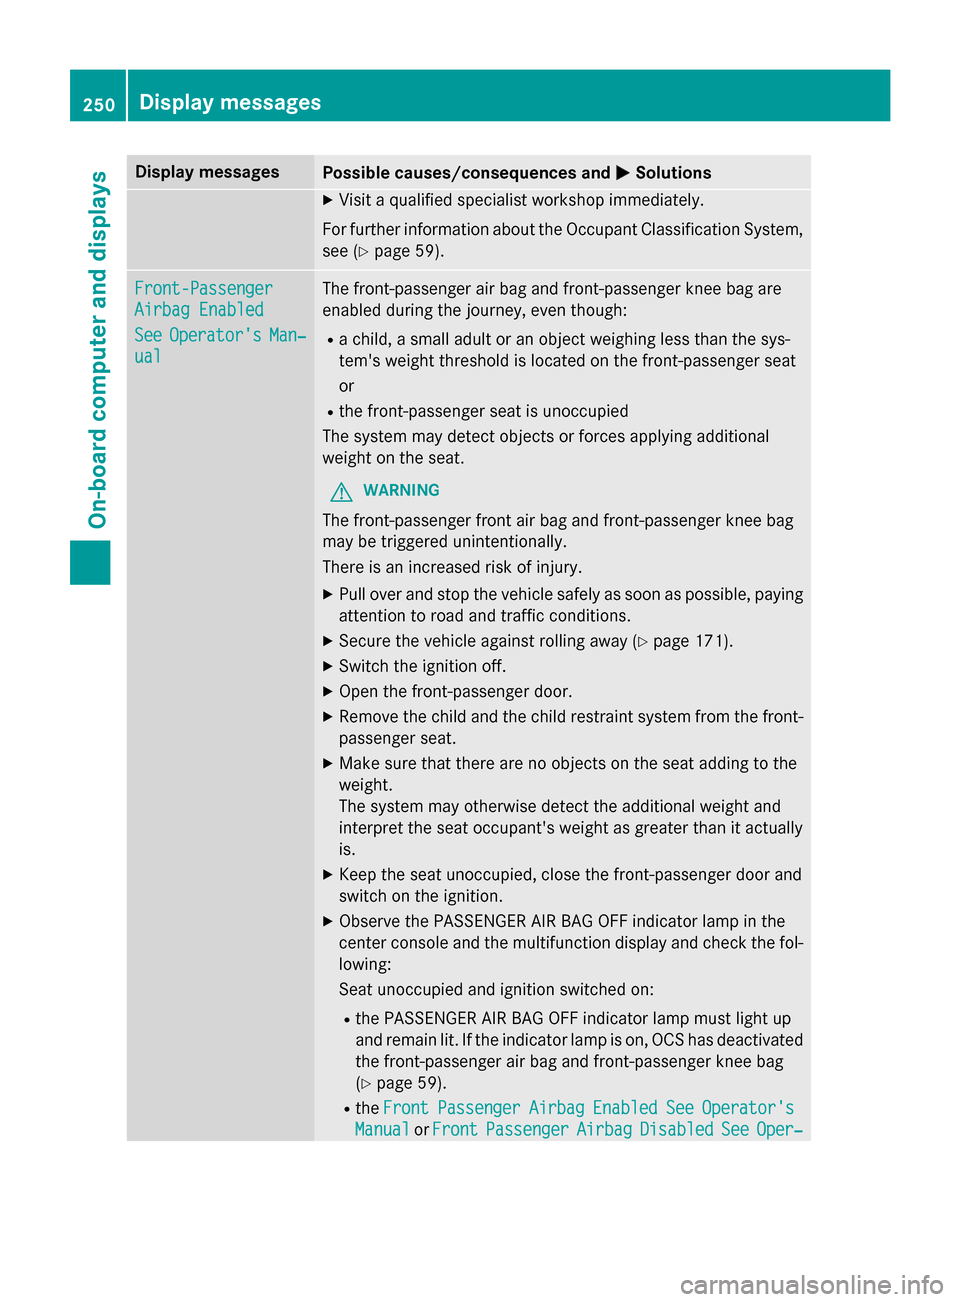
Display messages
Possible causes/consequences and
0050
0050Solutions X
Visit a qualified specialist workshop immediately.
For further information about the Occupant Classification System, see (Y page 59). Front-Passenger
Front-Passenger
Airbag Enabled Airbag Enabled
See See
Operator's
Operator's Man‐
Man‐
ual
ual The front-passenger air bag and front-passenger knee bag are
enabled during the journey, even though:
R a child, a small adult or an object weighing less than the sys-
tem's weight threshold is located on the front-passenger seat
or
R the front-passenger seat is unoccupied
The system may detect objects or forces applying additional
weight on the seat.
G WARNING
The front-passenger front air bag and front-passenger knee bag
may be triggered unintentionally.
There is an increased risk of injury. X Pull over and stop the vehicle safely as soon as possible, paying
attention to road and traffic conditions.
X Secure the vehicle against rolling away (Y page 171).
X Switch the ignition off.
X Open the front-passenger door.
X Remove the child and the child restraint system from the front-
passenger seat.
X Make sure that there are no objects on the seat adding to the
weight.
The system may otherwise detect the additional weight and
interpret the seat occupant's weight as greater than it actually
is.
X Keep the seat unoccupied, close the front-passenger door and
switch on the ignition.
X Observe the PASSENGER AIR BAG OFF indicator lamp in the
center console and the multifunction display and check the fol-
lowing:
Seat unoccupied and ignition switched on:
R the PASSENGER AIR BAG OFF indicator lamp must light up
and remain lit. If the indicator lamp is on, OCS has deactivated
the front-passenger air bag and front-passenger knee bag
(Y page 59).
R the Front
Front Passenger Passenger Airbag
AirbagEnabled
Enabled See
SeeOperator's
Operator's
Manual
Manual orFront
Front Passenger
Passenger Airbag
AirbagDisabled
Disabled See
SeeOper‐
Oper‐ 250
Display
messagesOn-board computer and displays
Page 561 of 610
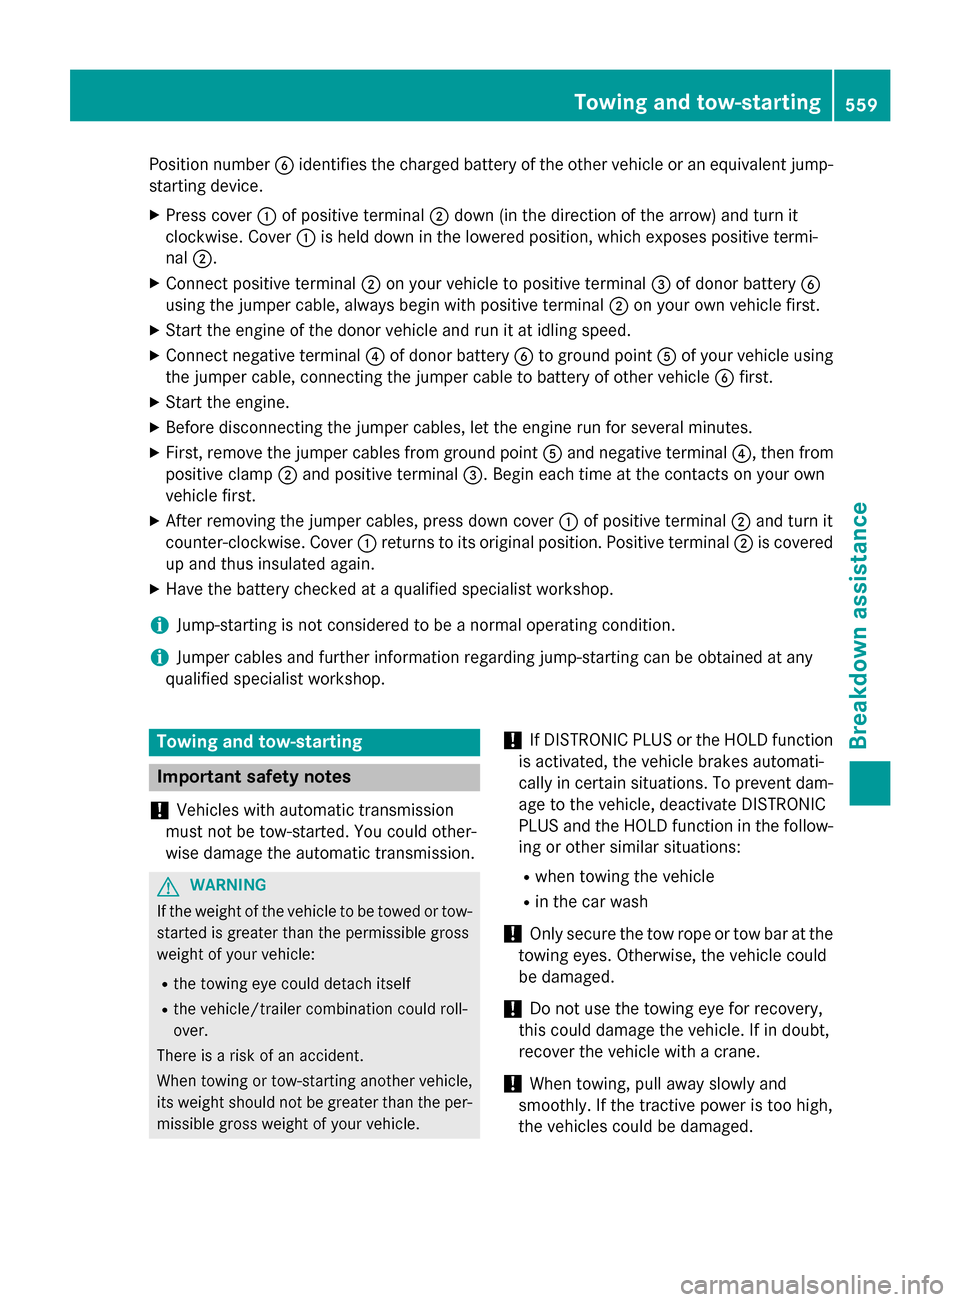
Position number
0084identifies the charged battery of the other vehicle or an equivalent jump-
starting device.
X Press cover 0043of positive terminal 0044down (in the direction of the arrow) and turn it
clockwise. Cover 0043is held down in the lowered position, which exposes positive termi-
nal 0044.
X Connect positive terminal 0044on your vehicle to positive terminal 0087of donor battery 0084
using the jumper cable, always begin with positive terminal 0044on your own vehicle first.
X Start the engine of the donor vehicle and run it at idling speed.
X Connect negative terminal 0085of donor battery 0084to ground point 0083of your vehicle using
the jumper cable, connecting the jumper cable to battery of other vehicle 0084first.
X Start the engine.
X Before disconnecting the jumper cables, let the engine run for several minutes.
X First, remove the jumper cables from ground point 0083and negative terminal 0085, then from
positive clamp 0044and positive terminal 0087. Begin each time at the contacts on your own
vehicle first.
X After removing the jumper cables, press down cover 0043of positive terminal 0044and turn it
counter-clockwise. Cover 0043returns to its original position. Positive terminal 0044is covered
up and thus insulated again.
X Have the battery checked at a qualified specialist workshop.
i Jump-starting is not considered to be a normal operating condition.
i Jumper cables and further information regarding jump-starting can be obtained at any
qualified specialist workshop. Towing and tow-starting
Important safety notes
! Vehicles with automatic transmission
must not be tow-started. You could other-
wise damage the automatic transmission. G
WARNING
If the weight of the vehicle to be towed or tow- started is greater than the permissible gross
weight of your vehicle:
R the towing eye could detach itself
R the vehicle/trailer combination could roll-
over.
There is a risk of an accident.
When towing or tow-starting another vehicle,
its weight should not be greater than the per-
missible gross weight of your vehicle. !
If DISTRONIC PLUS or the HOLD function
is activated, the vehicle brakes automati-
cally in certain situations. To prevent dam-
age to the vehicle, deactivate DISTRONIC
PLUS and the HOLD function in the follow- ing or other similar situations:
R when towing the vehicle
R in the car wash
! Only secure the tow rope or tow bar at the
towing eyes. Otherwise, the vehicle could
be damaged.
! Do not use the towing eye for recovery,
this could damage the vehicle. If in doubt,
recover the vehicle with a crane.
! When towing, pull away slowly and
smoothly. If the tractive power is too high,
the vehicles could be damaged. Towing and tow-starting
559Breakdown assistance Z