stop start MERCEDES-BENZ SL CLASS 2019 User Guide
[x] Cancel search | Manufacturer: MERCEDES-BENZ, Model Year: 2019, Model line: SL CLASS, Model: MERCEDES-BENZ SL CLASS 2019Pages: 330, PDF Size: 16.53 MB
Page 86 of 330

HANDS-FREE ACCESS
General notes
With KEYLESS-GO and HANDS-FREE ACCESS,you can open or close the trunk lid or stop theprocedure without using your hands. This isuseful if you have your hands full. To do this,make a kicking movement under the bumperwith your foot.
Observe the following points:
RCarry your KEYLESS-GO key about your per-son. The SmartKey must be at the rear ofthe vehicle in the detection range of KEY-LESS-GO.
RWhen making the kicking movement, makesure that you are standing firmly on theground and that there is sufficient clearanceto the rear of the vehicle. You could other-wise lose your balance, for example on ice.
Important safety notes
GWARNING
The vehicle exhaust system can become
very hot. If you use HANDS-FREE ACCESS,
you could burn yourself by touching the
exhaust system. There is a risk of injury.
Always ensure that you make the kicking
movement only within the detection range of
the sensors.
!If the SmartKey is within the rear detectionrange of KEYLESS-GO, the following situa-tions, for example, could lead to the unin-tentional opening of the trunk lid:
Rwhen using an automatic car wash
Rwhen using a power washer
Make sure that the SmartKey is at least10 ft (3 m) away from the vehicle.
RAlways ensure that you make the kickingmovement only within the detection rangeof sensors�C.
RStand at least 12 in (30 cm) away from therear area while doing so.
RDo not come into contact with the bumperwhile making the kicking movement. Other-wise, the sensors may not function cor-rectly.
RHANDS-FREE ACCESS does not functionduring engine start.
RDirt caused by road salt and snow build-uparound sensors�Cmay restrict functional-ity.
RUsing the HANDS-FREE ACCESS with aprosthetic leg may restrict functionality.
RIf a KEYLESS-GO key is at the rear of thevehicle in the detection range of KEYLESS-GO, HANDS-FREE ACCESS could be trig-gered. The trunk lid could thus be opened orclosed unintentionally, for example, if you:
-sit on the edge of the trunk.
-set something down or lift something upbehind the vehicle.
-polish the rear of the vehicle.
Do not carry the KEYLESS-GO key aboutyour person in these situations or in situa-tions similar to these. This will prevent theunintentional opening/closing of the trunklid.
84Trunk
Opening and closing
Page 90 of 330
Opening and closing the side win-
dows
Opening and closing the side windows
in the front
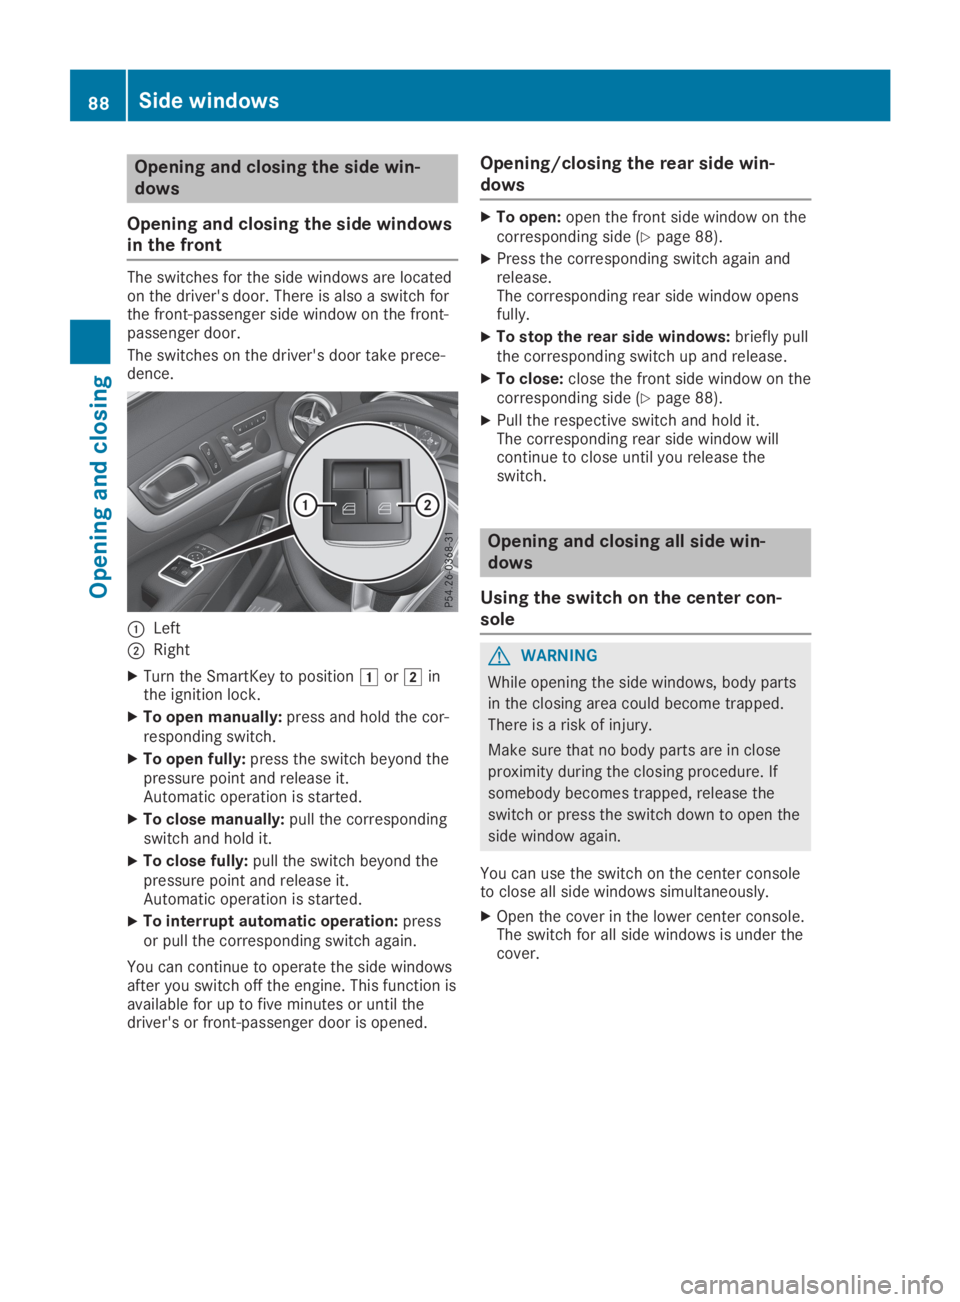
The switches for the side windows are locatedon the driver's door. There is also a switch forthe front-passenger side window on the front-passenger door.
The switches on the driver's door take prece-dence.
�CLeft
�DRight
XTurn the SmartKey to position�Gor�Hinthe ignition lock.
XTo open manually:press and hold the cor-responding switch.
XTo open fully:press the switch beyond thepressure point and release it.Automatic operation is started.
XTo close manually:pull the correspondingswitch and hold it.
XTo close fully:pull the switch beyond thepressure point and release it.Automatic operation is started.
XTo interrupt automatic operation:pressor pull the corresponding switch again.
You can continue to operate the side windowsafter you switch off the engine. This function isavailable for up to five minutes or until thedriver's or front-passenger door is opened.
Opening/closing the rear side win-
dows
XTo open:open the front side window on thecorresponding side (Ypage 88).
XPress the corresponding switch again andrelease.The corresponding rear side window opensfully.
XTo stop the rear side windows:briefly pullthe corresponding switch up and release.
XTo close:close the front side window on thecorresponding side (Ypage 88).
XPull the respective switch and hold it.The corresponding rear side window willcontinue to close until you release theswitch.
Opening and closing all side win-
dows
Using the switch on the center con-
sole
GWARNING
While opening the side windows, body parts
in the closing area could become trapped.
There is a risk of injury.
Make sure that no body parts are in close
proximity during the closing procedure. If
somebody becomes trapped, release the
switch or press the switch down to open the
side window again.
You can use the switch on the center consoleto close all side windows simultaneously.
XOpen the cover in the lower center console.The switch for all side windows is under thecover.
88Side windows
Opening and closing
Page 102 of 330
seat belt guide. This makes it easier to movethe seats forward.
Before you drive off, the seat belt must beinserted into the seat belt guide.
Observe the safety guidelines for seat belts(Ypage 42).
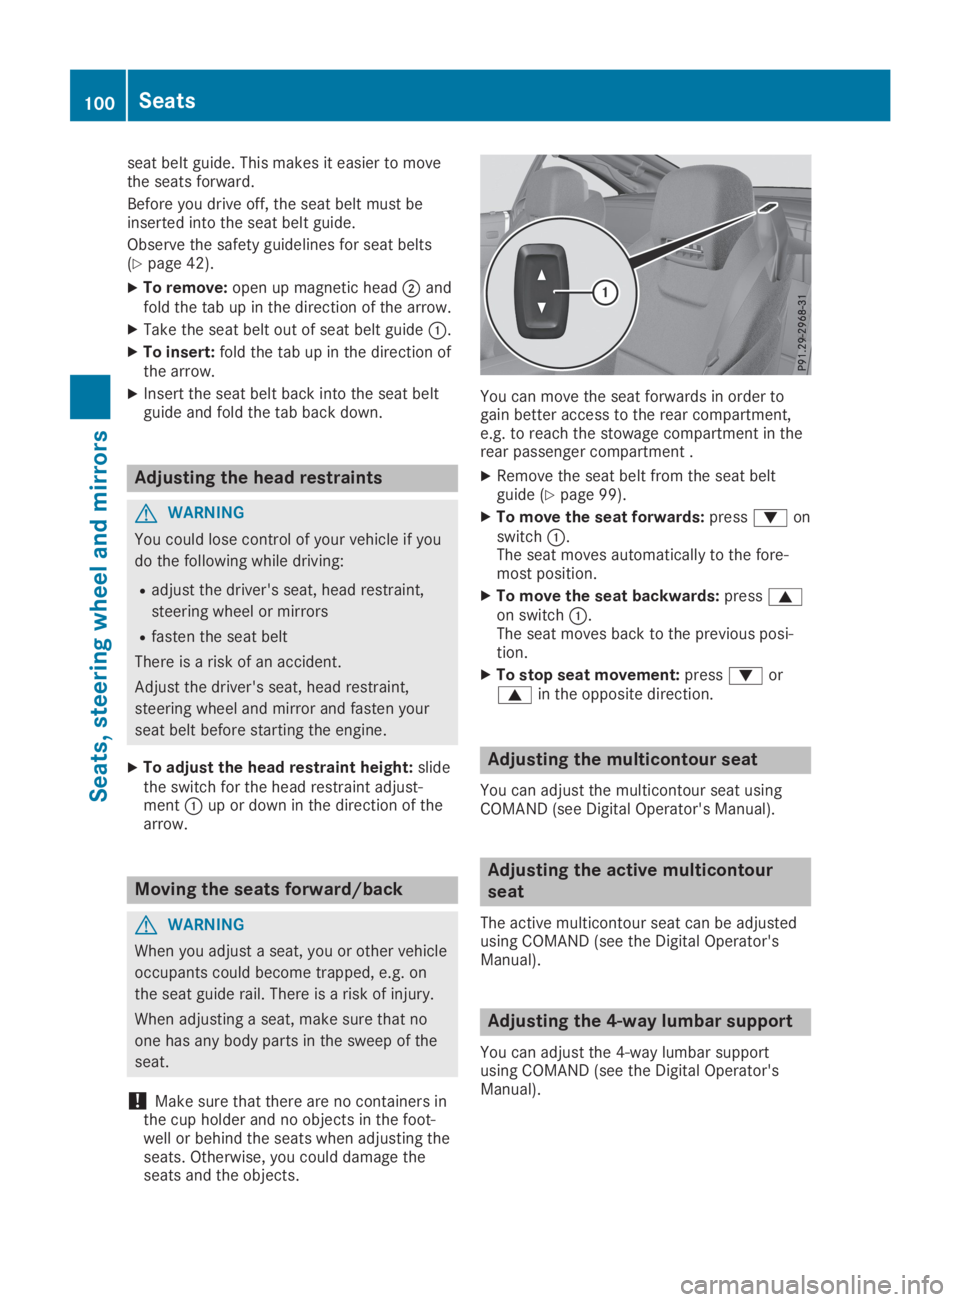
XTo remove:open up magnetic head�Dandfold the tab up in the direction of the arrow.
XTake the seat belt out of seat belt guide�C.
XTo insert:fold the tab up in the direction ofthe arrow.
XInsert the seat belt back into the seat beltguide and fold the tab back down.
Adjusting the head restraints
GWARNING
You could lose control of your vehicle if you
do the following while driving:
Radjust the driver's seat, head restraint,
steering wheel or mirrors
Rfasten the seat belt
There is a risk of an accident.
Adjust the driver's seat, head restraint,
steering wheel and mirror and fasten your
seat belt before starting the engine.
XTo adjust the head restraint height:slidethe switch for the head restraint adjust-ment�Cup or down in the direction of thearrow.
Moving the seats forward/back
GWARNING
When you adjust a seat, you or other vehicle
occupants could become trapped, e.g. on
the seat guide rail. There is a risk of injury.
When adjusting a seat, make sure that no
one has any body parts in the sweep of the
seat.
!Make sure that there are no containers inthe cup holder and no objects in the foot-well or behind the seats when adjusting theseats. Otherwise, you could damage theseats and the objects.
You can move the seat forwards in order togain better access to the rear compartment,e.g. to reach the stowage compartment in therear passenger compartment .
XRemove the seat belt from the seat beltguide (Ypage 99).
XTo move the seat forwards:press�donswitch�C.The seat moves automatically to the fore-most position.
XTo move the seat backwards:press�con switch�C.The seat moves back to the previous posi-tion.
XTo stop seat movement:press�dor�cin the opposite direction.
Adjusting the multicontour seat
You can adjust the multicontour seat usingCOMAND (see Digital Operator's Manual).
Adjusting the active multicontour
seat
The active multicontour seat can be adjustedusing COMAND (see the Digital Operator'sManual).
Adjusting the 4-way lumbar support
You can adjust the 4-way lumbar supportusing COMAND (see the Digital Operator'sManual).
100Seats
Seats, steering wheel and mirrors
Page 120 of 330
RUse the residual heat function if you want toheat or ventilate the vehicle interior whenthe ignition is switched off. The residualheat function can only be activated or deac-tivated with the ignition switched off.
RVehicles with COMAND:if you change thesettings of the climate control system, theclimate status display appears for three sec-onds at the bottom of the screen in theCOMAND display. You will see the currentsettings of the various climate control func-tions.
ECO start/stop function
During automatic engine switch-off, the cli-mate control system only operates at areduced capacity. If you require full climatecontrol capacity, the ECO start/stop functioncan be deactivated by pressing the ECO but-ton (Ypage 130).
Operating the climate control sys-
tems
Activating/deactivating climate con-
trol
General notes
When the climate control is switched off, theair supply and air circulation are also switchedoff. The windows could fog up. Therefore,switch off climate control only briefly
iActivate climate control primarily using the�Xbutton (Ypage 119).
Activating/deactivating
XTurn the SmartKey to position�Hin the igni-tion lock (Ypage 126).
XTo activate:press the�Xbutton.The indicator lamp in the�Xbutton lightsup. Airflow and air distribution are set toautomatic mode.
or
XPress the�xbutton.The indicator lamp in the�xbutton goesout. The previously selected settings arerestored.
XTo deactivate:press the�xbutton.The indicator lamp in the�xbutton lightsup.
Switching cooling with air dehumidi-
fication on/off
General notes
If you deactivate the "Cooling with air-dehu-midification" function, the air inside the vehiclewill not be cooled. The air inside the vehiclewill also not be dehumidified. The windows canfog up more quickly. Therefore, deactivate thecooling with air-dehumidification function onlybriefly.
The "Cooling with air dehumidification" func-tion is only available when the engine is run-ning. The air inside the vehicle is cooled anddehumidified according to the temperatureselected.
Condensation may drip from the underside ofthe vehicle when it is in cooling mode. This isnormal and not a sign that there is a malfunc-tion.
Activating/deactivating
XTo activate:press the�Zbutton.The indicator lamp in the�Zbutton lightsup.
XTo deactivate:press the�Zbutton.The indicator lamp in the�Zor�Vbut-ton goes out. The "Cooling with air dehumid-ification" function has a delayed switch-offfeature.
The indicator lamp in the�Zbutton goesout. The "Cooling with air dehumidification"function has a delayed switch-off feature.
118Operating the climate control systems
Climate control
Page 128 of 330
GWARNING
If you switch off the ignition while driving,
safety-relevant functions are only available
with limitations, or not at all. This could
affect, for example, the power steering and
the brake boosting effect. You will require
considerably more effort to steer and brake.
There is a risk of an accident.
Do not switch off the ignition while driving.
GWARNING
If the parking brake has not been fully
released when driving, the parking brake
can:
Roverheat and cause a fire
Rlose its hold function.
There is a risk of fire and an accident.
Release the parking brake fully before driv-
ing off.
!Do not warm up the engine while station-ary. Pull away immediately. Avoid highengine speeds and full throttle until theengine has reached its operating tempera-ture.
In vehicles with automatic transmission,engage positions P and R only when thevehicle is stationary.
Where possible, avoid spinning the drivewheels when pulling away on slippery roads.You could otherwise damage the drive train.
!Mercedes-AMG vehicles:at low engineoil temperatures below 68 ‡ (+20 †), themaximum engine speed is restricted inorder to protect the engine. To protect theengine and maintain smooth engine opera-tion, avoid driving at full throttle when theengine is cold.
Key positions
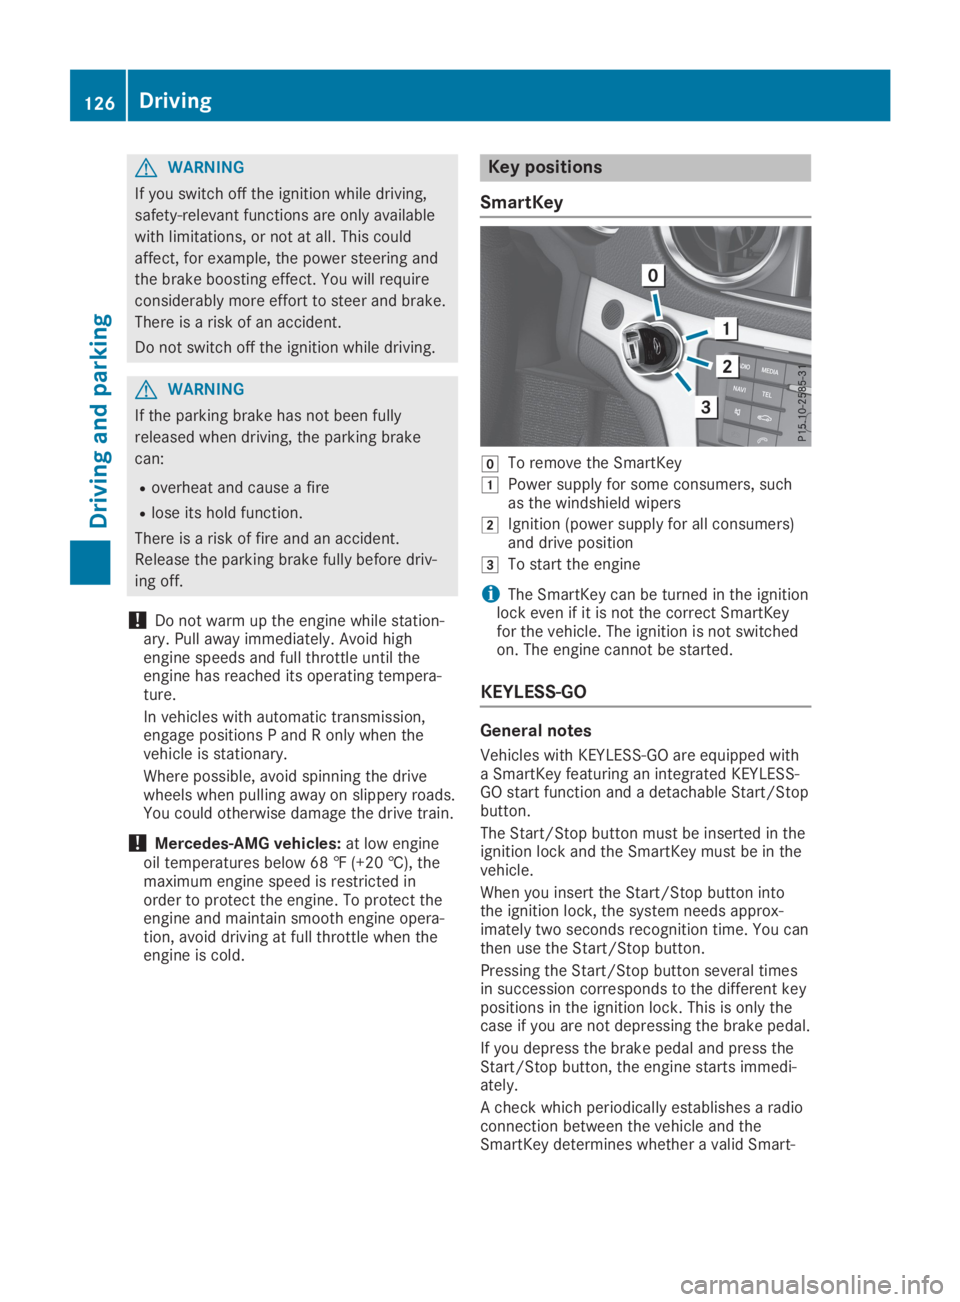
SmartKey
�ZTo remove the SmartKey
�GPower supply for some consumers, suchas the windshield wipers
�HIgnition (power supply for all consumers)and drive position
�ITo start the engine
iThe SmartKey can be turned in the ignitionlock even if it is not the correct SmartKeyfor the vehicle. The ignition is not switchedon. The engine cannot be started.
KEYLESS-GO
General notes
Vehicles with KEYLESS-GO are equipped witha SmartKey featuring an integrated KEYLESS-GO start function and a detachable Start/Stopbutton.
The Start/Stop button must be inserted in theignition lock and the SmartKey must be in thevehicle.
When you insert the Start/Stop button intothe ignition lock, the system needs approx-imately two seconds recognition time. You canthen use the Start/Stop button.
Pressing the Start/Stop button several timesin succession corresponds to the different keypositions in the ignition lock. This is only thecase if you are not depressing the brake pedal.
If you depress the brake pedal and press theStart/Stop button, the engine starts immedi-ately.
A check which periodically establishes a radioconnection between the vehicle and theSmartKey determines whether a valid Smart-
126Driving
Driving and parking
Page 129 of 330
Key is in the vehicle. This occurs, for example,when starting the engine.
To start the vehicle without actively using theSmartKey:
Rthe Start/Stop button must be inserted inthe ignition lock.
Rthe SmartKey must be in the vehicle.
Rthe vehicle must not be locked with theSmartKey or KEYLESS-GO (Ypage 74).
Do not keep the SmartKey:
Rwith electronic devices, e.g. a mobile phoneor another SmartKey.
Rwith metallic objects, e.g. coins or metalfoil.
Rinside metallic objects, e.g. a metal case.
This can impair the functionality of the KEY-LESS-GO key.
If you lock the vehicle with the SmartKey'sremote control or with KEYLESS-GO, after ashort time:
Ryou will not be able to switch on the ignitionwith the Start/Stop button.
Ryou will not be able to start the engine withthe Start/Stop button until the vehicle isunlocked again.
The engine can be switched off while the vehi-cle is in motion by pressing and holding theStart/Stop button for three seconds. Thisfunction operates independently of the ECOstart/stop automatic engine switch-off func-tion.
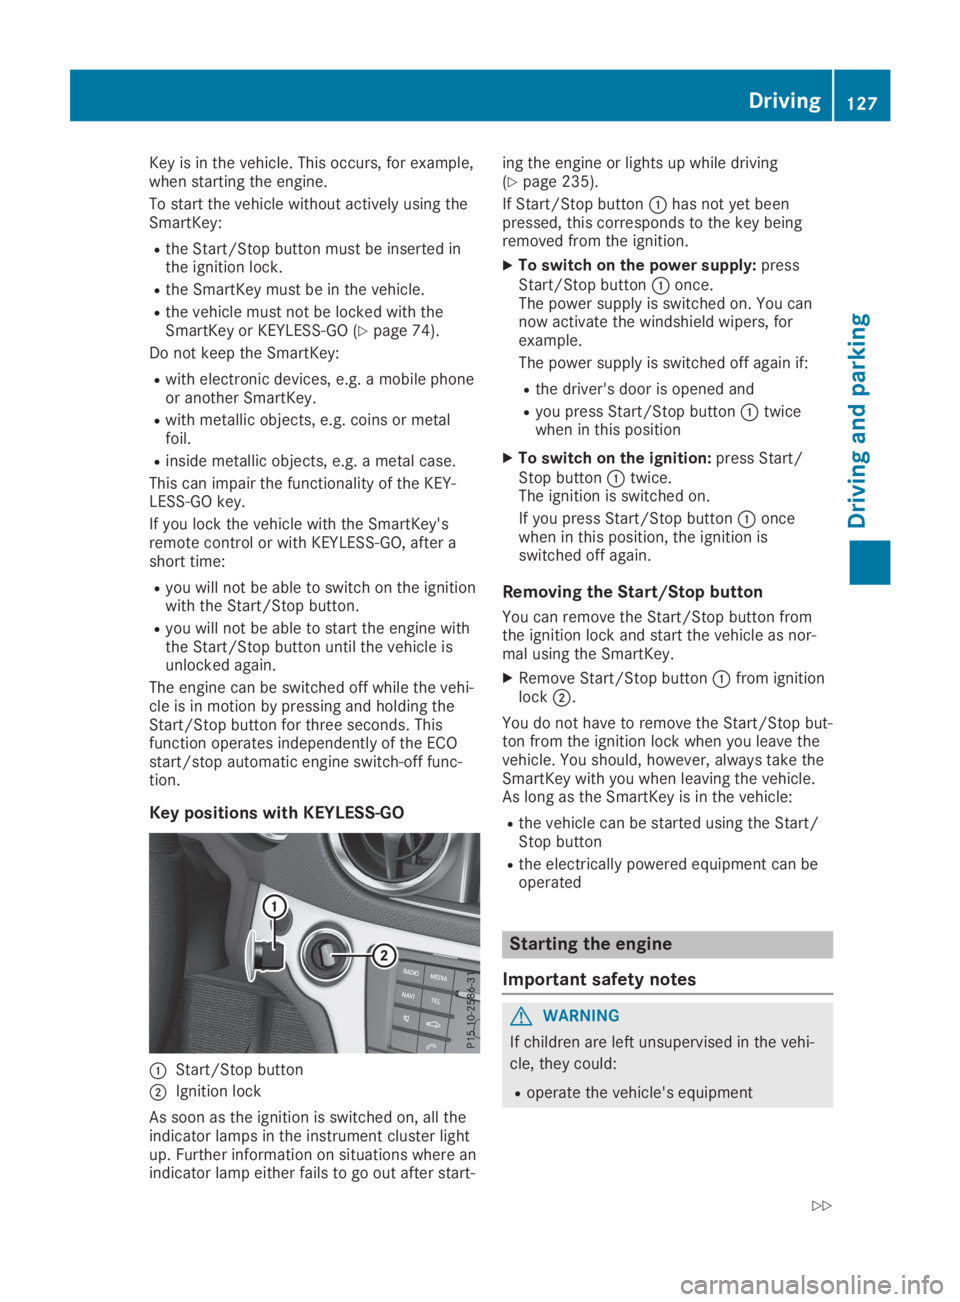
Key positions with KEYLESS-GO
�CStart/Stop button
�DIgnition lock
As soon as the ignition is switched on, all theindicator lamps in the instrument cluster lightup. Further information on situations where anindicator lamp either fails to go out after start-
ing the engine or lights up while driving(Ypage 235).
If Start/Stop button�Chas not yet beenpressed, this corresponds to the key beingremoved from the ignition.
XTo switch on the power supply:pressStart/Stop button�Conce.The power supply is switched on. You cannow activate the windshield wipers, forexample.
The power supply is switched off again if:
Rthe driver's door is opened and
Ryou press Start/Stop button�Ctwicewhen in this position
XTo switch on the ignition:press Start/Stop button�Ctwice.The ignition is switched on.
If you press Start/Stop button�Concewhen in this position, the ignition isswitched off again.
Removing the Start/Stop button
You can remove the Start/Stop button fromthe ignition lock and start the vehicle as nor-mal using the SmartKey.
XRemove Start/Stop button�Cfrom ignitionlock�D.
You do not have to remove the Start/Stop but-ton from the ignition lock when you leave thevehicle. You should, however, always take theSmartKey with you when leaving the vehicle.As long as the SmartKey is in the vehicle:
Rthe vehicle can be started using the Start/Stop button
Rthe electrically powered equipment can beoperated
Starting the engine
Important safety notes
GWARNING
If children are left unsupervised in the vehi-
cle, they could:
Roperate the vehicle's equipment
Driving127
Driving and parking
Z
Page 130 of 330
![MERCEDES-BENZ SL CLASS 2019 User Guide Additionally, children could set the vehicle in
motion if, for example, they:
Rrelease the parking brake
Rshift the automatic transmission out of
park position�]
Rstart the engine
There is a risk of a MERCEDES-BENZ SL CLASS 2019 User Guide Additionally, children could set the vehicle in
motion if, for example, they:
Rrelease the parking brake
Rshift the automatic transmission out of
park position�]
Rstart the engine
There is a risk of a](/img/4/59125/w960_59125-129.png)
Additionally, children could set the vehicle in
motion if, for example, they:
Rrelease the parking brake
Rshift the automatic transmission out of
park position�]
Rstart the engine
There is a risk of an accident and injury.
Never leave children or animals unattended
in the vehicle.
When leaving the vehicle, always take the
SmartKey with you and lock the vehicle. This
also applies for the Digital Vehicle Key if the
"Digital Vehicle Key" function is activated via
Mercedes me connect.
GDANGER
Combustion engines emit poisonous
exhaust gases such as carbon monoxide.
Inhaling these exhaust gases is hazardous to
health and can result in poisoning. There is a
risk of fatal injury. Therefore, never leave the
engine running an enclosed space without
adequate ventilation.
GWARNING
Flammable materials introduced through
environmental influence or by animals can
ignite if in contact with the exhaust system
or parts of the engine that heat up. There is
a risk of fire.
Carry out regular checks to make sure that
there are no flammable foreign materials in
the engine compartment or in the exhaust
system.
The catalytic converter is preheated for up to30 seconds after a cold start. The sound of theengine may change during this time.
Automatic transmission
XDepress the brake pedal and keep itdepressed.
XShift the transmission to position�].Transmission position display�]is shownin the multifunction display.
iYou can start the engine in transmissionposition�]and�\\.
Starting procedure with the SmartKey
To start the engine using the SmartKey insteadof KEYLESS-GO, pull the Start/Stop button outof the ignition lock.
XTurn the SmartKey to position�I(Ypage 126) in the ignition lock and releaseit as soon as the engine is running.
Using KEYLESS-GO to start the engine
The Start/Stop button can be used to start thevehicle manually without inserting the Smart-Key into the ignition lock. The Start/Stop but-ton must be inserted in the ignition lock andthe SmartKey must be in the vehicle. Thismode for starting the engine operates inde-pendently of the ECO start/stop automaticengine start function.
XDepress the brake pedal and keep itdepressed.
XPress the Start/Stop button once(Ypage 126).The engine starts.
Pulling away
General notes
GWARNING
If the engine speed is above the idling speed
and you engage transmission position�:
or�F, the vehicle could pull away sud-
denly. There is a risk of an accident.
When engaging transmission position�:
or�F, always firmly depress the brake
pedal and do not simultaneously accelerate.
Depress the accelerator carefully when pullingaway.
The vehicle locks centrally once you havepulled away. The locking knobs in the doorsdrop down.
You can open the doors from the inside at anytime.
You can also deactivate the automatic lockingfeature (Ypage 201).
128Driving
Driving an d parking
Page 131 of 330
![MERCEDES-BENZ SL CLASS 2019 User Guide It is only possible to shift the transmissionfrom position�]to the desired position if youdepress the brake pedal. Only then is the shiftlock released.
iUpshifts take place at higher enginespeeds afte MERCEDES-BENZ SL CLASS 2019 User Guide It is only possible to shift the transmissionfrom position�]to the desired position if youdepress the brake pedal. Only then is the shiftlock released.
iUpshifts take place at higher enginespeeds afte](/img/4/59125/w960_59125-130.png)
It is only possible to shift the transmissionfrom position�]to the desired position if youdepress the brake pedal. Only then is the shiftlock released.
iUpshifts take place at higher enginespeeds after a cold start. This helps the cat-alytic converter to reach its operating tem-perature more quickly.
Information on the automatic release of theelectric parking brake (Ypage 148).
Hill start assist
Hill start assist helps you when pulling awayforward or in reverse on an uphill gradient. Itholds the vehicle for a short time after youhave removed your foot from the brake pedal.This gives you enough time to move your footfrom the brake pedal to the accelerator pedaland to depress it before the vehicle begins toroll.
GWARNING
After a short time, hill start assist will no lon-
ger brake your vehicle and it could roll away.
There is a risk of an accident and injury.
Therefore, quickly move your foot from the
brake pedal to the accelerator pedal. Never
leave the vehicle when it is held by hill start
assist.
Hill start assist is not active if:
Ryou are pulling away on a level road or on adownhill gradient
Rthe transmission is in position�\\
Rthe electric parking brake is applied
RESP®is malfunctioning
ECO start/stop function
Introduction
The ECO start/stop function switches theengine off automatically if the vehicle is stop-ped under certain conditions.
The engine starts automatically when thedriver wants to pull away again. The ECOstart/stop function thereby helps you toreduce the fuel consumption and emissions ofyour vehicle.
Important safety notes
GWARNING
If the engine is switched off automatically
and you exit the vehicle, the engine is
restarted automatically. The vehicle may
begin moving. There is a risk of accident and
injury.
If you wish to exit the vehicle, always turn
off the ignition and secure the vehicle
against rolling away.
General notes
�CECO start/stop display
The ECO start/stop function is activatedwhenever you switch on the engine using theSmartKey or the Start/Stop button.
If the engine has been switched off automati-cally by the ECO start/stop function, the�
Page 132 of 330
Rthe system detects that the windshield isnot fogged up when the air-conditioning sys-tem is switched on
Rthe hood is closed
Rthe driver's door is closed and the driver'sseat belt is fastened
All of the vehicle's systems remain activewhen the engine is stopped automatically.
All vehicles (except Mercedes-AMG vehi-cles):automatic engine switch-off can takeplace a maximum of four times in a row (initialstop, then three subsequent stops).
Mercedes-AMG vehicles:the number of con-secutive automatic engine switch-offs isunlimited.
The HOLD function can be activated if theengine has been switched off automatically. Itis then not necessary to continue applying thebrakes during the automatic stop phase. Whenyou depress the accelerator pedal, the enginestarts automatically and the braking effect ofthe HOLD function is deactivated.
Automatic engine start
The engine starts automatically if:
Ryou switch off the ECO start/stop functionby pressing the ECO button
Rin transmission position�[or�\\, the brakepedal is released and the HOLD function isnot active
Ryou depress the accelerator pedal
Ryou engage reverse gear�^
Ryou move the transmission out of position�]
Ryou switch to drive programS+
Ryou switch to drive programSorM(Mercedes-AMG vehicles)
Ryou unfasten your seat belt or open the driv-er's door
Rthe vehicle starts to roll
Rthe brake system requires this
Rthe temperature in the vehicle interior devi-ates from the set range
Rthe system detects moisture on the wind-shield when the air-conditioning system isswitched on
Rthe battery's condition of charge is too low
Shifting the transmission to position�]doesnot start the engine.
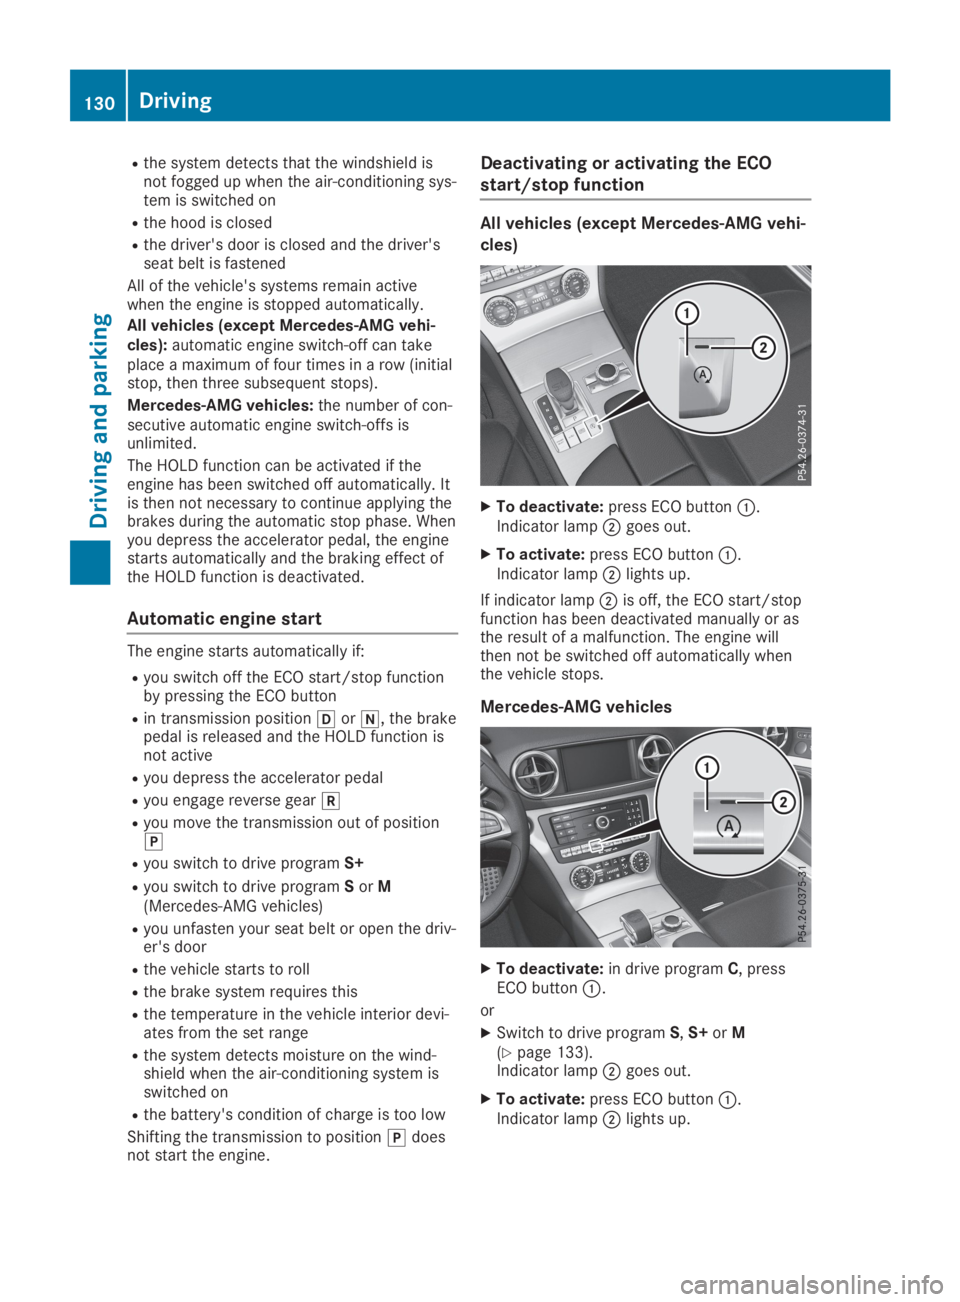
Deactivating or activating the ECO
start/stop function
All vehicles (except Mercedes-AMG vehi-
cles)
XTo deactivate:press ECO button�C.Indicator lamp�Dgoes out.
XTo activate:press ECO button�C.Indicator lamp�Dlights up.
If indicator lamp�Dis off, the ECO start/stopfunction has been deactivated manually or asthe result of a malfunction. The engine willthen not be switched off automatically whenthe vehicle stops.
Mercedes-AMG vehicles
XTo deactivate:in drive programC, pressECO button�C.
or
XSwitch to drive programS,S+orM(Ypage 133).Indicator lamp�Dgoes out.
XTo activate:press ECO button�C.Indicator lamp�Dlights up.
130Driving
Driving an d parking
Page 133 of 330
If drive programS,S+orMis active, theautomatic transmission switches to driveprogramC.
If indicator lamp�Dis off, the ECO start/stopfunction has been deactivated manually or as
the result of a malfunction. The engine willthen not be switched off automatically whenthe vehicle stops.
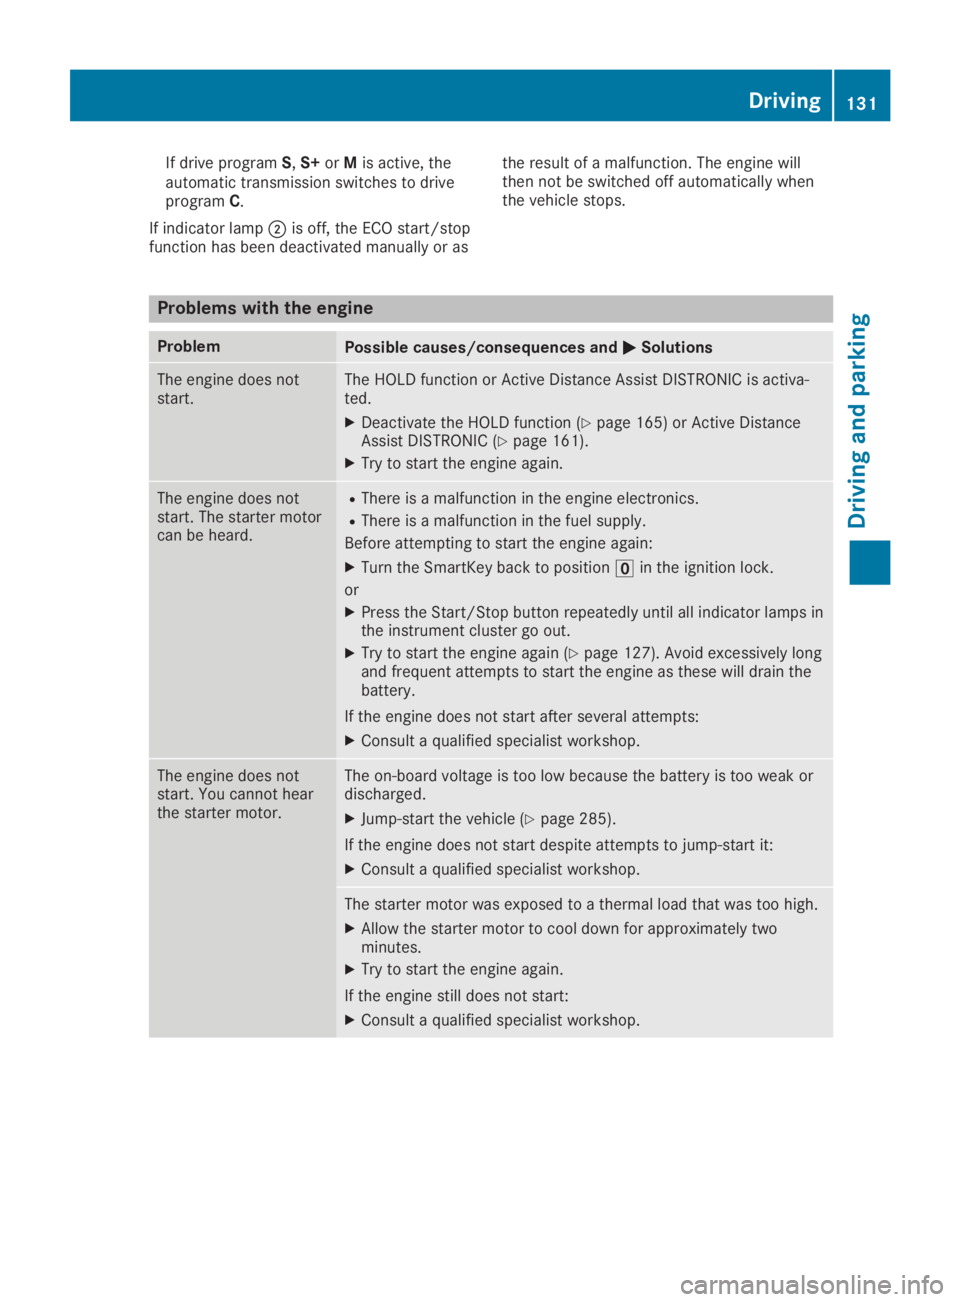
Problems with the engine
ProblemPossible causes/consequences and�P�PSolutions
The engine does notstart.The HOLD function or Active Distance Assist DISTRONIC is activa-ted.
XDeactivate the HOLD function (Ypage 165) or Active DistanceAssist DISTRONIC (Ypage 161).
XTry to start the engine again.
The engine does notstart. The starter motorcan be heard.
RThere is a malfunction in the engine electronics.
RThere is a malfunction in the fuel supply.
Before attempting to start the engine again:
XTurn the SmartKey back to position�