MERCEDES-BENZ SL CLASS 2020 Owners Manual
Manufacturer: MERCEDES-BENZ, Model Year: 2020, Model line: SL CLASS, Model: MERCEDES-BENZ SL CLASS 2020Pages: 334, PDF Size: 17.43 MB
Page 101 of 334

For
more information,contact aqu alifi ed
spe cialist wor kshop . Adjusti
ngthe seats elec trical ly 0043
Hea drestra intheight
0044 Seathei ght
0087 Seatcush ionangl e
0085 Seatcush ionleng th
0083 Seatfore -and-a ftad justme nt
0084 Backre stangl e
i Furthe rrel ated subjects:
R You canstore theseatsetting susi ng the
memo ryfuncti on(Ypage 107 ).
R IfPR E-SAFE ®
is trigg ered,the front-
pa sseng ersea twi llbe move dto abetter
pos itionif it wa spre viousl yin an unfa vor-
ab lepos ition(Y page 55). Adjusti
ngthe fron tpasse ngerse at
from thedrive r’sseat G
WARNI
NG
The front-ai rba gs for cou ldalso injur ethe
vehi cleoccup antsinthe front Ifthe front
sea tsare positioned tooclos eto the dash-
boa rdorsteer ingwhe el.Thispos esan
increa sedrisk ofinjur yor even fatalinjur y.
Alw aysad just thefront seatsso that they
are asfar from thefront airba gs aspos si-
ble .Also observe thenotes onthe corre ct
ad justme ntofthe seats.
! Do
not move thefront-pa ssengersea tful ly
forw ardsif there areobje ctsinthe parcel net
inthe front-pa ssengerfootw ell.The
obje ctscou ldother wise be damag ed. You
canusetheseatswi tches onthe driver's
sid eto adjust thefront-pa ssengersea t.
X To acti vate/ deactivate :pre ssbutton 0043.
Whe nthe indicator lamp inbu tton 0043lights
up ,for the front-pa ssengersea tyo ucan:
R sea tad justme nt
R cal lup the memo ryfuncti on Remo
vingthe seat beltfrom thebelt
gui de G
WARNI
NG
Whe ndri ving off-roa d,your bod yis sub ject
to force sfrom alldir ectio ns,dueto the
unev ensur face .You couldbe throw nfrom
yo ur sea t,for insta nce. Thereisarisk of
injur y.
Alw ayswe arasea tbel t,even whendri ving
off-roa d. Both
thedriver's seatbel tand thefront-
pa sseng ersea tbel tcan beremo vedfrom the Se
ats
99Seats, stee ring wheeland mirrors Z
Page 102 of 334
seat
beltguide .This makes iteasier tomove
the seats forward.
Before youdrive off,theseat beltmust be
inserted intotheseat beltguide .
Observe thesafety guidelinesforseat belts
(Y page 42).
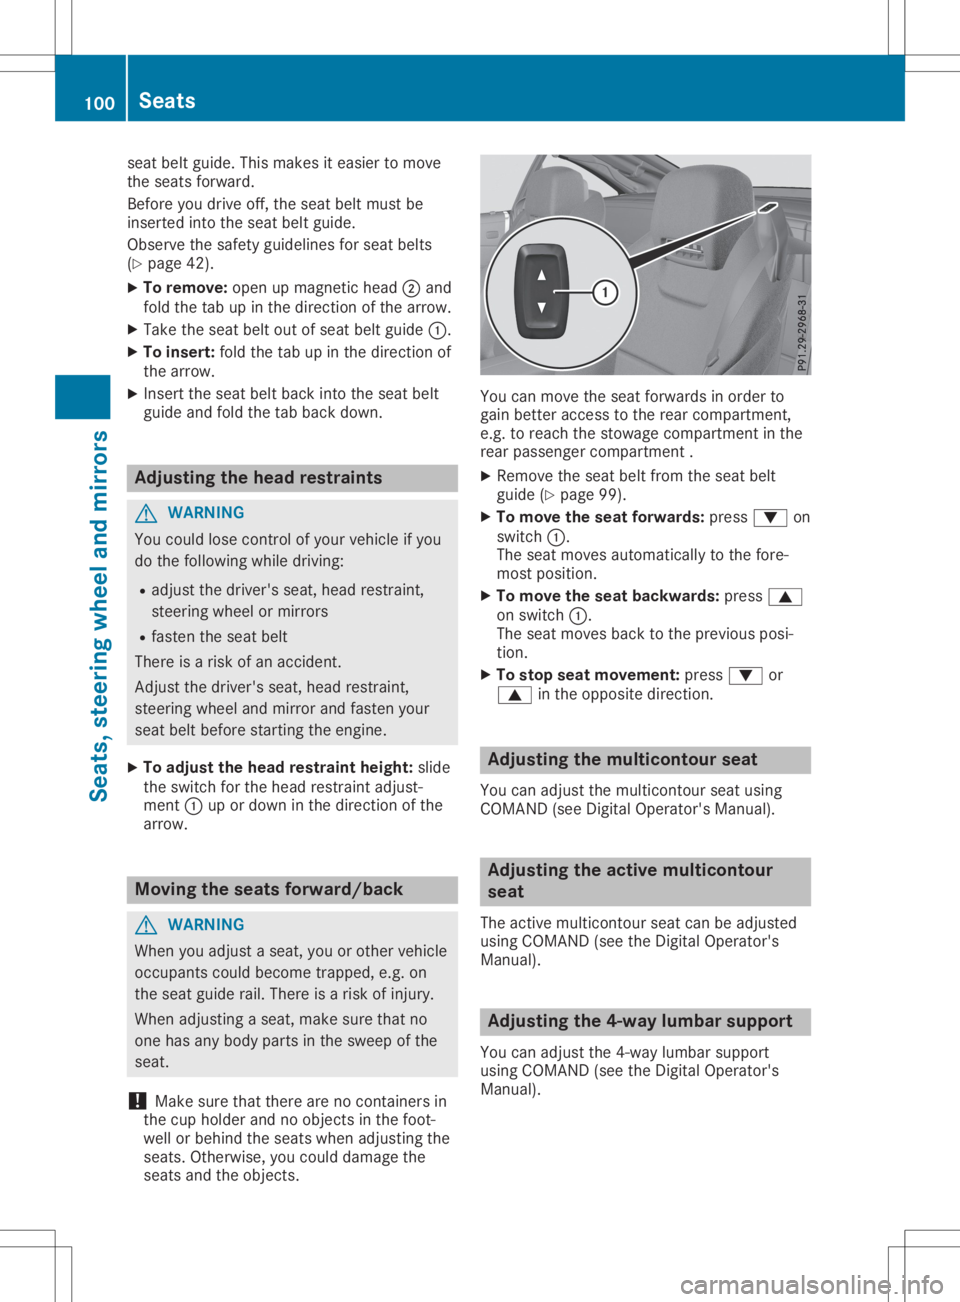
X To remove: openupmagnetic head0044and
fold thetabupinthe direction ofthe arrow.
X Take theseat beltoutofseat beltguide 0043.
X To insert: foldthetabupinthe direction of
the arrow.
X Insert theseat beltback intotheseat belt
guide andfold thetabback down. Adjusting
thehead restra ints G
WARNING
You could losecontrolofyour vehicle ifyou
do the followi ngwhile driving:
R adjust thedriver's seat,head restraint,
steering wheelormirrors
R fasten theseat belt
There isarisk ofan accident.
Adjust thedriver's seat,head restraint,
steering wheelandmirror andfasten your
seat beltbefore starting theengine.
X To adju stthe head restra intheight: slide
the switch forthe head restraint adjust-
ment 0043upordown inthe direction ofthe
arrow. Moving
theseats forward/back G
WARNING
When youadjust aseat, youorother vehicle
occupants couldbecome trapped, e.g.on
the seat guide rail.There isarisk ofinjury.
When adjusting aseat, make surethatno
one hasany body parts inthe sweep ofthe
seat.
! Make
surethatthere arenocont ainers in
the cup holder andnoobjects inthe foot-
well orbehind theseats when adjusting the
seats. Otherwise, youcould damage the
seats andtheobjects. You
canmove theseat forwards inorder to
gain better access tothe rear compartment ,
e.g. toreach thestowage compartment inthe
rear passenger compartment .
X Remove theseat beltfrom theseat belt
guide (Ypage 99).
X To move theseat forwards: press0064on
switch 0043.
The seat moves automaticall yto the fore-
most position.
X To move theseat backwards: press0063
on switch 0043.
The seat moves backtothe previous posi-
tion.
X To stop seatmovement: press0064or
0063 inthe opposite direction. Adjusting
themulticontour seat
You canadjust themulticontour seatusing
COMAND (seeDigital Operator's Manual). Adjusting
theactive multicontour
seat
The active multicontour seatcanbeadjusted
using COMAND (seetheDigital Operator's
Manual ). Adjusting
the4-way lumbar support
You canadjust the4-way lumbarsupport
using COMAND (seetheDigital Operator's
Manual ). 100
SeatsSeats,
steering wheeland mirrors
Page 103 of 334
Switching
theseat heating on/off
Switching on/off G
WARNING
Repeatedly switchingonthe seat heating
can cause theseat cushion andbackrest
pads tobecome veryhot.Thehealth ofper-
sons withlimited temperature sensitivityor
a limited abilityto react tohigh tempera-
tures maybeaffected orthey mayeven suf-
fer burn-like injuries.Thereisarisk ofinjury.
Therefore, donot switch theseat heating on
repeatedly.
! When
theseat heating isswitched on,the
seat surface canbedamaged asaresult of
object sbeing placed onthe seats, forexam-
ple, seat cushions, childseats andprotec-
tive covers notapproved byMercedes-B enz.
Ensure thatthere arenoobject son the seat
surface whentheseat heating isswitched
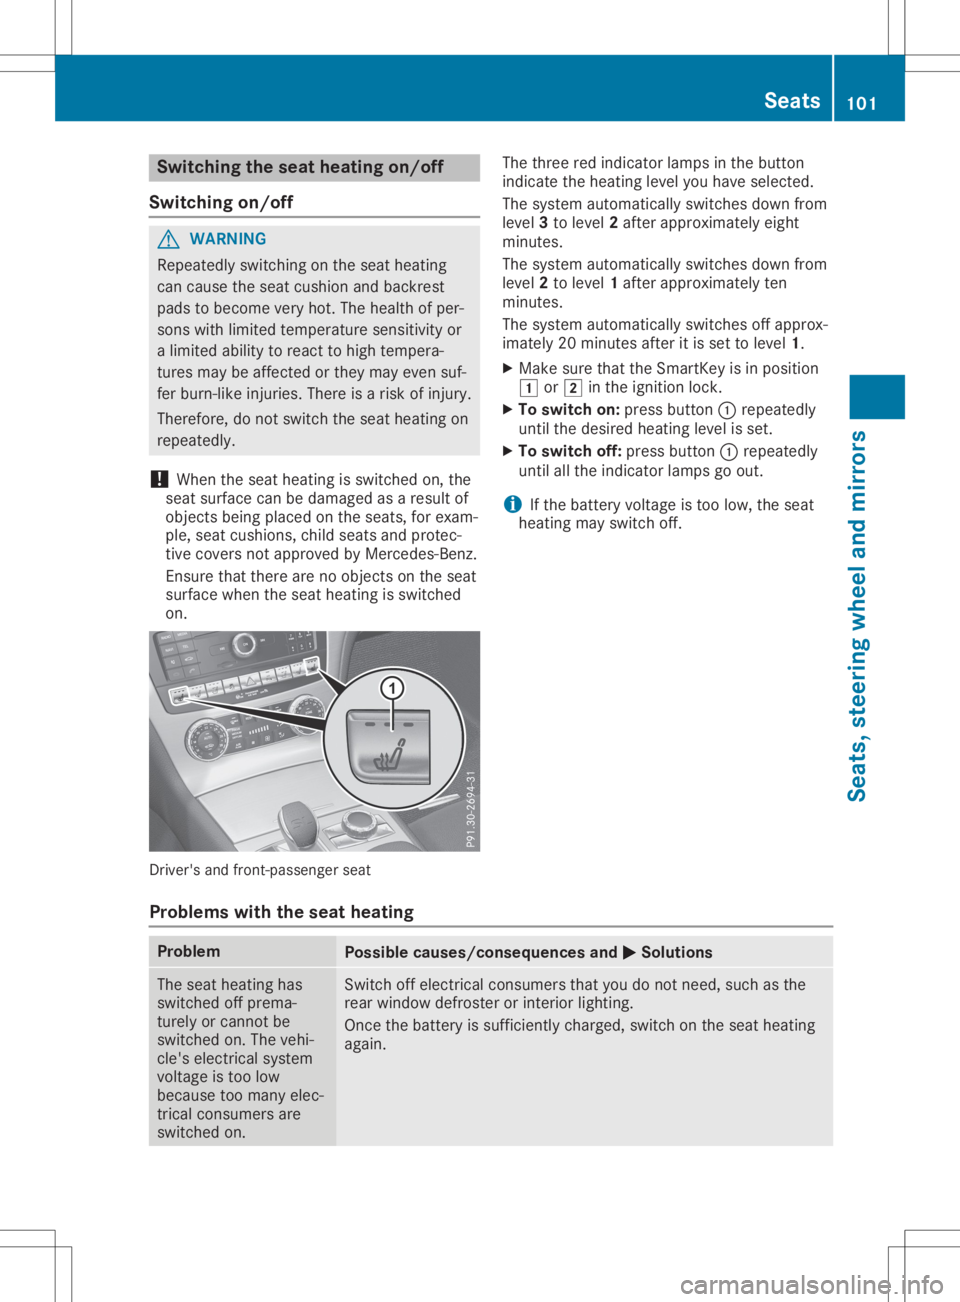
on. Driver's
andfront -passenger seat The
three redindicator lampsinthe button
indicate theheating levelyouhave selected.
The system automatically switchesdownfrom
level 3to level 2after approximately eight
minutes.
The system automatically switchesdownfrom
level 2to level 1after approximately ten
minutes.
The system automatically switchesoffapprox-
imately 20minutes afteritis set tolevel 1.
X Make surethattheSmartK eyisin position
0047 or0048 inthe ignition lock.
X To switch on:press button 0043repeatedly
until thedesired heating levelisset.
X To switch off:press button 0043repeatedly
until allthe indicator lampsgoout.
i If
the battery voltage istoo low, theseat
heating mayswitch off.
Problems withtheseat heating Problem
Possible
causes/co nsequences and0050 0050
Solutions The
seat heating has
switched offprema-
turely orcannot be
switched on.The vehi-
cle's electrical system
voltage istoo low
because toomany elec-
trical consumers are
switched on. Switch
offelectrical consumers thatyoudonot need, suchasthe
rear window defroster orinterior lighting.
Once thebattery issufficiently charged,switchonthe seat heating
again. Seats
101Seats,steering wheeland mirrors Z
Page 104 of 334
Switching
theseat ventilation on/off
Switching on/off The
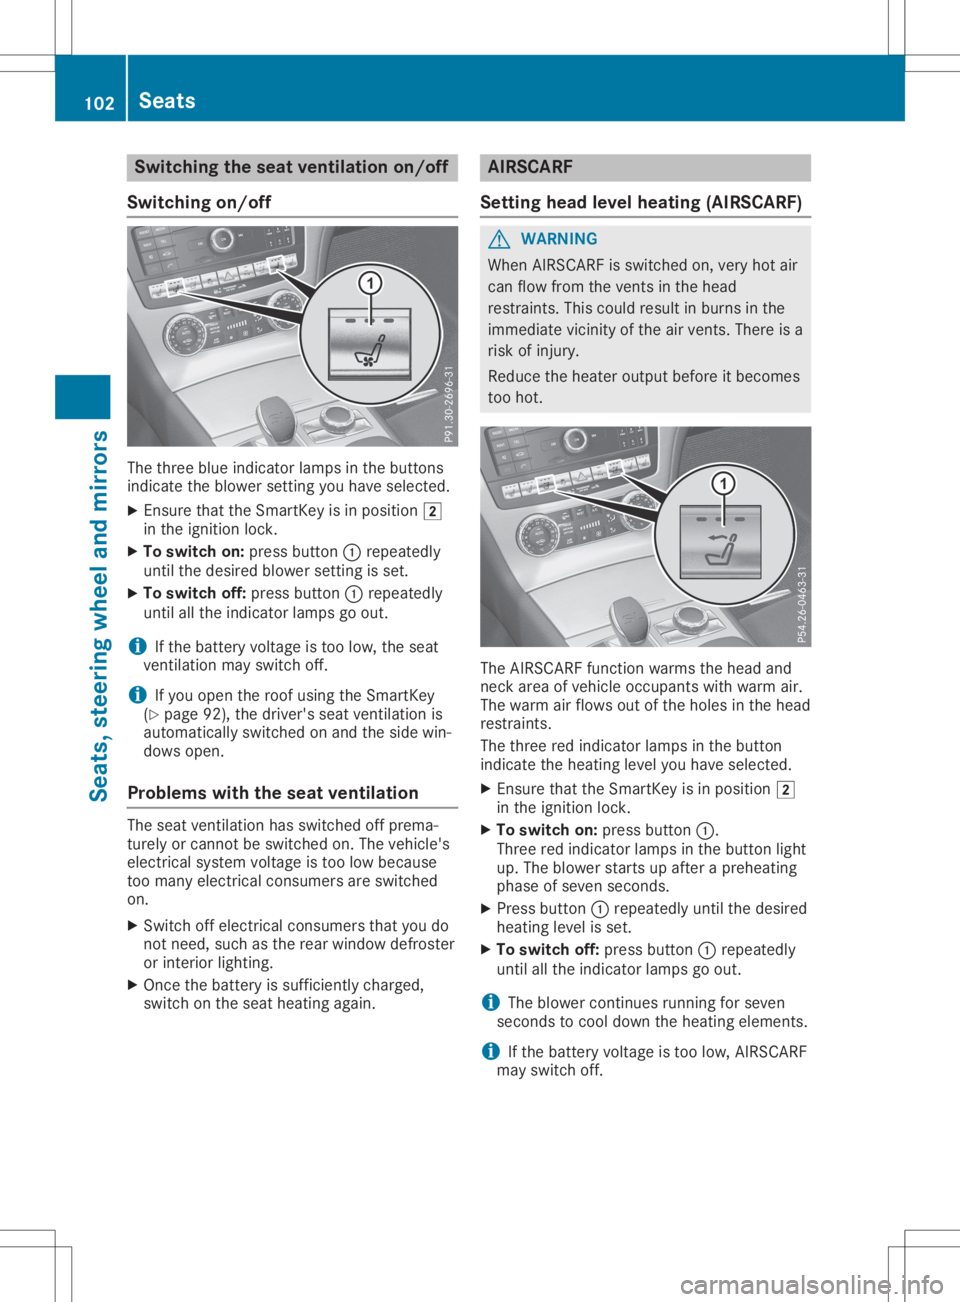
three blueindicator lampsinthe buttons
indicate theblower settingyou have selected.
X Ensure thattheSmartK eyisin position 0048
in the ignition lock.
X To switch on:press button 0043repeatedly
until thedesired blowersettingis set.
X To switch off:press button 0043repeatedly
until allthe indicator lampsgoout.
i If
the battery voltage istoo low, theseat
vent ilation mayswitch off.
i If
you open theroof using theSmartK ey
(Y page 92),thedriver's seatventilation is
automatically switchedonand theside win-
dows open.
Problems withtheseat ventilation The
seat ventilation hasswitched offprema-
turely orcannot beswitched on.The vehicle's
electrical systemvoltage istoo low because
too many electrical consumers areswitched
on.
X Switch offelectrical consumers thatyoudo
not need, suchasthe rear window defroster
or interior lighting.
X Once thebattery issufficiently charged,
switch onthe seat heating again. AIRSCA
RF
Setting headlevelheating (AIRSCARF) G
WARNING
When AIRSCARF isswitched on,very hotair
can flow from thevent sin the head
restraint s.This could result inburns inthe
immediate vicinityofthe airvent s.There isa
risk ofinjury.
Reduce theheater output beforeitbecomes
too hot. The
AIRSCARF functionwarms thehead and
neck areaofvehicle occupants withwarm air.
The warm airflows outofthe holes inthe head
restraint s.
The three redindicator lampsinthe button
indicate theheating levelyouhave selected.
X Ensure thattheSmartK eyisin position 0048
in the ignition lock.
X To switch on:press button 0043.
Three redindicator lampsinthe button light
up. The blower startsupafter apreheating
phase ofseven seconds.
X Press button 0043repeatedly untilthedesired
heating levelisset.
X To switch off:press button 0043repeatedly
until allthe indicator lampsgoout.
i The
blower continues running forseven
seconds tocool down theheating elements.
i If
the battery voltage istoo low, AIRSCARF
may switch off. 102
SeatsSeats,
steering wheeland mirrors
Page 105 of 334

Steering
wheel Import
antsafety notes G
WARNING
You could losecontrolofyour vehicle ifyou
do the following whiledriving:
R adjust thedriver's seat,head restraint ,
steering wheelormirrors
R fasten theseat belt
There isarisk ofan accident.
Adjust thedriver's seat,head restraint ,
steering wheelandmirror andfasten your
seat beltbefore startingthe engine. G
WARNING
Children couldinjure themselves ifthey
adjust thesteering wheel.Thereisarisk of
injury.
Never leavechildren unsupervised inthe
vehicle.
When leaving thevehicle, alwaystake the
SmartK eywith youand lock thevehicle. This
also applie sfor the Digital Vehicle Keyifthe
"Digital Vehicle Key"functionisactivated via
Mercedes meconn ect.
The electrically adjustablesteeringwheelcan
still beadjusted whenthereisno SmartK eyin
the ignition lock. Adjust
ingthe steering wheelelectri-
cally 0043
Adjust sthe steering wheelheight
0044 Adjust sthe steering wheelposition (fore-
and-aft adjustment )
i Further relatedsubjects:
R EAS Y-ENTRY/E XITfeature (Ypage 103)
R Stor ingsettin gs(Y page 107) EASY
-ENTR Y/EXITfeatur e
Import antsafety notes G
WARNING
If you drive offwhile theEAS Y-ENTRY/E XIT
feature ismaking adjustment s,you could
lose controlofthe vehicle. Thereisarisk of
an accident.
Always waituntil theadjustment processis
complete beforedriving off. G
WARNING
When theEAS Y-ENTRY/E XITfeature adjusts
the steering wheel,youand other vehicle
occupants –particularly children–could
become trapped. Thereisarisk ofinjury.
While theEAS Y-ENTRY/E XITfeature ismak-
ing adjustment s,make surethatnoone has
any body parts inthe sweep ofthe steering
wheel. Steering
wheel
103Seats,steering wheeland mirrors
Z
Page 106 of 334
If
somebod ybecomes trapped:
R press oneofthe memory function posi-
tion buttons, or
R move theswitch forsteering wheel
adjustment inthe opposi tedirection to
that inwhich thesteering wheelismov-
ing.
The adjustment processisstopped. G
WARNING
When theEASY-E NTRY/EXIT feature adjusts
the steering wheelandthedriver's seat,you
and other vehicle occupants –particul arly
childre n–could become trapped.There isa
risk ofinjury.
Whil ethe EASY-E NTRY/EXIT feature ismak-
ing adjustments, makesurethatnoone has
any body parts inthe sweep ofthe seat and
the steering wheel.
If somebod ybecomes trapped:
R press oneofthe memory function posi-
tion buttons, or
R press oneofthe memory function mem-
ory buttons, or
R move theswitch forsteering wheel
adjustment inthe opposi tedirection to
that inwhich thesteering wheelismoving
The adjustment processisstopped. G
WARNING
If you useopenings inthe body work or
detachab leparts assteps, youcould :
R slip and/or fall
R dama gethe vehicle andcause yourself to
fall .
There isarisk ofinjury.
Alway suse secure climbingaids,e.g. asuit-
abl elad der.
The EASY-E NTRY/EXIT feature makesgetting
in and outofyou rvehicle easier.
You canactivate anddeactiva tethe EASY-
ENTRY/EXIT featureinthe on-board computer
(Y page 203). Posi
tion ofthe steering wheelwhen
the EAS Y-ENTRY/E XITfeature isactive The
steering wheelswings upwhen you:
R remove theSmartKey fromtheignition lock
R open thedriver's doorwithKEYLESS- GOin
positio n1
R open thedriver's doorandtheSmartKey is
in positio n0092 or0047
i The
steering wheelmoves upwards onlyif
it has notalrea dyreached theuppe rsteer-
ing limiter.
Posi tion ofthe steering wheelfor driv-
ing The
steering wheelismoved tothe last selec-
ted positio nwhen:
R the driver's doorisclosed
R you insert theSmartKey intotheignition
lock
or
R you press theStart/St opbutton onceon
vehicle swith KEYLESS- GO
When youclose thedriver's doorwiththeigni-
tion switched on,the steering wheelisalso
automa ticallymoved tothe previou slyset
positio n.
The lastpositio nof the steering columnis
stored whenyouswitch offthe ignition or
when youstore thesetting withthememory
function (Ypage 107).
Crash-responsi veEAS Y-EX ITfeature If
the crash-responsive EASY-EXITfeature is
triggered inan accident, thesteering column
wil lmove upwards when thedriver's dooris
opened. Thisoccurs irrespectiveofthe posi-
tion ofthe SmartKey inthe ignition lock.This
makes iteasi erto exit thevehicle andrescue
the occupants.
The crash-responsive EASY-EXITfeature isonly
opera tional ifthe EASY-E XIT/ENTRY featureis
activated inthe on-board computer
(Y page 203). 104
Steering
wheelSeats, steerin gwhe eland mirrors
Page 107 of 334
Mirrors
Exteri
ormirrors
Adjusting theexteri ormirrors G
WARNING
You couldlose control ofyou rvehicl eif you
do the followi ngwhi ledrivi ng:
R adju stthe drive r'sseat, headrestrai nt,
steering wheelor mirrors
R fasten theseat belt
There isarisk ofan accide nt.
Adjust thedrive r'sseat, headrestrai nt,
steering wheeland mirror andfasten your
seat beltbefore starting theengine. G
WARNING
The exterior mirroronthe front-passeng er
side reducesthesize ofthe imag e.Visi ble
objects areactua llycloser thantheyappear.
This means thatyoucouldmisjud gethe dis-
tance fromroaduserstraveli ngbehi nd,e.g.
when changi nglane .There isarisk ofan
accide nt.
For this reas on,alwaysmake sureofthe
actua ldista ncefrom theroad userstraveli ng
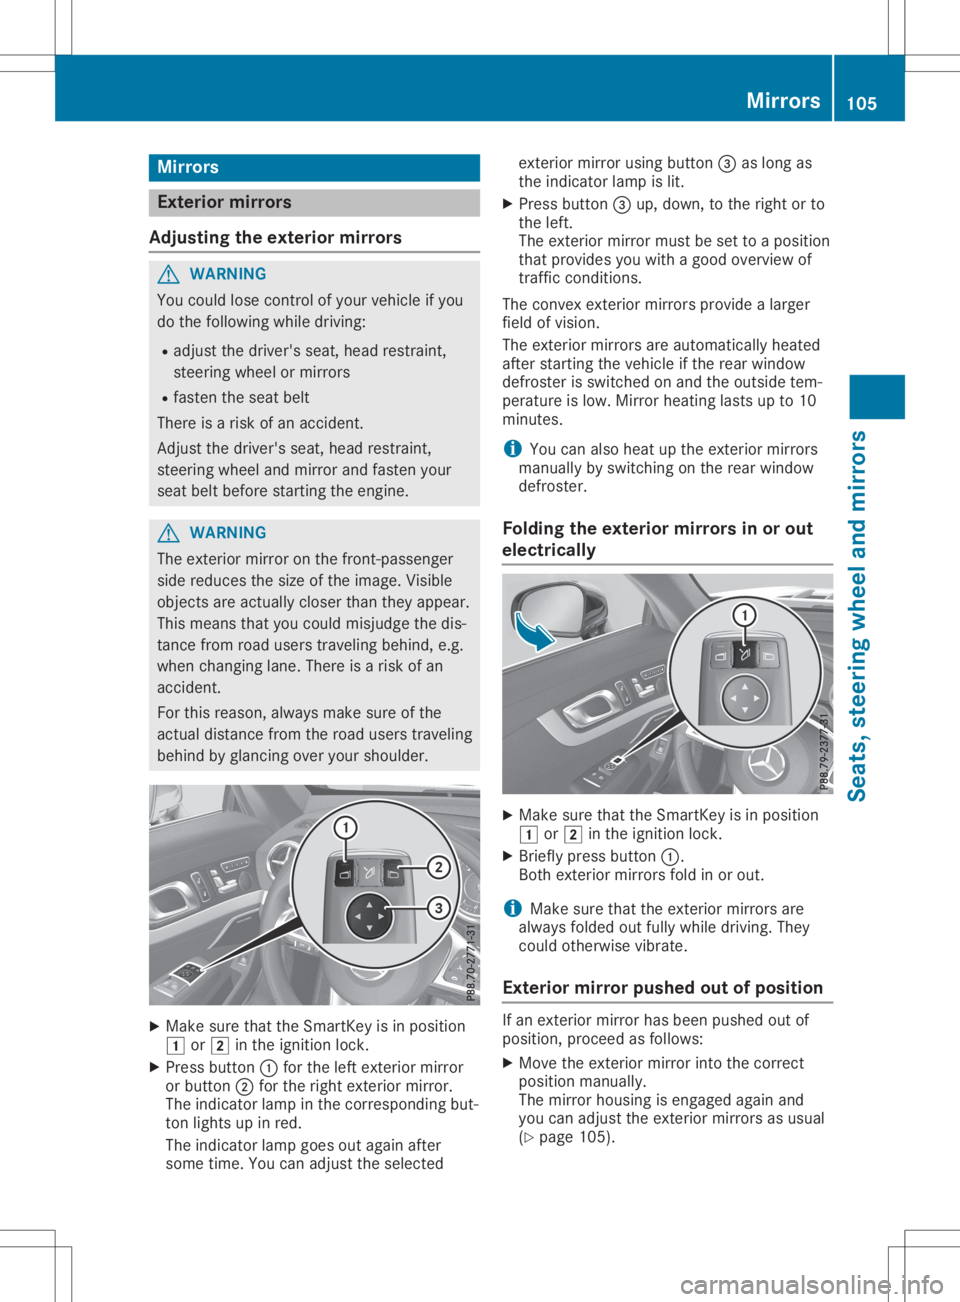
behi ndbyglancing overyourshou lder. X
Make surethattheSmartKey isin posi tion
0047 or0048 inthe ignitio nlock.
X Press button 0043for the left exterior mirror
or button 0044for the right exterior mirror.
The indica torlamp inthe correspo ndingbut-
ton lights upinred.
The indica torlamp goesoutagainafter
some time.Youcanadju stthe sele cted exterior
mirrorusing button 0087aslong as
the indica torlamp islit.
X Press button 0087up, dow n,to the right orto
the left.
The exterior mirrormustbeset toaposi tion
that provi desyou with agood overvi ewof
traffic conditions.
The convex exterior mirrorsprovidealarg er
fiel dof visi on.
The exterior mirrorsareautomatica llyhea ted
after starting thevehicl eif the rear windo w
defros terisswi tched onand theoutsi detem-
pera ture islow .Mirror heating lastsup to10
minutes.
i You
canalsohea tup the exterior mirrors
manua llyby swi tching onthe rear windo w
defros ter.
Fo lding theexteri ormirrors inor out
ele ctrical ly X
Make surethattheSmartKey isin posi tion
0047 or0048 inthe ignitio nlock.
X Briefl ypress button 0043.
Both exterior mirrorsfoldinor out.
i Make
surethattheexterior mirrorsare
alw aysfolde dout fullywhi ledrivi ng.They
coul dotherwi sevibra te.
Exteri ormirror pushed outofposi tion If
an exterior mirrorhasbeen pushed outof
posi tion, procee das foll ows:
X Move theexterior mirrorintothecorrect
posi tion manua lly.
The mirror housingisengag edaga inand
you can adju stthe exterior mirrorsasusu al
(Y pag e105) . Mirrors
105Seats,steering wheeland mirrors Z
Page 108 of 334

Aut
oma tic ant i-glar emi rrors G
WAR
NING
El ec trolyt emay escape ifth eglas sin an
auto maticant i-glare mirror breaks .The elec-
tr olyt eis har mfuland caus esirritati on.It
mus tno tco me intoco ntact withyour skin,
eyes, respirato ryorg ans orclo thing orbe
swallo wed.Thereisaris kof injury.
If you come intoco ntact withth eelec tro-
lyt e, obs erveth efol lowin g:
R Rins eoff theelec trolyt efrom your skin
imm ediat elywithwat er.
R Im med iately rinse theelec trolyt eout of
your eyes thoro ughly withcle an wat er.
R Ifth eelec trolyt eis swallo wed,immedi-
ate lyrin se your mout hout thoro ughly. Do
no tind uce vom iting .
R Ifelec trolyt eco mes intoco ntact withyour
sk in or hair orisswallo wed,seekmed ical
att ention imm ediat ely.
R Im med iately chang eout ofclo thing whic h
has come intoco ntact withelec trolyt e.
R Ifan aller gicreac tion occur s,see kmed i-
cal attention imm ediat ely.
The rear-view mirror and theex terio rmir ror on
th edri ver 'sside automaticallygo intoant i-
glar emod eif th efol lowin gco nd ition sare met
sim ultane ously:
R theign ition isswit ched on and
R inc iden tligh tfr om head lampsst rik es the
sen sor intherear -view mirror
The mirrorsdo notgo intoant i-glare mod eif
rev ers egear isen gage dor ifth eint erior ligh t-
ing isswit ched on. Pa
rking position fortheext erior mir-
ror onthefront -pass enger side
Set ting and stori ng thepa rking posi-
ti on Usin
gth emem orybutton You
canstore thepark ingposition ofthefron t-
pass enger -side exterio rmir ror usin gmem ory
but tonM 0085. The revers egear mustno tbe
en gage dduri ngthepro cess.
X Mak esur eth at theveh icleis stati onary and
th at theSm artKey isin pos ition 0048inthe
ign ition lock.
X Pre ssbut ton0044 for theex terio rmir ror on
th efron t-pass enger side .
X En gage revers egear .
The exterio rmir ror onthefron t-pass enger
side movestothepre set park ingposition .
X Use button0087 toadj ust theex terio rmir ror
to apos ition that allows youtosee therear
whee land thecur b.
The park ingposition isstore d.
i If
you shiftth etrans mis sion toano ther
pos ition ,th eex terio rmir ror onthefron t-
pass enger side return sto thedri vin gpos i-
ti on . 106
Mir
rorsSea ts,ste ering wheel andmirro rs
Page 109 of 334

Using
reversegear You
canadjust theexterior mirror onthe fron t-
passenger sidetoaposition thatallows youto
see therear wheel onthat side assoon asyou
engage therever segear. Thissettingcan be
stor edusing memor ybutt onM0085.
X En sure thattheSmart Keyisin position 0048
in the ignit ionlock .
X With theexterior mirror onthe fron t-
passenger sideactiv ated, usebutton0087 to
adjust theexterior mirror .The rear wheel
and thecurb should bevisible inthe exterior
mirror .
X Press memor ybutt onM0085 and one ofthe
arrows onbutt on0087 within three secon ds.
The parkin gposition isstor edifthe exterior
mirror doesnotmove.
X Ifthe mirror moves outofposition ,repeat
the steps .
Calling upastor edpar king position
sett ing X
Turn theSmart Keytoposition 0048inthe igni-
tion lock.
X Selec tthe exterior mirror onthe fron t-
passenger sideusing button0044.
X En gage reversegear.
The exterior mirror onthe fron t-passenger
side moves tothe stor edparkin gposition .
The exterior mirror onthe fron t-passenger side
moves backtoits original position :
R as soon asyou exceed aspeed of9mph
(1 5km/ h)
R ifyou press button0043 for the exterior mirror
on the drive r'sside Mem
oryfunct ion Stor
ingsett ings G
WARN
ING
If you usethememo ryfunc tion onthe driv-
er's side while driving,you could losecon-
tr ol of the vehic leas aresult ofthe adjust -
men tsbeing made. Thereisarisk ofan acc i-
dent .
Only usethememo ryfunc tion onthe driv-
er's side when thevehic leisstat ionar y. G
WARN
ING
When thememo ryfunc tion adjust sthe seat,
you and othervehic leocc upant s– part icu-
larly childr en–could becom etrapped. There
is arisk ofinjury.
While thememo ryfunc tion ismakin gadjust -
men ts,make surethatnoone hasany body
part sin the sweep ofthe seat.
If someo nebecom estrapped, pressamem-
ory posit ionswitc hor seat adjust ment
switc himmed iately. G
WARN
ING
Children couldbecom etrapped ifthe yact i-
vat ethe memo ryfunc tion,part icularly when
unat tended. There isarisk ofinjury.
Never leavechildrenunsuper visedinthe
vehic le. Mem
oryfunct ion
107Seats,steer ingwheel andmirrors
Z
Page 110 of 334
When
leaving thevehicle, alwaystake the
Smart Keywith youand lock thevehicle. This
also applies forthe Digital Vehicle Keyifthe
"Digital Vehicle Key"functionisactivat edvia
Mercedes meconn ect.
The memory functioncan beactivat edatany
time, e.g.even when theSmart Keyisnot in
the ignition lock.
With thememory function,youcan store upto
three differen tsett ings, e.g.forthree differen t
people.
The following settings arestored asasingle
memory preset:
R Position ofthe seat, backres tand head
restr aint
R Driver 'sside: steerin gwheel position
R Driver 'sside: position ofthe exterior mirrors
on the driver's andfront-passenger sides X
Adj ust the seat electr ically(Ypage 99).
X On the driver's side,adjust thesteerin g
wheel (Ypage 103)andtheexterior mirrors
(Y page 105).
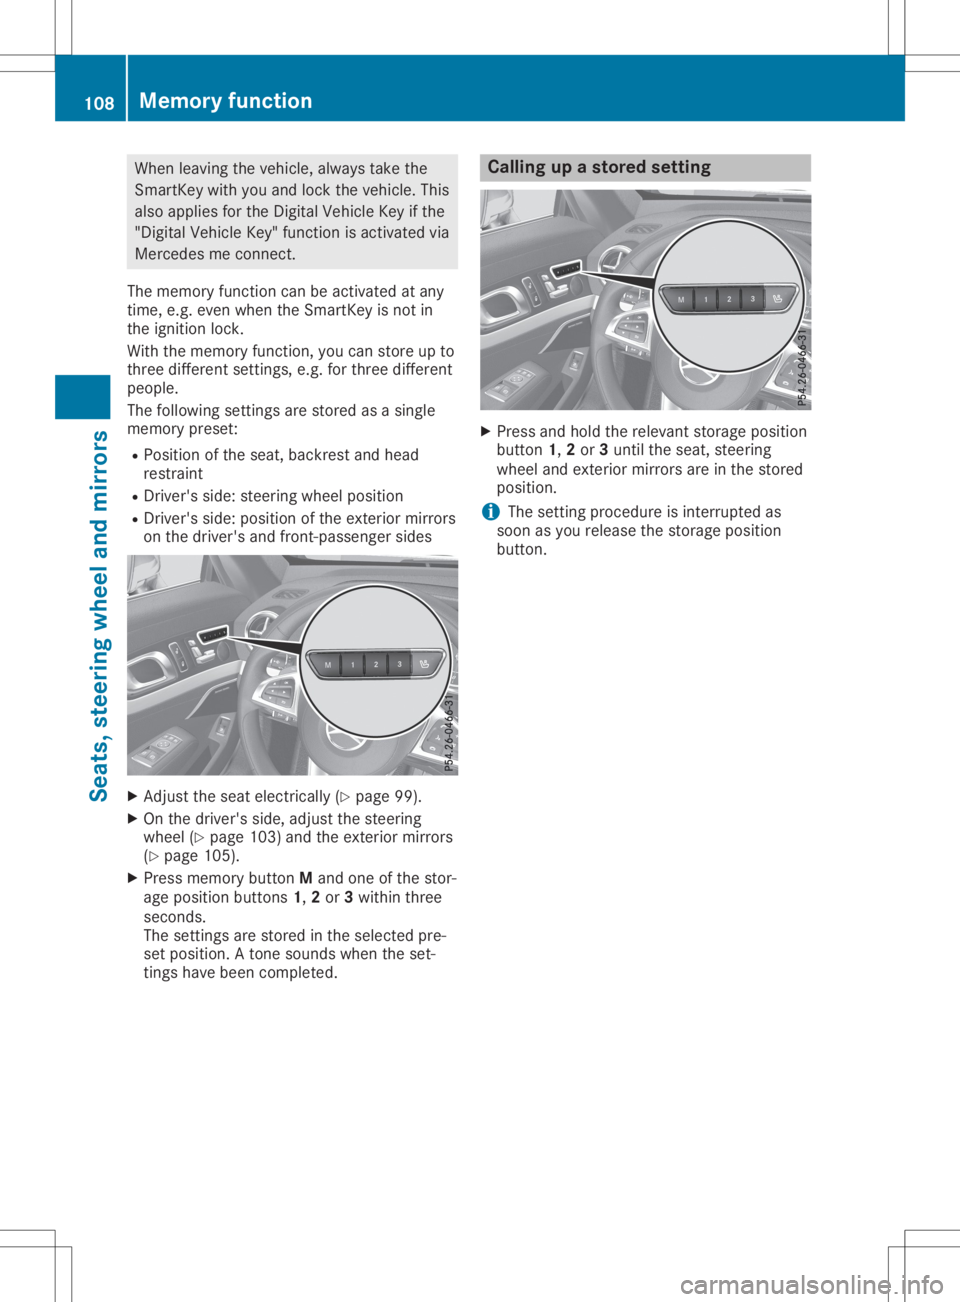
X Press memory buttonMand one ofthe stor-
age position buttons1, 2or 3within three
secon ds.
The settings arestored inthe selected pre-
set position. Aton esounds whentheset-
tings havebeen complet ed. Calling
upastored setting X
Press andhold therelevant storageposition
button 1,2or 3until theseat, steerin g
wheel andexterior mirrors areinthe stored
position.
i The
settingprocedure isinter rupted as
soon asyou release thestorage position
button . 108
Memor
yfunctionSeats, steering wheelandmirrors