instrument cluster MERCEDES-BENZ SL-CLASS ROADSTER 2013 Owner's Manual
[x] Cancel search | Manufacturer: MERCEDES-BENZ, Model Year: 2013, Model line: SL-CLASS ROADSTER, Model: MERCEDES-BENZ SL-CLASS ROADSTER 2013Pages: 572, PDF Size: 9.23 MB
Page 138 of 572
The Start/Stop button can be removed from
the ignition lock. Then, you can insert the
SmartKey into the ignition lock.
i
You do
not have to remove the Start/Stop
button from the ignition lock when you
leave the vehicle. You should, however,
always take the SmartKey with you when
leaving the vehicle. As long as the
SmartKey is in the vehicle:
R the vehicle can be started using the
Start/Stop button and
R electrically powered equipment can be
operated.
i The engine can be turned off while the
vehicle is in motion by pressing and holding
the Start/Stop button for three seconds.
This function operates independently from
the ECO start/stop automatic engine
switch-off function.
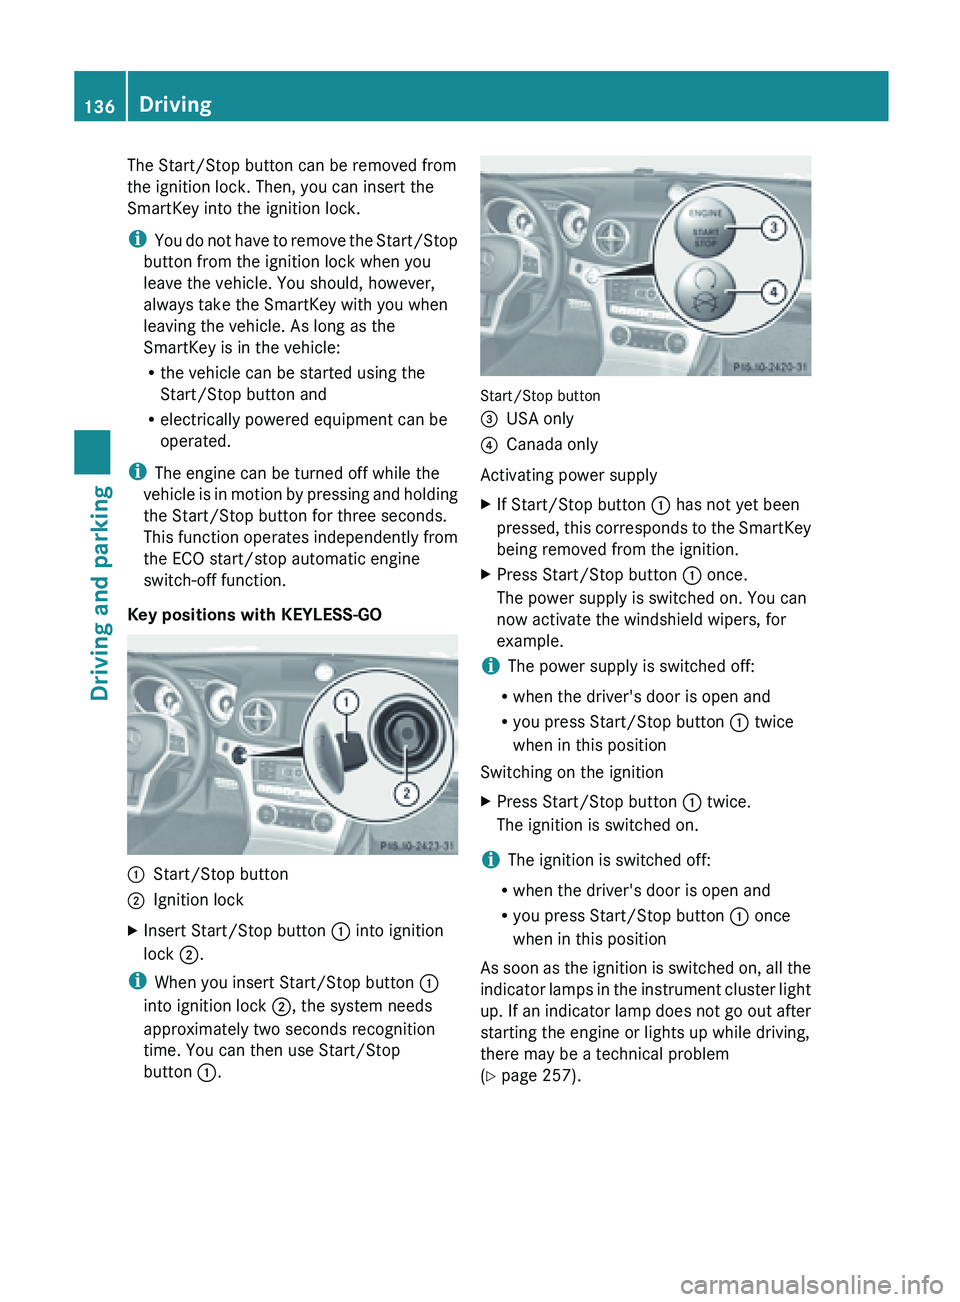
Key positions with KEYLESS-GO :
Start/Stop button
; Ignition lock
X Insert Start/Stop button : into ignition
lock ;.
i When you insert Start/Stop button :
into ignition lock ;, the system needs
approximately two seconds recognition
time. You can then use Start/Stop
button :. Start/Stop button
=
USA only
? Canada only
Activating power supply
X If Start/Stop button : has not yet been
pressed, this
corresponds to the SmartKey
being removed from the ignition.
X Press Start/Stop button : once.
The power supply is switched on. You can
now activate the windshield wipers, for
example.
i The power supply is switched off:
R when the driver's door is open and
R you press Start/Stop button : twice
when in this position
Switching on the ignition
X Press Start/Stop button : twice.
The ignition is switched on.
i The ignition is switched off:
R when the driver's door is open and
R you press Start/Stop button : once
when in this position
As soon
as the ignition is switched on, all the
indicator lamps in the instrument cluster light
up. If an indicator lamp does not go out after
starting the engine or lights up while driving,
there may be a technical problem
(Y page 257). 136
Driving
Driving and parking
Page 144 of 572
Problems with the engine
Problem Possible causes/consequences and
M Solutions
The engine does not
start. The HOLD function is activated.
X
Deactivate the HOLD function (Y page 175).
X Try to start the engine again. The engine does not
start.
The
starter motor
can be heard. R
There is a malfunction in the engine electronics.
R There is a malfunction in the fuel supply.
X Turn
the SmartKey back to position
0
in
the ignition lock before
attempting to start the engine again.
or
X Press the Start/Stop button repeatedly until all indicator lamps
in the instrument cluster go out.
X Try to start the engine again (Y page 137). Avoid excessively
long and
frequent attempts to start the engine, as this will drain
the battery.
If the engine does not start after several attempts:
X Consult a qualified specialist workshop. The engine does not
start. You cannot hear
the starter motor. The on-board voltage is too low because the battery is too weak
or discharged.
X
Jump-start the vehicle (
Y page 516).
If the engine does not start despite attempts to jump-start it:
X Consult a qualified specialist workshop. The starter motor was exposed to a thermal load that was too high.
X Allow the starter motor to cool down for approximately two
minutes.
X Try to start the engine again.
If the engine still does not start:
X Consult a qualified specialist workshop. The engine is not
running smoothly and
is misfiring. There is a malfunction in the engine electronics or in a mechanical
component of the engine management system.
X Only depress the accelerator pedal slightly.
X Have the cause rectified immediately at a qualified specialist
workshop.
Otherwise, non-combusted fuel may get into the catalytic
converter and damage it.142
Driving
Driving and parking
Page 155 of 572
For further information on fuel and fuel quality
(Y page 561).
Refueling
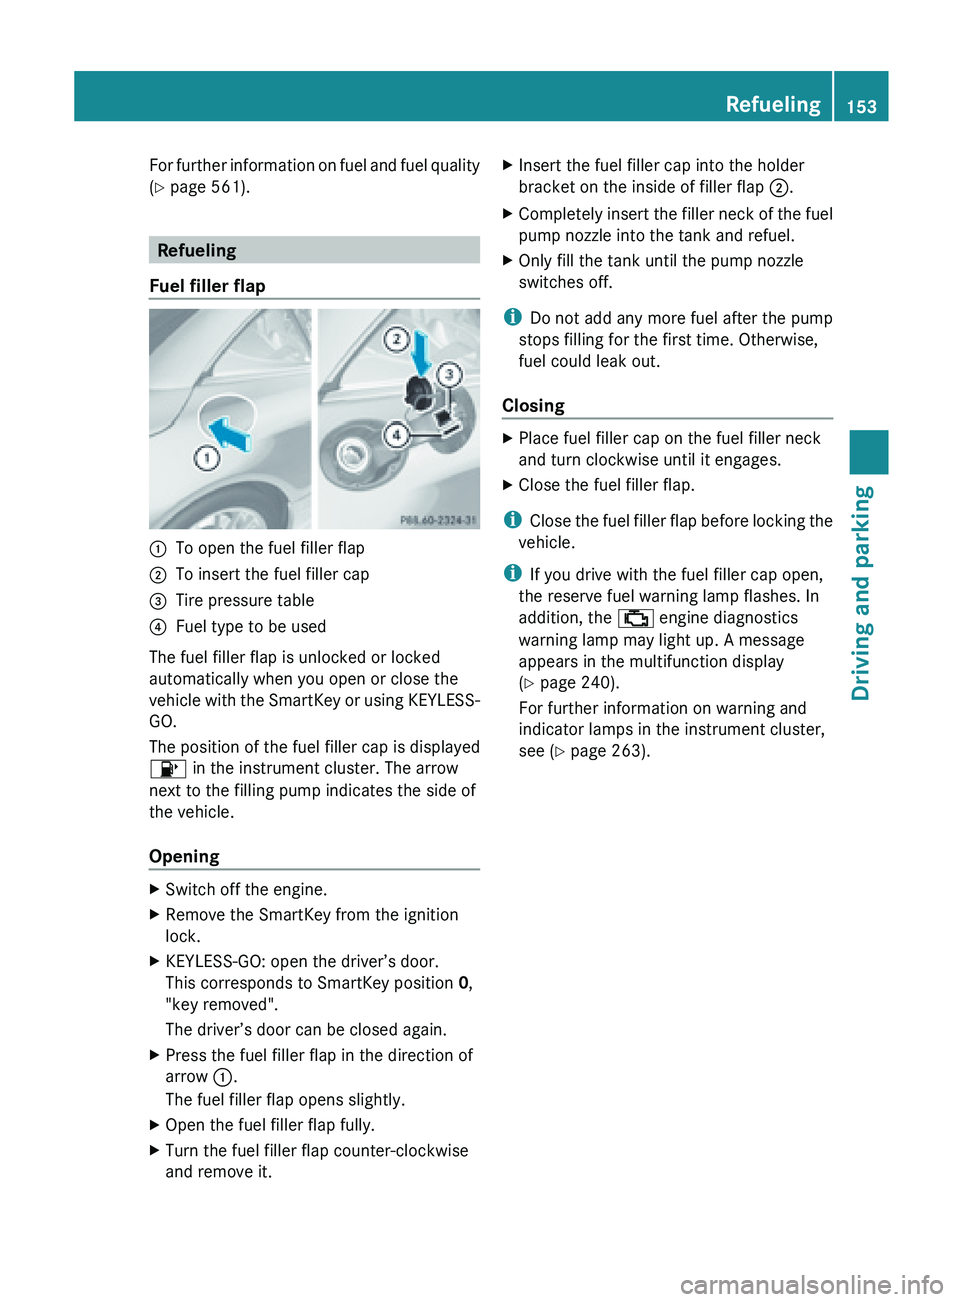
Fuel filler flap :
To open the fuel filler flap
; To insert the fuel filler cap
= Tire pressure table
? Fuel type to be used
The fuel filler flap is unlocked or locked
automatically when you open or close the
vehicle with
the SmartKey or using KEYLESS-
GO.
The position of the fuel filler cap is displayed
8 in the instrument cluster. The arrow
next to the filling pump indicates the side of
the vehicle.
Opening X
Switch off the engine.
X Remove the SmartKey from the ignition
lock.
X KEYLESS-GO: open the driver’s door.
This corresponds to SmartKey position 0,
"key removed".
The driver’s door can be closed again.
X Press the fuel filler flap in the direction of
arrow :.
The fuel filler flap opens slightly.
X Open the fuel filler flap fully.
X Turn the fuel filler flap counter-clockwise
and remove it. X
Insert the fuel filler cap into the holder
bracket on the inside of filler flap ;.
X Completely insert the filler neck of the fuel
pump nozzle into the tank and refuel.
X Only fill the tank until the pump nozzle
switches off.
i Do not add any more fuel after the pump
stops filling for the first time. Otherwise,
fuel could leak out.
Closing X
Place fuel filler cap on the fuel filler neck
and turn clockwise until it engages.
X Close the fuel filler flap.
i Close the
fuel filler flap before locking the
vehicle.
i If you drive with the fuel filler cap open,
the reserve fuel warning lamp flashes. In
addition, the ; engine diagnostics
warning lamp may light up. A message
appears in the multifunction display
(Y page 240).
For further information on warning and
indicator lamps in the instrument cluster,
see ( Y page 263). Refueling
153
Driving and parking Z
Page 157 of 572
Vehicles with automatic transmission
X
Vehicles with a SmartKey: move the
transmission to position P.
X Turn the SmartKey to position 0 in the
ignition lock and remove it.
The immobilizer is activated.
X Vehicles with KEYLESS-GO: press the
Start/Stop button (
Y page 135).
The engine stops and all the indicator
lamps in the instrument cluster go out.
When the driver's door is closed, this
corresponds to key position 1. When the
driver's door is open, this corresponds to
key position 0(Y page 135).
If you try to switch off the engine when the
transmission is not in position P, a message
appears in
the multifunction display. A signal
sounds.
i The engine can be turned off while the
vehicle is in motion by pressing and holding
the Start/Stop button for three seconds.
This function operates independently from
the ECO start/stop automatic engine
switch-off function. Electric parking brake
General notes G
WARNING
When leaving the vehicle, always remove the
SmartKey from
the starter switch, take it with
you, and lock the vehicle. Do not leave
children unattended in the vehicle, or with
access to an unlocked vehicle. Children could
release the parking brake and/or shift the
automatic transmission out of park position
P, either of which could result in an accident
and/or serious personal injury.
i The electric parking brake performs a
function test at regular intervals while the
engine is switched off. The sounds that can
be heard while this is occurring are normal. Engaging and releasing manually
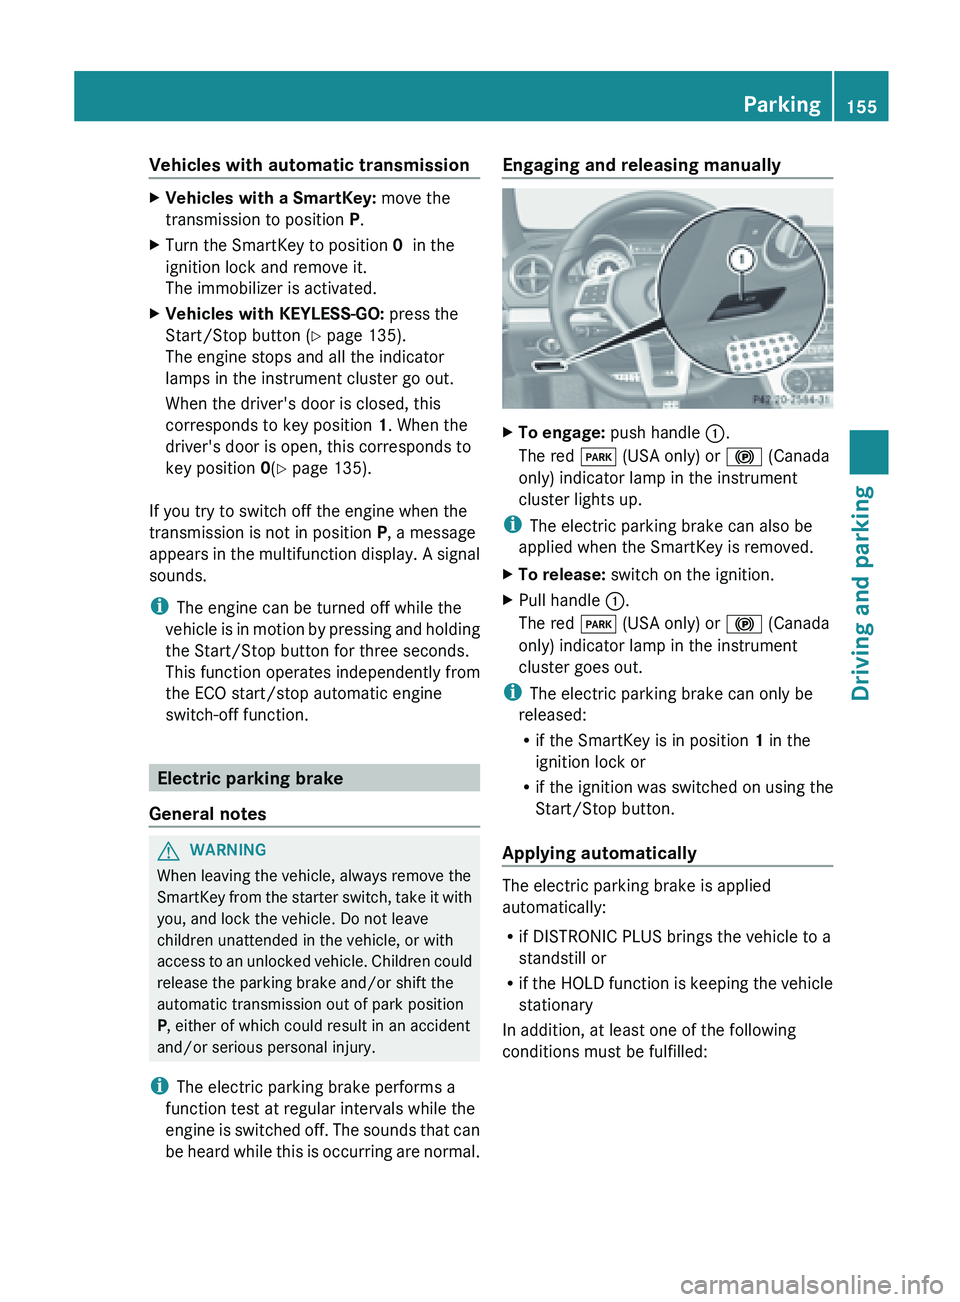
X
To engage: push handle :.
The red F (USA only) or ! (Canada
only) indicator lamp in the instrument
cluster lights up.
i The electric parking brake can also be
applied when the SmartKey is removed.
X To release: switch on the ignition.
X Pull handle :.
The red F (USA only) or ! (Canada
only) indicator lamp in the instrument
cluster goes out.
i The electric parking brake can only be
released:
R if the SmartKey is in position 1 in the
ignition lock or
R if the ignition was switched on using the
Start/Stop button.
Applying automatically The electric parking brake is applied
automatically:
R
if DISTRONIC PLUS brings the vehicle to a
standstill or
R if the
HOLD function is keeping the vehicle
stationary
In addition, at least one of the following
conditions must be fulfilled: Parking
155
Driving and parking Z
Page 158 of 572
R
the engine is switched off, unless it is
automatically switched off by the ECO
start/stop function.
R the driver's seat belt is not inserted in the
belt buckle and the driver's door is open.
R the vehicle is stationary for a lengthy
period.
The red F (USA only) or ! (Canada
only) indicator
lamp in the instrument cluster
lights up.
Releasing automatically The electric parking brake is released
automatically when all of the following
conditions are fulfilled:
R
the engine is running.
R the transmission is in position D or R.
R the driver's seat belt is fastened.
R you depress the accelerator pedal.
If the transmission is in position R, the trunk
lid must be closed.
For the parking brake to be released
automatically if
your seat belt is not fastened,
the following conditions must be fulfilled:
R the driver's door is closed.
R you have shifted out of P or you have
previously driven faster than 2 mph
(3 km/h).
Emergency braking The vehicle can also be braked during an
emergency by using the electric parking
brake.
X
While driving, push handle : of
the electric
parking brake.
i The vehicle is braked for as long as the
handle of the electric parking brake is
pressed. The longer the electric parking
brake handle
is depressed, the greater the
braking force. During braking:
R
a warning tone sounds.
R the Please Release Parking Brake
message appears.
R the red F (USA only) or ! (Canada
only) indicator lamp in the instrument
cluster flashes.
When the vehicle has been braked to a
standstill, the electric parking brake is
engaged. Parking the vehicle for a long period
X Connect a trickle charger.
If you leave the vehicle parked up for longer
than four
weeks, the battery may be damaged
by exhaustive discharging.
i You can obtain information about trickle
chargers from a qualified specialist
workshop.
If you leave the vehicle parked for longer than
six weeks, the vehicle may suffer damage as
a result of lack of use. Consult a qualified
specialist workshop. Driving tips
General notes
Important safety notes G
WARNING
Always remember that you must concentrate
primarily on driving the vehicle. The driver's
concentration must always be directed
primarily at road traffic. For your own safety
and that of others, we recommend that you
stop the vehicle at a safe place and in
accordance with
the traffic conditions before
making or accepting a phone call.
Comply with all legal requirements if you use
the telephone while driving. Use the hands-
free system and only use the telephone when
road, weather and traffic conditions permit. In 156
Driving tips
Driving and parking
Page 159 of 572
some jurisdictions, it is forbidden for drivers
to use mobile phones while driving.
Only
operate
COMAND (Cockpit Management
and Data System) in compliance with all legal
requirements and when the road, weather and
traffic conditions permit. You may otherwise
not be able to observe the traffic conditions,
endangering yourself and others.
Remember that your vehicle covers a distance
of 44 ft (approximately 14 m) a second when
it is traveling at only 30 mph (approximately
50 km/h).
Drive sensibly – save fuel Observe the following tips to save fuel:
R
The tires should always be inflated to the
recommended tire pressure.
R Remove unnecessary loads.
R Warm up
the engine at low engine speeds.
R Avoid frequent acceleration or braking.
R Observe the service intervals in the
Maintenance Booklet or in the service
interval display. Have all the maintenance
work carried in accordance with Daimler
AG regulations.
Fuel consumption also increases when
driving in cold weather, in stop-and-go traffic
and in mountainous terrain.
Drinking and driving G
WARNING
Drinking
and driving and/or taking drugs and
driving are very dangerous combinations.
Even a small amount of alcohol or drugs can
affect your reflexes, perceptions and
judgment.
The possibility of a serious or even fatal
accident are
greatly increased when you drink
or take drugs and drive.
Do not drink or take drugs and drive or allow
anyone to drive who has been drinking or
taking drugs. Pedals G
WARNING
Make sure absolutely no objects are
obstructing the pedals' range of movement.
Keep the driver's footwell clear of all
obstacles. If there are any floormats or
carpets in the footwell, make sure that the
pedals still have sufficient clearance.
During sudden driving or braking maneuvers,
the objects could get caught between the
pedals. You could then no longer brake or
accelerate. This could lead to accidents and
injury.
Rolling with the engine switched off G
WARNING
There
is no power assistance for the steering
and the
brake when the engine is not running.
Steering and braking requires significantly
more effort and you could lose control of the
vehicle and cause an accident as a result.
Do not turn off the engine while the vehicle is
in motion. G
WARNING
Electric power is required to operate the
brake system.
A malfunction in the power supply or in the
vehicle's electrical system can impair the
operation of the brake system and result in
the brake system switching to emergency
mode. In this situation, the red brake system
warning lamp and warning messages may
appear in the instrument cluster while the
vehicle is moving. When braking, the driver
must depress the brake pedal considerably
more firmly and much further in order to
obtain the expected braking effect. If
necessary, apply full pressure to the brake
pedal. Brakes are only applied to the front
wheels. Stopping distance is increased. Driving tips
157
Driving and parking Z
Page 161 of 572
more quickly and protecting them against
corrosion.
Limited braking performance on salt-
treated roads
G
WARNING
The layer of salt on the brake discs and the
brake pads/linings may cause a delay in the
braking effect, resulting in a significantly
longer braking distance, which could lead to
an accident.
To avoid this danger, you should:
R occasionally brake carefully, without
putting other road users at risk, when you
are driving on salted roads. This helps to
remove any salt that may have started to
build up on the brake discs and the brake
pads/linings.
R maintain a greater distance to the vehicle
ahead and drive with particular care.
R carefully apply the brakes at the end of a
trip and immediately after commencing a
new trip,
so that salt residues are removed
from the brake discs.
High-performance brake system for
AMG vehicles G
WARNING
New vehicle brake pads and discs, and
replacement brake pads and discs may take
several hundred miles of driving until they
provide optimum
braking efficiency. Until that
time, you may need to use increased brake
pedal pressure while braking. Please be aware
of this and adjust your driving and braking
accordingly during this break-in period.
Excessive high-demand braking will cause
correspondingly high brake wear. Please be
attentive to the brake warning lamp in the
instrument cluster and brake condition
messages in the multifunction display.
Especially for high performance driving, it is
important to maintain and have the brake
system checked regularly. The AMG brake systems are designed for
heavy loads. This may lead to noise when
braking. This will depend on:
R
speed
R braking force
R ambient conditions, e.g. temperature and
humidity
The wear of individual components of the
brake system,
such as the brake pads/linings
or brake discs, depends on the individual
driving style and operating conditions.
For this reason, it is impossible to state a
mileage that will be valid under all
circumstances. An aggressive driving style
will lead to high wear. You can obtain more
information on this from a qualified specialist
workshop.
Servicing the brakes G
WARNING
If brake pads or brake fluid other than those
recommended are used, the braking
properties of the vehicle can be degraded to
an extent that safe braking is substantially
impaired. This could result in an accident. G
WARNING
Make sure that you do not endanger other
road users when you apply the brakes.
! If the
brake warning lamp lights up in the
instrument cluster and you hear a warning
tone even though the parking brake has
been released, the brake fluid level may be
too low. Observe additional warning
messages in the multifunction display.
The brake fluid level may be too low due to
brake pad wear or leaking brake lines.
Have the brake system checked
immediately. This work should be carried
out at a qualified specialist workshop. Driving tips
159
Driving and parking Z
Page 168 of 572
Deactivate DISTRONIC PLUS:
R
when changing to the right lane, if the
vehicles in the left lane are driving slower
R when driving into a filter lane or an
expressway exit
R in complex driving situations, for example
in construction sites on an expressway
In these situations DISTRONIC PLUS will
maintain the
set speed if it is not deactivated.
DISTRONIC PLUS is intended only for
maintaining a set speed and a set distance
from the objects moving in front of the
vehicle. G
WARNING
An intermittent warning sounds and the
distance warning
lamp · in the instrument
cluster is illuminated if the DISTRONIC PLUS
system calculates that the distance to the
vehicle ahead and your vehicle's current
speed indicate that the DISTRONIC PLUS will
not be capable of slowing the vehicle
sufficiently to maintain the preset following
distance, which creates a danger of a
collision.
Immediately brake the vehicle to increase
your distance to the preceding vehicle. The
warning sound is intended as a final caution
in which you should intercede with your own
braking inputs to avoid a potentially
dangerous situation. Do not wait for the
operation of the warning signal to intercede
with your own braking. This will result in
potentially dangerous emergency braking
which will not always result in an impact being
avoided.
Tailgating increases the risk of an accident. G
WARNING
DISTRONIC PLUS brakes your vehicle with a
maximum deceleration of 13 ft/s 2
(4 m/s 2
).
This corresponds to approximately 40% of
your vehicle's maximum braking force.
To
avoid a collision, you must apply the brakes
yourself. DISTRONIC PLUS brakes the vehicle just
enough to restore the preset speed or the
preset distance to the vehicle in front. G
WARNING
If you do not receive visual or acoustic
warning signals during a critical traffic
situation, DISTRONIC PLUS has either not
recognized the collision risk, has been
deactivated or is malfunctioning.
Remember, whether
or not DISTRONIC PLUS
is operating, it is ultimately always the drivers
responsibility to apply the brakes in order to
control the vehicle and avoid a collision.
General notes DISTRONIC PLUS regulates the speed and
automatically helps you maintain the
distance to the vehicle detected in front.
DISTRONIC PLUS brakes automatically so
that the set speed is not exceeded.
On long and steep downhill gradients,
especially if the vehicle is laden, you must
select shift range
1, 2 or 3 in good time
(Y page 149).
By doing so, you will make use
of the braking effect of the engine, which
relieves the load on the brake system and
prevents the brakes from overheating and
wearing too quickly.
If a slower-moving vehicle is detected in front,
DISTRONIC PLUS brakes your vehicle. It
maintains the preset distance to the vehicle
in front.
If you want DISTRONIC PLUS to assist you,
the radar sensor system must be activated
(Y page 218) and operational.
If there is no vehicle in front, DISTRONIC
PLUS operates in the same way as cruise
control in the speed range between 20 mph
(Canada: 30 km/h) and120 mph (Canada:
200 km/h). If a vehicle is driving in front of
you, it operates in the speed range between
0 mph and (0 km/h) 120 mph (Canada:
200 km/h).
Do not use DISTRONIC PLUS while driving on
roads with steep gradients. 166
Driving systems
Driving and parking
Page 171 of 572
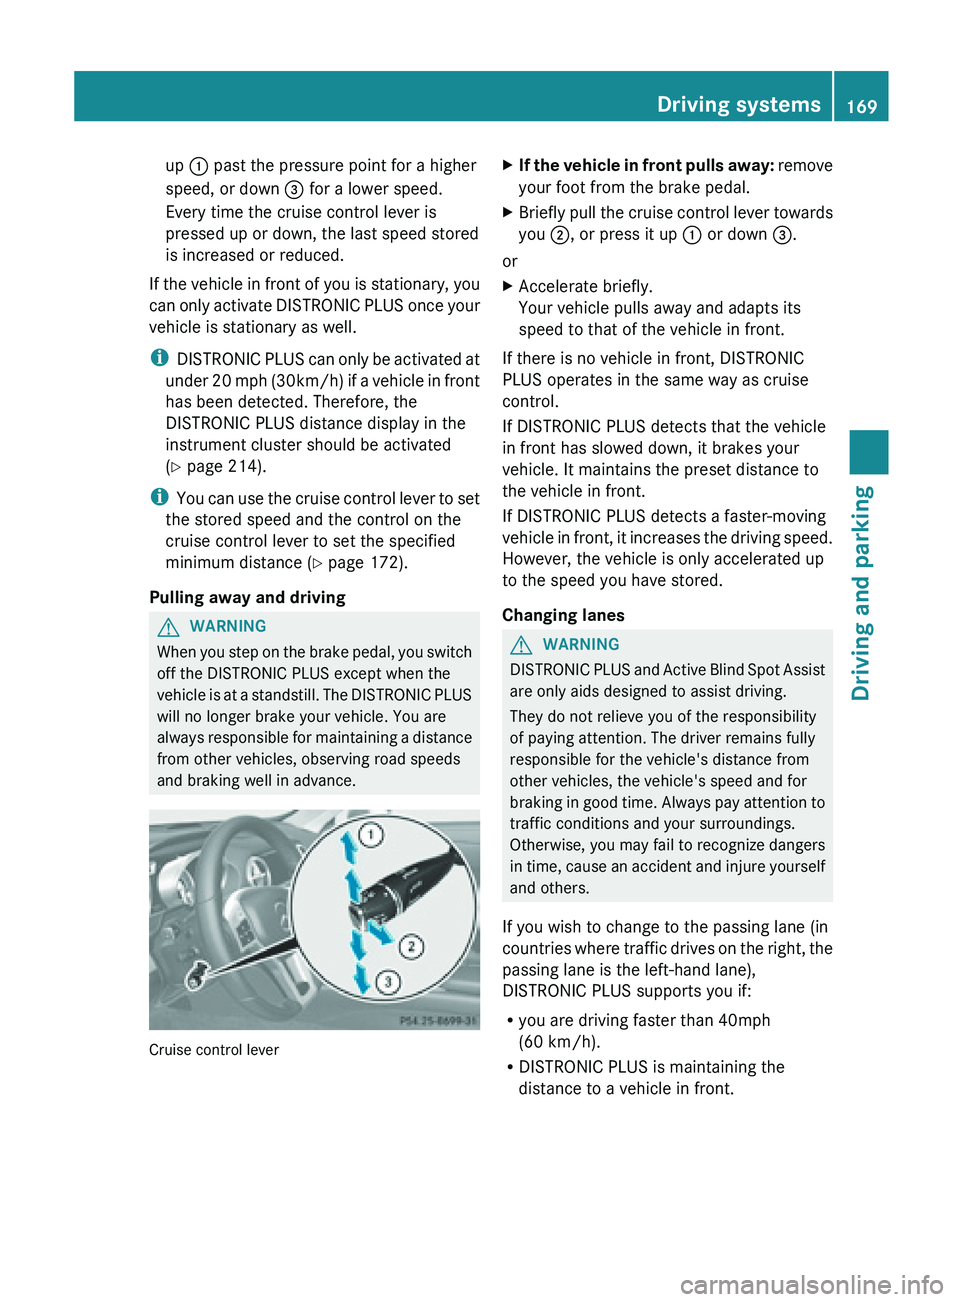
up
: past the pressure point for a higher
speed, or down = for a lower speed.
Every time the cruise control lever is
pressed up or down, the last speed stored
is increased or reduced.
If the vehicle in front of you is stationary, you
can only
activate DISTRONIC PLUS once your
vehicle is stationary as well.
i DISTRONIC PLUS can only be activated at
under 20 mph (30km/h) if a vehicle in front
has been detected. Therefore, the
DISTRONIC PLUS distance display in the
instrument cluster should be activated
(Y page 214).
i You can use the cruise control lever to set
the stored speed and the control on the
cruise control lever to set the specified
minimum distance (Y page 172).
Pulling away and driving G
WARNING
When you step on the brake pedal, you switch
off the DISTRONIC PLUS except when the
vehicle is
at a standstill. The DISTRONIC PLUS
will no longer brake your vehicle. You are
always responsible for maintaining a distance
from other vehicles, observing road speeds
and braking well in advance. Cruise control lever X
If the vehicle in front pulls away: remove
your foot from the brake pedal.
X Briefly
pull the cruise control lever towards
you ;, or press it up : or down =.
or
X Accelerate briefly.
Your vehicle pulls away and adapts its
speed to that of the vehicle in front.
If there is no vehicle in front, DISTRONIC
PLUS operates in the same way as cruise
control.
If DISTRONIC PLUS detects that the vehicle
in front has slowed down, it brakes your
vehicle. It maintains the preset distance to
the vehicle in front.
If DISTRONIC PLUS detects a faster-moving
vehicle in
front, it increases the driving speed.
However, the vehicle is only accelerated up
to the speed you have stored.
Changing lanes G
WARNING
DISTRONIC PLUS and Active Blind Spot Assist
are only aids designed to assist driving.
They do not relieve you of the responsibility
of paying attention. The driver remains fully
responsible for the vehicle's distance from
other vehicles, the vehicle's speed and for
braking in
good time. Always pay attention to
traffic conditions and your surroundings.
Otherwise, you may fail to recognize dangers
in time, cause an accident and injure yourself
and others.
If you wish to change to the passing lane (in
countries where traffic drives on the right, the
passing lane is the left-hand lane),
DISTRONIC PLUS supports you if:
R you are driving faster than 40mph
(60 km/h).
R DISTRONIC PLUS is maintaining the
distance to a vehicle in front. Driving systems
169
Driving and parking Z
Page 174 of 572
Setting the specified minimum distance
G
WARNING
It is up to the driver to exercise discretion to
select the appropriate setting given road
conditions, traffic, driver's preferred driving
style and applicable laws and driving
recommendations for
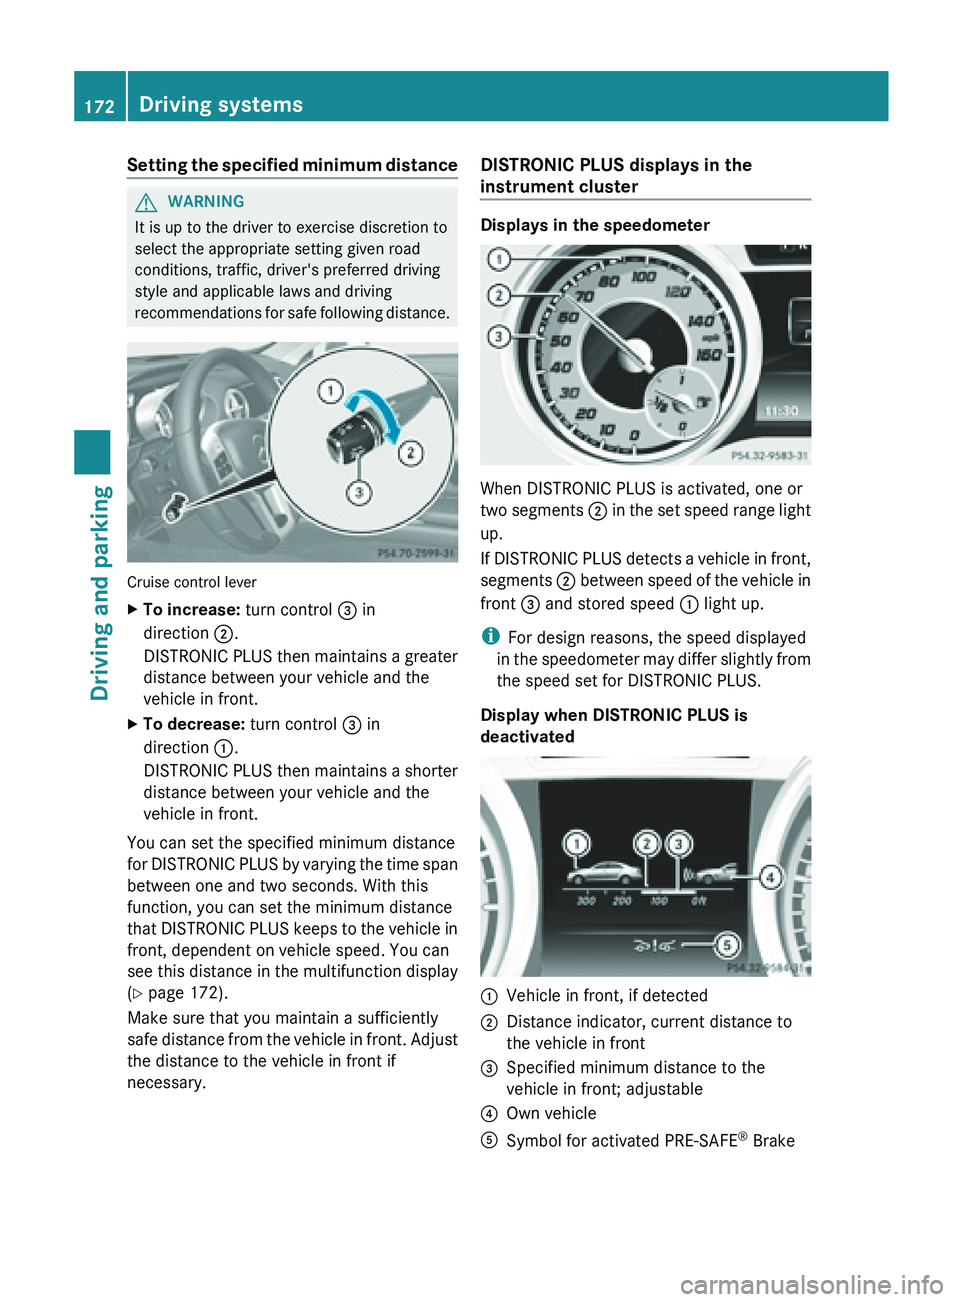
safe following distance.Cruise control lever
X
To increase: turn control = in
direction ;.
DISTRONIC PLUS
then maintains a greater
distance between your vehicle and the
vehicle in front.
X To decrease: turn control = in
direction :.
DISTRONIC PLUS
then maintains a shorter
distance between your vehicle and the
vehicle in front.
You can set the specified minimum distance
for DISTRONIC
PLUS by varying the time span
between one and two seconds. With this
function, you can set the minimum distance
that DISTRONIC PLUS keeps to the vehicle in
front, dependent on vehicle speed. You can
see this distance in the multifunction display
(Y page 172).
Make sure that you maintain a sufficiently
safe distance from the vehicle in front. Adjust
the distance to the vehicle in front if
necessary. DISTRONIC PLUS displays in the
instrument cluster Displays in the speedometer
When DISTRONIC PLUS is activated, one or
two
segments ;
in the set speed range light
up.
If DISTRONIC PLUS detects a vehicle in front,
segments ; between speed of the vehicle in
front = and stored speed : light up.
i For design reasons, the speed displayed
in the speedometer may differ slightly from
the speed set for DISTRONIC PLUS.
Display when DISTRONIC PLUS is
deactivated :
Vehicle in front, if detected
; Distance indicator, current distance to
the vehicle in front
= Specified minimum distance to the
vehicle in front; adjustable
? Own vehicle
A Symbol for activated PRE-SAFE ®
Brake 172
Driving systems
Driving and parking