instrument cluster MERCEDES-BENZ SL-CLASS ROADSTER 2013 User Guide
[x] Cancel search | Manufacturer: MERCEDES-BENZ, Model Year: 2013, Model line: SL-CLASS ROADSTER, Model: MERCEDES-BENZ SL-CLASS ROADSTER 2013Pages: 572, PDF Size: 9.23 MB
Page 63 of 572
R
ESP ®
still provides support when you
brake.
R engine torque is not limited and the drive
wheels are able to spin. The spinning
wheels produce a cutting effect for better
traction.
Deactivating/activating ESP ®
(AMG
vehicles) Activating/deactivating SPORT handling
mode
G
WARNING
When SPORT handling mode is activated,
there is a greater risk of skidding and
accidents.
Only activate SPORT handling mode in the
situations described in the following. X
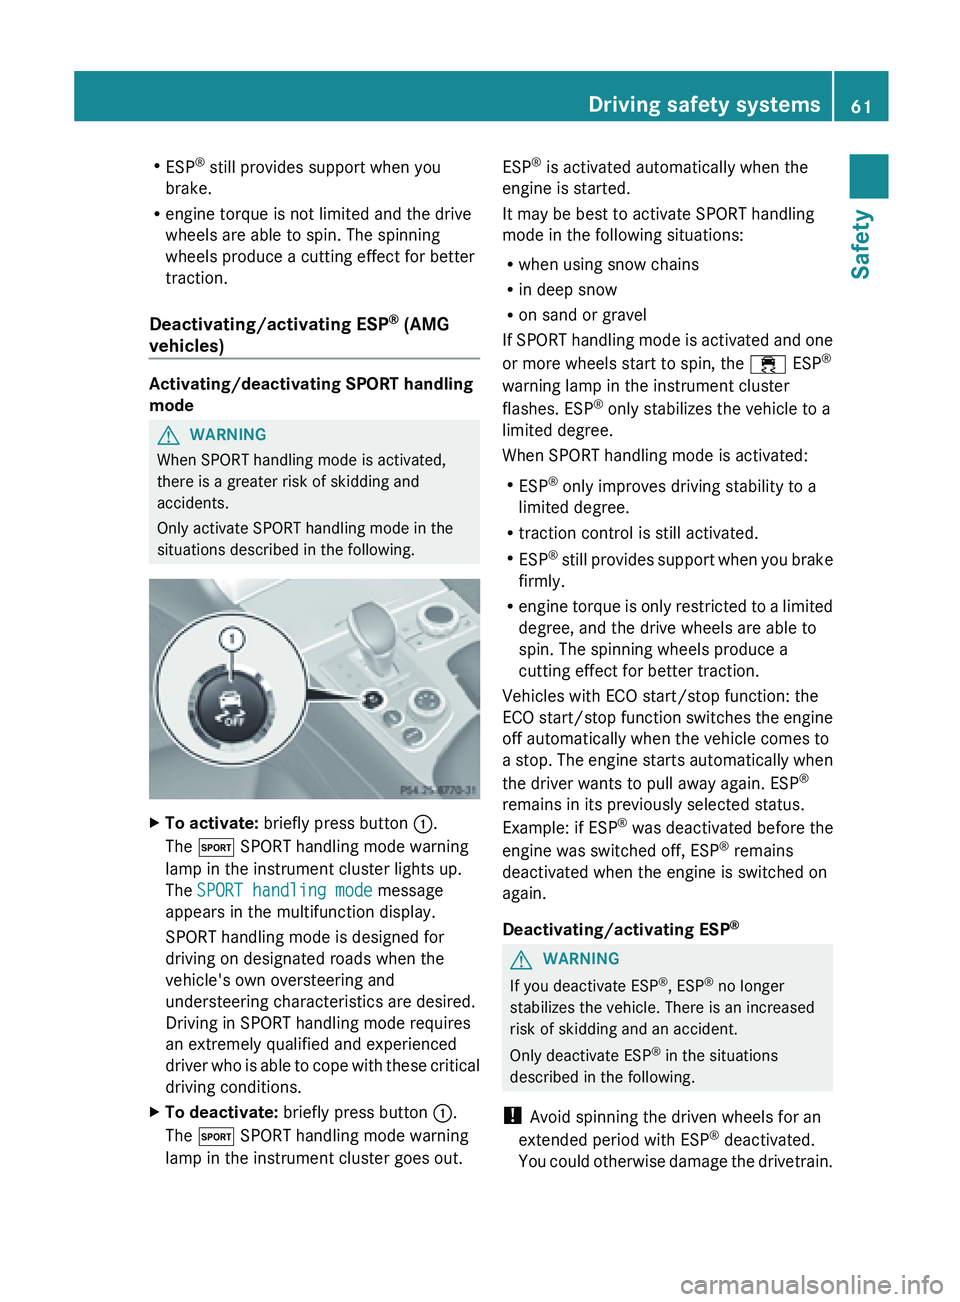
To activate: briefly press button :.
The M SPORT handling mode warning
lamp in the instrument cluster lights up.
The SPORT handling mode message
appears in the multifunction display.
SPORT handling mode is designed for
driving on designated roads when the
vehicle's own oversteering and
understeering characteristics are desired.
Driving in SPORT handling mode requires
an extremely qualified and experienced
driver who
is able to cope with these critical
driving conditions.
X To deactivate: briefly press button :.
The M SPORT handling mode warning
lamp in the instrument cluster goes out. ESP
®
is activated automatically when the
engine is started.
It may be best to activate SPORT handling
mode in the following situations:
R when using snow chains
R in deep snow
R on sand or gravel
If SPORT
handling mode is activated and one
or more wheels start to spin, the ÷ ESP ®
warning lamp in the instrument cluster
flashes. ESP ®
only stabilizes the vehicle to a
limited degree.
When SPORT handling mode is activated:
R ESP ®
only improves driving stability to a
limited degree.
R traction control is still activated.
R ESP ®
still provides support when you brake
firmly.
R engine torque is only restricted to a limited
degree, and the drive wheels are able to
spin. The spinning wheels produce a
cutting effect for better traction.
Vehicles with ECO start/stop function: the
ECO start/stop function switches the engine
off automatically when the vehicle comes to
a stop. The engine starts automatically when
the driver wants to pull away again. ESP ®
remains in its previously selected status.
Example: if ESP ®
was deactivated before the
engine was switched off, ESP ®
remains
deactivated when the engine is switched on
again.
Deactivating/activating ESP ® G
WARNING
If you deactivate ESP ®
, ESP ®
no longer
stabilizes the vehicle. There is an increased
risk of skidding and an accident.
Only deactivate ESP ®
in the situations
described in the following.
! Avoid spinning the driven wheels for an
extended period with ESP ®
deactivated.
You could
otherwise damage the drivetrain. Driving safety systems
61
Safety Z
Page 64 of 572
X
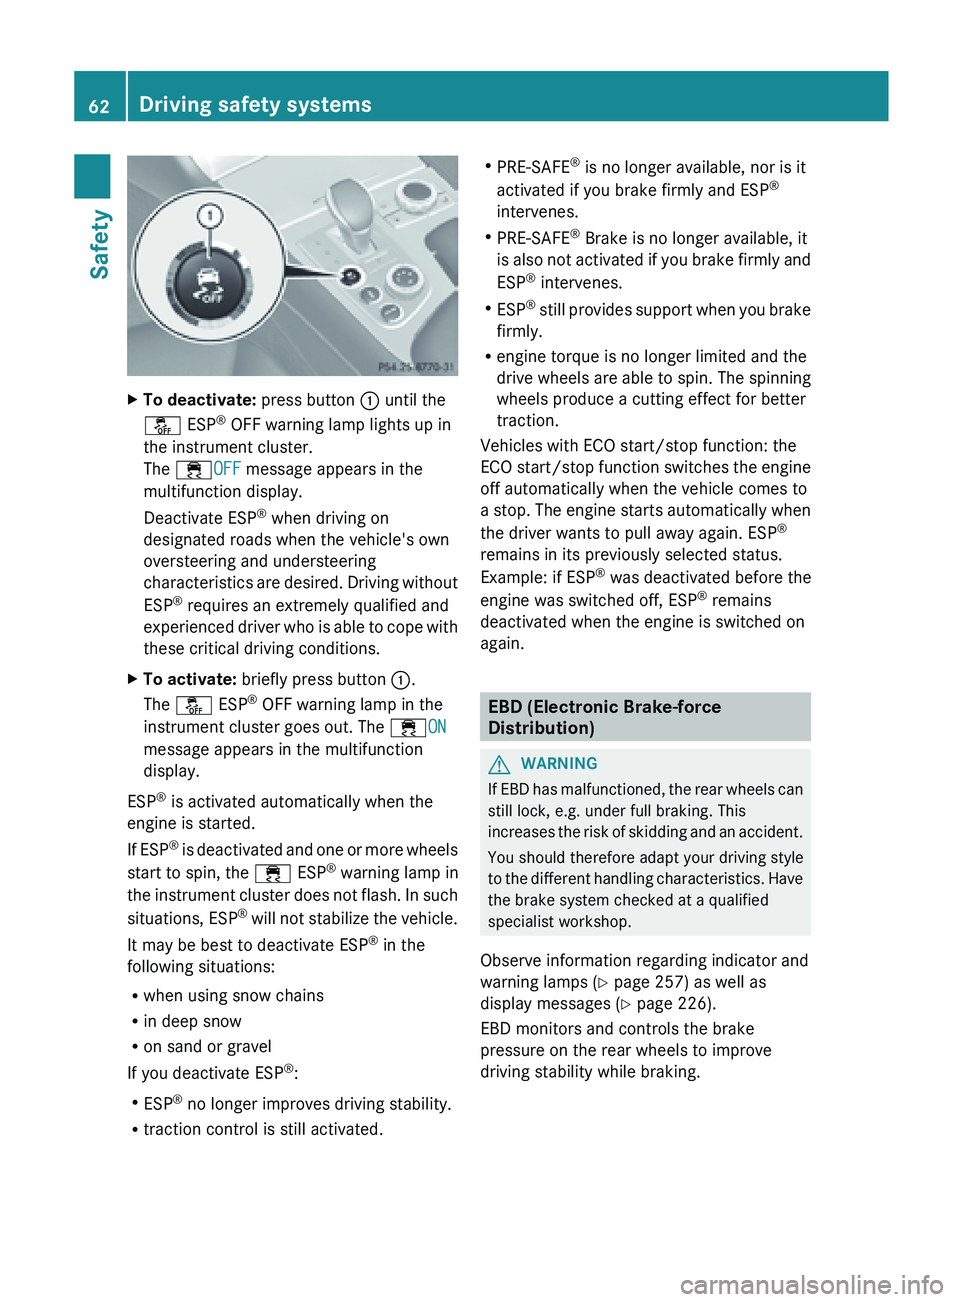
To deactivate: press button : until the
å ESP ®
OFF warning lamp lights up in
the instrument cluster.
The ÷OFF message appears in the
multifunction display.
Deactivate ESP ®
when driving on
designated roads when the vehicle's own
oversteering and understeering
characteristics are
desired. Driving without
ESP ®
requires an extremely qualified and
experienced driver who is able to cope with
these critical driving conditions.
X To activate: briefly press button :.
The å ESP ®
OFF warning lamp in the
instrument cluster goes out. The ÷ON
message appears in the multifunction
display.
ESP ®
is activated automatically when the
engine is started.
If ESP ®
is deactivated and one or more wheels
start to spin, the ÷ ESP®
warning lamp in
the instrument cluster does not flash. In such
situations, ESP ®
will not stabilize the vehicle.
It may be best to deactivate ESP ®
in the
following situations:
R when using snow chains
R in deep snow
R on sand or gravel
If you deactivate ESP ®
:
R ESP ®
no longer improves driving stability.
R traction control is still activated. R
PRE-SAFE ®
is no longer available, nor is it
activated if you brake firmly and ESP ®
intervenes.
R PRE-SAFE ®
Brake is no longer available, it
is also
not activated if you brake firmly and
ESP ®
intervenes.
R ESP ®
still provides support when you brake
firmly.
R engine torque is no longer limited and the
drive wheels are able to spin. The spinning
wheels produce a cutting effect for better
traction.
Vehicles with ECO start/stop function: the
ECO start/stop function switches the engine
off automatically when the vehicle comes to
a stop. The engine starts automatically when
the driver wants to pull away again. ESP ®
remains in its previously selected status.
Example: if ESP ®
was deactivated before the
engine was switched off, ESP ®
remains
deactivated when the engine is switched on
again. EBD (Electronic Brake-force
Distribution)
G
WARNING
If EBD has malfunctioned, the rear wheels can
still lock, e.g. under full braking. This
increases the
risk of skidding and an accident.
You should therefore adapt your driving style
to the different handling characteristics. Have
the brake system checked at a qualified
specialist workshop.
Observe information regarding indicator and
warning lamps ( Y page 257) as well as
display messages ( Y page 226).
EBD monitors and controls the brake
pressure on the rear wheels to improve
driving stability while braking. 62
Driving safety systems
Safety
Page 65 of 572
ADAPTIVE BRAKE
ADAPTIVE BRAKE enhances braking safety
and offers increased braking comfort. In
addition to the braking function, ADAPTIVE
BRAKE also has the HOLD function
( Y page 176) and hill start assist
(Y page 138). PRE-SAFE
®
Brake
PRE-SAFE ®
Brake
is only available in vehicles
with DISTRONIC PLUS.
PRE-SAFE ®
Brake can help you to minimize
the risk of a collision with a vehicle ahead or
reduce the effects of such a collision. If PRE-
SAFE ®
Brake has detected a risk of collision,
you will be warned visually and acoustically
as well as by automatic braking. PRE-SAFE ®
Brake cannot prevent a collision without your
intervention.
Starting at a speed of around
4 mph (7 km/h), this function warns you if
you very quickly approach a vehicle in front.
An intermittent warning tone will then sound
and the · distance warning lamp will light
up in the instrument cluster.
X Brake immediately in order to increase the
distance from the vehicle in front.
or
X Take evasive action provided it is safe to do
so.
From a speed of approximately
4 mph (
7 km/h), if the driver and passengers
have fastened their seat belts, PRE-SAFE ®
Brake can brake the vehicle automatically at
speeds up to approximately
124 mph (200 km/h).
Due to the nature of the system, particularly
complicated driving conditions may cause
unnecessary warnings or the unnecessary
intervention of PRE-SAFE ®
Brake. You can end PRE-SAFE
®
Brake
intervention in
a non-critical driving situation at any time by:
R depressing the accelerator pedal further
R activating kickdown
R releasing the brake pedal.
The braking action of PRE-SAFE ®
Brake is
ended automatically if:
R you maneuver to avoid the obstacle.
R there is no longer any danger of a rear-end
collision.
R there is no longer an obstacle detected in
front of your vehicle.
With the help of the radar sensor system,
PRE-SAFE ®
Brake can detect obstacles that
are in front of your vehicle for an extended
period of time.
At speeds up to approximately
40 mph (70 km/h), PRE-SAFE ®
Brake can
also detect stationary obstacles such as
stopped or parked vehicles.
If you approach an obstacle and PRE-SAFE ®
Brake detects a risk of a collision, the system
will alert you both visually and acoustically. If
you do not brake or take evasive action, the
system will warn you by automatically braking
the vehicle gently. If there is an increased risk
of collision, preventative passenger
protection measures (PRE-SAFE ®
) are
activated (Y page 48).
If, at speeds over 20 mph (30 km/h), a risk
of collision remains and you do not brake,
take evasive action or significantly
accelerate, automatic braking may be
performed up to a level of automatic
emergency braking. Automatic emergency
braking is not performed until immediately
prior to an accident that can no longer be
avoided. G
WARNING
PRE-SAFE ®
Brake will initially brake your
vehicle by a partial application of the brakes
if a
danger of collision is detected. There may
be a collision unless you also brake. Driving safety systems
63
Safety
Z
Page 98 of 572
Useful information
i This Operator's Manual describes all
models and all standard and optional
equipment of your vehicle available at the
time of publication of the Operator's
Manual. Country-specific differences are
possible. Please
note that your vehicle may
not be equipped with all features
described. This also applies to safety-
related systems and functions.
i Read the information on qualified
specialist workshops: ( Y page 31).Correcting the driver's seat position
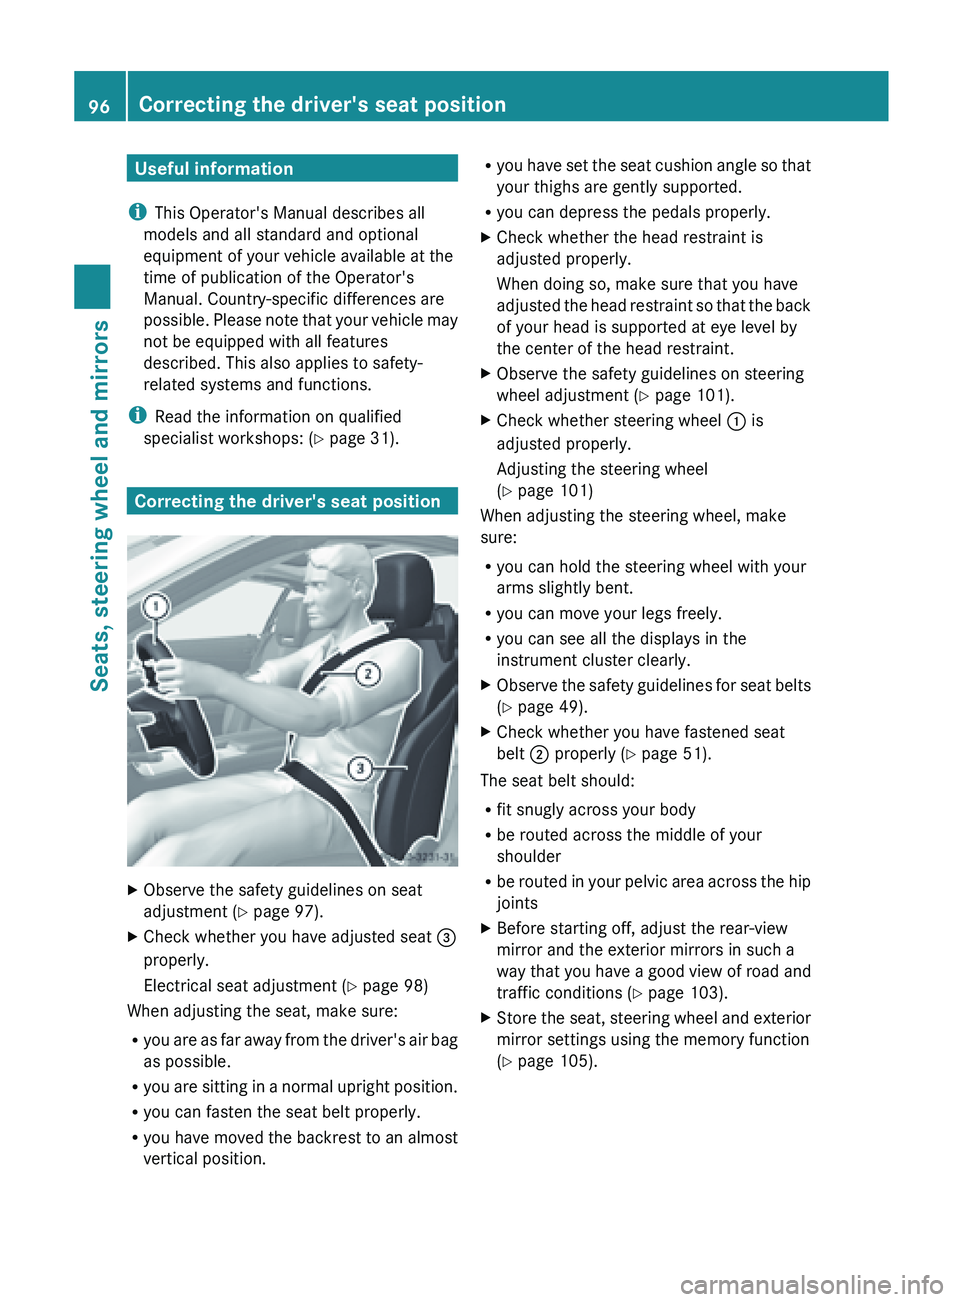
X
Observe the safety guidelines on seat
adjustment ( Y
page 97).
X Check whether you have adjusted seat =
properly.
Electrical seat adjustment ( Y page 98)
When adjusting the seat, make sure:
R you are
as far away from the driver's air bag
as possible.
R you are sitting in a normal upright position.
R you can fasten the seat belt properly.
R you have moved the backrest to an almost
vertical position. R
you have
set the seat cushion angle so that
your thighs are gently supported.
R you can depress the pedals properly.
X Check whether the head restraint is
adjusted properly.
When doing so, make sure that you have
adjusted the
head restraint so that the back
of your head is supported at eye level by
the center of the head restraint.
X Observe the safety guidelines on steering
wheel adjustment ( Y page 101).
X Check whether steering wheel : is
adjusted properly.
Adjusting the steering wheel
(Y page 101)
When adjusting the steering wheel, make
sure:
R you can hold the steering wheel with your
arms slightly bent.
R you can move your legs freely.
R you can see all the displays in the
instrument cluster clearly.
X Observe the safety guidelines for seat belts
(Y page 49).
X Check whether you have fastened seat
belt ; properly (Y
page 51).
The seat belt should:
R fit snugly across your body
R be routed across the middle of your
shoulder
R be routed
in your pelvic area across the hip
joints
X Before starting off, adjust the rear-view
mirror and the exterior mirrors in such a
way that
you have a good view of road and
traffic conditions (Y page 103).
X Store the seat, steering wheel and exterior
mirror settings using the memory function
(Y page 105).96
Correcting the driver's seat position
Seats, steering wheel and mirrors
Page 110 of 572
Useful information
i This Operator's Manual describes all
models and all standard and optional
equipment of your vehicle available at the
time of publication of the Operator's
Manual. Country-specific differences are
possible. Please
note that your vehicle may
not be equipped with all features
described. This also applies to safety-
related systems and functions.
i Read the information on qualified
specialist workshops: ( Y page 31).Exterior lighting
Important safety notes
For reasons of safety, Mercedes-Benz
recommends that you drive with the lights
switched on
even during the daytime. In some
countries, operation of the headlamps varies
due to legal requirements and self-imposed
obligations. Driving abroad
Conversion to symmetrical low beam Switch the headlamps to symmetrical low
beam in countries in which traffic drives on
the
opposite
side of the road from the country
where the vehicle is registered. This prevents
glare to oncoming traffic. When using
symmetrical lights, the edge of the road is not
lit as widely and as far ahead as normal.
Have the headlamps converted at a qualified
specialist workshop as close to the border as
possible before driving in these countries.
Conversion to asymmetrical low beam
after returning Have the headlamps converted back to
asymmetrical low-beam headlamps at a
qualified specialist workshop as soon as
possible after crossing the border again. Light switch
Operation !
If the battery has been excessively
discharged, the parking lamps or standing
lamps are automatically switched off to
enable the next engine start. Always park
your vehicle safely and sufficiently lit
according to legal standards. Avoid the
continuous use of the
T parking lamps
for several
hours. If possible, switch on the
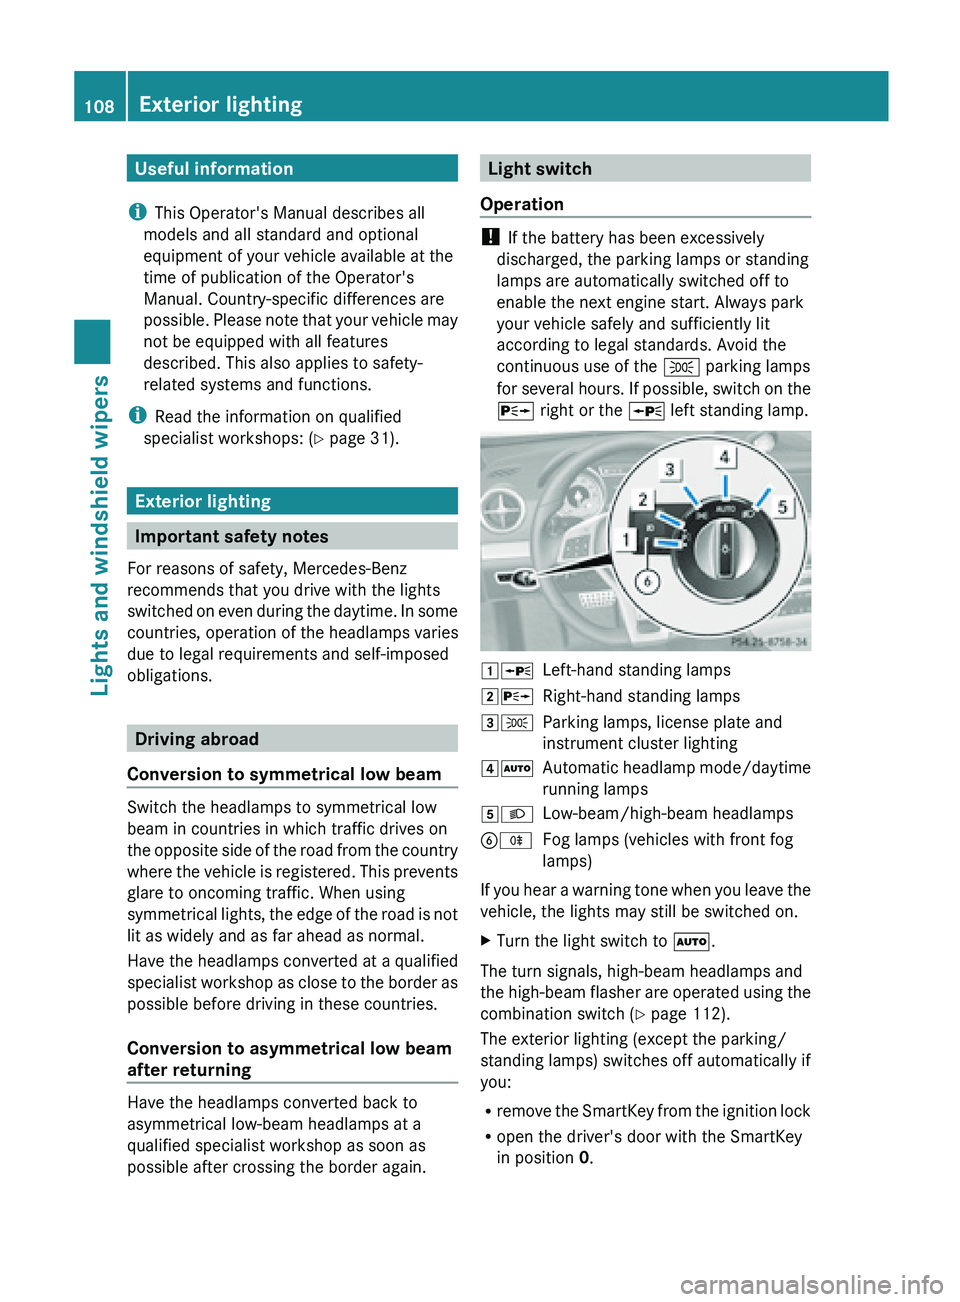
X right or the W left standing lamp. 1
W
Left-hand standing lamps
2X Right-hand standing lamps
3T Parking lamps, license plate and
instrument cluster lighting
4Ã Automatic headlamp mode/daytime
running lamps
5L Low-beam/high-beam headlamps
BR Fog lamps (vehicles with front fog
lamps)
If you hear a warning tone when you leave the
vehicle, the lights may still be switched on.
X Turn the light switch to Ã.
The turn signals, high-beam headlamps and
the high-beam
flasher are operated using the
combination switch (Y page 112).
The exterior lighting (except the parking/
standing lamps) switches off automatically if
you:
R remove the SmartKey from the ignition lock
R open the driver's door with the SmartKey
in position 0.108
Exterior lighting
Lights and windshield wipers
Page 111 of 572
Low-beam headlamps
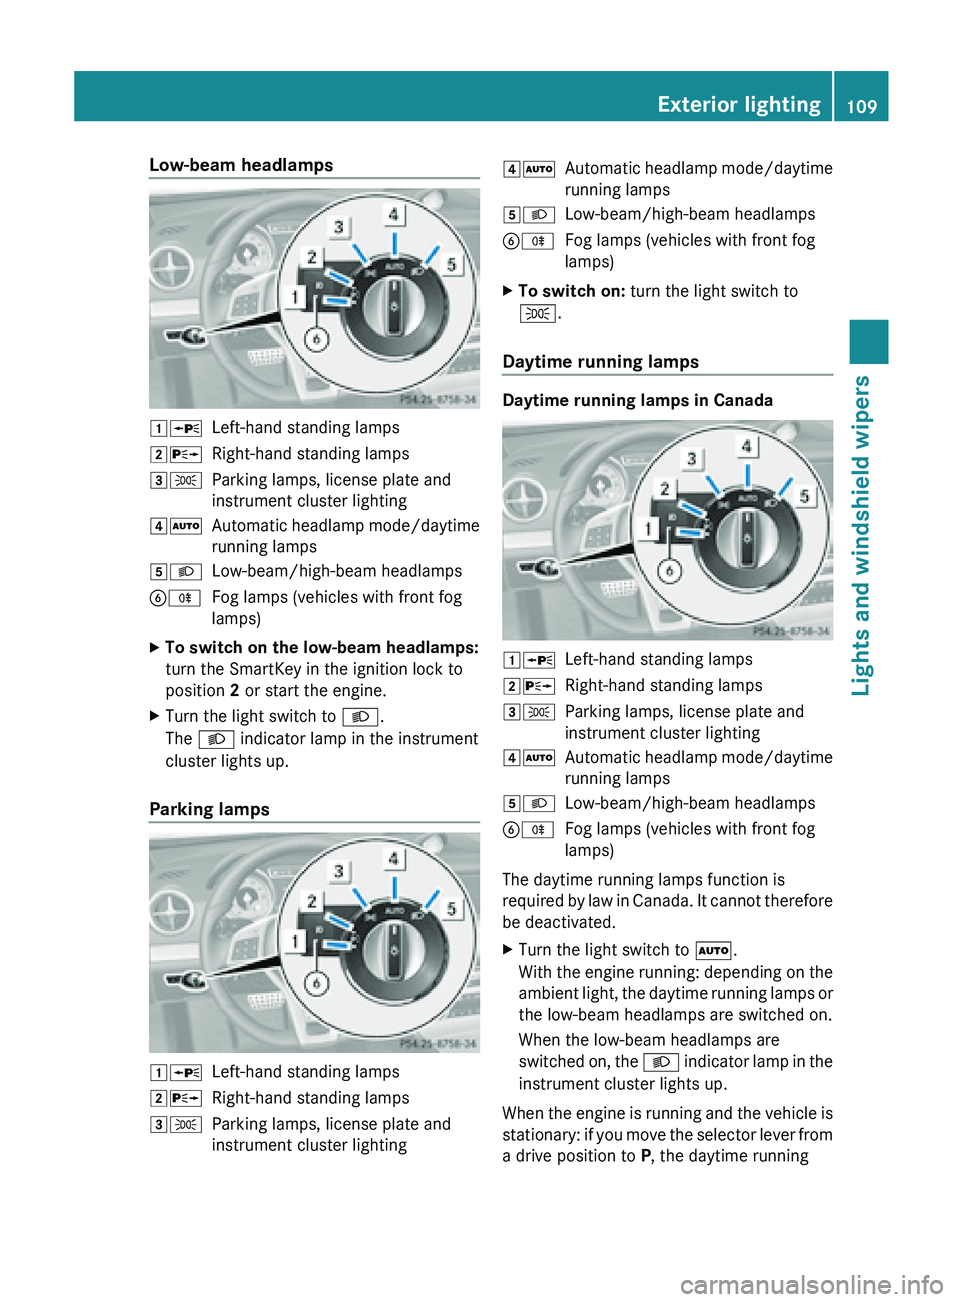
1W
Left-hand standing lamps
2X Right-hand standing lamps
3T Parking lamps, license plate and
instrument cluster lighting
4Ã Automatic headlamp mode/daytime
running lamps
5L Low-beam/high-beam headlamps
BR Fog lamps (vehicles with front fog
lamps)
X To switch on the low-beam headlamps:
turn the SmartKey in the ignition lock to
position 2 or start the engine.
X Turn the light switch to L.
The L indicator lamp in the instrument
cluster lights up.
Parking lamps 1W
Left-hand standing lamps
2X Right-hand standing lamps
3T Parking lamps, license plate and
instrument cluster lighting 4Ã
Automatic headlamp mode/daytime
running lamps
5L Low-beam/high-beam headlamps
BR Fog lamps (vehicles with front fog
lamps)
X To switch on: turn the light switch to
T.
Daytime running lamps Daytime running lamps in Canada
1W
Left-hand standing lamps
2X Right-hand standing lamps
3T Parking lamps, license plate and
instrument cluster lighting
4Ã Automatic headlamp mode/daytime
running lamps
5L Low-beam/high-beam headlamps
BR Fog lamps (vehicles with front fog
lamps)
The daytime running lamps function is
required by
law in Canada. It cannot therefore
be deactivated.
X Turn the light switch to Ã.
With the
engine running: depending on the
ambient light, the daytime running lamps or
the low-beam headlamps are switched on.
When the low-beam headlamps are
switched on, the L indicator lamp in the
instrument cluster lights up.
When the engine is running and the vehicle is
stationary: if
you move the selector lever from
a drive position to P, the daytime running Exterior lighting
109
Lights and windshield wipers
Page 112 of 572
lamps/low-beam headlamps go out after
three minutes.
When the engine is running, the vehicle is
stationary and in high ambient light
brightness: if you turn the light switch
to T, the daytime running lamps and the
parking lamps are switched on.
If
the
engine is running and you turn the light
switch to L, the manual settings take
precedence over the daytime running lamps.
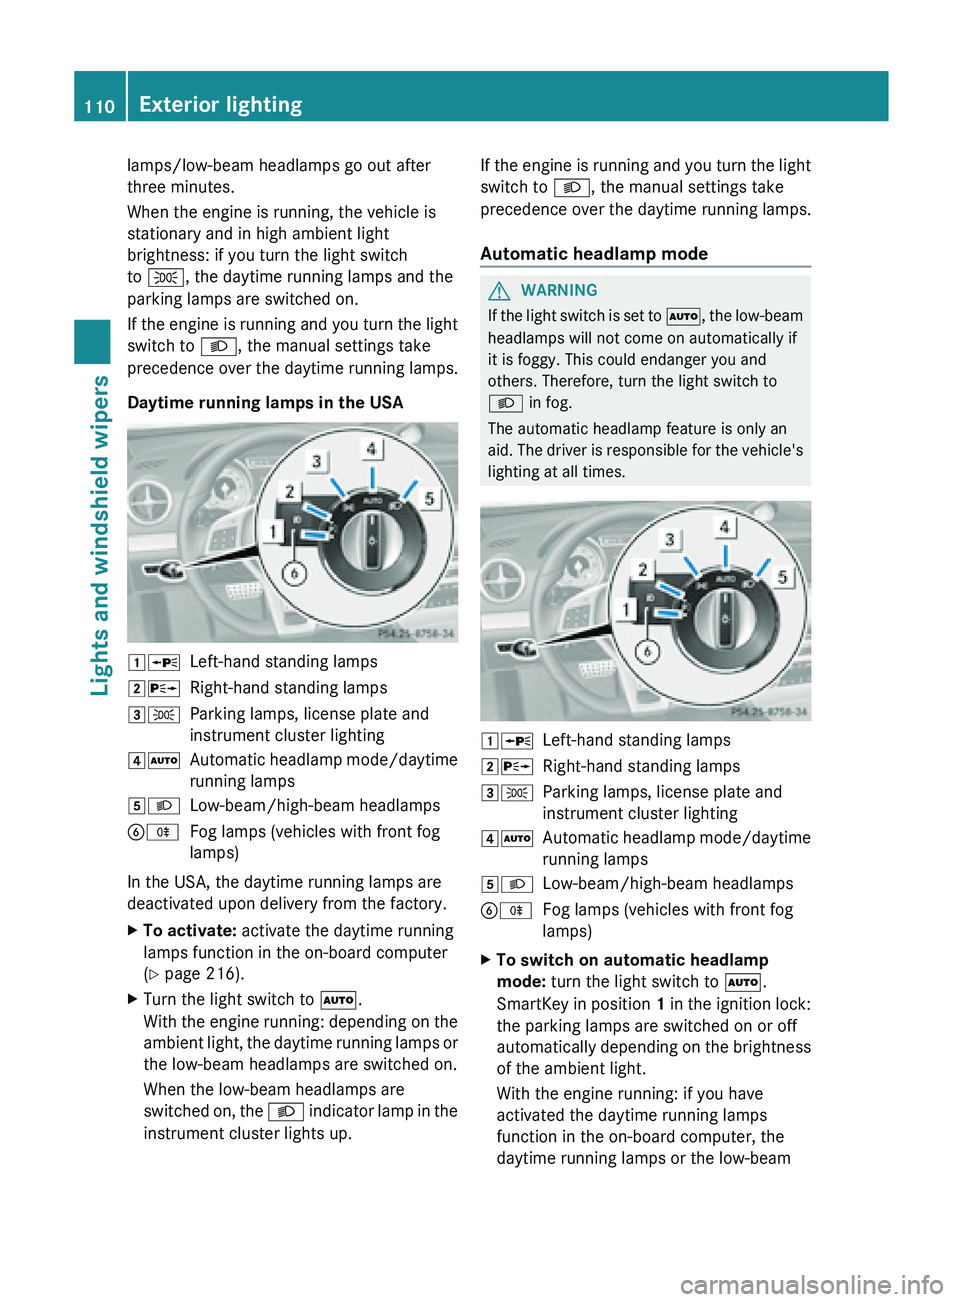
Daytime running lamps in the USA 1W
Left-hand standing lamps
2X Right-hand standing lamps
3T Parking lamps, license plate and
instrument cluster lighting
4Ã Automatic headlamp mode/daytime
running lamps
5L Low-beam/high-beam headlamps
BR Fog lamps (vehicles with front fog
lamps)
In the USA, the daytime running lamps are
deactivated upon delivery from the factory.
X To activate: activate the daytime running
lamps function in the on-board computer
(Y page 216).
X Turn the light switch to Ã.
With the
engine running: depending on the
ambient light, the daytime running lamps or
the low-beam headlamps are switched on.
When the low-beam headlamps are
switched on, the L indicator lamp in the
instrument cluster lights up. If the engine is running and you turn the light
switch to L, the manual settings take
precedence over the daytime running lamps.
Automatic headlamp mode
G
WARNING
If the light switch is set to Ã,
the
low-beam
headlamps will not come on automatically if
it is foggy. This could endanger you and
others. Therefore, turn the light switch to
L in fog.
The automatic headlamp feature is only an
aid. The driver is responsible for the vehicle's
lighting at all times. 1W
Left-hand standing lamps
2X Right-hand standing lamps
3T Parking lamps, license plate and
instrument cluster lighting
4Ã Automatic headlamp mode/daytime
running lamps
5L Low-beam/high-beam headlamps
BR Fog lamps (vehicles with front fog
lamps)
X To switch on automatic headlamp
mode: turn the light switch to Ã.
SmartKey in
position 1 in the ignition lock:
the parking lamps are switched on or off
automatically depending on the brightness
of the ambient light.
With the engine running: if you have
activated the daytime running lamps
function in the on-board computer, the
daytime running lamps or the low-beam 110
Exterior lighting
Lights and windshield wipers
Page 113 of 572
headlamps are switched on or off
automatically
depending
on the brightness
of the ambient light.
When the low-beam headlamps are
switched on, the L indicator lamp in the
instrument cluster lights up.
Front fog lamps G
WARNING
If you suspect that driving conditions will be
foggy, turn
the light switch to L before you
start your journey. Your vehicle may
otherwise not be visible and you could
endanger yourself and others. 1W
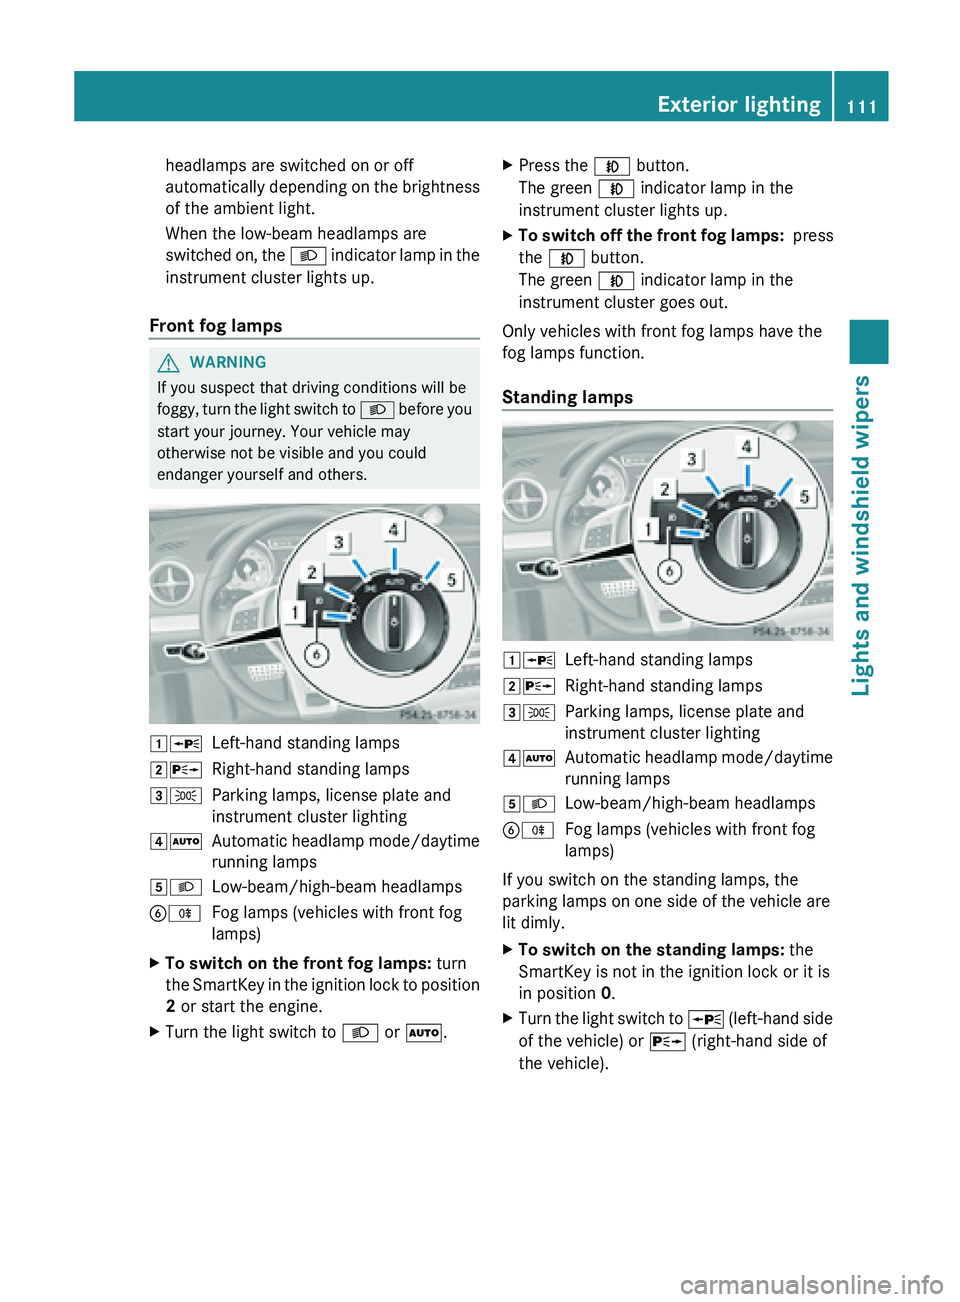
Left-hand standing lamps
2X Right-hand standing lamps
3T Parking lamps, license plate and
instrument cluster lighting
4Ã Automatic headlamp mode/daytime
running lamps
5L Low-beam/high-beam headlamps
BR Fog lamps (vehicles with front fog
lamps)
X To switch on the front fog lamps: turn
the SmartKey
in the ignition lock to position
2 or start the engine.
X Turn the light switch to L or Ã. X
Press the N button.
The green N indicator lamp in the
instrument cluster lights up.
X To switch off the front fog lamps: press
the N button.
The green N indicator lamp in the
instrument cluster goes out.
Only vehicles with front fog lamps have the
fog lamps function.
Standing lamps 1W
Left-hand standing lamps
2X Right-hand standing lamps
3T Parking lamps, license plate and
instrument cluster lighting
4Ã Automatic headlamp mode/daytime
running lamps
5L Low-beam/high-beam headlamps
BR Fog lamps (vehicles with front fog
lamps)
If you switch on the standing lamps, the
parking lamps on one side of the vehicle are
lit dimly.
X To switch on the standing lamps: the
SmartKey is not in the ignition lock or it is
in position 0.
X Turn the light switch to W (left-hand
side
of the vehicle) or X (right-hand side of
the vehicle). Exterior lighting
111
Lights and windshield wipers Z
Page 114 of 572
Combination switch
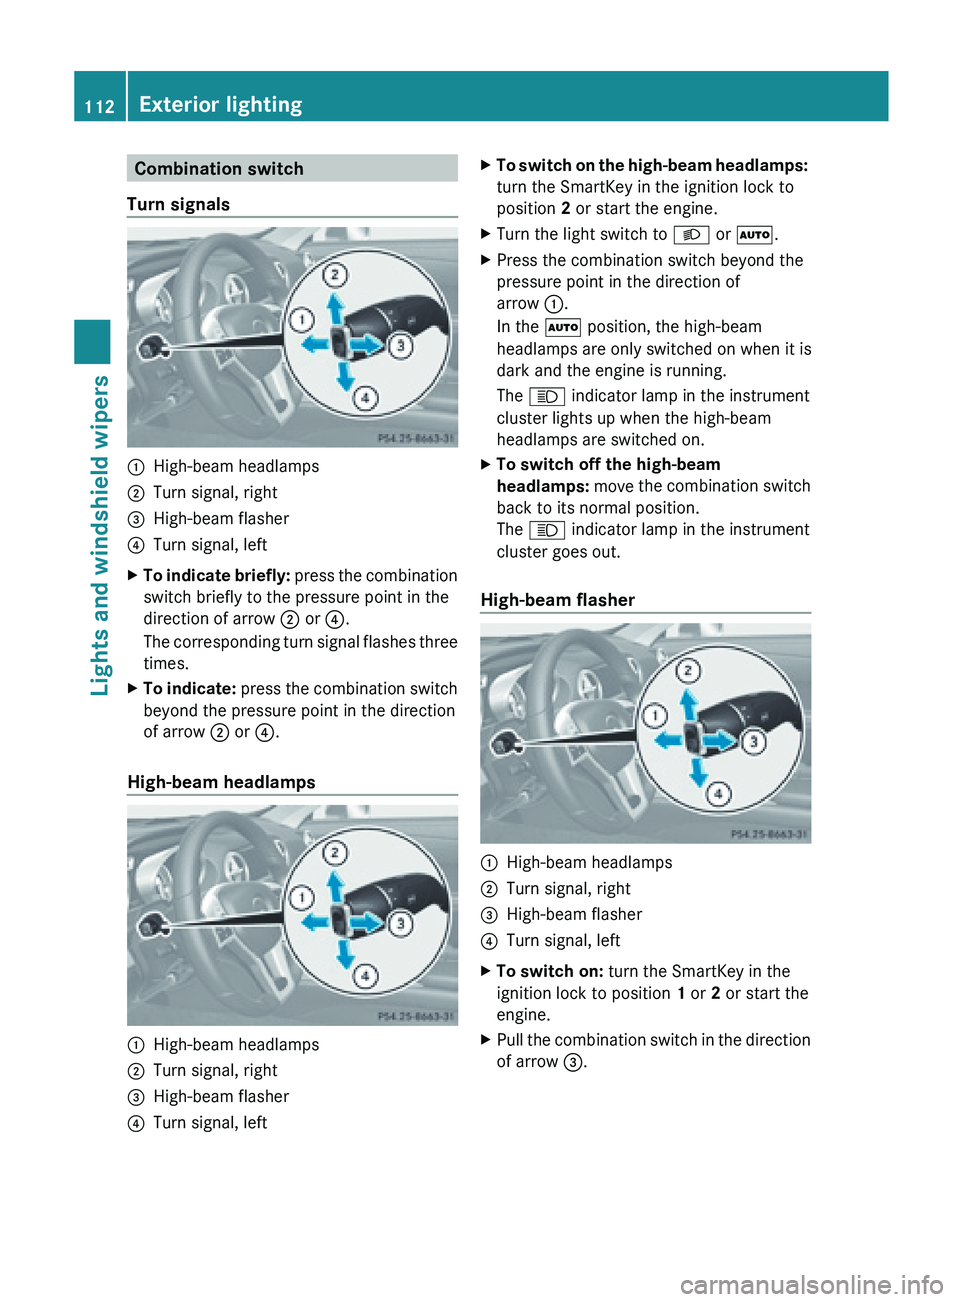
Turn signals :
High-beam headlamps
; Turn signal, right
= High-beam flasher
? Turn signal, left
X To indicate briefly:
press the
combination
switch briefly to the pressure point in the
direction of arrow ; or ?.
The corresponding turn signal flashes three
times.
X To indicate: press the
combination switch
beyond the pressure point in the direction
of arrow ; or ?.
High-beam headlamps :
High-beam headlamps
; Turn signal, right
= High-beam flasher
? Turn signal, left X
To
switch on the high-beam headlamps:
turn the SmartKey in the ignition lock to
position 2 or start the engine.
X Turn the light switch to L or Ã.
X Press the combination switch beyond the
pressure point in the direction of
arrow :.
In the à position, the high-beam
headlamps are only switched on when it is
dark and the engine is running.
The K indicator lamp in the instrument
cluster lights up when the high-beam
headlamps are switched on.
X To switch off the high-beam
headlamps: move the
combination switch
back to its normal position.
The K indicator lamp in the instrument
cluster goes out.
High-beam flasher :
High-beam headlamps
; Turn signal, right
= High-beam flasher
? Turn signal, left
X To switch on: turn the SmartKey in the
ignition lock to position 1
or 2 or start the
engine.
X Pull the combination switch in the direction
of arrow =.112
Exterior lighting
Lights and windshield wipers
Page 117 of 572
Switching Adaptive Highbeam Assist
on/off
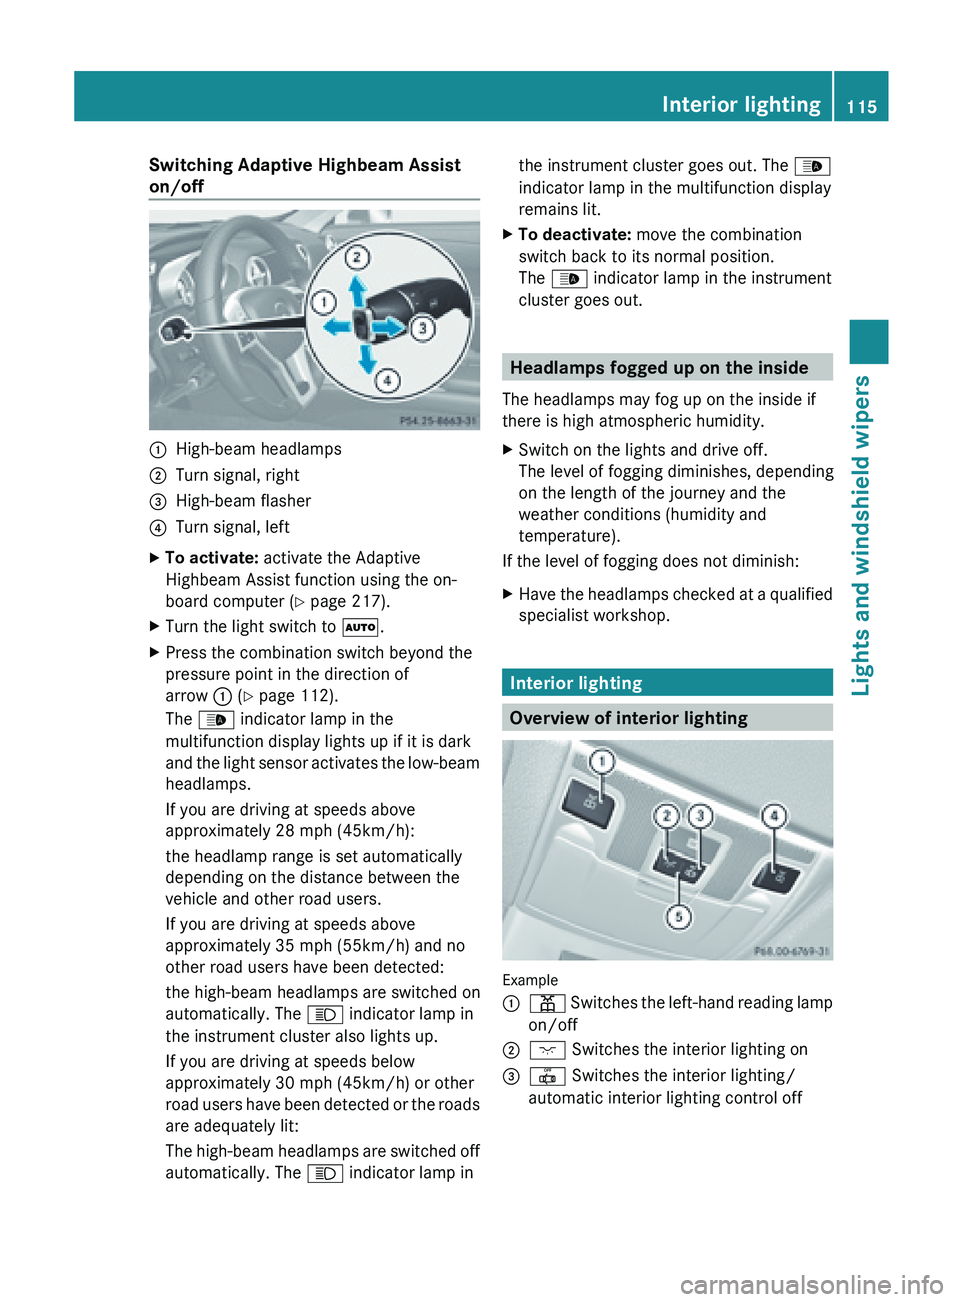
:
High-beam headlamps
; Turn signal, right
= High-beam flasher
? Turn signal, left
X To activate: activate the Adaptive
Highbeam Assist function using the on-
board computer ( Y page 217).
X Turn the light switch to Ã.
X Press the combination switch beyond the
pressure point in the direction of
arrow : (Y page 112).
The _ indicator lamp in the
multifunction display lights up if it is dark
and the
light sensor activates the low-beam
headlamps.
If you are driving at speeds above
approximately 28 mph (45km/h):
the headlamp range is set automatically
depending on the distance between the
vehicle and other road users.
If you are driving at speeds above
approximately 35 mph (55km/h) and no
other road users have been detected:
the high-beam headlamps are switched on
automatically. The K indicator lamp in
the instrument cluster also lights up.
If you are driving at speeds below
approximately 30 mph (45km/h) or other
road users have been detected or the roads
are adequately lit:
The high-beam headlamps are switched off
automatically. The K indicator lamp in the instrument cluster goes out. The
_
indicator lamp in the multifunction display
remains lit.
X To deactivate: move the combination
switch back to its normal position.
The _ indicator lamp in the instrument
cluster goes out. Headlamps fogged up on the inside
The headlamps may fog up on the inside if
there is high atmospheric humidity.
X Switch on the lights and drive off.
The level of fogging diminishes, depending
on the length of the journey and the
weather conditions (humidity and
temperature).
If the level of fogging does not diminish:
X Have the headlamps checked at a qualified
specialist workshop. Interior lighting
Overview of interior lighting
Example
:
p Switches the left-hand reading lamp
on/off
; c
Switches the interior lighting on
= | Switches the interior lighting/
automatic interior lighting control off Interior lighting
115
Lights and windshield wipers Z