ignition MERCEDES-BENZ SL ROADSTER 2008 Owner's Manual
[x] Cancel search | Manufacturer: MERCEDES-BENZ, Model Year: 2008, Model line: SL ROADSTER, Model: MERCEDES-BENZ SL ROADSTER 2008Pages: 317, PDF Size: 5.35 MB
Page 84 of 317
Mirrors
81
Resetting the exterior mirrors If the battery has been disconnected or has
become discharged, the exterior mirrors
must be reset. Otherwise, they wil lnot fold in
whe nyou select the "Fol dinmirrors when
locking" function in the on-board computer
(Y pag e121).
X Make sure that the key is in position 1in
the ignition lock.
X Briefl ypress button 1.
Folding the exterior mirrors in or out
automatically* If the "Fol
dinmirrors whe nlocking" function
is activated in the on-board computer
(Y pag e121):
R The exterior mirrors fold in automatically as
soon as you lock the vehicle from the out-
side.
R The exterior mirrors fold out again auto-
matically as soon as you unlock the vehicle
and then open the driver's or front-
passenger door.
i If you have activated this function and fold
in the exterior mirrors using button 1,they
wil lnot be folded out automatically .You can then only fold out the exterior mirrors
using button
1. Automatic anti-dazzle mirrors
The rear-view mirror and the exterior mirror
on the driver's side automatically go into anti-
dazzle mode if the ignition is switched on and
incident light from headlamps strikes the sen-
sor in the rear-view mirror.
The mirrors do not go into anti-dazzle mode if
reverse gea risengaged or the interior lighting
is switched on. G
Risk of accident
If incident light from the headlamps of other
vehicles is prevented from striking the sen-
sor in the rear-view mirror, for instance if
the draught stop is fitted, the mirror's auto-
matic anti-dazzle function wil lnot operate.
Incident light coul dthen dazzle you .This
may distract you from the traffic conditions,
and you may thereby cause an accident. In
this case, adjust the rear-view mirror man-
ually. Passengers
ide exterior mirror park-
ing position
To make it easier to park, you can store the
front-passenger side exterior mirror position
in such awaythat you can see the rear wheel
on that side as soon as you engag ereverse
gear.
You can store aparking position for the exte-
rior mirror on the front-passenger side using
the memory button.
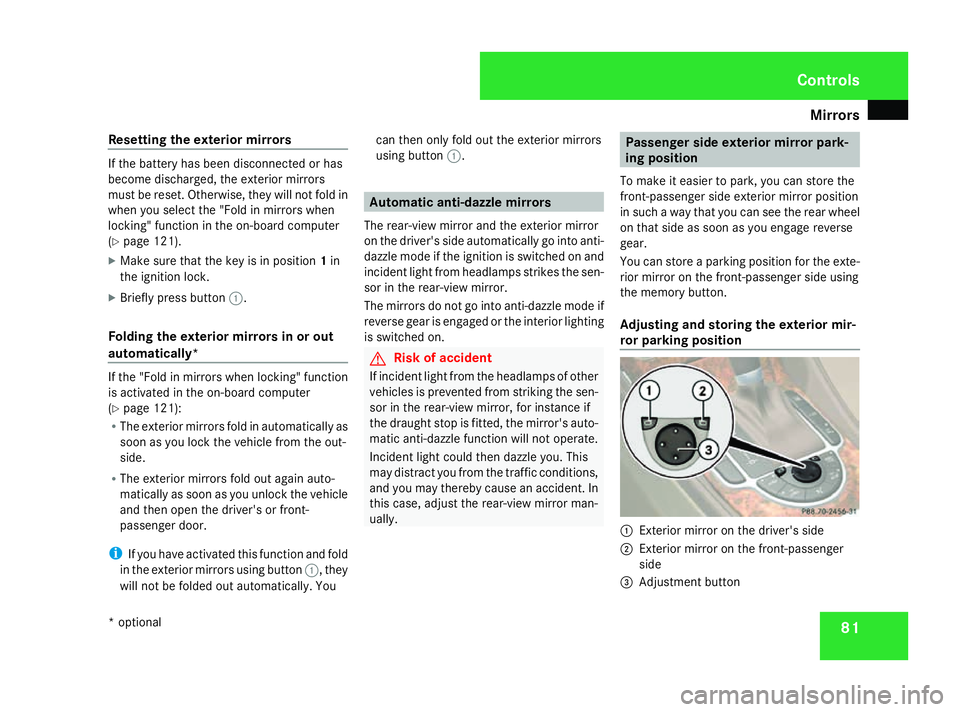
Adjusting and storin gthe exterior mir-
ror parking position 1
Exterior mirror on the driver's side
2 Exterior mirror on the front-passenger
side
3 Adjustment button Controls
*o ptional
230_AKB; 5; 4, en-GB
bjanott,
Version: 2.9.6 2008-04-08T15:09:54+02:00-Seite 81 ZDateiname: 6515_3089_02_buchblock.pdf; preflight
Page 85 of 317
Memory functions
82
X
Make sure that the vehicle is stationary and
that the key is in position 2in the ignition
lock.
X Press button 2for the exterior mirror on
the front-passenger side.
X Use adjustment button 3to adjust the
exterior mirror to aposition which allows
you to see the rear wheel and the kerb.
X Press memory button M(Y pag e82)on
the door control panel.
X Press one of the arrow sonadjustment but-
ton 3withi nthree seconds.
The parking position is stored if the exterior
mirror does not move.
i If the mirror moves out of position, repeat
the steps. You can adjust the exterior mir-
ror again after storing the setting.
Calling up astored parking position set-
ting X
With the key in position 2in the ignition
lock and with exterior mirror on the front-
passenger side 2activated, engage
reverse gear.
Exterior mirror on the front-passenger 2
moves to the stored parking position. The exterior mirror on the front-passenger
side moves back to its original position:
R as soon as you exceed aspee dof
10 km/h
R about ten seconds after you have disen-
gaged reverse gear
R if you press button 1for the exterior mir-
ror on the driver's side Memory functions
Storing settings
You can store up to three different settings
using the memory button.
The following settings are stored as asingle
memory preset:
R position of the seat, backres tand head
restraint
R multi-contour seat*: the backres tside
cushions of the sea tcushion and the back-
rest, contour of the backres tinthe lumbar
and shoulde rregions
R driver's side :steering-whee lposition
R driver's side :position of the exterior mir-
rors on the driver's and front-passenger
sides G
Risk of injury
The memory function can be use dwhent he
key has been removed .For this reason,
children should never be left unsupervised
in the vehicle. They coul dotherwise
become trappe dwhenm oving the sea tor
the steering wheel. Controls
*optional
230_AKB; 5; 4, en-GB
bjanott,
Version: 2.9.6 2008-04-08T15:09:54+02:00-Seite 82 Dateiname: 6515_3089_02_buchblock.pdf; preflight
Page 90 of 317
Lights
87Lights
Light switch
For reason sofsafety, Mercedes-Ben zrecom-
mends that you driv ewith th elight sswitched
on eve ndurin gthe daytime. In som ecoun-
tries, daytime operatio nofheadlamps varies
due to legal requirements and self-imposed
obligations .Inthese countries, th edipped-
beam headlamps are automaticall yswitched
on when th eengineiss tarted.
i If you driv eincountries in whic htraffic
drives on th eopposit eside of th eroad to
th ec ountr ywher ethe vehicle is registered,
oncomin gtraffic may be dazzle dbythe
asymmetrical dipped-beam headlamps.
Hav ethe headlamps changed to symmet-
rical dipped beam when driving in these
countries. You can obtain information
about this from any Mercedes-Ben zService
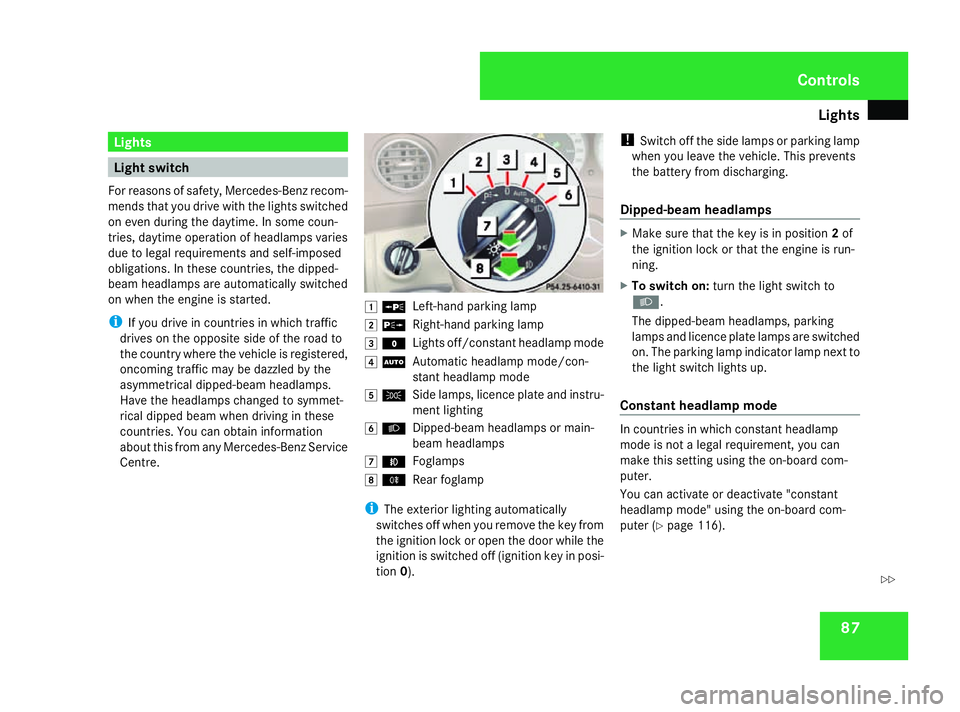
Centre. $
a
Left-han dparking lamp
% g
Right-hand parking lamp
& M
Lightsoff/constan theadlamp mode
( U
Automatic headlamp mode/con-
stant headlamp mode
) C
Side lamps, licence plate and instru-
mentlighting
* B
Dipped-beam headlamps or main-
beam headlamps
, ¥
Foglamps
. †
Rear foglamp
i The exterior lighting automatically
switches off when you remove the key from
the ignition lock or open the door while the
ignition is switched off (ignition key in posi-
tion 0). !
Switch off the side lamps or parking lamp
when you leave the vehicle. This prevents
the battery fro mdischarging.
Dipped-beam headlamps X
Make sure that the key is in position 2of
the ignition lock or that the engin eisrun-
ning.
X To switch on: turnthe light switc hto
B .
The dipped-beam headlamps, parking
lamps and licence plate lamps are switched
on. The parking lamp indicator lamp nex tto
the light switc hlight sup.
Constant headlam pmode In countries in which constant headlamp
mode is not
alegal requirement, you can
make thi ssettin gusing the on-board com-
puter.
You can activat eordeactivat e"constant
headlamp mode" using the on-board com-
puter (Y page 116). Controls
230_AKB; 5; 4, en-GB
bjanott
,V ersion: 2.9.6
2008-04-08T15:09:54+02:00
-Seite 87 ZDateiname: 6515_3089_02_buchblock.pdf; preflight
Page 91 of 317
Lights
88
X
To switch on: turnthe light switch to
M orU.
The dipped-beam headlamps, side lamps
and licenc eplatelamp are switched on
when th eengineisr unning.
i When you tur nthe light switch to any
position other than MorU,t hecor-
respondin glight goes on.
Automatic headlamp mode The side lamps
,dipped-beam headlamps and
licenc eplatelamp are switched on or off
automatically, dependin gonthebrightness of
th ea mbient light. G
Ris
kofa ccident
If th elight switch is set to the Uposi-
tion, th elight will no tcom eona utomati-
cally in foggy conditions. This coul dendan-
ger you and others. Therefore, tur nthe light
switch to Bin thedark or in fog.
The automatic headlam pfeature is only an
aid. The driver is responsible for th evehi-
cle's lighting at all times. G
Ris
kofa ccident
When it is dark or foggy, tur nthe light
switch from UtoB in good time.
Otherwise, th eheadlamps could switch off
temporarily and you could caus eanacci-
dent.
X To switch on: turnthe light switch to
U.
The side lamps are switched on and off
automaticall ywhen th ekeyis in position
1 in th eignition lock.
The dipped-beam headlamps, side lamps
and licenc eplatelamp are switched on
automaticall ywhen th eengineisr unning.
When th eparking lamp or dipped-beam
headlamps are switched on ,the indicator
lamp next to th elight switch light sup.
Fron tfoglamps/Rear foglamp G
Ris
kofa ccident
If you suspect that driving conditions will be
foggy, tur nthe light switch to Bbefore
you start your journey. Otherwise, your
vehicle may no tbevisible and you could
endanger yourself and others. G
Ris
kofa ccident
When it is dark or foggy, tur nthe light
switch from UtoB in good time.
Otherwise, th eheadlamps coul dswitch off
temporarily and you coul dcaus eana cci-
dent.
When th elight switch is set to Uyou can-
no tswitch on th efront or rear foglamp.
X Mak esure that th ekeyis in position 2in
th ei gnition lock.
X To switch on th efront foglamps: turnthe
light switch to the BorC position.
X Pull th elight switch out to th efirst stop.
The ¥ green indicator lamp next to the
light switch light sup.
X To switch on th erearfoglamp: turnthe
light switch to BorC.
X Pull th elight switch out to th esecond
detent.
The † yellow indicator lamp next to the
light switch light sup.
X To switch off th efront foglamps/rear
foglamp: push in thelight switch to the
stop.
The corresponding indicator lamp goes out. Controls
230_AKB
;5;4,en-GB
bjanott ,V ersion: 2.9.6
2008-04-08T15:09:54+02:00
-Seite 88 Dateiname: 6515_3089_02_buchblock.pdf; preflight
Page 93 of 317
Lights
90 Hazard warning lamps
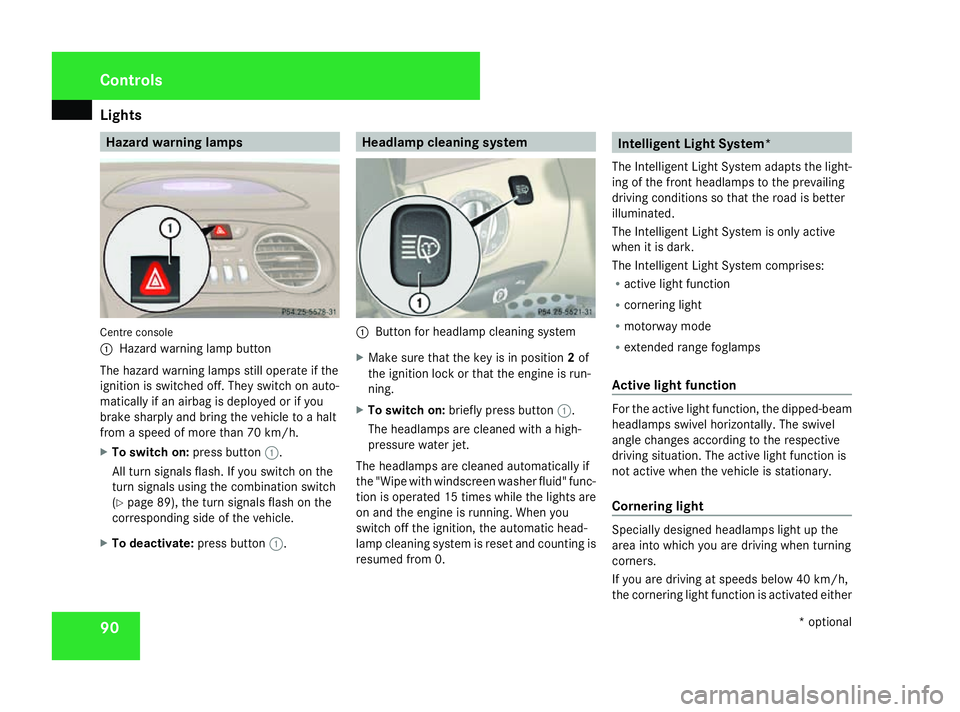
Centre console
1
Hazard warnin glamp button
The hazar dwarnin glamps still operat eifthe
ignition is switched off .They switc honauto-
matically if an airbag is deployed or if you
brak esharply and brin gthe vehicle to ahalt
fro mas peed of more than 70 km/h.
X To switch on: press button1.
All tur nsignals flash. If you switc honthe
tur ns ignals using the combination switch
(Y page 89), the tur nsignals flash on the
correspondin gside of the vehicle.
X To deactivate: press button1. Headlam
pcleaning system 1
Button for headlamp cleaning system
X Make sure that the key is in position 2of
the ignition lock or that the engin eisrun-
ning.
X To switch on: briefly press button 1.
The headlamps are cleaned with ahigh-
pressure water jet.
The headlamps are cleaned automatically if
the "Wipe with windscreen washer fluid" func-
tion is operated 15 times while the light sare
on and the engin eisrunning. When you
switc hoff the ignition, the automatic head-
lamp cleaning system is reset and countin gis
resume dfrom0. Intelligent Light System*
The Intelligent Light System adapts the light-
ing of the front headlamps to the prevailing
driving conditions so that the road is better
illuminated.
The Intelligent Light System is only active
when it is dark.
The Intelligent Light System comprises:
R active light function
R cornering light
R motorway mode
R extended rang efoglamps
Active light function For the active light function
,the dipped-beam
headlamps swivel horizontally. The swivel
angle changes accordin gtothe respective
driving situation .The active light function is
not active when the vehicle is stationary.
Cornering light Specially designed headlamps light up the
area int
owhich you are driving when turning
corners.
If you are driving at speeds below 40 km/h,
the cornering light function is activated either Controls
*optional
230_AKB; 5; 4, en-GB
bjanott
,V ersion: 2.9.6
2008-04-08T15:09:54+02:00
-Seite 90 Dateiname: 6515_3089_02_buchblock.pdf; preflight
Page 95 of 317
Windscreen wipers
92
3
ð To switch the interio rlighting on/off
4 ¤ To switch the automatic interior
lighting control on/off
Automatic interior lighting control
X To switch on or off: slide the¤switch
to the left or right.
The interio rlighting switches on whe nyou:
R unlock the vehicle
R open adoor
R remove the key from the ignition lock
The interio rlighting switches off after adelay.
You can set the delayed switch-off using the
on-board computer (Y page119).
i If the door is left open, the interio rlighting
goes out after approximately five minutes.
Manual control
Interior lighting
X To switch on/off: press theðbutton.
i The setting applie ssimultaneousl ytothe
boot lighting. If you leave the boot lid open,
the boot lighting goes out automatically
after approximately ten minutes. Reading lamps
X To switch on/off: press theXbutton. Windscreen wipers
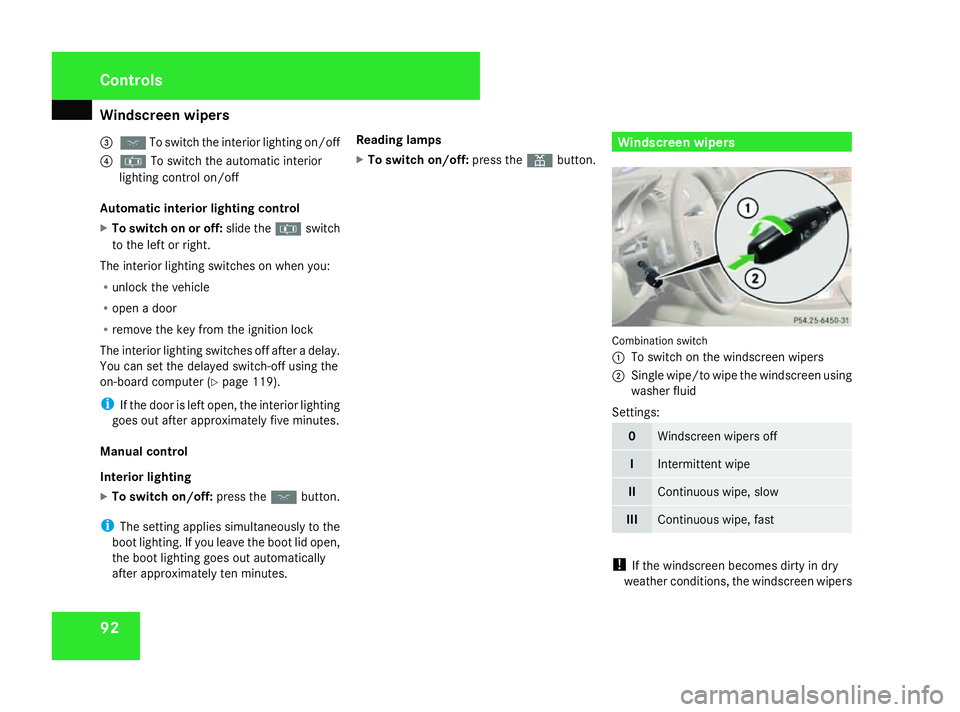
Combinatio
nswitch
1 To switch on the windscreen wipers
2 Singl ewipe/to wipe the windscreen using
washe rfluid
Settings: 0 Windscreen wiper
soff I Intermittent wipe
II Continuous wipe, slow
III Continuous wipe, fast
!
If the windscreen becomes dirty in dry
weathe rconditions, the windscreen wipers Controls
230_AKB; 5; 4, en-GB
bjanott,
Version: 2.9.6 2008-04-08T15:09:54+02:00-Seite 92 Dateiname: 6515_3089_02_buchblock.pdf; preflight
Page 96 of 317
Side windows
93
may be activated inadvertently. This could
then damage the windscreen wiper blades
or scratcht
he windscreen.
For this reason, you should always switch
off the windscreen wipers in dry weather.
X Make sure that the key is in position 1or
2 in the ignition lock.
The various wiper settings can be selected
as follows: Single wipe
X Briefly press the combination switch to the
pressure point in the direction of arrow
2. Wiping with washer fluid
X Press the combination switch beyond the
pressure point in the direction of arrow
2. Intermittent wipe/rain sensor
X Turn the combination switch in the direc-
tion of arrow 1to position I.
The rain sensor is activated. The appropri-
ate wiping frequency is automatically
adjusted according to the intensity of the
rain. Continuous wipe
X Depending on the intensity of the rain, turn
the combination switch in the direction of
arrow 1to position IIor III. Switching off the windscreen wipers
X Turn the combination switch to position 0. Side windows
Opening/closing the side windows
G
Risk of injury
Make sure that nobody can become trap-
ped between the side window and the door
frame as aside window is opened. Do not
touch or lean against the side window dur-
ing the opening procedure. You could
become trapped between the side window
and the door frame as the window moves
down. If there is arisk of becoming trapped,
release the switch immediately or pull the
switch up to close the side window again. G
Risk of injury
Make sure that nobody can become trap-
ped as you close aside window. If there is
ar isk of becoming trapped, release the
switch immediately or push the switch
again to reopen the side window. G
Risk of injury
Children may injure themselves if they open
or close the side windows.
Never leave children unsupervised in the
vehicle. Always take the KEYLESS GO
key* with you when leaving the vehicle, Controls
*o ptional
230_AKB; 5; 4, en-GB
bjanott
,V ersion: 2.9.6
2008-04-08T15:09:54+02:00
-Seite 93 ZDateiname: 6515_3089_02_buchblock.pdf; preflight
Page 97 of 317
Side windows
94 even if you are only leaving it for
ashort
time. G
Risk of injury
Do not leave children unsupervised in the
vehicle, even if they are secured in achild
restraint system. The children could:
R be seriously or even fatally injured on
parts of the vehicle
R be seriously or even fatally injured by
prolonged exposure to extremely high or
extremely low temperatures
If children open adoor, they could:
R seriously or even fatally injure other peo-
ple
R get out of the vehicle, thereby injuring
themselves or be seriously or even fatally
injured by apassing vehicle
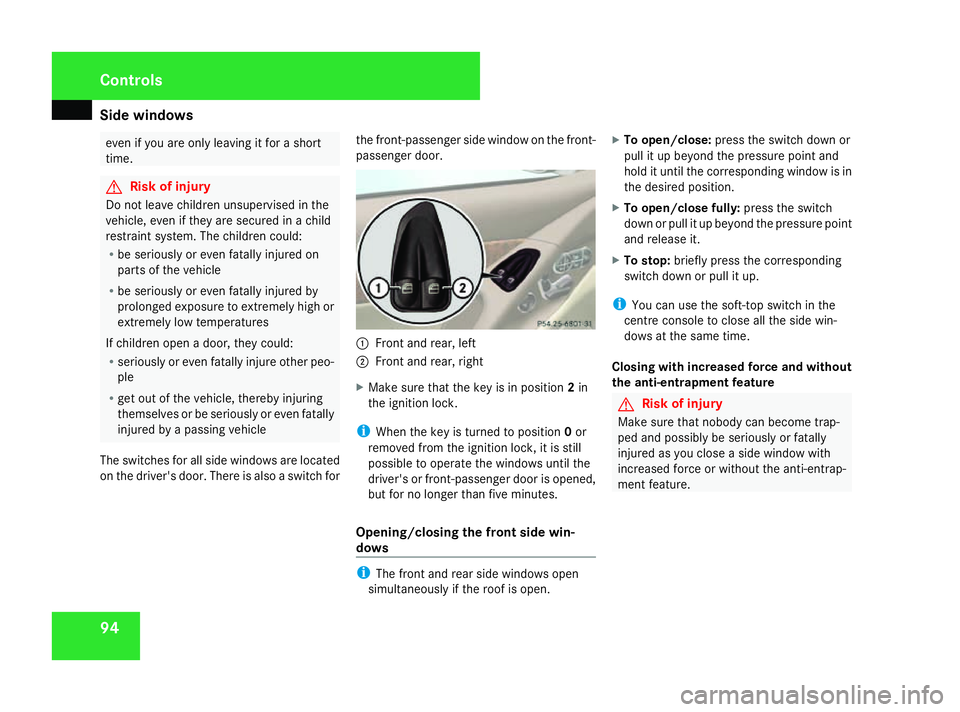
The switches for all side windows are located
on the driver's door. There is also aswitch for the front-passenger side window on the front-
passenger door. 1
Front and rear, left
2 Front and rear, right
X Make sure that the key is in position 2in
the ignition lock.
i When the key is turned to position 0or
removed from the ignition lock, it is still
possible to operate the windowsu ntil the
driver's or front-passenger door is opened,
but for no longer than five minutes.
Opening/closing the front side win-
dows i
The front and rear side windowso pen
simultaneously if the roof is open. X
To open/close: press the switch down or
pullitupb eyond the pressure point and
hold it until the corresponding window is in
the desired position.
X To open/close fully: press the switch
down or pullitupb eyond the pressure point
and release it.
X To stop: briefly press the corresponding
switch down or pullitu p.
i You can use the soft-top switch in the
centre console to close all the side win-
dows at the same time.
Closing with increased force and without
the anti-entrapment feature G
Risk of injury
Make sure that nobody can become trap-
ped and possibly be seriously or fatally
injured as you close aside window with
increased force or withoutt he anti-entrap-
ment feature. Controls
230_AKB; 5; 4, en-GB
bjanott,
Version: 2.9.6
2008-04-08T15:09:54+02:00
-Seite 94 Dateiname: 6515_3089_02_buchblock.pdf; preflight
Page 98 of 317
Driving an
dpark ing 95
If
as idew indo wl ocks up during closing and
ha sr eopened againsligh tly:
X Immediatel yafter the windo wlocks up ,pull
the switc hupwards until the windo wis
closed.
Th es idew indo wisc losedwithm oref orce.
If as idew indo wl ocks up agai ndurin gclosing
an dh asreopene dagain slightly:
X Immediatel yafter the windo wlocks up ,pull
the switc hupwards until the windo wis
closed.
Th es idew indo wisc losedwithout the anti-
entrapment feature.
Opening the rea rsidew indows Yo
uc an onlyopena nd close the rear side
windows fully.
X Whe nthe roo fiso pen: open the front
window.
Th ef ront an drears idew indows open
simultaneously.
X Whe nthe roo fisc losed: pressthe corre-
sponding switc hfor the front side windows
again.
X To sto pasidew indow: brieflypress the
corresponding switc hdownorp ullitu p. Closin
gthe rea rsidew indows X
Clos ethe front windows.
X Pull the switc hupwards again.
X To sto pasidew indow: brieflypress the
corresponding switc hdownorp ullitu p.
i If the windo wisobstructed during clos-
ing ,the closing procedure is interrupted
an dito pens agai nsligh tly. Resettin
gthe windows
Eac hsidew indo wm ustber esetif the battery
wa sd isconnected or discharged.
X Make sure tha tthe key is in position 2in
the ignition lock.
X Pull the switc hupwards until the windo wis
closed, an dholditint hisp osit ionf or
another second. Drivin
gand parking Starting th
eengine G
Risk of accident
Do no tkee pa ny objects in th edriver's foot-
well. If you use afloormat or carpet in the
driver's footwell, mak esuret hatthe ya re
correctl ysecure dand that there is suffi-
cien tclearanc efor thep edals.
Objects could otherwise get between the
pedals in th eevent of sudden braking or
acceleration .You may then no longer be
able to brake ,cha ng eg ear or accelerat eas
intended. Thi smay result in an acciden tand
injury. G
Risk of poisoning
Never leav ethe engin erunning in enclosed
spaces. The exhaus tgase scontai ncarbon
monoxide. Inhalin gexhaus tfumes consti-
tute sah ealth hazard and could lead to loss
of consciousness or eve ndeath.
! Do no tdepress th eaccelerator pedal
when startin gthe engine.
i If you depress th ebrake when startin gthe
engine, peda ltra ve lw ill be unusuall ylong
and there will be les speda lresistance. Cont
rols
230_AKB; 5; 4, en-GB
bjanott,
Version: 2.9.6
2008-04-08T15:09:54+02:00
-Seite 95 ZDateiname: 6515_3089_02_buchblock.pdf; preflight
Page 99 of 317
Driving an
dpark ing 96
Automatic transmission
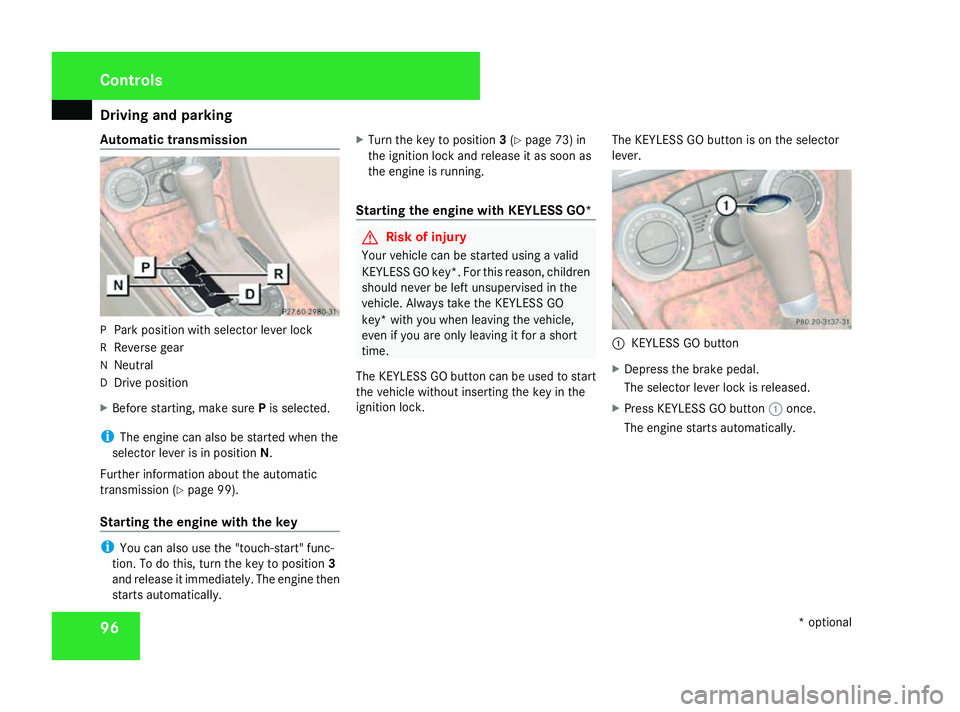
P
Park positio nwiths elect or leve rlock
R Reverse gear
N Neutral
D Drive position
X Before starting, make sure Pis selected.
i Thee ngine ca nalsobes tartedwhent he
selector leve risinposition N.
Furthe rinformation abou tthe automatic
transmission (Y page 99).
Startin gthe engine with the key i
Youc an also us ethe "touch-start" func-
tion. To do this, tur nthe key to position 3
an dr elease it immediately .The engine then
starts automatically. X
Turn the key to position 3(Y page 73) in
the ignition lock an drelease it as soon as
the engine is running.
Startin gthe engine with KE YLESS GO* G
Risk of injury
Your vehicle can be started usin gavalid
KEYLESS GO key*. Fo rthisr eason ,children
should never be lef tunsupervised in the
vehicle. Always take th eKEYLESS GO
key* wit hyou when leavin gthe vehicle,
eve nify ou are only leavin gitforas hort
time.
The KEYLESS GO butto ncan be used to start
th ev ehicle without inserting th ekeyin the
ignition lock. The KEYLESS GO butto
nisontheselector
lever. 1
KEYLESS GO button
X Depress th ebrake pedal.
The selecto rlever loc kisreleased.
X Press KEYLESS GO button 1once.
The engin estartsa utomatically. Cont
rols
*optional
230_AKB; 5; 4, en-GB
bjanott,
Version: 2.9.6
2008-04-08T15:09:54+02:00
-Seite 96 Dateiname: 6515_3089_02_buchblock.pdf; preflight