MERCEDES-BENZ SL ROADSTER 2018 Owners Manual
Manufacturer: MERCEDES-BENZ, Model Year: 2018, Model line: SL ROADSTER, Model: MERCEDES-BENZ SL ROADSTER 2018Pages: 322, PDF Size: 5.43 MB
Page 91 of 322
Roof
Important safety notes
GWARNING
If you do not fully open/close the soft top, the
soft-top hydraulics depressurize after a short
time. This causes the soft top to lower unex-
pectedly and may cause you or others to be
trapped. There is a risk of injury.
Always open or close the soft top completely.
GWARNING
Closing the roof manually is a complicated
and technically demanding procedure, which
requires a lot of strength. You or others can
become trapped. There is a risk of injury.
Only have the soft top closed manually at a
qualified specialist workshop.
!Never sit on the rear compartment trim or
stow heavy objects there. You will otherwise
damage the roof and rear compartment trim
of the vehicle.
!Do not forget that the weather can change
abruptly. Make certain that the roof is closed
when you leave the vehicle. The vehicle elec-
tronics can be damaged if water enters the
vehicle interior.
!When opening and closing the roof, make
sure that:
Rthere is sufficient clearance, as the roof
swings upwards.
Rthere is sufficient clearance behind the
vehicle, as the trunk lid swings backwards
beyond the bumper.
Rthe trunk is only loaded to below the trunk
partition.
Rthe trunk partition is not pushed up by the
load.
Rthe trunk partition is closed.
Rthe trunk lid is closed.
Rthe outside temperature is above 5 ‡
( Ò15 †).
You could otherwise damage the roof, trunk
and other parts of the vehicle.
The vehicle dimensions for opening/closing the
roof can be found in the "Vehicle data" section
(
Ypage 317). Make sure that the roof and rear window are
clean and d
ry before opening the roof. Other-
wise, water or dirt could enter the vehicle inte-
rior or trunk.
Opening and closing using the roof
switch
Important safety notes
GWARNING
When opening or closing the roof, body parts
could be trapped by, for example, the roof
mechanism, trunk lid or side windows. There
is a risk of injury.
When raising or lowering the roof, make sure
that no body parts are in the vicinity of moving
components. If someone becomes trapped,
release the button.
For safety reasons, you can only open or close
the roof when the vehicle is stationary.
!Operating the roof while pulling away:
RObserve the following traffic carefully.
RDo not drive faster than 25 mph (40 km/h).
RAvoid abrupt braking and swerving maneu-
vers.
Do not operate the roof when cornering, driv-
ing on uneven surfaces or during strong
winds. The vehicle may otherwise be dam-
aged.
iIf the traffic conditions mean that you have
to drive off while opening/closing the roof,
the procedure which was started while sta-
tionary can be continued at speeds of up to
approximately 25 mph (40 km/h).
Roof89
Opening and closing
Z
Page 92 of 322
Opening and closing
XClose the trunk lid (Ypage 80).
If the trunk is loaded correctly, the trunk par-
tition closes automatically.
XTurn the SmartKey to position 2in the igni-
tion lock.
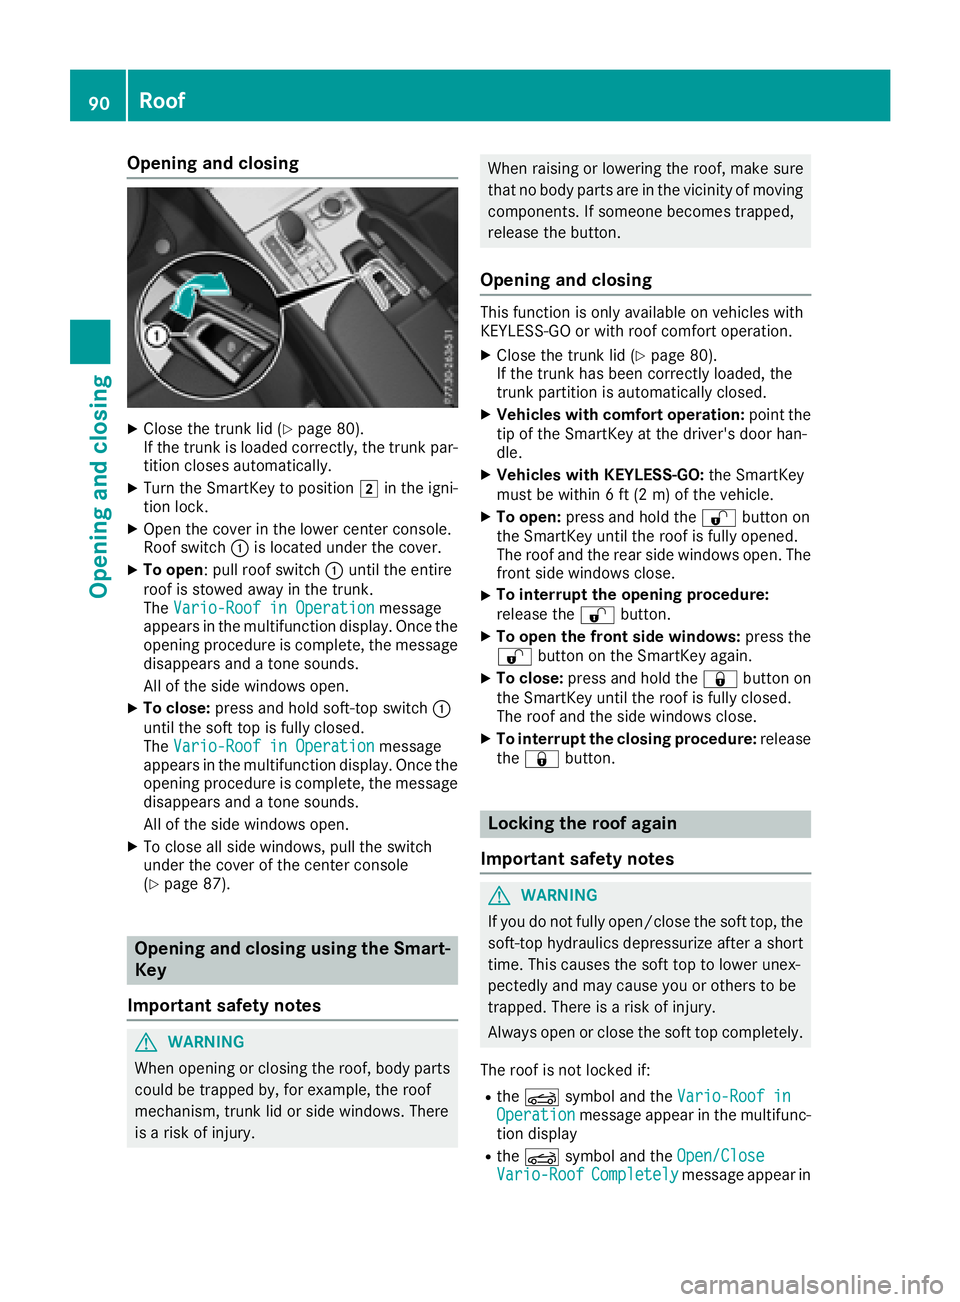
XOpen the cover in the lower center console.
Roof switch :is located under the cover.
XTo open: pull roof switch :until the entire
roof is stowed away in the trunk.
The Vario-Roof in Operation
message
appears in the multifunction display. Once the
opening procedure is complete, the message
disappears and a tone sounds.
All of the side windows open.
XTo close: press and hold soft-top switch :
until the soft top is fully closed.
The Vario-Roof in Operation
message
appears in the multifunction display. Once the opening procedure is complete, the message
disappears and a tone sounds.
All of the side windows open.
XTo close all side windows, pull the switch
under the cover of the center console
(
Ypage 87).
Opening and closing using the Smart-
Key
Important safety notes
GWARNING
When opening or closing the roof, body parts
could be trapped by, for example, the roof
mechanism, trunk lid or side windows. There
is a risk of injury.
When raising or lowering the roof, make sure
that no body parts are in the vicinity of moving components. If someone becomes trapped,
release the button.
Opening and closing
This function is only available on vehicles with
KEYLESS-GO or with roof comfort operation.
XClose the trunk lid (Ypage 80).
If the trunk has been correctly loaded, the
trunk partition is automatically closed.
XVehicles with comfort operation: point the
tip of the SmartKey at the driver's door han-
dle.
XVehicles with KEYLESS-GO: the SmartKey
must be within 6 ft (2 m) of the vehicle.
XTo open: press and hold the %button on
the SmartKey until the roof is fully opened.
The roof and the rear side windows open. The
front side windows close.
XTo interrupt the opening procedure:
release the %button.
XTo open the front side windows: press the
% button on the SmartKey again.
XTo close: press and hold the &button on
the SmartKey until the roof is fully closed.
The roof and the side windows close.
XTo interrupt the closing procedure: release
the & button.
Locking the roof again
Important safety notes
GWARNING
If you do not fully open/close the soft top, the
soft-top hydraulics depressurize after a short
time. This causes the soft top to lower unex-
pectedly and may cause you or others to be
trapped. There is a risk of injury.
Always open or close the soft top completely.
The roof is not locked if:
Rthe K symbol and the Vario-Roof inOperationmessage appear in the multifunc-
tion display
Rthe K symbol and the Open/CloseVario-RoofCompletelymessage appear in
90Roof
Opening and closing
Page 93 of 322
the multifunction display and you hear a warn-
ing tone
Ryou hear a warning tone for up to ten seconds
when pulling away or while driving
Locking
You can lock the roof again if it is not locked
fully.
XPull over and stop the vehicle safely as soon
as possible, paying attention to road and traf-
fic conditions.
XEnsure that the SmartKey is in position2in
the ignition lock.
XPress the roof switch (Ypage 90).
Trunk partition
General notes
!To avoid damaging the roof or luggage when
folding back the roof, you should:
Ronly load the trunk to below the trunk par-
tition
Rnot place any objects on or in front of the
trunk partition
Rnot place any objects on the cover behind
the roll bars
Rnot allow the cargo to push the trunk par-
tition upwards
!Make sure the trunk separator is completely
closed. Otherwise, the roof can be blocked
when it is opened or closed.
The trunk partition can be used to cover luggage
and loads in the trunk.
Opening and closing
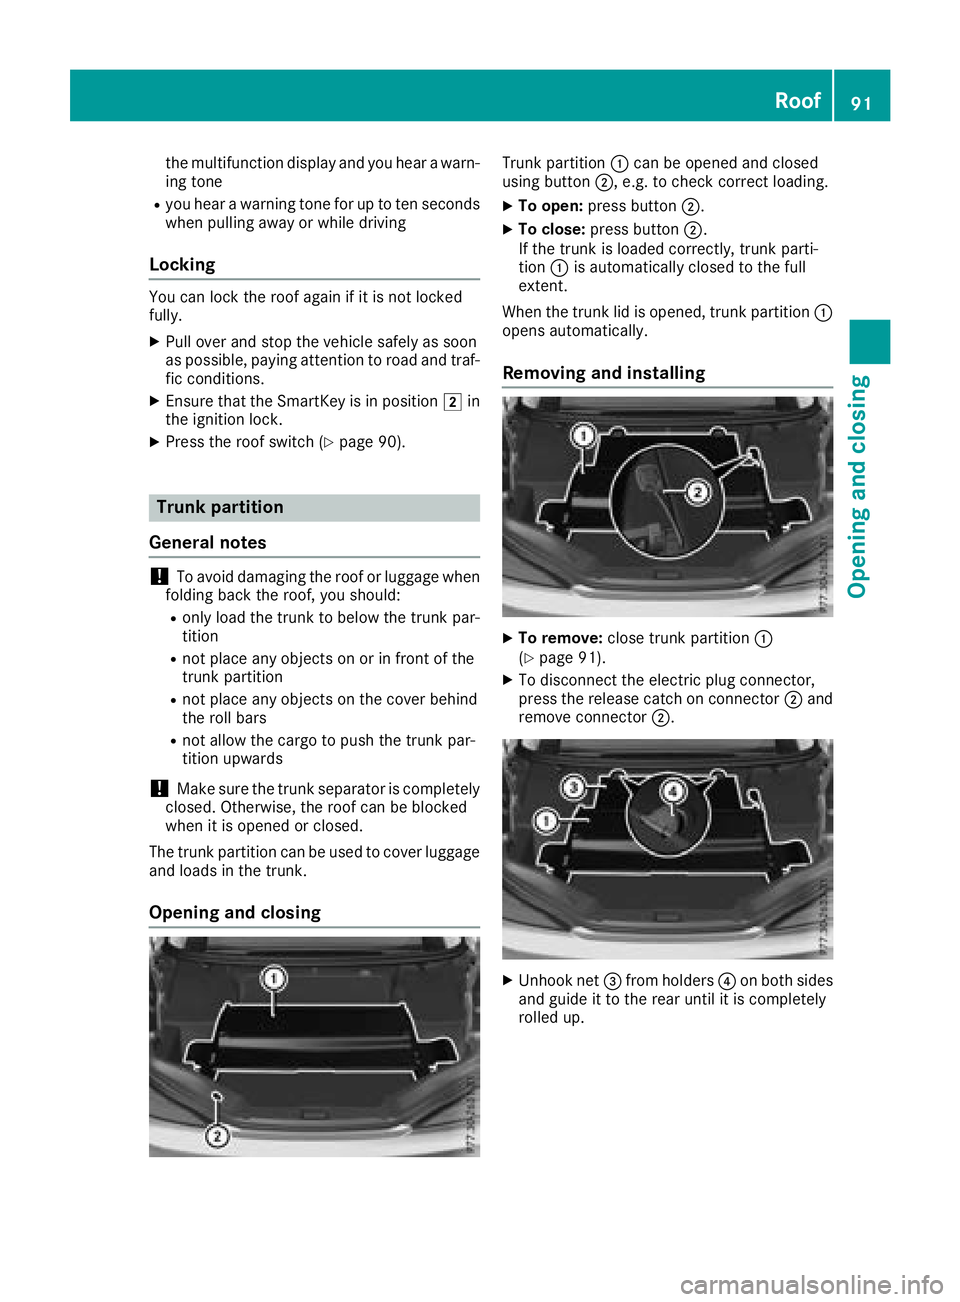
Trunk partition :can be opened and closed
using button ;, e.g. to check correct loading.
XTo open:press button ;.
XTo close:press button ;.
If the trunk is loaded correctly, trunk parti-
tion :is automatically closed to the full
extent.
When the trunk lid is opened, trunk partition :
opens automatically.
Removing and installing
XTo remove: close trunk partition :
(Ypage 91).
XTo disconnect the electric plug connector,
press the release catch on connector ;and
remove connector ;.
XUnhook net=from holders ?on both sides
and guide it to the rear until it is completely
rolled up.
Roof91
Opening and closing
Z
Page 94 of 322
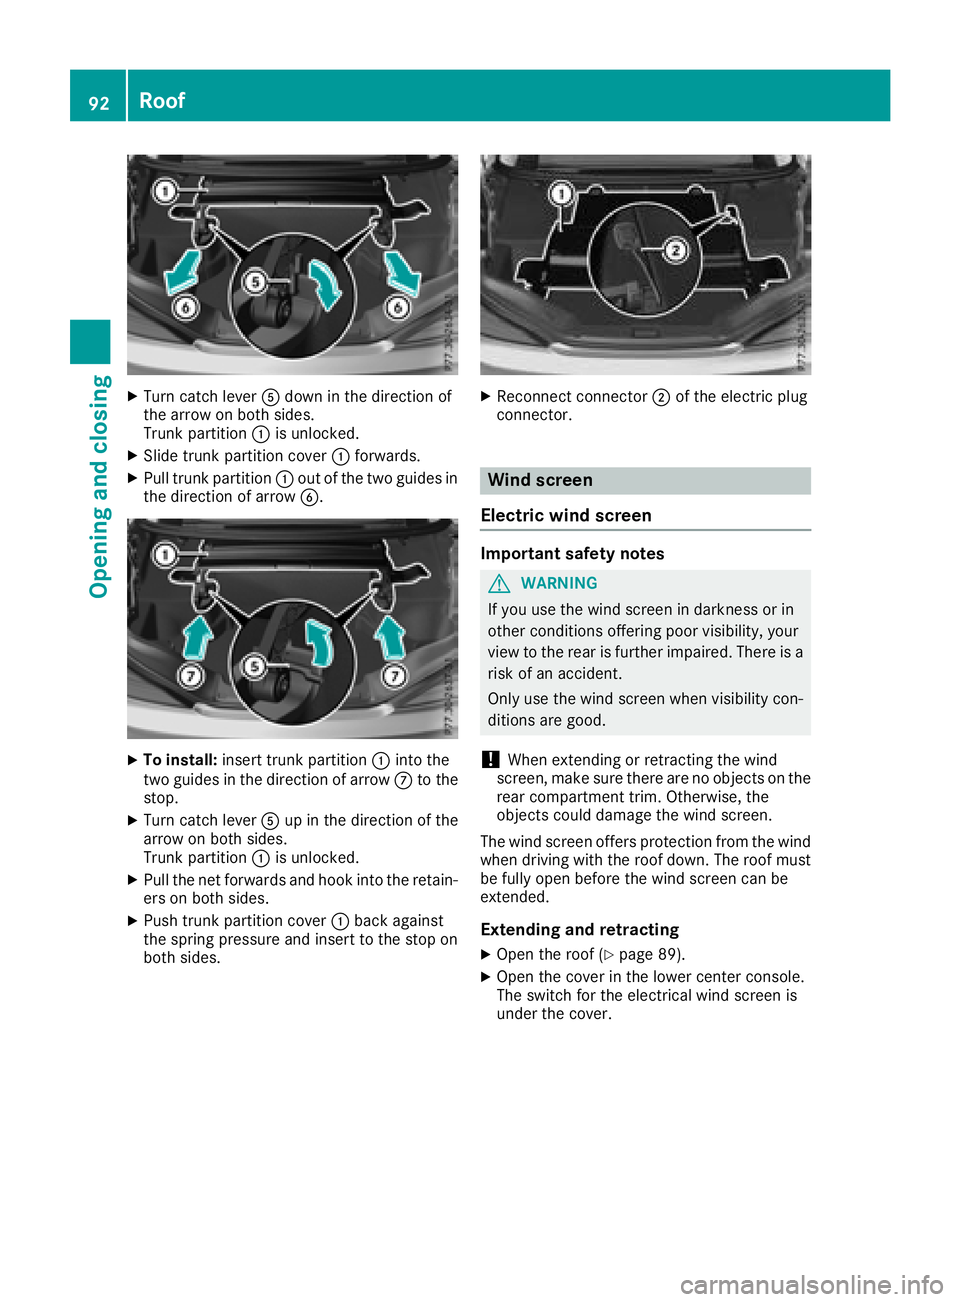
XTurn catch leverAdown in the direction of
the arrow on both sides.
Trunk partition :is unlocked.
XSlide trunk partition cover :forwards.
XPull trunk partition :out of the two guides in
the direction of arrow B.
XTo install:insert trunk partition :into the
two guides in the direction of arrow Cto the
stop.
XTurn catch lever Aup in the direction of the
arrow on both sides.
Trunk partition :is unlocked.
XPull the net forwards and hook into the retain-
ers on both sides.
XPush trunk partition cover :back against
the spring pressure and insert to the stop on
both sides.
XReconnect connector ;of the electric plug
connector.
Wind screen
Electric wind screen
Important safety notes
GWARNING
If you use the wind screen in darkness or in
other conditions offering poor visibility, your
view to the rear is further impaired. There is a
risk of an accident.
Only use the wind screen when visibility con-
ditions are good.
!When extending or retracting the wind
screen, make sure there are no objects on the
rear compartment trim. Otherwise, the
objects could damage the wind screen.
The wind screen offers protection from the wind
when driving with the roof down. The roof must
be fully open before the wind screen can be
extended.
Extending and retracting
XOpen the roof (Ypage 89).
XOpen the cover in the lower center console.
The switch for the electrical wind screen is
under the cover.
92Roof
Opening and closing
Page 95 of 322
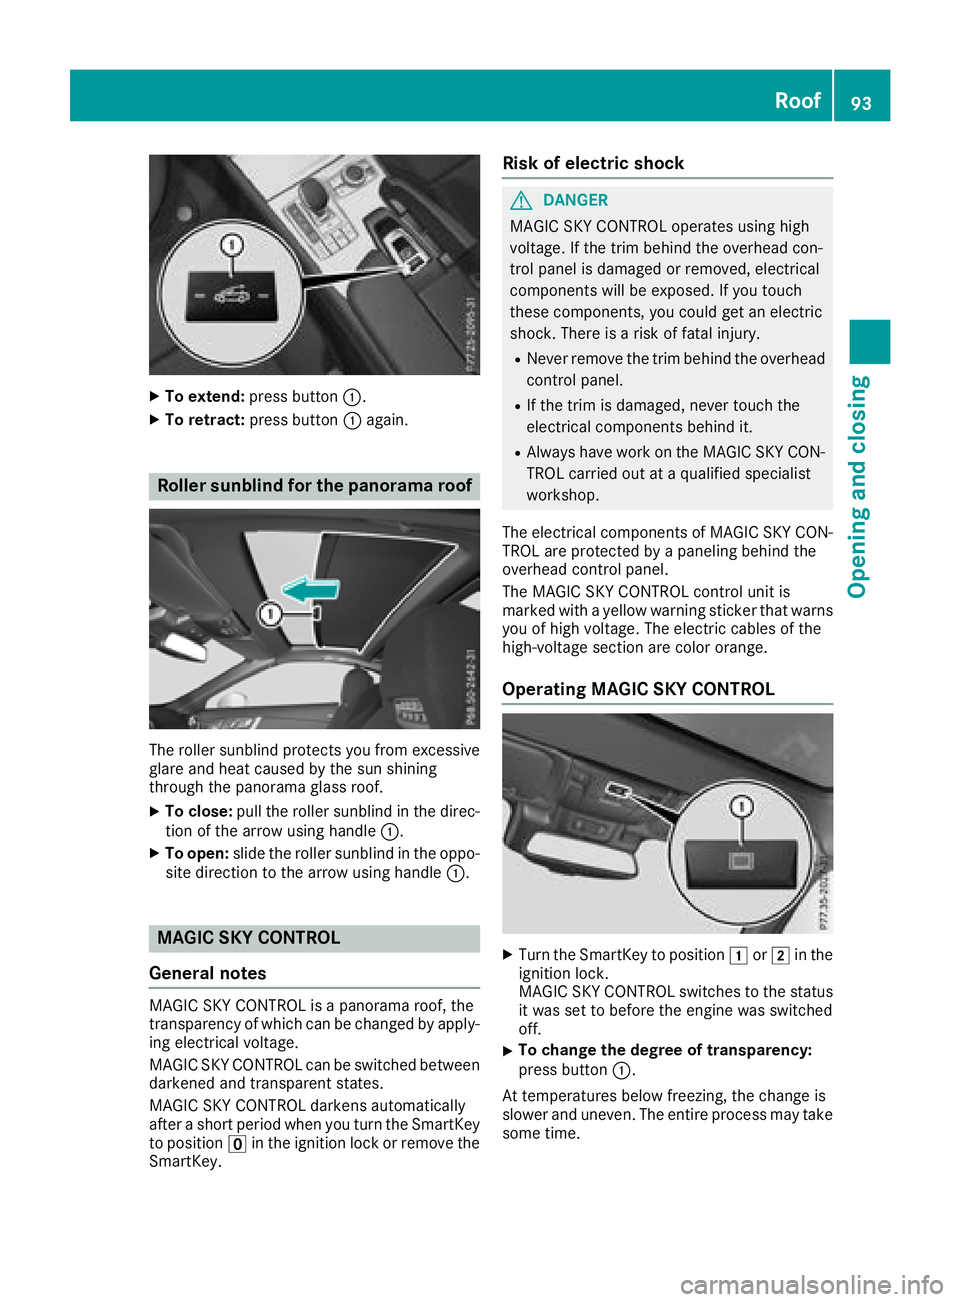
XTo extend:press button :.
XTo retract:press button :again.
Roller sunblind for the panorama roof
The roller sunblind protects you from excessive
glare and heat caused by the sun shining
through the panorama glass roof.
XTo close: pull the roller sunblind in the direc-
tion of the arrow using handle :.
XTo open:slide the roller sunblind in the oppo-
site direction to the arrow using handle :.
MAGIC SKY CONTROL
General notes
MAGIC SKY CONTROL is a panorama roof, the
transparency of which can be changed by apply-
ing electrical voltage.
MAGIC SKY CONTROL can be switched between
darkened and transparent states.
MAGIC SKY CONTROL darkens automatically
after a short period when you turn the SmartKey
to position uin the ignition lock or remove the
SmartKey.
Risk of electric shock
GDANGER
MAGIC SKY CONTROL operates using high
voltage. If the trim behind the overhead con-
trol panel is damaged or removed, electrical
components will be exposed. If you touch
these components, you could get an electric
shock. There is a risk of fatal injury.
RNever remove the trim behind the overhead
control panel.
RIf the trim is damaged, never touch the
electrical components behind it.
RAlways have work on the MAGIC SKY CON-
TROL carried out at a qualified specialist
workshop.
The electrical components of MAGIC SKY CON-
TROL are protected by a paneling behind the
overhead control panel.
The MAGIC SKY CONTROL control unit is
marked with a yellow warning sticker that warns
you of high voltage. The electric cables of the
high-voltage section are color orange.
Operating MAGIC SKY CONTROL
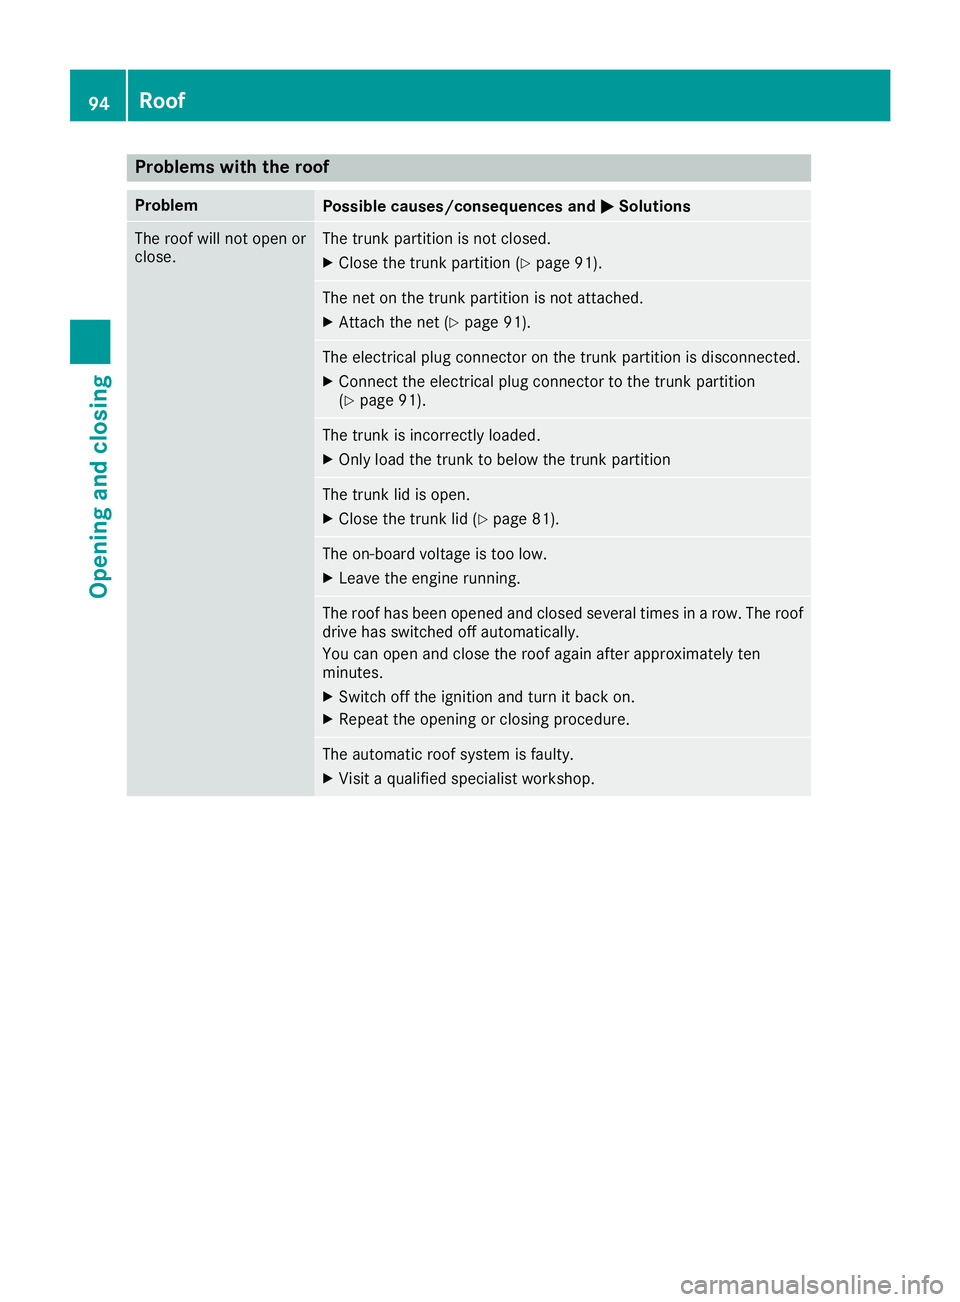
XTurn the SmartKey to position 1or2 in the
ignition lock.
MAGIC SKY CONTROL switches to the status
it was set to before the engine was switched
off.
XTo change the degree of transparency:
press button :.
At temperatures below freezing, the change is
slower and uneven. The entire process may take
some time.
Roof93
Opening and closing
Z
Page 96 of 322
Problems with the roof
ProblemPossible causes/consequences andMSolutions
The roof will not open or
close.The trunk partition is not closed.
XClose the trunk partition (Ypage 91).
The net on the trunk partition is not attached.
XAttach the net (Ypage 91).
The electrical plug connector on the trunk partition is disconnected.
XConnect the electrical plug connector to the trunk partition
(Ypage 91).
The trunk is incorrectly loaded.
XOnly load the trunk to below the trunk partition
The trunk lid is open.
XClose the trunk lid (Ypage 81).
The on-board voltage is too low.
XLeave the engine running.
The roof has been opened and closed several times in a row. The roof
drive has switched off automatically.
You can open and close the roof again after approximately ten
minutes.
XSwitch off the ignition and turn it back on.
XRepeat the opening or closing procedure.
The automatic roof system is faulty.
XVisit a qualified specialist workshop.
94Roof
Opening and closing
Page 97 of 322
Correct driver's seat position
GWARNING
You could lose control of your vehicle if you do the following while driving:
Radjust the driver's seat, head restraint,
steering wheel or mirrors
Rfasten the seat belt
There is a risk of an accident.
Adjust the driver's seat, head restraint, steer-
ing wheel and mirror and fasten your seat belt before starting the engine.
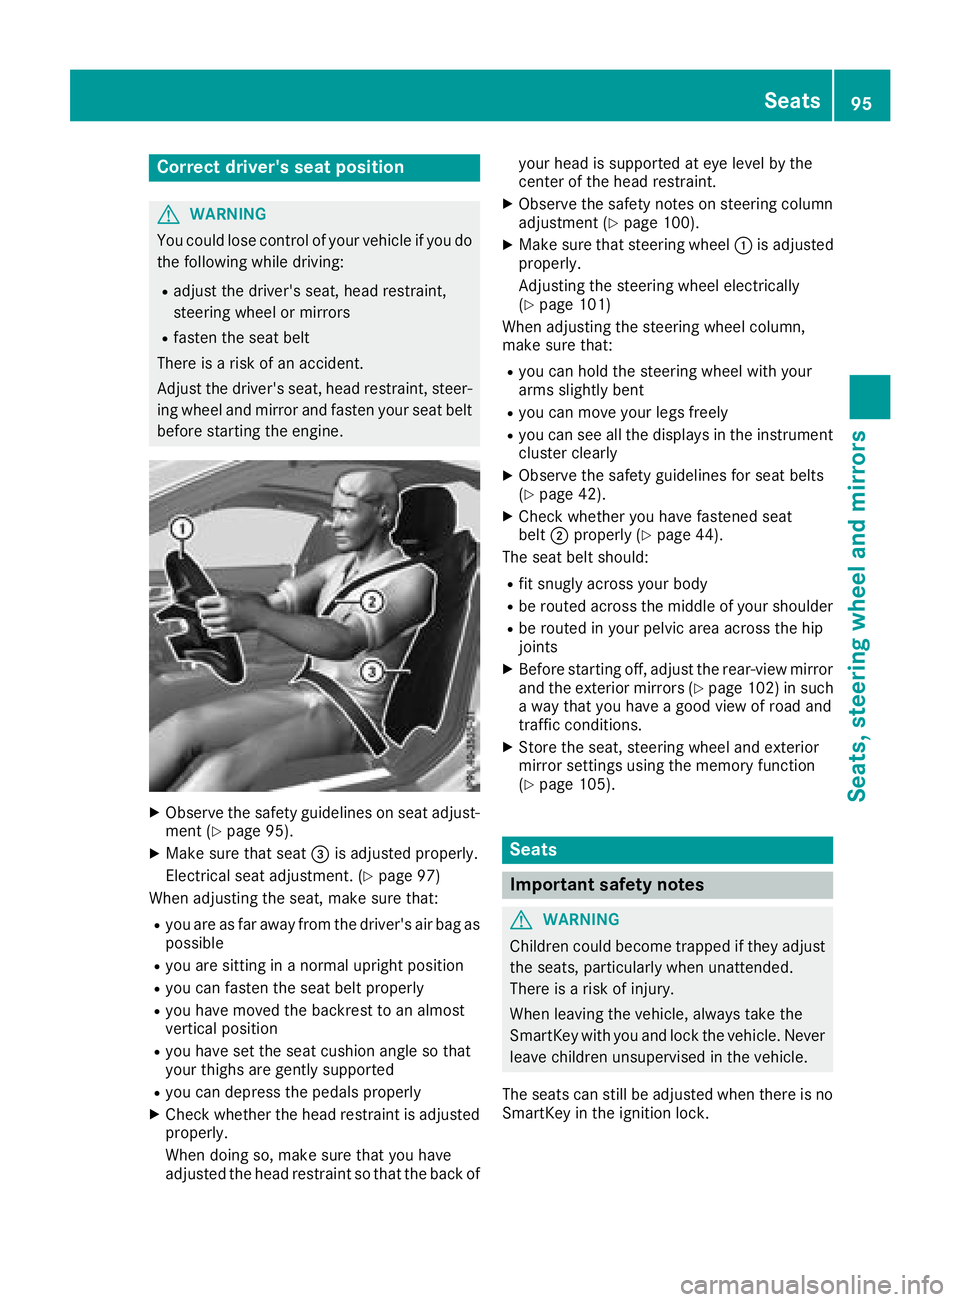
XObserve the safety guidelines on seat adjust-
ment (Ypage 95).
XMake sure that seat =is adjusted properly.
Electrical seat adjustment. (
Ypage 97)
When adjusting the seat, make sure that:
Ryou are as far away from the driver's air bag as
possible
Ryou are sitting in a normal upright position
Ryou can fasten the seat belt properly
Ryou have moved the backrest to an almost
vertical position
Ryou have set the seat cushion angle so that
your thighs are gently supported
Ryou can depress the pedals properly
XCheck whether the head restraint is adjusted
properly.
When doing so, make sure that you have
adjusted the head restraint so that the back of your head is supported at eye level by the
center of the head restraint.
XObserve the safety notes on steering column
adjustment (Ypage 100).
XMake sure that steering wheel
:is adjusted
properly.
Adjusting the steering wheel electrically
(
Ypage 101)
When adjusting the steering wheel column,
make sure that:
Ryou can hold the steering wheel with your
arms slightly bent
Ryou can move your legs freely
Ryou can see all the displays in the instrument cluster clearly
XObserve the safety guidelines for seat belts
(Ypage 42).
XCheck whether you have fastened seat
belt ;properly (Ypage 44).
The seat belt should:
Rfit snugly across your body
Rbe routed across the middle of your shoulder
Rbe routed in your pelvic area across the hip
joints
XBefore starting off, adjust the rear-view mirror
and the exterior mirrors (Ypage 102) in such
a way that you have a good view of road and
traffic conditions.
XStore the seat, steering wheel and exterior
mirror settings using the memory function
(
Ypage 105).
Seats
Important safety notes
GWARNING
Children could become trapped if they adjust
the seats, particularly when unattended.
There is a risk of injury.
When leaving the vehicle, always take the
SmartKey with you and lock the vehicle. Never
leave children unsupervised in the vehicle.
The seats can still be adjusted when there is no
SmartKey in the ignition lock.
Seats95
Seats, steering wheel and mirrors
Z
Page 98 of 322
GWARNING
When you adjust a seat, you or other vehicle
occupants could become trapped, e.g. on the seat guide rail. There is a risk of injury.
Make sure when adjusting a seat that no one
has any body parts in the sweep of the seat.
GWARNING
If the driver's seat is not engaged, it could
move forwards as far as the next catch during movement such as braking or abrupt changes
of direction. As a result, you would be pushed
against your seat belt by the unsecured driv-
er's seat.
This could cause you to lose control of the
vehicle. The seat belt cannot protect as inten-
ded and could result in additional injury.
There is a risk of an accident and injury.
Before every journey, make sure that the driv-
er's seat is fully engaged.
Observe the safety notes on "Air bags"
(
Ypage 45) and "Children in the vehicle"
(Ypage 56).
GWARNING
If you adjust the seat height carelessly, you or
other vehicle occupants could be trapped and
thereby injured. Children in particular could
accidentally press the electrical seat adjust-
ment buttons and become trapped. There is a
risk of injury.
While moving the seats, make sure that your
hands or other body parts do not get under the
lever assembly of the seat adjustment sys-
tem.
GWARNING
If the head restraints are not installed or not
adjusted correctly, they cannot provide pro-
tection as intended. There is an increased risk
of injury in the head and neck area, e.g. in the event of an accident or when braking.
Always drive with the head restraints instal-
led. Before driving off, make sure for every
vehicle occupant that the center of the head
restraint supports the back of the head at
about eye level.
GWARNING
You could lose control of your vehicle if you do the following while driving:
Radjust the driver's seat, head restraint,
steering wheel or mirrors
Rfasten the seat belt
There is a risk of an accident.
Adjust the driver's seat, head restraint, steer-
ing wheel and mirror and fasten your seat belt before starting the engine.
!To prevent damage to the seats and the seat
heating, observe the following notes:
RDo not spill liquids onto the seats. Dry the
seats as soon as possible if liquid does get
spilled on the seats.
RIf the seat covers are damp or wet, do not
switch on the seat heating. Also, do not use
the seat heating to dry the seats.
RClean the seat covers as recommended;
see the "Interior care" section.
RDo not transport heavy loads on the seats.
Do not place pointed objects on the seat
cushions such as knives, nails or tools.
Where possible, use the seats only for car-
rying passengers.
RWhen operating the seat heating, do not
cover the seats with insulating materials,
e.g. blankets, coats, bags, protective cov-
ers, child seats or booster seats.
RWhen the seat heating is switched on, the
seat surface can be damaged as a result of
objects being placed on the seats; for
example, seat cushions, child seats and
protective covers not approved by
Mercedes-Benz.
!Make sure that there are no objects in the
footwell under or behind the seats when mov-
ing the seats back. There is a risk that the
seats and/or the objects could be damaged.
iThe head restraints cannot be removed.
For more information, contact a qualified spe-
cialist workshop.
96Seats
Seats, steering wheel and mirrors
Page 99 of 322
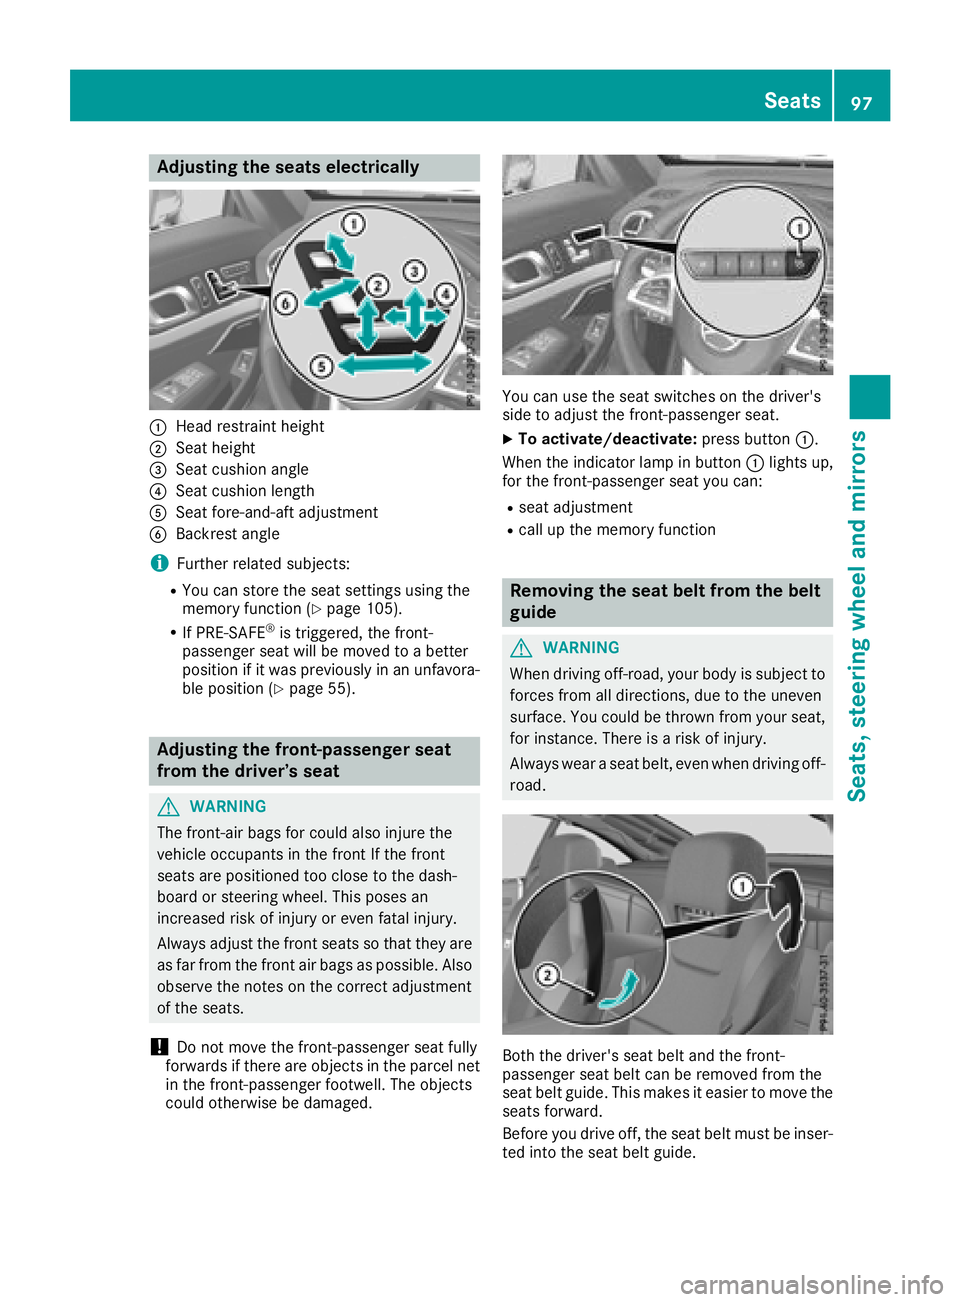
Adjusting the seats electrically
:Headrestrain theight
;Seat height
=Seat cushion angle
?Seat cushion lengt h
ASeat fore-and-aftadjustmen t
BBackrest angle
iFurther relate dsubjects :
RYou can store th eseat setting susin gth e
memory function (Ypage 105).
RIf PRE-SAFE®is triggered ,th efront-
passenger seat will be moved to abette r
position if it was previously in an unfavora-
ble position (
Ypage 55).
Adjusting the front-passenger seat
from the driver’s seat
GWARNIN G
The front-air bags for could also injure th e
vehicl eoccupant sin th efron tIf th efron t
seat sare positioned to oclose to th edash -
boar dor steering wheel. This poses an
increased ris kof injury or eve nfatal injury.
Always adjust th efron tseat sso that they are
as far from th efron tair bags as possible. Als o
observ eth enote son th ecorrec tadjustmen t
of th eseats.
!Do no tmov eth efront-passenger seat fully
forward sif there are objects in th eparcel ne t
in th efront-passenger footwell. The objects
could otherwise be damaged.
You can use th eseat switches on th edriver's
side to adjust th efront-passenger seat .
XTo activate/deactivate: press button:.
When th eindicator lamp in butto n: lights up,
for th efront-passenger seat you can :
Rseat adjustment
Rcall up thememory function
Removing the seat belt fr omthe belt
guide
GWARNIN G
When drivin goff-road, your body is subjec tto
force sfrom all directions, due to th euneven
surface. You could be throw nfrom your seat ,
for instance .There is aris kof injury.
Always wear aseat belt ,eve nwhen drivin goff -
road .
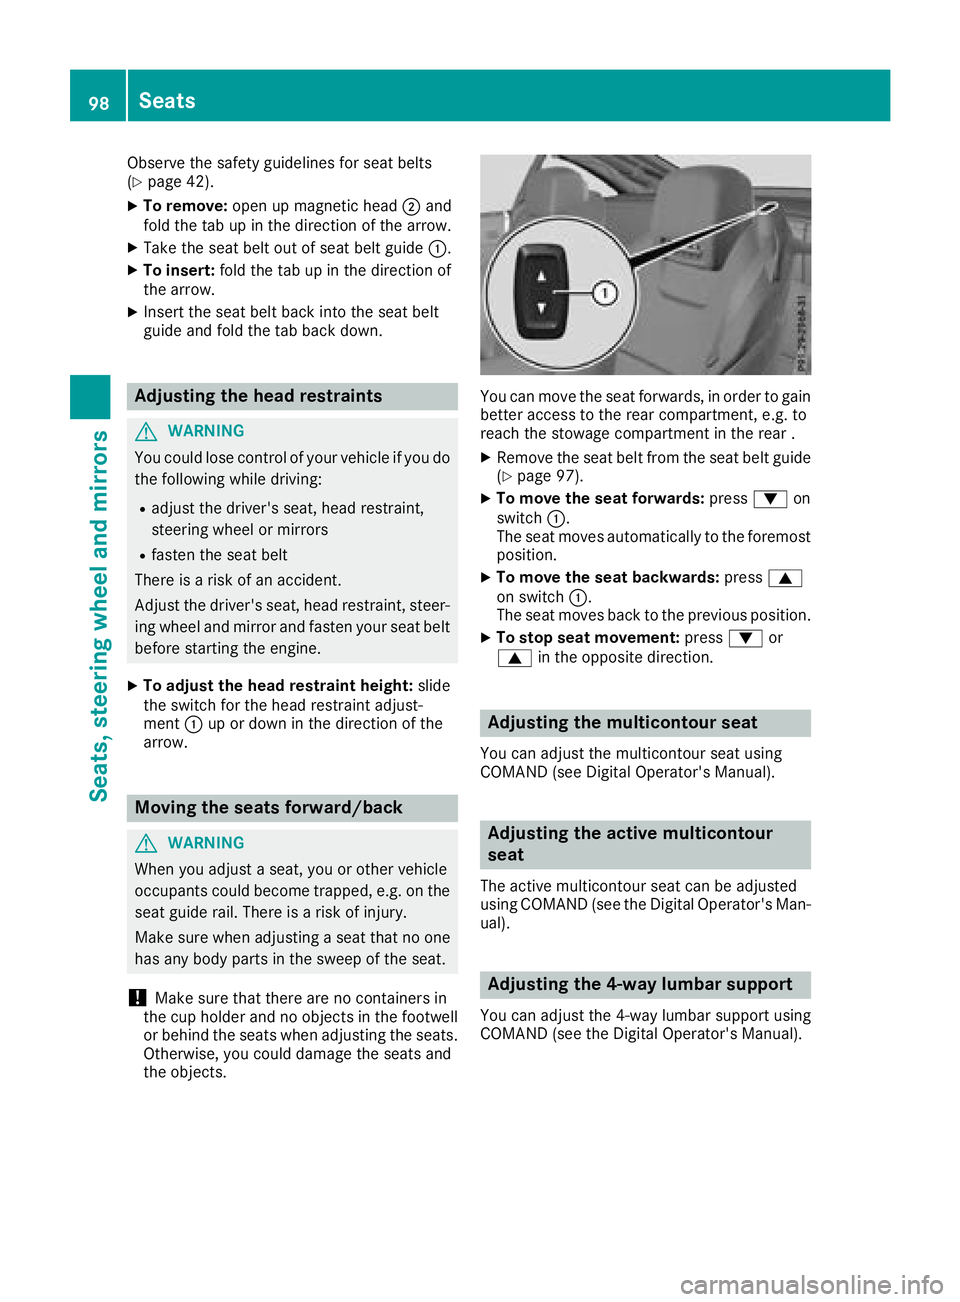
Both th edriver's seat belt and th efront-
passenger seat belt can be remove dfrom th e
seat belt guide .This makes it easie rto mov eth e
seat sforward .
Befor eyou drive off ,th eseat belt mus tbe inser-
te dint oth eseat belt guide .
Seats97
Seats, steering wheel and mirrors
Z
Page 100 of 322
Observe the safety guidelines for seat belts
(Ypage 42).
XTo remove:open up magnetic head ;and
fold the tab up in the direction of the arrow.
XTake the seat belt out of seat belt guide :.
XTo insert:fold the tab up in the direction of
the arrow.
XInsert the seat belt back into the seat belt
guide and fold the tab back down.
Adjusting the head restraints
GWARNING
You could lose control of your vehicle if you do the following while driving:
Radjust the driver's seat, head restraint,
steering wheel or mirrors
Rfasten the seat belt
There is a risk of an accident.
Adjust the driver's seat, head restraint, steer-
ing wheel and mirror and fasten your seat belt before starting the engine.
XTo adjust the head restraint height: slide
the switch for the head restraint adjust-
ment :up or down in the direction of the
arrow.
Moving the seats forward/back
GWARNING
When you adjust a seat, you or other vehicle
occupants could become trapped, e.g. on the seat guide rail. There is a risk of injury.
Make sure when adjusting a seat that no one
has any body parts in the sweep of the seat.
!Make sure that there are no containers in
the cup holder and no objects in the footwell
or behind the seats when adjusting the seats.
Otherwise, you could damage the seats and
the objects.
You can move the seat forwards, in order to gain
better access to the rear compartment, e.g. to
reach the stowage compartment in the rear .
XRemove the seat belt from the seat belt guide
(Ypage 97).
XTo move the seat forwards: press:on
switch :.
The seat moves automatically to the foremost position.
XTo move the seat backwards: press9
on switch :.
The seat moves back to the previous position.
XTo stop seat movement: press:or
9 in the opposite direction.
Adjusting the multicontour seat
You can adjust the multicontour seat using
COMAND (see Digital Operator's Manual).
Adjusting the active multicontour
seat
The active multicontour seat can be adjusted
using COMAND (see the Digital Operator's Man-
ual).
Adjusting the 4-way lumbar support
You can adjust the 4-way lumbar support using
COMAND (see the Digital Operator's Manual).
98Seats
Seats, steering wheel and mirrors