MERCEDES-BENZ SL ROADSTER 2018 Owner's Manual
Manufacturer: MERCEDES-BENZ, Model Year: 2018, Model line: SL ROADSTER, Model: MERCEDES-BENZ SL ROADSTER 2018Pages: 322, PDF Size: 5.43 MB
Page 141 of 322
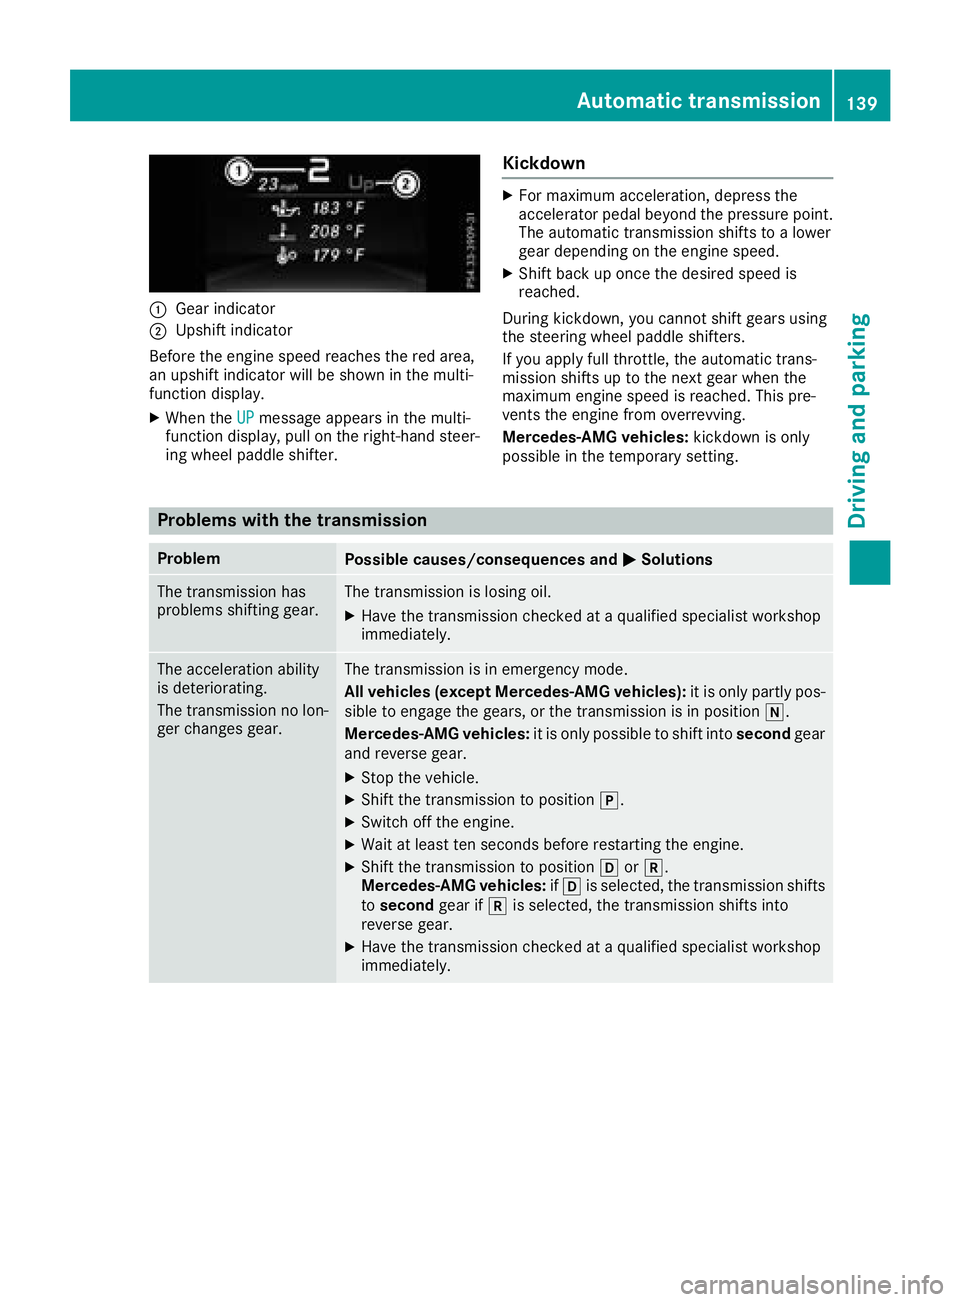
:Gear indicator
;Upshift indicator
Before the engine speed reaches the red area,
an upshift indicator will be shown in the multi-
function display.
XWhen the UPmessage appears in the multi-
function display, pull on the right-hand steer-
ing wheel paddle shifter.
Kickdown
XFor maximum acceleration, depress the
accelerator pedal beyond the pressure point. The automatic transmission shifts to a lower
gear depending on the engine speed.
XShift back up once the desired speed is
reached.
During kickdown, you cannot shift gears using
the steering wheel paddle shifters.
If you apply full throttle, the automatic trans-
mission shifts up to the next gear when the
maximum engine speed is reached. This pre-
vents the engine from overrevving.
Mercedes-AMG vehicles: kickdown is only
possible in the temporary setting.
Problems with the transmission
ProblemPossible causes/consequences and MSolutions
The transmission has
problems shifting gear.The transmission is losing oil.
XHave the transmission checked at a qualified specialist workshop
immediately.
The acceleration ability
is deteriorating.
The transmission no lon-
ger changes gear.The transmission is in emergency mode.
All vehicles (except Mercedes-AMG vehicles): it is only partly pos-
sible to engage the gears, or the transmission is in position i.
Mercedes-AMG vehicles: it is only possible to shift into secondgear
and reverse gear.
XStop the vehicle.
XShift the transmission to position j.
XSwitch off the engine.
XWait at least ten seconds before restarting the engine.
XShift the transmission to position hork.
Mercedes-AMG vehicles: ifh is selected, the transmission shifts
to second gear ifkis selected, the transmission shifts into
reverse gear.
XHave the transmission checked at a qualified specialist workshop
immediately.
Automatic transmission139
Driving and parking
Z
Page 142 of 322
Refueling
Important safety notes
GWARNING
Fuel is highly flammable. If you handle fuel
incorrectly, there is a risk of fire and explo-
sion.
You must avoid fire, open flames, creating
sparks and smoking. Switch off the engine
and, if applicable, the auxiliary heating before refueling.
GWARNING
Fuel is poisonous and hazardous to health.
There is a risk of injury.
You must make sure that fuel does not come into contact with your skin, eyes or clothing
and that it is not swallowed. Do not inhale fuel
vapors. Keep fuel away from children.
If you or others come into contact with fuel,
observe the following:
RWash away fuel from skin immediately
using soap and water.
RIf fuel comes into contact with your eyes,
immediately rinse them thoroughly with
clean water. Seek medical assistance with-
out delay.
RIf fuel is swallowed, seek medical assis-
tance without delay. Do not induce vomit-
ing.
RImmediately change out of clothing which
has come into contact with fuel.
GWARNING
Electrostatic buildup can create sparks and
ignite fuel vapors. There is a risk of fire and
explosion.
Always touch the vehicle body before opening
the fuel filler flap or touching the fuel pump
nozzle. Any existing electrostatic buildup is
thereby discharged.
Do not get into the vehicle again during the refu-
eling process. Otherwise, electrostatic charge
could build up again.
!Do not use diesel to refuel vehicles with a
gasoline engine. Do not switch on the ignition
if you accidentally refuel with the wrong fuel.
Otherwise, the fuel will enter the fuel system. Even small amounts of the wrong fuel could
result in damage to the fuel system and the
engine. Notify a qualified specialist workshop
and have the fuel tank and fuel lines drained
completely.
!Overfilling the fuel tank could damage the
fuel system.
!Take care not to spill any fuel on painted
surfaces. You could otherwise damage the
paintwork.
!Use a filter when adding fuel from a fuel can.
The fuel lines and/or the fuel injection system
could otherwise be blocked by particles from
the fuel can.
If you overfill the fuel tank, fuel could spray out
when the fuel pump nozzle is removed.
For further information on fuel and fuel quality
(
Ypage 313).
Refueling
General information
The fuel filler flap is unlocked or locked auto-
matically when you unlock or lock the vehicle
with the SmartKey or using KEYLESS-GO.
The position of the fuel filler cap is displayed
8 in the instrument cluster. The arrow next
to the filling pump indicates the side of the vehi-
cle.
Opening the fuel filler flap
:To open the fuel filler flap
;Insert the fuel filler cap
140Refueling
Driving and parking
Page 143 of 322
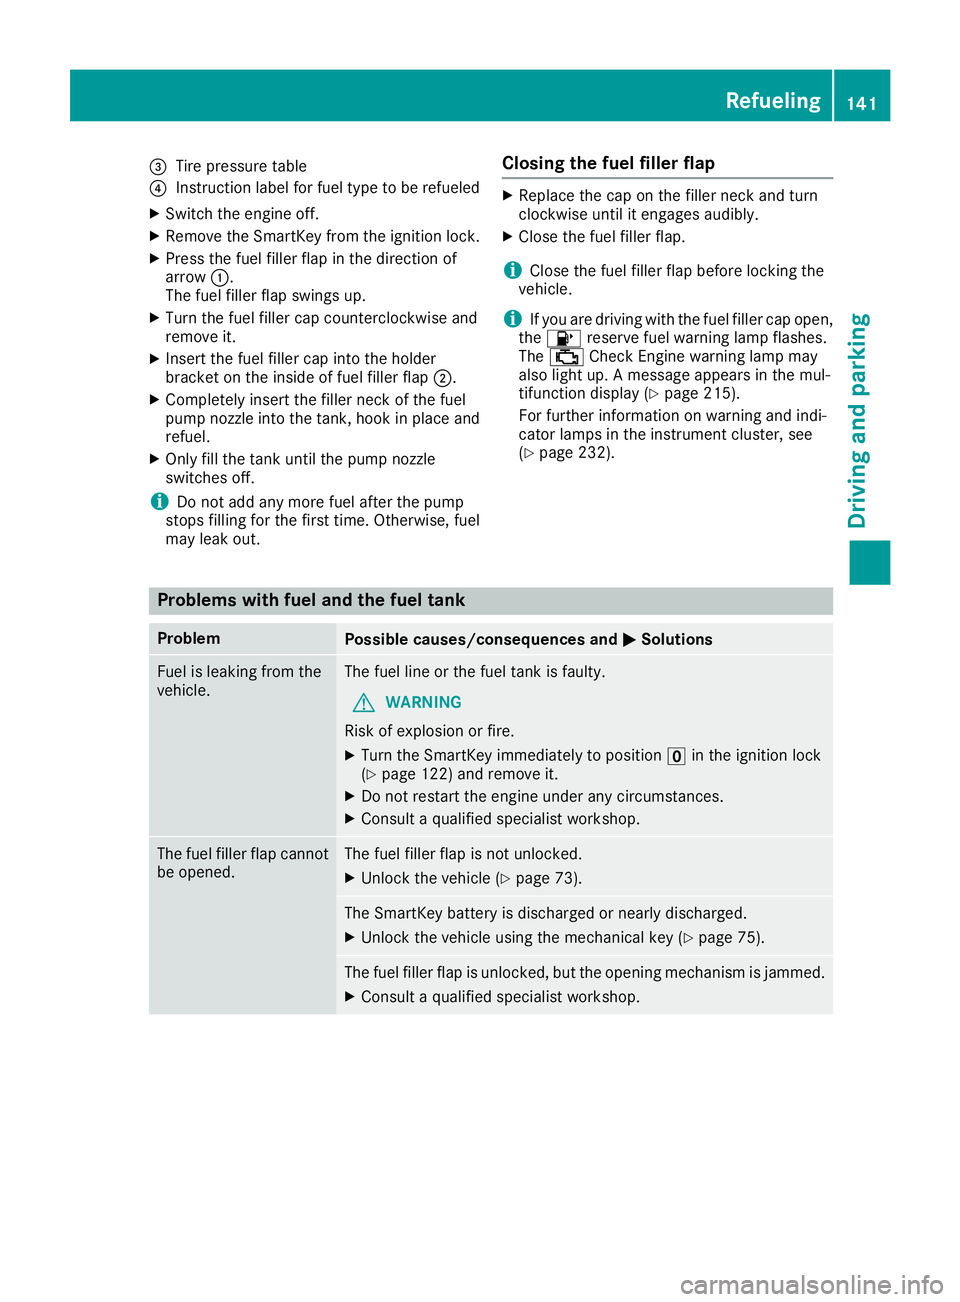
=Tire pressure table
?Instruction label for fuel type to be refueled
XSwitch the engine off.
XRemove the SmartKey from the ignition lock.
XPress the fuel filler flap in the direction of
arrow:.
The fuel filler flap swings up.
XTurn the fuel filler cap counterclockwise and
remove it.
XInsert the fuel filler cap into the holder
bracket on the inside of fuel filler flap ;.
XCompletely insert the filler neck of the fuel
pump nozzle into the tank, hook in place and
refuel.
XOnly fill the tank until the pump nozzle
switches off.
iDo not add any more fuel after the pump
stops filling for the first time. Otherwise, fuel
may leak out.
Closing the fuel filler flap
XReplace the cap on the filler neck and turn
clockwise until it engages audibly.
XClose the fuel filler flap.
iClose the fuel filler flap before locking the
vehicle.
iIf you are driving with the fuel filler cap open,
the 8 reserve fuel warning lamp flashes.
The ; Check Engine warning lamp may
also light up. A message appears in the mul-
tifunction display (
Ypage 215).
For further information on warning and indi-
cator lamps in the instrument cluster, see
(
Ypage 232).
Problems with fuel and the fuel tank
ProblemPossible causes/consequences and MSolutions
Fuel is leaking from the
vehicle.The fuel line or the fuel tank is faulty.
GWARNING
Risk of explosion or fire.
XTurn the SmartKey immediately to position uin the ignition lock
(Ypage 122) and remove it.
XDo not restart the engine under any circumstances.
XConsult a qualified specialist workshop.
The fuel filler flap cannot
be opened.The fuel filler flap is not unlocked.
XUnlock the vehicle (Ypage 73).
The SmartKey battery is discharged or nearly discharged.
XUnlock the vehicle using the mechanical key (Ypage 75).
The fuel filler flap is unlocked, but the opening mechanism is jammed.
XConsult a qualified specialist workshop.
Refueling141
Driving and parking
Z
Page 144 of 322
Parking
Important safety notes
GWARNING
Flammable material such as leaves, grass or
twigs may ignite if they come into contact with
hot parts of the exhaust system or exhaust
gas flow. There is a risk of fire.
Park the vehicle so that no flammable mate-
rials come into contact with parts of the vehi-
cle which are hot. Take particular care not to
park on dry grassland or harvested grain
fields.
GWARNING
If you leave children unsupervised in the vehi-
cle, they could set it in motion by, for example:
Rrelease the parking brake.
Rshift the automatic transmission out of the
parking position P.
Rstart the engine.
In addition, they may operate vehicle equip-
ment and become trapped. There is a risk of
an accident and injury.
When leaving the vehicle, always take the
SmartKey with you and lock the vehicle. Never
leave children unsupervised in the vehicle.
!Always secure the vehicle correctly against
rolling away. Otherwise, the vehicle or its driv-
etrain could be damaged.
To ensure that the vehicle is secured against
rolling away unintentionally:
Rthe electric parking brake must be applied.
Rthe transmission must be in position j.
Rthe SmartKey must be removed from the igni-
tion lock.
Rthe front wheels must be turned towards the
curb on steep uphill or downhill gradients.
Switching off the engine
GWARNING
The automatic transmission switches to neu-
tral position Nwhen you switch off the engine.
The vehicle may roll away. There is a risk of an
accident.
After switching off the engine, always switch
to parking position P. Prevent the parked vehi-
cle from rolling away by applying the parking
brake.
XApply the electric parking brake.
XShift the transmission to position j
(Ypage 131).
XWith the SmartKey : turn the SmartKey to
position uin the ignition lock and remove it.
The immobilizer is activated.
XWith KEYLESS-GO: press the KEYLESS-GO
Start/Stop button (Ypage 122).
The engine stops and all the indicator lamps in
the instrument cluster go out.
If the driver's door is closed, this is the same
as SmartKey position 1. If the driver's door
is open, this is the same as SmartKey position
u (
Ypage 122).
The engine can be switched off while the vehicle
is in motion by pressing and holding the Start/
Stop button for about three seconds. This func-
tion operates independently of the ECO start/
stop automatic engine switch-off function.
Electric parking brake
General notes
GWARNING
If you leave children unsupervised in the vehi-
cle, they could set it in motion by, for example:
Rrelease the parking brake.
Rshift the automatic transmission out of the
parking position P.
Rstart the engine.
In addition, they may operate vehicle equip-
ment and become trapped. There is a risk of
an accident and injury.
When leaving the vehicle, always take the
SmartKey with you and lock the vehicle. Never
leave children unsupervised in the vehicle.
142Parking
Driving and parking
Page 145 of 322
The function of the electric parking brake is
dependent on the on-board voltage. If the on-
board voltage is low or there is a malfunction in
the system, it may not be possible to apply the
released parking brake.
XIf this is the case, only park the vehicle on
level ground and secure it to prevent it rolling
away.
XShift the automatic transmission to position
j.
It may not be possible to release an applied
parking brake if the on-board voltage is low or
there is a malfunction in the system. Contact a
qualified specialist workshop.
The electric parking brake performs a function
test at regular intervals while the engine is
switched off. The sounds that can be heard while
this is occurring are normal.
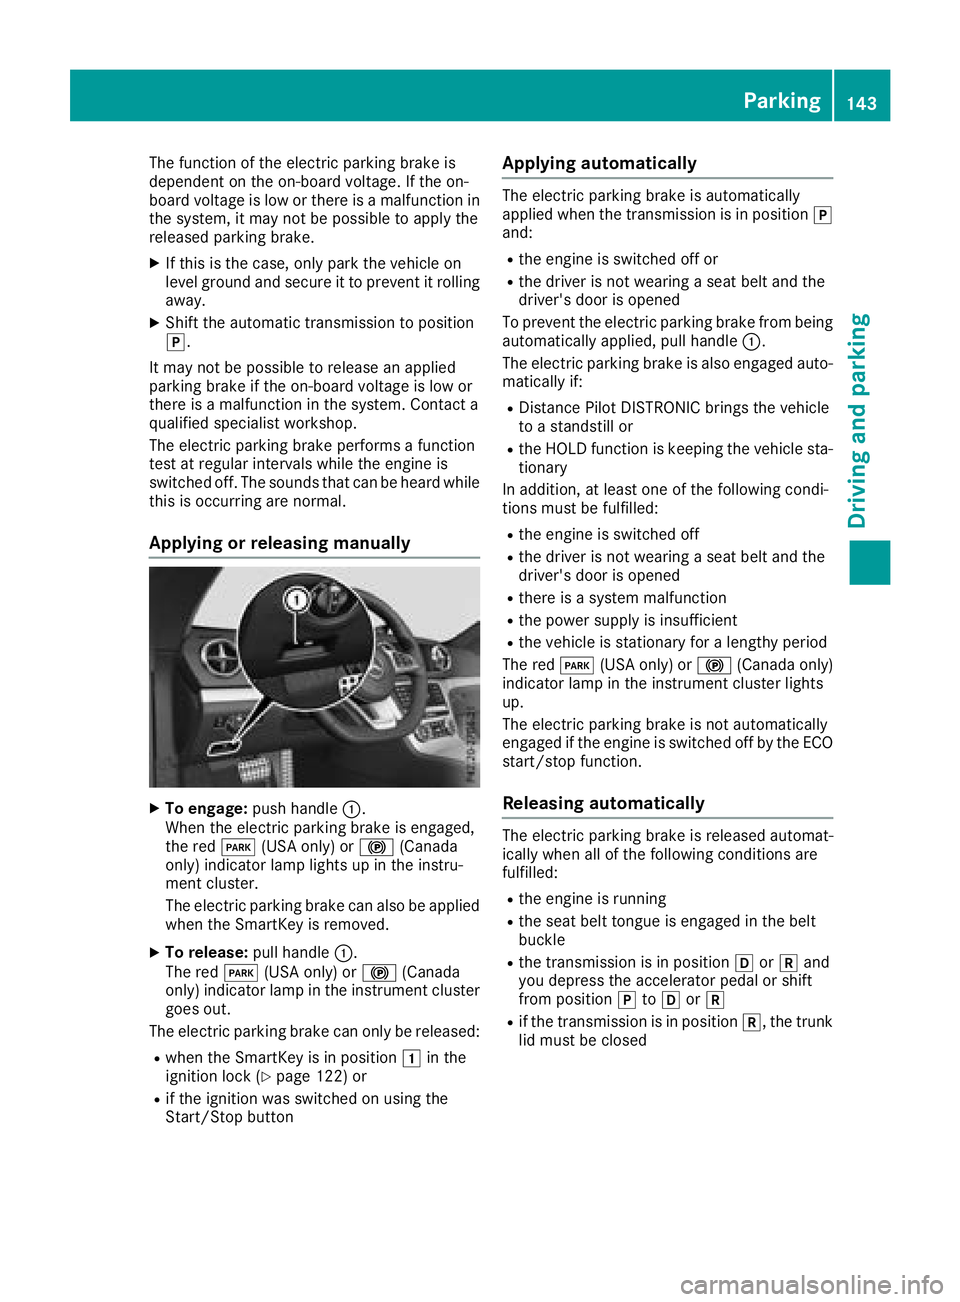
Applying or releasing manually
XTo engage: push handle :.
When the electric parking brake is engaged,
the red F(USA only) or !(Canada
only) indicator lamp lights up in the instru-
ment cluster.
The electric parking brake can also be applied
when the SmartKey is removed.
XTo release: pull handle:.
The red F(USA only) or !(Canada
only) indicator lamp in the instrument cluster
goes out.
The electric parking brake can only be released:
Rwhen the SmartKey is in position 1in the
ignition lock (Ypage 122) or
Rif the ignition was switched on using the
Start/Stop button
Applying automatically
The electric parking brake is automatically
applied when the transmission is in position j
and:
Rthe engine is switched off or
Rthe driver is not wearing a seat belt and the
driver's door is opened
To prevent the electric parking brake from being automatically applied, pull handle :.
The electric parking brake is also engaged auto-
matically if:
RDistance Pilot DISTRONIC brings the vehicle
to a standstill or
Rthe HOLD function is keeping the vehicle sta- tionary
In addition, at least one of the following condi-
tions must be fulfilled:
Rthe engine is switched off
Rthe driver is not wearing a seat belt and the
driver's door is opened
Rthere is a system malfunction
Rthe power supply is insufficient
Rthe vehicle is stationary for a lengthy period
The red F(USA only) or !(Canada only)
indicator lamp in the instrument cluster lights
up.
The electric parking brake is not automatically
engaged if the engine is switched off by the ECO
start/stop function.
Releasing automatically
The electric parking brake is released automat-
ically when all of the following conditions are
fulfilled:
Rthe engine is running
Rthe seat belt tongue is engaged in the belt
buckle
Rthe transmission is in position hork and
you depress the accelerator pedal or shift
from position jtoh ork
Rif the transmission is in position k, the trunk
lid must be closed
Parking143
Driving and parking
Z
Page 146 of 322
If the seat belt tongue is not engaged in the seat
belt buckle, the following conditions must be
fulfilled:
Rthe driver's door is closed
Ryou move the transmission out of positionj
or you have previously driven at a speed
above 2 mph (3 km/h)
Rif the transmission is in position k, the trunk
lid must be closed
When the electric parking brake is released,
the ! indicator lamp goes out in the instru-
ment cluster.
Emergency braking
The vehicle can also be braked during an emer- gency by using the electric parking brake.
XWhile driving, push handle :of the electric
parking brake.
The vehicle is braked for as long as the handle
of the electric parking brake is pressed. The
longer the electric parking brake handle is
depressed, the greater the braking force.
During braking:
Ra warning tone sounds
Rthe Release Parking Brakemessage
appears
Rthe red F(USA only) or !(Canada
only) indicator lamp in the instrument cluster flashes
When the vehicle has been braked to a stand-
still, the electric parking brake is engaged.
Parking the vehicle for a long period
If you leave the vehicle parked for longer than
four weeks, the battery may be damaged by
exhaustive discharging.
If you leave the vehicle parked for longer than six
weeks, the vehicle may suffer damage as a
result of lack of use.
XVisit a qualified specialist workshop and seek
advice.
iYou can obtain information about trickle
chargers from a qualified specialist work-
shop.
Driving tips
General notes
Important safety notes
GWARNING
If you switch off the ignition while driving,
safety-relevant functions are only available
with limitations, or not at all. This could affect, for example, the power steering and the brake
boosting effect. You will require considerably
more effort to steer and brake. There is a risk
of an accident.
Do not switch off the ignition while driving.
GWARNING
If you operate mobile communication equip-
ment when driving, you may be distracted
from the traffic situation. You could also lose
control of the vehicle. There is a risk of an
accident.
Only operate this equipment when the vehicle
is stationary.
Observe the legal requirements for the country
in which you are driving. Some jurisdictions pro-
hibit the driver from using a mobile phone while driving a vehicle.
If you make a call while driving, always use
hands-free mode. Only operate the telephone
when the traffic situation permits. If you are
unsure, pull over to a safe location and stop
before operating the telephone.
Bear in mind that at a speed of only 30 mph
(approximately 50 km/h), the vehicle covers a
distance of 44 ft (approximately 14 m)per sec-
ond.
Drive sensibly – save fuel
Observe the following tips to save fuel:
RThe tires should always be inflated to the rec-
ommended tire pressure.
RRemove unnecessary loads.
RWarm up the engine at low engine speeds.
RAvoid frequent acceleration or braking.
RObserve the service intervals in the Mainte-
nance Booklet or in the service interval dis-
144Driving tips
Driving and parking
Page 147 of 322
play. Have all the maintenance work carried in
accordance with Daimler AG regulations.
Fuel consumption also increases when driving in
cold weather, in stop-start traffic and in hilly ter-
rain.
Drinking and driving
GWARNING
Drinking and driving and/or taking drugs and driving are very dangerous combinations.
Even a small amount of alcohol or drugs can
affect your reflexes, perceptions and judg-
ment.
The possibility of a serious or even fatal acci-
dent is greatly increased when you drink or
take drugs and drive.
Do not drink or take drugs and drive or allow
anyone to drive who has been drinking or tak-
ing drugs.
Emission control
GWARNING
Combustion engines emit poisonous exhaust
gases such as carbon monoxide. Inhaling
these exhaust gases leads to poisoning. There
is a risk of fatal injury. Therefore never leave
the engine running in enclosed spaces with-
out sufficient ventilation.
Certain engine systems are designed to keep
the level of poisonous components in exhaust
fumes within legal limits.
These systems only work at peak efficiency if
they are serviced exactly in accordance with the
manufacturer's specifications. Always have
work on the engine carried out at a qualified
specialist workshop. Mercedes-Benz recom-
mends that you use an authorized Mercedes-
Benz Center for this purpose. In particular, work
relevant to safety or on safety-related systems
must be carried out at a qualified specialist
workshop.
The engine settings must not be changed under any circumstances. Furthermore, all specific
service work must be carried out at regular
intervals and in accordance with the Mercedes-
Benz service requirements. Details can be found in the Maintenance Booklet.
ECO display
The ECO display shows you how economical
your driving style is. The ECO display assists you
in achieving the most economical driving style
for the selected settings and prevailing condi-
tions. Your driving style can significantly influ-
ence the vehicle's consumption.
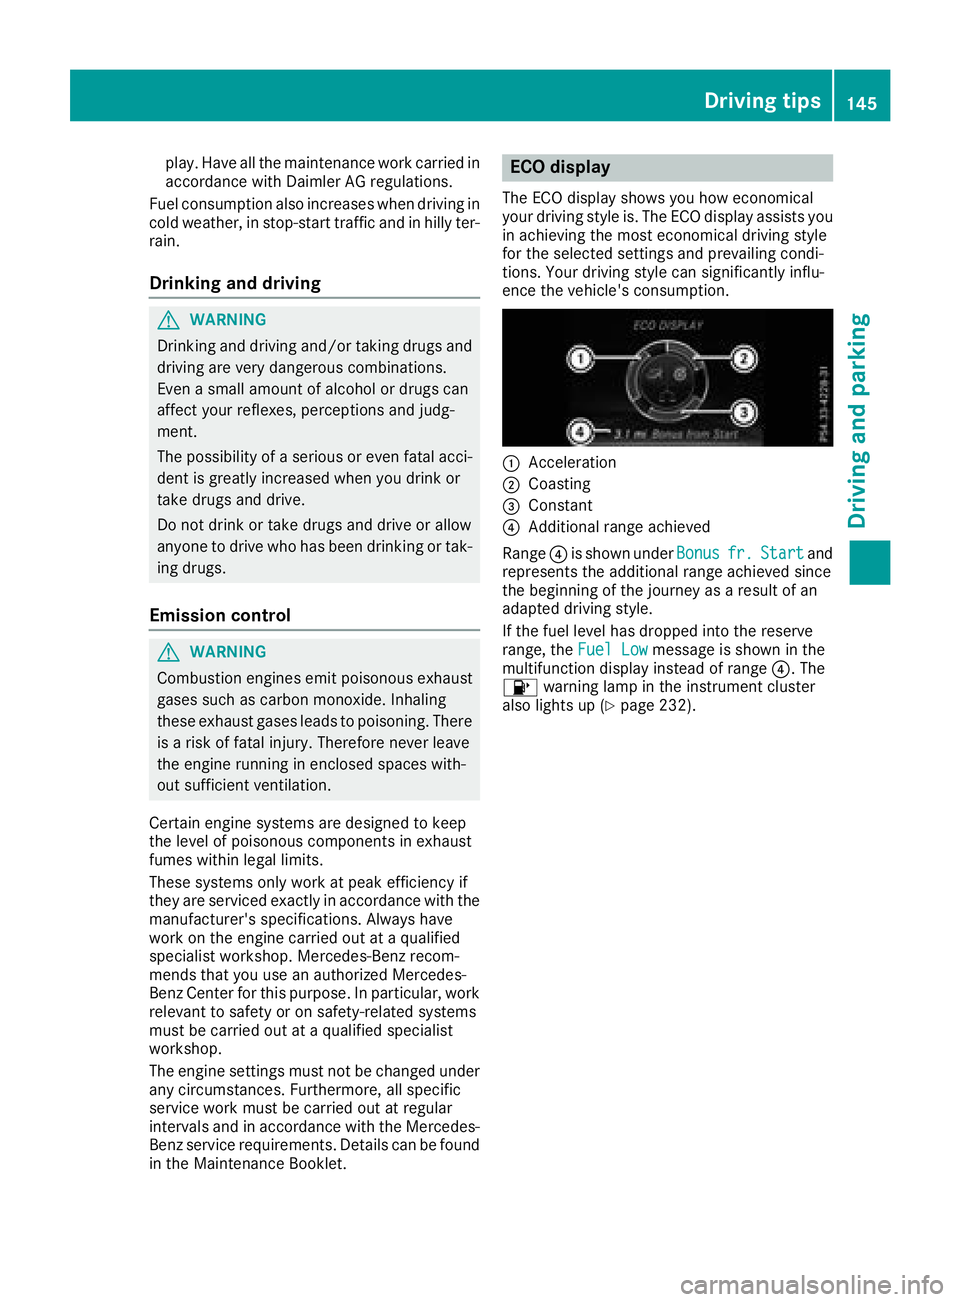
:Acceleration
;Coasting
=Constant
?Additional range achieved
Range ?is shown under Bonus
fr.Startand
represents the additional range achieved since
the beginning of the journey as a result of an
adapted driving style.
If the fuel level has dropped into the reserve
range, the Fuel Low
message is shown in the
multifunction display instead of range ?. The
8 warning lamp in the instrument cluster
also lights up (
Ypage 232).
Driving tips145
Driving and parking
Z
Page 148 of 322
The ECO display consists of three sections, with
an inner and outer area. The sections corre-
spond to the following three categories:
:Acceleration(evaluation of all accel-
eration processes):
Rthe outer area fills up and the inner area lights up green: moderate
acceleration, especially at higher
speeds
Rthe outer area empties and the
inner area is gray: sporty acceler-
ation
;Coasting (evaluation of all decelera-
tion processes):
Rthe outer area fills up and the inner area lights up green: anticipatory
driving, keeping your distance and
early release of the accelerator.
The vehicle can coast without use
of the brakes.
Rthe outer area empties and the
inner area is gray: frequent heavy
braking
=Constant (continuous evaluation
over the entire journey):
Rthe outer area fills up and the inner area lights up green: constant
speed and avoidance of unneces-
sary acceleration and deceleration
Rthe outer area empties and the
inner area is gray: fluctuations in
speed
The three inner areas display the current driving
style and light up green as a result of a particu-
larly economical driving style. Depending on thedriving situation, up to two areas may light up
simultaneously.
At the beginning of the journey, the three outer
areas are empty and fill up as a result of eco-
nomical driving. A higher level indicates a more
economical driving style. If the three outer areas
are completely filled at the same time, the driver
has adopted the most economical driving style
for the selected settings and prevailing condi-
tions. The ECO display border lights up.
The ECO display does not indicate the actual fuel consumption. The additionally achieved range
displayed under Bonus fr. start
does not
indicate a fixed consumption reduction. In addition to driving style, the actual consump-
tion is affected by other factors, such as:
Rload
Rtire pressure
Rcold start
Rchoice of route
Ractive electrical consumers
These factors are not included in the ECO dis-
play.
An economical driving style specially requires
driving at moderate engine speeds.
Achieving a higher value in the categories
"Acceleration" and "Constant":
Robserve the gearshift recommendations.
Rdrive the vehicle in drive program Cor E.
In urban traffic and stop-start traffic, drive pro-
gram Cis recommended.
On long journeys at a constant speed, e.g. on the
highway, only the outer area for "constant" will
change.
The ECO display summarizes the driving style
from the start of the journey to its completion.
Therefore, there are more marked changes in
the outer areas at the start of a journey. On lon- ger journeys, there are fewer changes. For more
marked changes, perform a manual rest
(
Ypage 189).
Further information on the ECO display
(
Ypage 188).
Braking
Important safety notes
GWARNING
If you shift down on a slippery road surface in an attempt to increase the engine's braking
effect, the drive wheels could lose their grip.
There is an increased danger of skidding and
accidents.
Do not shift down for additional engine brak-
ing on a slippery road surface.
Downhill gradients
!On long, steep gradients, you must reduce
the load on the brakes. To use engine braking,
shift to a lower gear in good time. This helps
146Driving tips
Driving and parking
Page 149 of 322
you to avoid overheating thebrakes and wear -
in g them out excessively.
Whe nmakin guse of th eengin ebrakin g
effect, it is possibl ethat adrive whee lmay no t
tur nfor som etime, e.g. in th ecas eof sud-
denly changin gor slipper yroa dsurfac econ-
ditions. This could caus edamage to th edrive
train .This typ eof damage is no tcovered by
th eMercedes-Ben zwarranty.
Change into alower gear in goo dtime on lon g
and steep downhill gradients .This is especially
important if th evehicl eis laden .
This also applies if you hav eactivated cruise
control or Distanc ePilo tDISTRONIC.
Heavy and light loads
GWARNIN G
If you res tyour foo ton th ebrak epedal while
driving, th ebrakin gsystem can overheat. This
increase sth estopping distanc eand can eve n
caus eth ebrakin gsystem to fail .There is a
ris kof an accident.
Never use th ebrak epedal as afootrest .Never
depress th ebrak epedal and th eaccelerato r
pedal at th esam etime.
!Depressing th ebrak epedal constantl y
result sin excessive and premature wear to
th ebrak epads .
If th ebrakes hav ebeen subjecte dto aheav y
load, do no tstop th evehicl eimmediately, but
drive on for ashort while .This allows th eairflow
to cool th ebrakes mor equickly.
Wet roads
If you hav edriven for alon gtime in heav yrain
without braking, there may be adelaye dreac -
tion from th ebrakes when brakin gfor th efirst
time. This may also occur after th evehicl ehas
been washed or driven through deep water.
You then hav eto depress th ebrak epedal mor e
firmly. Maintai n agreate rdistanc efrom th e
vehicl ein front.
Afte rdrivin gon awet roa dor havin gth evehicl e
washed, brak efirmly while payin gattention to
th etraffic conditions. This will warm up th e
brak ediscs, thereby drying them mor equickl y
and protectin gthem against corrosion.
Limited braking perfor mance onsalt-
treated roads
If you drive on salted roads, alayer of salt resi-
due may for mon th ebrak edisc sand brak e
pads .This can result in asignificantly longer
brakin gdistance.
RIn order to preven tany salt build-up, apply th e
brakes occasionally while payin gattention to
th etraffic conditions.
RCarefull ydepress th ebrak epedal and th e
beginnin gand en dof ajourney.
RMaintai n agreate rdistanc eto th evehicl e
ahead .
Servicing the brakes
!The brak eflui dlevel may be to olow, if:
Rif th ered brak ewarnin glamp lights up in
th einstrumen tcluste rand
Ryou hear awarnin gtone while th eengin eis
running
Observ eadditional warnin gmessage sin th e
multifunction display.
The brak eflui dlevel may be to olow due to
brak epad wear or leakin gbrak elines.
Hav eth ebrak esystem checke dimmediately.
Consult aqualified specialist workshop to
arrang ethis.
!As th eES P®system operate sautomatically,
th eengin eand th eignition mus tbe switched
off (the SmartKey mus tbe in position uor
1 in th eignition loc kor th eStart/Sto pbut -
to nmus tbe in position uor1), if:
Rtheparkin gbrak eis tested usin g abrak e
dynamometer.
Rth evehicl eis towed wit hth efron taxl e
raised.
Braking triggered automatically by ES P
®may
caus esevere damage to th ebrak esystem.
Al lchecks and maintenance wor kon th ebrak e
system mus tbe carrie dout at aqualified spe -
cialist workshop .
Hav ebrak epads installed and brak eflui d
replaced at aqualified specialist workshop .
If th ebrak esystem has only been subjec tto
moderat eloads ,you should test th efunctional-
it y of your brakes at regular intervals.
In forma
tion on BA
S(Brake Assist) (Ypage 60)
and on Brake Assis twit hCross-Traffic Assis t
(
Ypage 61).
Driving tips147
Driving and parking
Z
Page 150 of 322
Mercedes-Benz recommends that you only have
brake pads/linings installed on your vehicle
which have been approved for Mercedes-Benz
vehicles or which correspond to an equivalent
quality standard. Brake pads/linings which have
not been approved for Mercedes-Benz vehicles
or which are not of an equivalent quality could
affect your vehicle's operating safety.
Mercedes-Benz recommends that you only use
brake fluid that has been specially approved for
your vehicle by Mercedes-Benz, or which corre-
sponds to an equivalent quality standard. Brake
fluid which has not been approved for
Mercedes-Benz vehicles or which is not of an
equivalent quality could affect your vehicle's
operating safety.
High-performance and ceramic brake
system (Mercedes-AMG vehicles)
The AMG brake systems are designed for heavy
loads. This may lead to noise when braking. This will depend on:
RSpeed
RBraking force
RAmbient conditions, e.g. temperature and
humidity
The wear of individual components of the brake
system, such as the brake pads/linings or brake
discs, depends on the individual driving style
and operating conditions.
For this reason, it is impossible to state a mile-
age that will be valid under all circumstances. An aggressive driving style will lead to high wear.
You can obtain more information on this from a
qualified specialist workshop.
New and replaced brake pads and discs only
reach their optimum braking effect after several
hundred kilometers of driving. Compensate for
this by applying greater force to the brake pedal.
Keep this in mind, and adapt your driving and
braking accordingly during this break-in period.
Excessive heavy braking results in correspond-
ingly high brake wear. Observe the brake system
warning lamp in the instrument cluster and note
any brake status messages in the multifunction
display. Especially for high performance driving,it is important to maintain and have the brake
system checked regularly.
Driving on wet roads
Hydroplaning
If water has accumulated to a certain depth on
the road surface, there is a danger of hydro-
planing occurring.
For this reason, in the event of heavy rain or in
conditions in which hydroplaning may occur,
you must drive in the following manner:
Rlower your speed
Ravoid ruts
Ravoid sudden steering movements
Rbrake carefully
Driving on flooded roads
!Do not drive through flooded areas. Check
the depth of any water before driving through it. Drive slowly through standing water. Oth-
erwise, water could enter the vehicle interior
or engine compartment. It can then damage
the engine's or automatic transmission's
electronic components. It can also be sucked
in by the engine's air intake connection and
cause engine damage.
Winter driving
GWARNING
If you shift down on a slippery road surface in an attempt to increase the engine's braking
effect, the drive wheels could lose their grip.
There is an increased danger of skidding and
accidents.
Do not shift down for additional engine brak-
ing on a slippery road surface.
GDANGER
If the exhaust pipe is blocked or adequate
ventilation is not possible, poisonous gases
such as carbon monoxide (CO) may enter the vehicle. This is the case, e.g. if the vehicle
becomes trapped in snow. There is a risk of
fatal injury.
If you leave the engine or the auxiliary heating
running, make sure the exhaust pipe and area
around the vehicle are clear of snow. To
ensure an adequate supply of fresh air, open a
148Driving tips
Driving and parking