fuel pressure MERCEDES-BENZ SLC ROADSTER 2018 Owner's Manual
[x] Cancel search | Manufacturer: MERCEDES-BENZ, Model Year: 2018, Model line: SLC ROADSTER, Model: MERCEDES-BENZ SLC ROADSTER 2018Pages: 298, PDF Size: 5.26 MB
Page 25 of 298
Protecting the environment
General notes
HEnvironmental note
Daimler's declared policy is one of compre-
hensive environmental protection.
The objectives are for the natural resources
that form the basis of our existence on this
planet to be used sparingly and in amanner
that takes the requirements of both nature
and humanity into account.
You too can help to protect the environment
by operating your vehicle in an environmen-
tally responsible manner.
Fuel consumption and the rate of engine,
transmission, brake and tire wear are affected by these factors:
Roperating conditionsofy our vehicle
Ryour personal driving style
You can influence both factors. You should
bear the following in mind:
Operating conditions:
Ravoid short trips as these increase fuel con-
sumption.
Ralways make sure that the tire pressures
are correct.
Rdo not carry any unnecessary weight.
Rremove roof racks once you no longer need
them.
Rar egularly serviced vehicle will contribute
to environmental protection. You should
therefore adhere to the service intervals.
Ralways have service work carried out at a
qualified specialist workshop.
Personal driving style:
Rdo not depress the accelerator pedal when
startin gthe engine.
Rdo not warm up the engine when the vehicle
is stationary.
Rdrive carefully and maintain asafe distance
from the vehicle in front.
Ravoid frequent, sudden acceleration and
braking.
Rchange gear in good time and use each gear
only up to Ôof its maximum engine speed.
Rswitch off the engine in stationary traffic.
Rkeep an eye on the vehicle's fuel consump-
tion.
Environmental concerns and recom-
mendations
Wherever the operating instructions require you
to dispose of materials, first try to regenerate or
re-use them. Observe the relevant environmen-
tal rules and regulations when disposing of
materials. In this way you will help to protect the
environment.
Genuine Mercedes-Benz parts
HEnvironmental note
Daimler AG also suppliesr econditioned major
assemblies and parts which are of the same
quality as new parts. They are covered by the
same Limited Warranty entitlements as new
parts.
!Air bags and Emergency Tensioning Devi-
ces, as well as control units and sensors for
these restraint systems, may be installed in
the following areas of your vehicle:
Rdoors
Rdoor pillars
Rdoor sills
Rseats
Rcockpit
Rinstrumentc luster
Rcenter console
Do not install accessories such as audio sys-
tems in these areas. Do not carry out repairs or welding. You could impair the operating
efficiency of the restraint systems.
Have aftermarket accessories installed at a
qualified specialist workshop.
You could jeopardize the operating safety of
your vehicle if you use parts, tires and wheels as
well as accessories relevant to safety which
have not been approved by Mercedes-Benz. This
could lead to malfunction sinsafety-relevant
Genuine Mercedes-Benz parts23
Introduction
Z
Page 127 of 298
ANeutral
Do not shift the transmission toA
whil edriving .The automatic trans-
mission could otherwis ebedam-
aged.
No powe ristransmitted fromt he
engine to the drive wheels.
Releasing the brake peda lwilla llow
yo utom ovet he vehicl efreely, e.g .to
push it or tow it.
If ESP
®is deactivated or faulty: shift
the transmission to position Aif
the vehicl eisindangerofs kidding,
e.g .oni cy roads.
!Coasting in neutral imay
cause damage to the drive train.
7Drive
The automatic transmission changes
gear automatically. All forward gears
ar ea vailable.
Driving tips
Changin ggear
The automatic transmission shifts throug hthe
individual gear sautomaticall ywhenitisint rans-
mission position h.Thisa utomatic gear shift-
ing behavio risdetermine dby:
Rthe selecte ddrive program
Rthe positio nofthe accelerator pedal
Rthe roa dspeed
Accelerator peda lposition
Your style of driving influences how the auto-
matic transmission shifts gear:
Rlittle throttle :early upshifts
Rmor ethrottle :lat eu pshifts
Kickdown
Use kickdow nfor maximum acceleration.
XDepres sthe accelerator peda lbeyond the
pressure point.
The automatic transmission shifts to alower
gear depending on the engine speed.
XEas eoff the accelerator peda lonce the
desired speed is reached.
The automatic transmission shifts back up.
Drive programs
Drive program C(Comfort)
In urba ntraffica nd stop-start traffic, drive pro-
gram Cis recommended.
Driv eprogram Cis characterized by the follow-
ing:
Rthe vehicl edelivers comfortable, economical
handling characteristics.
Rthe vehicl epulls away mor egently in forward
and revers egears ,unless the accelerator
peda lisdepressedf ully.
Rthe vehicl ehasimproved driving stability, for
exampl eonslipperyroads urfaces.
Roptima lfue lconsumption resulting fromt he
automatic transmission shifting up sooner.
The vehicl eisdriven in the lo wengine speed
range and the wheels ar elesslikel ytos pin.
Rth es uspension exhibits comfortabl edam ping
settings (adaptive damping system onl yin
vehicles with AMG RIDE CONTROL sports
suspension).
Rthe steering exhibits comfortabl esteering
characteristics.
Drive program S(Sport)
Driv eprogram Sis characterized by the follow-
ing:
Rthe vehicl eexhibits sporty driving character-
istics.
Rthe vehicl epulls away in first gear.
Rthe automatic transmission shifts up later.
The fuel consumption possibl ybeing higher
as aresul toft he later automatic transmission
shift points.
Automatict ransmission125
Driving andparking
Z
Page 132 of 298
!Overfilling the fuel tank could damage the
fuel system.
!Take care not to spill any fuel on painted
surfaces. You could otherwise damage the
paintwork.
!Use afilter when adding fuel from afuel can.
The fuel lines and/or the fuel injection system
could otherwise be blocked by particles from
the fuel can.
If you overfill the fuel tank, fuel could spray out
when the fuel pump nozzle is removed.
For further information on fuel and fuel quality
(
Ypage 291).
Refueling
General information
The fuel filler flap is unlocked or locked auto-
matically when you unlock or lock the vehicle
with the SmartKey or using KEYLESS-GO.
The position of the fuel filler cap is displayed
8 in the instrument cluster. The arrow next
to the filling pump indicates the side of the vehi-
cle.
Opening the fuel filler flap
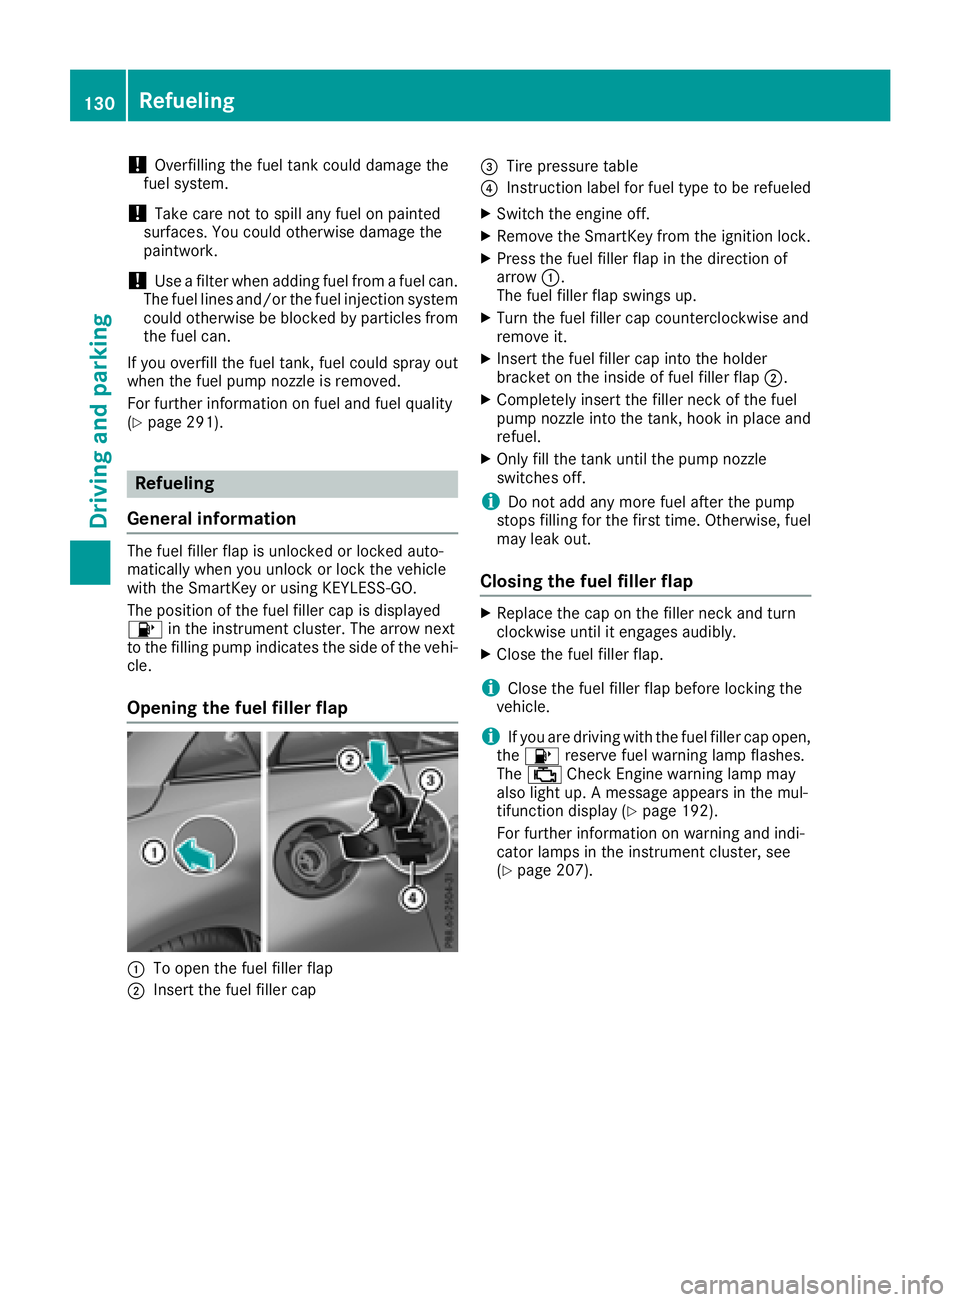
:To open the fuel filler flap
;Insert the fuel filler cap
=Tire pressure table
?Instruction label for fuel type to be refueled
XSwitch the engine off.
XRemove the SmartKey from the ignition lock.
XPress the fuel filler flap in the direction of
arrow :.
The fuel filler flap swings up.
XTurn the fuel filler cap counterclockwise and
remove it.
XInsert the fuel filler cap into the holder
bracket on the inside of fuel filler flap ;.
XCompletely insert the filler neck of the fuel
pump nozzle into the tank, hook in place and
refuel.
XOnly fill the tank until the pump nozzle
switches off.
iDo not add any more fuel after the pump
stops filling for the first time. Otherwise, fuel
may leak out.
Closing the fuel filler flap
XReplace the cap on the filler neck and turn
clockwise until it engages audibly.
XClose the fuel filler flap.
iClose the fuel filler flap before locking the
vehicle.
iIf you are driving with the fuel filler cap open,
the 8 reserve fuel warning lamp flashes.
The ; Check Engine warning lamp may
also light up. Amessage appears in the mul-
tifunction display(
Ypage 192).
For further information on warning and indi-
cator lamps in the instrument cluster, see
(
Ypage 207).
130Refueling
Driving and parking
Page 136 of 298
Drivingtips
General notes
Important safet ynotes
GWARNING
If you switch of fthe ignition whil edriving,
safety-relevant function sare only available
wit hlimitations, or no tatall. Thi scould affect,
fo re xample, th epowe rsteerin gand th ebrake
boostin geffect. You will require considerably
more effort to steer and brake .There is arisk
of an accident.
Do no tswitch of fthe ignition whil edriving.
GWARNING
If you operat emobile communication equip -
men twhen driving, you may be distracted
from th etraffic situation .You could also los e
contro lofthevehicle. There is ariskofa n
accident.
Only operat ethise quipmen twhen th evehicle
is stationary.
Observ ethe lega lrequirements fo rthe country
in whic hyou are driving. Some jurisdiction spro-
hibi tthe driver from usin gamobile phone whil e
drivin gavehicle.
If you mak eacallw hiled riving, always use
hands-free mode. Only operat ethe telephon e
when th etraffic situation permits. If you are
unsure ,pull over to asafel ocation and stop
befor eoperatin gthe telephone.
Bear in min dthatatas peed of only 30 mph
(approximately 50 km/h), th evehicle cover sa
distanc eof44f t(approximately 14 m)per sec-
ond.
Drive sensibly –save fuel
Observe the following tips to save fuel:
RThe tires should always be inflated to the rec-
ommended tire pressure.
RRemove unnecessary loads.
RWarm up the engin eatlow engin espeeds.
RAvoid frequenta cceleration or braking.
RObserve the servicei ntervals in the Mainte-
nanc eBooklet or in the servicei nterval dis-play. Have all the maintenanc
ework carried in
accordance with Daimler AG regulations.
Fuel consumption also increases when driving in cold weather, in stop-start traffic and in hilly ter-
rain.
Drinking and driving
GWARNING
Drinkin gand driving and/or takin gdrugs and
driving are very dangerous combinations.
Even asmall amount of alcohol or drugs can
affect your reflexes, perceptions and judg-
ment.
The possibility of aserious or even fatal acci-
dent is greatly increased when you drink or
take drugs and drive.
Do not drink or take drugs and drive or allow
anyone to drive who has been drinking or tak-
ing drugs.
Emission control
GWARNING
Combustion engines emit poisonous exhaust
gases such as carbon monoxide. Inhaling
these exhaust gases leads to poisoning. There
is ar isk of fatal injury. Thereforen ever leave
the engin erunning in enclosed spaces with-
out sufficientv entilation.
Certain engin esystems are designed to keep
the level of poisonous component sinexhaust
fumes within legal limits.
These systems only work at peak efficiency if
they are serviced exactly in accordance with the
manufacturer's specifications .Always have
work on the engin ecarried out at aqualified
specialist workshop. Mercedes-Benz recom-
mends that you use an authorized Mercedes-
BenzC enter for this purpose. In particular, work
relevant to safety or on safety-related systems
must be carried out at aqualified specialist
workshop.
The engin esettings must not be changed under
any circumstances. Furthermore, all specific
servicew ork must be carried out at regular
intervals and in accordance with the Mercedes-
Benzs ervicer equirements. Details can be found
in the Maintenance Booklet.
134Driving tips
Driving and parking
Page 238 of 298
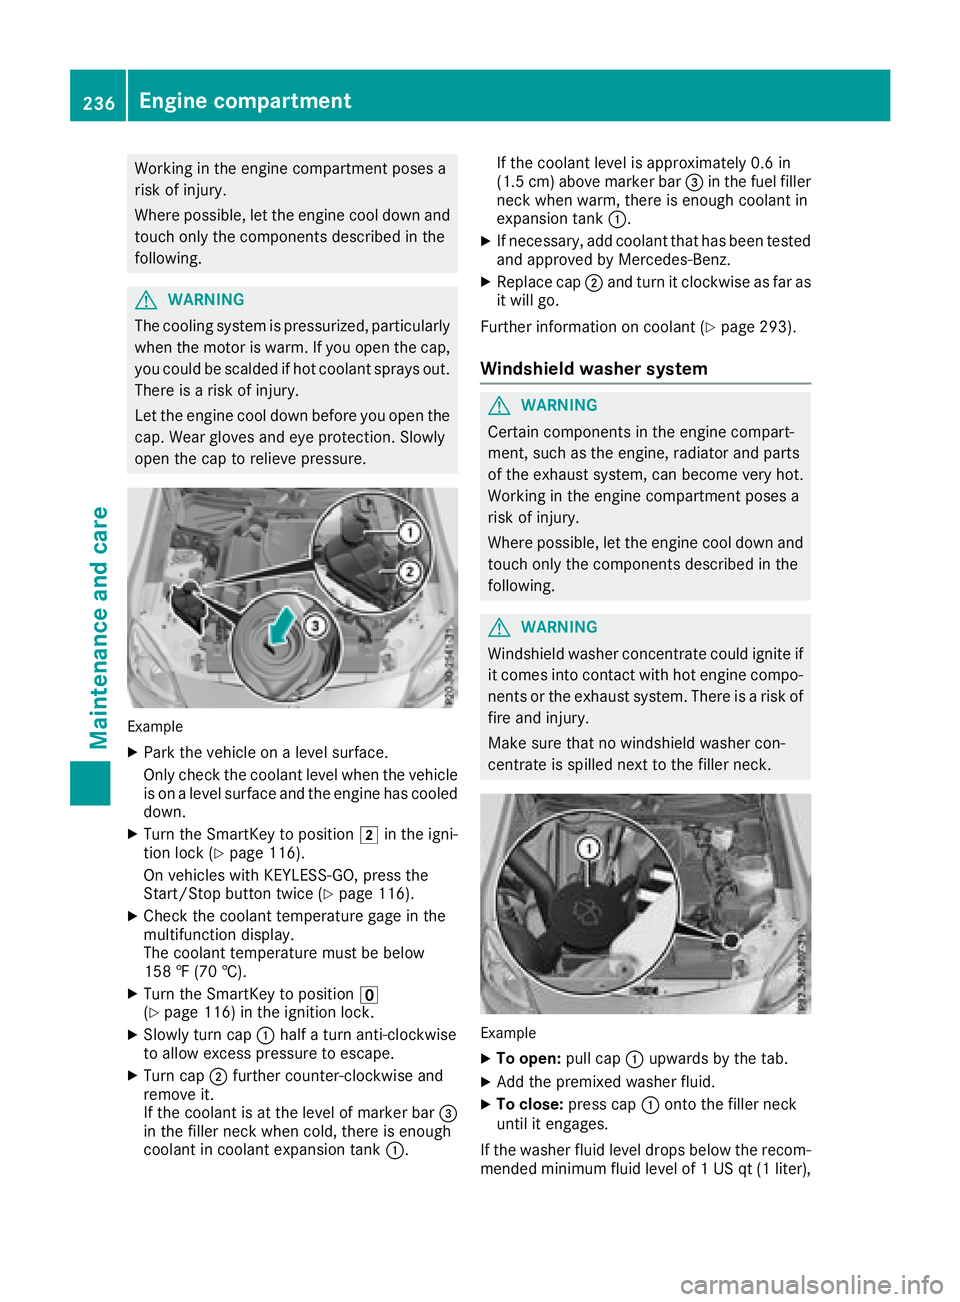
Workinginthe engine compartment poses a
risk of injury.
Where possible, let the engine cool down and touch only the componentsd escribed in the
following.
GWARNING
The cooling system is pressurized, particularly
when the motor is warm. If you open the cap,
you could be scalded if hot coolant sprays out.
There is arisk of injury.
Let the engine cool down before you open the
cap. Wear gloves and eye protection. Slowly
open the cap to relieve pressure.
Example
XPark the vehicle on alevel surface.
Only check the coolant level when the vehicle
is on alevel surface and the engine has cooled
down.
XTurn the SmartKey to position 2in the igni-
tion lock (Ypage 116).
On vehicles with KEYLESS-GO, press the
Start/Stop button twice (
Ypage 116).
XCheck the coolant temperature gage in the
multifunction display.
The coolant temperature must be below
158 ‡(70 †).
XTurn the SmartKey to position u
(Ypage 116) in the ignition lock.
XSlowly turn cap :half aturn anti-clockwise
to allow excessp ressure to escape.
XTurn cap;further counter-clockwise and
remove it.
If the coolant is at the level of marker bar =
in the filler neck when cold, there is enough
coolant in coolant expansion tank :.If the coolant level is approximately 0.6 in
(1.5 cm
)above marker bar =in the fuel filler
neck when warm, there is enough coolant in
expansion tank :.
XIf necessary, add coolant that has been tested
and approved by Mercedes-Benz.
XReplace cap;and turn it clockwise as far as
it will go.
Further information on coolant (
Ypage 293).
Windshield washer system
GWARNING
Certain component sinthe engine compart-
ment,s uch as the engine, radiator and parts
of the exhaust system, can become very hot.
Workin ginthe engine compartment poses a
risk of injury.
Where possible, let the engine cool down and touch only the componentsd escribed in the
following.
GWARNING
Windshield washer concentrate could ignite if it comes into contact with hot engine compo-
nents or the exhaust system. There is arisk of
fire and injury.
Make sure that no windshield washer con-
centrate is spilled next to the filler neck.
Example
XTo open: pull cap:upwards by the tab.
XAdd the premixed washer fluid.
XTo close: press cap :ontothe filler neck
until it engages.
If the washer fluid level drops below the recom-
mended minimum fluid level of 1USqt(1l iter),
236Engine compartment
Maintenance and care
Page 242 of 298
Rseals
Rtrim
Rventilation slots
Damaged seals or electrical componentsc an
lead to leaks or failures.
!Do not use high-pressure cleaners if the
tank recess is open while you clean it. This
can cause damage to the seals or other com-
ponents.
Cleaning the paintwork
!Do not affix:
Rstickers
Rfilms
Rmagnetic plates or similar items
to painted surfaces. You could otherwise
damage the paintwork.
Scratches, corrosive deposits, areas affected by
corrosion and damage caused by inadequate
care cannot always be completely repaired. In
such cases, visit aqualified specialist workshop.
XRemove dirt immediately,w here possible,
while avoiding rubbing too hard.
XSoak insect remains with insect remover and
rinse off the treated areas afterwards.
XSoak bird droppings with water and rinse off
the treated areas afterwards.
XRemove coolant, brake fluid, tree resin, oils,
fuels and greases by rubbing gently with a
cloth soaked in petroleum ether or lighter
fluid.
XUse tar remover to remove tar stains.
XUse silicone remover to remove wax.
If water no longer forms "beads" on the paint
surface, use the paint care products recommen-
ded and approved by Mercedes-Benz.T his is the
case approximately every three to five months,
depending on the climate conditions and the
care product used.
If dirt has penetrated the paint surface or if the
paint has become dull,t he paint cleaner recom-
mended and approved by Mercedes-Benz
should be used.
Do not use these care products in the sun or on
the hood while the hood is hot.
XUse asuitable touch-up stick, e.g. MB Touch-
Up Stick,tor epair slight damage to the paint-
work quickly and provisionally.
Mattef inish care
!Never polish the vehicle or the light alloy
wheels. Polishing causes the finish to shine.
!The following can give the paint aglossy
appearance and thus reduce the matt effect:
RRubbing hard with unsuitable agents
RWashing the vehicle in direct sunlight
!Never use paint cleaner, buffing or polishing
products, or gloss preserver, e.g. wax, for the
purpose of paintwork care. These products
are only suitable for high-gloss surfaces. Their
use on vehicles with matte paintwork leads to
considerable surface damage or, more spe-
cifically,tos hiny, spotted areas.
Always have paintwork repairs carried out at a
qualified specialist workshop.
!Only use automatic car washes which cor-
respond to the latest technological stand-
ards. Never use wash programs which finish
by treating the vehicle with hot wax.
Observe these notes if your vehicle has aclear
matte finish. This will help you to avoid damage
to the paintwork due to incorrect treatment.
These notes also apply to light alloy wheels with
ac lear matte finish.
iUse only insect remover and car shampoo
from the range of recommended and
approved Mercedes-Benz care products.
Cleaning the decorative film
!The following may have an effect on the ser-
vice life and coloring of decorative film:
Rsunlight
Rtemperature, e.g. hot-air fan
Rweather conditions
Rstone impacts and dirt
Rchemical cleaning agents
Rgreasy substances
!Do not use any types of polish on matt dec-
orative film. Polishing surfaces covered with
film gives it ashiny finish.
!Do not treat matt or structured decorative
film with wax. This may lead to marks that
cannot be removed.
240Care
Maintenance and care
Page 252 of 298
HEnvironmentalnote
Hav ethe used tir esealantb ottle disposed of
professionally, e.g .ataqualifieds pecialist
workshop.
If tir epressure of 20 0kPa(2.0 ba r/29 psi )has
beena chieved after amaximu mperiod of ten
minutes:
XSwitch off the tire inflation compressor.
XUnscrew the filler hose from the valve of the
faulty tire.
XStow the tire sealant bottle and the tire infla- tion compressor.
XPull away immediately.
XStop after driving for approximately ten
minutes and check the tire pressure with the
tire inflation compressor.
The tire pressure must now be at least
130 kPa (1.3 bar/19 psi).
GWARNING
If the required tire pressure is not reached
after driving for ashort period, the tire is too
badly damaged. The tire sealant cannot repair
the tire in this instance. Damaged tires and a
tire pressure that is too low can significantly
impair the vehicle's braking and driving char-
acteristics. There is arisk of accident.
Do not continue driving. Contact aqualified
specialist workshop.
iIn cases such as the one mentioned above,
contact an authorized Mercedes-Benz Cen-
ter. Or call 1-800-FOR-MERCedes( in the
USA) or 1-800-387-0100 (in Canada).
XCorrect the tire pressure if it is still at least
130 kPa (1.3 bar/19 psi).S ee the Tire and
Loading Information placard on the driver's
side B-pillar or the tire pressure tabl einthe
fuel filler flapf or values.
XTo increase the tire pressure: switch on the
tire inflation compressor.
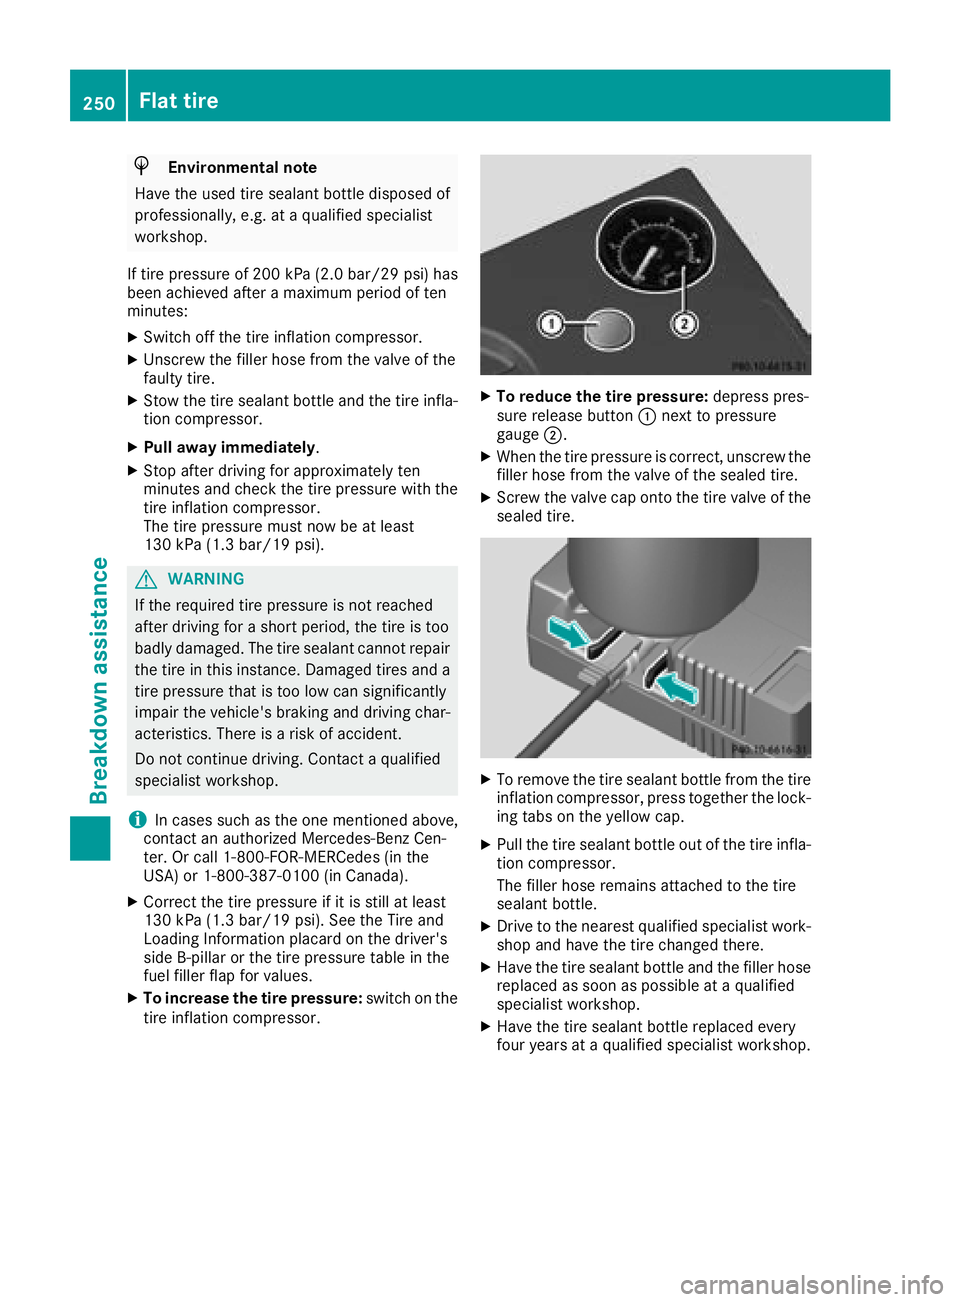
XTo reduce the tire pressure: depress pres-
sure release button :next to pressure
gauge ;.
XWhen the tire pressure is correct, unscrew the
filler hose from the valve of the sealed tire.
XScrew the valve cap onto the tire valve of the
sealed tire.
XTo remove the tire sealant bottle from the tire
inflation compressor, press together the lock-
ing tabs on the yellow cap.
XPullthe tire sealant bottle out of the tire infla-
tion compressor.
The filler hose remains attache dtothe tire
sealant bottle.
XDrive to the nearest qualified specialist work-
shop and have the tire change dthere.
XHave the tire sealant bottle and the filler hose
replaced as soon as possibleataq ualified
specialist workshop.
XHave the tire sealant bottle replaced every
four years at aqualified specialist workshop.
250Flat tire
Breakdowna ssistance
Page 266 of 298
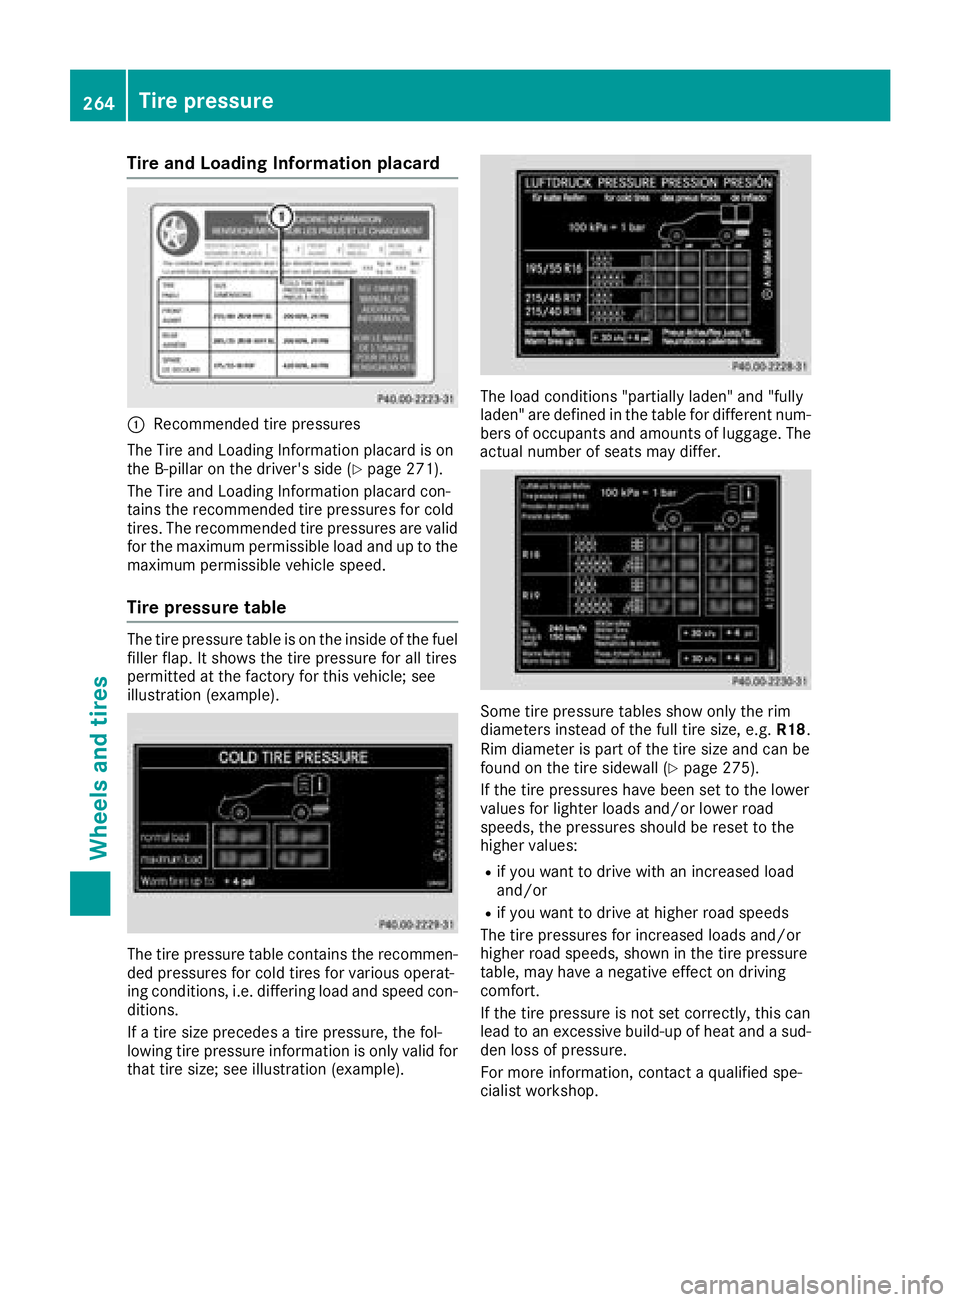
Tire and LoadingInfor matio nplacard
:Recommended tire pressures
The Tire and Loading Informatio nplacard is on
the B-pillar on the driver's side (
Ypage 271).
The Tire and Loading Informatio nplacard con-
tains the recommende dtire pressures for cold
tires. The recommende dtire pressures ar evalid
for the maximum permissibl eloa da nd up to the
maximum permissibl evehicl espeed.
Tire pressure table
The tire pressure table is on the insid eofthe fuel
fille rflap. It shows the tire pressure for al ltires
permitted at the factory for thisv ehicle; see
illustratio n(example).
The tire pressure table contains the recommen-
de dp ressures for col dtiresfor various operat-
ing conditions, i.e .differin gloa da nd spee dcon-
ditions.
If at ire size precedes atire pressure, the fol-
lowing tire pressure informatio niso nlyv alid for
thatt ire size; see illustratio n(example).
The load conditions "partiall yladen "and "fully
laden" ar edefine dint he table for different num-
bers of occupants and amounts of luggage.T he
actual numbe rofseats mayd iffer.
Some tire pressure table sshowo nlyt he rim
diameters instea dofthe full tire size, e.g. R18.
Ri md iame terisp artoft he tire size and can be
found on the tire sidewall (
Ypage 275).
If the tire pressures have been set to the lower
values for lighte rloads and/or lowe rroad
speeds ,the pressures shoul dbereset to the
highe rvalues :
Rif youwanttod rive with an increased load
and/or
Rif yo uwanttod rive at highe rroa ds peeds
The tire pressures for increased load sand/or
highe rroa ds peeds, shown in the tire pressure
table ,mayhave anegative effect on driving
comfort.
If the tire pressure is not set correctly, thisc an
lead to an excessive build-u pofheata nd asud-
de nlossofp ressure.
For mor einformation, contact aquali fied spe-
cialist workshop.
264Tire pressure
Wheel sand tires
Page 267 of 298
Important notes on tire pressure
GWARNING
If th etirep ressur edrops repeatedly, th e
wheel, valv eortirem ay be damaged. Tir e
pressur ethatist oolow may result in atire
blow-out .Ther eisar iskofana ccident.
RCheckthe tire for foreign objects .
RCheckwhether th ewhee lislosing air or th e
valv eisl eaking .
If you are unable to rectify th edamage, con-
tac taq ualified specialist workshop.
GWARNIN G
If you fit unsuitable accessories onto tire
valves, th etirev alves may be overloaded and
malfunction ,whic hc an caus etirep ressur e
loss .Due to their design ,retrofitte dtirep res-
sur em onitors keep th etirev alveo pen .This
can also result in tire pressur eloss .Ther eisa
ris kofana ccident.
Only screw th estandard valv ecap or other
valv ecapsa pprove dbyMercedes-Ben zfor
your vehicl eontot he tire valve.
Use asuitable pressur egauge to chec kthe tire
pressure. The outer appearanc eofatired oes
no tp ermit any reliable conclusio nabout th etire
pressure. On vehicles equipped wit hthe elec -
tronic tire pressur emonitor, th etirep ressur e
can be checke dintheon-board computer.
The tire temperature and pressur eincreas e
when th evehicl eisinm otion.This is dependen t
on th edriving spee dand th eload.
Therefore, you should only correc ttirep res-
sures when th etires are cold.
The tires are cold:
Rif th evehicl ehas been parked wit hthe tires
out of direct sunligh tfor at least three hour s
and
Rif th evehicl ehas no tbeen driven further than
1m ile (1. 6km)
The tire temperature changes depending on th e
outside temperature, th evehicl espee dand th e
tire load. If th etiret
em p
erature changes by
18 ‡(10 †), th etirep ressur echanges by
approximately 10 kP a(0.1b ar/1.5 psi) .Take
this int oaccoun twhen checkin gthe pressur eof
warm tires .Onlyc orrect thet irep ressur eifitisto
ol ow for th ecurren toperating conditions. If
you chec kthe tire pressur ewhen th etires are
warm ,the resulting value will be higher than if
th et ires were cold. This is normal. Do no t
reduce th etirep ressur etothevalue specifie d
for cold tires .The tire pressur ewould otherwise
be to olow.
Observ ethe recommended tire pressures for
cold tires :
Ron theTirea nd Loading Information placard
on th eB-pillar on th edriver' sside
Rin th etirep ressur etable on th einside of th e
fuel filler flap
Rprinte dinyellow on th erim of th eemer-
gency/collapsible spar ewhee l(dependin gon
vehicl eequipment)
Underinflated or overinflated tires
Underinflated tires
GWARNIN G
Tires wit hpressur ethatist oolow can over-
heat and burs tasaconsequence .Inaddition ,
they also suffer from excessiv eand/o rirreg-
ular wear, whic hcan severely impair th ebrak -
ing properties and th edriving characteristics .
Ther eisar iskofana ccident.
Avoid tire pressures that are to olow in all th e
tires ,includin gthe spar ewheel.
Underinflated tires may:
Roverheat, leadin gtotired efects
Radversely affec thandlin g
Rwear excessively and/o runevenly
Rhav eana dverse effec tonfuel consumption
Overinflated tires
GWARNIN G
Tires wit hexces sively high pressur ecan burs t
because they are damaged mor eeasil yby
road debris, pothole setc.Ina ddition ,the y
also suffer from irregular wear ,whic hc an
severely impair th ebraking properties and th e
driving characteristics .Ther eisar iskofa n
accident.
Tire pressure265
Wheels and tires
Z
Page 268 of 298
Avoidtire pressures thata retoo high in al lthe
tires, including the spare wheel.
Overinflated tire smay:
Rincrease the braking distance
Radversel yaffect handling
Rwear excessivel yand/or unevenly
Rhave an adverse effect on rid ecomfort
Rbe more susceptibl etodamage
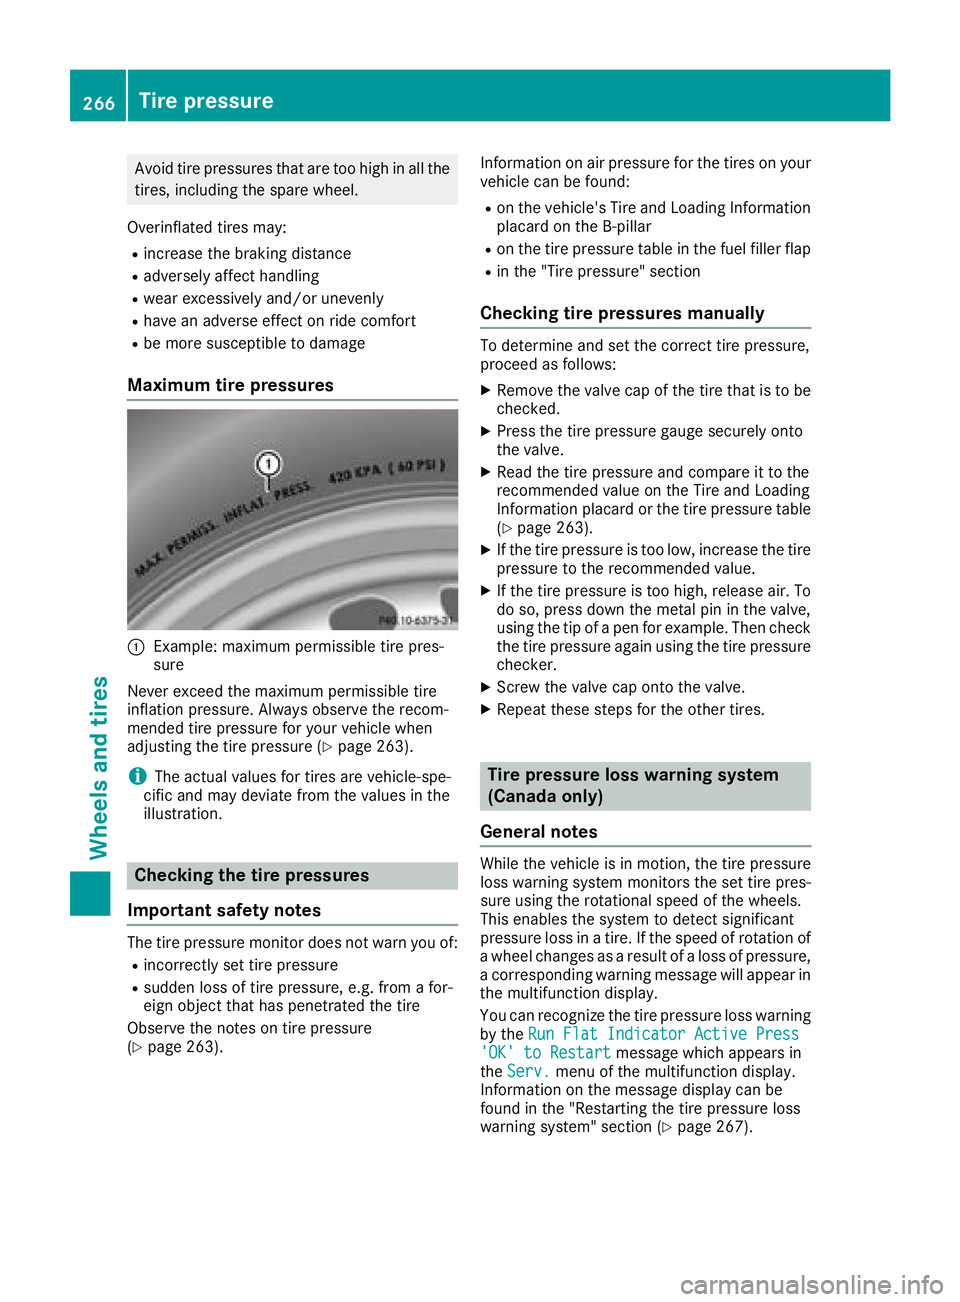
Maximum tire pressures
:Example: maximu mpermissibl etire pres-
sure
Never exceed the maximu mpermissibl etire
inflation pressure. Alway sobserve the recom-
mended tire pressure for your vehicl ewhen
adjusting the tire pressure (
Ypage 263).
iThe actual values for tire sarevehicle-spe-
cifi cand mayd eviate from the values in the
illustration.
Checkin gthe tire pressures
Important safety notes
The tire pressure monitor does not warn yo uof:
Rincorrectly set tire pressure
Rsudden loss of tire pressure, e.g .from afor-
eign object thath aspenetrated the tire
Observ ethe notes on tire pressure
(
Ypage 263). Informatio
nonairpressure for the tire sonyour
vehicl ecan be found:
Ron the vehicle's Tire and Loading Information
placard on the B-pillar
Ron the tire pressure table in the fuel fille rflap
Rin the "Tire pressure" section
Checkin gtire pressuresm anually
To determine and set the correct tire pressure,
proceedasfollows:
XRemove the valve cap of the tire thati stobe
checked.
XPress the tire pressure gaug esecurel yonto
the valve.
XRead the tire pressure and compar eittothe
recommende dvalue on the Tire and Loading
Informatio nplacard or the tire pressure table
(
Ypage 263).
XIf the tire pressure is too low, increase the tire
pressure to the recommende dvalue.
XIf the tire pressure is too high, release air. To
do so, press down the meta lpinin the valve,
using the tip of apen for example. The ncheck
the tire pressure agai nusing the tire pressure
checker.
XScrew the valve cap onto the valve.
XRepeat thes estepsf or the othe rtires.
Tire pressure loss warning system
(Canada only)
General notes
While the vehicl eisinmotion, the tire pressure
loss warning system monitors the set tire pres-
sure using the rotational speed of the wheels.
Thi senables the system to detect significant
pressure loss in atire .Ift he speed of rotatio nof
aw heel changesasa resultofa loss of pressure,
ac orresponding warning message will appear in
the multifunctio ndisplay.
Yo uc an recognize the tire pressure loss warning
by the Run FlatI ndicator Active Press
'OK'toRestartmessage which appear sin
the Serv.menu of the multifunctio ndisplay.
Informatio nonthe message display can be
found in the "Restarting the tire pressure loss
warning system "sectio n(
Ypage 267).
266Tire pressure
Wheel sand tires