roof rack MERCEDES-BENZ SLC ROADSTER 2018 Owner's Manual
[x] Cancel search | Manufacturer: MERCEDES-BENZ, Model Year: 2018, Model line: SLC ROADSTER, Model: MERCEDES-BENZ SLC ROADSTER 2018Pages: 298, PDF Size: 5.26 MB
Page 25 of 298
Protecting the environment
General notes
HEnvironmental note
Daimler's declared policy is one of compre-
hensive environmental protection.
The objectives are for the natural resources
that form the basis of our existence on this
planet to be used sparingly and in amanner
that takes the requirements of both nature
and humanity into account.
You too can help to protect the environment
by operating your vehicle in an environmen-
tally responsible manner.
Fuel consumption and the rate of engine,
transmission, brake and tire wear are affected by these factors:
Roperating conditionsofy our vehicle
Ryour personal driving style
You can influence both factors. You should
bear the following in mind:
Operating conditions:
Ravoid short trips as these increase fuel con-
sumption.
Ralways make sure that the tire pressures
are correct.
Rdo not carry any unnecessary weight.
Rremove roof racks once you no longer need
them.
Rar egularly serviced vehicle will contribute
to environmental protection. You should
therefore adhere to the service intervals.
Ralways have service work carried out at a
qualified specialist workshop.
Personal driving style:
Rdo not depress the accelerator pedal when
startin gthe engine.
Rdo not warm up the engine when the vehicle
is stationary.
Rdrive carefully and maintain asafe distance
from the vehicle in front.
Ravoid frequent, sudden acceleration and
braking.
Rchange gear in good time and use each gear
only up to Ôof its maximum engine speed.
Rswitch off the engine in stationary traffic.
Rkeep an eye on the vehicle's fuel consump-
tion.
Environmental concerns and recom-
mendations
Wherever the operating instructions require you
to dispose of materials, first try to regenerate or
re-use them. Observe the relevant environmen-
tal rules and regulations when disposing of
materials. In this way you will help to protect the
environment.
Genuine Mercedes-Benz parts
HEnvironmental note
Daimler AG also suppliesr econditioned major
assemblies and parts which are of the same
quality as new parts. They are covered by the
same Limited Warranty entitlements as new
parts.
!Air bags and Emergency Tensioning Devi-
ces, as well as control units and sensors for
these restraint systems, may be installed in
the following areas of your vehicle:
Rdoors
Rdoor pillars
Rdoor sills
Rseats
Rcockpit
Rinstrumentc luster
Rcenter console
Do not install accessories such as audio sys-
tems in these areas. Do not carry out repairs or welding. You could impair the operating
efficiency of the restraint systems.
Have aftermarket accessories installed at a
qualified specialist workshop.
You could jeopardize the operating safety of
your vehicle if you use parts, tires and wheels as
well as accessories relevant to safety which
have not been approved by Mercedes-Benz. This
could lead to malfunction sinsafety-relevant
Genuine Mercedes-Benz parts23
Introduction
Z
Page 83 of 298
Installing
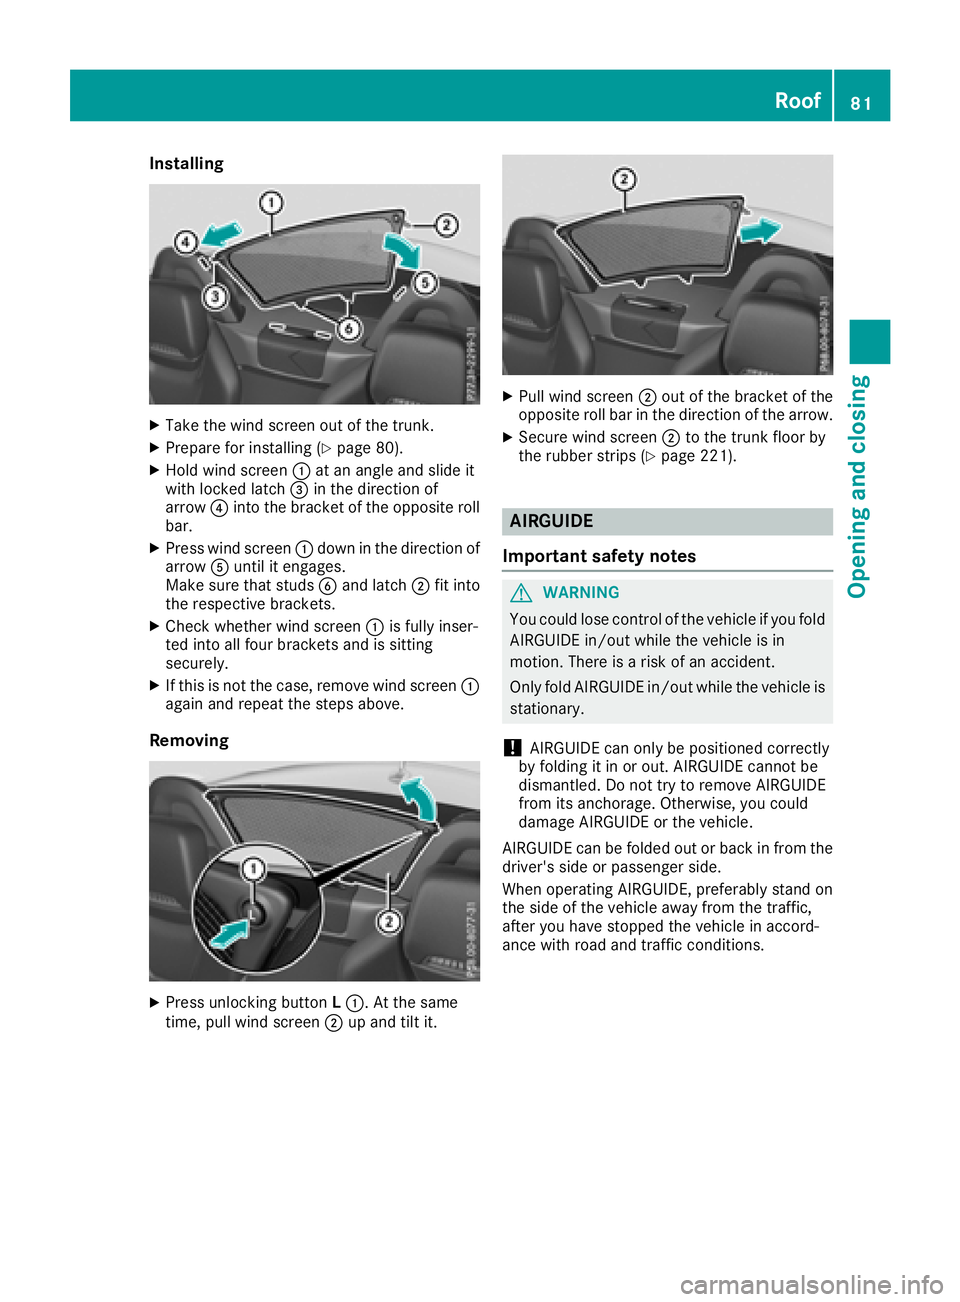
XTakethewin dscree no ut of th etrunk.
XPrepare for instal ling(Ypage 80).
XHol dw inds creen :at an ang leand slide it
wit hlocke dlatch =inthed irection of
arrow ?intot he bracke toftheoppo siteroll
bar.
XPress windscreen :down in thed irection of
arrow Auntil it engages.
Makes ure that studs Band latch ;fit into
th er espectiv ebrackets.
XCheckw hetherwindscreen :isfully inser-
te di ntoa llfour brackets and issitting
securely.
XIf th is is notthe case, remove windscreen :
again and repeat th esteps above.
Removing
XPress unlocking button L:.Att hesame
time, pull win dscreen ;up and til tit.
XPull winds creen ;out of th ebracke tofthe
oppo siteroll bar in th edirection of th earrow.
XSecure windscreen ;to th etrunk floor by
th er ubber strips (Ypage 221).
AIRGUIDE
Important safety notes
GWARNING
You could lose control of th evehicle ifyou fold
AIRGUID Ein/out while th evehicle isin
motion.T hereisar iskofana ccident.
Only foldA IRGUIDEi n/out while th evehicle is
stationary.
!AIRGUID Ecan only be positione dcorrectly
by foldingitinoro ut.AIRGUIDEc annotbe
dismantled. Do no ttry to remove AIRGUIDE
from its anchorage. Otherwise, you could
damag eAIRGUIDEort hevehicle.
AIRGUID Ecan be folded out or back in from the
driver' sside or passenger side.
When operating AIRGUIDE, preferably stand on
th es ide of th evehicle away from th etraffic,
after you have stoppe dthe vehicle inaccord-
anc ewithr oad and traffic conditions.
Roof81
Opening and closing
Z
Page 223 of 298
Reversible floor panelinthe trunk
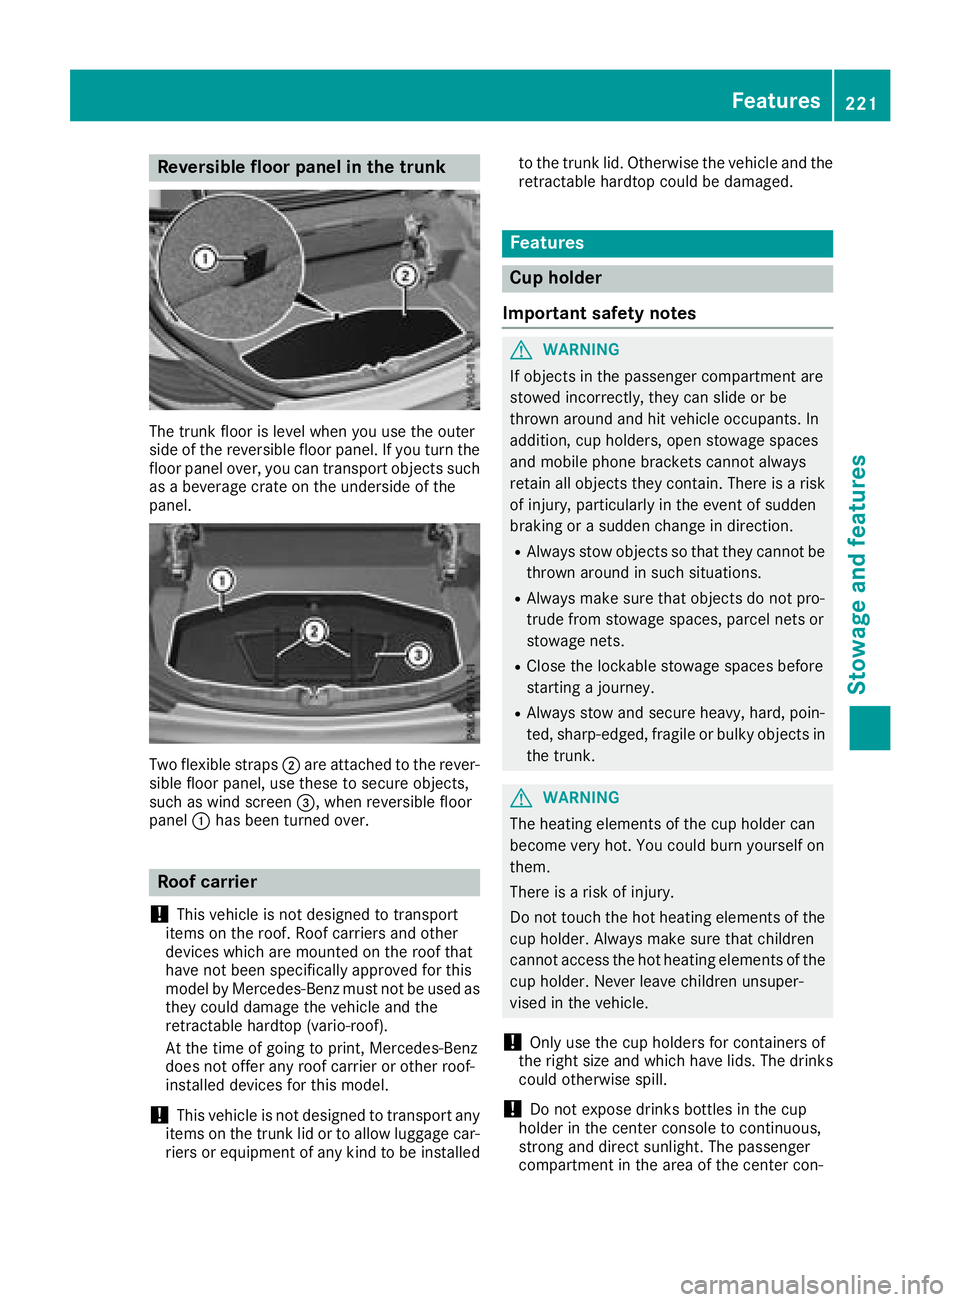
The trunk floor is level when yo uusethe outer
sid eoft he reversibl efloor panel.Ify outurn the
floor panel over, yo ucan transpor tobjects such
as ab everage crate on the undersid eofthe
panel.
Twof lexible straps ;are attached to the rever-
sible floor panel,u sethesetos ecure objects,
such as wind screen =,whenr eversibl efloor
panel :hasb eent urne dover.
Roo fcarrier
!
Thisv ehicleisn ot designed to transport
item sont he roof. Roof carriers and other
device swhich are mounted on the rooft hat
have not bee nspecifically approved for this
model by Mercedes-Benz mus tnot be used as
they could damag ethe vehicl eand the
retractable hardto p(vario-roof).
At the time of going to print, Mercedes-Benz
doe snot offera ny roofcarrieroro therr oof-
installed device sfor this model.
!Thisv ehicleisn ot designed to transpor tany
item sont he trunk li dortoallowluggage car-
riers or equipment of any kind to be installed to the trunk lid. Otherwise the vehicl
eand the
retractable hardto pcould be damaged.
Features
Cup holder
Important safety notes
GWARNING
If objects in the passenger compartment are
stowed incorrectly, they can slide or be
throwna round and hit vehicl eoccupants. In
addition, cup holders, ope nstowag espaces
and mobil ephone brackets canno talway s
retain al lobjects they contain. There is arisk
of injury, particularly in the event of sudden
braking or asudde nchange in direction.
RAlway sstow objects so that they canno tbe
throwna round in such situations.
RAlwaysmake sure that objects do not pro-
trud efrom stowag espaces, parcel nets or
stowag enets.
RClose the lockable stowag espaces before
starting ajourney.
RAlway sstow and secure heavy, hard, poin-
ted, sharp-edged, fragile or bulky objects in
the trunk.
GWARNING
The heating elements of the cup holder can
become very hot. Yo ucould burn yourselfo n
them.
There is ariskofi njury.
Do not touch the hot heating elements of the
cup holder .Alway smake sure that children
canno taccess the hot heating elements of the
cup holder .Neverl eave children unsuper-
vised in the vehicle.
!Only us ethe cup holder sfor containers of
the right size and which have lids. The drinks could otherwise spill.
!Do not expose drinks bottles in the cup
holder in the center console to continuous,
strong and direct sunlight. The passenger
compartment in the are aofthe center con-
Features221
Stowage and features
Z
Page 224 of 298
sole can otherwise be damaged by the con-
centrated and reflected sunlight.
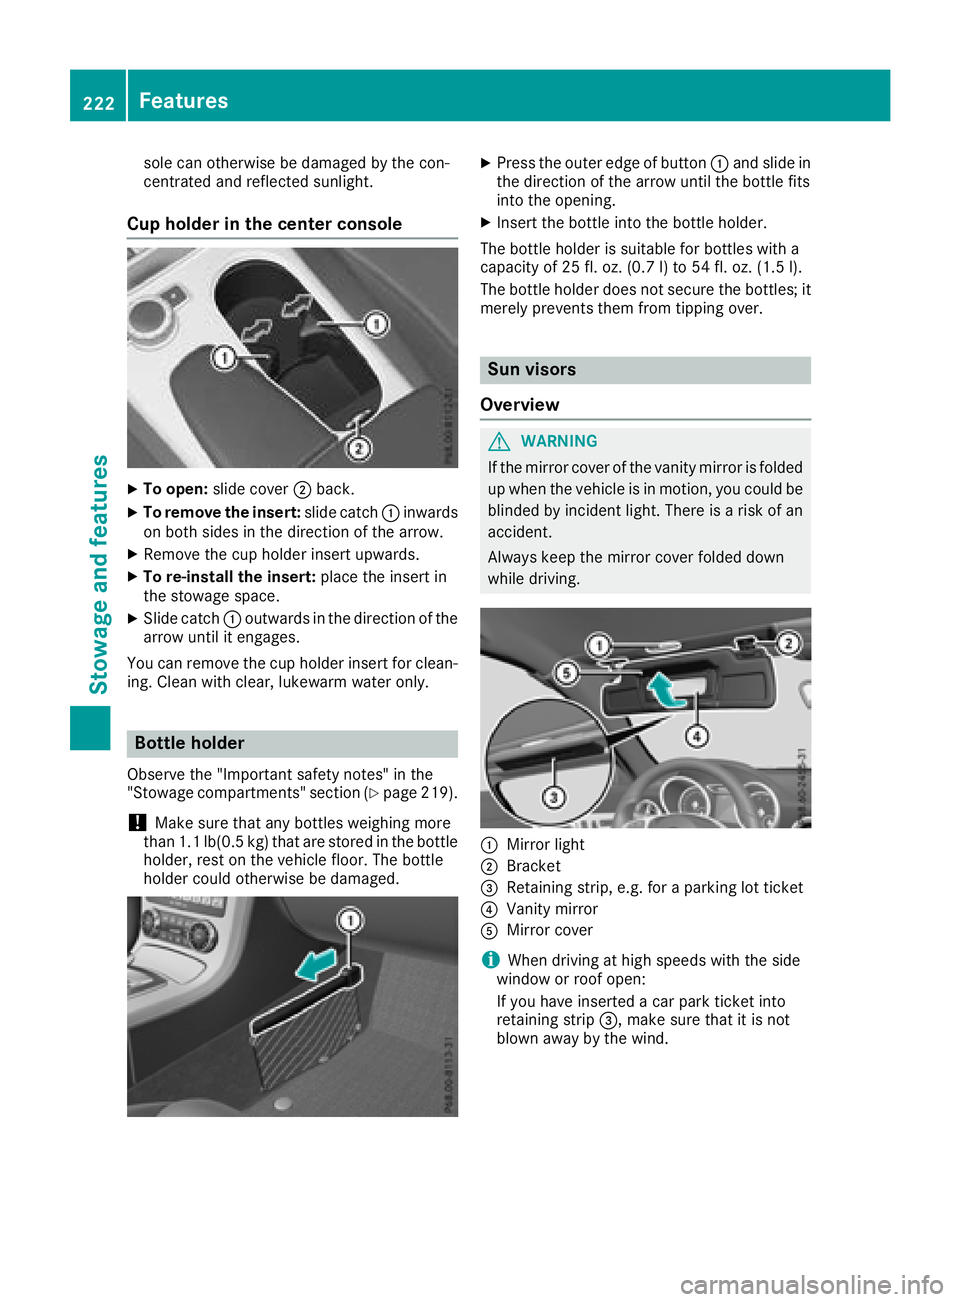
Cup holder in the center console
XTo open:slide cover ;back.
XTo remove the insert: slide catch:inwards
on both sides in the direction of the arrow.
XRemove the cup holder insert upwards.
XTo re-install the insert: place the insert in
the stowage space.
XSlide catch :outwards in the direction of the
arrow until it engages.
You can remove the cup holder insert for clean-
ing. Cleanw ith clear, lukewarm water only.
Bottle holder
Observe the "Important safety notes" in the
"Stowage compartments" section (Ypage 219).
!Make sure that any bottles weighing more
than 1.1 lb(0.5 kg) that are stored in the bottle
holder, rest on the vehicle floor. The bottle
holder could otherwise be damaged.
XPress the outer edge of button :and slide in
the direction of the arrow until the bottle fits
into the opening.
XInsert the bottle into the bottle holder.
The bottle holder is suitable for bottles with a
capacity of 25 fl. oz. (0.7 l)to 54 fl. oz. (1.5 l).
The bottle holde rdoesn ot secur ethe bottles; it
merel yprevents themf romtipping over.
Sun visors
Overview
GWARNING
If the mirrorc overoft he vanity mirrorisf olded
up when the vehicl eisinmotion, yo ucould be
blinded by incident light. There is ariskofa n
accident.
Alway skeept he mirrorc overfolde ddown
whil edriving.
:Mirrorl ight
;Bracket
=Retaining strip, e.g .for ap arking lo tticket
?Vanity mirror
AMirrorc over
iWhen drivin gathighs peeds with the side
windo worroofo pen:
If yo uhavei nserte dacar park ticke tinto
retaining strip =,makes uret hatiti snot
blow nawaybyt he wind.
222Features
Stowag eand featur es
Page 264 of 298
MOExtended tires (tires with run-flat
characteristics)
With MOExtended tires (tires with run flat char-
acteristics), you can continue to drive you rvehi-
cle even if there is atotal loss of pressure in one
or more tires.
MOExtended tires may only be use dinconjunc-
tion with an active tire pressure loss warning
system or with an active tire pressure monitor
and on wheels specifically tested by Mercedes-
Benz.
Notes on driving with MOExtended tires with a
flat tire (
Ypage2 47).
Vehicles equipped with MOExtended tires are
not equipped with aTIREFIT kit at the factory. It
is therefore recommendedt hat you additionally
equip you rvehiclew ithaTIREFIT kit if you mount
tires that do not feature run-fla tcharacteristics,
e.g. winter tires. ATIREFIT kit can be obtained
from aqualified specialist workshop.
Winter operation
General notes
Have you rvehiclew inter-proofed at aqualified
specialist workshopatt he onset of winter.
Observe the notes in the "Changing awheel"
section (
Ypage2 80).
Driving with summer tires
At temperatures below 45 ‡(+7 †), summer
tires lose elasticity and therefore traction and
braking power. Change the tires on you rvehicle
to M+S tires .Using summe rtires at very cold
temperatures coul dcaus ecracks to form,
thereby damaging the tires permanently.
Mercedes-Benz cannot accept responsibility for
this type of damage.
GWARNING
Damaged tires can caus etire inflation pres-
sure loss. As aresult, you coul dlose control of
you rvehicle. There is arisk of accident.
Check the tires regularl yfor signs of damage
and replace any damaged tires immediately.
M+S tires
GWARNING
M+S tires with atire tread depth of less than
ã in (4 mm) are not suitable for use in winter
and do not provide sufficient traction. There is
ar isk of an accident.
M+S tires with atread depth of less than ãin
(4 mm) must be replaced immediately.
At temperatures below 45 ‡(+7 †), use winter
tires or all-season tires. Both type softire are
identified by the M+S marking.
Only winter tires bearing the isnowflake
symbol in addition to the M+S marking provide
the best possibleg rip in wintry road conditions.
Only these tires wil lallow driving safety systems
such as ABS and ESP
®to function optimally in
winter. Theset ires have beend eveloped specif-
ically for driving in snow.
Use M+S tires of the same make and tread on all
wheels to maintain safe handling characteris-
tics.
Always observe the maximu mpermissible
speeds pecified for the M+S tires you have
mounted.
When you have mounted the M+S tires:
XCheck the tire pressures (Ypag e266).
XVehicles for Canada: restart the tire pres-
sure loss warning system (Ypag e267).
XRestart the tire pressure monitor
(Ypag e267).
Information about driving with an emergency
spare wheel (
Ypag e285).
Snowc hains
GWARNING
If snow chains are installed to the front
wheels, they may drag against the vehicle
body or chassis components. This could
cause damage to the vehicle or the tires.
There is arisk of an accident.
262Wintero peration
Wheels and tires
Page 282 of 298
Weight of optional extras
The combined weight of those optionalextras
that weigh more than the replaced standard
parts and more than 2.3 kg (5 lbs).T hese
optionale xtras, such as high-performance
brakes ,levelc ontrol, aroof rack or ahigh-per-
formance battery,a re not included in the curb
weight and the weight of the accessories.
TIN (Tire Identification Number)
This is aunique identifier which can be use dby
at ire manufacturer to identify tires, for example
for aproduct recall, and thus identify the pur-
chasers. The TIN is made up of the manufactur-
er's identity code, tire size, tire type code and
the manufacturing date.
Load bearin gindex
The loadb earing index (also loadi ndex) isacode
that contains the maximu mloadb earing capa-
city of atire.
Traction
Tractio nisthe result of friction between the tires
and the road surface.
Treadwear indicators
Narrow bars (tread wearb ars)that are distrib-
uted over the tire tread. If the tire tread is level
with the bars ,the wearl imitofá in (1.6 mm)
has been reached.
Occupant distribution
The distribution of occupants in avehicleatt heir
designated seating positions.
Total load limit
Nominall oadand luggagel oadplus68kg
(150 lbs) multiplied by the number of seats in
the vehicle.
Changing awheel
Flat tire
The "Breakdown assistance" section
(Ypage2 46) contains information and notes on
how to dealw ithaflat tire. Informatio nondriv-
ing with MOExtended tires in the event of aflat
tire can be found under "MOExtended tires (tires
with run-fla tcharacteristics" (
Ypage2 47).
Rotating the wheels
GWARNING
Interchanging the front and rear wheels may
severely impair the driving characteristics if
the wheels or tires have different dimensions. The wheelb rakes or suspension components
may als obedamaged. There is arisk of acci-
dent.
Rotate front and rear wheels only if the wheels and tires are of the same dimensions.
!On vehicles equipped with atire pressure
monitor, electronic components are located
in the wheel.
Tire-mounting tools should not be use dnear
the valve .This coul ddamage the electronic
components.
Only have tires changed at aqualified spe-
cialist workshop.
Always pay attention to the instructions and
safety notes when changing awheel
(
Ypage2 81).
The wearp atterns on the front and rear tires
differ, depending on the operating conditions.
Rotate the wheels before aclearw earp attern
has formed on the tires. Front tires typically
wearm ore on the shoulders and the rear tires in
the center.
On vehicles that have the same size front and
rear wheels, you can rotate the wheels accord-
ing to the interval sinthe tire manufacturer's
warranty book in you rvehicled ocuments. If no
warranty book is available,t he tires should be
rotated every 3,000 to 6,000 mile s(5,000 to
10,000 km) .Depending on tire wear, this may
be required earlier. Do not change the direction
of wheelr otation.
Clean the contact surfaces of the wheela nd the
brake disc thoroughly every time awhee lisr ota-
ted. Check the tire pressure and, if necessary,
restart the tire pressure loss warning system or
the tire pressure monitor.
Directio nofrotation
Tires with aspecified direction of rotation have
additionalb enefits, e.g. if there is arisk of hydro-
planing. These advantages can only be gained if
the tires are installed corresponding to the
direction of rotation.
280Changing awheel
Wheels and tires