roof MERCEDES-BENZ SLC ROADSTER 2018 Owner's Manual
[x] Cancel search | Manufacturer: MERCEDES-BENZ, Model Year: 2018, Model line: SLC ROADSTER, Model: MERCEDES-BENZ SLC ROADSTER 2018Pages: 298, PDF Size: 5.26 MB
Page 4 of 298
Index....................................................... 4
Digital Operator's Manual..................22
Introductio n........................................... 22
Operation ............................................... 22
Introduction ......................................... 23
Protecting the environment ...................2 3
Genuine Mercedes-Ben zparts............... 23
Operator's Manual ................................. 24
Service and vehicle operation ................2 4
Operating safety .................................... 26
QR codes for the rescue card ................2 8
Data stored in the vehicl e...................... 28
Informatio noncopyright ....................... 30
Atag lance ........................................... 31
Cockpi t.................................................. 31
Instrument cluster. ................................ 32
Multifunctio nsteering whee l................. 33
Center consol e...................................... 34
Overhead contro lpan el .........................3 6
Doorc ontrolpan el ................................. 37
Safety ................................................... 38
Panic alar m............................................ 38
Occupant safety .................................... 38
Childre ninthe vehicl e........................... 53
Pets in the vehicl e................................. 56
Driving safety systems ........................... 56
Protection against theft .........................6 3
Opening and closing...........................65
SmartKey ............................................... 65
Doors ..................................................... 70
Trunk ..................................................... 72
Side windows ......................................... 74
Roof .......................................................7 7
Seats, steering wheel and mirrors....84
Correct driver's seat position ................8 4
Seats ..................................................... 84
Steering wheel ....................................... 88
Mirrors. .................................................. 90 Memory function ................................... 93
Lights and windshield wipers
............95
Exterior lighting ..................................... 95
Interior lighting ...................................... 99
Replacing bulb s..................................... 99
Windshield wipers ................................ 101
Climate control ................................. 104
Overview of climate control systems ... 104
Operating the climate control sys-
tems .................................................... 108
Setting the ai rvents ............................ 113
Drivin gand parking .......................... 115
Notesonb reaking-inanew vehicl e..... 115
Driving ................................................. 115
DYNAMIC SELECT button .................... 121
Automati ctransmissio n....................... 122
Refueling ............................................. 129
Parking ................................................ 131
Driving tip s.......................................... 134
Driving systems ................................... 138
On-board computer and displays ....163
Important safety notes ........................ 163
Displays and operation ........................ 163
Menusa nd submenus ......................... 166
Displa ymessages ................................ 177
Warning and indicator lamps .............. 202
Multimedi asystem ........................... 211
Generaln otes ...................................... 211
Important safety notes ........................ 211
Function restrictions ............................ 211
Operating system ................................ 212
Stowag eand features ...................... 219
Stowag eareas ..................................... 219
Feature s.............................................. 221
Maintenancea nd care...................... 233
Engine compartment ........................... 233
Overview of the engine compartment .. 237
2Contents
Page 17 of 298
General notes............................... .118
Q
QR code
Mercedes-Ben zGuide Ap p................. 1
Rescue car d.................................... .28
Qualified specialist workshop ........... 27
R
RACE TIMER (on-board computer,
Mercedes-AMG vehicles).................. 175
Radio
Selecting astation .........................1 68
see Digita lOperator's Manual
Radio mode
see also Digita lOperator's Man-
ua l..................................................2 11
Radio-wave reception/transmis-
sionint he vehicle
Declaratio nofconformity ................ 26
Readingl amp....................................... 99
Rear fog lamp
Display message ............................ 189
Switching on/off .............................. 96
Rear lamps
see Lights
Rear viewc amera
Cleaning instructions ..................... 242
Display in the multimedias ystem .. 155
Function/notes .............................1 54
Switching on/off ........................... 155
Rear window defroster
General notes ................................ 111
Problem (malfunction) ................... 112
Switching on/off ........................... 111
Rear-vie wmirror
Anti-glare (manual ).......................... 90
Dipping (automatic) ......................... 92
Refrigerant (air-conditioning sys-
tem)
Important safety notes .................. 294
Refueling
Fuel gauge ....................................... 32
Important safety notes .................. 129
Refueling process. ......................... 130
see Fuel Remote control
Programming (garage door
opener) .......................................... 229
Replacing bulbs
High-beam headlamps ................... 100
Important safety notes .................... 99
Installing/removing the cover
(front wheel arch) .......................... 100
Low-beam headlamps .................... 100
Overview of bul btype s.................. 100
Reportin gsafety defects .................... 27
Rescue card ......................................... 28
Reserve (fuelt ank)
see Fuel
Reserve fuel
Display message ............................ 192
Warning lamp ................................. 207
Residual heat (climate control) ........112
Restraints ystem
Display message .............. .............. 185
Introdu
ction ..................................... 38
Warning lamp ................................. 206
Warning lamp (function) ................... 38
Reverse gear
Engaging (automatic transmis-
sion) ............................................... 123
Reversiblef loor panel (trunk) .......... 221
Reversing feature
Side windows ................................... 74
Reversing lamps (display mes-
sage) ................................................... 189
Roadside Assistance( breakdown).... 25
Roof
Display message ............................ 200
Important safety notes .................... 77
Opening/closing (with roof
switch) ............................................. 78
Opening/closing (with SmartKey ).... 79
Overview .......................................... 77
Problem (malfunction) ..................... 83
Relocking ......................................... 79
Roof carrier ........................................ 221
Roof switch .......................................... 78
Route guidance
see also Digita lOperator's Man-
ua l..................................................2 11
Route guidance active ......................167
Index15
Page 19 of 298
SmartKeyChanging the battery ....................... 68
Changing the programming .............6 6
Checkin gthe battery ...................... .68
Display message ............................ 201
Doorc entral locking/unlocking ....... 65
Important safety note s.................... 65
Loss. ................................................ 69
Mechanical key ................................ 67
Opening/closing the roof. ............... 79
Overview .......................................... 65
Positions (ignition lock) ................. 116
Problem (malfunction) ..................... 69
Starting the engine ........................ 118
SMS
see also Digital Operator's Man-
ual.................................................. 211
Snowc hains...................................... 262
Sockets
Center console .............................. 223
Generaln otes ................................ 223
Sound
Switching on/off. .......................... 212
Special seat belt retractor .................. 54
Specialist workshop ............................ 27
Speed, controlling
see Cruise control
Speedometer
Digital ............................................ 167
In the Instrument cluster ................. 32
Segments ...................................... 163
Selecting the display uni t............... 172
Sport handlin gmode
Activating/deactivating
(Mercedes-AMGS LC 43) ................. 62
Warning lamp ................................. 206
Standin glamps
Displa ymessage ............................ 189
Switching on/off. ............................. 96
Start/stopf unction
see ECO start/stop function
Startin g(engine )................................ 117
Steering
Displa ymessage ............................ 200
Steering wheel
Adjusting (electrically) ..................... 89
Adjusting (manually) ........................ 88
Butto noverview ............................... 33 Buttons (on-board computer) ......... 164
Important safety notes .................... 88
Storing settings (memory func-
tion) ................................................. 93
Steering whee lpaddle shifters ........ 126
Stopwatch (RACETIMER) ................... 175
Stowag eareas ................................... 219
Stowag ecom partments
Armrest (under )............................. 219
Cente
r console .............................. 220
Cu ph olders ................................... 221
Door ............................................... 220
Eyeglasses compartment ............... 220
Glove box ....................................... 219
Important safety information ......... 219
Rear wall ........................................ 220
Stowag enet ................................... 220
Stowag enet....................................... 220
Summert ires..................................... 262
Sun visor ............................................ 222
Surround lighting (on-board com-
puter) .................................................. 173
Switchin gair-recirculatio nmode
on/off ................................................. 112
Switchin gonmediam ode
Via the device list .......................... 217
T
Tachometer ........................................ 163
Tail lamps
Displa ymessage ............................ 189
see Lights
Tank content
Fuelgauge ....................................... 32
Technical data
Capacities ...................................... 290
Emergency spare wheel. ................ 286
Information .................................... 288
Tires/wheels ................................. 284
Vehicl edata. .................................. 295
TELEAID
Call priority .................................... 227
Emergency cal l.............................. 225
Generaln otes ................................ 224
MB info cal lbutton ........................ 226
Roadsid eAssistance button .......... 226
Self-test ......................................... 224
Index17
Page 25 of 298
Protecting the environment
General notes
HEnvironmental note
Daimler's declared policy is one of compre-
hensive environmental protection.
The objectives are for the natural resources
that form the basis of our existence on this
planet to be used sparingly and in amanner
that takes the requirements of both nature
and humanity into account.
You too can help to protect the environment
by operating your vehicle in an environmen-
tally responsible manner.
Fuel consumption and the rate of engine,
transmission, brake and tire wear are affected by these factors:
Roperating conditionsofy our vehicle
Ryour personal driving style
You can influence both factors. You should
bear the following in mind:
Operating conditions:
Ravoid short trips as these increase fuel con-
sumption.
Ralways make sure that the tire pressures
are correct.
Rdo not carry any unnecessary weight.
Rremove roof racks once you no longer need
them.
Rar egularly serviced vehicle will contribute
to environmental protection. You should
therefore adhere to the service intervals.
Ralways have service work carried out at a
qualified specialist workshop.
Personal driving style:
Rdo not depress the accelerator pedal when
startin gthe engine.
Rdo not warm up the engine when the vehicle
is stationary.
Rdrive carefully and maintain asafe distance
from the vehicle in front.
Ravoid frequent, sudden acceleration and
braking.
Rchange gear in good time and use each gear
only up to Ôof its maximum engine speed.
Rswitch off the engine in stationary traffic.
Rkeep an eye on the vehicle's fuel consump-
tion.
Environmental concerns and recom-
mendations
Wherever the operating instructions require you
to dispose of materials, first try to regenerate or
re-use them. Observe the relevant environmen-
tal rules and regulations when disposing of
materials. In this way you will help to protect the
environment.
Genuine Mercedes-Benz parts
HEnvironmental note
Daimler AG also suppliesr econditioned major
assemblies and parts which are of the same
quality as new parts. They are covered by the
same Limited Warranty entitlements as new
parts.
!Air bags and Emergency Tensioning Devi-
ces, as well as control units and sensors for
these restraint systems, may be installed in
the following areas of your vehicle:
Rdoors
Rdoor pillars
Rdoor sills
Rseats
Rcockpit
Rinstrumentc luster
Rcenter console
Do not install accessories such as audio sys-
tems in these areas. Do not carry out repairs or welding. You could impair the operating
efficiency of the restraint systems.
Have aftermarket accessories installed at a
qualified specialist workshop.
You could jeopardize the operating safety of
your vehicle if you use parts, tires and wheels as
well as accessories relevant to safety which
have not been approved by Mercedes-Benz. This
could lead to malfunction sinsafety-relevant
Genuine Mercedes-Benz parts23
Introduction
Z
Page 37 of 298
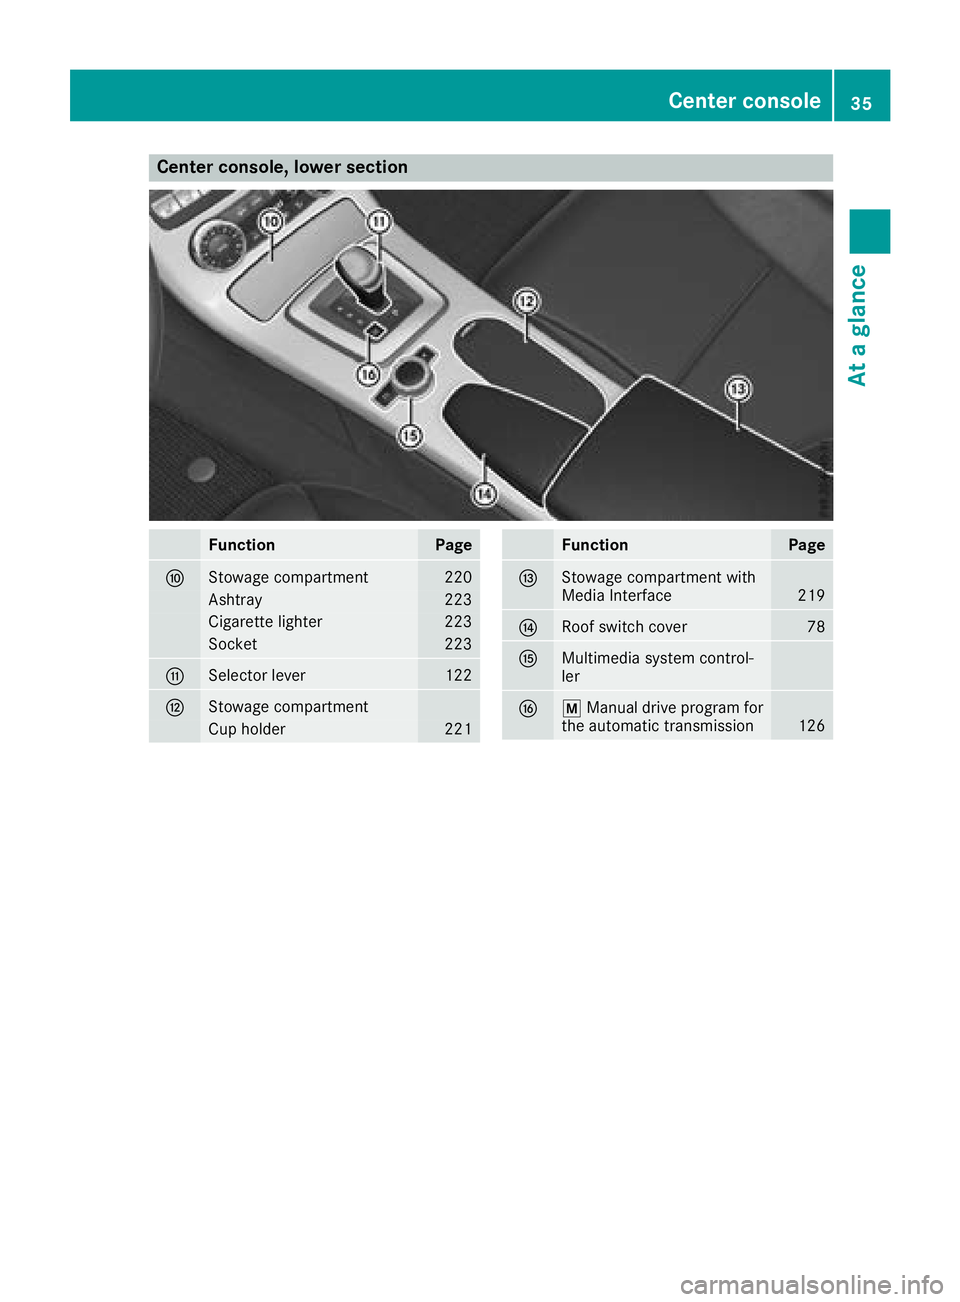
Center console, lower section
FunctionPage
FStowage compartment220
Ashtray223
Cigarettelighter223
Socket223
GSelector lever122
HStowage compartment
Cup holder221
FunctionPage
IStowage compartmen twith
Media Interface219
JRoof switch cover78
KMultimedia system control-
ler
Lp Manual driv eprogram for
th ea utomatic transmission126
Center console35
Atag lance
Page 48 of 298
The system does not deactivate:
Rthe side impact air bag
Rthe headbag
Rthe Emergency TensioningDevices
Requirements
To be classified correctly, the front passenger
must sit:
Rwith the seat belt fastened correctly
Rin an almost upright position with their back
against the seat backrest
Rwith their feet restin gonthe floor, if possible
If the front passenger does not observe these
conditions, OCS may produce afalse classifica-
tion, e.g. because the front passenger:
Rtransfers their weight by supporting them-
selves on avehicle armrest
Rsits in such away that their weight is raised
from the seat cushion
If you install achild restraint system on the
front-passenger seat, be sure to observe the
correctp ositioningofthe child restraint system.
Never place object sunder or behind the child
restraint system, e.g. acushion. The entir ebase
of the child restraint system must alwaysr est on
the seat cushion of the front-passenger seat.
The backrest of the forward-facing child
restraint system must lie as flat as possible
against the backrest of the front-passenger
seat.
The child restraint system must not touch the
roof or be subjected to aload by the head
restraint. Adjust the angle of the seat backrest
and the head restraint position accordingly.
Only then can OCS be guaranteed to function
correctly. Always observe the child restraint sys-
tem manufacturer's installation and operating
instructions.
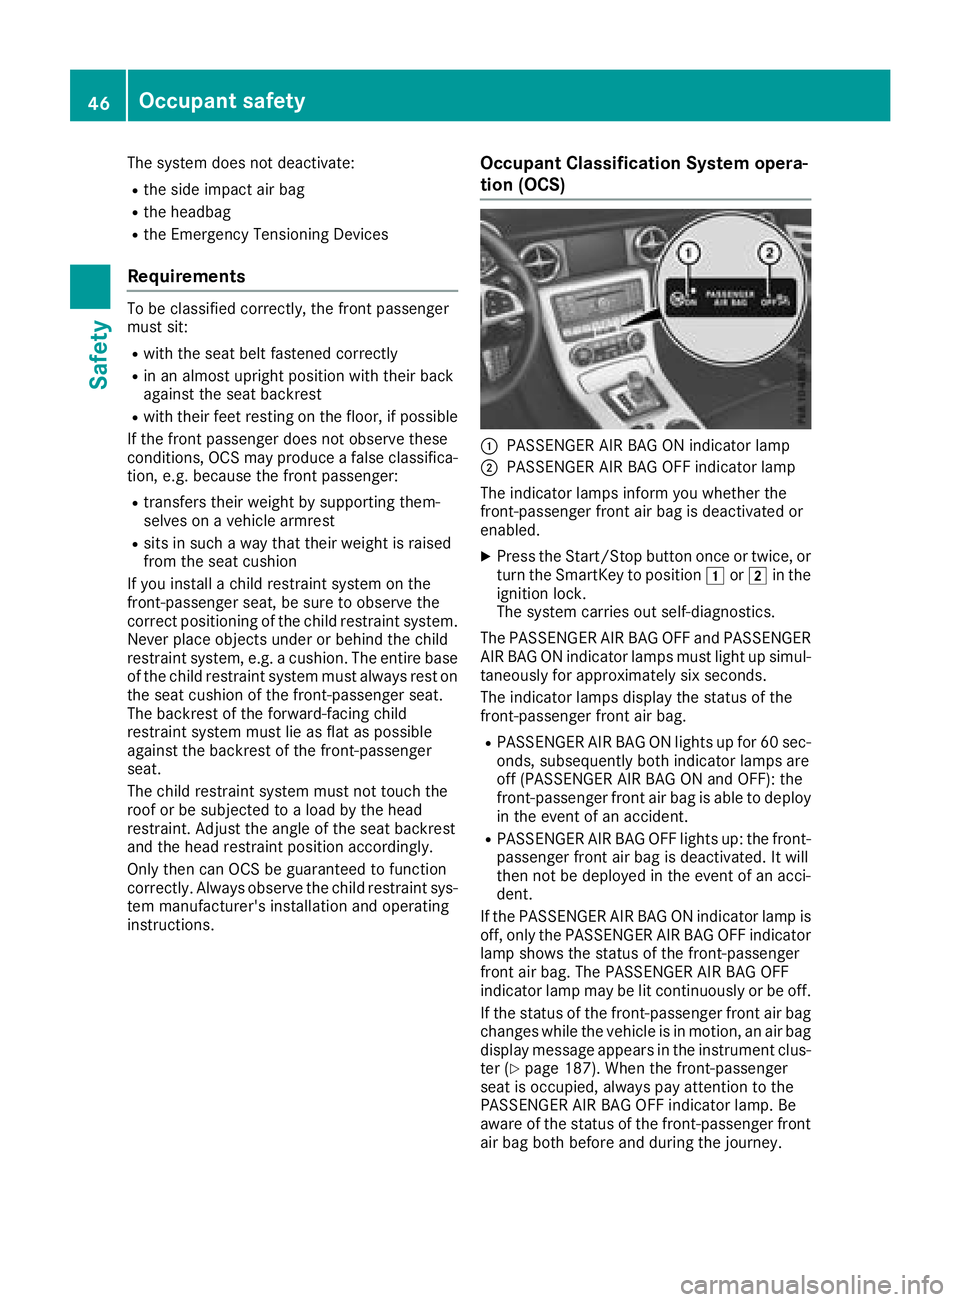
Occupant Classification System opera-
tion (OCS)
:PASSENGER AIR BAG ON indicator lamp
;PASSENGER AIR BAG OFF indicator lamp
The indicator lamps inform you whether the
front-passenger front air bag is deactivated or
enabled.
XPress the Start/Stop button once or twice, or
turn the SmartKey to position 1or2 in the
ignition lock.
The system carries out self-diagnostics.
The PASSENGER AIR BAG OFF and PASSENGER AIR BAG ON indicator lamps must light up simul-
taneously for approximately six seconds.
The indicator lamps display the status of the
front-passenger front air bag.
RPASSENGER AIR BAG ON lights up for 60 sec-
onds, subsequently both indicator lamps are
off (PASSENGER AIR BAG ON and OFF): the
front-passenger front air bag is able to deploy
in the event of an accident.
RPASSENGER AIR BAG OFF lights up: the front-
passenger front air bag is deactivated. It will
then not be deployed in the event of an acci-
dent.
If the PASSENGER AIR BAG ON indicator lamp is
off, only the PASSENGER AIR BAG OFF indicator lamp shows the status of the front-passenger
front air bag. The PASSENGER AIR BAG OFF
indicator lamp may be lit continuously or be off.
If the status of the front-passenger front air bag
changes while the vehicle is in motion,ana ir bag
display message appears in the instrument clus-
ter (
Ypage 187). When the front-passenger
seat is occupied, alwaysp ay attention to the
PASSENGER AIR BAG OFF indicator lamp. Be
aware of the status of the front-passenger front air bag both before and during the journey.
46Occupant safety
Safety
Page 58 of 298
instructions and safetynotes on the "Occupant
Classification System (OCS)" (Ypage 45).
You can thus avoid the riskst hat could arise as
ar esult of:
Ran incorrectly categorized personint he front-
passenger seat
Rthe unintentional deactivatio nofthe front-
passenger front air bag
Rthe unsuitable positionin gofthe child
restraint system, e.g. too clos etothe dash-
board
Rearward-facing child restraint system
If it is absolutely necessary to install arearward-
facin gchild restraint system on the front-
passenger seat, always make sure that the
front-passenge rfront air bag is deactivated.
Only if the PASSENGER AI RBAG OFF indicator
lamp is permanently lit (
Ypage 39) is the front-
passenger front air bag deactivated.
Always observe the child restraint system man-
ufacturer'si nstallation and operating instruc-
tions.
Forward-facing child restraint system
If you secur eachild in aforward-facin gchild
restraint system on the front-passenge rseat,
always move the front-passenge rseat as far
back as possible.T he entire base of the child
restraint system must always rest on the seat
cushio nofthe front-passenge rseat. The back-
rest of the child restraint system must lie as flat
as possible against the backrest of the front-
passenger seat. The child restraint system must
not touc hthe roof or be subjected to aload by
the head restraint .Adjust the angle of the seat
backrest and the head restraint position accord- ingly. Always make sure that the shoulder belt
strap is correctly routed fromt he front-
passenger seat belt guide to the shoulder belt
guide on the child restraint system. The shoul-
der belt strap must be routed forward and down
fromt he front-passenge rseat belt guide.
Always observe the child restraint system man-
ufacturer'si nstallation and operating instruc-
tions.
Pets in th evehicle
GWARNING
If you leave animals unattended or unsecured
in the vehicle, the ycould press buttons or
switches, for example.
As aresult,t heyc ould:
Ractivatev ehicle equipmenta nd become
trapped, for example
Ractivateord eactivatesystems, thereby
endangeringo ther road users
Unsecure danimals could also be flung around
the vehicle in the eventofana ccident or sud-
den steeringorb raking, thereby injuring vehi-
cle occupants. There is arisk of an accident
and injury.
Never leave animals unattended in the vehi-
cle. Always secur eanimals properly during
the journey, e.g. use asuitable animal trans-
port box.
Driving safety systems
Overview of driving safety systems
In this section, you will findi nformation about
the followingd rivingsafetysystems:
RABS(Anti-lock Braking System)
(Ypage 57)
RBA S(Brake Assist System) (Ypage 57)
RActiveBrakeA ssist (Ypage 58)
RAdaptive brakel ights(Ypage 60)
RESP®(ElectronicStabilityProgram)
(Ypage 60)
REB D( Electronic Bra ke force Distribution)
(Ypage 63)
RADAPTIVE BRAKE (Ypage 63)
Important safety notes
If you fail to adapt your drivings tyle or if you are
inattentive, the drivings afetysystems can nei-
the rreducet he risk of an accident nor override
the laws of physics .Drivings afetys ystems are
merely aids designed to assist driving.
56Driving safety systems
Safety
Page 74 of 298
XTo deactivate:press and holdbutton :for
aboutf ives econds unti latone sounds.
XTo activate: press and hol dbutton ;for
aboutf ives econds unti latone sounds.
If yo upress one of the two buttons and do not
hea rat one, the relevant setting hasa lready
been selected.
The vehicl eislocked automaticall ywhent he
ignition is switched on and the wheels are turn-
ing.
Yo uc ould therefore lock yoursel fout if:
Rthe vehicl eisbeing pushed.
Rthe vehicl eisbeing towed.
Rthe vehicl eisonar ollerdynamometer.
Yo uc an also switch the automatic locking func-
tio nona nd off using the on-board computer
(
Ypage 173).
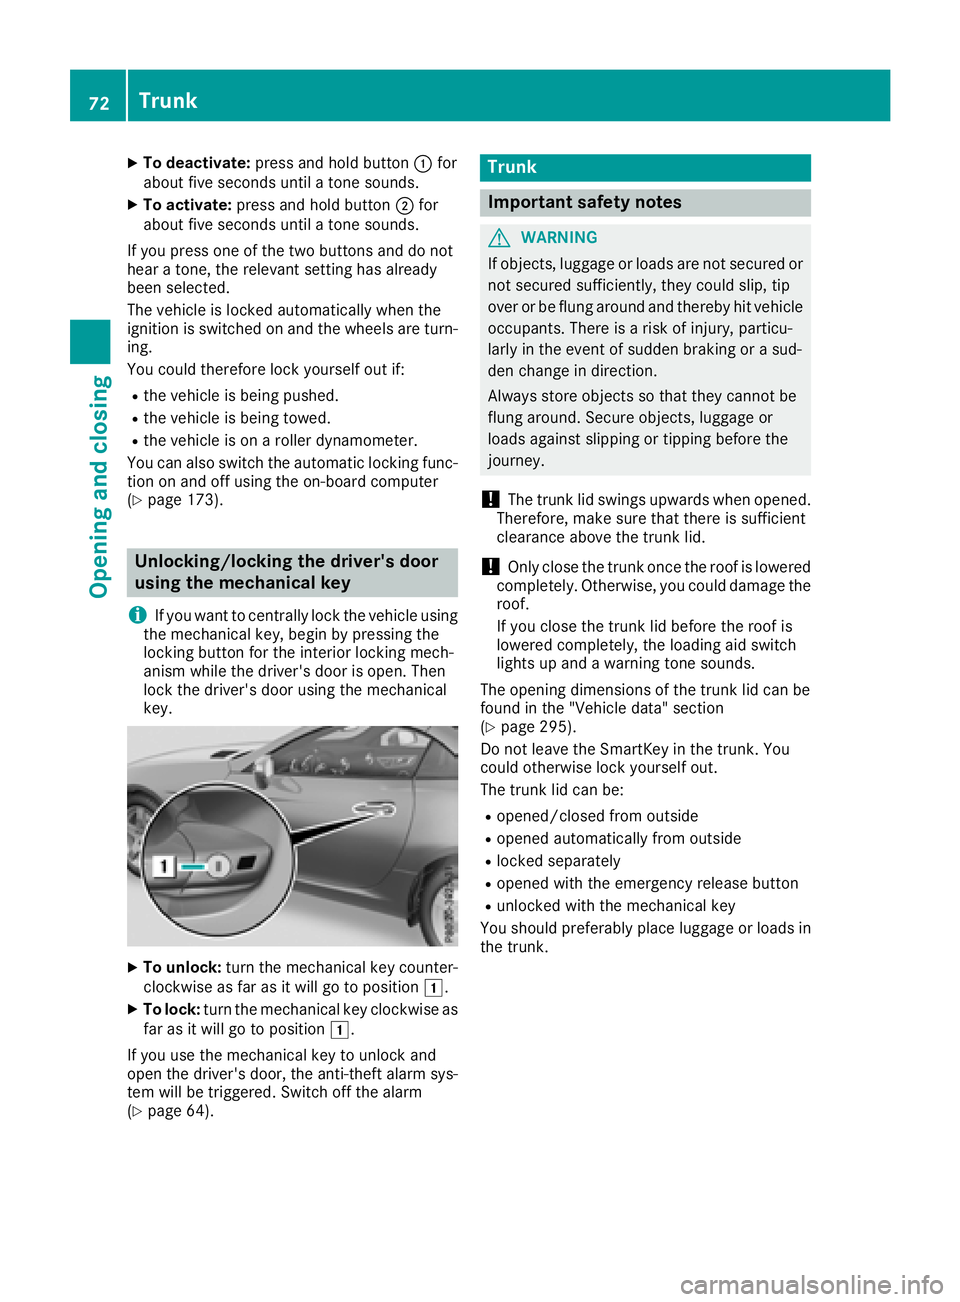
Unlocking/lockin gthe driver's door
using the mechanical key
i
If yo uwanttoc entrall yloc kthe vehicl eusing
the mechanical key,b eginby pressing the
locking button for the interio rloc king mech-
anism whil ethe driver's door is open. Then
lock the driver's door using the mechanical
key.
XTo unlock: turn the mechanical key counter-
clockwise as far as it will go to position 1.
XTo lock:turn the mechanical key clockwise as
far as it will go to position 1.
If yo uusethe mechanical key to unlock and
open the driver's door, the anti-thef talarm sys-
tem will be triggered .Switch off the alarm
(
Ypage 64).
Trunk
Important safety notes
GWARNING
If objects, luggage or load sare not secured or
not secured sufficiently ,they could slip ,tip
overorbef lung around and thereb yhitvehicle
occupants. There is ariskofi njury,p articu-
larly in the event of sudden braking or asud-
de nc hange in direction.
Alway sstoreo bjects so thatt hey cannotbe
flung around .Secure objects, luggage or
load sagain st slipping or tipping before the
journey.
!The trunk li dswing su pwar ds when opened.
Therefore, make sure thatt hereiss ufficient
clearance above the trunk lid.
!Onlyc lose the trunk once the roofisl owered
completely. Otherwise, yo ucould damag ethe
roof.
If yo uclose the trunk li dbefore the roofi s
lowered completely, the loading ai dswitch
lights up and awarning tone sounds.
The opening dimensions of the trunk li dcan be
found in the "Vehicle data" section
(
Ypage 295).
Do not leave the SmartKey in the trunk. You
could otherwise lock yoursel fout.
The trunk li dcan be:
Ropened/closedf rom outside
Ropenedautomaticall yfrom outside
Rlocked separately
Ropene dwitht he emergency release button
Runlockedw itht he mechanical key
Yo us houl dpreferabl yplace luggage or load sin
the trunk.
72Trunk
Opening and closing
Page 79 of 298
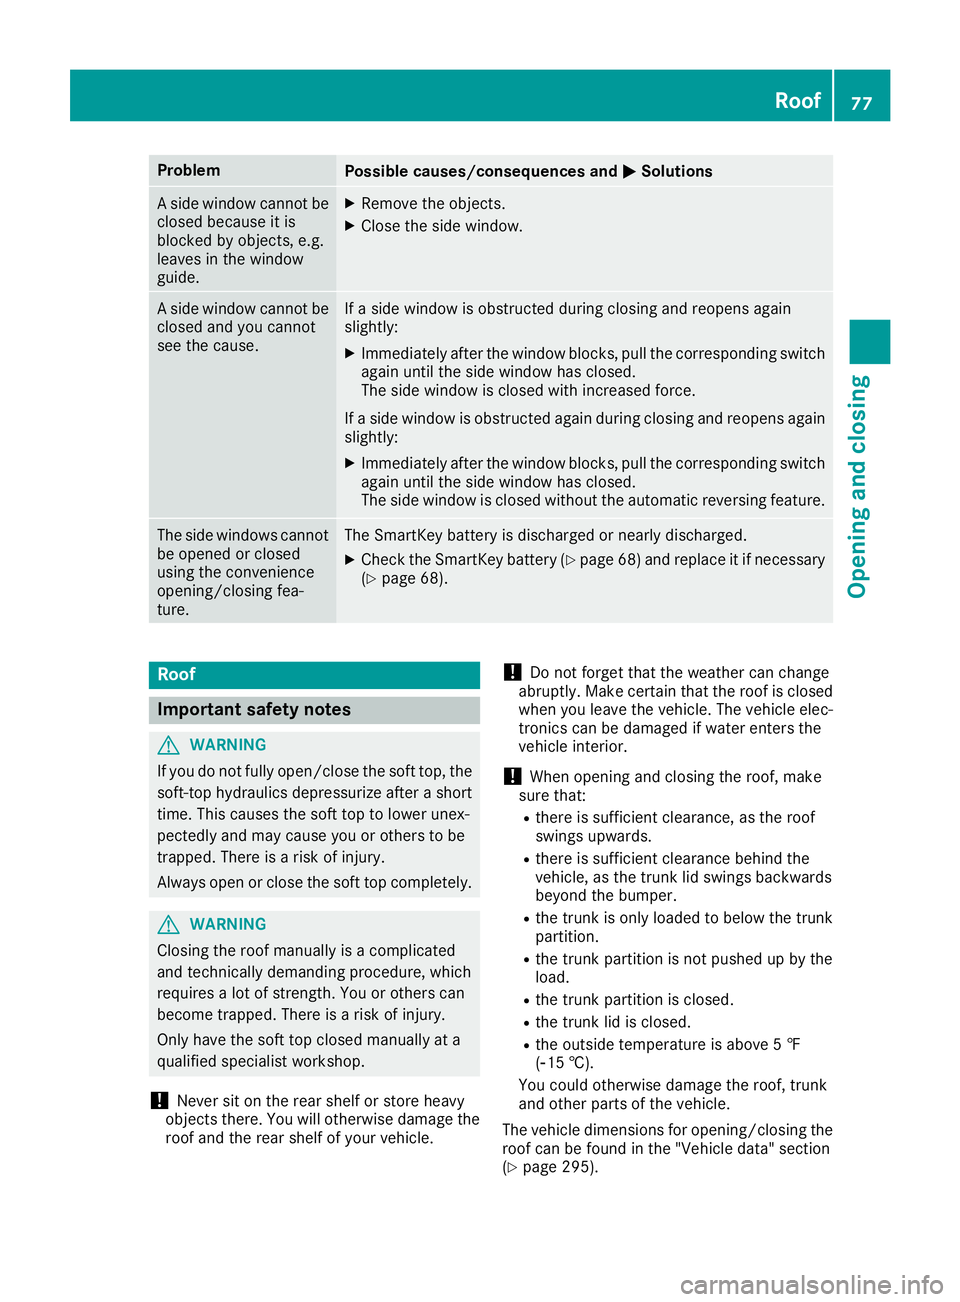
ProblemPossible causes/consequences andMSolutions
Aside window cannot be
closed because it is
blocked by objects, e.g.
leaves in the window
guide.XRemove the objects.
XClose the side window.
As ide window cannot be
closed and you cannot
see the cause.If as ide window is obstructed during closing and reopens again
slightly:
XImmediately after the window blocks, pull the correspondings witch
again until the side window has closed.
The side window is closed with increased force.
If as ide window is obstructed again during closing and reopens again
slightly:
XImmediately after the window blocks, pull the correspondings witch
again until the side window has closed.
The side window is closed without the automatic reversing feature.
The side windows cannot
be opened or closed
using the convenience
opening/closing fea-
ture.The SmartKey battery is discharged or nearly discharged.
XCheck the SmartKey battery (Ypage 68) and replace it if necessary
(Ypage 68).
Roof
Important safety notes
GWARNING
If you do not fully open/close the soft top, the
soft-top hydraulics depressurize after ashort
time. This causes the soft top to lower unex-
pectedly and may cause you or others to be
trapped. There is arisk of injury.
Always open or close the soft top completely.
GWARNING
Closing the roof manually is acomplicated
and technically demanding procedure, which
requires alot of strength. You or others can
become trapped. There is arisk of injury.
Only have the soft top closed manually at a
qualified specialist workshop.
!Never sit on the rear shelf or store heavy
object sthere. You will otherwise damage the
roof and the rear shelf of your vehicle.
!Do not forget that the weather can change
abruptly. Make certain that the roof is closed
when you leave the vehicle. The vehicle elec-
tronics can be damaged if water enters the
vehicle interior.
!When opening and closing the roof, make
sure that:
Rthere is sufficient clearance, as the roof
swings upwards.
Rthere is sufficient clearance behind the
vehicle, as the trunk lid swings backwards
beyond the bumper.
Rthe trunk is only loaded to below the trunk
partition.
Rthe trunk partition is not pushed up by the
load.
Rthe trunk partition is closed.
Rthe trunk lid is closed.
Rthe outside temperature is above 5‡
(Ò15 †).
You could otherwise damage the roof, trunk
and other parts of the vehicle.
The vehicle dimensions for opening/closing the
roof can be found in the "Vehicle data" section
(
Ypage 295).
Roof77
Opening and closing
Z
Page 80 of 298
Make sure that the roof and rear window are
clean and dry before opening the roof. Other-
wise, water or dirt could enter the vehicle inte-
rior or trunk.
Opening and closing using the roof
switch
Important safety notes
GWARNING
When opening or closing the roof, body parts
could be trapped by, for example, the roof
mechanism, trunk lid or side windows. There
is ar isk of injury.
When raising or lowering the roof, make sure
that no body parts are in the vicinity of moving
components. If someone becomes trapped,
release the button.
For safety reasons, you can only open or close
the roof when the vehicle is stationary.
!Operating the roof while pulling away:
RObserve the following traffic carefully.
RDo not drive faster than 25 mph (40 km/h).
RAvoid abrupt braking and swerving maneu-
vers.
Do not operate the roof when cornering, driv-
ing on uneven surfaces or during strong
winds. The vehicle may otherwise be dam-
aged.
iIf the traffic conditionsm ean that you have
to drive off while opening/closing the roof,
the procedure which was started while sta-
tionary can be continued at speeds of up to
approximately 25 mph (40 km/h).
Opening and closing
XVehicles without semi-automatic trunk
partition: close the trunk partition
(
Ypage 79).
XClose the trunk lid (Ypage 72).
XTurn the SmartKey to position 2in the igni-
tion lock.
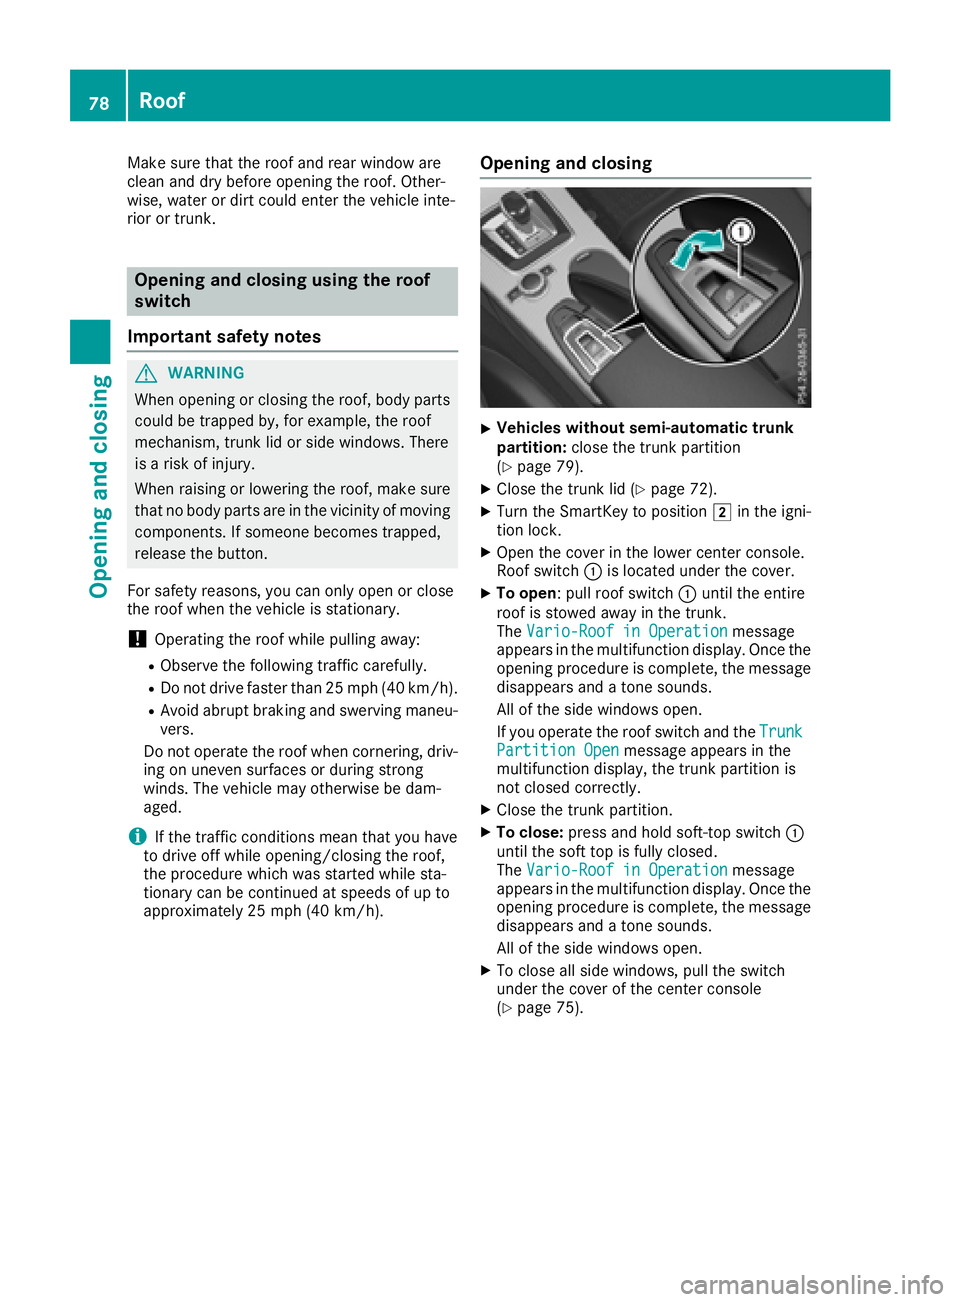
XOpen the cover in the lower center console.
Roof switch :is located under the cover.
XTo open:p ull roof switch :until the entire
roof is stowed away in the trunk.
The Vario-Roof in Operation
message
appears in the multifunction display.O nce the
opening procedure is complete, the message
disappears and atone sounds.
All of the side windows open.
If you operate the roof switch and the Trunk
Partition Openmessage appears in the
multifunction display,t he trunk partition is
not closed correctly.
XClose the trunk partition.
XTo close: press and hold soft-top switch :
until the soft top is fully closed.
The Vario-Roof in Operation
message
appears in the multifunction display.O nce the
opening procedure is complete, the message
disappears and atone sounds.
All of the side windows open.
XTo close all side windows, pull the switch
under the cover of the center console
(
Ypage 75).
78Roof
Opening and closing