MERCEDES-BENZ SLC ROADSTER 2019 Manual Online
Manufacturer: MERCEDES-BENZ, Model Year: 2019, Model line: SLC ROADSTER, Model: MERCEDES-BENZ SLC ROADSTER 2019Pages: 306, PDF Size: 47.03 MB
Page 81 of 306
Only
have thesoft topclosed manuall yat a
qual ified speciali stworkshop.
! Never
siton the rear shelf orstore heavy
objects there.Youwillotherwise damage
the roof andtherear shelf ofyour vehicle.
! Do
not forget thattheweather canchange
abruptly .Make certain thattheroof is
closed whenyouleave thevehicle. Thevehi-
cle electronics canbedamaged ifwater
enters thevehicle interior.
! When
opening andclosing theroof, make
sure that:
R there issufficient clearance, asthe roof
swings upwards.
R there issufficient clearance behindthe
vehicle, asthe trunk lidswings backwards
beyond thebumper.
R the trunk isonly loade dto below the
trunk partition.
R the trunk partition isnot pushed upbythe
load.
R the trunk partition isclosed.
R the trunk lidisclosed.
R the outside temperature isabove 5‡
(00F815 †).
You could otherwise damagetheroof, trunk
and other partsofthe vehicle.
The vehicle dimensions foropening/closing
the roof canbefound inthe "Vehicle data"
section (Ypage 303).
Make surethattheroof andrear window are
clean anddrybefore opening theroof. Other-
wise, water ordirt could enterthevehicle inte-
rior ortrunk. Opening
andclosing using theroof
switch
Importa ntsafety notes G
WARNING
When opening orclosing theroof, body
parts could betrapped by,forexample, the
roof mechanism, trunklidorside windows.
There isarisk ofinjury.
When raising orlowering theroof, make
sure thatnobody parts areinthe vicinity of moving
component s.Ifsomeone becomes
trapped, releasethebutton.
For safety reasons, youcan only open orclose
the roof when thevehicle isstationary.
! Operating
theroof while pulling awa y:
R Observe thefollowi ngtraffic carefully .
R Do not drive faster than25mph
(40 km/h).
R Avoid abrupt braking andswerving
maneuvers.
Do not operate theroof when cornering,
driving onuneven surfaces orduring strong
winds. Thevehicle mayotherwise bedam-
aged.
i If
the traffic conditions meanthatyouhave
to drive offwhile opening/closing theroof,
the procedure whichwasstarted whilesta-
tionary canbecont inued atspeeds ofup to
approximately 25mph (40km/h).
Opening andclosing X
Vehicles
withoutsemi-automa tictrunk
part ition: closethetrunk partition
(Y page 80).
X Close thetrunk lid(Ypage 73).
X Turn theSmartKey toposition 0048inthe igni-
tion lock.
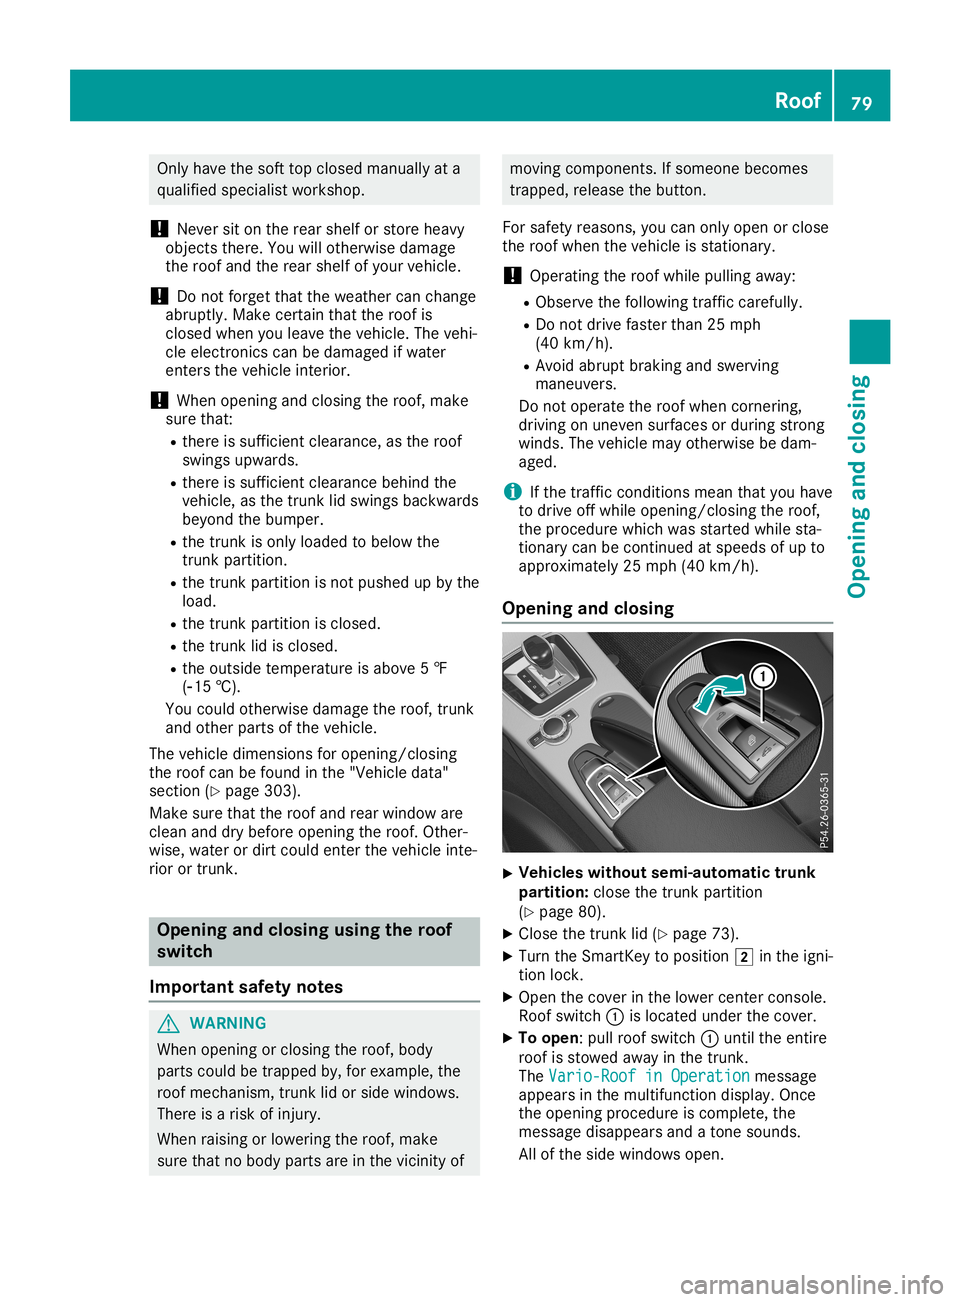
X Open thecover inthe lower center console.
Roof switch 0043islocated underthecover.
X To open: pullroof switch 0043until theentire
roof isstowed awayin the trunk.
The Vario-Roof inOperation Vario-Roof
inOperation message
appea rsinthe multifunction display.Once
the opening procedure iscomplete, the
message disappearsandatone sounds.
All ofthe side windows open. Roof
79Opening andclosing Z
Page 82 of 306
If
you opera tethe roof switch andthe
Trunk Partition Open Trunk
Partition Openmessage appears
in the multifu nctiondisplay,the trunk parti-
tion isnot closed correctly.
X Clos ethe trunk partition.
X To clo se: press andhold soft-top switch0043
until thesoft topisfull yclosed.
The Vario-Roof inOperation Vario-Roof
inOperation message
appe arsinthe multifu nctiondisplay.Once
the opening procedureiscomplete, the
messag edisa ppea rsand atone sounds.
All ofthe side window sopen.
X To close allside window s,pul lthe switch
under thecover ofthe center console
(Y page 76). Openin
g/closing using theSmart Key
Important safetynotes G
WARNING
When opening orclosing theroof, body
parts could betrapped by,forexample ,the
roof mechanism, trunklidorside window s.
There isarisk ofinjury.
When raisingorlowe ringtheroof, make
sure thatnobody parts areinthe vicinity of
moving components. Ifsomeone becomes
trapped ,relea sethe button.
Openin gand closing This
function isonly availableon vehicle swith
KEYLESS- GOorwith roofcomfort operation.
X Clos ethe trunk lid(Ypage 73).
X Vehicl eswith comfort operation: point
the tipofthe SmartKey atthe driver's door
handle .
X Vehicl eswith KEYLESS -GO:theSmartKey
must bewithin 6ft (2 m) ofthe vehicle .
X To open: pressandhold the0036 button on
the SmartKey untiltheroof isfull yopened.
The roof andtherear side window sopen.
The front sidewindow sclose.
X To
interrupt theopeni ngprocedure:
relea sethe 0036 button.
X To open thefront sidewindows: pressthe
0036 button onthe SmartKey again. X
To clo se: press andhold the0037 button
on the SmartKey untiltheroof isfull y
closed.
The roof andtheside window sclose.
X To
interrupt theclosing procedure:
relea sethe 0037 button. Loc
king theroof again
Important safetynotes G
WARNING
If you donot fullyopen/close thesoft top,
the soft-top hydraulics depres surizeaftera
short time.Thiscause sthe soft toptolowe r
unexpectedly andmay cause youorothers
to be trapped .There isarisk ofinjury.
Alway sopen orclose thesoft topcom-
pletel y.
The roof isnot locked if:
R the 0059 symbo land theVario-Roof in Vario-Roof
in
Operation Operation
messageappe arinthe multi-
function display
R the 0059 symbo land theOpen/Close Open/Close
Vario-Roof Completely Vario-Roof
Completelymessageappe ar
in the multifu nctiondisplayand youhear a
warning tone
R you hear awarning toneforuptoten sec-
onds when pulling awayor whil edriving
Loc king You
canlock theroof againifit is not locked
full y.
X Pul lover andstop thevehicle safelyas soon
as possib le,pay ing attention toroad and
traffic conditions.
X Ensure thattheSmartKey isin positio n0048
in the ignition lock.
X Press theroof switch (Ypage 79). Trunk
partition
Gene ralnotes !
To
avoid damagingtheroof orlug gage
when foldingback theroof, youshoul d: 80
RoofOpeni
ngand closi ng
Page 83 of 306
R
only load thetrunk tobelow thetrunk par-
tition
R not place anyobject son orinfront ofthe
trunk partition
R not place anyobject son the cover behind
the rollbars
R not allow thecargo topush thetrunk par-
tition upwards
The trunk partition canbeused tocover lug-
gage andloads inthe trunk .
Opening andclosi ng X
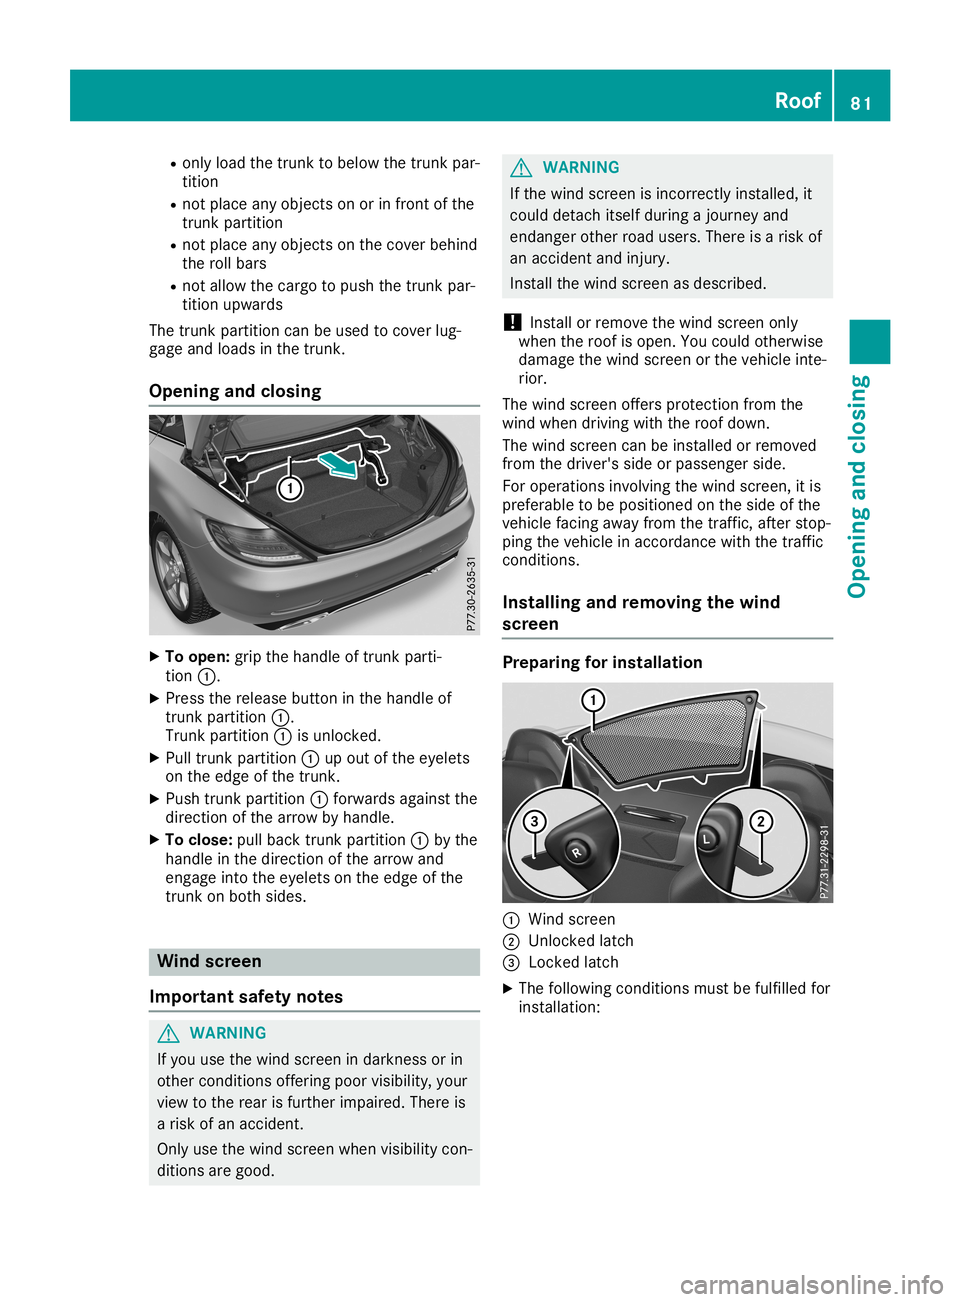
To open: gripthehandle oftrunk parti-
tion 0043.
X Press therelease buttoninthe handle of
trunk partition 0043.
Trunk partition 0043isunlocked.
X Pull trunk partition 0043upout ofthe eyelets
on the edge ofthe trunk .
X Push trunk partition 0043forwards againstthe
direction ofthe arrow byhandle.
X To close: pullback trunk partition 0043bythe
handle inthe direction ofthe arrow and
engage intotheeyelets onthe edge ofthe
trunk onboth sides. Wind
screen
Import antsafety notes G
WARNING
If you usethewind screen indarkness orin
other condit ionsoffering poorvisibility, your
view tothe rear isfurther impaired. Thereis
a risk ofan accident .
Only usethewind screen whenvisibility con-
ditions aregood. G
WARNING
If the wind screen isincorr ectlyinstalled, it
could detach itselfduring ajourney and
endanger otherroadusers. Thereisarisk of
an accident andinjury.
Inst allthe wind screen asdescribed.
! Inst
allorremove thewind screen only
when theroof isopen. Youcould otherwise
damage thewind screen orthe vehicle inte-
rior.
The wind screen offersprotect ionfrom the
wind when driving withtheroof down.
The wind screen canbeinstalled orremoved
from thedriver's sideorpassenger side.
For operations involvingthewind screen ,it is
preferable tobe positioned onthe side ofthe
vehicle facingawayfromthetraffic ,after stop-
ping thevehicle inaccordanc ewith thetraffic
condit ions.
Installing andremoving thewind
screen Prepa
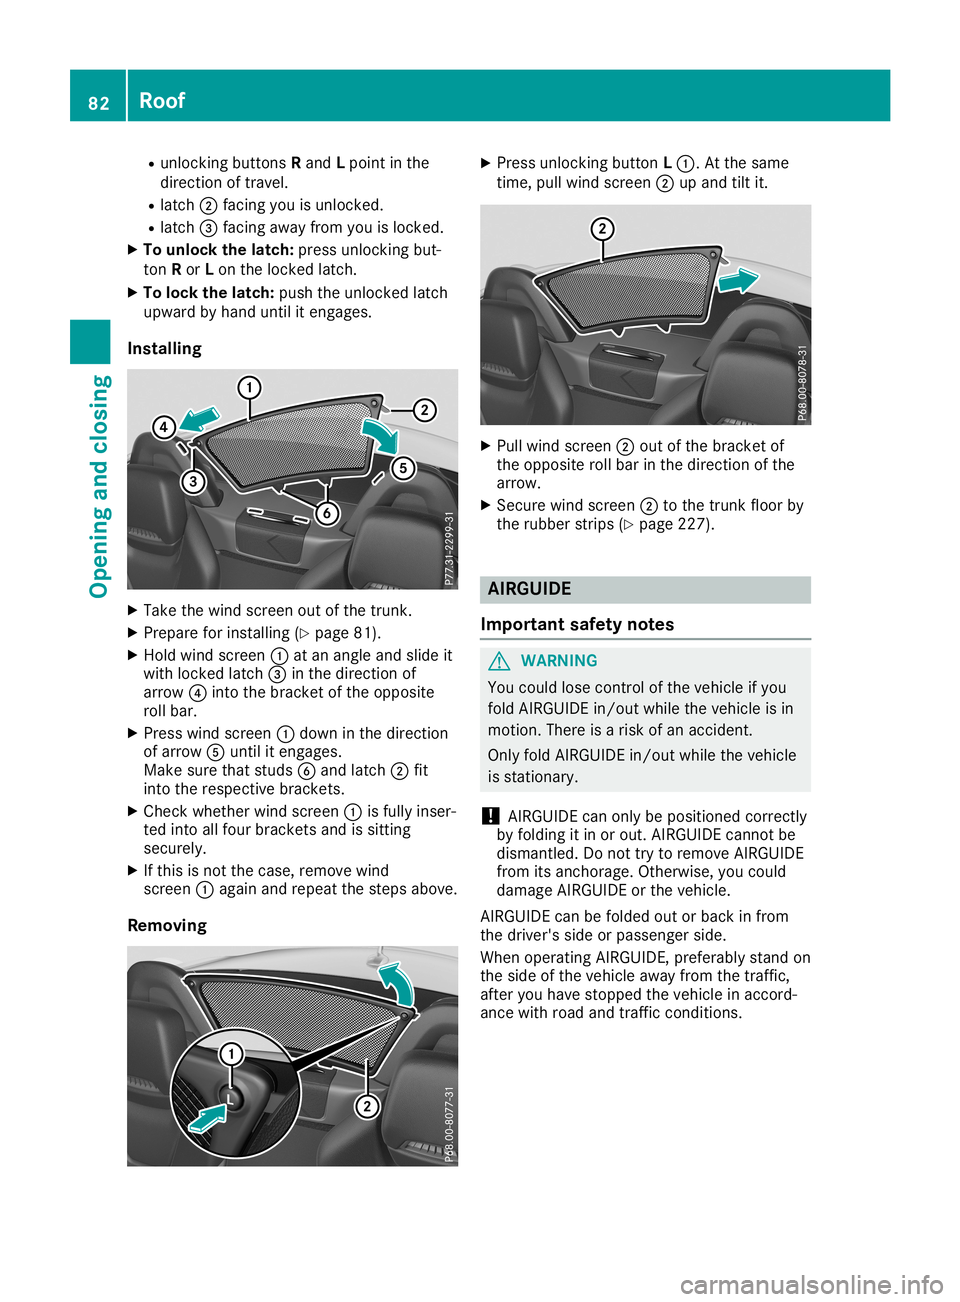
ringforinstallation 0043
Wind screen
0044 Unlock edlatch
0087 Lock edlatch
X The following conditionsmust befulfilled for
installation: Roof
81Opening andclosing Z
Page 84 of 306
R
unlo cking buttons Rand Lpoin tin the
dire ction oftravel.
R latc h0044 facing you isunlo cked.
R latc h0087 facing away from you isloc ked.
X To unlo ckthelat ch: pressunlo cking but-
to nR or Lon theloc kedlatc h.
X To lock thelat ch: push theunlo cked latc h
upward byhan dunt ilit en gages .
Inst alling X
Tak eth ewind scree nout ofthetrunk .
X Pre pare forinstall ing (Ypage 81).
X Hol dwind scree n0043 atan ang leand slide it
wit hloc kedlatc h0087 inthedire ction of
arr ow 0085intoth ebrac ketof theoppo site
roll bar.
X Pre sswind scree n0043 down inthedire ction
of arr ow 0083untilit en gages .
Mak esure that studs 0084and latch0044 fit
int oth eres pec tivebrac kets.
X Chec kwhet herwind scree n0043 isfully inser-
te dint oall four brackets and issit tin g
sec urely.
X Ifth is isno tth ecas e,rem ove wind
sc ree n0043 again andrepeat thest eps abov e.
Rem oving X
Pre ssunlo cking buttonL 0043. Atthesame
tim e,pull wind scree n0044 upand tiltit. X
Pull wind scree n0044 out ofthebrac ketof
th eoppo siteroll bar inthedire ction ofthe
arr ow.
X Sec ure wind scree n0044 tothetrunk floorby
th erubbe rst rips (Ypage 227). AIRG
UIDE
Imp ortant safety notes G
WAR
NING
You could lose control oftheveh icle ifyou
fol dAI RGUID Ein/ out while theveh icle isin
mot ion.Ther eis aris kof an acc iden t.
On lyfold AIRGUID Ein/ out while theveh icle
is statio nary.
! AI
RGUID Ecan onlybe posi tionedco rrect ly
by fold ingitin or out .AI RGUID Ecan notbe
dism antled. Donottr y to rem ove AIRGUID E
fr om itsanc horage. Other wise, youcould
damag eAI RGUID Eor theveh icle.
AI RGUID Ecan befold edout orback infrom
th edriv er'sside orpass enger side.
When operatingAI RGUID E,pre ferably stand on
th eside oftheveh icle away from thetraff ic,
aft eryou have stoppe dth eveh icle inacc ord-
anc ewit hroad andtraff icco nd ition s. 82
RoofOp
ening andclosing
Page 85 of 306
Opera
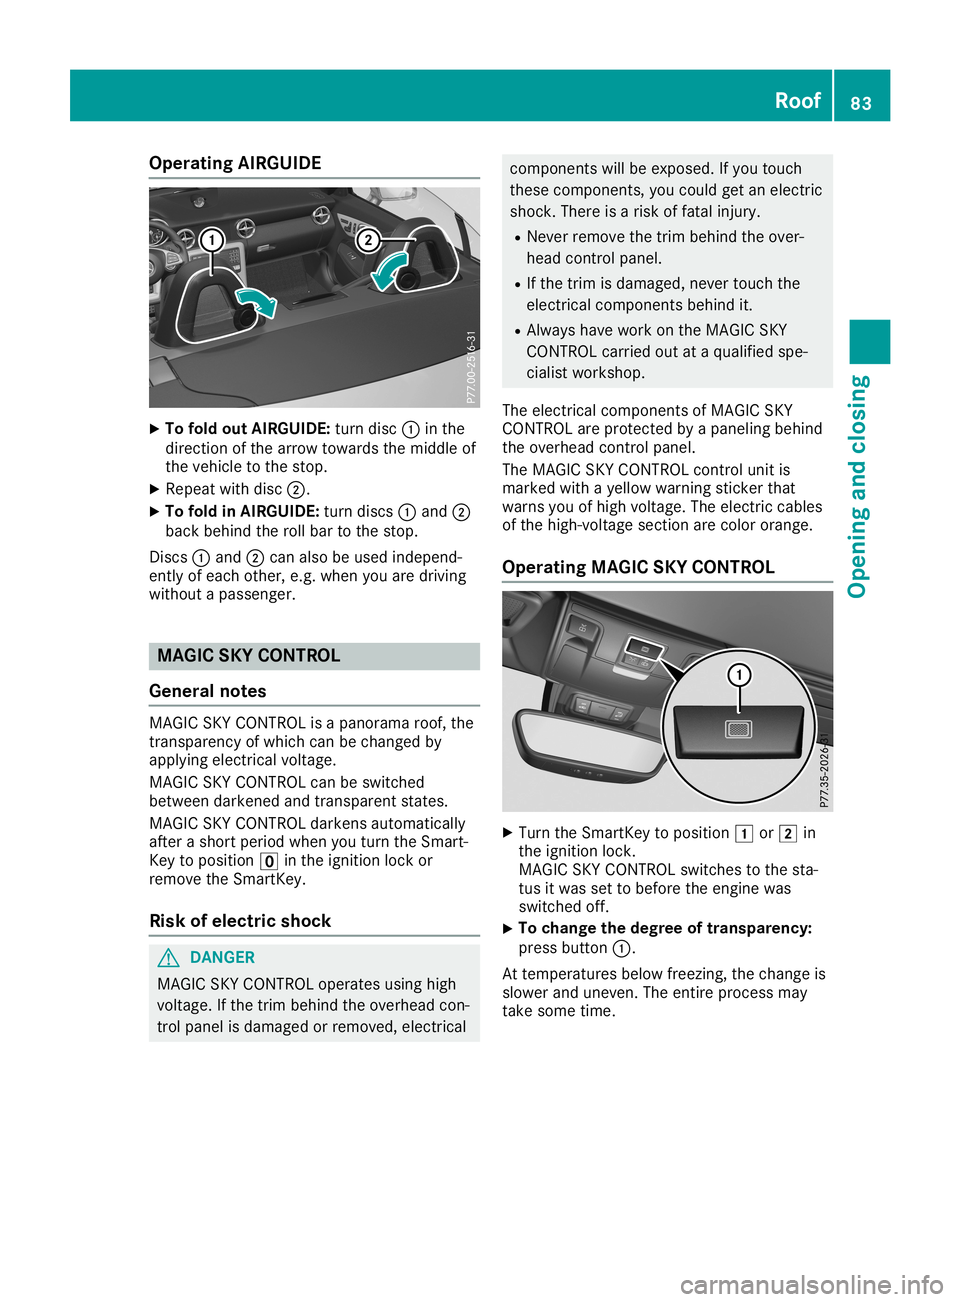
tingAIRGUIDE X
To fold outAIRGUIDE: turndisc0043inthe
direct ionofthe arrow towards themiddle of
the vehicle tothe stop.
X Repeat withdisc0044.
X To fold inAIRGUIDE: turndiscs 0043and 0044
back behind therollbar tothe stop.
Disc s0043 and 0044can also beused independ-
ent lyof each other,e.g. when youaredriving
without apassenger. MAGIC
SKYCONTR OL
General notes MAGIC
SKYCONTROL isapanorama roof,the
tran sparenc yof which canbechanged by
applying electricalvoltage.
MAGIC SKYCONTROL canbeswitched
between darkenedand transparent states.
MAGIC SKYCONTROL darkensautomatic ally
after ashort period whenyouturn theSmart -
Key toposition 0092inthe ignition lockor
remove theSmart Key.
Risk ofelectric shock G
DANGER
MAGIC SKYCONTROL operatesusinghigh
voltage. Ifthe trim behind theoverhead con-
trol panel isdamaged orremoved, electrical compon
entswill beexposed. Ifyou touch
these compon ents,you could getanelectr ic
shock .There isarisk offatal injury.
R Never remove thetrim behind theover-
head control panel.
R Ifthe trim isdamaged, nevertouch the
electr icalcompon entsbehind it.
R Always havework onthe MAGIC SKY
CONTROL carriedoutataqualified spe-
cialist worksho p.
The electr icalcompon entsof MAGIC SKY
CONTROL areprotec tedbyapaneling behind
the overhead control panel.
The MAGIC SKYCONTROL control unit is
marked withayellow warning sticker that
warns youofhigh voltage. Theelectr iccables
of the high-vo ltagesectionare color orange.
Opera tingMAGIC SKYCONTR OL X
Turn theSmart Keytoposition 0047or0048 in
the ignition lock.
MAGIC SKYCONTROL switchestothe sta-
tus itwas settobefore theengin ewas
switched off.
X To
change thedegree oftranspa rency:
press button 0043.
At temper aturesbelowfreezing,thechange is
slower anduneven .The entireprocess may
take some time. Roof
83Opening andclosi ng Z
Page 86 of 306
Problems
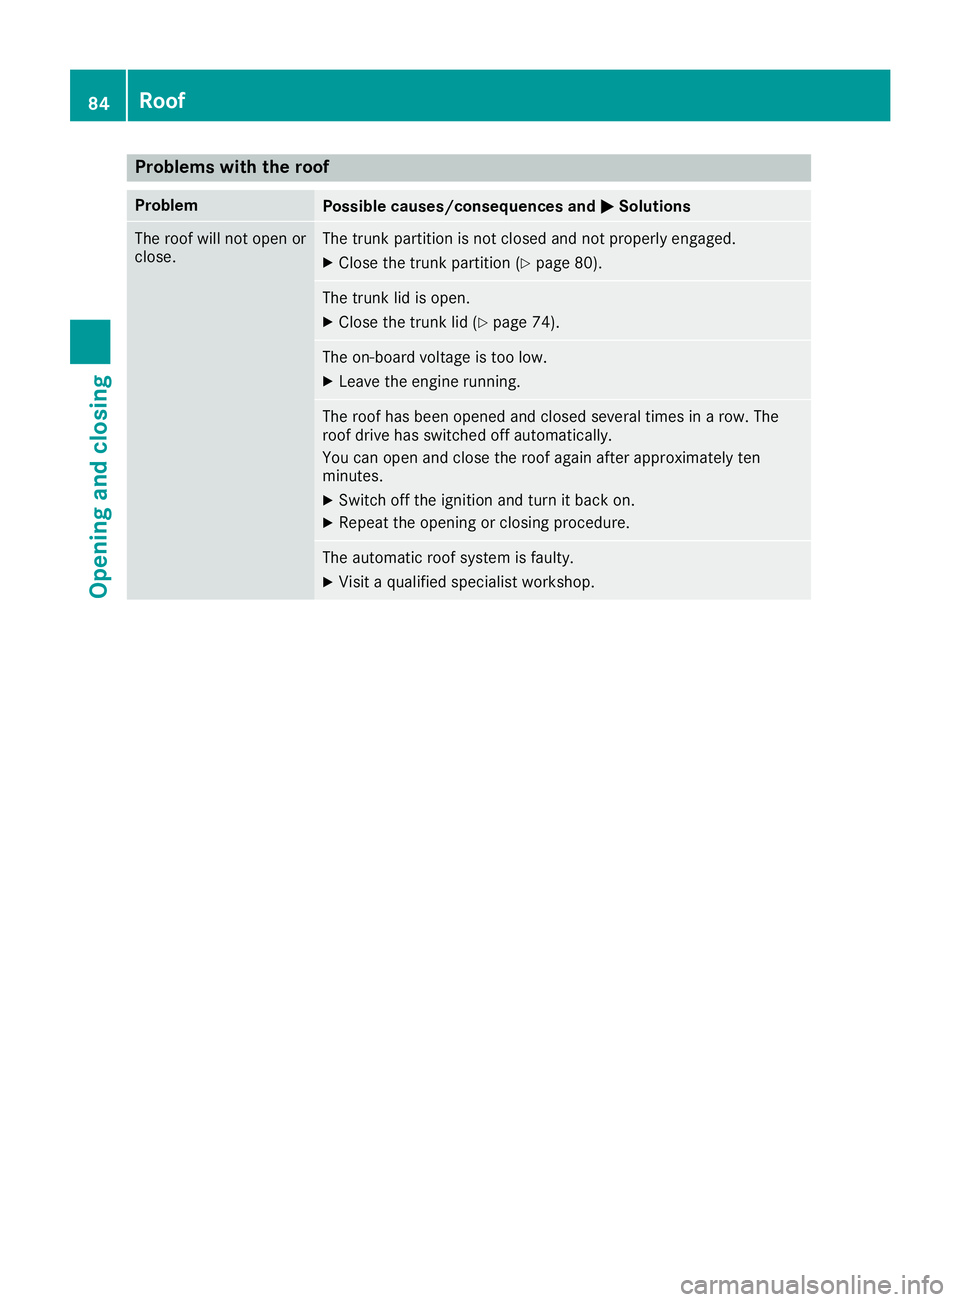
withtheroof Problem
Possible
causes/co nsequences and0050 0050
Solutions The
roof willnotopen or
close. The
trunk partition isnot closed andnotproperly engaged.
X Close thetrunk partition (Ypage 80). The
trunk lidisopen.
X Close thetrunk lid(Ypage 74). The
on-board voltageistoo low.
X Leave theengine running. The
roof hasbeen opened andclosed several timesinarow. The
roof drive hasswitched offautomatically.
You canopen andclose theroof again afterapproximately ten
minutes.
X Switch offthe ignition andturn itback on.
X Repeat theopening orclosing procedure. The
automatic roofsystem isfaulty.
X Visit aquali fiedspecialist workshop. 84
RoofOpening
andclosing
Page 87 of 306
Corr
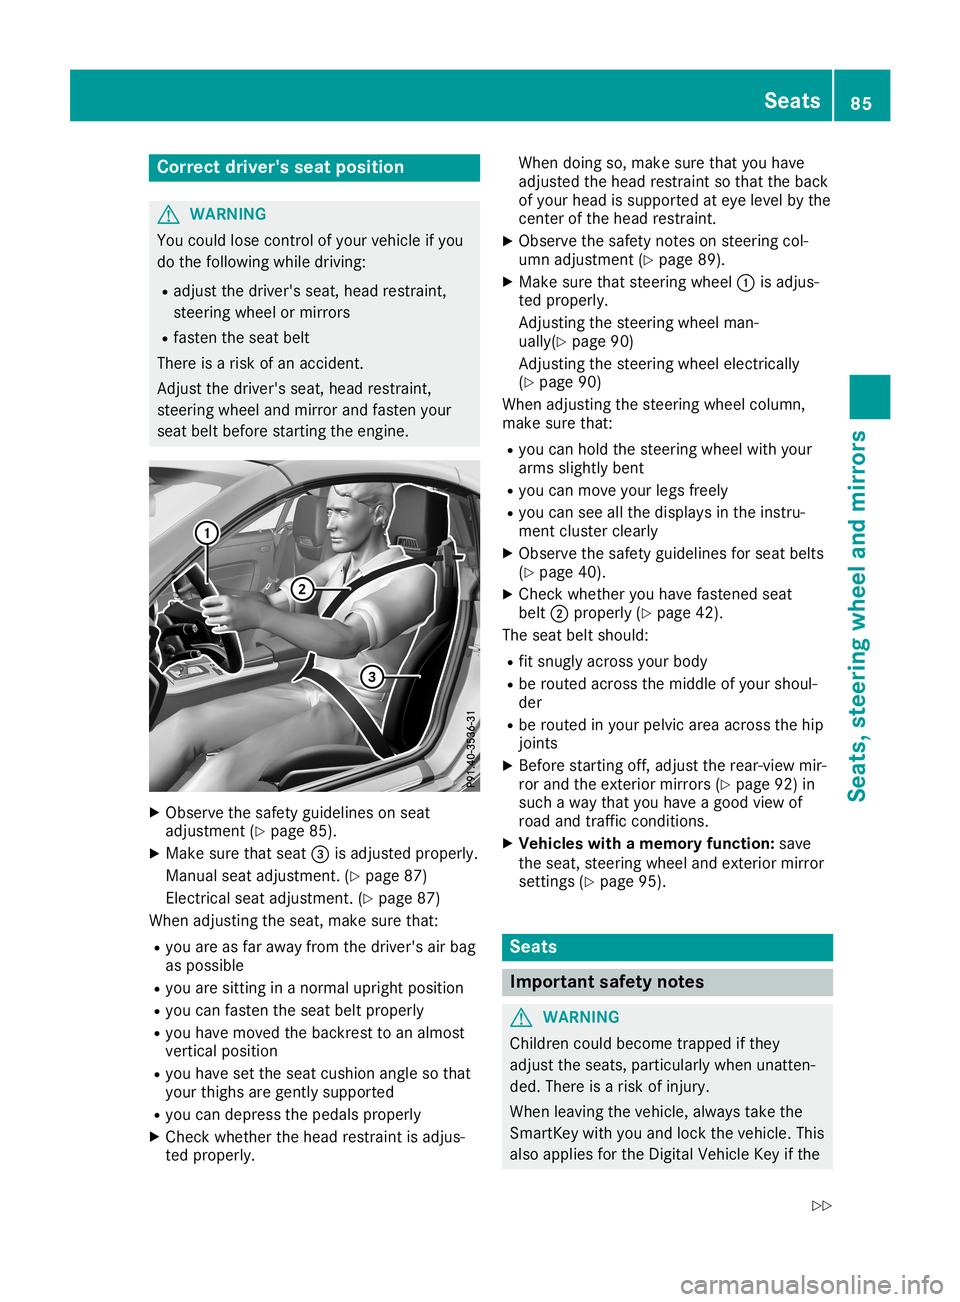
ectdriver 'sseat position G
WAR
NING
You couldlose control of your vehicle ifyou
do thefoll owin gwhile driving:
R adj ust thedriv er'sseat ,head restraint ,
st eer ing wheel ormir rors
R fast entheseat belt
Ther eis aris kof an acc iden t.
Adj ust thedriv er'sseat ,head restraint ,
st eer ing wheel andmirror and fastenyour
seat beltbefore start ing theen gin e. X
Obse rveth esafe tyguidel ineson seat
adj ust men t(Y page 85).
X Mak esure that seat 0087isadj ust edpro perl y.
Man ualseat adjust men t.(Y page 87)
Ele ctric alseat adjust men t.(Y page 87)
When adjust ing theseat ,mak esure that:
R you areasfar away from thedriv er'sair bag
as poss ible
R you aresittin gin ano rm aluprig htposi tion
R you can fastentheseat beltproperl y
R you have movedtheback restto an almos t
ver ticalposi tion
R you have settheseat cushion angleso that
your thighs aregentlysuppo rted
R you can depr essthepedals properl y
X Chec kwhet herthehead restraint isadj us-
te dpro perl y. When
doingso, mak esure that you have
adj ust edthehead restraint sothat theback
of your head issuppo rted ateye levelby the
cen terof thehead restraint .
X Obse rveth esafe tyno teson steer ing col-
umn adjust men t(Y page 89).
X Mak esure that steer ing wheel 0043isadj us-
te dpro perl y.
Ad jus tingth est eer ing wheel man-
ually (Ypage 90)
Ad jus tingth est eer ing wheel electricall y
(Y page 90)
When adjust ing thest eer ing wheel column ,
mak esure that:
R you can hold thest eer ing wheel withyour
arm ssligh tlyben t
R you can mov eyour legsfreely
R you can seeallthedispl aysintheins tru-
men tclus tercle arly
X Obse rveth esafe tyguidel inesfor seat belts
(Y page 40).
X Chec kwhet heryou have fastened seat
belt 0044properl y(Y page 42).
The seat beltshould:
R fit snugly across your body
R be rout edacr oss themidd leof your shoul-
der
R be rout edinyour pelvicarea across thehip
jo int s
X Bef ore start ing off,adj ust therear -view mir-
ror and theex terior mirrors(Y page 92)in
suc haway that you have agood viewof
road andtraff iccon dition s.
X Veh icles withamem oryfunct ion: save
th eseat ,st eer ing wheel andexterior mirror
set tings (Y page 95). Seat
s Imp
ortant safety notes G
WAR
NING
Childr encoul dbec ome trapped ifth ey
adj ust theseat s,part icular lywhen unatten-
ded. Thereis aris kof injury.
When leavingtheveh icle,always taketh e
Sm artKey withyou and lockth eveh icle.This
also applies fortheDig ital Veh icle Key ifth e Seat
s
85Seat s,steerin gwheel andmirro rs
Z
Page 88 of 306
"Dig
italVeh icle Key" function isact ivat edvia
Mer cedesme conn ect .Nev erleave childr en
uns uperv isedintheveh icle.
The seat scan still be adjust edwhen there is
no Sm artKey intheign ition lock. G
WAR
NING
When youadjust aseat ,you orother vehicle
oc cupan tscould become trapped, e.g.on
th eseat guide rail.Ther eis aris kof injury.
When adjust ing aseat ,mak esure that no
on ehas any body partsin thesweep ofthe
seat . G
WAR
NING
If th edriv er'sseat isno ten gaged ,it co uld
mov efor wards asfar asthene xt cat chdur-
ing mov eme ntsuc has brak ingorabrupt
ch ang esofdire ction .As ares ult, you would
be pushe dagain styour seatbeltbythe
uns ecur eddriv er'sseat .
This could caus eyou tolose control ofthe
veh icle.The seat beltcannotpro tect as
int ended andcould result inaddit ional
inj ury.
Ther eis aris kof an acc iden tand injury.
Bef ore everyjourn ey, mak esure that the
driv er'sseat isfully engaged .
Obse rveth esafe tyno teson "Air bags"
(Y page 43)and "Childr enintheveh icle"
(Y page 53). G
WAR
NING
If th edriv er'sseat isno ten gaged ,it co uld
mov eune xpectedly while theveh icle isin
mot ion.This could caus eyou tolose control
of theveh icle.Ther eis aris kof an acc iden t.
Alwa ysmak esure that thedriv er'sseat is
en gaged before start ing theveh icle. G
WAR
NING
If you adjust theseat heightcar eles sly,you
or other vehicle occupan tscould betrapped
and there byinjured. Childr eninpart icular
co uld acciden tallypre sstheelec trical seat adj
ust men tbut tons and become trapped.
Ther eis aris kof injury.
While movingtheseat s,mak esure that your
han dsorother body partsdo notget unde r
th eleve rasse mbly oftheseat adjust men t
syst em. G
WAR
NING
If th ehead restraint sare notins tall ed ornot
adj ust edcorrect ly,they can notpro vide pro-
te ction asintended. Thereis an increas ed
ris kof injury inthehead andneck area, e.g.
in theeve ntofan acc iden tor when braking.
Alwa ysdriv ewit hth ehead restraint sins tal-
led. Before drivingoff,mak esure foreve ry
veh icle occupan tth at thecen terof thehead
res traint suppo rts th eback ofthehead at
about eyelevel. G
WAR
NING
You could lose control ofyour vehicle ifyou
do thefoll owin gwhile driving:
R adj ust thedriv er'sseat ,head restraint ,
st eer ing wheel ormir rors
R fast entheseat belt
Ther eis aris kof an acc iden t.
Ad jus tth edriv er'sseat ,head restraint ,
st eer ing wheel andmirror and fastenyour
seat beltbefore start ing theen gin e.
! To
pre ven tdamag eto theseat sand the
seat heating,obse rveth efoll owin gno tes:
R Do notspill liquids onto theseat s.Dr yth e
seat sas soon asposs ibleifliquid does
get spille don theseat s.
R Ifth eseat cover sare damp orwet ,do not
swit chon theseat heating.Als o,do not
use theseat heatingtodry theseat s.
R Clean theseat cover sas rec omm ended;
see the"In terior care"sec tion.
R Do nottr ans portheav yloads onthe
seat s.Do notplac epoin tedobj ect son
th eseat cushion ssuc has knives ,nail sor
to ols. Wher eposs ible, usetheseat son ly
for carryin gpass enger s.
R When operatingth eseat heating,do not
co ver theseat swit hins ulati ngmat erial s, 86
Seat
sSeat s,steerin gwheel andmirro rs
Page 89 of 306
e.g.
blanket s,coats, bags,protec tivecov-
ers, child seats orbooster seats.
R When theseat heating isswitched on,the
seat surface canbedamaged asaresult
of objec tsbeing placed onthe seats, for
example, seatcushions ,child seats and
protec tivecover snot approved by
Mercedes- Benz.
! Make
surethatthere arenoobjec tsinthe
footwell underorbehind theseats when
movin gthe seats back. There isarisk that
the seats and/or theobjec tscould bedam-
aged.
i The
head restraints areequipped withthe
NECK- PROsystem (Ypage 52).Forthis rea-
son, itis not possible toremove thehead
restr aints fromtheseats.
For more information ,con tact aqualified
specialist workshop. Adju
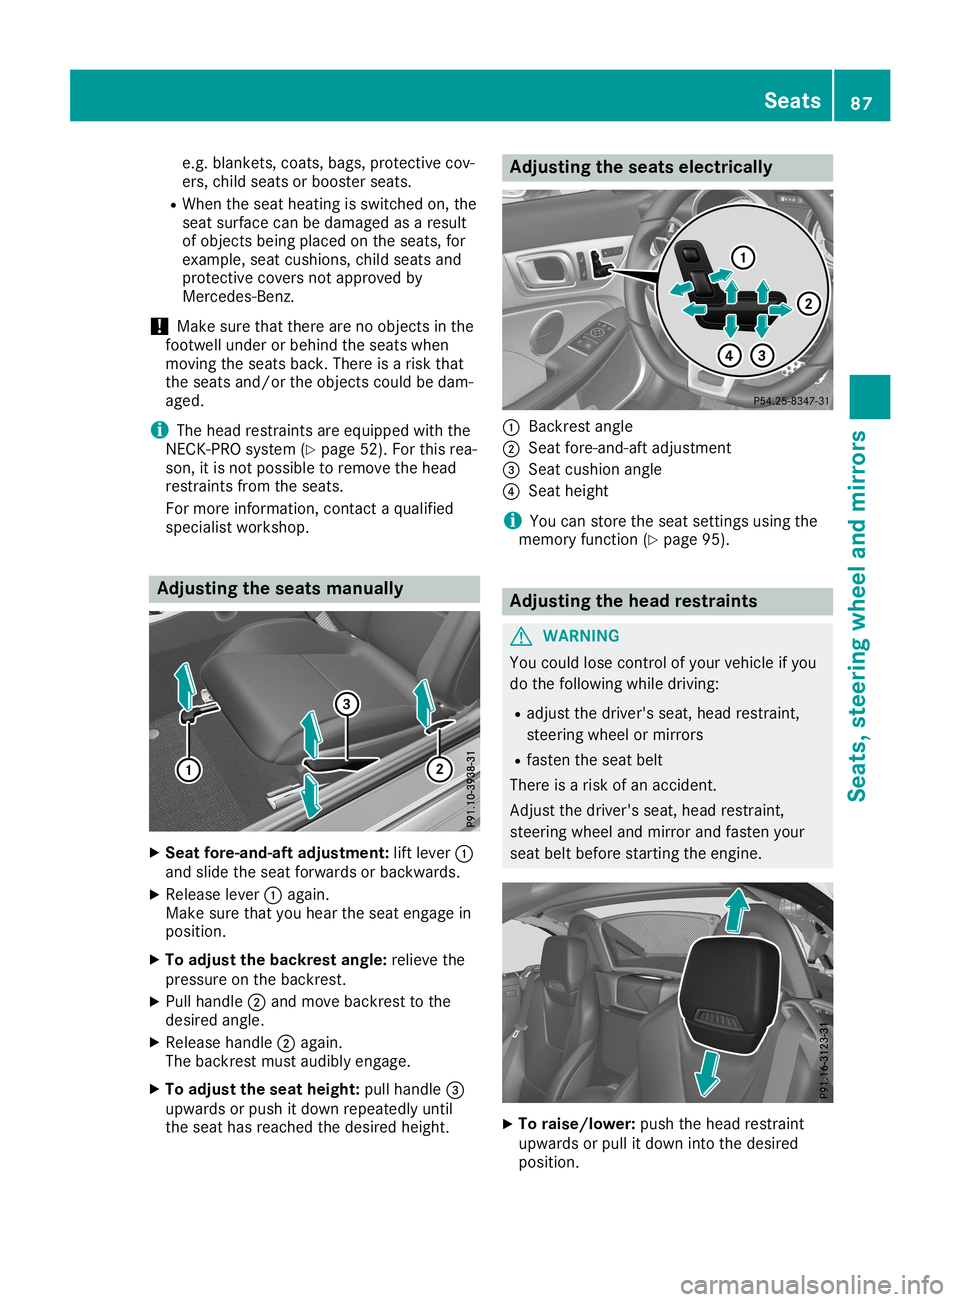
sting theseats manually X
Seat fore-a nd-aftadj ustm ent:liftlever 0043
and slide theseat forwards orbackwards.
X Release lever0043again.
Make surethatyouhear theseat engage in
position .
X To adj ust the backrest angle:relieve the
pressure onthe backr est.
X Pull handle 0044and move backresttothe
desired angle.
X Release handle0044again.
The backr estmust audibly engage.
X To adj ust the seat height: pullhandle 0087
upwards orpush itdown repeatedly until
the seat hasreached thedesired height. Adju
sting theseats electrically 0043
Back restangle
0044 Seat fore-and-aft adjustm ent
0087 Seat cushion angle
0085 Seat height
i You
canstorethe seat settings using the
memory function (Ypage 95). Adju
sting thehead restraints G
WARN
ING
You could losecontrol ofyour vehicle ifyou
do the following whiledriving:
R adjust thedriver's seat,head restraint,
steerin gwheel ormirror s
R fasten theseat belt
There isarisk ofan acciden t.
Adj ust the driver's seat,head restraint,
steerin gwheel andmirror andfasten your
seat beltbefore startingthe engine. X
To raise/lower: pushthehead restraint
upwards orpull itdown intothedesired
position . Seats
87Seats,steering wheelandmirrors Z
Page 90 of 306
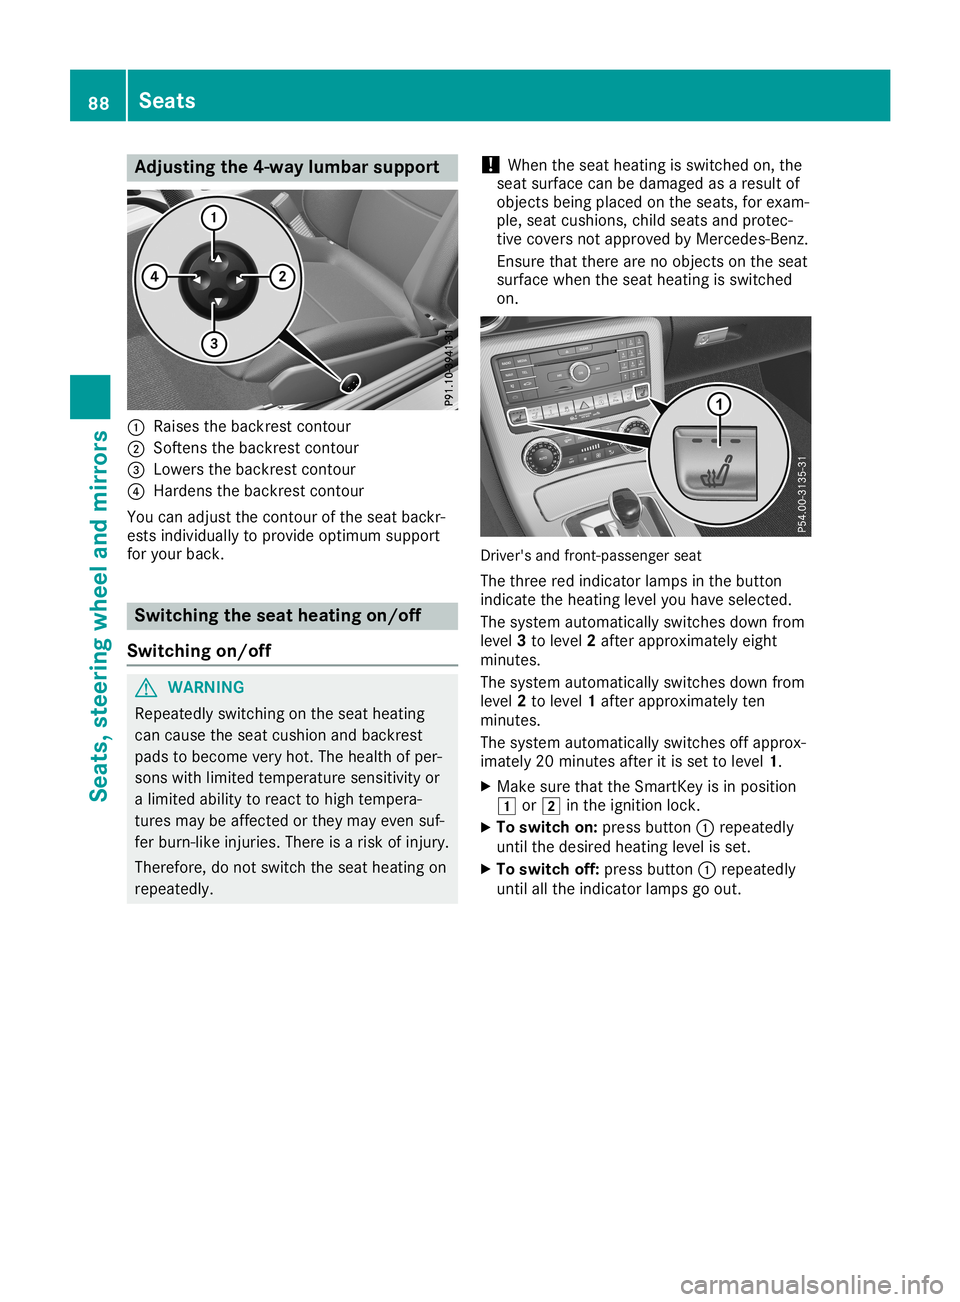
Adj
usting the4-wa ylum bar support 0043
Raises thebac krest contour
0044 Soften sth ebac krest contour
0087 Lowe rsthebac krest contour
0085 Harden sth ebac krest contour
You canadjust theco ntour oftheseat backr-
est sind ivid ually topro videopt imum support
for your back. Swit
chingth esea thea ting on/of f
Swit chingon/of f G
WAR
NING
Repeat edlyswitching ontheseat heating
can caus eth eseat cushion andbackrest
pads tobec ome veryhot .The healt hof per -
son swit hlimi tedte mpe rature sensitivit yor
a limi tedabilit yto reac tto high tempe ra-
tur es may beaffectedor they may evensuf -
fer burn -like injurie s.The reisaris kof injury.
The refore ,do notswit chtheseat heatingon
rep eatedly. !
When
theseat heatingisswit ched on,th e
seat surfacecan bedamag edasares ult of
obj ects bein gplac edon theseat s,for exam-
ple, seat cushion s,ch ild seat sand protec-
ti ve cover sno tappr ovedby Mer cedes- Benz.
En sur eth at there arenoobj ects on theseat
sur facewhen theseat heatingisswit ched
on . Dr
ive r's and fron t-pass enger seat
The three red indicat orlamp sin thebut ton
ind icat eth eheat inglevelyou havesele cted.
The systemauto maticallyswit ches down from
lev el3to lev el2aft erappr oximat elyeigh t
min utes.
The systemauto maticallyswit ches down from
lev el2to lev el1aft erappr oximat elyten
min utes.
The systemauto maticallyswit ches off appr ox-
imat ely20min utesaft eritis set tolev el1.
X Mak esur eth at theSm artKey isin pos ition
0047 or0048 intheign ition lock.
X To swit chon: pressbut ton0043 repeatedly
unt ilth edesi redheat inglevelisset .
X To swit choff:pre ssbut ton0043 repeatedly
unt ilall theind icat orlamp sgo out . 88
Sea
tsSea ts,ste ering wheel andmirro rs