code MERCEDES-BENZ SLK-Class 2015 R172 Comand Manual
[x] Cancel search | Manufacturer: MERCEDES-BENZ, Model Year: 2015, Model line: SLK-Class, Model: MERCEDES-BENZ SLK-Class 2015 R172Pages: 270, PDF Size: 5.82 MB
Page 6 of 270
1, 2, 3 ...
360° camera Displaying images ............................ 56
Switching on/off .............................. 56
911 emergency call .......................... 125A
Access data of the mobile phone
network provider Deleting .........................................1 65
Editing .......................................... .165
Making entries ............................... 162
Selecting ........................................ 161
Active partition (USB devices only)
Selecting ........................................ 202
Address book
Browsing ........................................ 147
Calling up ....................................... 147
Changing an entry .......................... 149
Connecting a call ........................... 150
Creating an entry ........................... 148
Deleting an entry ........................... 148
Deleting contacts ........................... 153
Details about an entry ................... 149
Entering characters ......................... 33
Entry as a home address .............. .103
Hiding contact details .................... 154
Importing contacts ........................ 152
Introduction ................................... 146
Receiving vCards ........................... 153
Searching for an entry ................... 148
Starting route guidance ................. 150
Voice tags ...................................... 151
Address entry menu ............................ 64
Adjusting the sound settings
Balance ............................................ 30
Alternative Route ................................ 93
Audio
Radio mode ................................... 186
Audio CD/DVD and MP3 mode
Switching to (Rear Seat Entertain-
ment System) ................................ 245
Audio format, setting
Video DVD ..................................... 231
Autostore .......................................... .189 AUX (audio)
Notes/socket ................................ 223
Switching to ................................... 223
AUX (video)
Setting the volume and sound ....... 232
Showing/hiding the menu ............. 232
Switching to ................................... 232
AUX jacks
CD/DVD drive ............................... 238
Avoiding an area ................................ 115 B
Back button ......................................... 27
Balance, adjusting ............................... 30
Bass, setting ........................................ 30
Bird's-eye view (navigation) ............. 109
Bluetooth®
Activating audio mode ................... 215
Activating/deactivating ................... 45
Conditions (telephone) .................. 125
Connecting another mobile
phone ............................................ 129
Connecting audio devices .............. 212
Device list ...................................... 212
Entering the passcode ................... 128
External authorization .................... 129
General information ......................... 44
Interface ........................................ 124
Introduction ................................... 124
Reconnecting an audio device ....... 214
Searching for a mobile phone ....... .127
Settings .......................................... .44
Telephone basic menu ...................1 31
Telephony ...................................... 125
Telephony notes ............................ 124
Bluetooth® audio basic display ....... 215
Brightness, setting (TV, video) ......... 226
Buttons on the COMAND control-
ler .......................................................... 27 C
Call Accepting/ending/rejecting .......... 132
see Telephone
Call lists
Displaying details ........................... 141 4
Index
Page 65 of 270
Carpool lanes may only be used under certain
conditions. They can normally be used when
there are two people in the vehicle. However, there are also carpool lanes which can only be
used when there are three or more people in
the vehicle. In California, lone drivers can use
a carpool lane if their vehicle's emission level or fuel consumption is below a fixed thresh-
old.
Carpool lanes may be reserved for specific
times (e.g. during the peak period).
Carpool lanes are identified by HOV symbols
on special road signs and by markings on the road. The road signs may also include the
designation CARPOOL CARPOOL. The lanes are arranged
as a separate lane next to the others or are
built as a physically separate lane.
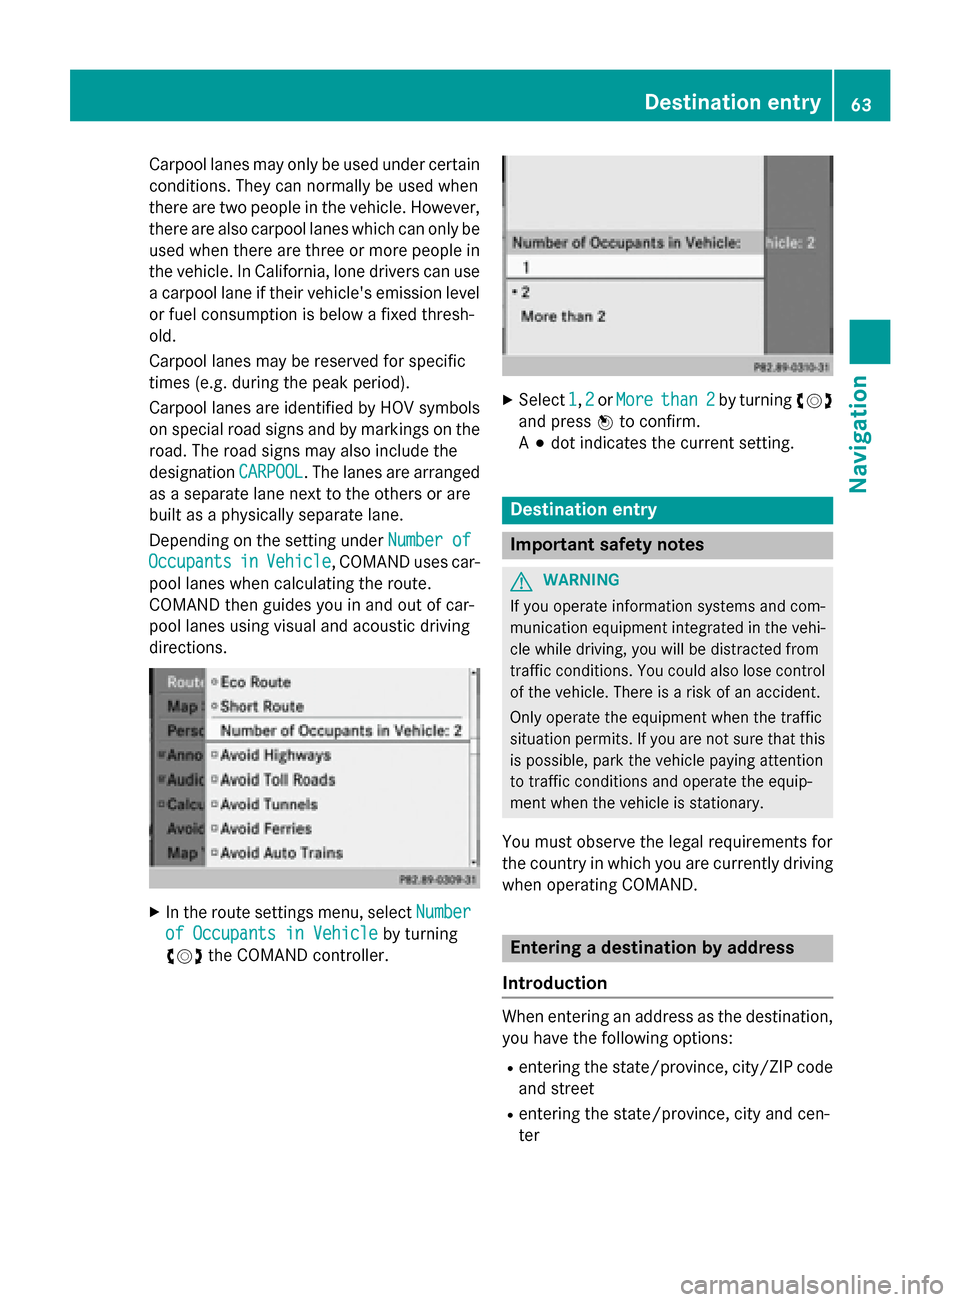
Depending on the setting under Number of Number of
Occupants
Occupants in
inVehicle
Vehicle, COMAND uses car-
pool lanes when calculating the route.
COMAND then guides you in and out of car-
pool lanes using visual and acoustic driving
directions. X
In the route settings menu, select Number Number
of Occupants in Vehicle
of Occupants in Vehicle by turning
00790052007A the COMAND controller. X
Select 1
1,2
2or More
More than 2
than 2 by turning 00790052007A
and press 0098to confirm.
A 003B dot indicates the current setting. Destination entry
Important safety notes
G
WARNING
If you operate information systems and com-
munication equipment integrated in the vehi- cle while driving, you will be distracted from
traffic conditions. You could also lose control of the vehicle. There is a risk of an accident.
Only operate the equipment when the traffic
situation permits. If you are not sure that this
is possible, park the vehicle paying attention
to traffic conditions and operate the equip-
ment when the vehicle is stationary.
You must observe the legal requirements for
the country in which you are currently driving when operating COMAND. Entering a destination by address
Introduction When entering an address as the destination,
you have the following options:
R entering the state/province, city/ZIP code
and street
R entering the state/province, city and cen-
ter Destination entry
63Navigation Z
Page 66 of 270

R
entering the state/province, city/ZIP code,
street and house number
R entering the state/province, city/ZIP code,
street and intersection
R entering the state/province, street, city
and house number
R entering the state/province, street and
house number
R entering the state/province, street and
intersection
i You can only enter those cities, streets,
ZIP codes etc. that are stored on the digital
map. This means that for some countries,
you cannot enter ZIP codes, for example.
The step-by-step instructions for entering an
address use the following example data:
New York (state)
New York (city)
40 Broadway
Of course, you can freely enter information
such as state/province, city, street and
house number, for example to enter your
home address.
Address entry menu Calling up the address entry menu
X To switch to navigation mode: press the
00BE button.
X To show the menu: press0098the COMAND
controller.
X Select Destination Destination by turning00790052007Athe
COMAND controller and press 0098to con-
firm. Address entry menu
X Select Address Entry
Address Entry and press0098to
confirm.
The address entry menu appears. If you
have previously entered a destination, this
will be shown in the display.
Depending on the amount of the address
entered and the data in the digital map, some
menu items may not be available at all or may not yet be available.
Example: after entering the state/province,
the menu items Map Map,No.
No.,Center
Center, Inter‐
Inter‐
section
section ,Save
Save andStart
Start are not available.
The ZIP ZIP menu item will not be available
unless the digital map contains zip codes.
Entering the state/province, city, street and number Selecting a state/province
X Call up the address entry menu
(Y page 64).
X Select State/Prov State/Prov in the address entry
menu by turning 00790052007Athe COMAND con-
troller and press 0098to confirm.
A menu with the available lists appears:
R Last States/Provinces
Last States/Provinces
R States (U.S.A.)
States (U.S.A.)
R Provinces (Canada)
Provinces (Canada) 64
Destination entryNavigation
Page 69 of 270

Entering the ZIP code, center and inter-
section Entering the ZIP code
X Call up the address entry menu
(Y page 64).
X Select ZIP ZIPin the address entry menu by
turning 00790052007Aand sliding 009700520064the
COMAND controller and press 0098to con-
firm.
You will see the ZIP code list either with the
character bar (option 1) or as a selection
list (option 2). List of ZIP codes with character bar
Option 1: ZIP code list with character bar
X Enter a ZIP code. Character entry, using city
input as an example (Y page 35).ZIP code list as selection list
Option 2: ZIP code list as selection list
X Select the desired ZIP code by turning 00790052007A
the COMAND controller. X
Irrespective of the option, press 0098to con-
firm your selection.
If COMAND is able to assign the ZIP code
unambiguously to a specific address, the
address entry menu appears again. The ZIP code appears in place of the city's name.
If COMAND cannot assign the ZIP code
unambiguously to a specific address, the
address entry menu also appears again.
The ZIP code is automatically entered. You
can now enter the street for a more precise location. Only streets in the area covered
by the entered ZIP code are available.
X Start route calculation (Y page 69).
Entering the center
Entering a center will, for example, delete a
previously entered street.
X Call up the address entry menu
(Y page 64).
X Select Center
Center in the address entry menu
by turning 00790052007Aand sliding 009700520064the
COMAND controller and pressing 0098to
confirm.
You will see the center list either with the
character bar (option 1) or as a selection
list (option 2). City center list with character bar
Option 1: center list with character bar
X Enter a center. Character entry, using city
input as an example (Y page 35). Destination entry
67Navigation Z
Page 121 of 270

this occurs, restart the update with the
engine running.
X Insert the DVD (Y page 196).
COMAND checks whether the digital map
on the DVD is compatible with the naviga-
tion system and system software.
A prompt then appears asking if you want
to install the database. Versions of the
database currently installed and the data-
base that is to be installed are displayed.
X Select Yes YesorNo
No and press 0098to confirm.
After selecting Yes
Yes, an activation code
must be entered when installing a database
for the first time. You will receive the acti-
vation code when you buy the navigation
DVD.
If you select No No, the process will be can-
celed.
X Enter the activation code.
After entering the activation code cor-
rectly, COMAND starts updating the digital
map. Once the update is finished, you will
see a message.
X To confirm the message: press0098the
COMAND controller.
X Take the DVD out of the slot.
While the update is running, you will see a
message to this effect and a progress bar.
The navigation system is not operational
until the update is complete.
i You cannot eject the DVD during the
update. If you switch off COMAND during
the update, the update is interrupted. It
then continues from where it was interrup-
ted when the system is restarted.
COMAND may prompt you to change the DVD during the update.
X Press the 0062load/eject button.
X Take the DVD out of the slot.
X Insert the requested DVD.
Once the update has been successfully
completed, you will see a message to this
effect. X
To confirm the message: press0098the
COMAND controller.
X Take the DVD out of the slot.
The update is complete.
If the update is not successfully completed, you will see a message that the map updateis not possible.
X To confirm the message: press0098the
COMAND controller.
X Take the DVD out of the slot. Additional settings
119Navigation Z
Page 124 of 270

Problem
Possible causes/consequences and
0050
0050Solutions COMAND asks for an
activation code during
the map update. The digital map is secured with an activation code.
X Consult an authorized Mercedes-Benz Center. 122
Problems with the navigation systemNavigation
Page 130 of 270
list. In this case, start a new search to
update the Bluetooth ®
telephone list.
Authorizing (registering) a mobile
phone Passkey entry
Telephone basic menu
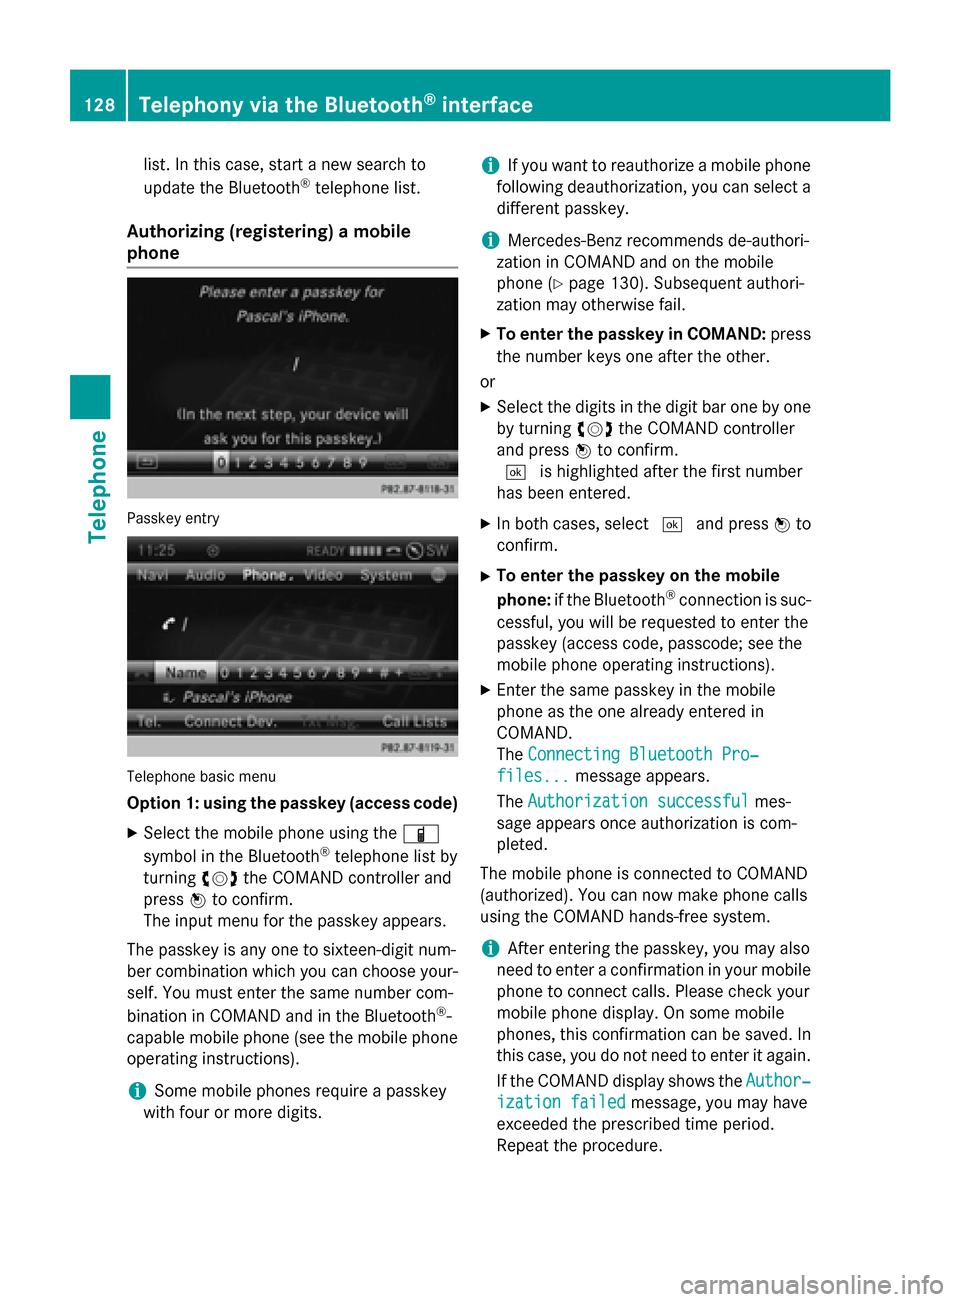
Option 1: using the passkey (access code)
X Select the mobile phone using the 00D3
symbol in the Bluetooth ®
telephone list by
turning 00790052007Athe COMAND controller and
press 0098to confirm.
The input menu for the passkey appears.
The passkey is any one to sixteen-digit num-
ber combination which you can choose your- self. You must enter the same number com-
bination in COMAND and in the Bluetooth ®
-
capable mobile phone (see the mobile phone
operating instructions).
i Some mobile phones require a passkey
with four or more digits. i
If you want to reauthorize a mobile phone
following deauthorization, you can select a different passkey.
i Mercedes-Benz recommends de-authori-
zation in COMAND and on the mobile
phone (Y page 130). Subsequent authori-
zation may otherwise fail.
X To enter the passkey in COMAND: press
the number keys one after the other.
or X Select the digits in the digit bar one by one
by turning 00790052007Athe COMAND controller
and press 0098to confirm.
0054 is highlighted after the first number
has been entered.
X In both cases, select 0054and press 0098to
confirm.
X To enter the passkey on the mobile
phone: if the Bluetooth ®
connection is suc-
cessful, you will be requested to enter the
passkey (access code, passcode; see the
mobile phone operating instructions).
X Enter the same passkey in the mobile
phone as the one already entered in
COMAND.
The Connecting Bluetooth Pro‐ Connecting Bluetooth Pro‐
files...
files... message appears.
The Authorization successful
Authorization successful mes-
sage appears once authorization is com-
pleted.
The mobile phone is connected to COMAND
(authorized). You can now make phone calls
using the COMAND hands-free system.
i After entering the passkey, you may also
need to enter a confirmation in your mobile
phone to connect calls. Please check your
mobile phone display. On some mobile
phones, this confirmation can be saved. In
this case, you do not need to enter it again.
If the COMAND display shows the Author‐ Author‐
ization failed
ization failed message, you may have
exceeded the prescribed time period.
Repeat the procedure. 128
Telephony via the Bluetooth ®
interfaceTelephone
Page 131 of 270
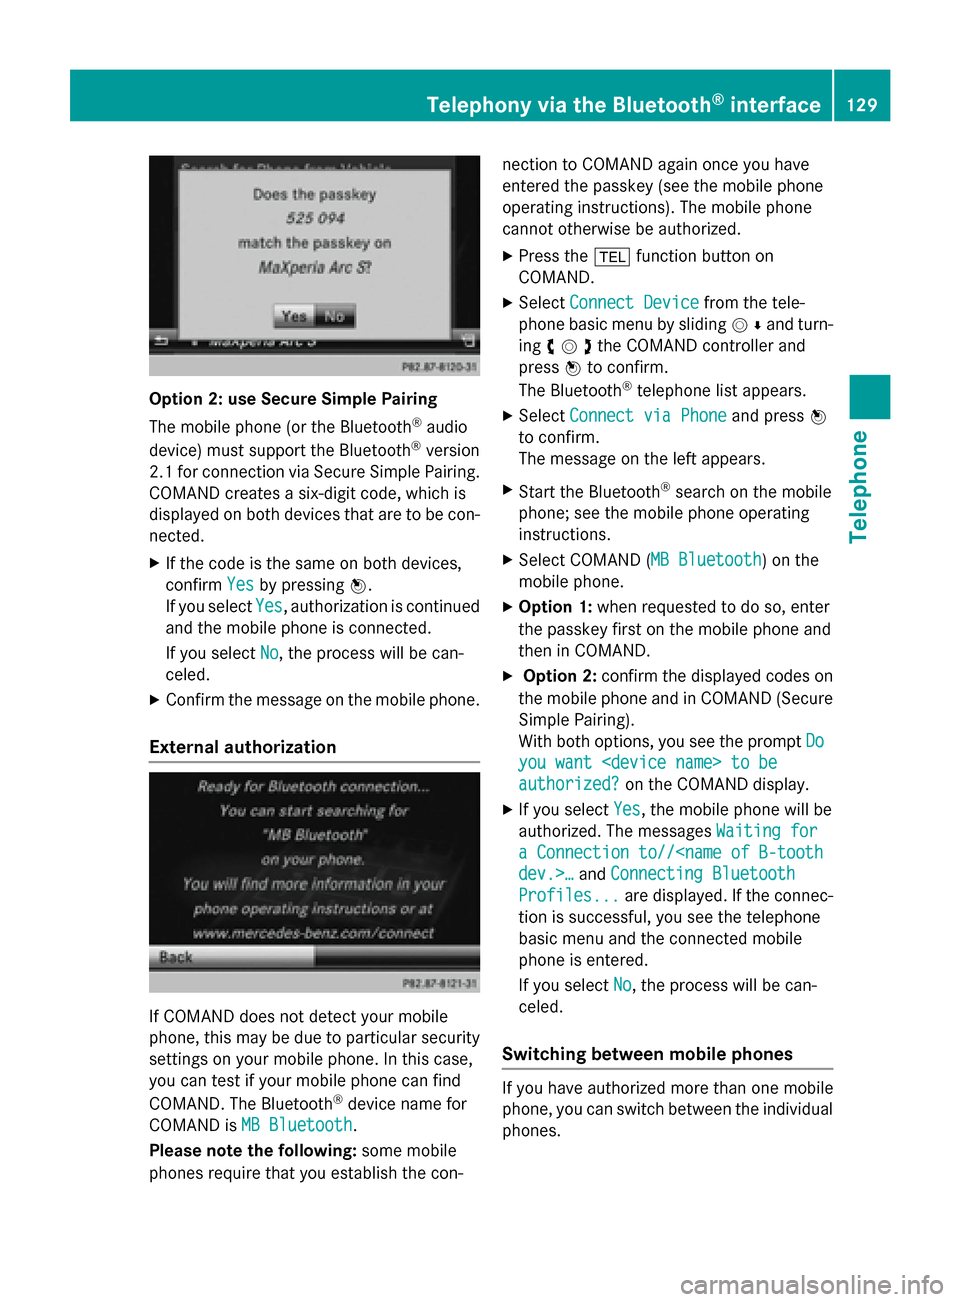
Option 2: use Secure Simple Pairing
The mobile phone (or the Bluetooth
®
audio
device) must support the Bluetooth ®
version
2.1 for connection via Secure Simple Pairing. COMAND creates a six-digit code, which is
displayed on both devices that are to be con-
nected.
X If the code is the same on both devices,
confirm Yes
Yes by pressing 0098.
If you select Yes Yes, authorization is continued
and the mobile phone is connected.
If you select No
No, the process will be can-
celed.
X Confirm the message on the mobile phone.
External authorization If COMAND does not detect your mobile
phone, this may be due to particular security settings on your mobile phone. In this case,
you can test if your mobile phone can find
COMAND. The Bluetooth ®
device name for
COMAND is MB Bluetooth
MB Bluetooth.
Please note the following: some mobile
phones require that you establish the con- nection to COMAND again once you have
entered the passkey (see the mobile phone
operating instructions). The mobile phone
cannot otherwise be authorized.
X Press the 002Bfunction button on
COMAND.
X Select Connect Device Connect Device from the tele-
phone basic menu by sliding 00520064and turn-
ing 00790052007Athe COMAND controller and
press 0098to confirm.
The Bluetooth ®
telephone list appears.
X Select Connect via Phone
Connect via Phone and press0098
to confirm.
The message on the left appears.
X Start the Bluetooth ®
search on the mobile
phone; see the mobile phone operating
instructions.
X Select COMAND ( MB Bluetooth MB Bluetooth) on the
mobile phone.
X Option 1: when requested to do so, enter
the passkey first on the mobile phone and
then in COMAND.
X Option 2: confirm the displayed codes on
the mobile phone and in COMAND (Secure Simple Pairing).
With both options, you see the prompt Do Do
you want
you want
authorized? authorized? on the COMAND display.
X If you select Yes
Yes, the mobile phone will be
authorized. The messages Waiting for
Waiting for
a Connection to//
Connecting Bluetooth
Profiles...
Profiles... are displayed. If the connec-
tion is successful, you see the telephone
basic menu and the connected mobile
phone is entered.
If you select No No, the process will be can-
celed.
Switching between mobile phones If you have authorized more than one mobile
phone, you can switch between the individual
phones. Telephony via the Bluetooth
®
interface 129Telephone Z
Page 185 of 270

Settings
Settings menu X
Call up the menu (Y page 179).
X Select Settings
Settings by turning00790052007Aor sliding
009700520064 the COMAND controller and press 0098
to confirm.
You can activate/deactivate the following
settings:
R Download Images Automatically
Download Images Automatically
It may take some time to download the
contents of websites that contain a large
amount of images. Therefore, it may be
useful to deactivate this option.
R Block Pop-Ups
Block Pop-Ups
Pop-ups are windows (usually with adver-
tisements) which are displayed automati-
cally when you call up a website. You can
block these displays.
R Activate Javascript
Activate Javascript
Javascript makes it possible to display and
interact with dynamic content on the web-
site.
R Allow Cookies Allow Cookies
Some websites save information in small
text files (cookies) in COMAND. You can
determine whether cookies may be stored.
R Character Size Character Size
You can select the font size which is used
when displaying the website.
R Character Code
Character Code You can select a different character set
here, e.g. if the characters of a website
appear distorted.
R Delete Private Data Delete Private Data
Deletes data which has been saved by the
browser during Internet use.
Changing settings X
Select a setting by turning 00790052007Athe
COMAND controller and press 0098to con-
firm.
Switch the setting on 0073or off 0053.
X Select Character Size Character Size orCharacter
Character
Code
Code by turning 00790052007Aor sliding 009700520064the
COMAND controller and press 0098to con-
firm.
X Select a setting using the COMAND con-
troller and press 0098to confirm.
i If you change the settings, the websites
may not be displayed correctly.
Deleting private data X
Select Delete Private Data Delete Private Data and press
0098 to confirm.
A menu appears. Internet
183Online and Internet functions Z
Page 204 of 270
For all media that contain MP3 data (e.g. MP3
CD, SD memory card, MUSIC REGISTER), you
can determine whether:
R the metadata contained in the tags of the
encoded music data should be displayed
R the file and directory names should be dis-
played during playback
X To display the album and artist name:
select MP3
MP3 orUSB USB in the basic display by
sliding 00520064and turning 00790052007Athe COMAND
controller and press 0098to confirm.
X Select Display Track Information
Display Track Information and
press 0098to confirm. Selecting an active partition (USB
mass storage devices only)
You can select this function for USB mass
storage devices when the storage device is
partitioned. Up to 5 partitions (primary or log- ical, FAT, FAT32 and NTFS) are supported.
X Select MP3
MP3 in the basic display by sliding
00520064 and turning 00790052007Athe COMAND con-
troller and press 0098to confirm.
X Select Select Active Partition
Select Active Partition and
press 0098to confirm. Playback options
X To select options: switch on audio CD or
MP3 mode (Y page 197).
X Select CD CDorMP3
MP3 mode by sliding 00520064and
turning 00790052007Athe COMAND controller and
then pressing 0098to confirm.
The options list appears. The 003Bdot indi-
cates the option selected.
X Select an option by turning 00790052007Aand press
0098 to confirm.
The option is switched on. For all options
except Normal Track Sequence
Normal Track Sequence , you will
see a corresponding display in the display/ selection window.
The following options are available to you:
R Normal Track Sequence
Normal Track Sequence The tracks are played in the normal order
(e.g. track 1, 2, 3, etc.).
In MP3 mode, the track order is determined
by the order in which the tracks are written to the MP3 data carrier when it is created.
Alphabetical order is the most common.
Once all the tracks in a folder have been
played, the tracks in the next folder are
played.
R Random Medium Random Medium
All the tracks on the medium are played in
random order (e.g. track 3, 8, 5 etc.).
R Random Track List Random Track List (MP3 mode only)
You will hear the tracks in the current play-
list or currently active folder (including all
subfolders) in random order.
i The
Normal Track Sequence Normal Track Sequence option is
automatically selected when you change
the disc you are currently listening to or
when you select a different medium. If an
option is selected, it remains selected after COMAND is switched on or off. Notes on MP3 mode
General notes Depending on the volume and format of the
MP3 data, the length of time required for
reading the data may increase.
Permissible data carriers R
CD-R and CD-RW
R DVD-R and DVD-RW
R DVD+R and DVD+RW
R SD memory card
R USB storage device
Permissible file systems R
ISO 9660/Joliet standard for CDs
R UDF for video DVDs
R FAT16, FAT32 and NTFS for SD memory
card and USB storage media 202
Audio CD and MP3 modeAudio