lock MERCEDES-BENZ SLK-Class 2016 R172 Owners Manual
[x] Cancel search | Manufacturer: MERCEDES-BENZ, Model Year: 2016, Model line: SLK-Class, Model: MERCEDES-BENZ SLK-Class 2016 R172Pages: 358, PDF Size: 7.24 MB
Page 191 of 358
bumper. Make sure that the bumper is free of
dirt, ice or slush in the vicinity of the sensors.
The sensors must not be covered, for exam-
ple by cycle racks or overhanging loads. Fol-
lowing a severe impact or in the event of dam-
age to the bumpers, have the function of the
sensors checked at a qualified specialist
workshop. Blind Spot Assist may otherwise
not work properly.
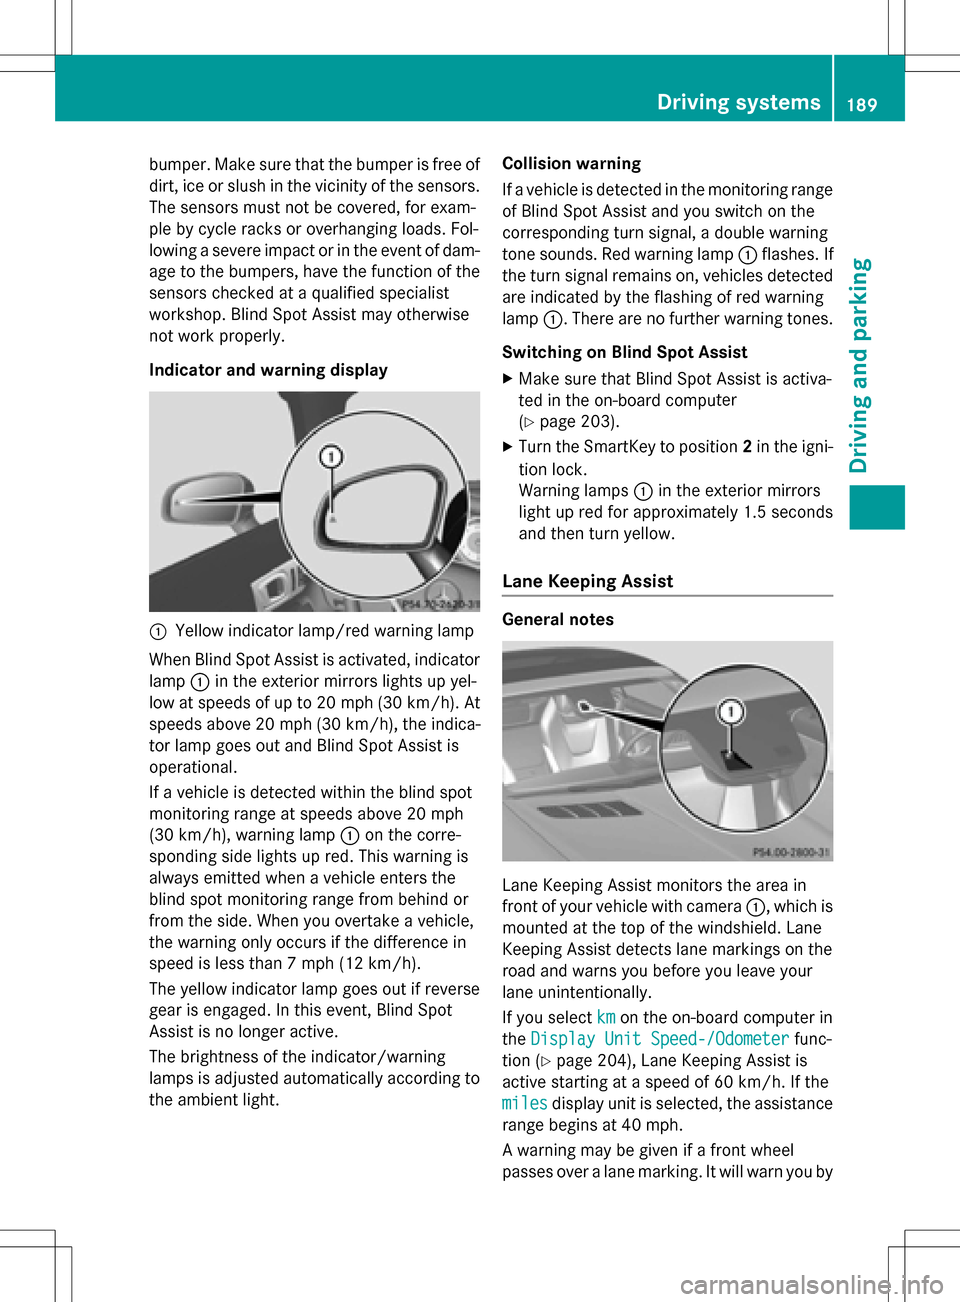
Indicator and warning display
:Yellow indicator lamp/red warning lamp
When Blind Spot Assist is activated, indicator
lamp :in the exterior mirrors lights up yel-
low at speeds of up to 20 mph (30 km/ h). At
speeds above 20 mph (30 km/h), the indica-
tor lamp goes out and Blind Spot Assist is
operational.
If a vehicle is detected within the blind spot
monitoring range at speeds above 20 mph
(30 km/h), warning lamp :on the corre-
sponding side lights up red. This warning is
always emitted when a vehicle enters the
blind spot monitoring range from behind or
from the side. When you overtake a vehicle,
the warning only occurs if the difference in
speed is less than 7 mph (12 km/h).
The yellow indicator lamp goes out if reverse
gear is engaged. In this event, Blind Spot
Assist is no longer active.
The brightness of the indicator/warning
lamps is adjusted automatically according to
the ambient light. Collision warning
If a vehicle is detected in the monitoring range
of Blind Spot Assist and you switch on the
corresponding turn signal, a double warning
tone sounds. Red warning lamp
:flashes. If
the turn signal remains on, vehicles detected
are indicated by the flashing of red warning
lamp :. There are no further warning tones.
Switching on Blind Spot Assist
XMake sure that Blind Spot Assist is activa-
ted in the on-board compu
ter
(
Ypage 203).
XTurn the SmartKey to position 2in the igni-
tion lock.
Warning lamps :in the exterior mirrors
light up red for approximately 1.5 seconds
and then turn yellow.
Lane Keeping Assist
General notes
Lane Keeping Assist monitors the area in
front of your vehicle with camera :, which is
mounted at the top of the windshield. Lane
Keeping Assist detects lane markings on the
road and warns you before you leave your
lane unintentionally.
If you select km
on the on-board computer in
the Display Unit Speed-/Odometer
func-
tion (
Ypage 204), Lane Keeping Assist is
active starting at a speed of 60 km/h. If the
miles
display unit is selected, the assistance
range begins at 40 mph.
A warning may be given if a front wheel
passes over a lane marking. It will warn you by
Driving systems189
Driving and parking
Z
Page 196 of 358
Useful information
i
This Operator's Manual describes all
models and all standard and optional equip-
ment of your vehicle available at the time of
publication of the Operator's Manual.
Country-specific differences are possible.
Please note that your vehicle may not be
equipped with all features described. This
also applies to safety-related systems and
functions.
iRead the information on qualified special-
ist workshops (
Ypage 25).
Important safety notes
GWARNING
If you operate information systems and com-
munication equipment integrated in the vehi-
cle while driving, you will be distracted from
traffic conditions. You could also lose control
of the vehicle. There is a risk of an accident.
Only operate the equipment when the traffic
situation permits. If you are not sure that this
is possible, park the vehicle paying attention
to traffic conditions and operate the equip-
ment when the vehicle is stationary.
You must observe the legal requirements for
the country in which you are currently driving
when operating the on-board computer.
GWARNING
If the instrument cluster has failed or mal-
functioned, you may not recognize function
restrictions in systems relevant to safety. The
operating safety of your vehicle may be
impaired. There is a risk of an accident.
Drive on carefully. Have the vehicle checked
at a qualified specialist workshop immedi-
ately.
The on-board computer only shows messages
or warnings from certain systems in the mul-
tifunction display. You should therefore make sure your vehicle is operating safely at all
times.
If the operating safety of your vehicle is
impaired, pull over as soon as it is safe to do
so. Contact a qualified specialist workshop.
For an overview, see the instrument panel
illustration (
Ypage 31).
Displays and operation
Instrument cluster lighting
The lighting in the instrument cluster, in the
displays and the controls in the vehicle inte-
rior can be adjusted using the brightness con-
trol knob.
The brightness control knob is located on the bottom left of the instrument cluster
(
Ypage 31).
XTurn the brightness control knob clockwise
or counter-clockwise.
If you turn the light switch to Ã,Tor
L, the brightness is dependent upon
the brightness of the ambient light.
iThe light sensor in the instrument cluster
automatically controls the brightness of
the multifunction display.
In daylight, the displays in the instrument
cluster are not illuminated.
Speedometer with segments
The speedometer is divided into segments
only on vehicles with DISTRONIC PLUS.
The segments in the speedometer indicate
which speed range is available.
RDISTRONIC PLUS activated (Ypage 170):
One or two segments in the set speed
range light up.
RDISTRONIC PLUS detects a vehicle in front
that is driving at a slower speed than the
stored speed:
194Displays and operation
On-board computer and displays
Page 197 of 358
The segments between the speed of the
vehicle in front and the stored speed light
up.
Tachometer
!
Do not drive in the overrevving range, as
this could damage the engine.
The red band in the tachometer indicates the
engine's overrevving range.
The fuel supply is interrupted to protect the
engine when the red band is reached.
Outside temperature display
You should pay special attention to road con-
ditions when temperatures are around freez-
ing point.
Bear in mind that the outside temperature
display indicates the temperature measured
and does not record the road temperature.
The outside temperature display is in the mul-
tifunction display (
Ypage 196).
A change in the outside temperature is shown
in the multifunction display after a delay.
Coolant temperature display
GWARNING
Opening the hood when the engine is over-
heated or when there is a fire in the engine
compartment could expose you to hot gases
or other service products. There is a risk of
injury.
Let an overheated engine cool down before
opening the hood. If there is a fire in the
engine compartment, keep the hood closed
and contact the fire department.
!A display message is shown if the coolant
temperature is too high.
If the coolant temperature is over 248 ‡
(120 †), do not continue driving. The
engine will otherwise be damaged. The coolant temperature gauge is in the
instrument cluster on the right-hand side
(
Ypage 31).
Under normal operating conditions and with
the specified coolant level, the coolant tem-
perature may rise to 248 ‡ (120 †).
Operating the on-board computer
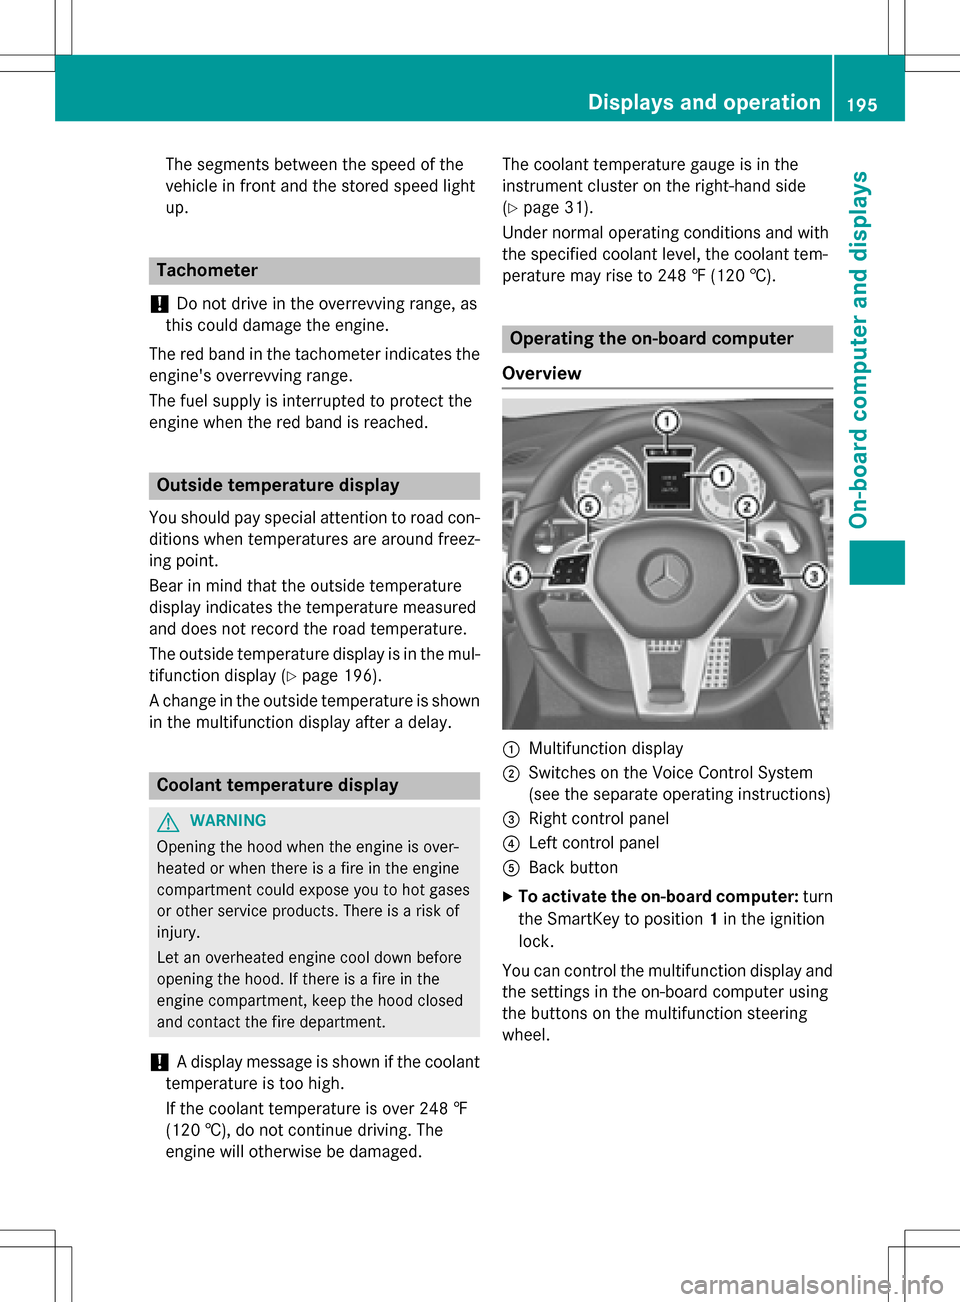
Overview
:Multifunction display
;Switches on the Voice Control System
(see the separate operating instructions)
=Right control panel
?Left control panel
ABack button
XTo activate the on-board computer: turn
the SmartKey to position 1in the ignition
lock.
You can control the multifunction display and
the settings in the on-board computer using
the buttons on the multifunction steering
wheel.
Displays and operation195
On-board computer and displays
Z
Page 207 of 358
Rthe trip computer
Rthe current consumption and the range
Rthe navigation instructions in theNavi
menu
Rcruise control
RDISTRONIC PLUS
RASSYST PLUS service interval display
Selecting permanent display
The Permanent Display:
function allows
you to choose whether the multifunction dis-
play always shows the outside temperature or
the speed in km/h. Canada only: the speed is
shown in mph. The speed display is inverse to
the speedometer.
XPress the =or; button on the steer-
ing wheel to select the Sett.
menu.
XPress the:or9 button to select the
Instrument Cluster
submenu.
XPress ato confirm.
XPress the :or9 button to select the
Permanent Display:
function.
The current setting Outside
Temperature
orSpeedometer [km/h]/Speedometer
[mph]appears.
XPress the abutton to save the setting.
Lights
Setting the daytime running lamps
This function is not available in Canada.
XPress the =or; button on the steer-
ing wheel to select the Sett.
menu.
XPress the:or9 button to select the
Light
submenu.
XPress ato confirm.
XPress :or9 to select the Daytime
Running Lightsfunction.
If the Daytime Running Lights
function
has been switched on, the multifunction
display shows the cone of light and the
W symbol in orange.
XPress the abutton to save the setting. Further information on daytime running
lamps (
Ypage 108).
Setting the brightness of the ambient
lighting
XPress the =or; button on the steer-
ing wheel to select the Sett.
menu.
XPress the:or9 button to select the
Light
submenu.
XPress ato confirm.
XPress the :or9 button to select the
Amb. Light +/-
function.
The current setting appears.
XPress ato confirm.
XPress the :or9 button to adjust the
brightness to a level from Disabled
to
Level 5
(bright).
XPress the aor% button to save the
setting.
Activating/deactivating surround light-
ing and exterior lighting delayed switch-
off
XPress the =or; button on the steer-
ing wheel to select the Sett.
menu.
XPress the:or9 button to select the
Light
submenu.
XPress ato confirm.
XPress :or9 to select the Sur‐
round Lightingfunction.
If the Surround
Lightingfunction is acti-
vated, the multifunction display shows the
light cone and the area around the vehicle
in orange.
XPress the abutton to save the setting.
Deactivating delayed switch-off of the exte-
rior lighting temporarily:
XBefore leaving the vehicle, turn the Smart-
Key to position 0in the ignition lock.
XTurn the SmartKey to position 2in the igni-
tion lock.
The exterior lighting delayed switch-off is
deactivated.
Menus and submenus205
On-board computer and displays
Z
Page 208 of 358
Delayed switch-off of the exterior lighting is
reactivated the next time you start the
engine.
If you have activated theSurround Light‐
ingfunction and you turn the light switch to
Ã, the following functions are activated
when it is dark:
Rsurround lighting: the exterior lighting
remains lit for 40 seconds after unlocking
with the SmartKey. If you start the engine,
the surround lighting is switched off and
automatic headlamp mode is activated
(
Ypage 108).
Rexterior lighting delayed switch-off: the
exterior lighting remains lit for 60 seconds
after the engine is switched off. If you close
all the doors and the trunk lid, the exterior
lighting goes off after 15 second s.
iDepending on your vehicle's equipment,
when the surround lighting and delayed
switch-off exterior lighting are on, the fol-
lowing light up:
RParking lamps
RLow-beam headlamps
RDaytime running lamps
RSide marker lamps
RSurround lighting in the exterior mirrors
Activating/deactivating the interior light-
ing delayed switch-off
If you activate the Interior Lighting
Delayfunction, the interior lighting remains
on for 20 seconds after you remove the
SmartKey from the ignition lock.
XPress the =or; button on the steer-
ing wheel to select the Sett.
menu.
XPress the:or9 button to select the
Light
submenu.
XPress ato confirm.
XPress the :or9 button to select the
Interior Lighting Delay
function.
If the Interior
LightingDelayfunction
is activated, the multifunction display
shows the vehicle interior in orange.
XPress the abutton to save the setting.
Vehicle
Activating/deactivating the automatic
door locking mechanism
If you activate the Automatic Door Lock
function, the vehicle is centrally locked above
a speed of approximately 9 mph (15 km/h).
XPress the=or; button on the steer-
ing wheel to select the Sett.
menu.
XPress the:or9 button to select the
Vehicle
submenu.
XPress ato confirm.
XPress the :or9 button to select the
Automatic Door Lock
function.
When the Automatic door locks
func-
tion is activated, the multifunction display
shows the left-hand vehicle door in orange.
XPress the abutton to save the setting.
For further information on the automatic lock- ing feature, see (
Ypage 79).
Activating/deactivating the acoustic
locking verification signal
If you switch on the Acoustic
Lockfunction,
an acoustic signal sounds when you lock the
vehicle.
XPress the =or; button on the steer-
ing wheel to select the Sett.
menu.
XPress the:or9 button to select the
Vehicle
submenu.
XPress ato confirm.
XPress the :or9 button to select the
Acoustic Lock
function.
If the Acoustic
Lockfunction is activated,
the multifunction display shows the &
symbol in orange.
XPress the abutton to save the setting.
Convenience
Activating/deactivating the EASY-
ENTRY/EXIT feature
GWARNING
When the EASY-ENTRY/EXIT feature adjusts
the steering wheel, you and other vehicle
206Menus and submenus
On-board computer and displays
Page 209 of 358
occupants – particularly children – could
become trapped. There is a risk of injury.
While the EASY-ENTRY/EXIT feature is mak-
ing adjustments, make sure that no one has
any body parts in the sweep of the steering
wheel.
If somebody becomes trapped:
Rpress one of the memory function position
buttons, or
Rmove the switch for steering wheel adjust-
ment in the opposite direction to that in
which the steering wheel is moving.
The adjustment process is stopped.
XPress the =or; button on the steer-
ing wheel to select the Sett.
menu.
XPress the:or9 button to select the
Convenience
submenu.
XPress ato confirm.
XPress the :or9 button to select the
Easy Entry/Exit
function.
If the Easy Entry/Exit
function is activa-
ted, the multifunction display shows the
steering wheel in orange.
XPress the abutton to save the setting.
Further information on the EASY-ENTRY/EXIT feature (
Ypage 101).
Switching the belt adjustment on/off
XPress the =or; button on the steer-
ing wheel to select the Sett.
menu.
XPress the:or9 button to select the
Convenience
submenu.
XPress ato confirm.
XPress the :or9 button to select the
Belt Adjustment
function.
If the Belt Adjustment
function is activa-
ted, the multifunction display shows the
seat belt in orange.
XPress the abutton to save the setting.
For further information on belt adjustment,
see (
Ypage 45). Switching the fold-in mirrors when lock-
ing feature on/off
This function is only available when the vehi-
cle is equipped with the electrical fold-in func-
tion.
This function is only available in Canada.
When you activate the Auto.
MirrorFold‐
ingfunction, the exterior mirrors are folded
in when the vehicle is locked.
If you unlock the vehicle and then open the
driver's or front-passenger door, the exterior
mirrors fold out again.
If you have switched on the Auto. Mirror
Foldingfunction and you fold in the exterior
mirrors using the button on the door
(
Ypage 104), they will not fold out automat-
ically. The exterior mirrors can then only be
folded out using the button on the door.
XPress the =or; button on the steer-
ing wheel to select the Sett.
menu.
XPress the:or9 button to select the
Convenience
submenu.
XPress ato confirm.
XPress the :or9 button to select the
Auto. Mirror Folding
function.
If the Auto. Mirror Folding
function is
switched on, the multifunction display
shows the exterior mirror in orange.
XPress the abutton to save the setting.
Restoring the factory settings
XPress the =or; button on the steer-
ing wheel to select the Sett.
menu.
XPress the:or9 button to select the
Factory Setting
submenu.
XPress ato confirm.
The Reset All Settings?
function
appears.
Menus and submenus207
On-board computer and displays
Z
Page 210 of 358
XPress the:or9 button to select No
orYes.
XPress the abutton to confirm the selec-
tion.
If you have selected Yes
and confirmed, the
multifunction display shows a confirmation
message.
For safety reasons, the Daytime Running
Lightsfunction in theLightsubmenu is only
reset if the vehicle is stationary.
AMG menu (Mercedes-AMG vehicles)
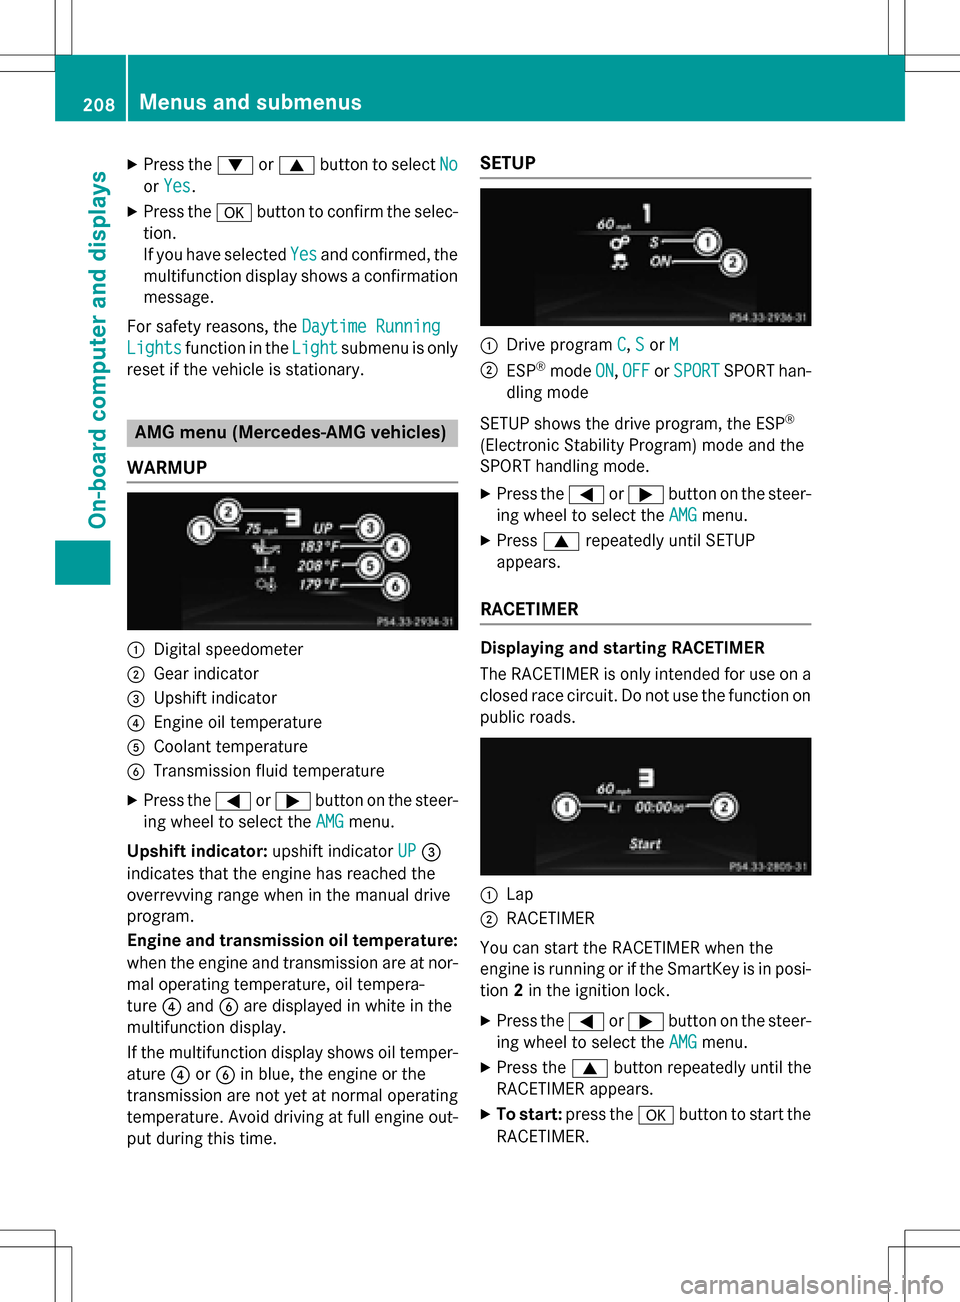
WARMUP
:Digital speedometer
;Gear indicator
=Upshift indicator
?Engine oil temperature
ACoolant temperature
BTransmission fluid temperature
XPress the =or; button on the steer-
ing wheel to select the AMG
menu.
Upshift indicator: upshift indicatorUP
=
indicates that the engine has reached the
overrevving range when in the manual drive
program.
Engine and transmission oil temperature:
when the engine and transmission are at nor-
mal operating temperature, oil tempera-
ture ?and Bare displayed in white in the
multifunction display.
If the multifunction display shows oil temper-
ature ?orB in blue, the engine or the
transmission are not yet at normal operating
temperature. Avoid driving at full engine out-
put during this time.
SETUP
:Drive program C,Sor M
;ESP®mode ON,OFFor SPORTSPORT han-
dling mode
SETUP shows the drive program, the ESP
®
(Electronic Stability Program) mode and the
SPORT handling mode.
XPress the =or; button on the steer-
ing wheel to select the AMG
menu.
XPress9repeatedly until SETUP
appears.
RACETIMER
Displaying and starting RACETIMER
The RACETIMER is only intended for use on a
closed race circuit. Do not use the function on
public roads.
:Lap
;RACETIMER
You can start the RACETIMER when the
engine is running or if the SmartKey is in posi-
tion 2in the ignition lock.
XPress the =or; button on the steer-
ing wheel to select the AMG
menu.
XPress the9button repeatedly until the
RACETIMER appears.
XTo start: press the abutton to start the
RACETIMER.
208Menus and submenus
On-board computer and displays
Page 211 of 358
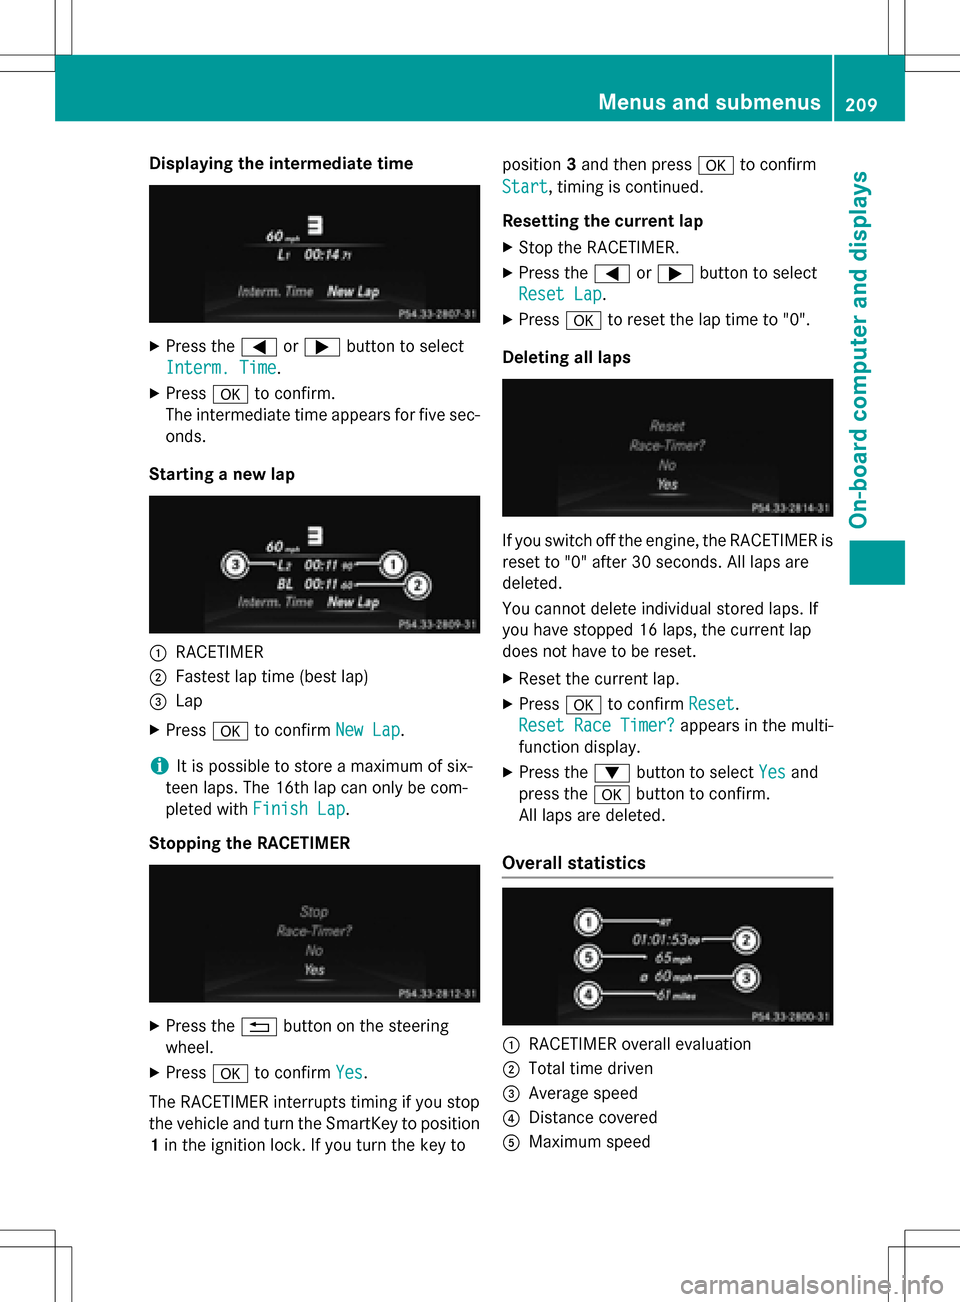
Displaying theintermediat etime
XPress th e= or; buttonto select
Interm .Tim e
.
XPress ato confirm .
The intermediat etime appears fo rfiv esec -
onds.
Starting anew lap
:RACETIMER
;Fastest lap time (bes tlap)
=Lap
XPress ato confirm New Lap.
iIt is possibl eto store amaximum of six -
teen laps .The 16th lap can only be com-
pleted wit hFinish Lap
.
Stopping th eRACETIMER
XPress th e% buttonon th esteerin g
wheel.
XPress ato confirm Yes.
The RACETIMER interrupt stimin gif you stop
th evehicl eand tur nth eSmartKey to position
1 in th eignition lock. If you tur nth eke yto position
3and then press ato confirm
Start
, timin gis continued.
Resetting th ecurrent lap
XStop th eRACETIMER.
XPress th e= or; buttonto select
Reset Lap
.
XPress ato reset th elap time to "0".
Deleting all lap s
If you switch offth eengine, th eRACETIMER is
reset to "0" after 30 seconds. Al llaps are
deleted.
You canno tdelete individual store dlaps .If
you hav estoppe d16 laps ,th ecurren tlap
does no thav eto be reset .
XResetth ecurren tlap.
XPress ato confirm Reset.
Reset Rac eTimer?
appears in th emulti-
function display.
XPress th e: buttonto select Yesand
press th ea buttonto confirm .
Al llaps are deleted.
Overall statistics
:RACETIMER overall evaluation
;Total time driven
=Averag espeed
?Distanc ecovered
AMaximum speed
Menus and submenus20 9
On-board computer and displays
Z
Page 214 of 358
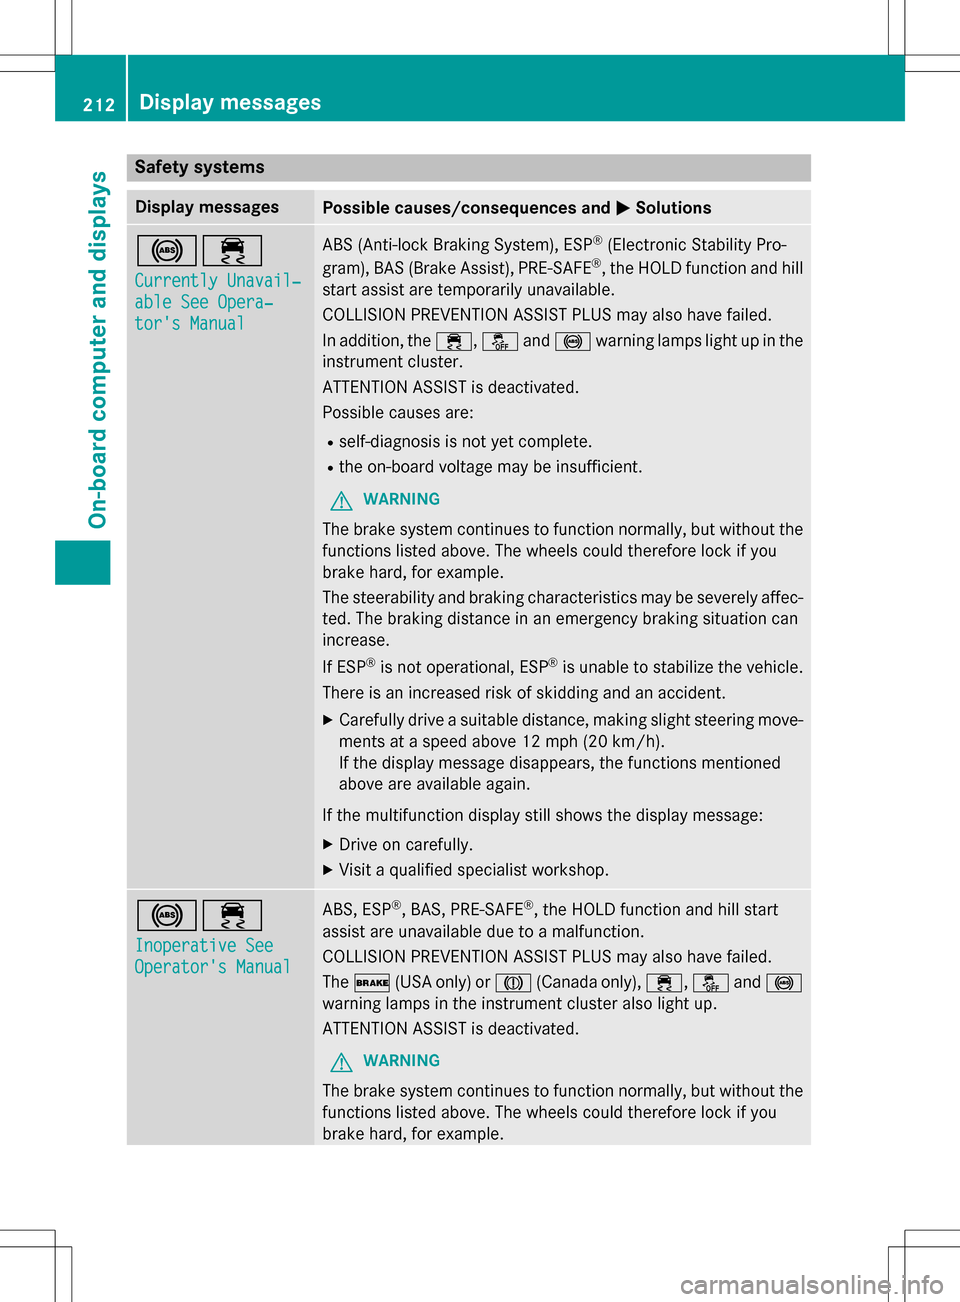
Safety systems
Display messagesPossible causes/consequences andMSolutions
!÷
Currently Unavail‐
able See Opera‐
tor's Manual
ABS (Anti-lock Braking System), ESP®(Electronic Stability Pro-
gram), BAS (Brake Assist), PRE ‑SAFE®, the HOLD function and hill
start assist are temporarily unavailable.
COLLISION PREVENTION ASSIST PLUS may also have failed.
In addition, the ÷,åand! warning lamps light up in the
instrument cluster.
ATTENTION ASSIST is deactivated.
Possible causes are:
Rself-diagnosis is not yet complete.
Rthe on-board voltage may be insufficient.
GWARNING
The brake system continues to function normally, but without the
functions listed above. The wheels could therefore lock if you
brake hard, for example.
The steerability and braking characteristics may be severely affec-
ted. The braking distance in an emergency braking situation can
increase.
If ESP
®is not operational, ESP®is unable to stabilize the vehicle.
There is an increased risk of skidding and an accident.
XCarefully drive a suitable distance, making slight steering move-
ments at a speed above 12 mph (20 km/h).
If the display message disappears, the functions mentioned
above are available again.
If the multifunction display still shows the display message:
XDrive on carefully.
XVisit a qualified specialist workshop.
!÷
Inoperative See
Operator's Manual
ABS, ESP®, BAS, PRE‑SAFE®, the HOLD function and hill start
assist are unavailable due to a malfunction.
COLLISION PREVENTION ASSIST PLUS may also have failed.
The $ (USA only) or J(Canada only), ÷,åand!
warning lamps in the instrument cluster also light up.
ATTENTION ASSIST is deactivated.
GWARNING
The brake system continues to function normally, but without the
functions listed above. The wheels could therefore lock if you
brake hard, for example.
212Display messages
On-board computer and displays
Page 217 of 358

Display messagesPossible causes/consequences andMSolutions
F(USA
only)
!(Canada
only)
Tur nOn the Igni‐
tio nto Releas e
the Parkin gBrake
The red F(USAonly) or !(Canada only) indicato rlamp
lights up.
You attempte dto release th eelectric parkin gbrak ewhile th eigni-
tion was switched off.
XSmartKey: turnth eSmartKey to position 1in th eignition lock.
XKEYLESS-GO: switch on theignition .
F(USA
only)
!(Canada
only)
Please Releas e
ParkingBrake
The red F(USAonly) or !(Canada only) indicato rlamp
flashes and awarnin gtone sounds. Acondition fo rautomati c
release of th eelectric parkin gbrak eis no tfulfilled (
Ypage 161).
You are drivin gwit hth eelectric parkin gbrak eapplied.
XReleas eth eelectric parkin gbrak emanually.
The red F(USAonly) or !(Canada only) indicato rlamp
flashes and awarnin gtone sounds.
You are usin gth eelectric parkin gbrak efo remergenc ybrakin g
(
Ypage 161).
F(USA
only)
!(Canada
only)
Parkin gBrake See
Operator' sManual
The yello w! warnin glamp lights up.
The electric parkin gbrak eis malfunctioning.
To apply:
XSwitc hth eignition off.
XPress th eelectric parkin gbrak ehandle fo rat leas tte nseconds.
XShift th eselector lever to position P.
XConsultaqualified specialist workshop .
The yellow! warnin glamp and th ered F (USAonly)
or ! (Canada only) indicato rlamp ligh tup.
The electric parkin gbrak eis malfunctioning.
To release:
XSwitc hof fth eignition and tur nit bac kon .
XReleas eth eelectric parkin gbrak emanually.
or
XReleas eth eelectric parkin gbrak eautomatically (Ypage 161).
If th eelectric parkin gbrak estill canno tbe released:
XDo no tdrive on .
XConsult aqualified specialist workshop .
Display messages215
On-board computer and displays
Z