wheel MERCEDES-BENZ SLK ROADSTER 2008 User Guide
[x] Cancel search | Manufacturer: MERCEDES-BENZ, Model Year: 2008, Model line: SLK ROADSTER, Model: MERCEDES-BENZ SLK ROADSTER 2008Pages: 273, PDF Size: 4.42 MB
Page 31 of 273
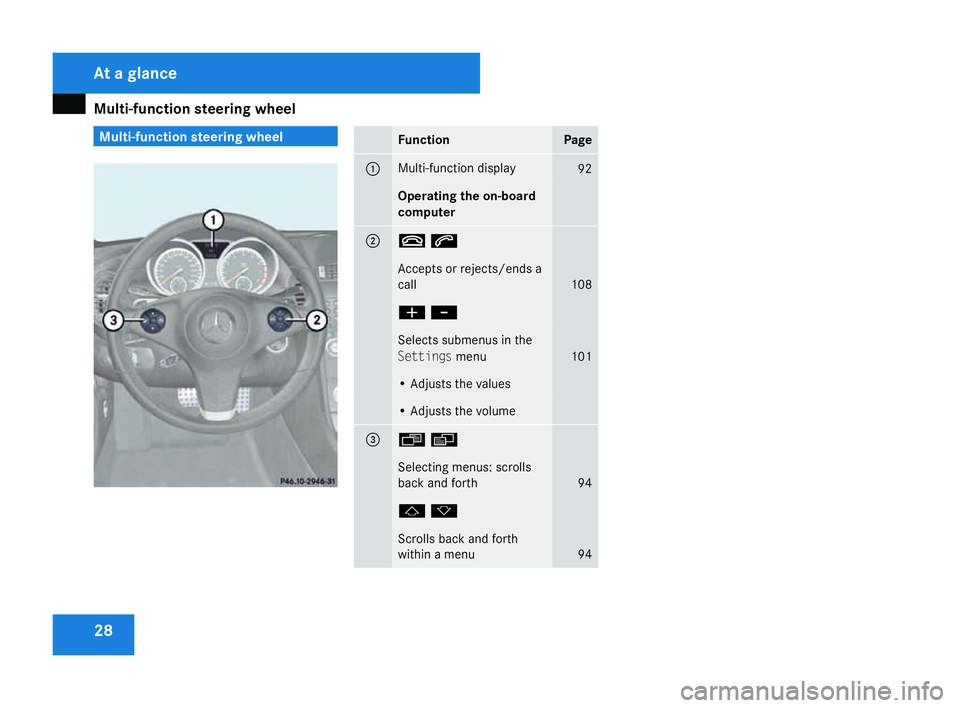
Multi-function steering wheel
28 Multi-function steering wheel
Function Pag
e 1 Multi-function display
92
Operating the on-board
computer
2 ts
Accepts or rejects/ends
a
call 108
æ
- Selects submenus in the
Settings
menu 101
• Adjusts the values
• Adjusts the volum
e 3 ÿè
Selecting menus: scrolls
back and forth
94
jk
Scrolls back and forth
within a menu
94At a glance
171_AKB; 3; 4, en-GB
vpfaff7,
2007-11-13T10:50:25+01:00 - Seite 28
Page 41 of 273
Occupant safet
y38 Occupant safet
y
Seat belts, together with belt tensioners, belt
force limiters and airbags, are coordinate d
restraint systems. They reduce the risk of
injury in defined accident situations and
thereby increase occupant safety. However,
seat belts and airbags generally do not pro-
tect against objects penetrating the vehicl e
from the outside.
To ensure that the restraint systems can
deliver their full potential protection, you
should ensure that:
R the seat and head restraint are adjusted
properly (Y page 59)
R the seat belt has been fastened properl y
( Y page 69)
R the airbags can inflate properly if they ar e
deployed (Y page 41)
R the steering wheel is adjusted properl y
( Y page 63)
R the restraint systems have not been modi-
fied
i An airbag increases the protection of
vehicle occupants wearing a seat belt.
However, airbags are only an additional
restraint system which complements, bu tdoes not replace, the seat belt. All vehicle
occupants must wear their seat belt cor-
rectly at all times, even if the vehicle is
equipped with airbags. This is because - on
the one hand - airbags are not deployed in
all types of accident, as in some situation
s
airbag deployment would not increase th e
protection afforded to vehicle occupants,
provided they are wearing their seat belt
correctly. On the other hand, airbag deploy-
ment only provides increased protection if
the seat belt is worn correctly because:
R the seat belt helps to keep the vehicl e
occupant in the best position in relation
to the airbag
R for example, in a head-on collision, the
seat belt can more adequately prevent
the occupant from being propelle d
towards the force of the impact, and is
thus better suited to prevent injury
Therefore, in accident situations where an
airbag is deployed, it only provides protec-
tion in addition to the seat belt if the seat
belt is being worn correctly. G
Risk of injury
The restraint system may not work as inten-
ded if the following components have bee n
modified or work on these components has
not been performed correctly:
R restraint system, consisting of the seat
belts and anchorages, belt tensioners,
belt force limiters, airbags
R wirin g
R networked electronic system s
Airbags or belt tensioners could then fail ,
e.g. in the event of an accident in which the
deceleration force would normally be high
enough to trigger the systems, or they
could be triggered unintentionally. Never
carry out any modifications on the restraint
systems. Never tamper with electronic
components and their software. G
Risk of accident and injury
Always have maintenance work carried ou t
at a qualified specialist workshop whic h
has the necessary specialist knowledge
and tools to carry out the work required.
Mercedes-Benz recommends that you use
a Mercedes-Benz Service Centre for this
purpose. Safety
171_AKB; 3; 4, en-GB
vpfaff7,
2007-11-13T10:50:25+01:00 - Seite 38
Page 45 of 273
Occupant safet
y42 R
Make sure there are no heavy or sharp-
edged objects in pockets of clothing.
R Do not lean forwards, e.g. over the cove r
of the driver's front airbag, particularly
when the vehicle is in motion .
R Do not put your feet on the dashboard.
R Only hold the steering wheel by the rim.
This allows the airbag to inflate fully. You
could be injured if the airbag is deployed
and you are holding the inside of the
steering wheel.
R Do not lean on the doors from inside the
vehicle.
R Make sure that there are no people, ani-
mals or objects between the vehicle
occupants and the area of deployment of
the airbag.
R Do not place any objects between the
seat backrest and the door.
R Do not hang any hard objects, for exam-
ple coat hangers, on the grab handles or
coat hooks .
R Do not attach accessories, e.g. cup hold -
ers, to the doors.
It is not possible to rule out the risk of inju-
ries caused by an airbag due to the high speed at which the airbag is required to
deploy.
G
Risk of injury
The airbag's functionality can only be guar-
anteed if the following parts are not cov-
ered and no badges or stickers are
attached to them:
R Padded steering wheel boss
R Front-passenger front airbag cover
R Outer side of seats G
Risk of injury
When an airbag deploys, a small amount of
powder is released. The powder may cause
short-term breathing difficulties to persons
suffering from asthma or other pulmonary
conditions .
In order to prevent possible breathing dif-
ficulties you should leave the vehicle as
soon as it is safe to do so. You can also open
the window to allow fresh air to enter the
interior. The powder does not constitute a
health hazard and does not indicate that
there is a fire in the vehicle. G
Risk of injury
The airbag parts are hot after the airbag ha s
been deployed. Do not touch them, other -
wise you may burn yourself.
Occupants are not protected by the airbags
in the event of another accident. Have th e
airbags checked at a qualified specialist
workshop.
Front airbag s
The front airbags are designed to increase
protection for the driver's and front-
passenger head and chest .
The driver's front airbag and front-passenger
front airbag are deployed:
R at the start of an accident with a high rat e
of vehicle acceleration or deceleration in a
longitudinal direction
R if the system determines that airbag
deployment can offer additional protection
to that provided by the seat belt
R if the seat belt is fastened
R independently of other airbags in the vehi-
cle
R if the vehicle overturns, but only if the sys-
tem detects high vehicle deceleration in a
longitudinal direction Safety
171_AKB; 3; 4, en-GB
vpfaff7,
2007-11-13T10:50:25+01:00 - Seite 42
Page 46 of 273
Occupant safet
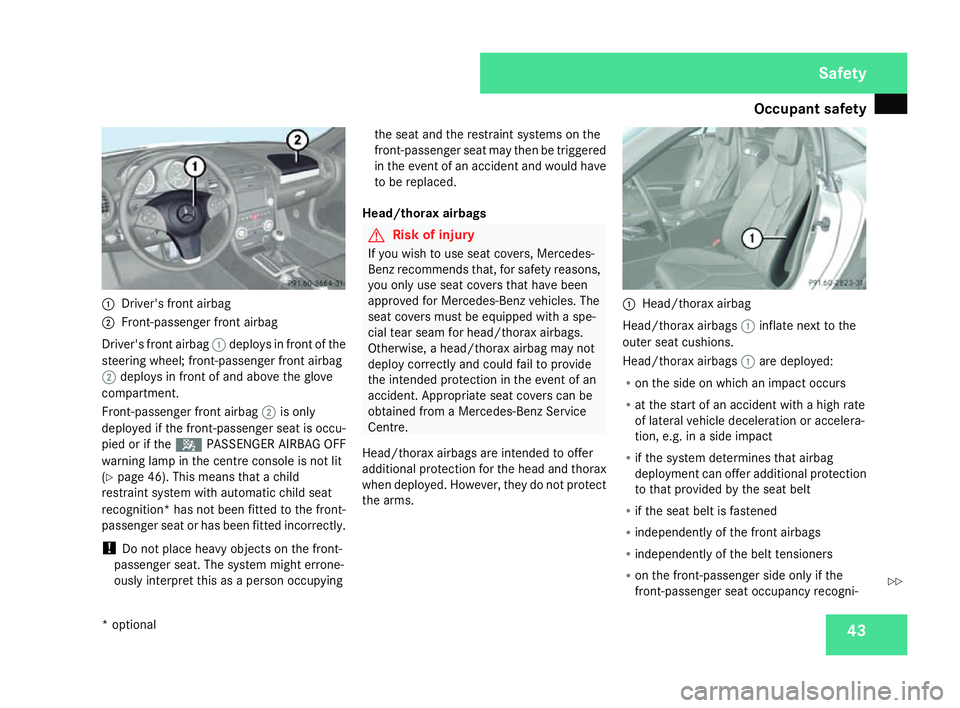
y 431
Driver's front airbag
2 Front-passenger front airba g
Driver's front airbag 1deploys in front of the
steering wheel; front-passenger front airbag
2 deploys in front of and above the glove
compartment.
Front-passenger front airbag 2is only
deployed if the front-passenger seat is occu-
pied or if the 5PASSENGER AIRBAG OFF
warning lamp in the centre console is not lit
( Y page 46). This means that a child
restraint system with automatic child seat
recognition* has not been fitted to the front-
passenger seat or has been fitted incorrectly.
! Do not place heavy objects on the front-
passenger seat. The system might errone-
ously interpret this as a person occupying the seat and the restraint systems on the
front-passenger seat may then be triggered
in the event of an accident and would have
to be replaced.
Head/thorax airbags G
Risk of injury
If you wish to use seat covers, Mercedes-
Benz recommends that, for safety reasons,
you only use seat covers that have been
approved for Mercedes-Benz vehicles. Th e
seat covers must be equipped with a spe-
cial tear seam for head/thorax airbags.
Otherwise, a head/thorax airbag may not
deploy correctly and could fail to provid e
the intended protection in the event of an
accident. Appropriate seat covers can be
obtained from a Mercedes-Benz Service
Centre .
Head/thorax airbags are intended to offe r
additional protection for the head and thorax
when deployed. However, they do not protect
the arms. 1
Head/thorax airba g
Head/thorax airbags 1inflate next to the
outer seat cushions.
Head/thorax airbags 1are deployed:
R on the side on which an impact occurs
R at the start of an accident with a high rat e
of lateral vehicle deceleration or accelera-
tion, e.g. in a side impact
R if the system determines that airbag
deployment can offer additional protection
to that provided by the seat belt
R if the seat belt is fastened
R independently of the front airbags
R independently of the belt tensioner s
R on the front-passenger side only if the
front-passenger seat occupancy recogni- Safety
* optional
171_AKB; 3; 4, en-GB
vpfaff7,
2007-11-13T10:50:25+01:00 - Seite 43 Z
Page 53 of 273
Driving safety sys
tems50 Driving safety systems
In this section, you will find information abou t
the following driving safety systems:
R ABS ( Anti-lock Braking System)
R BAS ( Brake Assist System)
R ESP ®
( Electronic Stability Program)
i In wintry road conditions, always use win-
ter tyres (M+S tyres) and, where necessary ,
snow chains. Only in this way will the driv-
ing safety systems described in this section
work as effectively as possible. G
Risk of accident
The risk of an accident is significantl y
increased by driving too fast. This is partic-
ularly the case when cornering on wet and
slippery roads and when driving too clos e
to the vehicle in front.
The driving safety systems described in thi s
section cannot reduce this risk or override
the laws of physics.
For this reason, always adapt your driving
style to suit the prevailing road and weather
conditions. Maintain sufficient distance
from other road users and objects on the
road. ABS (Anti-lock Braking System)
ABS regulates brake pressure in such a way
that the wheels do not lock when you brake.
This allows you to continue steering the vehi-
cle when braking.
ABS works from a speed of about 8 km/h
upwards, regardless of road surface condi-
tions. ABS works on slippery surfaces, even
when you only brake gently. G
Risk of accident
Do not depress the brake pedal severa l
times in quick succession (pumping) .
Depress the brake firmly and evenly. Pump-
ing the brake pedal reduces the braking
effect.
Braking If ABS intervenes when braking, you will fee
l
a pulsing in the brake pedal.
If ABS intervenes:
X Continue to depress the brake pedal wit h
force until the braking situation is over.
For full braking application:
X Depress the brake pedal with maximum
force. G
Risk of accident
If ABS is faulty, the wheels could lock when
braking. This limits the steerability of the
vehicle when braking and the braking dis-
tance may increase.
If ABS is deactivated due to a malfunction,
then BAS and ESP are also deactivated. The
risk of your vehicle skidding is then
increased in certain situations.
You should therefore always adapt your
driving style to suit the prevailing road and
weather conditions . BAS (Brake Assist)
BAS operates in emergency braking situa -
tions. If you depress the brake pedal quickly,
BAS automatically boosts the braking force,
thus shortening the stopping distance.
X Keep the brake pedal firmly depressed until
the emergency braking situation is over.
ABS prevents the wheels from locking.
The brakes will function as usual once you
release the brake pedal. BAS is deactivated. Safety
171_AKB; 3; 4, en-GB
vpfaff7,
2007-11-13T10:50:25+01:00 - Seite 50
Page 54 of 273
Driving safety sys
tems 51G
Risk of accident
If BAS has malfunctioned, the braking sys-
tem remains available with full brake boost-
ing effect. However, braking force is not
automatically increased in emergency
braking situations and the stopping dis-
tance may increase. ES
P®
(Electronic Stability Program)
ES P®
monitors driving stability and traction,
i.e. power transmission between the tyres
and the road surface.
If ESP ®
detects that the vehicle is deviatin g
from the direction desired by the driver, one
or more wheels are braked to stabilise the
vehicle. The engine output is also modified, if
necessary, to keep the vehicle on the desired
course within the scope of the laws of phys-
ics. ESP ®
assists the driver when pulling away
on wet or slippery roads. ES P®
can also sta-
bilise the vehicle during braking.
When ESP ®
intervenes, the vwarning
lamp flashes in the instrument cluster. G
Risk of accident
If the v warning lamp in the instrumen t
cluster flashes, proceed as follows: R
Do not deactivate ESP ®
under any cir -
cumstances .
R Only depress the accelerator pedal as far
as necessary when pulling away.
R Adapt your driving style to suit the pre -
vailing road and weather conditions.
The vehicle could otherwise go into a skid.
ESP ®
cannot reduce the risk of an accident
if you drive too fast. ESP ®
cannot overrid e
the laws of physics .
! The ignition must be switched off (key in
position 0or Iin the ignition lock) if:
R the vehicle is being towed with the front
or rear axle raised
R you are having the handbrake checke d
on the brake dynamometer
Application of the brakes by ESP ®
could
otherwise destroy the brake system on the
front or rear axle.
i Only use wheels with the recommended
tyre sizes. Only then will ESP ®
function
properly . To deactivate/activate ES
P® ESP
®
is activated automatically when the
engine is running.
It may be best to deactivate ES P®
in the fol-
lowing situations:
R when using snow chain s
R in deep sno w
R on sand or gravel G
Risk of accident
Activate ESP ®
as soon as the situations
described above no longer apply. ES P®
will
otherwise not be able to stabilise the vehi -
cle if the vehicle starts to skid or a wheel
starts to spin.
If you deactivate ESP ®
:
R ESP ®
no longer improves driving stability
R Engine torque is not limited and the drive
wheels are able to spin. The spinning
wheels produce a cutting effect for better
traction.
R traction control is still activated .
R ESP ®
still provides support when you
brake. Safety
171_AKB; 3; 4, en-GB
vpfaff7,
2007-11-13T10:50:25+01:00 - Seite 51
Page 55 of 273
Anti-theft syste
ms52
i
If ESP ®
is deactivated and one or mor e
wheels start to spin, the vwarning lamp
in the instrument cluster flashes. ES P®
does not, stabilise the vehicle. 1
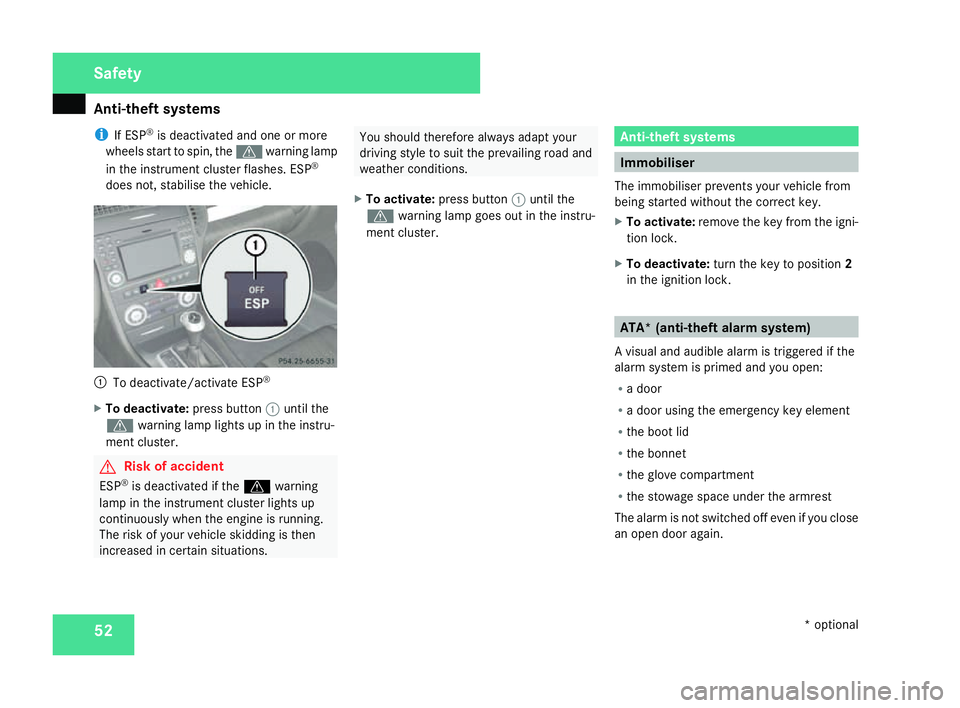
To deactivate/activate ESP ®
X To deactivate :press button 1until th e
v warning lamp lights up in the instru-
ment cluster. G
Risk of acciden
t
ESP ®
is deactivated if the vwarnin g
lamp in the instrument cluster lights up
continuously when the engine is running.
The risk of your vehicle skidding is then
increased in certain situations. You should therefore always adapt your
driving style to suit the prevailing road and
weather conditions.
X To activate :press button 1until th e
v warning lamp goes out in the instru-
ment cluster. Anti-theft systems
Immobiliser
The immobiliser prevents your vehicle from
being started without the correct key.
X To activate :remove the key from the igni -
tion lock.
X To deactivate :turn the key to position 2
in the ignition lock . ATA* (anti-theft alarm system)
A visual and audible alarm is triggered if th e
alarm system is primed and you open :
R a door
R a door using the emergency key elemen t
R the boot li d
R the bonne t
R the glove compartment
R the stowage space under the armrest
The alarm is not switched off even if you clos e
an open door again. Safety
* optional
171_AKB; 3; 4, en-GB
vpfaff7
, 2007-11-13T10:50:25+01:00 - Seite 52
Page 58 of 273
55
Opening and closing
...........................56
Key positions ...................................... .59
Seats .................................................... 59
Steering wheel .................................... 63
Mirrors ................................................. 65
Memory functions* .............................68
Seat belts ............................................ .69
Lights ................................................... 73
Windscreen wipers .............................78
Side windows ...................................... 79Driving and parking
............................81
Transmission ....................................... 84
Instrument cluster ..............................90
On-board computer .............................91
Driving systems ................................ 109
Air conditioning ................................. 118
Opening/closing the roof .................132
Loading and stowing ........................136
Features ............................................. 140 Controls
171_AKB; 3; 4, en-GB
vpfaff7,
2007-11-13T10:50:25+01:00 - Seite 55
Page 60 of 273
Opening and closing
57
The key now functions as follows:
X
To unlock the driver's door: press the
k button once.
X To unlock centrally :press the kbut-
ton twice.
X To lock centrally :press the jbutton.
Restoring the factory settings X
Press the kandj buttons simulta-
neously for approximately six seconds until
the battery check lamp flashes twice. Opening the doors from the inside
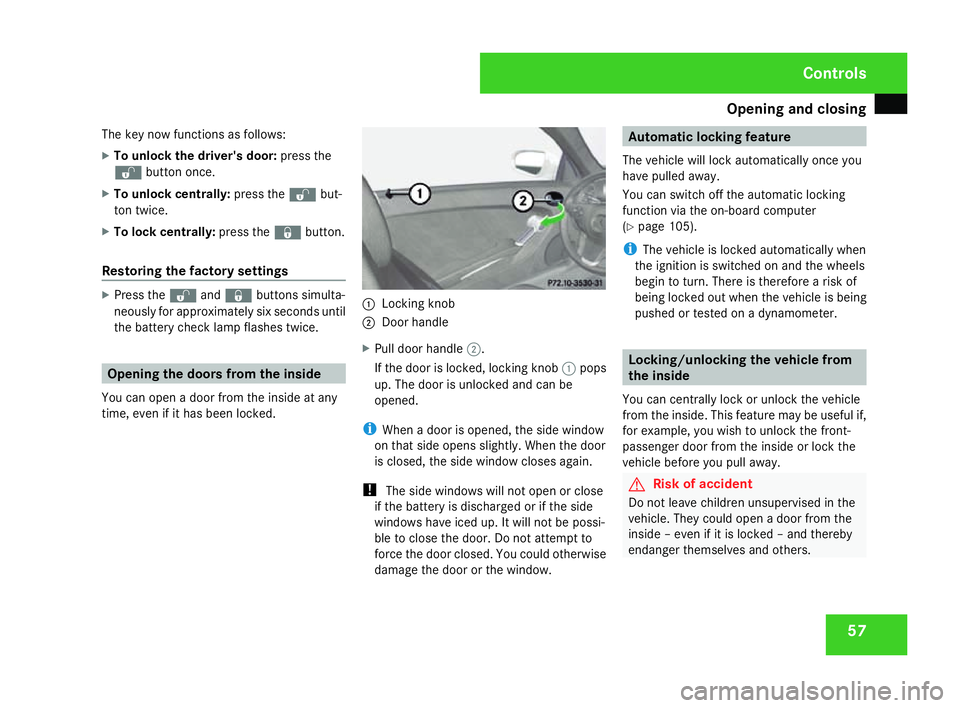
You can open a door from the inside at any
time, even if it has been locked. 1
Locking knob
2 Door handl e
X Pull door handle 2.
If the door is locked, locking knob 1pops
up. The door is unlocked and can be
opened.
i When a door is opened, the side window
on that side opens slightly. When the door
is closed, the side window closes again.
! The side windows will not open or close
if the battery is discharged or if the side
windows have iced up. It will not be possi-
ble to close the door. Do not attempt to
force the door closed. You could otherwise
damage the door or the window. Automatic locking feature
The vehicle will lock automatically once you
have pulled away .
You can switch off the automatic locking
function via the on-board computer
( Y page 105).
i The vehicle is locked automatically when
the ignition is switched on and the wheels
begin to turn. There is therefore a risk of
being locked out when the vehicle is being
pushed or tested on a dynamometer. Locking/unlocking the vehicle from
the inside
You can centrally lock or unlock the vehicle
from the inside. This feature may be useful if,
for example, you wish to unlock the front-
passenger door from the inside or lock the
vehicle before you pull away. G
Risk of accident
Do not leave children unsupervised in the
vehicle. They could open a door from the
inside – even if it is locked – and thereby
endanger themselves and others. Control
s
171_AKB; 3; 4, en-GB
vpfaff7,
2007-11-13T10:50:25+01:00 - Seite 57
Page 65 of 273

Seats
621
Upper backrest contour
2 Lower backrest contour
X Make sure that the key is in position 2in
the ignition lock .
X Turn thumbwheels 1and 2until th e
desired backrest contour has been set. AIRSCARF neck-level heating*
The AIRSCARF neck-level heating function
blows warm air around the heads of car occu-
pants. The warm air flows out of the holes in
the head restraints. G
Risk of injury
When AIRSCARF is in operation, very hot ai r
can flow from the vents in the head
restraints. This could cause burns to bare
skin in the immediate vicinity of the vents .
Make sure that you reduce the heater out-
put in time.
The three red indicator lamps in the button
indicate the heating level you have selected. 1
AIRSCARF neck-level heating X
Make sure the key is in position 2in the
ignition lock .
X To activate :press button 1.
Three red indicator lamps in the button light
up. The blower starts up after a preheating
phase of seven seconds.
X Press button 1repeatedly until the
desired heating level is set.
X To switch off: press button1repeatedly
until all the indicator lamps go out.
i The blower continues running for seven
seconds to cool down the heating ele-
ments.
i If the battery voltage is too low, the AIR-
SCARF neck level heating may switch off. Controls
* optional
171_AKB; 3; 4, en-GB
vpfaff7,
2007-11-13T10:50:25+01:00 - Seite 62