brakes MERCEDES-BENZ SLK ROADSTER 2008 Owners Manual
[x] Cancel search | Manufacturer: MERCEDES-BENZ, Model Year: 2008, Model line: SLK ROADSTER, Model: MERCEDES-BENZ SLK ROADSTER 2008Pages: 273, PDF Size: 4.42 MB
Page 10 of 273
7
Frequencies . . . . . . . . . . . . . . . . .
.262
Programming the remote control . .144
Gear indicator (on-board computer) .96
Gearshift program Manua l.. . . . . . . . . . . . . . . . . . . . . .88
Genuine Mercedes-Benz parts . . . ..240
Glove compartment . . . . . . . . . . . . ..138
Golf bag Storage location . . . . . . . . . . . . . . .138
Gross vehicle weight, maximum
permissible . . . . . . . . . . . . . . . . . . . . .253 H
Handbrake Display message . . . . . . . . . . . . . .181
Head/thorax airbags . . . . . . . . . . . . ..43
Headlamp Misting up . . . . . . . . . . . . . . . . . . .205
Headlamp mode (automatic ). . . . . . .74
Headlamps Cleaning . . . . . . . . . . . . . . . . . . . . .168
Cleaning system . . . . . . . . . . . . . . . .76
Headlamps delayed switch-off
see Exterior lighting delayed switch-off
Head restraint
Adjusting (front) . . . . . . . . . . . . .60, 61
Heatin g
see Air conditioning
High-pressure cleaners . . . . . . . . . ..167 HomeLink
®
see Garage door opener I
Immobiliser . . . . . . . . . . . . . . . . . . . . .52
Indicator and warning lam p
Brakes (red) . . . . . . . . . . . . . . . . . .194
Engine diagnostic . . . . . . . . . . . . . .195
ESP ®
. . . . . . . . . . . . . . . . . . . .51, 194
PASSENGER AIRBAG OFF . . . .46, 191
Reserve fuel . . . . . . . . . . . . . . . . . .197
Seat belt . . . . . . . . . . . . . . . . . . . . .195
SRS . . . . . . . . . . . . . . . . . . . . .39, 194
Indicator and warning lamps . . . . ..193
Indicator lamp see Indicator and warning lamp
Instrument cluster . . . . . . . . . . . . . ..90
Overview . . . . . . . . . . . . . . . . . . . . .24
Selecting the language (on-board
computer) . . . . . . . . . . . . . . . . . . .102
Instrument lighting . . . . . . . . . . . . . ..90
Interior lightin g. . . . . . . . . . . . . . . . . .77
Automatic contro l.. . . . . . . . . . . . .77
Delayed switch-off (on-boar d
computer) . . . . . . . . . . . . . . . . . . .105
Emergency lighting . . . . . . . . . . . . . .77
Manual control . . . . . . . . . . . . . . . . .78
Reading lamp . . . . . . . . . . . . . . . . . .78
Interior motion sensor . . . . . . . . . . ..54 Intermittent wipe
Windscreen wiper s.. . . . . . . . . . . . .79 J
Jack Operation . . . . . . . . . . . . . . . . . . . .225
Storage location . . . . . . . . . . . . . . .172
Jump-starting . . . . . . . . . . . . . . . . . . .233
Jump leads . . . . . . . . . . . . . . . . . . .233 K
Key . . . . . . . . . . . . . . . . . . . . . . . . . . . .56
Changing the battery . . . . . . . . . . .212
Checking the battery . . . . . . . . . . .212
Closing the roof . . . . . . . . . . . . . . .134
Display message . . . . . . . . . .184, 187
Factory setting . . . . . . . . . . . . . .56, 57
Loss . . . . . . . . . . . . . . . . . . . . . . . .207
Malfunction . . . . . . . . . . . . . . . . . .207
Modifying the programming . . . . . . .56
Opening the roof . . . . . . . . . . . . . .134
Key position s
Key . . . . . . . . . . . . . . . . . . . . . . . . . .59
Kickdown . . . . . . . . . . . . . . . . . . . .87, 89 Index
171_AKB; 3; 4, en-GB
vpfaff7,
2007-11-13T10:50:25+01:00 - Seite
7
Page 53 of 273
Driving safety sys
tems50 Driving safety systems
In this section, you will find information abou t
the following driving safety systems:
R ABS ( Anti-lock Braking System)
R BAS ( Brake Assist System)
R ESP ®
( Electronic Stability Program)
i In wintry road conditions, always use win-
ter tyres (M+S tyres) and, where necessary ,
snow chains. Only in this way will the driv-
ing safety systems described in this section
work as effectively as possible. G
Risk of accident
The risk of an accident is significantl y
increased by driving too fast. This is partic-
ularly the case when cornering on wet and
slippery roads and when driving too clos e
to the vehicle in front.
The driving safety systems described in thi s
section cannot reduce this risk or override
the laws of physics.
For this reason, always adapt your driving
style to suit the prevailing road and weather
conditions. Maintain sufficient distance
from other road users and objects on the
road. ABS (Anti-lock Braking System)
ABS regulates brake pressure in such a way
that the wheels do not lock when you brake.
This allows you to continue steering the vehi-
cle when braking.
ABS works from a speed of about 8 km/h
upwards, regardless of road surface condi-
tions. ABS works on slippery surfaces, even
when you only brake gently. G
Risk of accident
Do not depress the brake pedal severa l
times in quick succession (pumping) .
Depress the brake firmly and evenly. Pump-
ing the brake pedal reduces the braking
effect.
Braking If ABS intervenes when braking, you will fee
l
a pulsing in the brake pedal.
If ABS intervenes:
X Continue to depress the brake pedal wit h
force until the braking situation is over.
For full braking application:
X Depress the brake pedal with maximum
force. G
Risk of accident
If ABS is faulty, the wheels could lock when
braking. This limits the steerability of the
vehicle when braking and the braking dis-
tance may increase.
If ABS is deactivated due to a malfunction,
then BAS and ESP are also deactivated. The
risk of your vehicle skidding is then
increased in certain situations.
You should therefore always adapt your
driving style to suit the prevailing road and
weather conditions . BAS (Brake Assist)
BAS operates in emergency braking situa -
tions. If you depress the brake pedal quickly,
BAS automatically boosts the braking force,
thus shortening the stopping distance.
X Keep the brake pedal firmly depressed until
the emergency braking situation is over.
ABS prevents the wheels from locking.
The brakes will function as usual once you
release the brake pedal. BAS is deactivated. Safety
171_AKB; 3; 4, en-GB
vpfaff7,
2007-11-13T10:50:25+01:00 - Seite 50
Page 54 of 273
Driving safety sys
tems 51G
Risk of accident
If BAS has malfunctioned, the braking sys-
tem remains available with full brake boost-
ing effect. However, braking force is not
automatically increased in emergency
braking situations and the stopping dis-
tance may increase. ES
P®
(Electronic Stability Program)
ES P®
monitors driving stability and traction,
i.e. power transmission between the tyres
and the road surface.
If ESP ®
detects that the vehicle is deviatin g
from the direction desired by the driver, one
or more wheels are braked to stabilise the
vehicle. The engine output is also modified, if
necessary, to keep the vehicle on the desired
course within the scope of the laws of phys-
ics. ESP ®
assists the driver when pulling away
on wet or slippery roads. ES P®
can also sta-
bilise the vehicle during braking.
When ESP ®
intervenes, the vwarning
lamp flashes in the instrument cluster. G
Risk of accident
If the v warning lamp in the instrumen t
cluster flashes, proceed as follows: R
Do not deactivate ESP ®
under any cir -
cumstances .
R Only depress the accelerator pedal as far
as necessary when pulling away.
R Adapt your driving style to suit the pre -
vailing road and weather conditions.
The vehicle could otherwise go into a skid.
ESP ®
cannot reduce the risk of an accident
if you drive too fast. ESP ®
cannot overrid e
the laws of physics .
! The ignition must be switched off (key in
position 0or Iin the ignition lock) if:
R the vehicle is being towed with the front
or rear axle raised
R you are having the handbrake checke d
on the brake dynamometer
Application of the brakes by ESP ®
could
otherwise destroy the brake system on the
front or rear axle.
i Only use wheels with the recommended
tyre sizes. Only then will ESP ®
function
properly . To deactivate/activate ES
P® ESP
®
is activated automatically when the
engine is running.
It may be best to deactivate ES P®
in the fol-
lowing situations:
R when using snow chain s
R in deep sno w
R on sand or gravel G
Risk of accident
Activate ESP ®
as soon as the situations
described above no longer apply. ES P®
will
otherwise not be able to stabilise the vehi -
cle if the vehicle starts to skid or a wheel
starts to spin.
If you deactivate ESP ®
:
R ESP ®
no longer improves driving stability
R Engine torque is not limited and the drive
wheels are able to spin. The spinning
wheels produce a cutting effect for better
traction.
R traction control is still activated .
R ESP ®
still provides support when you
brake. Safety
171_AKB; 3; 4, en-GB
vpfaff7,
2007-11-13T10:50:25+01:00 - Seite 51
Page 87 of 273
Transmission
84
X
To apply :pull handbrake 2up firmly.
The 3 indicator lamp in the instrumen t
cluster lights up if the engine is running.
i On steep slopes, turn the front wheels
towards the kerb. Stopping the engine
G
Risk of accident
If the engine is not running, there is no
power assistance for the steering and
brakes. Steering and braking then take s
much more effort.
As a result, you might lose control of the
vehicle, cause an accident and injure your-
self and others.
Do not switch off the engine while driving.
Vehicles with manual transmissio nX
Shift to either first or reverse gear.
X Turn the key to position 0(Y page 59) in
the ignition lock and remove it.
The immobiliser is activated. Vehicles with automatic transmission* X
Move the selector lever to P.
X Turn the key to position 0(Y page 59) in
the ignition lock and remove it.
The immobiliser is activated. Transmission
Introduction to the transmission
G
Risk of accident
The movement of the pedals must not be
impaired in any way. Do not keep any
objects in the driver's footwell. Make sure
that floormats or carpets are correctly
secured and that there is sufficient clear-
ance for the pedals. G
Risk of accident
Do not change down for additional engine
braking on a slippery road surface. Thi s
could cause the drive wheels to lose thei r
grip and the vehicle could skid. This could
cause you to lose control of your vehicle
and cause an accident .Cont
rols
* optional
171_AKB; 3; 4, en-GB
vpfaff7,
2007-11-13T10:50:25+01:00 - Seite 84
Page 89 of 273
Transmission
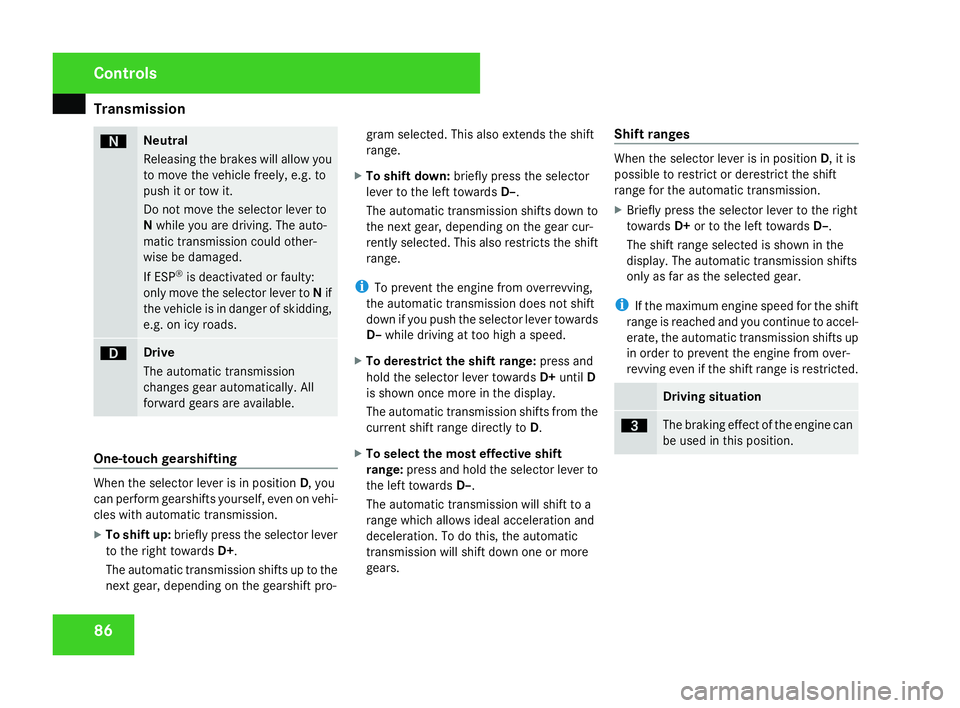
86 ë Neutral
Releasing the brakes will allow yo
u
to move the vehicle freely, e.g. to
push it or tow it.
Do not move the selector lever to
N while you are driving. The auto-
matic transmission could other-
wise be damaged .
If ESP ®
is deactivated or faulty:
only move the selector lever to Nif
the vehicle is in danger of skidding,
e.g. on icy roads. ê Drive
The automatic transmissio
n
changes gear automatically. All
forward gears are available .One-touch gearshifting
When the selector lever is in position
D, you
can perform gearshifts yourself, even on vehi-
cles with automatic transmission.
X To shift up: briefly press the selector lever
to the right towards D+.
The automatic transmission shifts up to the
next gear, depending on the gearshift pro- gram selected. This also extends the shift
range.
X To shift down: briefly press the selecto r
lever to the left towards D–.
The automatic transmission shifts down to
the next gear, depending on the gear cur-
rently selected. This also restricts the shift
range.
i To prevent the engine from overrevving,
the automatic transmission does not shift
down if you push the selector lever towards
D– while driving at too high a speed.
X To derestrict the shift range: press and
hold the selector lever towards D+until D
is shown once more in the display.
The automatic transmission shifts from the
current shift range directly to D.
X To select the most effective shift
range: press and hold the selector lever to
the left towards D–.
The automatic transmission will shift to a
range which allows ideal acceleration and
deceleration. To do this, the automatic
transmission will shift down one or more
gears. Shift ranges When the selector lever is in position
D, it is
possible to restrict or derestrict the shift
range for the automatic transmission .
X Briefly press the selector lever to the right
towards D+or to the left towards D–.
The shift range selected is shown in the
display. The automatic transmission shifts
only as far as the selected gear.
i If the maximum engine speed for the shift
range is reached and you continue to accel-
erate, the automatic transmission shifts up
in order to prevent the engine from over-
revving even if the shift range is restricted. Driving situation
è The braking effect of the engine can
be used in this position.Controls
171_AKB; 3; 4, en-GB
vpfaff7,
2007-11-13T10:50:25+01:00 - Seite 86
Page 112 of 273
Driving sys
tems 10
9
X
Press the jork button to call up
the phone book.
X Press the jork button to select the
desired name. To scroll through the tele-
phone book faster, press and hold the
j ork button for longer than 1 sec-
ond.
X Press the sbutton to start dialling.
The DIALLING message appears in the
multi-function display.
The number dialled is stored in the redial
memory.
When there is a connection, the call dura-
tion appears in the multi-function display.
The name also appears, provided it is
stored in the phone book, otherwise the
dialled number is still displayed.
or
X If you do not wish to make a call, press the
t button.
Redialling The on-board computer stores the last phone
numbers which were dialled. X
Press the sbutton to call up the most
recently dialled number in the redial mem-
ory.
X Press the jork button to select the
desired name or number.
X Press the sbutton to start dialling. Driving system
s
Your vehicle's driving systems are described
on the following pages:
R Cruise control and Speedtronic, which you
can use to control the speed of the vehicl e
R Parktronic*, which assists you in parking
and manoeuvrin g
The ABS, BAS and ESP ®
driving safety sys-
tems are described in the "Driving safety sys-
tems" section (Y page 50). Cruise control
Cruise control maintains a constant road
speed for you. It brakes automatically in order
to avoid exceeding the set speed. On long and
steep downhill gradients, especially if the
vehicle is laden, you must shift to a lower gear
in good time or select shift range 1,2 or 3in
vehicles with automatic transmission*. In this
way you will make use of the braking effect of
the engine, which relieves the load on the
brake system and prevents the brakes fro m
overheating and wearing too quickly. Controls
* optional
171_AKB; 3; 4, en-GB
vpfaff7,
2007-11-13T10:50:25+01:00 - Seite 109 Z
Page 114 of 273
Driving sys
tems 11
1 G
Risk of injury
Cruise control brakes automatically in
order to avoid exceeding the set speed. As
it does so, the brake pedal is depressed. Do
not place your foot under the brake pedal
as it could become trapped .
Storing and maintaining the current
speed You can store the current speed if you are
driving faster than 30 km/h.
X Accelerate the vehicle to the desired
speed.
X Briefly press the cruise control lever up
1 or down 4.
X Remove your foot from the accelerato r
pedal.
Cruise control is activated. The vehicle
automatically maintains the stored speed.
i Cruise control may be unable to maintai n
the stored speed on uphill gradients. Th e
stored speed is resumed when the gradient
evens out. Cruise control maintains the
stored speed on downhill gradients by
automatically applying the brakes.
Vehicles with manual transmission: When selecting another gear, press the
accelerator pedal slightly to increase the
smoothness of the gear change.
When you depress the clutch pedal and
change to another gear, the engine speed
can increase slightly as long as no gear is
selected.
R
Always drive at adequate but not exces-
sive engine speeds .
R Change gear in good time.
R If possible, do not change down several
gears at a time.
Resuming the last speed stored G
Risk of accident
Only select a stored speed if you know what
that speed is and whether it is suitable for
the current situation. Otherwise, sudden
acceleration or braking could endanger yo u
or others.
X Briefly pull the cruise control lever towards
you 3.
X Remove your foot from the accelerato r
pedal.
Cruise control is activated and adjusts the
vehicle's speed to the last speed stored. Setting a speed X
Press the cruise control lever up 1for a
higher speed or down 4for a lower speed.
X Keep the cruise control lever pressed until
the desired speed is reached .
X Release the cruise control lever.
The new speed is stored.
i Cruise control is not deactivated if you
depress the accelerator pedal. For exam-
ple, if you accelerate briefly to overtake ,
cruise control adjusts the vehicle's speed
to the last speed stored after you have fin-
ished overtaking.
i Deceleration of the vehicle by means of
the cruise control lever is assisted by auto-
matic application of the brakes .
Vehicles with automatic transmission*:
On long downhill gradients, the automatic
transmission shifts down as a further meas-
ure. Controls
171_AKB; 3; 4, en-GB
vpfaff7,
2007-11-13T10:50:25+01:00 - Seite 111
Page 115 of 273
Driving sys
tems 11
2
Making fine adjustments in 1 km/h
increments X
Briefly press the cruise control lever up
1 for a higher speed or down 4for a
lower speed.
The last speed stored is increased or
reduced.
Deactivating cruise control There are several ways to deactivate cruise
control:
X
Briefly press the cruise control lever for-
wards 6.
or
X Brake .
or
X Briefly press the cruise control lever in the
direction of arrow 5.
Variable Speedtronic is selected. LIM indi-
cator lamp 2in the cruise control lever
lights up.
Cruise control is automatically deactivated if,
for example:
R you apply the handbrake
R you are driving at less than 30 km/h R
ESP ®
is intervening or you deactivat e
ESP ®
R you depress the clutch pedal for more than
seven seconds on vehicles with a manual
transmissio n
R you move the selector lever to Nin vehicles
with automatic transmission* while drivin g
i The last speed stored is cleared when you
switch off the engine. Speedtronic
Speedtronic brakes automatically so that you
do not exceed the set speed. On long and
steep downhill gradients, especially if the
vehicle is laden, you must shift to a lower gear
in good time or select shift range 1,2 or 3in
vehicles with automatic transmission*. In this
way you will make use of the braking effect of
the engine, which relieves the load on the
brake system and prevents the brakes fro m
overheating and wearing too quickly. If you
need additional braking, depress the brake
pedal repeatedly rather than continuously. G
Risk of accident
Never depress the brake pedal continu -
ously while the vehicle is in motion, e.g.
never cause the brakes to rub by applying
constant slight pedal pressure. This causes
the brake system to overheat, increases
the braking distance and can lead to the
brakes failing completely. G
Risk of accident
Do not change down for additional engine
braking on a slippery road surface. Thi s
could cause the drive wheels to lose thei r
grip and the vehicle could skid.
You can set a variable or permanent limit
speed:
R Variable for speed limits, e.g. in built-up
areas (Y page 113 )
R Permanent for long-term speed restric-
tions, e.g. for driving on winter tyres
( Y page 114 ) G
Risk of accident
Speedtronic is only an aid designed to
assist driving. You are responsible for the
vehicle's speed and for braking in goo d
time. Controls
* optional
171_AKB; 3; 4, en-G
B
vpfaff7, 2007-11-13T10:50:25+01:00 - Seite 112
Page 116 of 273
Driving sys
tems 11
3
i
The speed indicated in the speedometer
may differ slightly from the limit speed
stored.
Variable Speedtronic You can operate cruise control and variable
Speedtronic with the cruise control lever.
The LIM indicator lamp on the cruise control
lever indicates which system you have selec-
ted:
R
LIM indicator lamp off:
cruise control is selected
R LIM indicator lamp lit:
variable Speedtronic is selected
You can use the cruise control lever to limit
the speed to any speed above 30 km/h whil e
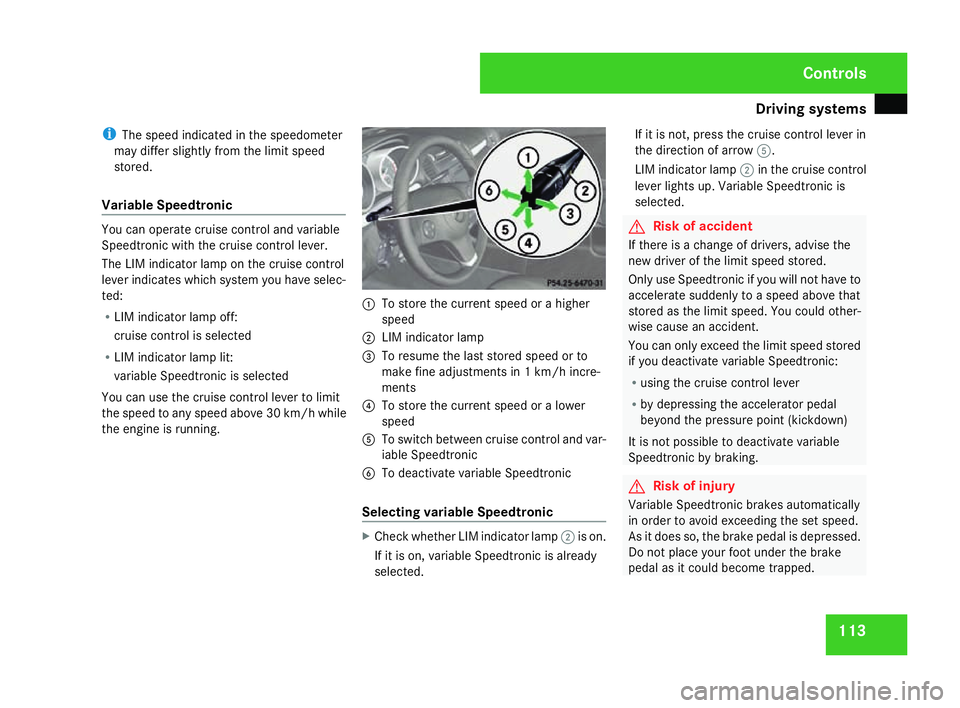
the engine is running . 1
To store the current speed or a higher
speed
2 LIM indicator lamp
3 To resume the last stored speed or to
make fine adjustments in 1 km/h incre-
ments
4 To store the current speed or a lower
speed
5 To switch between cruise control and var-
iable Speedtronic
6 To deactivate variable Speedtronic
Selecting variable Speedtronic X
Check whether LIM indicator lamp 2is on.
If it is on, variable Speedtronic is already
selected. If it is not, press the cruise control lever in
the direction of arrow
5.
LIM indicator lamp 2in the cruise control
lever lights up. Variable Speedtronic is
selected. G
Risk of accident
If there is a change of drivers, advise the
new driver of the limit speed stored.
Only use Speedtronic if you will not have to
accelerate suddenly to a speed above that
stored as the limit speed. You could other-
wise cause an accident.
You can only exceed the limit speed store d
if you deactivate variable Speedtronic :
R using the cruise control leve r
R by depressing the accelerator pedal
beyond the pressure point (kickdown)
It is not possible to deactivate variable
Speedtronic by braking. G
Risk of injury
Variable Speedtronic brakes automaticall y
in order to avoid exceeding the set speed.
As it does so, the brake pedal is depressed.
Do not place your foot under the brak e
pedal as it could become trapped. Controls
171_AKB; 3; 4, en-GB
vpfaff7,
2007-11-13T10:50:25+01:00 - Seite 113
Page 119 of 273
Driving sys
tems 11
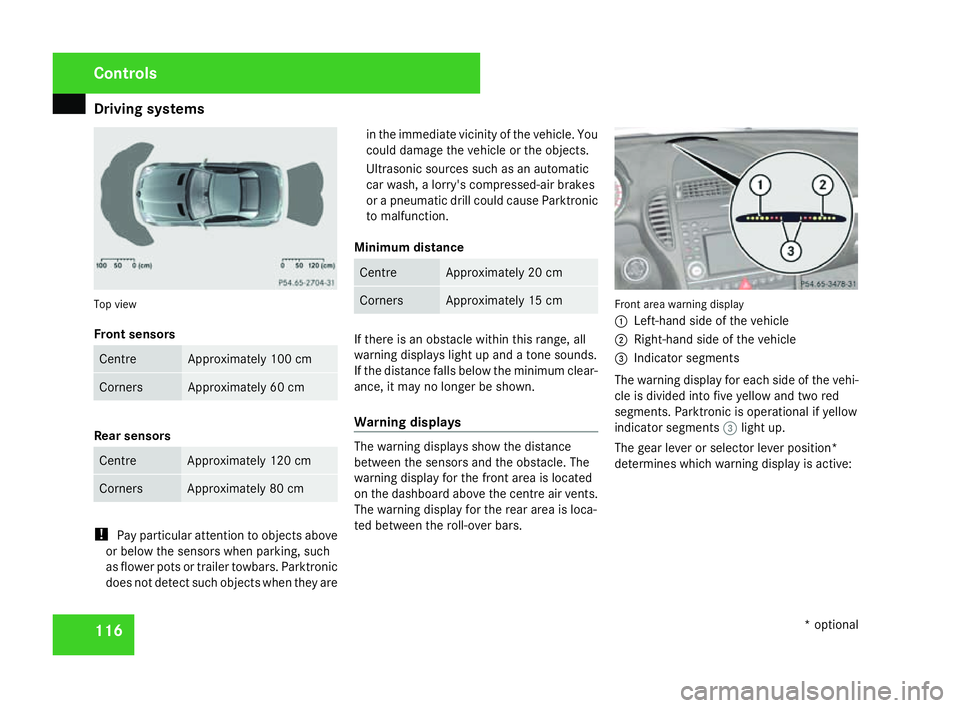
6 Top view
Front sensors
Centre Approximately 100 cm
Corners Approximately 60 cm
Rear sensors
Centre Approximately 120 cm
Corners Approximately 80 cm
!
Pay particular attention to objects above
or below the sensors when parking, such
as flower pots or trailer towbars. Parktronic
does not detect such objects when they are in the immediate vicinity of the vehicle. You
could damage the vehicle or the objects.
Ultrasonic sources such as an automatic
car wash, a lorry's compressed-air brakes
or a pneumatic drill could cause Parktronic
to malfunction.
Minimum distance Centre Approximately 20 cm
Corners Approximately 15 cm
If there is an obstacle within this range, all
warning displays light up and a tone sounds.
If the distance falls below the minimum clear-
ance, it may no longer be shown.
Warning displays
The warning displays show the distance
between the sensors and the obstacle. The
warning display for the front area is located
on the dashboard above the centre air vents.
The warning display for the rear area is loca-
ted between the roll-over bars. Front area warning display
1
Left-hand side of the vehicle
2 Right-hand side of the vehicle
3 Indicator segments
The warning display for each side of the vehi -
cle is divided into five yellow and two red
segments. Parktronic is operational if yellow
indicator segments 3light up.
The gear lever or selector lever position *
determines which warning display is active: Controls
* optional
171_AKB; 3; 4, en-GB
vpfaff7, 2007-11-13T10:50:25+01:00 - Seite 116