handbrake MERCEDES-BENZ SLK ROADSTER 2008 Owners Manual
[x] Cancel search | Manufacturer: MERCEDES-BENZ, Model Year: 2008, Model line: SLK ROADSTER, Model: MERCEDES-BENZ SLK ROADSTER 2008Pages: 273, PDF Size: 4.42 MB
Page 10 of 273
7
Frequencies . . . . . . . . . . . . . . . . .
.262
Programming the remote control . .144
Gear indicator (on-board computer) .96
Gearshift program Manua l.. . . . . . . . . . . . . . . . . . . . . .88
Genuine Mercedes-Benz parts . . . ..240
Glove compartment . . . . . . . . . . . . ..138
Golf bag Storage location . . . . . . . . . . . . . . .138
Gross vehicle weight, maximum
permissible . . . . . . . . . . . . . . . . . . . . .253 H
Handbrake Display message . . . . . . . . . . . . . .181
Head/thorax airbags . . . . . . . . . . . . ..43
Headlamp Misting up . . . . . . . . . . . . . . . . . . .205
Headlamp mode (automatic ). . . . . . .74
Headlamps Cleaning . . . . . . . . . . . . . . . . . . . . .168
Cleaning system . . . . . . . . . . . . . . . .76
Headlamps delayed switch-off
see Exterior lighting delayed switch-off
Head restraint
Adjusting (front) . . . . . . . . . . . . .60, 61
Heatin g
see Air conditioning
High-pressure cleaners . . . . . . . . . ..167 HomeLink
®
see Garage door opener I
Immobiliser . . . . . . . . . . . . . . . . . . . . .52
Indicator and warning lam p
Brakes (red) . . . . . . . . . . . . . . . . . .194
Engine diagnostic . . . . . . . . . . . . . .195
ESP ®
. . . . . . . . . . . . . . . . . . . .51, 194
PASSENGER AIRBAG OFF . . . .46, 191
Reserve fuel . . . . . . . . . . . . . . . . . .197
Seat belt . . . . . . . . . . . . . . . . . . . . .195
SRS . . . . . . . . . . . . . . . . . . . . .39, 194
Indicator and warning lamps . . . . ..193
Indicator lamp see Indicator and warning lamp
Instrument cluster . . . . . . . . . . . . . ..90
Overview . . . . . . . . . . . . . . . . . . . . .24
Selecting the language (on-board
computer) . . . . . . . . . . . . . . . . . . .102
Instrument lighting . . . . . . . . . . . . . ..90
Interior lightin g. . . . . . . . . . . . . . . . . .77
Automatic contro l.. . . . . . . . . . . . .77
Delayed switch-off (on-boar d
computer) . . . . . . . . . . . . . . . . . . .105
Emergency lighting . . . . . . . . . . . . . .77
Manual control . . . . . . . . . . . . . . . . .78
Reading lamp . . . . . . . . . . . . . . . . . .78
Interior motion sensor . . . . . . . . . . ..54 Intermittent wipe
Windscreen wiper s.. . . . . . . . . . . . .79 J
Jack Operation . . . . . . . . . . . . . . . . . . . .225
Storage location . . . . . . . . . . . . . . .172
Jump-starting . . . . . . . . . . . . . . . . . . .233
Jump leads . . . . . . . . . . . . . . . . . . .233 K
Key . . . . . . . . . . . . . . . . . . . . . . . . . . . .56
Changing the battery . . . . . . . . . . .212
Checking the battery . . . . . . . . . . .212
Closing the roof . . . . . . . . . . . . . . .134
Display message . . . . . . . . . .184, 187
Factory setting . . . . . . . . . . . . . .56, 57
Loss . . . . . . . . . . . . . . . . . . . . . . . .207
Malfunction . . . . . . . . . . . . . . . . . .207
Modifying the programming . . . . . . .56
Opening the roof . . . . . . . . . . . . . .134
Key position s
Key . . . . . . . . . . . . . . . . . . . . . . . . . .59
Kickdown . . . . . . . . . . . . . . . . . . . .87, 89 Index
171_AKB; 3; 4, en-GB
vpfaff7,
2007-11-13T10:50:25+01:00 - Seite
7
Page 54 of 273
Driving safety sys
tems 51G
Risk of accident
If BAS has malfunctioned, the braking sys-
tem remains available with full brake boost-
ing effect. However, braking force is not
automatically increased in emergency
braking situations and the stopping dis-
tance may increase. ES
P®
(Electronic Stability Program)
ES P®
monitors driving stability and traction,
i.e. power transmission between the tyres
and the road surface.
If ESP ®
detects that the vehicle is deviatin g
from the direction desired by the driver, one
or more wheels are braked to stabilise the
vehicle. The engine output is also modified, if
necessary, to keep the vehicle on the desired
course within the scope of the laws of phys-
ics. ESP ®
assists the driver when pulling away
on wet or slippery roads. ES P®
can also sta-
bilise the vehicle during braking.
When ESP ®
intervenes, the vwarning
lamp flashes in the instrument cluster. G
Risk of accident
If the v warning lamp in the instrumen t
cluster flashes, proceed as follows: R
Do not deactivate ESP ®
under any cir -
cumstances .
R Only depress the accelerator pedal as far
as necessary when pulling away.
R Adapt your driving style to suit the pre -
vailing road and weather conditions.
The vehicle could otherwise go into a skid.
ESP ®
cannot reduce the risk of an accident
if you drive too fast. ESP ®
cannot overrid e
the laws of physics .
! The ignition must be switched off (key in
position 0or Iin the ignition lock) if:
R the vehicle is being towed with the front
or rear axle raised
R you are having the handbrake checke d
on the brake dynamometer
Application of the brakes by ESP ®
could
otherwise destroy the brake system on the
front or rear axle.
i Only use wheels with the recommended
tyre sizes. Only then will ESP ®
function
properly . To deactivate/activate ES
P® ESP
®
is activated automatically when the
engine is running.
It may be best to deactivate ES P®
in the fol-
lowing situations:
R when using snow chain s
R in deep sno w
R on sand or gravel G
Risk of accident
Activate ESP ®
as soon as the situations
described above no longer apply. ES P®
will
otherwise not be able to stabilise the vehi -
cle if the vehicle starts to skid or a wheel
starts to spin.
If you deactivate ESP ®
:
R ESP ®
no longer improves driving stability
R Engine torque is not limited and the drive
wheels are able to spin. The spinning
wheels produce a cutting effect for better
traction.
R traction control is still activated .
R ESP ®
still provides support when you
brake. Safety
171_AKB; 3; 4, en-GB
vpfaff7,
2007-11-13T10:50:25+01:00 - Seite 51
Page 85 of 273
Driving and pa
rking82
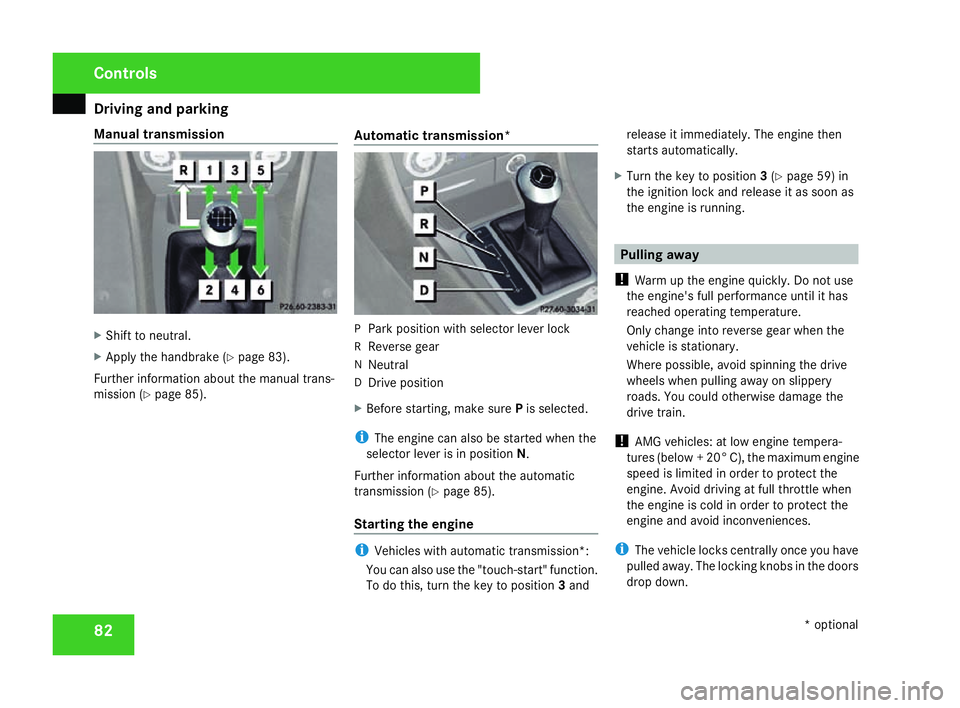
Manual transmissio
nX
Shift to neutral .
X Apply the handbrake (Y page 83).
Further information about the manual trans-
mission (Y page 85). Automatic transmission* P
Park position with selector lever lock
R Reverse gear
N Neutral
D Drive positio n
X Before starting, make sure Pis selected.
i The engine can also be started when the
selector lever is in position N.
Further information about the automatic
transmission (Y page 85).
Starting the engine i
Vehicles with automatic transmission*:
You can also use the "touch-start" function.
To do this, turn the key to position 3and release it immediately. The engine then
starts automatically.
X Turn the key to position 3(Y page 59) in
the ignition lock and release it as soon as
the engine is running. Pulling away
! Warm up the engine quickly. Do not use
the engine's full performance until it has
reached operating temperature.
Only change into reverse gear when the
vehicle is stationary.
Where possible, avoid spinning the drive
wheels when pulling away on slippery
roads. You could otherwise damage the
drive train .
! AMG vehicles: at low engine tempera-
tures (below + 20° C), the maximum engine
speed is limited in order to protect the
engine. Avoid driving at full throttle when
the engine is cold in order to protect the
engine and avoid inconveniences.
i The vehicle locks centrally once you have
pulled away. The locking knobs in the doors
drop down. Controls
* optional
171_AKB; 3; 4, en-GB
vpfaff7,
2007-11-13T10:50:25+01:00 - Seite 82
Page 86 of 273
Driving and pa
rking 83
You can open the doors from the inside at
any time.
You can also deactivate the automatic lock-
ing feature
(Y page 105).
Manual transmission X
Depress the clutch pedal.
X Shift to either first or reverse gear.
X Slowly release the clutch pedal and
depress the accelerator pedal.
! Change gear in good time and avoid spin-
ning the wheels. You could otherwise dam-
age the vehicle.
Automatic transmission *i
It is only possible to move the selector
lever to the desired position if you depres s
the brake pedal. Only then is the selector
lever lock released.
X Depress the brake pedal and hold it down.
X Release the handbrake .
X Move the selector lever to position Dor R.
i Wait for the shift process to complet e
before pulling away. X
Release the brake pedal .
X Carefully depress the accelerator pedal.
i Upshifts take place at higher engine
speeds after a cold start. This helps the
catalytic converter to reach its operating
temperature more quickly. Parking
G
Risk of fire
Make sure that the exhaust system doe s
not under any circumstances come into
contact with easily ignitable material such
as dry grass or petrol. The material could
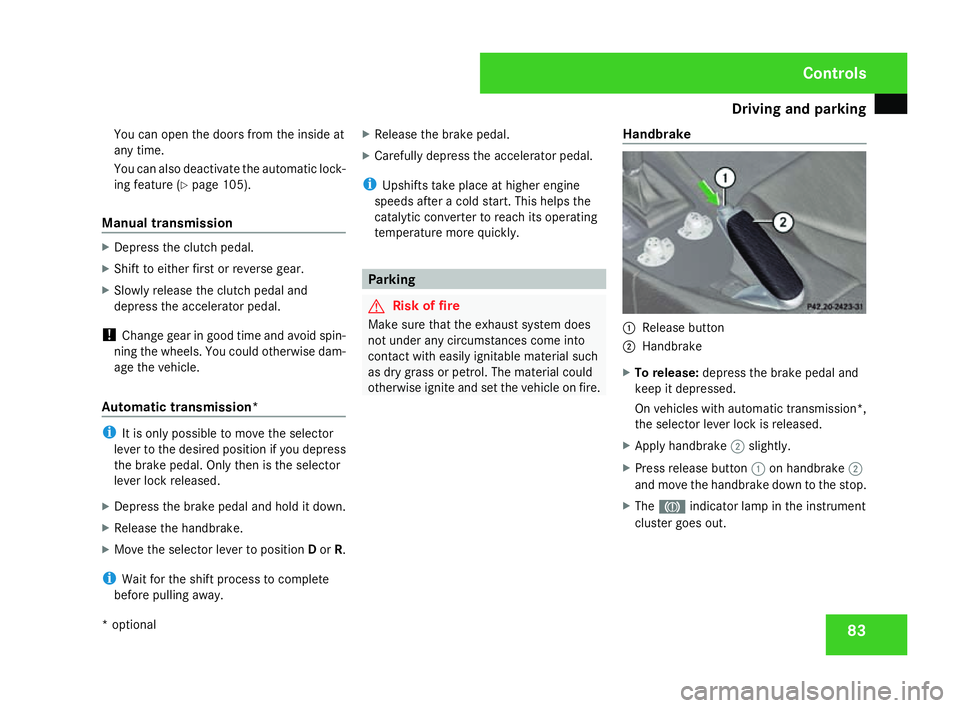
otherwise ignite and set the vehicle on fire. Handbrake 1
Release butto n
2 Handbrake
X To release: depress the brake pedal and
keep it depressed.
On vehicles with automatic transmission* ,
the selector lever lock is released.
X Apply handbrake 2slightly.
X Press release button 1on handbrake 2
and move the handbrake down to the stop.
X The 3 indicator lamp in the instrumen t
cluster goes out. Control
s
* optional
171_AKB; 3; 4, en-GB
vpfaff7,
2007-11-13T10:50:25+01:00 - Seite 83
Page 87 of 273
Transmission
84
X
To apply :pull handbrake 2up firmly.
The 3 indicator lamp in the instrumen t
cluster lights up if the engine is running.
i On steep slopes, turn the front wheels
towards the kerb. Stopping the engine
G
Risk of accident
If the engine is not running, there is no
power assistance for the steering and
brakes. Steering and braking then take s
much more effort.
As a result, you might lose control of the
vehicle, cause an accident and injure your-
self and others.
Do not switch off the engine while driving.
Vehicles with manual transmissio nX
Shift to either first or reverse gear.
X Turn the key to position 0(Y page 59) in
the ignition lock and remove it.
The immobiliser is activated. Vehicles with automatic transmission* X
Move the selector lever to P.
X Turn the key to position 0(Y page 59) in
the ignition lock and remove it.
The immobiliser is activated. Transmission
Introduction to the transmission
G
Risk of accident
The movement of the pedals must not be
impaired in any way. Do not keep any
objects in the driver's footwell. Make sure
that floormats or carpets are correctly
secured and that there is sufficient clear-
ance for the pedals. G
Risk of accident
Do not change down for additional engine
braking on a slippery road surface. Thi s
could cause the drive wheels to lose thei r
grip and the vehicle could skid. This could
cause you to lose control of your vehicle
and cause an accident .Cont
rols
* optional
171_AKB; 3; 4, en-GB
vpfaff7,
2007-11-13T10:50:25+01:00 - Seite 84
Page 115 of 273
Driving sys
tems 11
2
Making fine adjustments in 1 km/h
increments X
Briefly press the cruise control lever up
1 for a higher speed or down 4for a
lower speed.
The last speed stored is increased or
reduced.
Deactivating cruise control There are several ways to deactivate cruise
control:
X
Briefly press the cruise control lever for-
wards 6.
or
X Brake .
or
X Briefly press the cruise control lever in the
direction of arrow 5.
Variable Speedtronic is selected. LIM indi-
cator lamp 2in the cruise control lever
lights up.
Cruise control is automatically deactivated if,
for example:
R you apply the handbrake
R you are driving at less than 30 km/h R
ESP ®
is intervening or you deactivat e
ESP ®
R you depress the clutch pedal for more than
seven seconds on vehicles with a manual
transmissio n
R you move the selector lever to Nin vehicles
with automatic transmission* while drivin g
i The last speed stored is cleared when you
switch off the engine. Speedtronic
Speedtronic brakes automatically so that you
do not exceed the set speed. On long and
steep downhill gradients, especially if the
vehicle is laden, you must shift to a lower gear
in good time or select shift range 1,2 or 3in
vehicles with automatic transmission*. In this
way you will make use of the braking effect of
the engine, which relieves the load on the
brake system and prevents the brakes fro m
overheating and wearing too quickly. If you
need additional braking, depress the brake
pedal repeatedly rather than continuously. G
Risk of accident
Never depress the brake pedal continu -
ously while the vehicle is in motion, e.g.
never cause the brakes to rub by applying
constant slight pedal pressure. This causes
the brake system to overheat, increases
the braking distance and can lead to the
brakes failing completely. G
Risk of accident
Do not change down for additional engine
braking on a slippery road surface. Thi s
could cause the drive wheels to lose thei r
grip and the vehicle could skid.
You can set a variable or permanent limit
speed:
R Variable for speed limits, e.g. in built-up
areas (Y page 113 )
R Permanent for long-term speed restric-
tions, e.g. for driving on winter tyres
( Y page 114 ) G
Risk of accident
Speedtronic is only an aid designed to
assist driving. You are responsible for the
vehicle's speed and for braking in goo d
time. Controls
* optional
171_AKB; 3; 4, en-G
B
vpfaff7, 2007-11-13T10:50:25+01:00 - Seite 112
Page 118 of 273
Driving sys
tems 11
5
X
Press the æorç button to select the
Vehicl esubmenu.
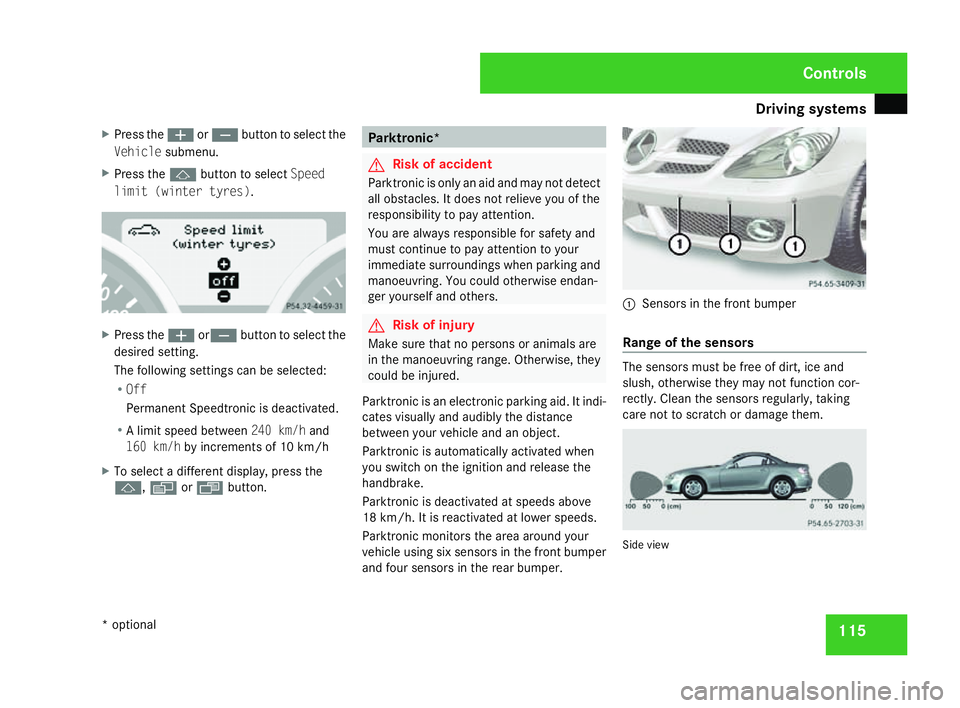
X Press the jbutton to select Speed
limit (winter tyres) .X
Press the æorç button to select the
desired setting.
The following settings can be selected:
R Off
Permanent Speedtronic is deactivated.
R A limit speed between 240 km/hand
160 km/h by increments of 10 km/h
X To select a different display, press the
j ,è orÿ button . Parktronic*
G
Risk of acciden
t
Parktronic is only an aid and may not detect
all obstacles. It does not relieve you of the
responsibility to pay attention.
You are always responsible for safety and
must continue to pay attention to your
immediate surroundings when parking and
manoeuvring. You could otherwise endan-
ger yourself and others. G
Risk of injury
Make sure that no persons or animals ar e
in the manoeuvring range. Otherwise, they
could be injured.
Parktronic is an electronic parking aid. It indi-
cates visually and audibly the distance
between your vehicle and an object.
Parktronic is automatically activated when
you switch on the ignition and release the
handbrake.
Parktronic is deactivated at speeds above
18 km/h. It is reactivated at lower speeds.
Parktronic monitors the area around your
vehicle using six sensors in the front bumper
and four sensors in the rear bumper. 1
Sensors in the front bumpe r
Range of the sensors The sensors must be free of dirt, ice and
slush, otherwise they may not function cor-
rectly. Clean the sensors regularly, taking
care not to scratch or damage them
. Side vie
w Controls
* optional
171_AKB; 3; 4, en-GB
vpfaff7,
2007-11-13T10:50:25+01:00 - Seite 11
5
Page 136 of 273
Opening/closing the roof
133
damage the roof and the rear shelf of your
vehicle.
! When opening and closing the roof, make
sure that :
R there is sufficient upward clearance, as
the roof swings upwards
R there is sufficient clearance behind the
vehicle as the boot lid swings backwards
beyond the bumpe r
R the boot is only loaded to below the boot
separator
R the boot separator is not pushed up by
the load
R the boot separator is close d
R the boot lid is close d
R no roof rack is fitte d
R the outside temperature is above -15° C
R the roof is not dirty or we t
You will otherwise damage the roof and the
boot of your vehicle. Using the roof switch
G
Risk of injury
When opening or closing the roof, make
sure that nobody is trapped or injured by
moving parts such as the boot lid, the
hinged roof or the roof linkage .
If danger threatens, release the roof switch
immediately. The roof folding mechanism
stops immediately.
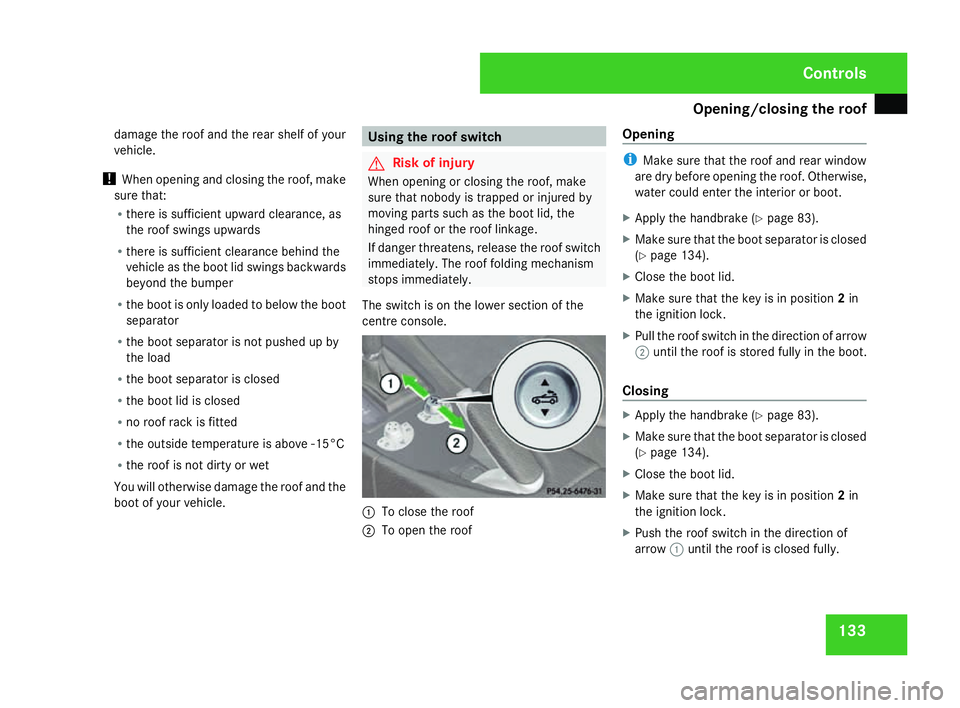
The switch is on the lower section of the
centre console. 1
To close the roof
2 To open the roof Opening i
Make sure that the roof and rear window
are dry before opening the roof. Otherwise ,
water could enter the interior or boot.
X Apply the handbrake (Y page 83).
X Make sure that the boot separator is closed
(Y page 134).
X Close the boot lid.
X Make sure that the key is in position 2in
the ignition lock .
X Pull the roof switch in the direction of arrow
2 until the roof is stored fully in the boot .
Closing X
Apply the handbrake (Y page 83).
X Make sure that the boot separator is closed
(Y page 134).
X Close the boot lid.
X Make sure that the key is in position 2in
the ignition lock .
X Push the roof switch in the direction of
arrow 1until the roof is closed fully. Controls
171_AKB; 3; 4, en-GB
vpfaff7,
2007-11-13T10:50:25+01:00 - Seite 133
Page 184 of 273
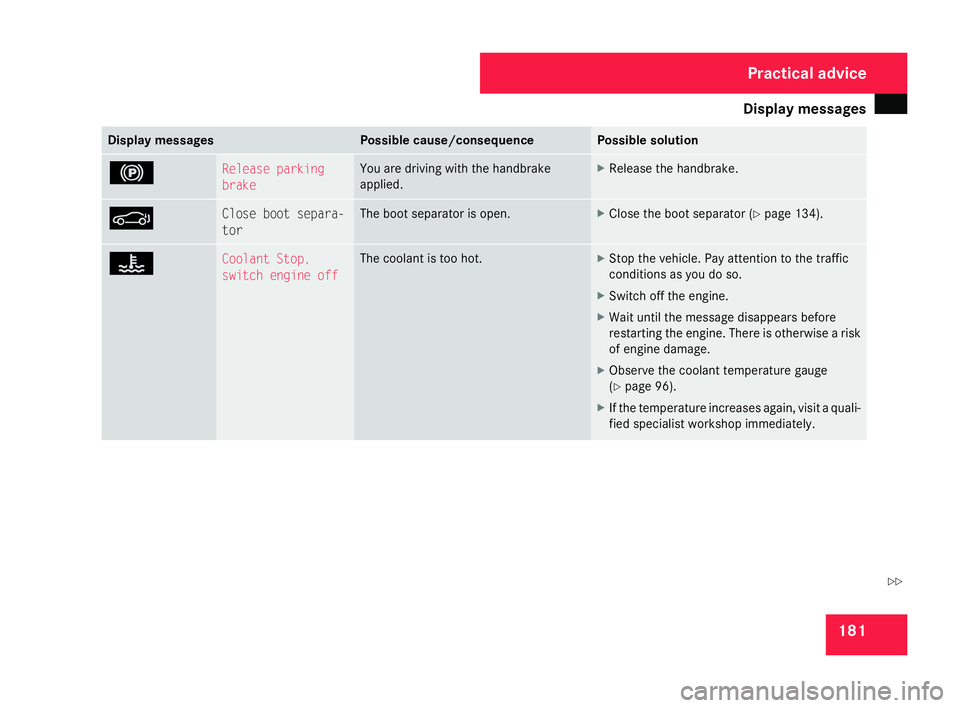
Display
messages 18
1 Display messages Possible cause/consequence Possible solution
! Release parking
brake You are driving with the handbrake
applied. X
Release the handbrake .M Close boot separa-
tor The boot separator is open. X
Close the boot separator (Y page 134). D Coolant Stop,
switch engine off The coolant is too hot. X
Stop the vehicle. Pay attention to the traffic
conditions as you do so.
X Switch off the engine.
X Wait until the message disappears before
restarting the engine. There is otherwise a risk
of engine damage.
X Observe the coolant temperature gauge
(Y page 96).
X If the temperature increases again, visit a quali-
fied specialist workshop immediately. Practical advice
171_AKB; 3; 4, en-GB
vpfaff7,
2007-11-13T10:50:25+01:00 - Seite 181 Z
Page 197 of 273
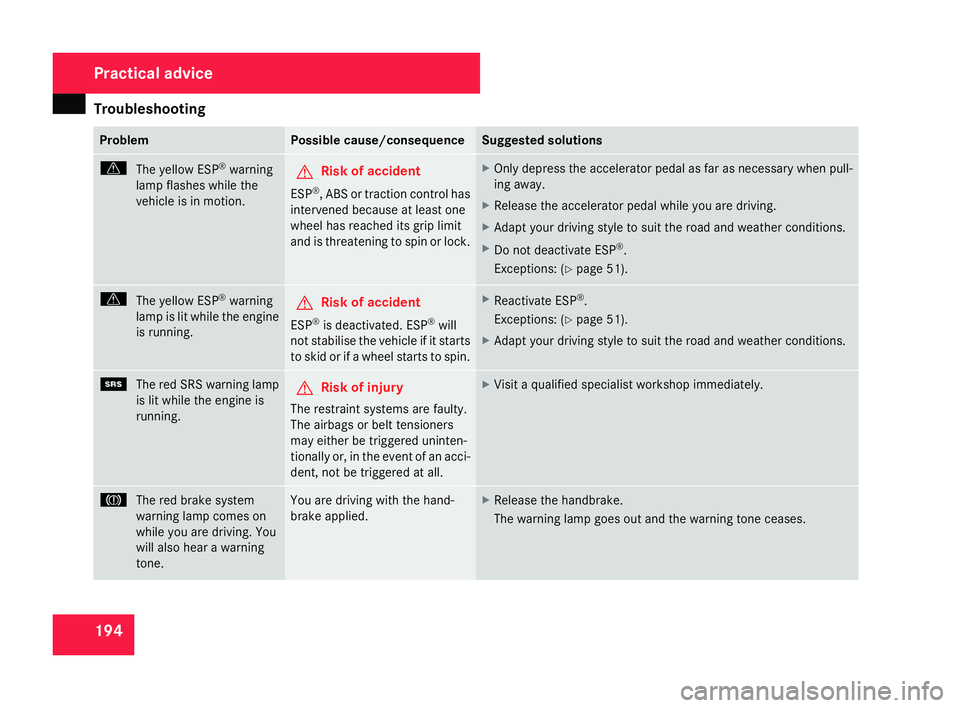
Troubleshooting
19
4 Problem Possible cause/consequence Suggested solutions
v
The yellow ESP ®
warning
lamp flashes while th e
vehicle is in motion. G
Risk of accident
ESP ®
, ABS or traction control has
intervened because at least one
wheel has reached its grip limit
and is threatening to spin or lock . X
Only depress the accelerator pedal as far as necessary when pull-
ing away.
X Release the accelerator pedal while you are driving.
X Adapt your driving style to suit the road and weather conditions.
X Do not deactivate ESP ®
.
Exceptions: (Y page 51). v
The yellow ESP ®
warning
lamp is lit while the engine
is running. G
Risk of accident
ESP ®
is deactivated. ES P®
will
not stabilise the vehicle if it start s
to skid or if a wheel starts to spin. X
Reactivate ES P®
.
Exceptions: (Y page 51).
X Adapt your driving style to suit the road and weather conditions. 1
The red SRS warning lamp
is lit while the engine is
running. G
Risk of injury
The restraint systems are faulty .
The airbags or belt tensioners
may either be triggered uninten-
tionally or, in the event of an acci-
dent, not be triggered at all. X
Visit a qualified specialist workshop immediately. 3
The red brake system
warning lamp comes on
while you are driving. You
will also hear a warning
tone. You are driving with the hand-
brake applied. X
Release the handbrake .
The warning lamp goes out and the warning tone ceases. Practical advice
171_AKB; 3; 4, en-GB
vpfaff7,
2007-11-13T10:50:25+01:00 - Seite 194