turn signal MERCEDES-BENZ SLK ROADSTER 2012 Owner's Manual
[x] Cancel search | Manufacturer: MERCEDES-BENZ, Model Year: 2012, Model line: SLK ROADSTER, Model: MERCEDES-BENZ SLK ROADSTER 2012Pages: 321, PDF Size: 6.9 MB
Page 259 of 321

Always have paintwork repairs carried out
at a qualified specialis
tworkshop.
! Do not use wash programs with a hot wax
treatment under any circumstances.
i The vehicle should preferably be washed
by hand using a soft sponge, car shampoo
and plenty of water.
i Use only insect remover and car shampoo
from the range of recommended and
approved Mercedes-Benz care products.
Cleaning the windows G
WARNING
Switch off the windscreen wipers and remove
the key from the ignition lock before cleaning
the windscreen or the wiper blades. On vehi-
cles with KEYLESS-GO, press the Start/Stop
button repeatedly until all indicator lamps in
the instrument cluster have gone off. The
windscreen wipers could otherwise move and
injure you.
X Clean the inside and outside of the win-
dows with a damp cloth and a cleaning
agent that is recommended and approved
by Mercedes-Benz.
! Do not use dry cloths, abrasive products,
solvents or cleaning agents containing sol-
vents to clean the inside of the windows.
Do not touch the insides of the windows
with hard objects, e.g. an ice scraper or
ring. There is otherwise a risk of damaging
the windows.
! Clean the water drainage channels of the
windscreen and the rear window at regular
intervals. Deposits such as leaves, petals
and pollen may under certain circumstan-
ces prevent water from draining away.T his
can lead to corrosion damage and damage
to electronic components. Cleaning the wiper blades G
WARNING
Switch off the windscreen wipers and remove
the key from the ignition lock before cleaning
the windscreen or the wiper blades. On vehi-
cles with KEYLESS-GO, press the Start/Stop
button repeatedly until all indicator lamps in
the instrument cluster have gone off. The
windscreen wipers could otherwise move and
injure you.
! Do not pull on the wiper blade. Otherwise,
the wiper blade could be damaged.
! Do not clean wiper blades too often and
do not rub them too hard. Otherwise, the
graphite coating could be damaged. This
could cause wiper noise.
X Fold the wiper arms away from the wind-
screen.
X Cleant he wiper blades carefully using a
damp cloth.
X Fold the windscreen wipers back again
before switching on the ignition.
! Hold the wiper arm securely when folding
back. The windscreen could be damaged if
the wiper arm hits against it suddenly.
Cleaning the exterior lighting !
Only use cleaning agents or cleaning
cloths that are suitable for plastic lenses.
Unsuitable cleaning agents or cleaning
cloths could scratch or damage the plastic
lenses of the exterior lighting.
X Cleant he plastic lenses of the exterior
lighting using a wet sponge and a mild
cleaning agent, e.g. Mercedes-Ben zcar
shampoo. Or clean the exterior lighting
with cleaning cloths.
Cleaning the mirror turn signal !
Only use cleaning agents or cleaning
cloths that are suitable for plastic lenses.
Unsuitable cleaning agents or cleaning 256
CareMaintenance and care
Page 260 of 321
cloths could scratch or damage the plastic
lenses of the mirror turn signals.
X Clea nthe plastic lenses of the mirror turn
signals using a wet sponge and a mild
cleaning agent, e.g. Mercedes-Ben zcar
shampoo. Cleaning cloths may be used as
well.
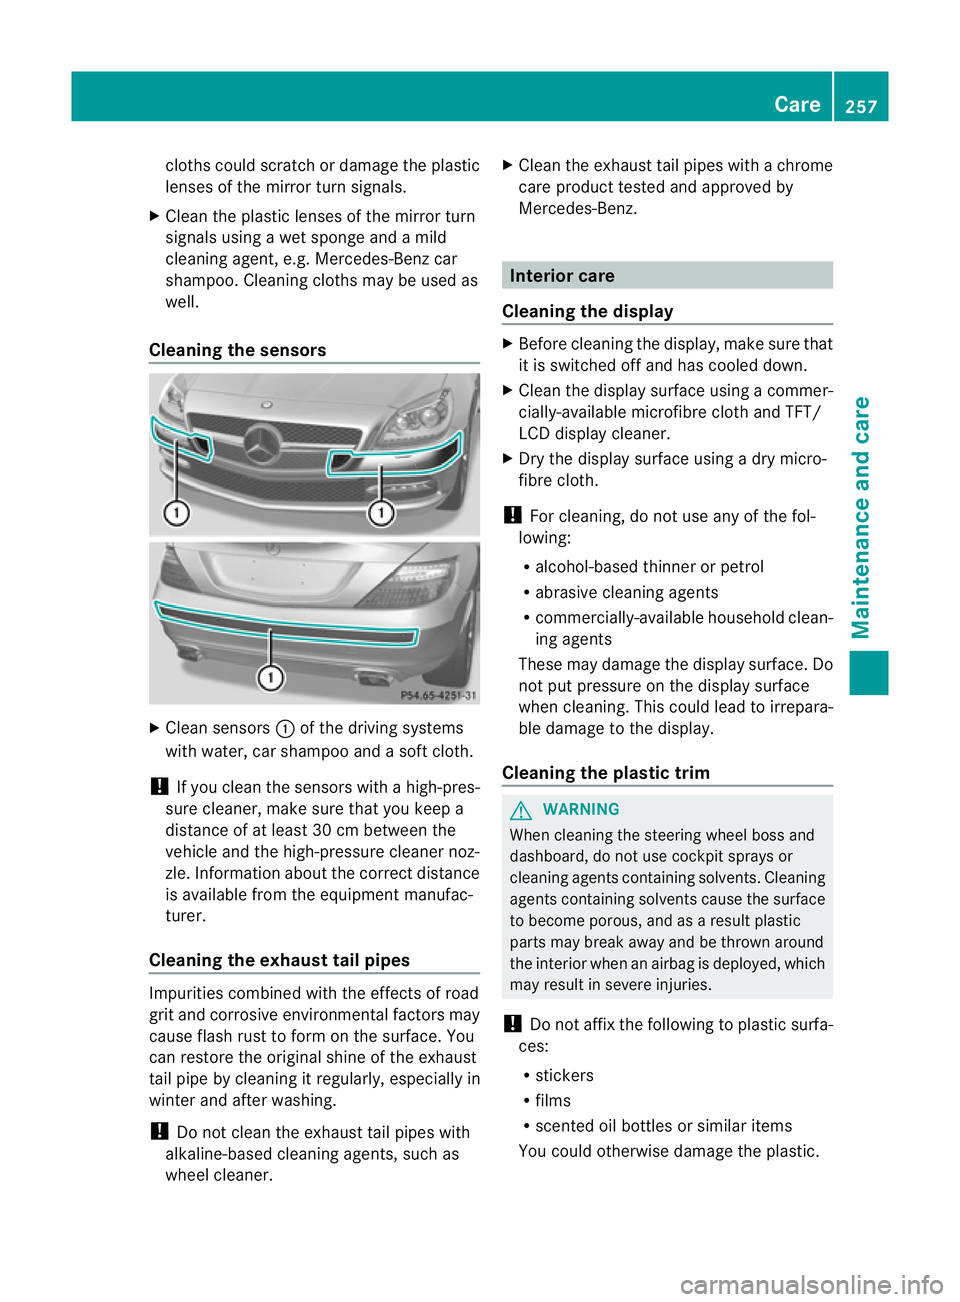
Cleaning the sensors X
Clean sensors :of the driving systems
with water, car shampoo and a sof tcloth.
! If you clean the sensors with a high-pres-
sure cleaner, make sure that you keep a
distance of at least 30 cm between the
vehicle and the high-pressure cleaner noz-
zle. Information about the correct distance
is available fro mthe equipment manufac-
turer.
Cleaning the exhaust tail pipes Impurities combined with the effects of road
grit and corrosive environmental factors may
cause flash rust to form on the surface. You
can restore the original shine of the exhaust
tail pipe by cleaning it regularly, especially in
winter and after washing.
! Do not clean the exhaust tail pipes with
alkaline-based cleaning agents, such as
wheel cleaner. X
Cleant he exhaust tail pipes with a chrome
care product tested and approved by
Mercedes-Benz. Interior care
Cleaning the display X
Before cleaning the display, make sure that
it is switched off and has cooled down.
X Cleant he display surface using a commer-
cially-available microfibre cloth and TFT/
LCD display cleaner.
X Dry the display surface using a dry micro-
fibre cloth.
! For cleaning, do not use any of the fol-
lowing:
R alcohol-based thinner or petrol
R abrasive cleaning agents
R commercially-available household clean-
ing agents
These may damage the display surface. Do
not put pressure on the display surface
when cleaning. This could lead to irrepara-
ble damage to the display.
Cleaning the plastic trim G
WARNING
When cleaning the steering wheel boss and
dashboard, do not use cockpit sprays or
cleaning agents containing solvents. Cleaning
agents containing solvents cause the surface
to become porous, and as aresult plastic
parts may break away and be thrown around
the interior when an airbag is deployed, which
may result in severe injuries.
! Do not affix the following to plastic surfa-
ces:
R stickers
R films
R scented oil bottles or similar items
You could otherwise damage the plastic. Care
257Maintenance and care Z
Page 283 of 321

X
Press the mark on cover :inwards in the
direction of the arrow.
X Take cover :off the opening.
X Screw the towing eye in clockwise to the
stop and tighten it.
Removing the towing eye X
Loosen the towing eye and unscrew it.
X Attach cover :to the bumper and press
until it engages.
X Place the towing eye in the vehicle tool kit. Towing the vehicle with the rear axle
raised
When towing your vehicle with the rear axle
raised, it is importan tthat you observe the
safety instructions (Y page 278).
! The ignition must be switched off if you
are towing the vehicle with the rear axle
raised. Intervention by ESP ®
could other-
wise damage the brake system. X
Switch on the hazard warning lamps
(Y page 103).
X Turn the key in the ignition lock to position
0and remove the key from the ignition
lock.
X When leaving the vehicle, take the key or
the KEYLESS-GO key with you. Towing the vehicle with both axles on
the ground
It is important that you observe the safety
instructions when towing away your vehicle
(Y page 278). G
WARNING
The power assistance for the steering and the
brake force booster do not work when the
engine is not running. You will then need
much more effort to brake and steer the vehi-
cle. Adapt your style of driving accordingly.
X Switch on the hazard warning lamps
(Y page 103).
i When towing with the hazard warning
lamps switched on, use the combination
switch as usual to signal achange of direc-
tion. In this case, only the turn signals for
the desired direction flash. When the com-
bination switch is reset, the hazard warning
lamps start flashing again.
X Turn the key to position 2in the ignition
lock.
X When the vehicle is stationary, depress the
brake pedal and keep it depressed.
X Vehicles with manual transmission:
depress the clutch pedal.
X Engage neutral.
or
X Vehicles with automatic transmission:
shift the automatic transmission to posi-
tion N.
X Release the brake pedal.
X Release the parking brake. 280
Towing and tow-startingBreakdown assistance