oil pressure MERCEDES-BENZ SLK ROADSTER 2012 Owners Manual
[x] Cancel search | Manufacturer: MERCEDES-BENZ, Model Year: 2012, Model line: SLK ROADSTER, Model: MERCEDES-BENZ SLK ROADSTER 2012Pages: 321, PDF Size: 6.9 MB
Page 7 of 321
1, 2, 3 ...
12 Vsocket
see Socket A
ABS (Anti-lock Braking System) Display message ............................ 200
Function/notes ................................ 54
Important safety notes ....................54
Warning lamp ................................. 226
Activating/deactivating air-recir-
culation mode .................................... 121
Activating/deactivating cooling
with air dehumidification .................117
Active light function .........................104
Active Service Syste mPLUS
see ASSYS TPLUS service interval
display
ADAPTIVE BRAKE .................................59
Adaptive brake lamps .........................56
Additional speedometer ...................191
Additives (engine oil) ........................308
Adjusting the headlamp range .........102
Airbag Headbag .......................................... 43
Airbags
Front airbag (driver, front
passenger )....................................... 41
Important safety guidelines .............40
Sidebag ............................................ 42
Triggering ......................................... 39
Air-conditioning system
see Climate control
AIRGUIDE ............................................. 84
Air pressure see Tyre pressure
AIRSCARF
Problem (malfunction) .....................92
Setting the vents ........................... 123
Switching on/off .............................. 91
Airv ents
Important safet ynotes .................. 122
Setting ........................................... 122
Setting the AIRSCARF vents ..........123
Setting the centre air vents ...........123 Setting the side air vents
...............123
Switching AIRSCARF on/off ............91
Alarm system
see ATA (Anti-Theft Alarm system)
Alertness Assistant
see ATTENTION ASSIST
Ambient lighting (on-board com-
puter) ................................................. .192
AMG menu (on-board computer) .....195
Anti-glare film .................................... 246
Anti-loc kBraking System
see ABS (Anti-lock Braking System)
Anti-Theft Alarm system
see ATA (Anti-Theft Alarm system)
Aquaplaning ....................................... 150
Ashtray ............................................... 240
Assistance menu (on-board com-
puter) ................................................. .189
ASSYST PLUS see ASSYST PLUS service interval
display
ASSYST PLUS service interval dis-
play
Displaying service messages .........253
Hiding service messages ...............253
Notes ............................................. 253
Service messages ..........................252
ATA (Anti-Theft Alarm system)
Activating/deactivating ...................61
Function .......................................... .61
Interior motion sensor .....................62
Switching off the alarm ....................61
Tow-away protection ........................ 62
ATTENTIO NASSIST
Activating/deactivating .................190
Display message ............................ 213
Function/notes ............................. 173
Audio menu (on-board computer) ....186
Authorised workshop see Qualified specialist workshop
AUTO lights
Display message ............................ 211
see Lights
Automatic engine start (ECO start/
stop function) .................................... 132
Automatic engine switch-off (ECO
start/stop function) ..........................1314
Index
Page 20 of 321
Summer opening
see Convenience opening feature
Summer tyres .................................... 288
Sun visor ............................................ 240
Supplement Restraint System see SRS (Supplemental Restraint
System)
Surround lighting (on-board com-
puter) ................................................. .192
Switching off the alarm (ATA) ............61 T
Tail lamps Display message ............................ 209
see Lights
Tank
see Fuel tank
Technical data
Notes ............................................. 300
Tyres/wheels ................................. 295
Vehicle data ................................... 310
Telephone
Accepting acall............................. 188
Display message ............................ 221
Menu (on-board computer) ............187
Number from the phone book ....... .188
Redialling ....................................... 188
Rejecting/ending acall................. 188
Telephone compartment ................237
Temperature
Coolant .......................................... 178
Coolant (on-board computer) ......... 195
Engine oil (on-board computer) ...... 195
Outside temperature ..................... .179
Setting (climate control) ................118
TEMPOMAT
Function/notes ............................. 151
Theft-deterrent system
ATA (Anti-Theft Alarm system) .........61
Immobiliser ...................................... 61
Time
see Separate Owner' smanual
Timing (RACETIMER) .........................196
TIREFIT kit .......................................... 263
Total distance recorder ....................183
Tow-away protection ..........................62Towing
Important safety notes ..................278
With the rear axle raised ................280
Towing away
Fitting the towing eye. ...................279
Removing the towing eye. ..............280
With both axles on the ground .......280
Tow-starting
Emergency engine starting ............281
Fitting the towing eye. ...................279
Important safety notes ..................278
Removing the towing eye. ..............280
Transmission
see Automatic transmission
see Manual transmission
Transporting the vehicle ..................281
Trim pieces (cleaning instructions) .258
Trip computer (on-board com-
puter) ................................................. .183
Trip meter Calling up ....................................... 183
Resetting (on-board computer) ......184
Trip odometer
see Trip meter
Turn signals
Changing bulbs (front) ...................108
Switching on/off ........................... 103
Two-way radio
Frequencies ................................... 301
Installatio n..................................... 301
Transmission output (maximum) .... 301
Type identification plate
see Vehicle identification plate
Tyre pressure
Calling up (on-board computer) .....292
Display message ............................ 217
Not reached (TIREFIT) ....................265
Pressure loss warning ....................291
Reached (TIREFIT) ..........................265
Recommended ............................... 289
Tyre pressure monitor
Function/notes ............................. 292
Restarting ...................................... 293
Warning lamp ................................. 233
Tyres
Checking ........................................ 287
Direction of rotatio n...................... 295 Index
17
Page 258 of 321
the correct distance is available fro
mthe
equipment manufacturer.
Move the high-pressure cleaner nozzle
around when cleaning your vehicle.
Do not aim directly at any of the following:
R tyres
R door gaps, roof gaps, joints etc.
R electrical components
R battery
R connectors
R lights
R seals
R trim elements
R ventilation slots
Damaged seals or electrical components
can lead to leaks or failures.
! Do not use high-pressure cleaning equip-
ment to clean the tank recess when it is
open. This can damage the seals or other
components.
Cleaning the wheels !
Do not use acidic wheel cleaning products
to remove brake dust. This could damage
wheel bolts and brake components.
! Do not park up the vehicle for an extended
period straight after cleaning it, particularly
after having cleaned the wheels with wheel
cleaner. Wheel cleaners could cause
increased corrosion of the brake discs and
brake pads/linings. For this reason, you
should drive for a few minutes after clean-
ing. Braking heats the brake discs and the
brake pads/linings, thus drying them. The
vehicle can then be parked up.
Cleaning the paintwork Scratches, corrosive deposits, areas affected
by corrosion and damage caused by inade-
quate care cannot always be completely
repaired. In such cases, visit a qualified spe-
cialist workshop. X
Remove impurities immediately, where
possible, whilst avoiding rubbing too hard.
X Soak insect remains with insect remover
and rinse off the treated areas afterwards.
X Soak bird droppings with water and rinse
off the treated areas afterwards.
X Remove coolant, brake fluid, tree resin,
oils, fuels and greases by rubbing gently
with a cloth soaked in petroleum ether or
lighter fluid.
X Use tar remover to remove tar stains.
X Use silicone remover to remove wax.
! Do not affix:
R stickers
R films
R magnetic plates or similar items
to painted surfaces. You could otherwise
damage the paintwork.
Care and treatment of matt paintwork If your vehicle has a clear matt finish, observe
the following instructions in order to avoid
damage to the paintwork due to incorrect
care.
These notes also apply to light-alloy wheels
with a clear matt finish.
!
Never polish the vehicle or the light alloy
wheels. Polishing makes the paintwork
shiny.
! The following may cause the paint to
become shiny and thus reduce the matt
effect:
R Vigorous rubbing with unsuitable mate-
rials.
R Frequent use of car washes.
R Washing the vehicle in direct sunlight.
! Never use paint cleaner, buffing or pol-
ishing products, or gloss preserver, e.g.
wax. These products are only suitable for
high-gloss surfaces. Their use on vehicles
with matt finish leads to considerable sur-
face damage (shiny, spotted areas). Care
255Maintenance and care Z
Page 260 of 321
cloths could scratch or damage the plastic
lenses of the mirror turn signals.
X Clea nthe plastic lenses of the mirror turn
signals using a wet sponge and a mild
cleaning agent, e.g. Mercedes-Ben zcar
shampoo. Cleaning cloths may be used as
well.
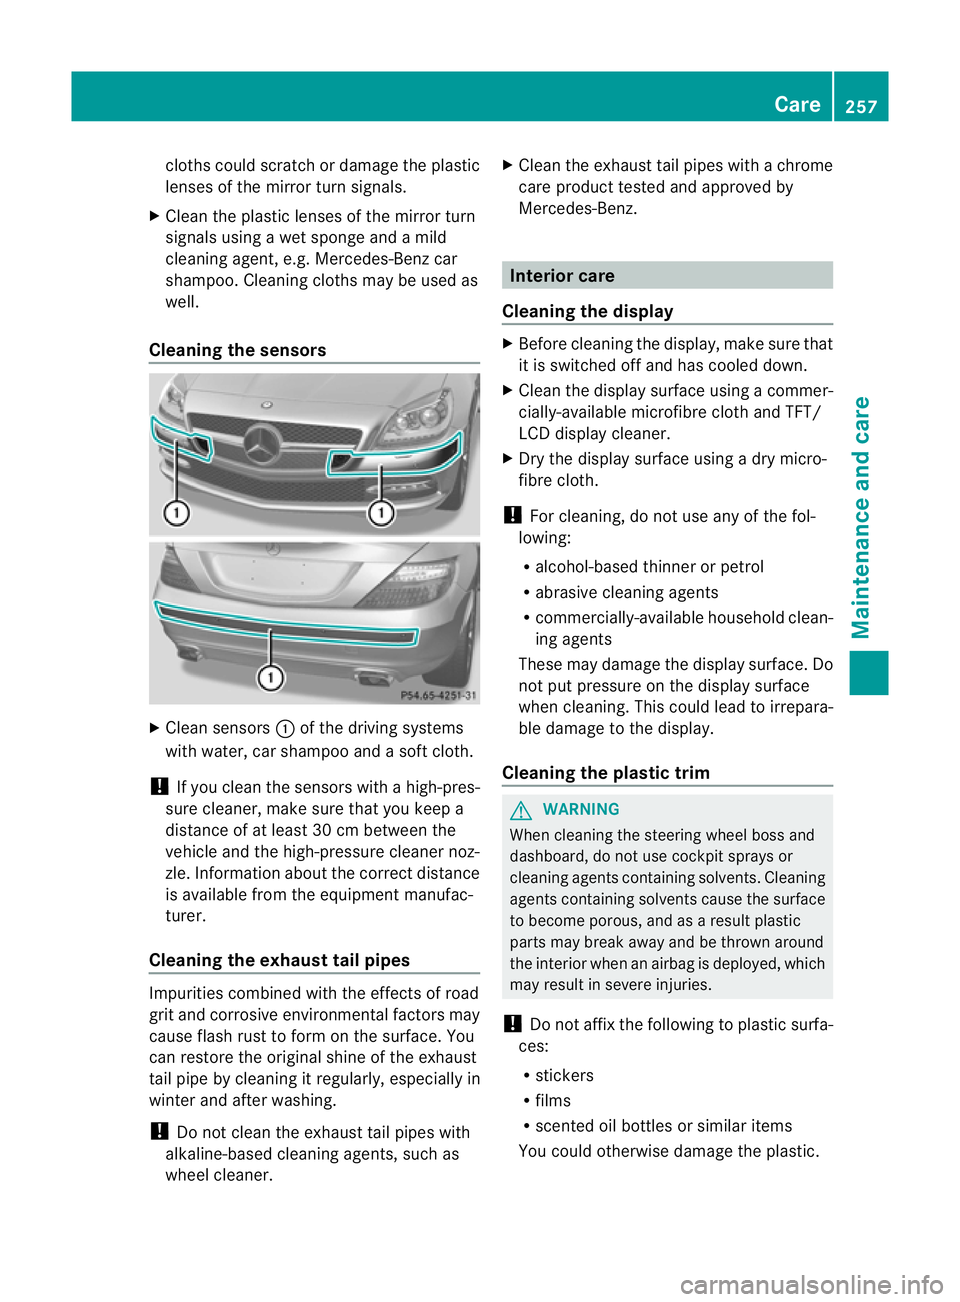
Cleaning the sensors X
Clean sensors :of the driving systems
with water, car shampoo and a sof tcloth.
! If you clean the sensors with a high-pres-
sure cleaner, make sure that you keep a
distance of at least 30 cm between the
vehicle and the high-pressure cleaner noz-
zle. Information about the correct distance
is available fro mthe equipment manufac-
turer.
Cleaning the exhaust tail pipes Impurities combined with the effects of road
grit and corrosive environmental factors may
cause flash rust to form on the surface. You
can restore the original shine of the exhaust
tail pipe by cleaning it regularly, especially in
winter and after washing.
! Do not clean the exhaust tail pipes with
alkaline-based cleaning agents, such as
wheel cleaner. X
Cleant he exhaust tail pipes with a chrome
care product tested and approved by
Mercedes-Benz. Interior care
Cleaning the display X
Before cleaning the display, make sure that
it is switched off and has cooled down.
X Cleant he display surface using a commer-
cially-available microfibre cloth and TFT/
LCD display cleaner.
X Dry the display surface using a dry micro-
fibre cloth.
! For cleaning, do not use any of the fol-
lowing:
R alcohol-based thinner or petrol
R abrasive cleaning agents
R commercially-available household clean-
ing agents
These may damage the display surface. Do
not put pressure on the display surface
when cleaning. This could lead to irrepara-
ble damage to the display.
Cleaning the plastic trim G
WARNING
When cleaning the steering wheel boss and
dashboard, do not use cockpit sprays or
cleaning agents containing solvents. Cleaning
agents containing solvents cause the surface
to become porous, and as aresult plastic
parts may break away and be thrown around
the interior when an airbag is deployed, which
may result in severe injuries.
! Do not affix the following to plastic surfa-
ces:
R stickers
R films
R scented oil bottles or similar items
You could otherwise damage the plastic. Care
257Maintenance and care Z
Page 298 of 321
Direction of rotation
Tyres with a specified direction of rotation
have additional benefits, e.g. if there is a risk
of aquaplaning .You will only gain these ben-
efits if the correct direction of rotation is
observed.
An arrow on the sidewall of the tyre indicates
its correct direction of rotation.
You may fit a spare wheel/emergency spare
wheel against the direction of rotation.
Observe the time restriction on use as well as
the speed limitation specified on the emer-
gency spare wheel/spare wheel. Storing wheels
Store wheels that are not being used in a cool,
dry and preferably dark place. Protec tthe
tyres against oil, grease, petrol and diesel. Cleaning the wheels
G
WARNING
Do not use high-pressure cleaners with circu-
lar-jet nozzles (dirt grinders) to clean your
vehicle, in particular the tyres. You could oth-
erwise damage the tyres and cause an acci-
dent. Wheel and tyre combinations
Points to remember
! For safety reasons, Mercedes-Ben zrec-
ommends that you only use tyres and
wheels which have been approved by
Mercedes-Benzs pecifically for your vehi-
cle. These are specially adapted to the control
systems, such as ABS or ESP
®
and are
marked as follows:
R MO =Mercedes-BenzO riginal
R MOE =Mercedes-BenzO riginal Extended
(tyres featuring run-flat characteristics)
R MO1 =Mercedes-BenzO riginal (only cer-
tain AMG tyres)
Mercedes-Benz Original Extended tyres
may only be used on wheels that have been
specifically approved by Mercedes-Benz.
Only use tyres, wheels or accessories tes-
ted and approved by Mercedes-Benz. Cer-
tain characteristics, e.g. handling, vehicle
noise emissions or fuel consumption, may
otherwise be adversely affected. In addi-
tion, when driving with aload, tyre dimen-
sion variations could cause the tyres to
come into contact with the bodywork and
axle components.T his could result in dam-
age to the tyres or the vehicle.
Mercedes-Ben zaccepts no liability for
damage resulting from the use of tyres,
wheels or accessories othe rthan those tes-
ted and approved.
Further information about wheels, tyres
and approved combinations can be
obtained from any qualified specialist
workshop.
! Large wheels: the lower the section width
for a certain wheel size, the lower the ride
comfort is on poor road surfaces. Roll com-
fort and suspension comfort are reduced
and the risk of damage to the wheels and
tyres as a result of driving over obstacles
increases.
i You will find a table of tyre pressures on
the inside of your vehicle's fuel filler flap.
For further information on tyre pressure,
see (Y page 289). Check tyre pressures
regularly, and only when the tyres are cold. Wheel and tyre combinations
295Wheels and tyres Z