brake MERCEDES-BENZ SLK ROADSTER 2014 Owner's Manual
[x] Cancel search | Manufacturer: MERCEDES-BENZ, Model Year: 2014, Model line: SLK ROADSTER, Model: MERCEDES-BENZ SLK ROADSTER 2014Pages: 357, PDF Size: 10.22 MB
Page 66 of 357
ESP
®
monitors driving stability and traction,
i.e. power transmission between the tyres
and the road surface.
If ESP ®
detects that the vehicle is deviating
from the direction desired by the driver, one
or more wheels are braked to stabilise the
vehicle. The engine output is also modified to keep the vehicle on the desired course within
physical limits. ESP ®
assists the driver when
pulling away on wet or slippery roads. ESP ®
can also stabilise the vehicle during braking.
ETS (Electronic Traction System) i
Observe the "Important safety notes" sec-
tion (Y page 60).
ETS traction control is part of ESP ®
.
ETS brakes the drive wheels individually if
they spin. This enables you to pull away and
accelerate on slippery surfaces, for example
if the road surface is slippery on one side. In
addition, more drive torque is transferred to
the wheel or wheels with traction.
ETS remains active when you deactivate
ESP ®
.
i AMG vehicles:
your vehicle may be
equipped with 20-inch tyres on the rear
axle. If replaced with a 19-inch tyre, ETS
may intervene noticeably sooner for the
first few kilometres. After approximately
10 km ETS will function as usual again.
Information on the dimensions and types of
wheels and tyres for your vehicle can be
found under "Wheel/tyre combinations"
(Y page 328).
Important safety notes G
WARNING
If ESP ®
is malfunctioning, ESP ®
is unable to
stabilise the vehicle. In addition, other driving
safety systems are switched off. This increa-
ses the risk of skidding and an accident.
Drive on carefully. Have ESP ®
checked at a
qualified specialist workshop. !
When testing the electric parking brake
on a braking dynamometer, switch off the
ignition. Application of the brakes by ESP ®
may otherwise destroy the brake system.
When towing your vehicle with the rear axle
raised, observe the notes on
ESP ®
(Y page 308).
ESP ®
is deactivated if the åwarning lamp
in the instrument cluster lights up continu-
ously when the engine is running.
If the ÷ warning lamp and the åwarn-
ing lamp are lit continuously, ESP ®
is not
available due to a malfunction.
Observe the information on warning lamps
(Y page 254) and display messages which
may be shown in the instrument cluster
(Y page 223).
i Only use wheels with the recommended
tyre sizes. Only then will ESP ®
function
properly.
Characteristics of ESP ® General notes
If the
÷ ESP warning lamp goes out before
beginning the journey, ESP ®
is automatically
active.
If ESP ®
intervenes, the ÷ESP®
warning
lamp flashes in the instrument cluster.
If ESP ®
intervenes:
X Do not deactivate ESP ®
under any circum-
stances.
X When pulling away, only depress the accel-
erator pedal as far as is necessary.
X Adapt your driving style to suit the prevail-
ing road and weather conditions.
ECO start/stop function
The ECO start/stop function switches the
engine off automatically if the vehicle stops
moving. When pulling away again, the engine
starts automatically. ESP ®
remains in its pre-
viously selected status. Example:if ESP®
was deactivated before the engine was Driving safety systems
63Safety Z
Page 67 of 357
switched off, ESP
®
remains deactivated when
the engine is switched on again.
Deactivating/activating ESP ®
(except
AMG vehicles) Important safety notes
i Observe the "Important safety notes" sec-
tion (Y page 60).
You can select between the following states
of ESP ®
:
R ESP ®
is activated
R ESP ®
is deactivated G
WARNING
If you deactivate ESP ®
, ESP ®
no longer sta-
bilises the vehicle. There is an increased risk
of skidding and an accident.
Only deactivate ESP ®
in the situations descri-
bed in the following.
It may be best to deactivate ESP ®
in the fol-
lowing situations:
R when using snow chains
R in deep snow
R on sand or gravel
i Activate ESP ®
as soon as the situations
described above no longer apply. ESP ®
will
otherwise not be able to stabilise the vehi-
cle if the vehicle starts to skid or a wheel
starts to spin.
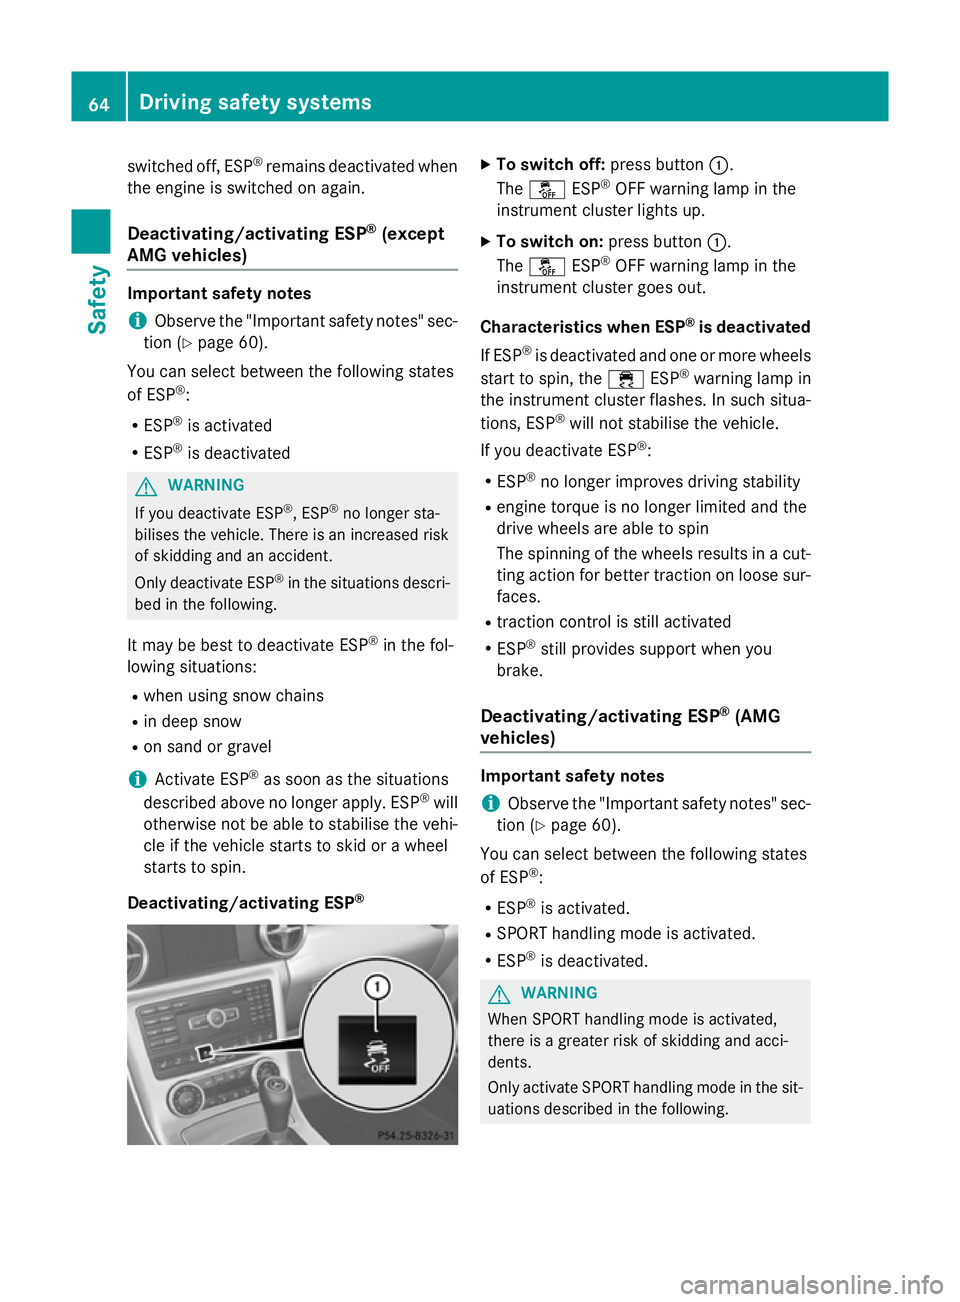
Deactivating/activating ESP ® X
To switch off: press button:.
The å ESP®
OFF warning lamp in the
instrument cluster lights up.
X To switch on: press button:.
The å ESP®
OFF warning lamp in the
instrument cluster goes out.
Characteristics when ESP ®
is deactivated
If ESP ®
is deactivated and one or more wheels
start to spin, the ÷ESP®
warning lamp in
the instrument cluster flashes. In such situa-
tions, ESP ®
will not stabilise the vehicle.
If you deactivate ESP ®
:
R ESP ®
no longer improves driving stability
R engine torque is no longer limited and the
drive wheels are able to spin
The spinning of the wheels results in a cut-
ting action for better traction on loose sur- faces.
R traction control is still activated
R ESP ®
still provides support when you
brake.
Deactivating/activating ESP ®
(AMG
vehicles) Important safety notes
i Observe the "Important safety notes" sec-
tion (Y page 60).
You can select between the following states
of ESP ®
:
R ESP ®
is activated.
R SPORT handling mode is activated.
R ESP ®
is deactivated. G
WARNING
When SPORT handling mode is activated,
there is a greater risk of skidding and acci-
dents.
Only activate SPORT handling mode in the sit- uations described in the following. 64
Driving safety systemsSafety
Page 68 of 357
G
WARNING
If you deactivate ESP ®
, ESP ®
no longer sta-
bilises the vehicle. There is an increased risk
of skidding and an accident.
Only deactivate ESP ®
in the situations descri-
bed in the following.
In the following situations, it may be better to activate SPORT handling mode or deactivate
ESP ®
:
R when using snow chains
R in deep snow
R on sand or gravel
R on specially designated roads when the
vehicle's own oversteering and understeer-
ing characteristics are desired
Driving in SPORT handling mode or without
ESP ®
requires an extremely qualified and
experienced driver.
i Activate ESP ®
as soon as the situations
described above no longer apply. ESP ®
will
otherwise not be able to stabilise the vehi-
cle if the vehicle starts to skid or a wheel
starts to spin.
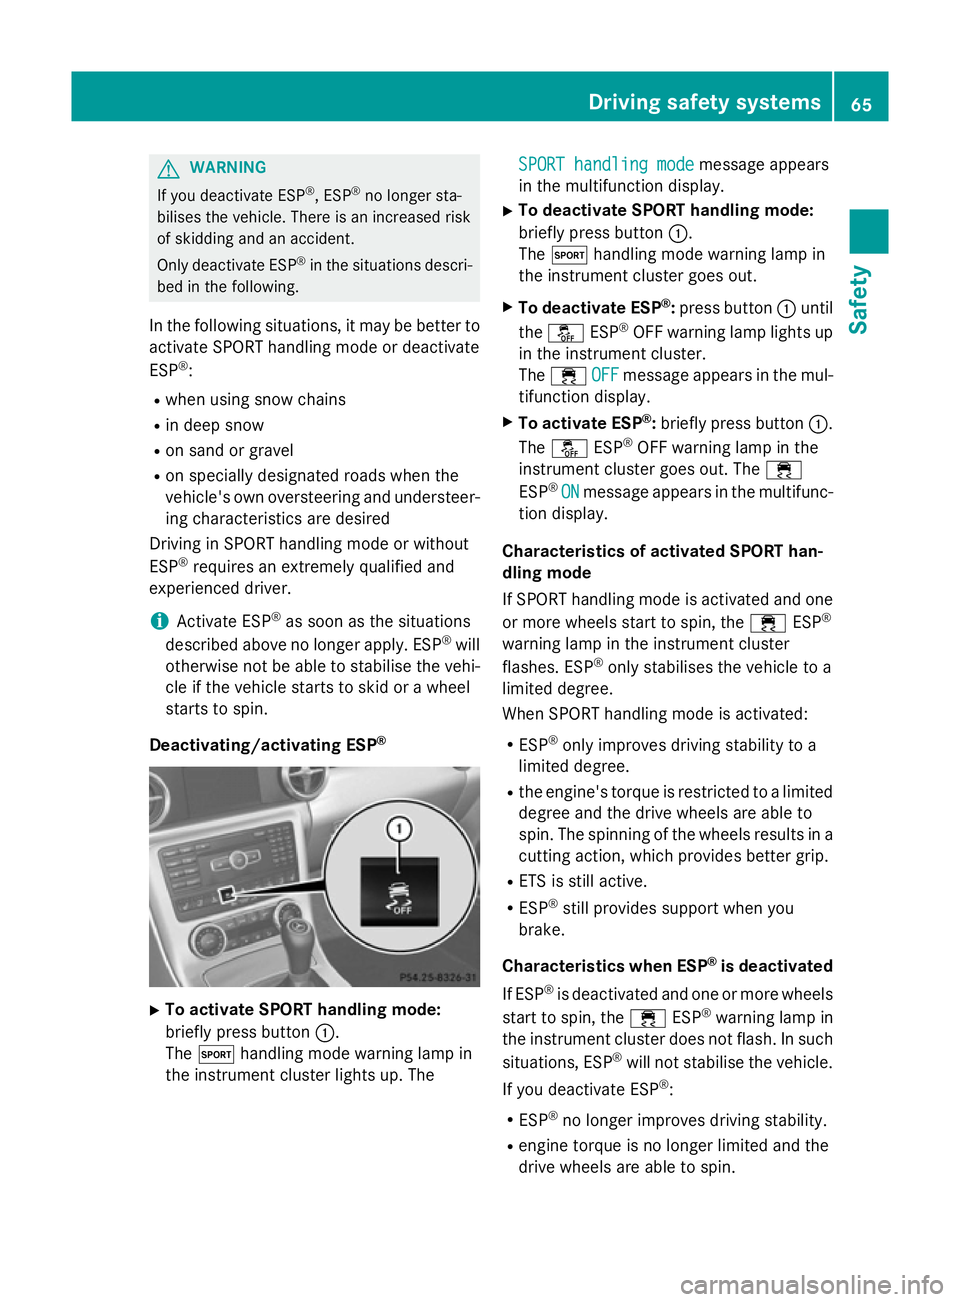
Deactivating/activating ESP ®X
To activate SPORT handling mode:
briefly press button :.
The M handling mode warning lamp in
the instrument cluster lights up. The SPORT handling mode
SPORT handling mode message appears
in the multifunction display.
X To deactivate SPORT handling mode:
briefly press button :.
The M handling mode warning lamp in
the instrument cluster goes out.
X To deactivate ESP ®
:press button :until
the å ESP®
OFF warning lamp lights up
in the instrument cluster.
The ÷ OFF OFFmessage appears in the mul-
tifunction display.
X To activate ESP ®
:briefly press button :.
The å ESP®
OFF warning lamp in the
instrument cluster goes out. The ÷
ESP ®
ON
ON message appears in the multifunc-
tion display.
Characteristics of activated SPORT han-
dling mode
If SPORT handling mode is activated and one or more wheels start to spin, the ÷ESP®
warning lamp in the instrument cluster
flashes. ESP ®
only stabilises the vehicle to a
limited degree.
When SPORT handling mode is activated:
R ESP ®
only improves driving stability to a
limited degree.
R the engine's torque is restricted to a limited
degree and the drive wheels are able to
spin. The spinning of the wheels results in a cutting action, which provides better grip.
R ETS is still active.
R ESP ®
still provides support when you
brake.
Characteristics when ESP ®
is deactivated
If ESP ®
is deactivated and one or more wheels
start to spin, the ÷ESP®
warning lamp in
the instrument cluster does not flash. In such
situations, ESP ®
will not stabilise the vehicle.
If you deactivate ESP ®
:
R ESP ®
no longer improves driving stability.
R engine torque is no longer limited and the
drive wheels are able to spin. Driving safety systems
65Safety Z
Page 69 of 357
The spinning of the wheels results in a cut-
ting action for better traction on loose sur-faces.
R traction control is still activated.
R PRE-SAFE ®
is no longer available; nor is it
activated if you brake firmly with assis-
tance from ESP ®
.
R PRE-SAFE ®
Brake is no longer available; it
is also not activated if you brake firmly with
assistance from ESP ®
.
R ESP ®
still provides support when you
brake. EBD (electronic brake force distribu-
tion)
General notes EBD monitors and controls the brake pres-
sure on the rear wheels to improve driving
stability while braking.
Important safety notes i
Observe the "Important safety notes" sec-
tion for driving safety systems (Y page 60).G
WARNING
If EBD has malfunctioned, the rear wheels can still lock, e.g. under full braking. This increa-
ses the risk of skidding and an accident.
You should therefore adapt your driving style
to the different handling characteristics. Have the brake system checked at a qualified spe-
cialist workshop.
Observe information regarding indicator and
warning lamps (Y page 252) as well as dis-
play messages (Y page 225).ADAPTIVE BRAKE
i Observe the "Important safety notes" sec-
tion (Y page 60).
ADAPTIVE BRAKE enhances braking safety
and offers increased braking comfort. In addi- tion to the braking function, ADAPTIVE BRAKE
also has the HOLD function (Y page 183) and
hill start assist (Y page 145). PRE-SAFE
®
Brake
General notes i
Observe the "Important safety notes" sec-
tion (Y page 60).
PRE-SAFE ®
Brake is only available on vehicles
with DISTRONIC PLUS.
For PRE-SAFE ®
Brake to assist you when driv-
ing, the radar sensor system must be opera-
tional.
With the help of the radar sensor system,
PRE-SAFE ®
Brake can detect obstacles that
are in front of your vehicle for an extended
period of time.
PRE-SAFE ®
Brake can help you to minimise
the risk of a collision with a vehicle ahead, and reduce the effects of such a collision. If PRE-
SAFE ®
Brake has detected a risk of collision,
you will be warned visually and acoustically as
well as by automatic braking. PRE-SAFE ®
Brake cannot prevent a collision without your intervention.
Important safety notes G
WARNING
PRE-SAFE ®
Brake will initially brake your vehi-
cle by a partial application of the brakes if a
danger of collision is detected. There may be
a collision unless you also brake. Automatic
emergency braking cannot prevent a colli-
sion. There is a risk of an accident.
Always apply the brakes yourself and try to
take evasive action. G
WARNING
PRE-SAFE ®
Brake cannot always clearly iden-
tify objects and complex traffic conditions. 66
Driving safety systemsSafety
Page 70 of 357
In these cases, PRE-SAFE
®
Brake may:
R give an unnecessary warning and then
brake the vehicle
R neither give a warning nor intervene
There is a risk of an accident.
Always pay particular attention to the traffic
situation and be ready to brake, especially if
PRE-SAFE ®
Brake warns you. Terminate the
intervention in a non-critical driving situation.
In order to maintain the appropriate distance
to the vehicle in front and thus prevent a col- lision, you must apply the brakes yourself. G
WARNING
PRE-SAFE ®
Brake does not react:
R to people or animals
R to oncoming vehicles
R to crossing traffic
R when cornering
As a result, PRE-SAFE ®
Brake may neither
give warnings nor intervene in all critical sit-
uations. There is a risk of an accident.
Always pay careful attention to the traffic sit-
uation and be ready to brake.
In the event of snowfall or heavy rain, detec-
tion can be impaired.
Detection by the radar sensor system is also
impaired in the event of:
R dirt on the sensors or obscured sensors
R interference by other radar sources
R strong radar reflections, for example, in
multi-storey car parks
R a narrow vehicle travelling in front, e.g. a
motorcycle
R a vehicle travelling in front on a different
line
Following damage to the front end of the vehi-
cle, have the radar sensor settings and oper- ation checked at a qualified specialist work-
shop. This also applies to collisions at slow
speeds where there is no visible damage to
the front of the vehicle. Function X
To activate/deactivate: activate or deac-
tivate PRE-SAFE ®
Brake in the on-board
computer (Y page 211).
Vehicles with a black and white multi-
function display: when PRE-SAFE®
Brake
is activated, the Äsymbol appears in
the status overview in the multifunction
display.
Vehicles with a colour multifunction
display: when PRE-SAFE ®
Brake is deacti-
vated, the æsymbol appears in the
assistance graphic in the multifunction dis- play.
This function will issue a warning if:
R at a speed of approximately 30 km/h or
higher, the distance maintained to the vehi-
cle travelling in front is insufficient for sev-
eral seconds.
The · distance warning lamp then lights
up in the instrument cluster.
R at a speed of approximately 7 km/h or
higher, you rapidly approach a vehicle in
front.
An intermittent warning tone will then
sound and the ·distance warning lamp
will light up in the instrument cluster.
X Brake immediately to defuse the situation.
or X Take evasive action provided it is safe to do
so.
The PRE-SAFE ®
Brake function can also brake
the vehicle automatically under the following
conditions:
R the driver and front passenger have their
seat belts fastened
and
R the vehicle speed is between approx-
imately 7 km/h and 200 km/h
Up to a speed of approximately 70 km/h,
PRE-SAFE ®
Brake can also detect stationary
objects. Examples of stationary objects are
stopped or parked vehicles. Driving safety systems
67Safety Z
Page 71 of 357
i
If there is an increased risk of collision,
preventive passenger protection measures
(PRE-SAFE ®
) are activated.
If the risk of collision with the vehicle in front
remains and you do not brake, take evasive
action or accelerate significantly, the vehicle
may perform automatic emergency braking,
up to the point of full brake application. Auto- matic emergency braking is not performed
until immediately prior to an imminent acci-
dent.
You can prevent the intervention of PRE-
SAFE ®
Brake at any time by:
R depressing the accelerator pedal further
R activating kickdown
R releasing the brake pedal
The braking action of PRE-SAFE ®
Brake is
ended automatically if:
R you manoeuvre to avoid the obstacle
R there is no longer any danger of a collision
R there is no longer an obstacle detected in
front of your vehicle Protection against theft
Immobiliser
X To activate with the key: remove the key
from the ignition lock.
X To activate with KEYLESS-GO: switch the
ignition off and open the driver's door.
X To deactivate: switch on the ignition.
The immobiliser prevents your vehicle from
being started without the correct key.
When leaving the vehicle, always take the key with you and lock the vehicle. The engine can
be started by anyone with a valid key that is
left inside the vehicle.
i The immobiliser is always deactivated
when you start the engine. ATA (Anti-Theft Alarm system)
X
To prime: lock the vehicle with the key or
KEYLESS-GO.
Indicator lamp :flashes. The alarm sys-
tem is primed after approximately
15 seconds.
X To switch off: unlock the vehicle with the
key or KEYLESS-GO.
A visual and audible alarm is triggered if the
alarm system is primed and you open: R a door
R the vehicle with the emergency key ele-
ment
R the boot lid
R the bonnet
R the glove compartment
R the stowage space under the armrest
X To turn the alarm off with the key: press
the % or& button on the key.
The alarm is switched off.
or
X Insert the key into the ignition lock.
The alarm is switched off.
X To stop the alarm using KEYLESS-GO:
grasp the outside door handle. The key
must be outside the vehicle.
The alarm is switched off.
or
X Press the Start/Stop button on the dash-
board. The key must be inside the vehicle.
The alarm is switched off. 68
Protection against theftSafety
Page 75 of 357
Useful information
i This Owner's Manual describes all mod-
els, series and optional equipment for your
vehicle that were available at the time of
going to press. National variations are pos- sible. Note that your vehicle may not be
equipped with all of the functions descri-
bed. This is also the case for systems and
functions relevant to safety.
i Read the information on qualified special-
ist workshops: (Y page 24). Key
Important safety notes
United Kingdom only: G
WARNING
When the double locks are activated, the
doors can no longer be opened from the
inside. People in the vehicle can no longer get out, e.g. in hazardous situations. There is a
risk of injury.
Therefore, do not leave any people unsuper-
vised in the vehicle, particularly children, eld-
erly people or people in need of special assis-
tance. Do not activate the double lock when
people are in the vehicle.
If the vehicle has been locked from the out-
side, the double lock function is activated as
standard. It is then not possible to open the
doors from inside the vehicle. You can deac-
tivate the double lock function by deactivat-
ing the interior motion sensor (Y page 69).
The doors can then be opened from the inside after the vehicle has been locked from the
outside. The anti-theft alarm system is trig-
gered if the door is opened from the inside.
Switch off the alarm (Y page 68).
All countries: G
WARNING
If children are left unsupervised in the vehicle, they could:
R open doors, thereby endangering other per-
sons or road users
R get out and be struck by oncoming traffic
R operate vehicle equipment and become
trapped, for example
In addition, the children could also set the
vehicle in motion, for example, if they:
R release the parking brake
R shift the automatic transmission out of park
position P or shift manual transmission into
neutral
R start the engine
There is a risk of an accident and injury.
When leaving the vehicle, always take the key with you and lock the vehicle. Never leave
children and animals unattended in the vehi-
cle. Keep the keys out of the reach of children. G
WARNING
If you attach heavy or large objects to the key, the key could be unintentionally turned in the
ignition lock. This could cause the engine to
be switched off. There is a risk of an accident.
Do not attach any heavy or large objects to the
key. Remove any bulky keyrings before insert-
ing the key into the ignition lock.
! Keep the key away from strong magnetic
fields. Otherwise, the remote control func-
tion could be affected.
Strong magnetic fields can occur in the
vicinity of powerful electrical installations.
Do not keep the key: R with electronic devices, e.g. a mobile
phone or another key
R with metallic objects, e.g. coins or metal
film
R inside metallic objects, e.g. a metal case
This can affect the key's functionality. 72
KeyOpening and closing
Page 81 of 357
Problem
Possible causes/consequences and
M
MSolutions The engine can no lon-
ger be started using the key. The on-board voltage is too low.
X Switch off non-essential consumers, e.g. seat heating or interior
lighting, and try to start the engine again.
If this does not work:
X Check the starter battery and charge it if necessary
(Y page 303).
or
X Jump-start the vehicle (Y page 304).
or
X Consult a qualified specialist workshop. The engine can no lon-
ger be started using
KEYLESS-GO. The key
is in the vehicle. The vehicle is locked.
X Unlock the vehicle and try to start the vehicle again. There is interference from a powerful source of radio waves.
X Start your vehicle with the key in the ignition lock. Doors
Important safety notes
United Kingdom only: G
WARNING
When the double locks are activated, the
doors can no longer be opened from the
inside. People in the vehicle can no longer get out, e.g. in hazardous situations. There is a
risk of injury.
Therefore, do not leave any people unsuper-
vised in the vehicle, particularly children, eld-
erly people or people in need of special assis-
tance. Do not activate the double lock when
people are in the vehicle.
If the vehicle has been locked from the out-
side, the double-lock function is activated as
standard. It is then not possible to open the
doors from inside the vehicle. You can deac-
tivate the double lock function by deactivat-
ing the interior motion sensor (Y page 69).
The doors can then be opened from the inside after the vehicle has been locked from the
outside. The anti-theft alarm system is trig- gered if the door is opened from the inside.
Switch off the alarm (Y page 68).
All countries: G
WARNING
If children are left unsupervised in the vehicle, they could:
R open doors, thereby endangering other per-
sons or road users
R get out and be struck by oncoming traffic
R operate vehicle equipment and become
trapped, for example
In addition, the children could also set the
vehicle in motion, for example, if they:
R release the parking brake
R shift the automatic transmission out of park
position P or shift manual transmission into
neutral
R start the engine
There is a risk of an accident and injury.
When leaving the vehicle, always take the key with you and lock the vehicle. Never leave
children and animals unattended in the vehi-
cle. Keep the keys out of the reach of children. 78
DoorsOpening and closing
Page 116 of 357
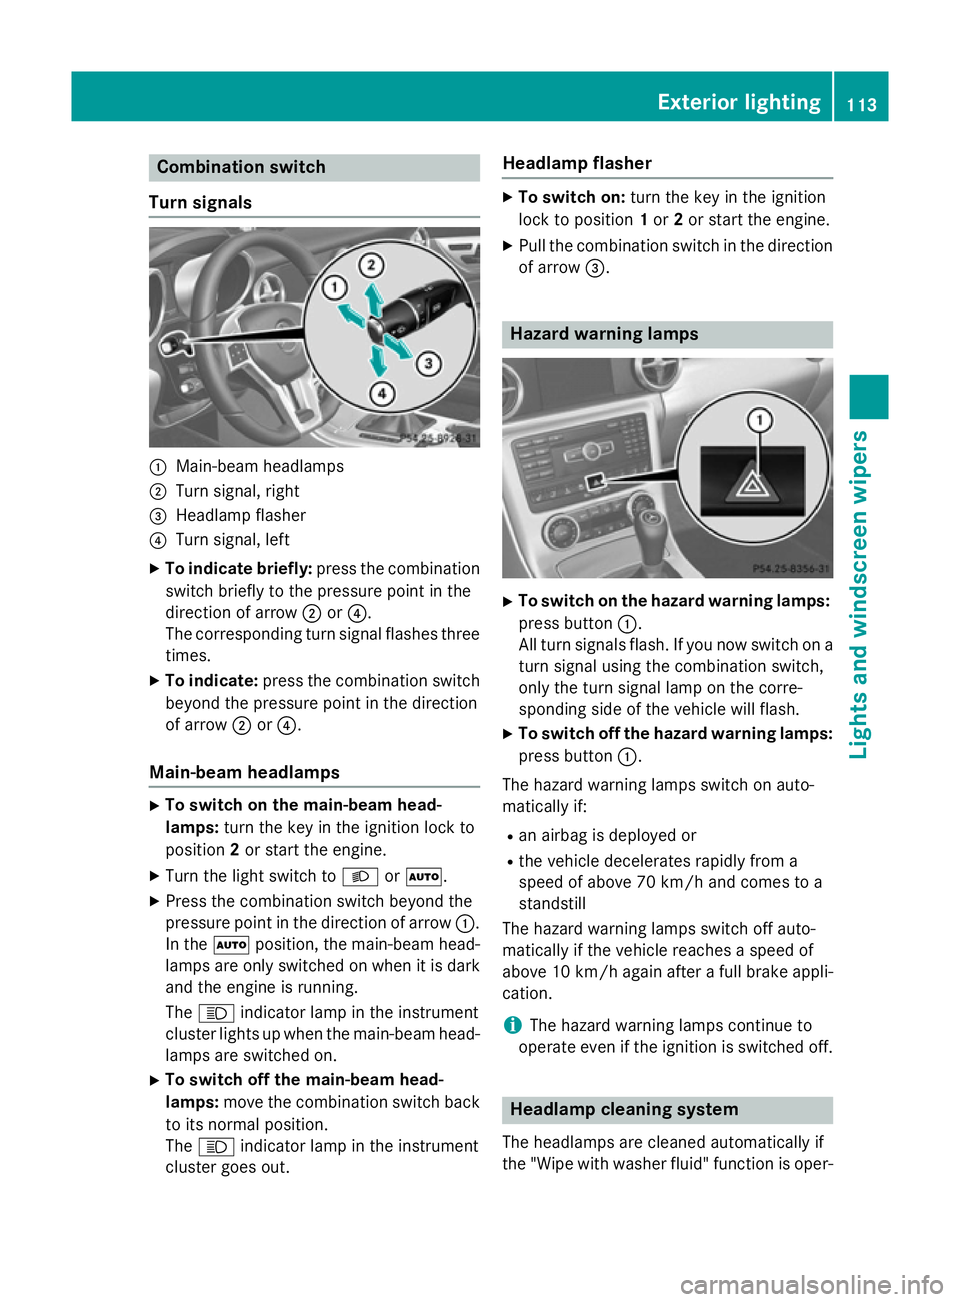
Combination switch
Turn signals :
Main-beam headlamps
; Turn signal, right
= Headlamp flasher
? Turn signal, left
X To indicate briefly: press the combination
switch briefly to the pressure point in the
direction of arrow ;or?.
The corresponding turn signal flashes three
times.
X To indicate: press the combination switch
beyond the pressure point in the direction
of arrow ;or?.
Main-beam headlamps X
To switch on the main-beam head-
lamps: turn the key in the ignition lock to
position 2or start the engine.
X Turn the light switch to LorÃ.
X Press the combination switch beyond the
pressure point in the direction of arrow :.
In the Ãposition, the main-beam head-
lamps are only switched on when it is dark
and the engine is running.
The K indicator lamp in the instrument
cluster lights up when the main-beam head-
lamps are switched on.
X To switch off the main-beam head-
lamps: move the combination switch back
to its normal position.
The K indicator lamp in the instrument
cluster goes out. Headlamp flasher X
To switch on: turn the key in the ignition
lock to position 1or 2or start the engine.
X Pull the combination switch in the direction
of arrow =. Hazard warning lamps
X
To switch on the hazard warning lamps:
press button :.
All turn signals flash. If you now switch on a turn signal using the combination switch,
only the turn signal lamp on the corre-
sponding side of the vehicle will flash.
X To switch off the hazard warning lamps:
press button :.
The hazard warning lamps switch on auto-
matically if:
R an airbag is deployed or
R the vehicle decelerates rapidly from a
speed of above 70 km/h and comes to a
standstill
The hazard warning lamps switch off auto-
matically if the vehicle reaches a speed of
above 10 km/h again after a full brake appli- cation.
i The hazard warning lamps continue to
operate even if the ignition is switched off. Headlamp cleaning system
The headlamps are cleaned automatically if
the "Wipe with washer fluid" function is oper- Exterior lighting
113Lights and windscreen wipers Z
Page 143 of 357
Useful information
i This Owner's Manual describes all mod-
els, series and optional equipment for your
vehicle that were available at the time of
going to press. National variations are pos- sible. Note that your vehicle may not be
equipped with all of the functions descri-
bed. This is also the case for systems and
functions relevant to safety.
i Read the information on qualified special-
ist workshops: (Y page 24). Running-in notes
Important safety notes
In certain driving and driving safety systems,
the sensors adjust automatically while a cer-
tain distance is being driven after the vehicle has been delivered or after repairs. Full sys-
tem effectiveness is not reached until the end
of this teach-in procedure.
Brake pads/linings and discs that are either
new or have been replaced only achieve opti- mum braking effect after several hundred kil-
ometres of driving. Compensate for the
reduced braking effect by applying greater
force to the brake pedal. The first 1500 km
If you treat the engine with sufficient care
from the very start, you will be rewarded with excellent performance for the remainder of
the engine's life.
R Drive at varying vehicle speeds and engine
speeds for the first 1500 km.
R Avoid overstraining the vehicle during this
period, e.g. driving at full throttle.
R Change gear in good time, before the rev
counter needle is Ôof the way to the red
area of the rev counter. R
Do not shift down a gear manually in order
to brake.
R Vehicles with automatic transmission:
try to avoid depressing the accelerator
pedal beyond the point of resistance (kick- down).
After 1500 km, you may gradually bring the
vehicle up to full road and engine speeds.
Additional running-in notes for AMG vehicles:
R Do not drive at speeds above 140 km/ hfor
the first 1500 km.
R Only briefly allow the engine to reach a
maximum engine speed of 4500 rpm.
i You should also observe these notes on
running-in if the engine or parts of the drive train on your vehicle have been replaced. AMG vehicles with self-locking rear
axle differential
Your vehicle is equipped with a self-locking
differential on the rear axle. Change the oil
after a running-in period of 3000 km to
improve protection of the rear axle differen-
tial. This oil change prolongs the service life of
the differential. Have the oil change carried
out at a qualified specialist workshop. Driving
Important safety notes
G
WARNING
Objects in the driver's footwell may restrict
the clearance around the pedals or block a
depressed pedal. This jeopardises the oper-
ating and road safety of the vehicle. There is a risk of an accident.
Stow all objects securely in the vehicle so that
they do not get into the driver's footwell.
Always fit the floormats securely and as pre-
scribed in order to ensure that there is always sufficient room for the pedals. Do not use
loose floormats and do not place several floor-mats on top of one another. 140
DrivingDriving and parking