buttons MERCEDES-BENZ SLK ROADSTER 2014 Owners Manual
[x] Cancel search | Manufacturer: MERCEDES-BENZ, Model Year: 2014, Model line: SLK ROADSTER, Model: MERCEDES-BENZ SLK ROADSTER 2014Pages: 357, PDF Size: 10.22 MB
Page 20 of 357
Speedometer
Activating/deactivating the addi-
tional speedometer ........................ 213
Digital ............................................ 205
In the Instrument cluster ................. 30
Segments ...................................... 201
Selecting the unit of measure-
ment ..............................................2 13
SPEEDTRONIC
Deactivating variable ..................... 182
Display message ............................ 241
Function/notes ............................ .180
Important safety notes .................. 180
LIM indicator lamp ......................... 181
Permanent ..................................... 182
Selecting ........................................ 181
Storing the current spee d.............. 181
Variabl e......................................... 181
SPORT handling mode
Activating/deactivating (AMG
vehicles) .......................................... 64
Warning lamp ................................. 255
Start/stop function
see ECO start/stop function
Starting (engine) ................................ 143
Status overview (on-board com-
puter) .................................................. 210
Steering (display message) .............. 248
Steering wheel
Adjusting (electrically) ................... 101
Adjusting (manually) ...................... 101
Button overview ............................... 33
Buttons (on-board computer) ......... 201
Cleaning ......................................... 291
Gearshift paddle s........................... 154
Important safety notes .................. 100
Storing settings (memory func-
tion) ............................................... 106
Steering wheel gearshift paddles .... 154
Stopwatch (RACETIMER) ................... 219
Stowage areas ................................... 264
Stowage compartments
Armrest (front) ............................... 265
Armrest (under) ............................. 265
Centre console .............................. 265
Cup holde r..................................... 267
Door ............................................... 266 Glove compartment ....................... 264
Important safety information ......... 264
Rear wall ........................................ 266
Spectacles compartment ............... 265
Stowage net ....................................... 266
Stowage space
Display message ............................ 248
Stowage net ................................... 266
Summer tyres .................................... 316
Sun visor ............................................ 268
Surround lighting (on-board com-
puter) .................................................. 215 T
Tail lamps Display message ............................ 232
see Lights
Technical data
Capacities ...................................... 342
Emergency spare wheel ................. 337
Information .................................... 340
Tyres/wheels ................................. 328
Vehicle data ................................... 349
Telephone
Accepting a cal l............................. 209
Display message ............................ 248
Menu (on-board computer) ............ 208
Number from the phone book ........ 209
Redialling ....................................... 209
Rejecting/ending a call ................. 209
Telephone compartment ................ 265
Temperature
Coolant .......................................... 200
Coolant (on-board computer) ......... 219
Engine oil (on-board computer) ...... 219
Outside temperature ...................... 201
Setting (climate control )................ 131
TEMPOMAT
Function/note s............................. 168
Time
see Separate Owner's manual
Timing (RACETIMER) ......................... 219
TIREFIT kit .......................................... 297
Total distance recorder .................... 204
Tow-away protection
Activating ......................................... 69
Deactivating ..................................... 69 Index
17
Page 39 of 357
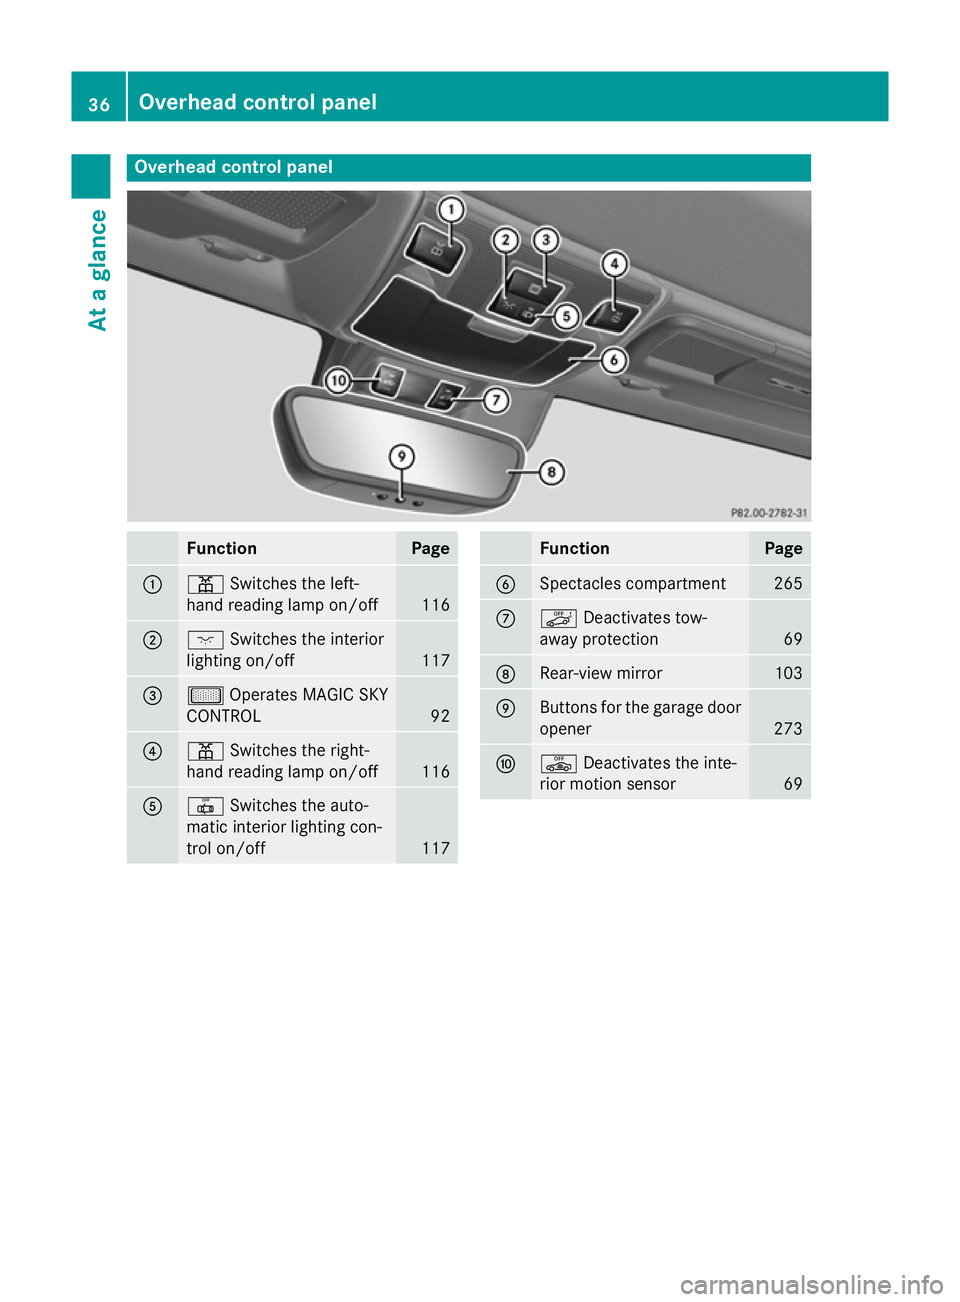
Overhead control panel
Function Page
:
p
Switches the left-
hand reading lamp on/off 116
;
c
Switches the interior
lighting on/off 117
=
µ
Operates MAGIC SKY
CONTROL 92
?
p
Switches the right-
hand reading lamp on/off 116
A
|
Switches the auto-
matic interior lighting con-
trol on/off 117 Function Page
B
Spectacles compartment 265
C
ë
Deactivates tow-
away protection 69
D
Rear-view mirror 103
E
Buttons for the garage door
opener 273
F
ê
Deactivates the inte-
rior motion sensor 6936
Overhead control panelAt a glance
Page 77 of 357
Further information on the convenience
closing feature (Y page 85).
X To unlock the boot lid: pull the boot lid
handle.
The vehicle only unlocks the boot lid. Changing the settings of the locking
system
You can change the settings of the locking
system. This means only the driver's door, the
lockable stowage compartments in the vehi-
cle interior and the fuel filler flap are unlocked when the vehicle is unlocked. This is useful if
you frequently travel on your own.
X To change the setting: press and hold
down the %and& buttons simulta-
neously for approximately six seconds until the battery check lamp flashes twice
(Y page 75).
i If the setting of the locking system is
changed within the signal range of the vehi- cle, pressing the &or% button:
R locks or
R unlocks the vehicle
The key now functions as follows:
X To unlock the driver's door: press the
% button once.
X To unlock centrally: press the%but-
ton twice.
X To lock centrally: press the&button.
The KEYLESS-GO function is changed as fol-
lows:
X To unlock the driver's door: touch the
inner surface of the door handle on the
driver's door.
X To unlock centrally: touch the inner sur-
face of the front-passenger door handle.
X To lock centrally: touch the outer sensor
surface on one of the door handles.
X To restore the factory settings: press
and hold down the %and& buttons
simultaneously for approximately six sec- onds until the battery check lamp flashes
twice (Y
page 75). Emergency key element
General notes If the vehicle can no longer be locked or
unlocked with the key, use the emergency
key element.
If you use the emergency key element to
unlock and open the driver's door or the boot
lid, the anti-theft alarm system will be trig-
gered (Y page 68).
There are several ways to deactivate the
alarm:
X To deactivate the alarm with the key:
press the %or& button on the key.
or
X Insert the key into the ignition lock.
or
X To deactivate the alarm with KEYLESS-
GO: press the Start/Stop button in the igni-
tion lock. The key must be in the vehicle.
or
X Lock or unlock the vehicle using KEYLESS-
GO. The key must be outside the vehicle.
If you unlock the vehicle using the emergency
key element, the fuel filler flap will not auto-
matically be unlocked.
X To unlock the fuel filler flap: insert the
key into the ignition lock. 74
KeyOpening and closing
Page 79 of 357
X
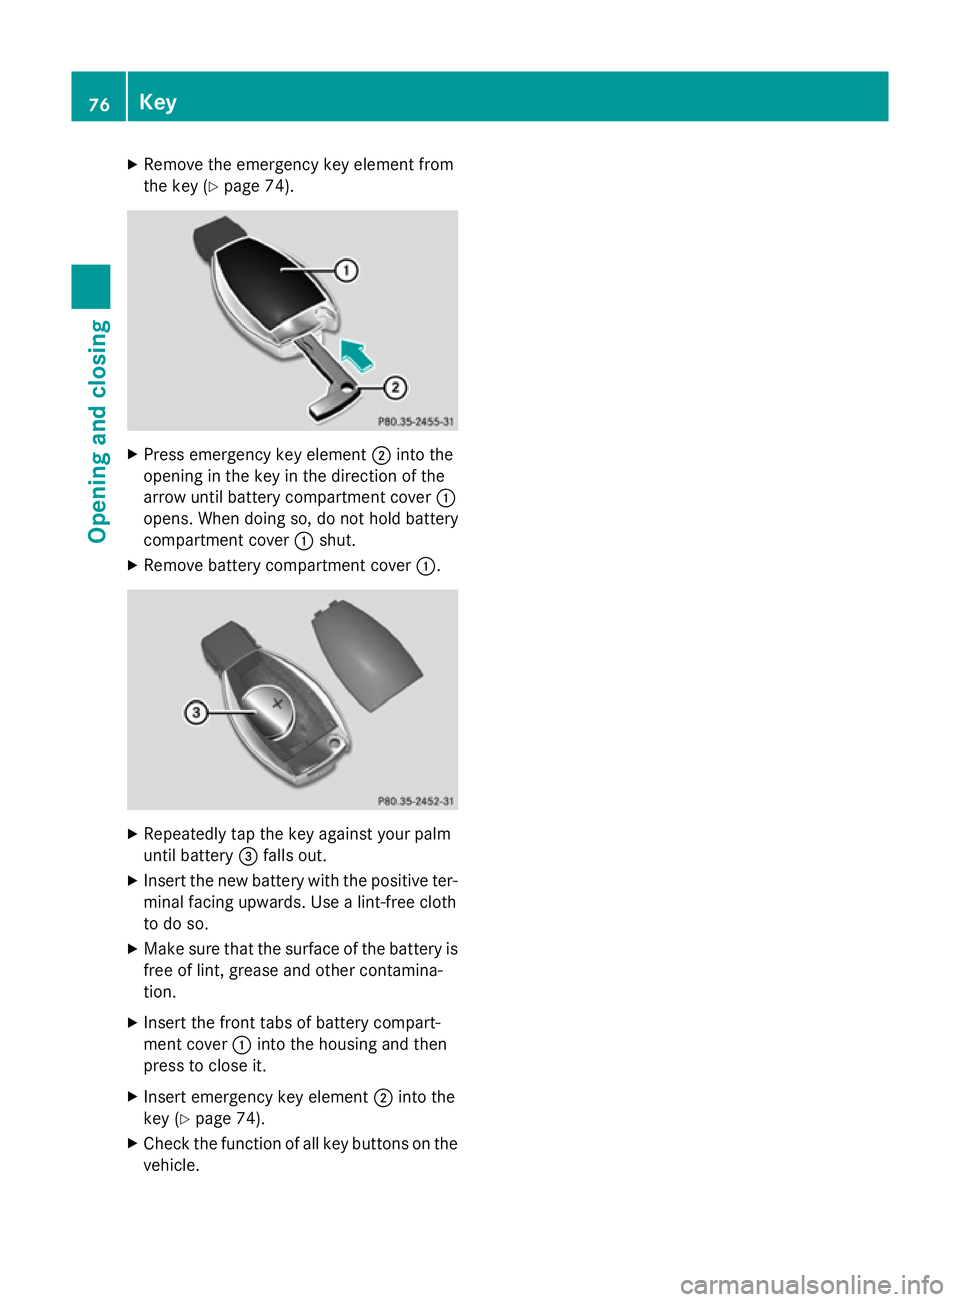
Remove the emergency key element from
the key (Y page 74). X
Press emergency key element ;into the
opening in the key in the direction of the
arrow until battery compartment cover :
opens. When doing so, do not hold battery
compartment cover :shut.
X Remove battery compartment cover :.X
Repeatedly tap the key against your palm
until battery =falls out.
X Insert the new battery with the positive ter-
minal facing upwards. Use a lint-free cloth
to do so.
X Make sure that the surface of the battery is
free of lint, grease and other contamina-
tion.
X Insert the front tabs of battery compart-
ment cover :into the housing and then
press to close it.
X Insert emergency key element ;into the
key (Y page 74).
X Check the function of all key buttons on the
vehicle. 76
KeyOpening and closing
Page 83 of 357
When a locked door is opened from inside the
vehicle, the previous unlocking process will
be observed if the vehicle has been:
R locked with the locking button for the cen-
tral locking or
R locked automatically
The vehicle will be fully unlocked if it had pre- viously been fully unlocked. Only the door
which has been opened from the inside is
unlocked if only the driver's door had been
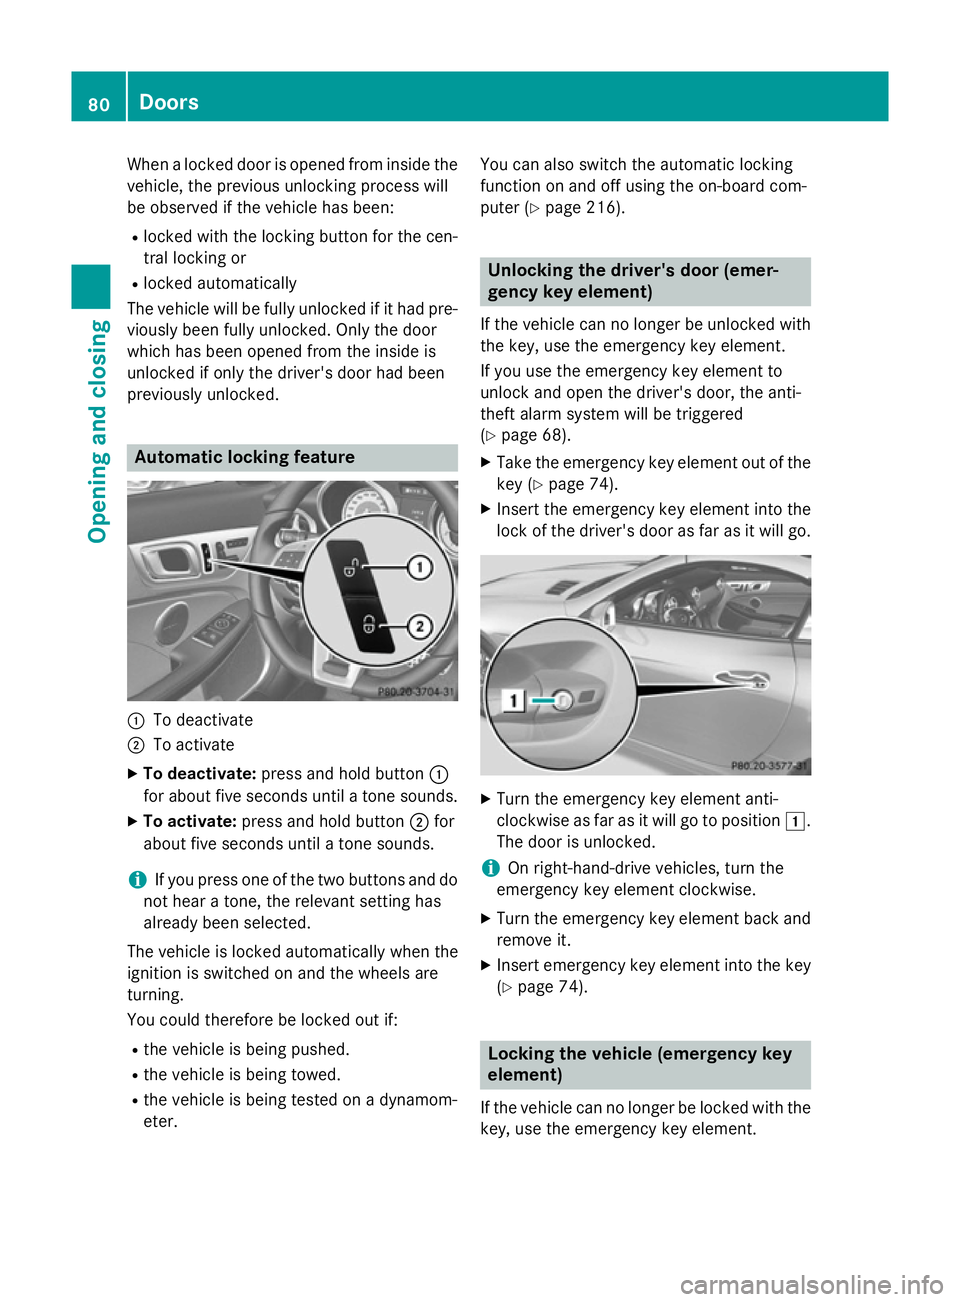
previously unlocked. Automatic locking feature
:
To deactivate
; To activate
X To deactivate: press and hold button :
for about five seconds until a tone sounds.
X To activate: press and hold button ;for
about five seconds until a tone sounds.
i If you press one of the two buttons and do
not hear a tone, the relevant setting has
already been selected.
The vehicle is locked automatically when the
ignition is switched on and the wheels are
turning.
You could therefore be locked out if:
R the vehicle is being pushed.
R the vehicle is being towed.
R the vehicle is being tested on a dynamom-
eter. You can also switch the automatic locking
function on and off using the on-board com-
puter (Y page 216). Unlocking the driver's door (emer-
gency key element)
If the vehicle can no longer be unlocked with
the key, use the emergency key element.
If you use the emergency key element to
unlock and open the driver's door, the anti-
theft alarm system will be triggered
(Y page 68).
X Take the emergency key element out of the
key (Y page 74).
X Insert the emergency key element into the
lock of the driver's door as far as it will go. X
Turn the emergency key element anti-
clockwise as far as it will go to position 1.
The door is unlocked.
i On right-hand-drive vehicles, turn the
emergency key element clockwise.
X Turn the emergency key element back and
remove it.
X Insert emergency key element into the key
(Y page 74). Locking the vehicle (emergency key
element)
If the vehicle can no longer be locked with the key, use the emergency key element. 80
DoorsOpening and closing
Page 94 of 357
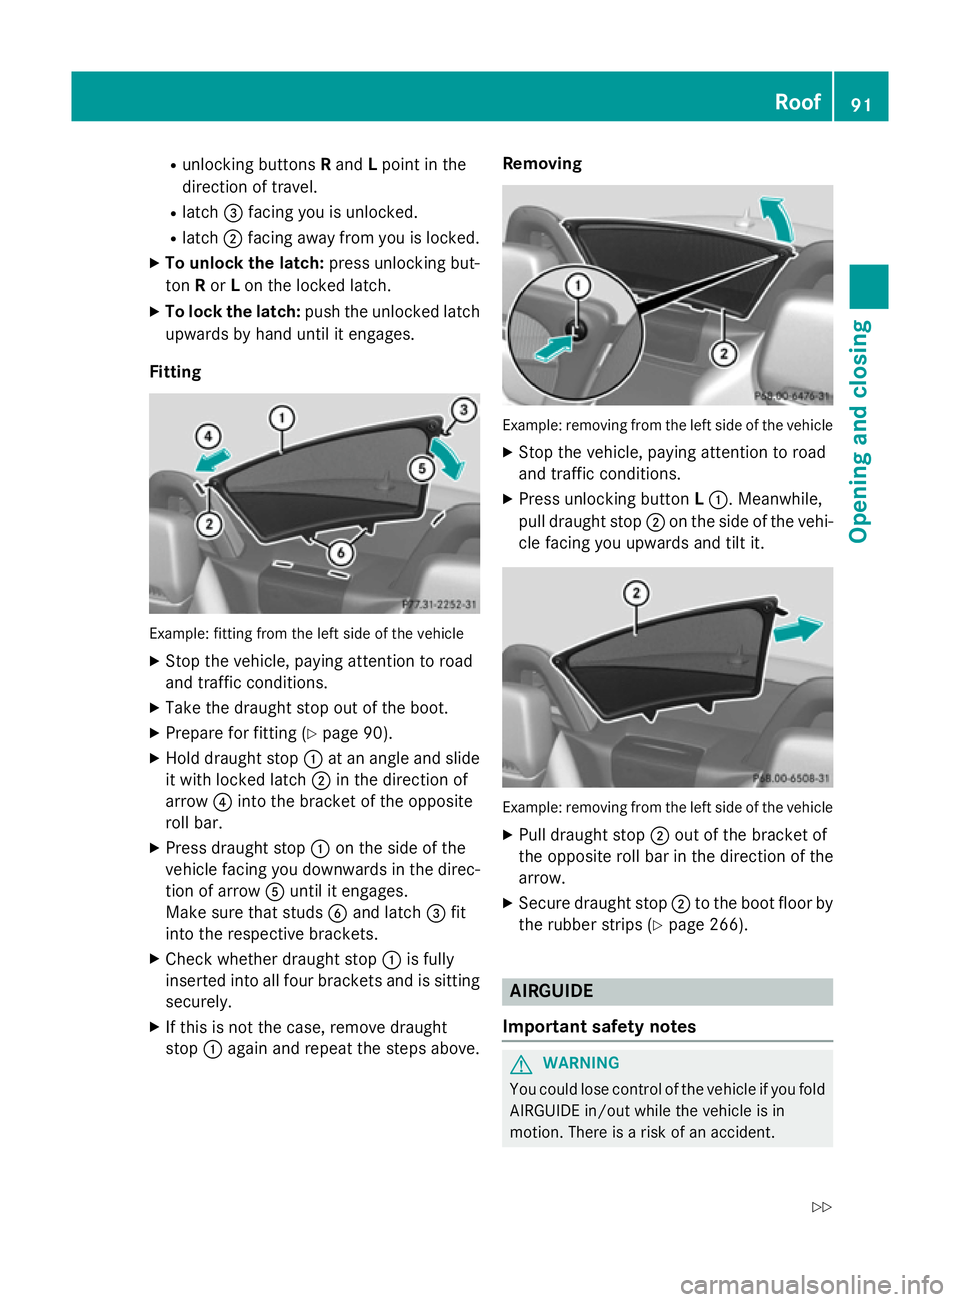
R
unlocking buttons Rand Lpoint in the
direction of travel.
R latch =facing you is unlocked.
R latch ;facing away from you is locked.
X To unlock the latch: press unlocking but-
ton Ror Lon the locked latch.
X To lock the latch: push the unlocked latch
upwards by hand until it engages.
Fitting Example: fitting from the left side of the vehicle
X Stop the vehicle, paying attention to road
and traffic conditions.
X Take the draught stop out of the boot.
X Prepare for fitting (Y page 90).
X Hold draught stop :at an angle and slide
it with locked latch ;in the direction of
arrow ?into the bracket of the opposite
roll bar.
X Press draught stop :on the side of the
vehicle facing you downwards in the direc-
tion of arrow Auntil it engages.
Make sure that studs Band latch =fit
into the respective brackets.
X Check whether draught stop :is fully
inserted into all four brackets and is sitting
securely.
X If this is not the case, remove draught
stop :again and repeat the steps above. Removing
Example: removing from the left side of the vehicle
X Stop the vehicle, paying attention to road
and traffic conditions.
X Press unlocking button L:. Meanwhile,
pull draught stop ;on the side of the vehi-
cle facing you upwards and tilt it. Example: removing from the left side of the vehicle
X Pull draught stop ;out of the bracket of
the opposite roll bar in the direction of the
arrow.
X Secure draught stop ;to the boot floor by
the rubber strips (Y page 266). AIRGUIDE
Important safety notes G
WARNING
You could lose control of the vehicle if you fold AIRGUIDE in/out while the vehicle is in
motion. There is a risk of an accident. Roof
91Opening and closing
Z
Page 100 of 357
Seats
Important safety notes
G
WARNING
If children adjust the seats, they could
become trapped, especially if they are unat-
tended. There is a risk of injury.
When leaving the vehicle, always take the key with you and lock the vehicle. Never leave
children unattended in the vehicle.
The seats can still be adjusted when there is
no key in the ignition lock. G
WARNING
When adjusting a seat, you or another vehicle occupant could become trapped by the guiderail of the seat, for instance. There is a risk of
injury.
Make sure that no one has any part of their
body within the sweep of the seat when
adjusting it.
Observe the safety notes on "Airbags"
(Y page 45) and "Children in the Vehicle"
(Y page 51). G
WARNING
If the driver's seat is not engaged, it can move unexpectedly while the vehicle is in motion.
This could cause you to lose control of the
vehicle. There is a risk of an accident.
Always make sure that the driver's seat is
engaged before starting the engine. G
WARNING
If you adjust the seat height carelessly, you or other vehicle occupants could be trapped andthereby injured. Children in particular could
accidentally press the electrical seat adjust-
ment buttons and become trapped. There is a
risk of injury.
While moving the seats, make sure that your
hands or other body parts do not get under the
lever assembly of the seat adjustment sys-
tem. G
WARNING
The head restraints cannot provide the inten-
ded protection unless they are fitted and
adjusted correctly. There is an increased risk of injury to the head and neck in the event of
an accident or sudden braking, for example.
Always drive with the head restraints fitted.
Ensure that the centre of the head restraints
support the back of each vehicle occupant's
head at eye level before driving off. G
WARNING
You could lose control of the vehicle while
driving if you:
R adjust the driver's seat, steering wheel or
mirror
R fasten the seat belt.
There is a risk of an accident.
Adjust the driver's seat, steering wheel or
mirror and fasten the seat belt before starting
the engine.
! To avoid damage to the seats and the seat
heating, observe the following information:
R do not spill any liquids on the seats. If
liquid is spilled on the seats, dry them as
soon as possible.
R if the seat covers are damp or wet, do not
switch on the seat heating. The seat
heating should also not be used to dry
the seats.
R clean the seat covers as recommended;
see the "Interior care" section.
R do not transport heavy loads on the
seats. Do not place sharp objects on the
seat cushions, e.g. knives, nails or tools. The seats should only be occupied by
passengers, if possible.
R when the seat heating is in operation, do
not cover the seats with insulating mate- rials, e.g. blankets, coats, bags, seat cov-
ers, child seats or booster seats.
! Make sure that there are no objects in the
footwell under or behind the seats when
moving the seats back. There is a risk that Seats
97Seats, steering wheel and mirrors Z
Page 104 of 357
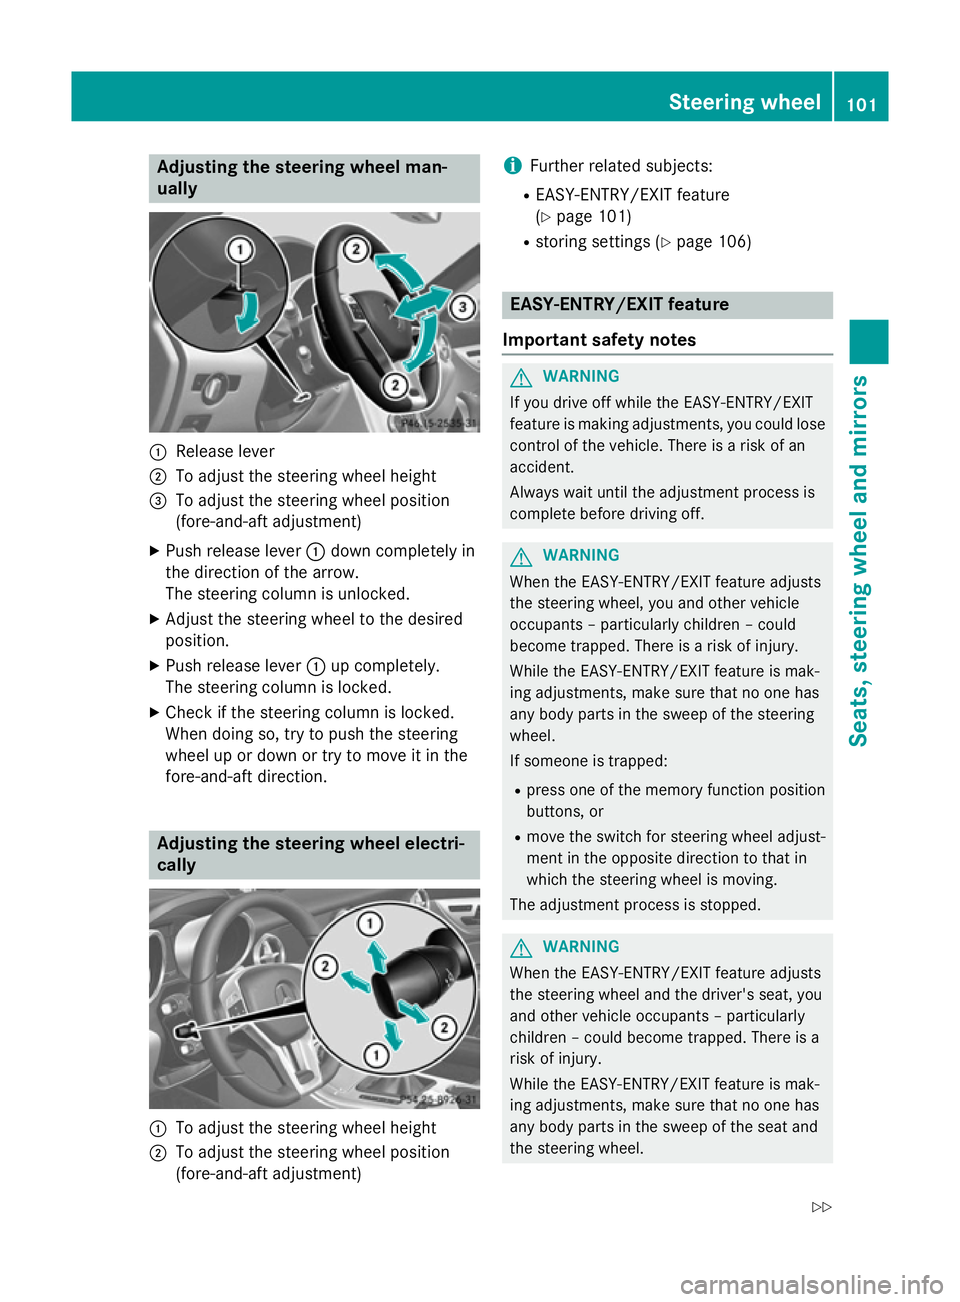
Adjusting the steering wheel man-
ually :
Release lever
; To adjust the steering wheel height
= To adjust the steering wheel position
(fore-and-aft adjustment)
X Push release lever :down completely in
the direction of the arrow.
The steering column is unlocked.
X Adjust the steering wheel to the desired
position.
X Push release lever :up completely.
The steering column is locked.
X Check if the steering column is locked.
When doing so, try to push the steering
wheel up or down or try to move it in the
fore-and-aft direction. Adjusting the steering wheel electri-
cally :
To adjust the steering wheel height
; To adjust the steering wheel position
(fore-and-aft adjustment) i
Further related subjects:
R EASY-ENTRY/EXIT feature
(Y page 101)
R storing settings (Y page 106) EASY-ENTRY/EXIT feature
Important safety notes G
WARNING
If you drive off while the EASY-ENTRY/EXIT
feature is making adjustments, you could lose
control of the vehicle. There is a risk of an
accident.
Always wait until the adjustment process is
complete before driving off. G
WARNING
When the EASY-ENTRY/EXIT feature adjusts
the steering wheel, you and other vehicle
occupants – particularly children – could
become trapped. There is a risk of injury.
While the EASY-ENTRY/EXIT feature is mak-
ing adjustments, make sure that no one has
any body parts in the sweep of the steering
wheel.
If someone is trapped:
R press one of the memory function position
buttons, or
R move the switch for steering wheel adjust-
ment in the opposite direction to that in
which the steering wheel is moving.
The adjustment process is stopped. G
WARNING
When the EASY-ENTRY/EXIT feature adjusts
the steering wheel and the driver's seat, you
and other vehicle occupants – particularly
children – could become trapped. There is a
risk of injury.
While the EASY-ENTRY/EXIT feature is mak-
ing adjustments, make sure that no one has
any body parts in the sweep of the seat and
the steering wheel. Steering wheel
101Seats, steering wheel and mirrors
Z
Page 105 of 357
If someone is trapped:
R press one of the memory function position
buttons, or
R press one of the memory function memory
buttons, or
R move the switch for steering wheel adjust-
ment in the opposite direction to that in
which the steering wheel is moving.
The adjustment process is stopped. G
WARNING
If you use openings in the bodywork or
detachable parts as steps, you could:
R slip and/or fall
R damage the vehicle and cause yourself to
fall.
There is a danger of injury.
Always use secure climbing aids, e.g. a suita-
ble ladder.
The EASY-ENTRY/EXIT feature makes getting
in and out of your vehicle easier.
You can activate and deactivate the EASY-
ENTRY/EXIT feature in the on-board com-
puter (Y page 217).
Position of the steering wheel when the EASY-ENTRY/EXIT feature is active The steering wheel tilts upwards if you:
R remove the key from the ignition lock
R open the driver's door and KEYLESS-GO is
in position 1
R open the driver's door and the key is in
position 0or 1in the ignition lock
i The steering wheel only moves upwards if
it has not already reached the upper end
stop. Position of the steering wheel for driv-
ing The steering wheel is moved to the previously
set position if:
R the driver's door is closed and
R you insert the key into the ignition lock
or
R you press the Start/Stop button once on
vehicles with KEYLESS-GO
If you close the driver's door with the key
inserted in the ignition lock, the steering
wheel is automatically moved to the previ-
ously set position.
The last position of the steering wheel is
stored when you switch off the ignition or
when you store the setting with the memory
function (Y page 106).
Crash-responsive EASY-EXIT feature If the crash-responsive EASY-EXIT feature is
triggered in an accident, the steering column
will move upwards when the driver's door is
opened. This occurs irrespective of the posi-
tion of the key in the ignition lock. This makes it easier to exit the vehicle and rescue the
occupants.
The crash-responsive EASY-EXIT feature is
only operational if the EASY-EXIT/ENTRY fea-
ture is activated in the on-board computer
(Y page 217). 102
Steering wheelSeats, steering wheel and mirrors
Page 131 of 357
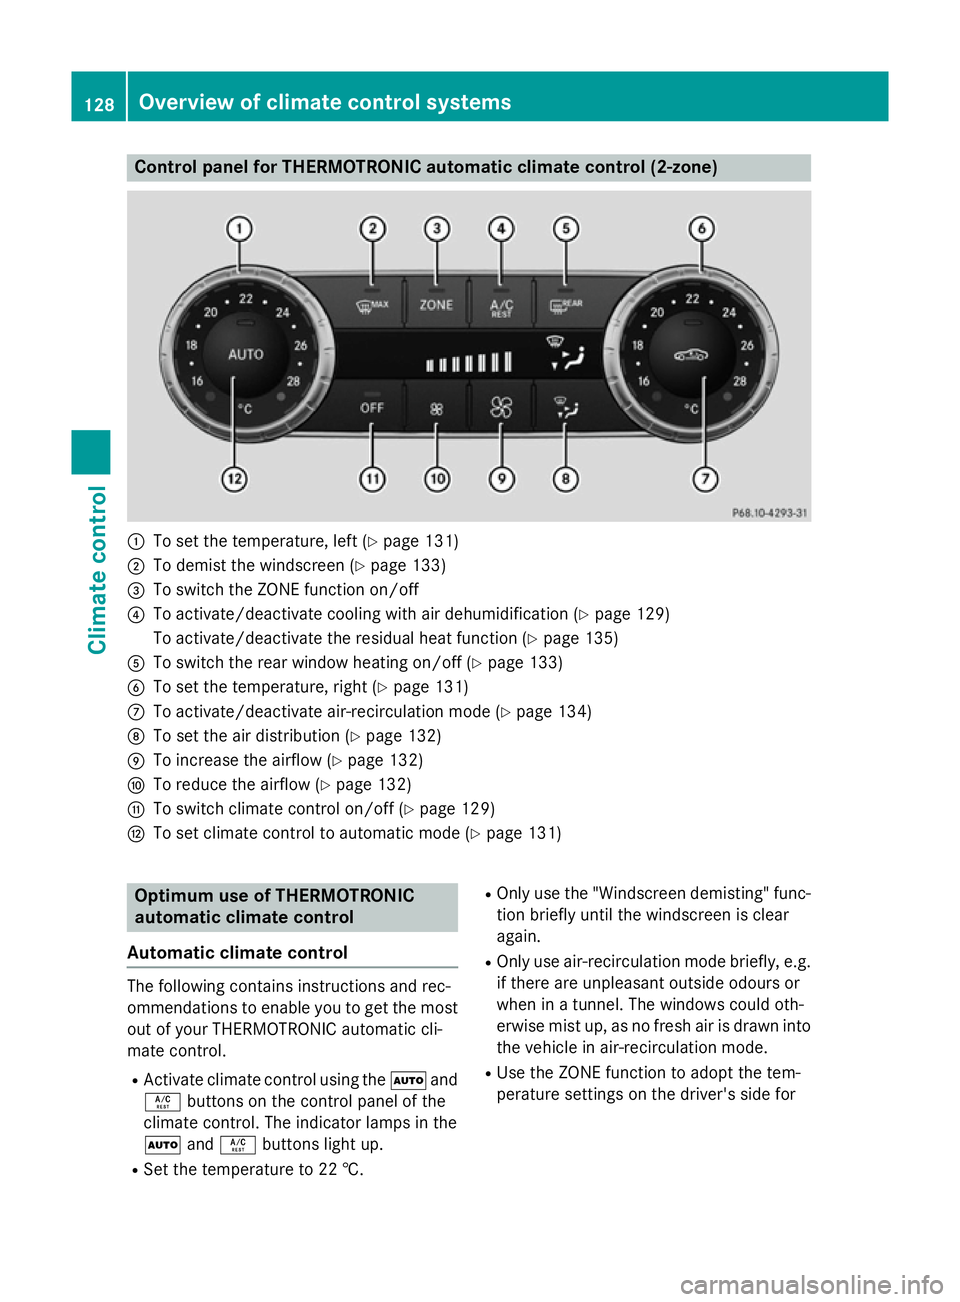
Control panel for THERMOTRONIC automatic climate control (2-zone)
:
To set the temperature, left (Y page 131)
; To demist the windscreen (Y page 133)
= To switch the ZONE function on/off
? To activate/deactivate cooling with air dehumidification (Y page 129)
To activate/deactivate the residual heat function (Y page 135)
A To switch the rear window heating on/off (Y page 133)
B To set the temperature, right (Y page 131)
C To activate/deactivate air-recirculation mode (Y page 134)
D To set the air distribution (Y page 132)
E To increase the airflow (Y page 132)
F To reduce the airflow (Y page 132)
G To switch climate control on/off (Y page 129)
H To set climate control to automatic mode (Y page 131)Optimum use of THERMOTRONIC
automatic climate control
Automatic climate control The following contains instructions and rec-
ommendations to enable you to get the most
out of your THERMOTRONIC automatic cli-
mate control.
R Activate climate control using the Ãand
Á buttons on the control panel of the
climate control. The indicator lamps in the
à andÁ buttons light up.
R Set the temperature to 22 †. R
Only use the "Windscreen demisting" func-
tion briefly until the windscreen is clear
again.
R Only use air-recirculation mode briefly, e.g.
if there are unpleasant outside odours or
when in a tunnel. The windows could oth-
erwise mist up, as no fresh air is drawn into
the vehicle in air-recirculation mode.
R Use the ZONE function to adopt the tem-
perature settings on the driver's side for 128
Overview of climate control systemsClimate control