service indicator MERCEDES-BENZ SLK ROADSTER 2014 Owners Manual
[x] Cancel search | Manufacturer: MERCEDES-BENZ, Model Year: 2014, Model line: SLK ROADSTER, Model: MERCEDES-BENZ SLK ROADSTER 2014Pages: 357, PDF Size: 10.22 MB
Page 16 of 357
Switching the daytime driving
lights on/off (on-board com-
puter) ............................................. 214
Switching the exterior lighting
delayed switch-off on/off (on-
board computer) ............................ 215
Switching the surround lighting
on/off (on-board computer) .......... 215
Turn signals ................................... 113
see Interior lighting
see Replacing bulbs
LIM indicator lamp
Cruise control ................................ 169
DISTRONIC PLUS ........................... 173
Variable SPEEDTRONIC ................. 181
Limiting the speed
see SPEEDTRONIC
Locking
see Central locking
Locking (doors)
Automatic ........................................ 80
Emergency locking ........................... 80
From inside (central locking but-
ton) .................................................. 79
Locking centrally
see Central locking
Locking verification signal (on-
board computer) ............................... 217
Luggage cover
see Boot separator
Lumbar support ................................... 99 M
M+S tyres ........................................... 316
MAGIC SKY CONTROL ......................... 92
Main-beam headlamps
Changing bulb s.............................. 119
Display message ............................ 232
Switching on/of f........................... 113
Manual transmission
Engaging reverse gear ................... 151
Gear lever ...................................... 151
Pulling away ................................... 144
Shift recommendation ................... 152
Starting the engine ........................ 144
Matt finish (cleaning instructions) .. 288Media Interface
see Separate operating instructions
Memory card (audio) ......................... 207
Memory function ............................... 106
Mercedes-Benz Service Centre
see Qualified specialist workshop
Message memory (on-board com-
puter) .................................................. 222
Messages
see Display messages
Mirrors
see Exterior mirrors
see Rear-view mirror
see Vanity mirror (in sun visor)
Mobile phone
Frequencies ................................... 340
Installation ..................................... 340
Menu (on-board computer) ............ 208
Notes/placing in the bracket ......... 270
Transmission output (maximum) .... 340
Modifying the programming (key) ..... 74
MOExtended tyres ............................. 296
Motorway mode ................................ 114
MP3
see Separate operating instructions
Multifunction display
Function/note s............................. 202
Permanent display ......................... 213
Multifunction steering wheel
Operating the on-board compute r..2 01
Overview .......................................... 33 N
Navigation Menu (on-board computer) ............ 205
NECK-PRO head restraints
Important safety notes .................... 49
Operation ......................................... 49
Resetting after being triggered ....... .50
Notes on running in a new vehicle .. 140 O
Occupant safety Automatic measures after an acci-
dent ................................................. 51
Children in the vehicle ..................... 51 Index
13
Page 17 of 357
Important safety notes .................... 41
Pets in the vehicle ........................... 59
PRE-SAFE® (anticipatory occu-
pant protection) ............................... 50
Odometer
see Trip meter
Oil
see Engine oil
On-board computer
AMG menu .....................................2 19
Assistance menu ........................... 210
Audio menu ................................... 207
Convenience submenu .................. 217
Display messages .......................... 222
Displaying a service message ....... .285
DISTRONIC PLUS ........................... 177
Factory setting submenu .............. .218
Important safety notes .................. 200
Instrument cluster submenu .......... 213
Light submenu ............................... 214
Menu overview .............................. 203
Message memory .......................... 222
Navigation menu ............................ 205
Operating the TV ............................ 208
Operating video DVD ..................... 207
Operation ....................................... 201
RACETIMER ................................... 219
Service menu ................................. 212
Settings menu ............................... 213
Standard displa y............................ 204
Telephone menu ............................ 208
Trip menu ...................................... 204
Vehicle submenu ........................... 216
Operating instructions
Vehicle equipment ........................... 22
Operating safety
Declaration of conformity ................ 23
Important safety note ...................... 22
Operating system
see On-board computer
Outside temperature display ........... 201
Overhead control panel ...................... 36P
Paint code .......................................... 342
Paintwork (cleaning instructions) ... 288
Panic alarm .......................................... 40 Park Assist
Parking Guidance ........................... 188
Parking
Important safety notes .................. 162
Parking brake ................................ 163
Position of exterior mirror, front-
passenger side ............................... 105
see PARKTRONIC
Parking aid
see Exterior mirrors
see PARKTRONIC
Parking assistance
see PARKTRONIC
Parking brake
Display message ............................ 226
Electric parking brake .................... 163
Warning lamp ................................. 257
Parking Guidance
Display message ............................ 239
Important safety notes .................. 188
Parking lamps
Changing bulbs .............................. 119
Display message ............................ 233
Switching on/of f........................... 112
Parking lamps (changing bulbs) ...... 119
PARKTRONIC
Deactivating/activating ................. 187
Driving system ............................... 185
Function/note s............................. 185
Important safety notes .................. 185
Problem (fault) ............................... 188
Sensor rang e................................. 185
Warning display ............................. 186
PASSENGER AIR BAG OFF
Indicator lamp .................................. 41
Problems (malfunctions) .................. 56
Petrol .................................................. 344
Pets in the vehicle ............................... 59
Plastic trim (cleaning instruc-
tions) .................................................. 290
Power windows
see Side windows
PRE-SAFE® (anticipatory occupant
protection)
Operation ......................................... 50
PRE-SAFE® (preventive occupant
safety system)
Display message ............................ 230 14
Index
Page 44 of 357
well as on child restraint systems
(Y
page 51). Important safety notes
G
WARNING
If the restraint system is modified, it may no
longer work as intended. The restraint system
may then not perform its intended protective function by failing in an accident or triggering
unexpectedly, for example. There is an
increased risk of injury, possibly even fatal.
Never modify parts of the restraint system. Do not attempt to modify the wiring as well as
electronic components or their software.
If it is necessary to modify an airbag system
for a person with physical disabilities, contact a Mercedes-Benz Service Centre for details. Restraint system warning lamp
The functions of the restraint system are
checked after the ignition is switched on and at regular intervals while the engine is run-
ning. Therefore, malfunctions can be detec-
ted in good time.
The 6 restraint system warning lamp in
the instrument cluster lights up when the igni- tion is switched on. It goes out no later than afew seconds after the engine is started. The
components of the restraint system are in
operational readiness.
A malfunction has occurred if the 6
restraint system warning lamp:
R does not light up after the ignition is
switched on
R does not go out after a few seconds with
the engine running
R lights up again while the engine is running G
WARNING
If the restraint system is malfunctioning,
restraint system components may be trig-
gered unintentionally or might not be trig- gered at all in the event of an accident with a
high rate of vehicle deceleration. This can
effect belt tensioners or airbags, for example. There is an increased risk of serious or even
fatal injuries.
Have the restraint system checked and
repaired immediately at a qualified specialist
workshop. PASSENGER AIR BAG OFF indicator
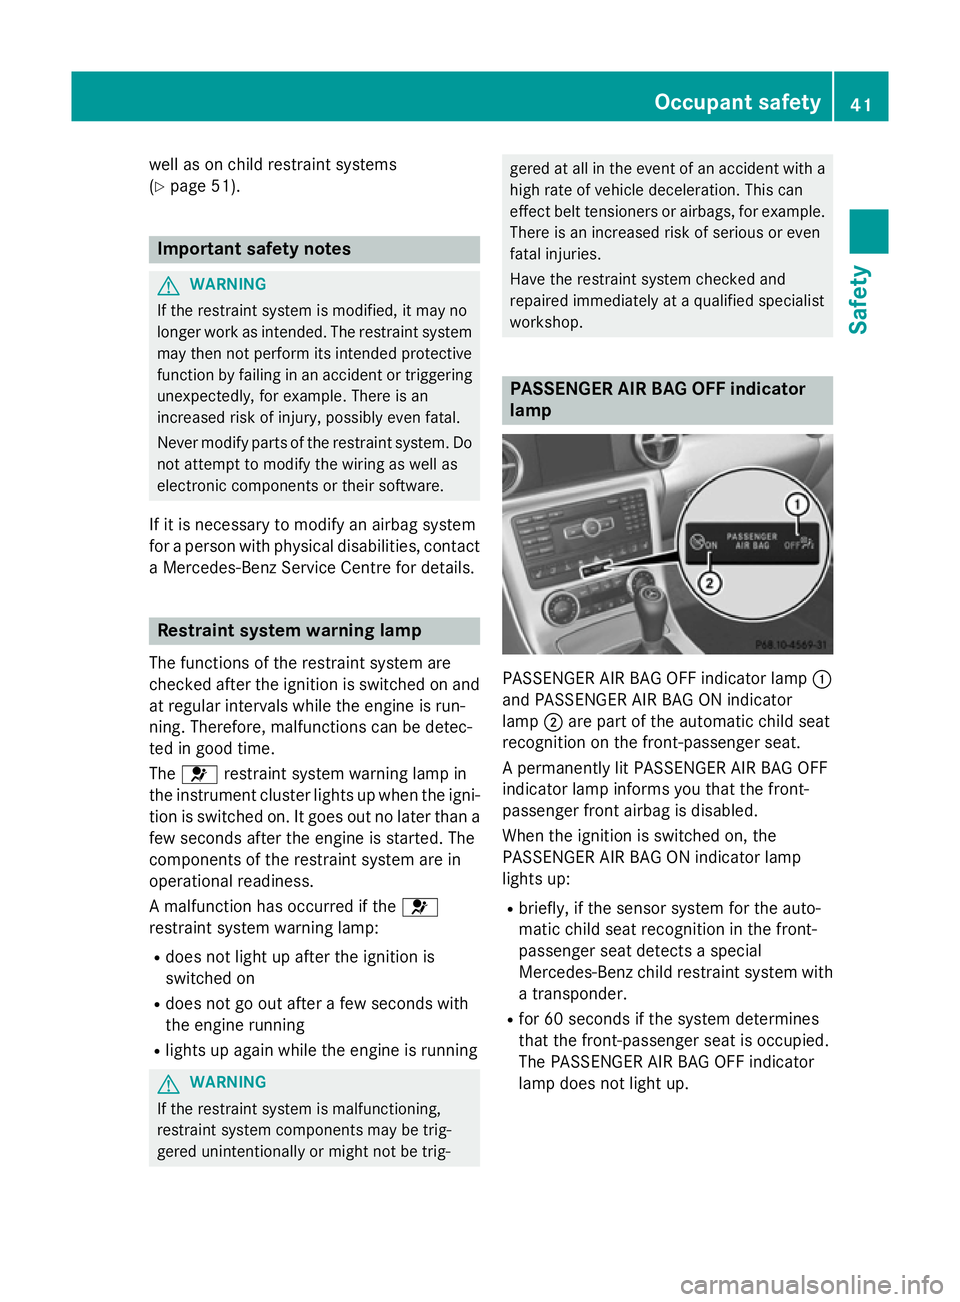
lamp PASSENGER AIR BAG OFF indicator lamp
:
and PASSENGER AIR BAG ON indicator
lamp ;are part of the automatic child seat
recognition on the front-passenger seat.
A permanently lit PASSENGER AIR BAG OFF
indicator lamp informs you that the front-
passenger front airbag is disabled.
When the ignition is switched on, the
PASSENGER AIR BAG ON indicator lamp
lights up:
R briefly, if the sensor system for the auto-
matic child seat recognition in the front-
passenger seat detects a special
Mercedes-Benz child restraint system with
a transponder.
R for 60 seconds if the system determines
that the front-passenger seat is occupied.
The PASSENGER AIR BAG OFF indicator
lamp does not light up. Occupant safety
41Safety Z
Page 55 of 357
Child restraint system
Observe the instructions for correct use of
the child restraint system (Y page 57).
For safety reasons, Mercedes-Benz recom-
mends that you only use a child restraint sys- tem recommended by Mercedes-Benz
(Y page 58). G
WARNING
If the child restraint system is incorrectly fit-
ted on the seat position suitable for this pur-
pose, it cannot perform its intended protec-
tive function. In the event of an accident,
sharp braking or a sudden change in direction, the child may not be held securely. There is an
increased risk of serious or even fatal injuries.
Observe the manufacturer's installation
instructions and the correct use for the child
restraint system. Make sure that the entire
surface of the child restraint system is resting
on the seat surface. Never place objects
under or behind the child restraint system,
e.g. cushions. Only use child restraint sys-
tems with the original cover designed for
them. Only replace damaged covers with gen- uine covers. G
WARNING
If the child restraint system is fitted incor-
rectly or is not secured, it can come loose in
the event of an accident, heavy braking or a
sudden change in direction. The child
restraint system could be thrown about, strik- ing vehicle occupants. There is an increased
risk of injury, possibly even fatal.
Always fit child restraint systems properly,
even if they are not being used. Make sure
that you observe the child restraint system
manufacturer's installation instructions.
Further information on stowing objects, lug-
gage and loads securely can be found under
“Stowing options/stowage compartments”
(Y page 264). G
WARNING
Child restraint systems or their securing sys-
tems that have been damaged or subjected to a load in an accident cannot perform their
intended protective function. In the event of
an accident, sharp braking or a sudden
change in direction, the child may not be held securely. There is an increased risk of serious
or even fatal injuries.
Immediately replace child restraint systems
that have been damaged or subjected to a
load in an accident. Have the child restraint
securing systems checked in a qualified spe-
cialist workshop before fitting a child restraint
system again.
i If a child is carried on the front-passenger
seat, be sure to observe the information on "Child restraint systems on the front-
passenger seat" (Y page 54). There you
will also find information on disabling the
front-passenger front airbag.
Observe the warning labels in the vehicle inte-
rior and on the child restraint system.
i It is advisable to use Mercedes-Benz care
products to clean child restraint systems
recommended by Mercedes-Benz. You can obtain information about this at any
Mercedes-Benz Service Centre. Automatic child seat recognition on
the front-passenger seat
The sensor system for child restraint systems
in the front-passenger seat detects whether a special Mercedes-Benz child restraint system
with a transponder for automatic child seat
recognition has been fitted. In this case, the
PASSENGER AIR BAG ON indicator lamp
lights up briefly when the ignition is switched on. The PASSENGER AIR BAG OFF indicator
lamp is lit continuously. The front-passenger
front airbag is disabled. 52
Children in the vehicleSafety
Page 61 of 357
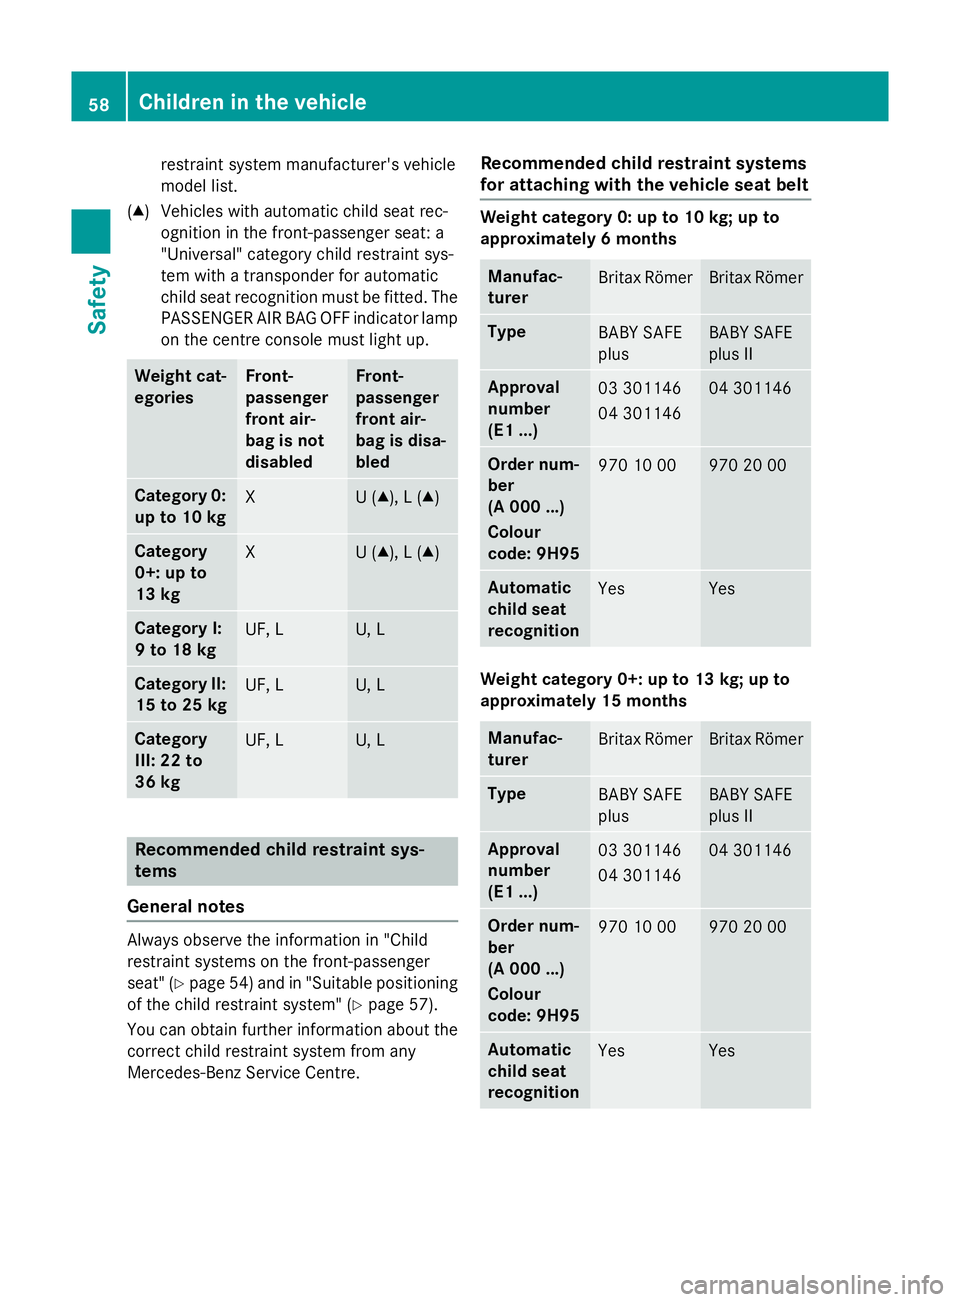
restraint system manufacturer's vehicle
model list.
(▲) Vehicles with automatic child seat rec- ognition in the front-passenger seat: a
"Universal" category child restraint sys-
tem with a transponder for automatic
child seat recognition must be fitted. The
PASSENGER AIR BAG OFF indicator lamp
on the centre console must light up. Weight cat-
egories Front-
passenger
front air-
bag is not
disabled Front-
passenger
front air-
bag is disa-
bled
Category 0:
up to 10 kg X U (▲), L (▲)
Category
0+: up to
13 kg
X U (▲), L (▲)
Category I:
9 to 18 kg
UF, L U, L
Category II:
15 to 25 kg UF, L U, L
Category
III: 22 to
36 kg
UF, L U, L
Recommended child restraint sys-
tems
General notes Always observe the information in "Child
restraint systems on the front-passenger
seat" (Y page 54) and in "Suitable positioning
of the child restraint system" (Y page 57).
You can obtain further information about the correct child restraint system from any
Mercedes-Benz Service Centre. Recommended child restraint systems
for attaching with the vehicle seat belt Weight category 0: up to 10 kg; up to
approximately 6 months
Manufac-
turer
Britax Römer Britax Römer
Type
BABY SAFE
plus BABY SAFE
plus II
Approval
number
(E1 ...)
03 301146
04 301146 04 301146
Order num-
ber
(A 000 ...)
Colour
code: 9H95
970 10 00 970 20 00
Automatic
child seat
recognition
Yes Yes
Weight category 0+: up to 13 kg; up to
approximately 15 months
Manufac-
turer
Britax Römer Britax Römer
Type
BABY SAFE
plus BABY SAFE
plus II
Approval
number
(E1 ...)
03 301146
04 301146 04 301146
Order num-
ber
(A 000 ...)
Colour
code: 9H95
970 10 00 970 20 00
Automatic
child seat
recognition
Yes Yes58
Children in the vehicleSafety
Page 305 of 357
cialist workshop or to a col-
lection point for used batter-
ies.
! Have the battery checked regularly at a
qualified specialist workshop.
Observe the service intervals in the Service
Booklet or contact a qualified specialist
workshop for more information.
! You should have all work involving the
battery carried out at a qualified specialist
workshop. In the exceptional case that it is
necessary for you to disconnect the battery yourself, make sure that:
R you switch off the engine and remove the
key. On vehicles with KEYLESS-GO,
ensure that the ignition is switched off.
Check that all the indicator lamps in the
instrument cluster are off. Otherwise,
electronic components, such as the
alternator, may be damaged.
R you first remove the negative terminal
clamp and then the positive terminal
clamp. Never swap the terminal clamps.
Otherwise, the vehicle's electronic sys-
tem may be damaged.
R in vehicles with automatic transmission,
the transmission is locked in position P
after disconnecting the battery. The vehi-
cle is secured against rolling away. You
can then no longer move the vehicle.
The battery and the cover of the positive
terminal clamp must be fitted securely dur- ing operation.
In order for the battery to achieve the maxi-
mum possible service life, it must always be
sufficiently charged.
Comply with safety precautions and take pro-
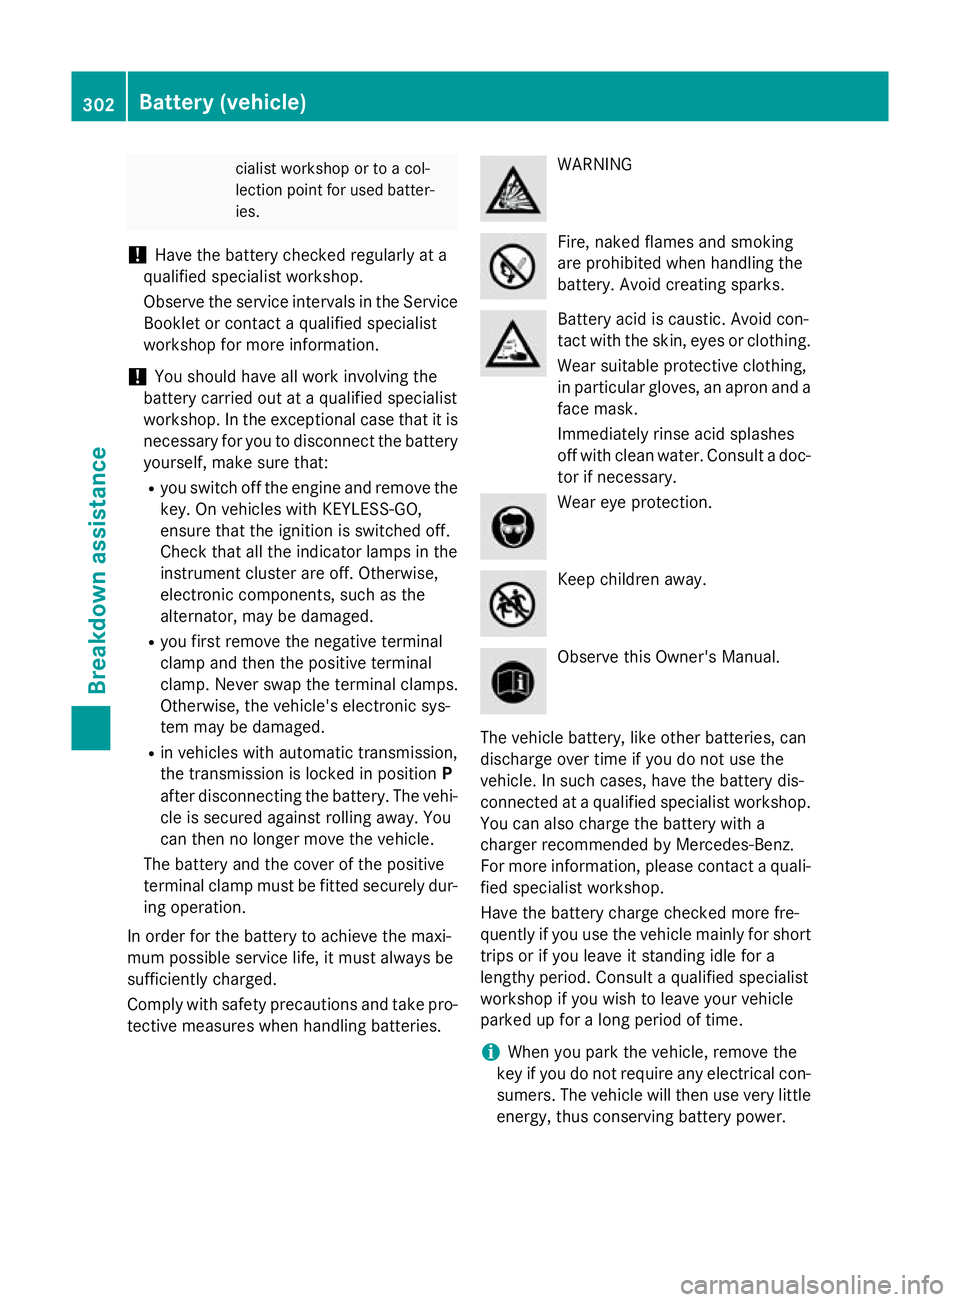
tective measures when handling batteries. WARNING
Fire, naked flames and smoking
are prohibited when handling the
battery. Avoid creating sparks. Battery acid is caustic. Avoid con-
tact with the skin, eyes or clothing.
Wear suitable protective clothing,
in particular gloves, an apron and a face mask.
Immediately rinse acid splashes
off with clean water. Consult a doc-tor if necessary. Wear eye protection.
Keep children away.
Observe this Owner's Manual.
The vehicle battery, like other batteries, can
discharge over time if you do not use the
vehicle. In such cases, have the battery dis-
connected at a qualified specialist workshop.
You can also charge the battery with a
charger recommended by Mercedes-Benz.
For more information, please contact a quali- fied specialist workshop.
Have the battery charge checked more fre-
quently if you use the vehicle mainly for short
trips or if you leave it standing idle for a
lengthy period. Consult a qualified specialist
workshop if you wish to leave your vehicle
parked up for a long period of time.
i When you park the vehicle, remove the
key if you do not require any electrical con- sumers. The vehicle will then use very littleenergy, thus conserving battery power. 302
Battery (vehicle)Breakdown assistance
Page 306 of 357
i
If the power supply has been interrupted,
e.g. if the battery was discharged, you will
have to:
R set the clock; see the separate operating
instructions.
On vehicles with COMAND Online and a
navigation system, the clock is set auto-
matically.
R reset the function for folding the exterior
mirrors in/out automatically, by folding
the mirrors out once (Y page 104).Charging the battery
G
WARNING
During charging and jump-starting, explosive
gases can escape from the battery. There is a risk of an explosion.
Particularly avoid fire, naked flames, creating
sparks and smoking. Ensure there is sufficient
ventilation while charging and jump-starting.
Do not lean over a battery. G
WARNING
Battery acid is caustic. There is a risk of injury. Avoid contact with the skin, eyes or clothing.
Do not inhale any battery gases. Do not lean
over the battery. Keep children away from
batteries. Wash battery acid immediately with water and seek medical attention. G
WARNING
A discharged battery can freeze at tempera-
tures below freezing point. When jump-start-
ing the vehicle or charging the battery, gases can escape from the battery. There is a risk of
an explosion.
Allow the frozen battery to thaw out before
charging it or jump-starting.
! Only charge the installed battery with a
battery charger which has been tested and
approved by Mercedes-Benz. These battery chargers allow the battery to be charged
while still installed in the vehicle. !
Only use battery chargers with a maxi-
mum charging voltage of 14.8 V.
! Only
charge the battery using the jump-
start connection point.
The jump-starting connection point is in the
engine compartment.
If the indicator/warning lamps do not light up at low temperatures, it is very likely that the
discharged battery has frozen. In this case
you may neither jump-start the vehicle nor
charge the battery. The service life of a bat-
tery that has been thawed may be reduced.
The starting characteristics may be impaired,
especially at low temperatures. Have the
thawed battery checked at a qualified spe-
cialist workshop.
Read the battery charger's operating instruc- tions before charging the battery.
X Open the bonnet.
X Connect the battery charger to the positive
terminal and earth point in the same order
as when connecting the donor battery in
the jump-starting procedure (Y page 304). Battery (vehicle)
303Breakdown assistance Z
Page 307 of 357
Jump-starting
For the jump-starting procedure, use only the jump-starting connection point, consisting of a positive terminal and an earth point, in the engine compartment. G
WARNING
Battery acid is caustic. There is a risk of injury.
Avoid contact with the skin, eyes or clothing. Do not inhale any battery gases. Do not lean over the battery. Keep children away from batteries. Wash battery acid immediately with water and seek
medical attention. G
WARNING
During charging and jump-starting, explosive gases can escape from the battery. There is a risk of an explosion.
Particularly avoid fire, naked flames, creating sparks and smoking. Ensure there is sufficient
ventilation while charging and jump-starting. Do not lean over a battery. G
WARNING
During the charging process, a battery produces hydrogen gas. If a short circuit occurs or sparks
are created, the hydrogen gas can ignite. There is a risk of an explosion.
R Make sure that the positive terminal of a connected battery does not come into contact with
vehicle parts.
R Never place metal objects or tools on a battery.
R It is important that you observe the described order of the battery terminals when connecting
and disconnecting a battery.
R When jump-starting, make sure that the battery poles with identical polarity are connected.
R It is particularly important to observe the described order when connecting and disconnecting
the jump leads.
R Never connect or disconnect the battery terminals while the engine is running. G
WARNING
A discharged battery can freeze at temperatures below freezing point. When jump-starting the
vehicle or charging the battery, gases can escape from the battery. There is a risk of an explosion.
Allow the frozen battery to thaw out before charging it or jump-starting.
! Vehicles with a petrol engine:
avoid repeated and lengthy starting attempts. Otherwise,
the non-combusted fuel may damage the catalytic converter.
If the indicator/warning lamps do not light up at low temperatures, it is very likely that the
discharged battery has frozen. In this case you may neither jump-start the vehicle nor charge
the battery. The service life of a battery that has been thawed may be reduced. The starting
characteristics may be impaired, especially at low temperatures. Have the thawed battery
checked at a qualified specialist workshop. 304
Jump-startingBreakdown assistance
Page 322 of 357
The tyres are cold:
R if the vehicle has been parked with the tyres
out of direct sunlight for at least three
hours and
R if the vehicle has not been driven further
than 1.6 km
Depending on the ambient temperature, the
speed at which you are driving and the load on the tyres, the tyre temperature and thus the
tyre pressure changes by approximately
10 kPa (0.1 bar/1.5 psi) per 10 †. Take this
into account when checking the pressure of
warm tyres. Only correct the tyre pressure if it
is too low for the current operating condi-
tions.
Driving with tyre pressure that is too high or
too low can:
R shorten the service life of the tyres
R cause increased tyre damage
R have a negative effect on handling charac-
teristics and thus driving safety (e.g. aqua- planing)
For speeds up to 210 km/h (does not
apply to AMG vehicles): the values given on
the tyre pressure information label (fuel filler
flap) for speeds up to 210 km/h may be
reduced by 30 kPa (0.3 bar/4 psi) without a
reduction in safety. This improves the ride
comfort of your vehicle; however, the fuel
consumption may increase slightly.
i The tyre pressure values given for low
loads are minimum values which offer you
good ride comfort characteristics.
However, you can also use the values given for higher loads. These are permissible andwill not adversely affect the running of the
vehicle. Tyre pressure loss warning system
General notes While the vehicle is in motion, the tyre pres-
sure loss warning system monitors the set
tyre pressure using the rotational speed of the wheels. This enables the system to detect
significant pressure loss in a tyre. If the speed
of rotation of a wheel changes as a result of a loss of pressure, a corresponding warning
message will appear in the multifunction dis-
play.
You can recognise the tyre pressure loss
warning by the Run Flat Indicator
Run Flat Indicator
active Restart with OK active Restart with OK message which
appears in the Serv.
Serv. menu of the multifunc-
tion display. Information on the message dis- play can be found in the "Restarting the tyre
pressure loss warning system" section
(Y page 320).
Important safety notes The tyre pressure warning system does not
warn you of an incorrectly set tyre pressure.
Observe the notes on the recommended tyre
pressure (Y page 318).
The tyre pressure loss warning does not
replace the need to regularly check the tyre
pressures. An even loss of pressure on sev-
eral tyres at the same time cannot be detec-
ted by the tyre pressure loss warning system.
The tyre pressure monitor is not able to warn you of a sudden loss of pressure, e.g. if the
tyre is penetrated by a foreign object. In the
event of a sudden loss of pressure, bring the
vehicle to a halt by braking carefully. Avoid
abrupt steering manoeuvres.
The function of the tyre pressure loss warning
system is limited or delayed if:
R snow chains are fitted to your vehicle's
tyres.
R road conditions are wintry.
R you are driving on sand or gravel.
R you adopt a very sporty driving style (cor-
nering at high speeds or driving with high
rates of acceleration).
R you drive with a heavy load. Tyre pressure
319Wheels and tyres Z