change wheel MERCEDES-BENZ SLK ROADSTER 2014 Owners Manual
[x] Cancel search | Manufacturer: MERCEDES-BENZ, Model Year: 2014, Model line: SLK ROADSTER, Model: MERCEDES-BENZ SLK ROADSTER 2014Pages: 357, PDF Size: 10.22 MB
Page 9 of 357
Brake fluid
Display message ............................ 229
Notes ............................................. 348
Brake force distribution, elec-
tronic
see EBD (electronic brake force
distribution)
Brake lamps
Adaptive ........................................... 62
Display message ............................ 232
Brakes
ABS .................................................. 60
BAS .................................................. 61
BAS PLUS ........................................ 61
Brake fluid (notes) ......................... 348
Display message ............................ 223
Driving tips .................................... 166
High-performance brake system .... 167
Important safety notes .................. 166
Parking brake ................................ 163
Warning lamp ................................. 252
Breakdown
see Flat tyre
see Towing away
Brightness control (instrument
cluster lighting) ................................... 30
Bulbs
see Replacing bulbs C
Calling up a fault see Display messages
Capacities (technical data) ............... 342
Car
see Vehicle
Car key
see Key
Car wash (care) ................................. 286
Care
Automatic car wash ....................... 286
Carpets .......................................... 292
Display ........................................... 290
Exhaust pipe .................................. 290
Exterior lighting ............................. 289
Gear or selector lever .................... 291
High-pressure cleaner .................... 287
Interior ........................................... 290 Matt paintwork .............................. 288
Note
s............................................. 286
Paint .............................................. 288
Plastic trim .................................... 290
Roof lining ...................................... 292
Seat belt ........................................ 292
Seat cove r..................................... 291
Sensors ......................................... 290
Steering wheel ............................... 291
Trim pieces .................................... 291
Washing by hand ........................... 287
Wheels ........................................... 288
Windows ........................................ 289
Wiper blades .................................. 289
Wooden trim .................................. 291
CD player/CD changer(on-board
computer) .......................................... 207
Central locking
Automatic locking (on-board com-puter) ............................................. 216
Locking/unlocking (key) .................. 73
Centre console
Lower section .................................. 35
Upper section .................................. 34
Changing bulbs
Dipped-beam headlamp s............... 119
Main-beam headlamp s................... 119
Parking lamps (front) ..................... 119
Reversing lamps ............................ 120
Standing lamps .............................. 119
Turn signals (front) ......................... 120
Child seat
Automatic recognition ..................... 52
Forward-facing restraint system ...... 55
On the front-passenger seat ............ 54
Problem (malfunction) ..................... 56
Rearward-facing restraint system .... 55
Recommendations ........................... 58
Suitable positions ............................ 57
Children
Restraint systems ............................ 52
Cigarette lighter ................................ 268
Cleaning
Mirror turn signal ........................... 289
Climate control
Air conditioning ............................. 127
Controlling automaticall y............... 131 6
Index
Page 25 of 357
Do not install accessories such as audio
systems in these areas. Do not carry out
repairs or welding. You could impair the
operating efficiency of the restraint sys-
tems.
Have accessories retrofitted at a qualified
specialist workshop.
You could jeopardise the operating safety of
your vehicle if you use parts, tyres and wheels
as well as accessories relevant to safety
which have not been approved by Mercedes. This could lead to malfunctions in safety-rel-
evant systems, e.g. the brake system. Use
only genuine Mercedes-Benz parts or parts of
equal quality. Only use tyres, wheels and
accessories that have been specifically
approved for your vehicle.
Mercedes-Benz tests genuine parts and con-
version parts and accessories that have been specifically approved for your vehicle for their
reliability, safety and suitability. Despite
ongoing market research, Mercedes-Benz is
unable to assess other parts. Mercedes-Benz therefore accepts no responsibility for the
use of such parts in Mercedes-Benz vehicles, even if they have been officially approved or
independently approved by a testing centre.
In Germany, certain parts are only officially
approved for installation or modification if
they comply with legal requirements. This
also applies to some other countries. All gen-
uine Mercedes-Benz parts meet the approval
requirements. The use of non-approved parts may invalidate the vehicle's general operating
permit.
This is the case:
R if they cause a change of the vehicle type
from that for which the vehicle's general
operating permit was granted
R if other road users could be endangered
R if the emission or noise levels are adversely
affected
Always specify the vehicle identification num- ber (VIN) when ordering genuine Mercedes-
Benz parts (Y page 342). Owner's Manual
Vehicle equipment
This Owner's Manual describes all models
and all standard and optional equipment
available for your vehicle at the time of pub-
lication of the Owner's Manual. Country-spe- cific differences are possible. Note that your
vehicle may not be fitted with all features
described. This is also the case for systems
and functions relevant to safety. Therefore,
the equipment on your vehicle may differ from
that in the descriptions and illustrations.
The original purchase contract documenta-
tion for your vehicle contains a list of all of the
systems in your vehicle.
Should you have any questions concerning
equipment and operation, please consult a
Mercedes-Benz Service Centre.
The Owner's Manual and Service Booklet are important documents and should kept in the
vehicle. Operating safety
Important safety notes
G
WARNING
If you do not have the prescribed service/
maintenance work or necessary repairs car-
ried out, this could result in malfunctions or
system failures. There is a risk of an accident.
Always have the prescribed service/mainte-
nance work as well as necessary repairs car-
ried out at a qualified specialist workshop. G
WARNING
If you switch off the ignition while driving,
safety-relevant functions are only available
with limitations, or not at all. This could affect, for example, the power steering and the brake
boosting effect. You will require considerably
more effort to steer and brake. There is a risk of an accident.
Do not switch off the ignition while driving. 22
Introduction
Page 26 of 357
G
WARNING
Flammable material such as leaves, grass or
twigs may ignite if they come into contact with hot parts of the exhaust system. There is a risk of fire.
When driving off road or on unpaved roads,
check the vehicle's underside regularly. In
particular, remove parts of plants or other
flammable materials which have become
trapped. In the case of damage, contact a
qualified specialist workshop. G
WARNING
Modifications to electronic components, their software as well as wiring could effect their
function and/or the operation of other net-
worked components. This could in particular
also be the case for systems relevant to
safety. They might not function properly any
more and/or jeopardise the operational
safety of the vehicle. There is an increased
risk of an accident and injury.
Do not attempt to modify the wiring as well as
electronic components or their software.
Always have work on electrical and electronic components carried out at a qualified special-
ist workshop.
If you make any changes to the vehicle elec-
tronics, the general operating permit is ren-
dered invalid.
! There is a risk of damage to the vehicle if:
R the vehicle becomes stuck, e.g. on a high
kerb or an unpaved road
R you drive too fast over an obstacle, e.g. a
kerb or a pothole in the road
R a heavy object strikes the underbody or
parts of the chassis
In situations like this, the body, the under-
body, chassis parts, wheels or tyres could
be damaged without the damage being visi-
ble. Components damaged in this way can
unexpectedly fail or, in the case of an acci-
dent, no longer withstand the strain they
are designed for. If the underbody panelling is damaged,
combustible materials such as leaves,
grass or twigs can gather between the
underbody and the underbody panelling. If
these materials come in contact with hot
parts of the exhaust system, they can catch
fire.
In such situations, have the vehicle
checked and repaired immediately at a
qualified specialist workshop. If, upon con-
tinuing your journey, you notice that driving
safety is impaired, pull over and stop the
vehicle immediately, paying attention to
road and traffic conditions. In such cases,
visit a qualified specialist workshop. Declarations of conformity
Wireless vehicle components The following information applies to all com-
ponents of the vehicle and the information
systems and communication devices integra-
ted into the vehicle which receive and/or
transmit radio waves:
The components of this vehicle that receive
and/or transmit radio waves are compliant
with the basic requirements and all other rel-
evant conditions of Directive 1999/5/EC.
You can obtain further information from any
Mercedes-Benz Service Centre.
Electromagnetic compatibility The electromagnetic compatibility of the vehi-
cle components has been checked and certi- fied according to the currently valid version of Regulation ECE-R 10. Diagnostics connection
The diagnostics connection is only intended
for the connection of diagnostic equipment at a qualified specialist workshop. Introduction
23 Z
Page 107 of 357
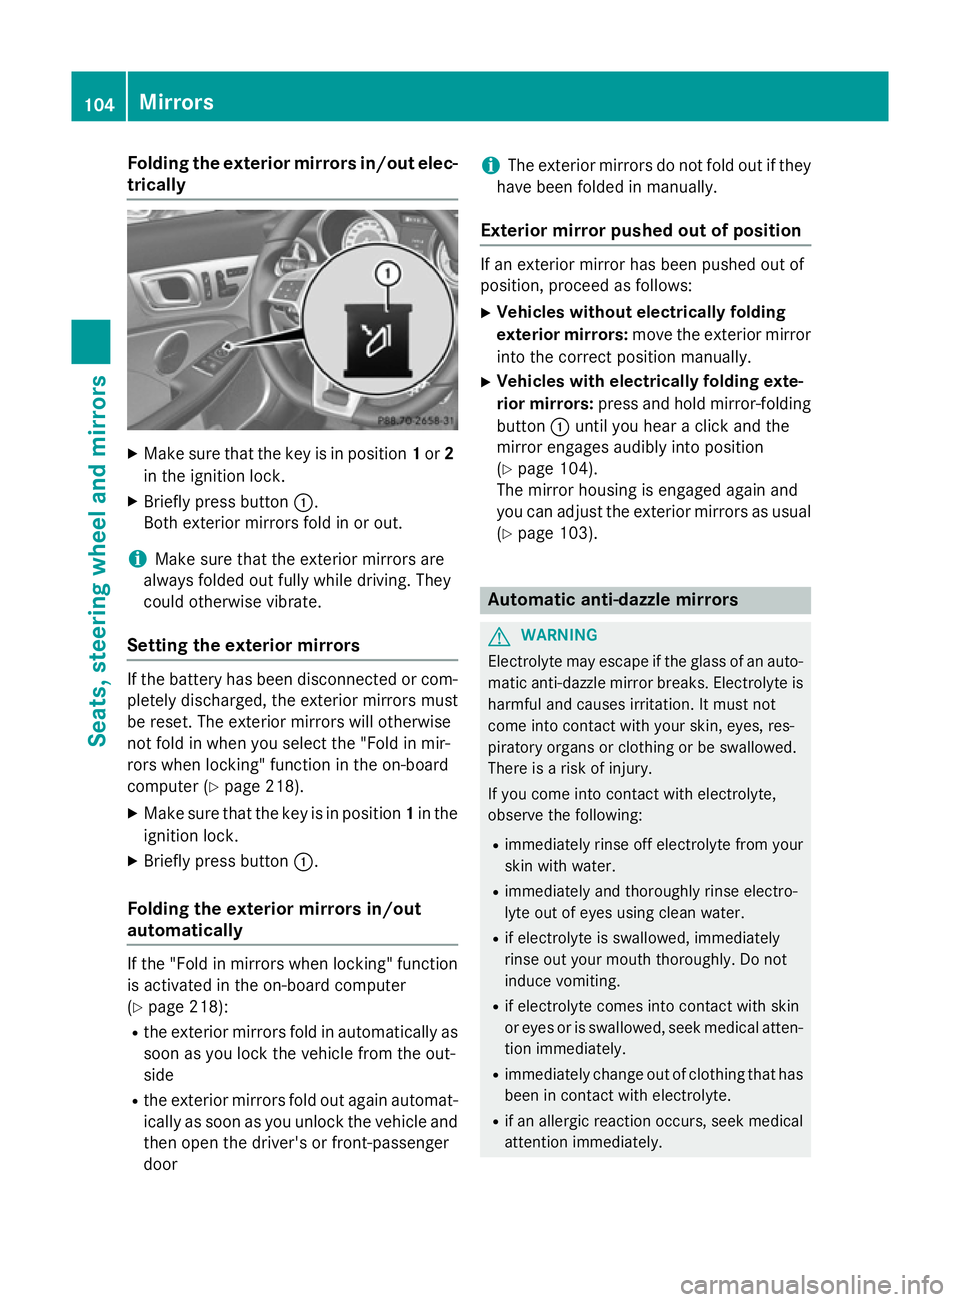
Folding the exterior mirrors in/out elec-
trically X
Make sure that the key is in position 1or 2
in the ignition lock.
X Briefly press button :.
Both exterior mirrors fold in or out.
i Make sure that the exterior mirrors are
always folded out fully while driving. They
could otherwise vibrate.
Setting the exterior mirrors If the battery has been disconnected or com-
pletely discharged, the exterior mirrors must
be reset. The exterior mirrors will otherwise
not fold in when you select the "Fold in mir-
rors when locking" function in the on-board
computer (Y page 218).
X Make sure that the key is in position 1in the
ignition lock.
X Briefly press button :.
Folding the exterior mirrors in/out
automatically If the "Fold in mirrors when locking" function
is activated in the on-board computer
(Y page 218):
R the exterior mirrors fold in automatically as
soon as you lock the vehicle from the out-
side
R the exterior mirrors fold out again automat-
ically as soon as you unlock the vehicle and
then open the driver's or front-passenger
door i
The exterior mirrors do not fold out if they
have been folded in manually.
Exterior mirror pushed out of position If an exterior mirror has been pushed out of
position, proceed as follows:
X Vehicles without electrically folding
exterior mirrors: move the exterior mirror
into the correct position manually.
X Vehicles with electrically folding exte-
rior mirrors: press and hold mirror-folding
button :until you hear a click and the
mirror engages audibly into position
(Y page 104).
The mirror housing is engaged again and
you can adjust the exterior mirrors as usual
(Y page 103). Automatic anti-dazzle mirrors
G
WARNING
Electrolyte may escape if the glass of an auto- matic anti-dazzle mirror breaks. Electrolyte is
harmful and causes irritation. It must not
come into contact with your skin, eyes, res-
piratory organs or clothing or be swallowed.
There is a risk of injury.
If you come into contact with electrolyte,
observe the following:
R immediately rinse off electrolyte from your
skin with water.
R immediately and thoroughly rinse electro-
lyte out of eyes using clean water.
R if electrolyte is swallowed, immediately
rinse out your mouth thoroughly. Do not
induce vomiting.
R if electrolyte comes into contact with skin
or eyes or is swallowed, seek medical atten-
tion immediately.
R immediately change out of clothing that has
been in contact with electrolyte.
R if an allergic reaction occurs, seek medical
attention immediately. 104
MirrorsSeats, steering wheel and
mirrors
Page 122 of 357
X
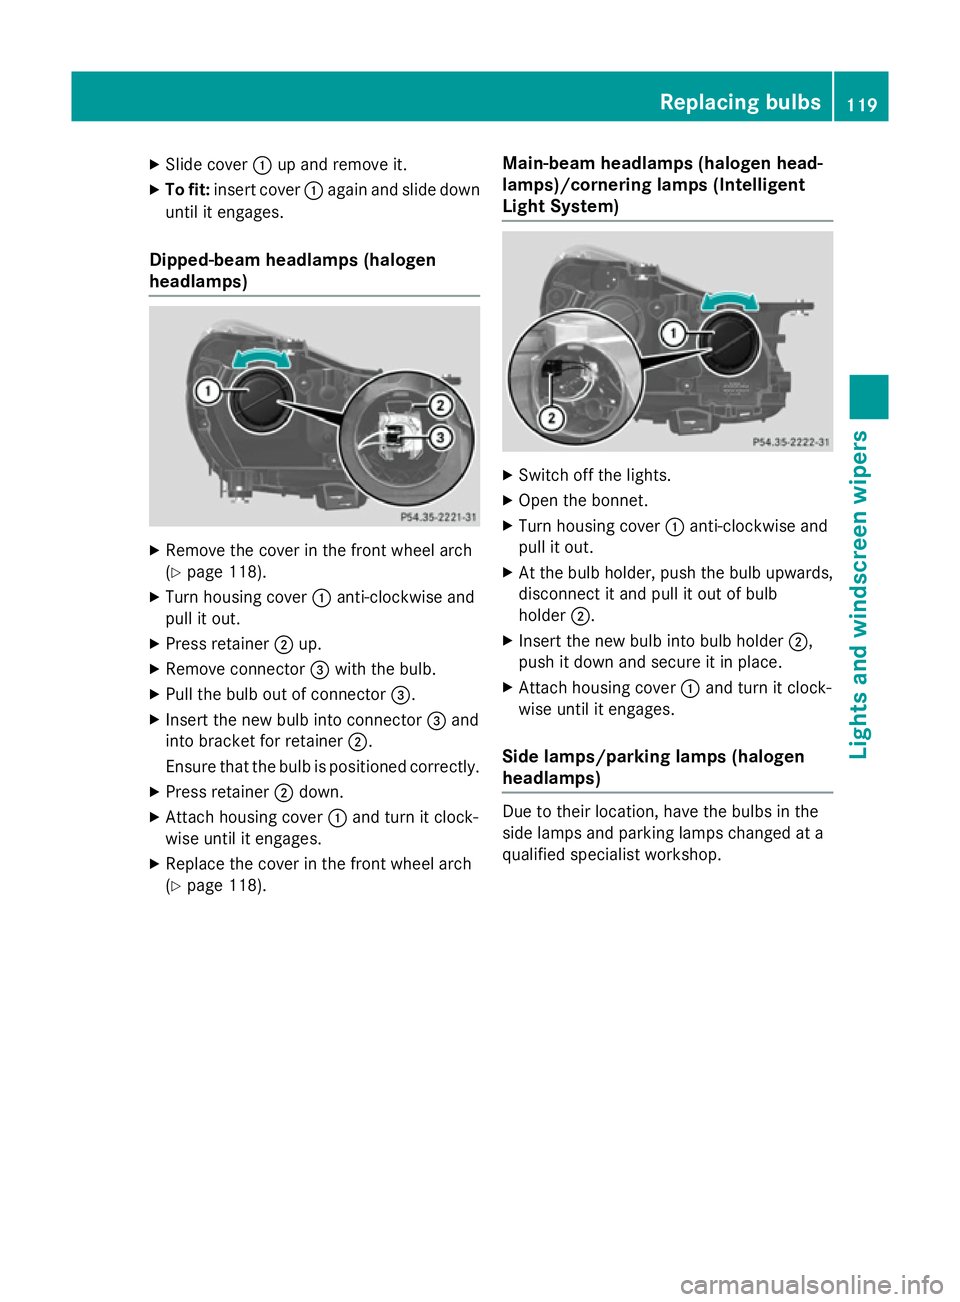
Slide cover :up and remove it.
X To fit: insert cover :again and slide down
until it engages.
Dipped-beam headlamps (halogen
headlamps) X
Remove the cover in the front wheel arch
(Y page 118).
X Turn housing cover :anti-clockwise and
pull it out.
X Press retainer ;up.
X Remove connector =with the bulb.
X Pull the bulb out of connector =.
X Insert the new bulb into connector =and
into bracket for retainer ;.
Ensure that the bulb is positioned correctly.
X Press retainer ;down.
X Attach housing cover :and turn it clock-
wise until it engages.
X Replace the cover in the front wheel arch
(Y page 118). Main-beam headlamps (halogen head-
lamps)/cornering lamps (Intelligent
Light System) X
Switch off the lights.
X Open the bonnet.
X Turn housing cover :anti-clockwise and
pull it out.
X At the bulb holder, push the bulb upwards,
disconnect it and pull it out of bulb
holder ;.
X Insert the new bulb into bulb holder ;,
push it down and secure it in place.
X Attach housing cover :and turn it clock-
wise until it engages.
Side lamps/parking lamps (halogen
headlamps) Due to their location, have the bulbs in the
side lamps and parking lamps changed at a
qualified specialist workshop. Replacing bulbs
119Lights and windscreen wipers Z
Page 147 of 357
Manual transmission
X
Depress the brake pedal and keep it
depressed.
X Fully depress the clutch pedal.
X Shift to neutral N.
i You can only start the engine when the
clutch pedal is fully depressed.
Automatic transmission X
Shift the transmission to position P.
The transmission position indicator in the
multifunction display shows P.
i You can also start the engine when the
transmission is in position N.
Starting procedure with the key X
To start a petrol engine: turn the key to
position 3in the ignition lock (Y page 141)
and release it as soon as the engine is run-
ning.
X To start a diesel engine: turn the key to
position 2in the ignition lock (Y page 141).
The % preglow indicator lamp in the
instrument cluster lights up.
X When the %preglow indicator lamp
goes out, turn the key to position 3
(Y page 141) and release it as soon as the
engine is running.
i To start the engine using the key instead
of KEYLESS-GO, pull the Start/Stop button
out of the ignition lock.
i You can start the engine without preglow
if the engine is warm.
Using KEYLESS-GO to start the engine i
The Start/Stop button can be used to
start the vehicle manually without inserting
the key into the ignition lock. The key must
be in the vehicle and the Start/Stop button must be inserted in the ignition lock. This
mode for starting the engine operates inde- pendently of the ECO start/stop automatic
engine start function.
X Depress the brake pedal and keep it
depressed.
X To start a petrol engine: press the Start/
Stop button once (Y page 141).
The engine starts.
X To start a diesel engine: press the Start/
Stop button once (Y page 141).
Preglow is activated and the engine starts. Pulling away
Manual transmission !
Change gear in good time and avoid spin-
ning the wheels. Otherwise, you could dam- age the vehicle.
X Depress the brake pedal and keep it
depressed.
X Depress the clutch pedal fully.
X Shift to either first gear or reverse gear R.
X Release the electric parking brake
(Y page 163).
X Release the brake pedal.
X Slowly release the clutch pedal and gently
depress the accelerator pedal.
i Follow the shift recommendations in the
multifunction display for an economical
driving style (Y page 152).
i The vehicle locks centrally once you have
pulled away. The locking knobs in the doors
drop down.
You can open the doors from the inside at
any time.
You can also deactivate the automatic lock- ing feature (Y page 216).
Automatic transmission G
WARNING
If the engine speed is above the idling speed
and you engage transmission position Dor R, 144
DrivingDriving and parking
Page 156 of 357
Transmission positions
B Park position
This prevents the vehicle from roll-
ing away when stopped. Do not
shift the transmission into position
P (Y page 152) unless the vehicle is
stationary. The parking lock should not be used as a brake when park-
ing. In order to secure the vehicle,
always apply the electric parking
brake in addition to the parking
lock.
The key can only be removed if the transmission is in position P. If the
key is removed from the ignition
lock, the selector lever is locked. C Reverse gear
Only shift the transmission to
R
when the vehicle is stationary. A Neutral
Do not shift the transmission to
N
while driving. Otherwise, the auto-
matic transmission could be dam-
aged.
No power is transmitted from the
engine to the drive wheels.
Releasing the brake pedal will allow
you to move the vehicle freely, e.g. to push it or tow it.
If ESP ®
is deactivated or faulty:
only shift the transmission to posi-
tion Nif the vehicle is in danger of
skidding, e.g. on icy roads.
! Rolling in neutral
Ncan lead to
damage to the transmission. 7 Drive
The automatic transmission
changes gear automatically. All
forward gears are available. Driving tips
Changing gear The automatic transmission shifts to the indi-
vidual gears automatically when it is in trans-
mission position D. Gearshifting is deter-
mined by:
R the selected drive program (Y page 154)
R the position of the accelerator pedal
(Y page 153)
R the road speed
Accelerator pedal position Your style of driving influences how the auto-
matic transmission shifts gear:
R little throttle: early upshifts
R more throttle: late upshifts
Double-clutch function When shifting down, the double-clutch func-
tion is active regardless of the currently selec-
ted drive program. The double-clutch functionreduces load change reactions and is condu-cive to a sporty driving style. The sound gen-
erated by the double-clutch function depends
on the drive program selected.
Kickdown Use kickdown for maximum acceleration.
X Depress the accelerator pedal beyond the
pressure point.
The transmission shifts to a lower gear
depending on the engine speed.
X Ease off the accelerator pedal once the
desired speed is reached.
The automatic transmission shifts back up. Automatic transmission
153Driving and parking Z
Page 157 of 357
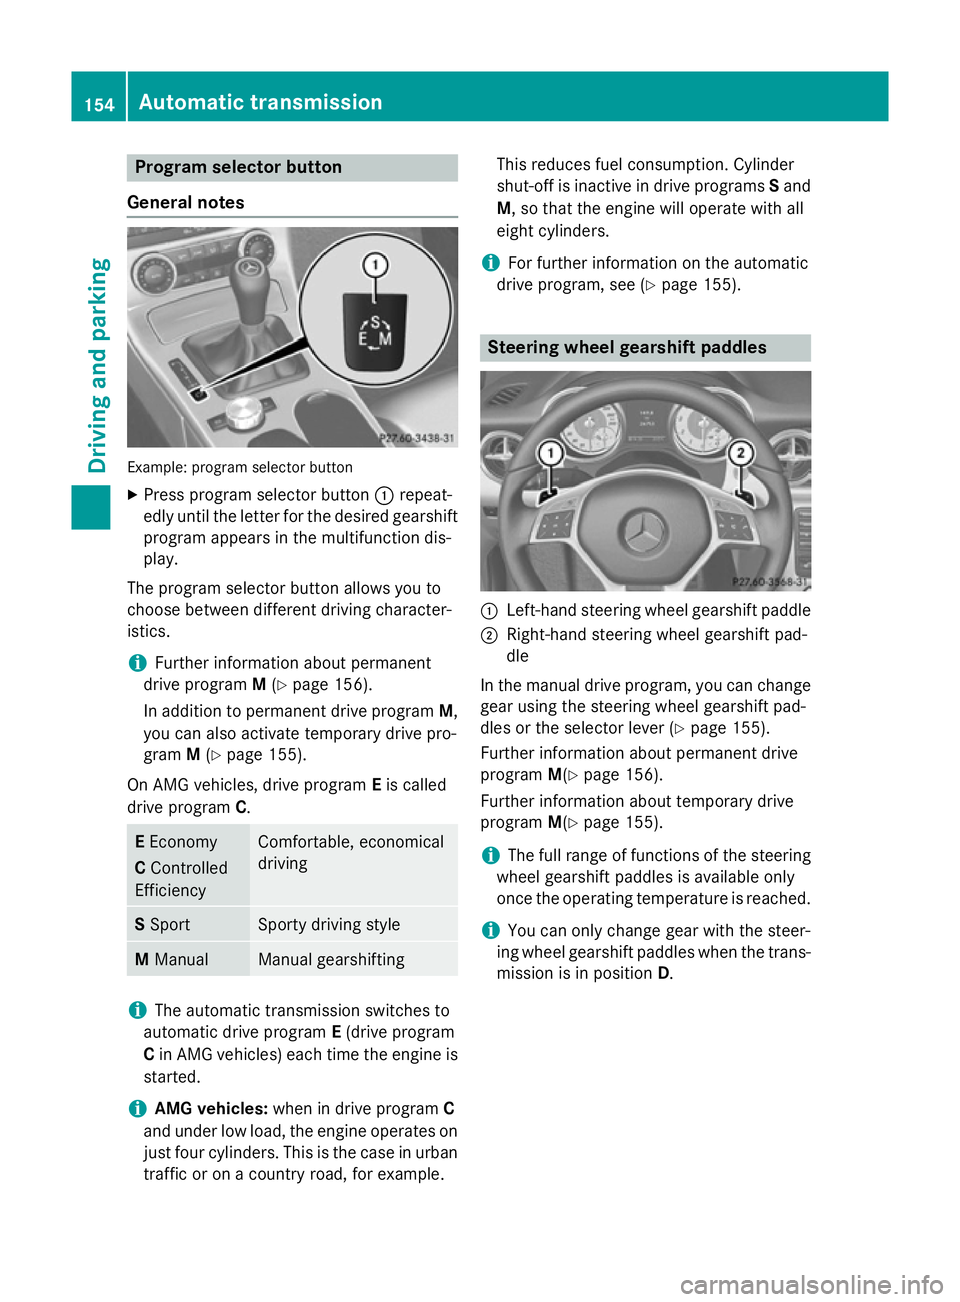
Program selector button
General notes Example: program selector button
X Press program selector button :repeat-
edly until the letter for the desired gearshift program appears in the multifunction dis-
play.
The program selector button allows you to
choose between different driving character-
istics.
i Further information about permanent
drive program M(Y page 156).
In addition to permanent drive program M,
you can also activate temporary drive pro-
gram M(Y page 155).
On AMG vehicles, drive program Eis called
drive program C. E
Economy
C Controlled
Efficiency Comfortable, economical
driving
S
Sport Sporty driving style
M
Manual Manual gearshifting
i
The automatic transmission switches to
automatic drive program E(drive program
C in AMG vehicles) each time the engine is
started.
i AMG vehicles:
when in drive program C
and under low load, the engine operates on
just four cylinders. This is the case in urban
traffic or on a country road, for example. This reduces fuel consumption. Cylinder
shut-off is inactive in drive programs
Sand
M, so that the engine will operate with all
eight cylinders.
i For further information on the automatic
drive program, see (Y page 155). Steering wheel gearshift paddles
:
Left-hand steering wheel gearshift paddle
; Right-hand steering wheel gearshift pad-
dle
In the manual drive program, you can change
gear using the steering wheel gearshift pad-
dles or the selector lever (Y page 155).
Further information about permanent drive
program M(Ypage 156).
Further information about temporary drive
program M(Ypage 155).
i The full range of functions of the steering
wheel gearshift paddles is available only
once the operating temperature is reached.
i You can only change gear with the steer-
ing wheel gearshift paddles when the trans-
mission is in position D.154
Automatic transmissionDriving and parking
Page 158 of 357
Automatic drive program
Automatic drive programs E and S Drive program
E(drive program Con AMG
vehicles) is characterised by the following:
R comfort-orientated engine and transmis-
sion settings.
R optimal fuel consumption resulting from
the automatic transmission shifting up
sooner.
R the vehicle pulling away more gently in
forward and reverse gears unless the accel-
erator pedal is depressed fully.
R increased sensitivity. This improves driving
stability on slippery road surfaces, for
example.
R the automatic transmission shifting up
sooner. This results in the vehicle being
driven at lower engine speeds and the
wheels being less likely to spin.
Drive program Sis characterised by the fol-
lowing:
R sporty engine and transmission settings
R the vehicle pulling away in first gear
R the automatic transmission shifting up
later
R as a result of the later automatic transmis-
sion shift points, the fuel consumption pos-sibly being higher
Manual drive program M General notes
In this drive program, you can briefly change
gear yourself by using the steering wheel
gearshift paddles. The transmission must be
in position D.
You can activate manual drive program Min
the Eand Sautomatic drive programs.
i In addition to temporary drive program
M,
you can also activate permanent drive pro- gram M(Y page 154).
Further information about permanent drive program M(Y page 156). Activating
X Shift the transmission to position D.
X Pull the left or right steering wheel gearshift
paddle (Y page 154).
Manual drive program Mis temporarily acti-
vated. The selected gear and Mappear in
the multifunction display.
Upshifting X Briefly press the selector lever to the right
towards D+.
or
X Pull the right-hand steering wheel gearshift
paddle (Y page 154).
In cases where it is permissible, the auto-
matic transmission shifts up to the next
gear.
i If the maximum engine speed on the cur-
rently engaged gear is reached and you
continue to accelerate, the automatic
transmission automatically shifts up in
order to prevent engine damage.
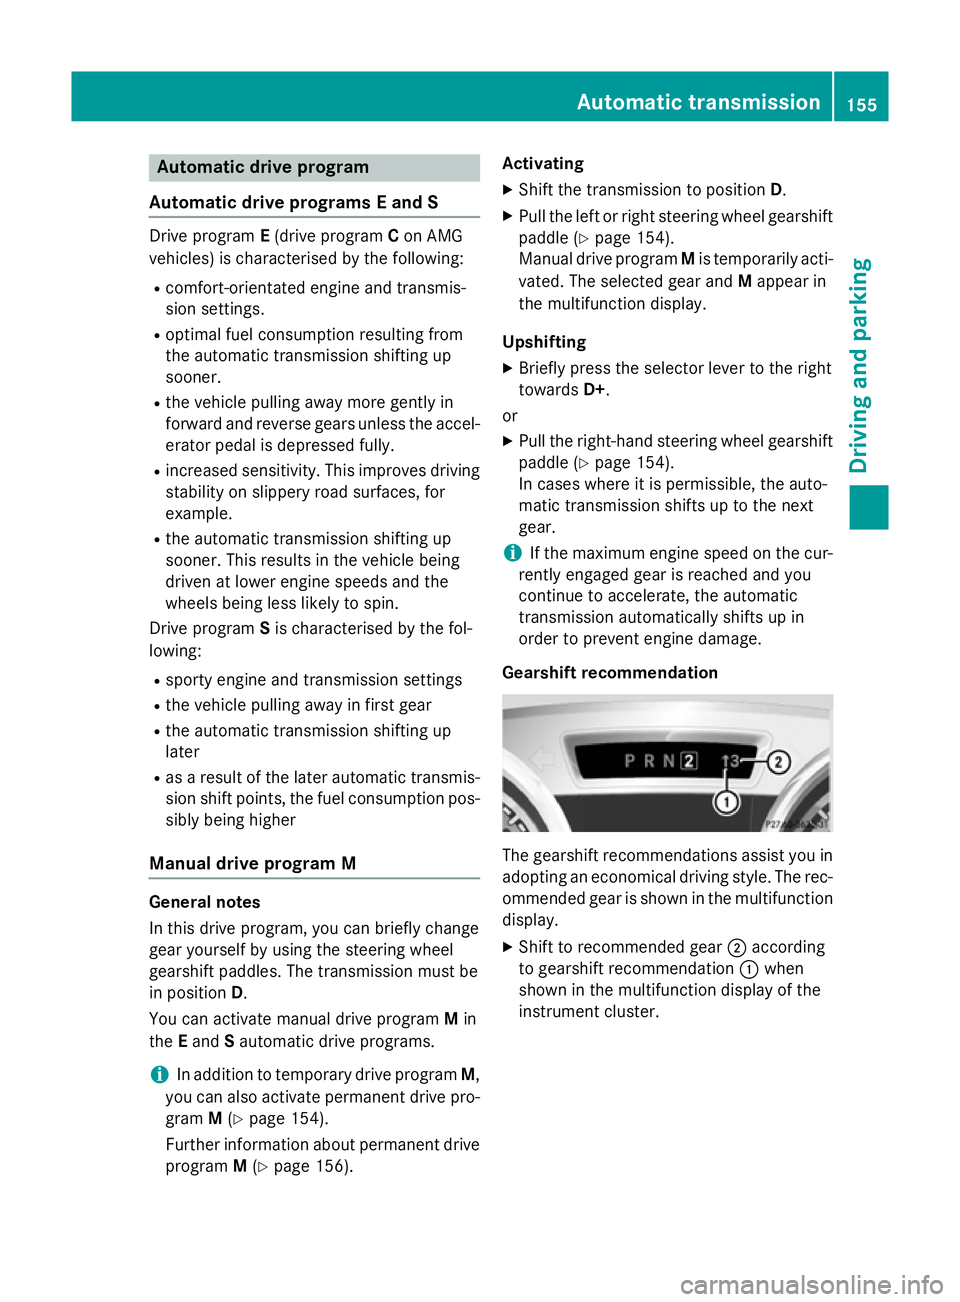
Gearshift recommendation The gearshift recommendations assist you in
adopting an economical driving style. The rec- ommended gear is shown in the multifunction
display.
X Shift to recommended gear ;according
to gearshift recommendation :when
shown in the multifunction display of the
instrument cluster. Automatic trans
mission
155Driving an d parking Z
Page 159 of 357
Downshifting
X Briefly press the selector lever to the left
towards D–.
or X Pull the left-hand steering wheel gearshift
paddle (Y page 154).
In cases where it is permissible, the auto-
matic transmission shifts down to the next gear.
i If you desire maximum acceleration, push
the selector lever to the left or pull and hold the left-hand steering wheel gearshift pad-
dle until the transmission shifts to the opti-
mal gear for the current speed.
i If the engine exceeds the maximum
engine speed when shifting down, the auto-
matic transmission protects against engine damage by not shifting down.
i Automatic downshifting occurs when
coasting.
Deactivating
If you have activated manual drive program
M, it will remain active for a certain amount of time. Under certain conditions the minimum
amount of time is extended, e.g. in the case of lateral acceleration, during an overrun phase
or when driving on steep terrain.
If manual drive program Mhas been deacti-
vated, the automatic transmission shifts into
the automatic drive program that was last
selected, i.e. Eor S.
You can also deactivate manual drive pro-
gram Myourself:
X Pull on the right-hand steering wheel gear-
shift paddle and hold it in place
(Y page 154).
or
X Use the lever to switch the transmission
position. or
X Use the program selector button to change
the drive program (Y page 154).
Manual drive program Mis deactivated.
The automatic transmission switches into
the automatic drive program that was last
selected, i.e. Eor S. Manual drive program
General notes In this drive program, you can permanently
change gear yourself by using the steering
wheel gearshift paddles. The transmission
must be in position D.
i In addition to permanent drive program
M, you can also activate temporary drive
program M(Y page 155).
Activating the manual drive program Manual drive program
Mdiffers from drive
program Swith regard to spontaneity,
responsiveness and the smoothness of the
gear changes.
You can select manual drive program Mwith
the program selector button. You can change gear using the steering wheel gearshift pad-
dles or the selector lever in manual drive pro-
gram Mif the transmission is in position D.
The selected gear appears in the multifunc-
tion display.
X Press the program selector button
(Y page 154) until Mappears in the multi-
function display.
Upshifting X
Briefly press the selector lever to the right
towards D+.
or X Pull the right-hand steering wheel gearshift
paddle (Y page 154).
The automatic transmission shifts up to the next gear. 156
Automatic transmissionDriving and pa
rking