weight MERCEDES-BENZ SLK ROADSTER 2014 Owners Manual
[x] Cancel search | Manufacturer: MERCEDES-BENZ, Model Year: 2014, Model line: SLK ROADSTER, Model: MERCEDES-BENZ SLK ROADSTER 2014Pages: 357, PDF Size: 10.22 MB
Page 24 of 357
Protection of the environment
General notes
H
Environmental note
Daimler's declared policy is one of compre-
hensive environmental protection.
Our objectives are to use the natural resour-
ces which form the basis of our existence on
this planet sparingly and in a manner which
takes the requirements of both nature and
humanity into consideration.
You too can help to protect the environment
by operating your vehicle in an environmen-
tally-responsible manner.
Fuel consumption and the rate of engine,
transmission, brake and tyre wear depend on
the following factors:
R operating conditions of your vehicle
R your personal driving style
You can influence both factors. Therefore,
please bear the following in mind:
Operating conditions:
R avoid short trips, as these increase fuel
consumption.
R observe the correct tyre pressure.
R do not carry any unnecessary weight in the
vehicle.
R remove the roof rack once you no longer
need it.
R a regularly serviced vehicle will contribute
to environmental protection. You should
therefore adhere to the service intervals.
R all maintenance work should be carried out
at a qualified specialist workshop.
Personal driving style:
R do not depress the accelerator pedal when
starting the engine.
R do not warm up the engine when the vehicle
is stationary.
R drive carefully and maintain a safe distance
from the vehicle in front.
R avoid frequent, sudden acceleration and
braking. R
change gear in good time and use each gear
only up to Ôof its maximum engine speed.
R switch off the engine in stationary traffic.
R monitor the vehicle's fuel consumption. Returning an end-of-life vehicle
EU countries only:
Mercedes-Benz will take back your old vehicle to dispose of it in an environmentally-respon-sible manner in accordance with the Euro-
pean Union (EU) End of Life Vehicles Direc-
tive.
There is a network of return points and dis-
assembly plants available. You can return
your vehicle to these plants free of charge.
This makes a valuable contribution to the
recycling process and the conservation of
resources.
For further information on recycling old vehi- cles, recovery and the terms of the policy,
visit the Mercedes-Benz homepage. Genuine Mercedes-Benz parts
H
Environmental note
Daimler AG also supplies reconditioned
assemblies and parts which are of the same
quality as new parts. For these, the same war-
ranty applies as for new parts.
! Airbags and seat belt tensioners, as well
as control units and sensors for these
restraint systems, may be installed in the
following areas of your vehicle:
R doors
R door pillars
R door sills
R seats
R dashboard
R instrument cluster
R centre console Introduction
21 Z
Page 46 of 357
is in an almost vertical position and that the
shoulder section of your seatbelt is routed
across the centre of your shoulder. G
WARNING
Persons under 1.50 mtall cannot wear the
seat belts correctly without a suitable, addi-
tional restraint system. The seat belt cannot
perform its intended protective function if it is not fastened correctly. Also, an improperly
fastened seat belt can cause additional inju-
ries in the event of an accident, sudden brak-
ing or abrupt changes of direction. There is an increased risk of injury, possibly even fatal.
Secure persons less than 1.50 mtall in a suit-
able restraint system.
If a child younger than 12 years old and under 1.50 m in height is travelling in the vehicle:
R always secure the child in a child restraint
system suitable for this Mercedes-Benz
vehicle. The child restraint system must be appropriate to the age, weight and size of
the child
R always observe the instructions and safety
notes on "Children in the vehicle" in this
Owner's Manual (Y page 51) in addition
to the child restraint system manufactur-
er's installation instructions G
WARNING
Seat belts cannot protect as intended, if:
R they are damaged, have been modified, are
extremely dirty, bleached or dyed
R the seat belt buckle is damaged or
extremely dirty
R modifications have been made to the belt
tensioners, belt anchorages or inertia reels
Damage caused to safety belts in an accident may not be visible, e.g. by splinters of glass.
Modified or damaged seat belts can tear or
fail, for example in the event of an accident.
Modified seat belt tensioners may be
deployed unintentionally or fail to be deployed
when required. There is an increased risk of
injury, possibly even fatal. Never modify safety belts, seat belt tension-
ers, seat belt anchorages and inertia reels.
Ensure that seat belts are not damaged or
worn and are clean. After an accident, have
the seat belts checked immediately at a quali- fied specialist workshop.
Mercedes-Benz recommends that you only
use seat belts which have been approved
specifically for your vehicle by Mercedes-
Benz. Any such modifications could invalidate
the vehicle's general operating permit.
Correct seat belt use Observe the safety notes on the seat belt
(Y page 42).
All vehicle occupants must be wearing the
seat belt correctly before beginning the jour-
ney. Also make sure that all vehicle occu-
pants are always wearing the seat belt cor-
rectly while the vehicle is in motion.
When fastening the seat belt, always make
sure that:
R the seat belt tongue is only inserted to the
belt buckle belonging to that seat.
R the seat belt is tight across your body.
Avoid wearing bulky clothing, e.g. a winter
coat.
R the seat belt is not twisted.
Only then can forces which occur be dis-
tributed across the surface of the seat belt.
R the shoulder section of the belt is always
routed across the centre of your shoulder.
The shoulder section of the seat belt should
not touch your neck nor be routed under
your arm.
R the lap belt passes across your lap as
tightly and as low down as possible.
The lap must always be routed across your hip joints and never across your abdomen.
This applies particularly to pregnant
women. If necessary, press the lap belt
down into your hip joints and pull tight with the shoulder section of the belt. Occupant safety
43Safety Z
Page 54 of 357
The seat-belt adjustment is an integral part of
the PRE-SAFE ®
convenience function. Infor-
mation about the convenience function can
be found under "Belt adjustment"
(Y page 45). Automatic measures after an acci-
dent
Immediately after an accident, the following
measures are implemented, depending on
the type and severity of the impact:
R the hazard warning lamps are activated
R the emergency lighting is activated
R the vehicle doors are unlocked
R the front side windows are lowered
R in vehicles with a memory function: the
electrically adjustable steering wheel is
raised
R the engine is switched off
R vehicles with the Mercedes-Benz emer-
gency call system: automatic emergency
call Children in the vehicle
Important safety notes
If a child younger than 12 years old and under
1.50 m in height is travelling in the vehicle:
R always secure the child in a child restraint
system suitable for Mercedes-Benz vehi-
cles. The child restraint system must be
appropriate to the age, weight and size of
the child
R be sure to observe the instructions and
safety notes in this section in addition to
the child restraint system manufacturer's
installation instructions G
WARNING
If you leave children unattended in the vehi-
cle, they may be able to set the vehicle in
motion if, for example, they:
R release the parking brake
R shift the automatic transmission out of park
position Por shift manual transmission into
neutral
R start the engine
In addition, they may operate vehicle equip-
ment and become trapped. There is a risk of
an accident and injury.
When leaving the vehicle, always take the key with you and lock the vehicle. Never leave
children unattended in the vehicle. G
WARNING
If persons (particularly children) are exposed
to heat or cold for a prolonged period, there is a risk of serious or even fatal injuries. Never
leave persons (particularly children) unatten-
ded in the vehicle. G
WARNING
If the child restraint system is placed in direct sunlight, the parts could become very hot.
Children could be suffer burns by touching
these parts, in particular on the metallic parts
of the child restraint system. There is a risk of injury.
If you and your child leave the vehicle, always
make sure that the child restraint system is
not in direct sunlight. Cover it with a blanket, for example. If the child restraint system has
been exposed to direct sunlight, leave it to
cool down before securing the child in it.
Never leave children unattended in the vehi-
cle.
Always ensure that all vehicle occupants have their seat belts fastened correctly and are sit-
ting properly. Particular attention must be
paid to children.
Observe the safety notes on the seat belt
(Y page 42) and the information on the cor-
rect use of the seat belt (Y page 43). Children in the vehicle
51Safety Z
Page 60 of 357
Suitable positioning of the child
restraint system
Introduction Only child restraint systems which are
approved in accordance with the ECE stand-
ard ECE R44 are permitted for use in the vehi-
cle.
Rearward-facing child restraint systems with-
out a transponder for automatic child seat
recognition may not be installed on the front- passenger seat.
Child restraint system on the front-
passenger seat – if you secure a child in a
child restraint system on the front-passenger seat:
X Always pay attention to the instructions
under "Child restraint system on the front-
passenger seat" (Y page 54).
There you will find instructions on how to
correctly route the shoulder belt strap from the front-passenger seat belt loop to the
shoulder belt guide on the child restraint
system (Y page 55).
X Move the front-passenger seat as far back
as possible and into the highest position.
X Move the backrest to an almost vertical
position.
The entire base of the child restraint sys-
tem must always rest on the seat cushion of
the front-passenger seat. The backrest of
the forwards-facing child restraint system
must, as far as possible, be resting on the
backrest of the front-passenger seat. The
child restraint system must not touch the
roof. Adjust the backrest angle accord-
ingly. Also observe the child restraint sys-
tem manufacturer's installation instruc-
tions.
X Move the seat cushion angle to the highest,
most vertical position.
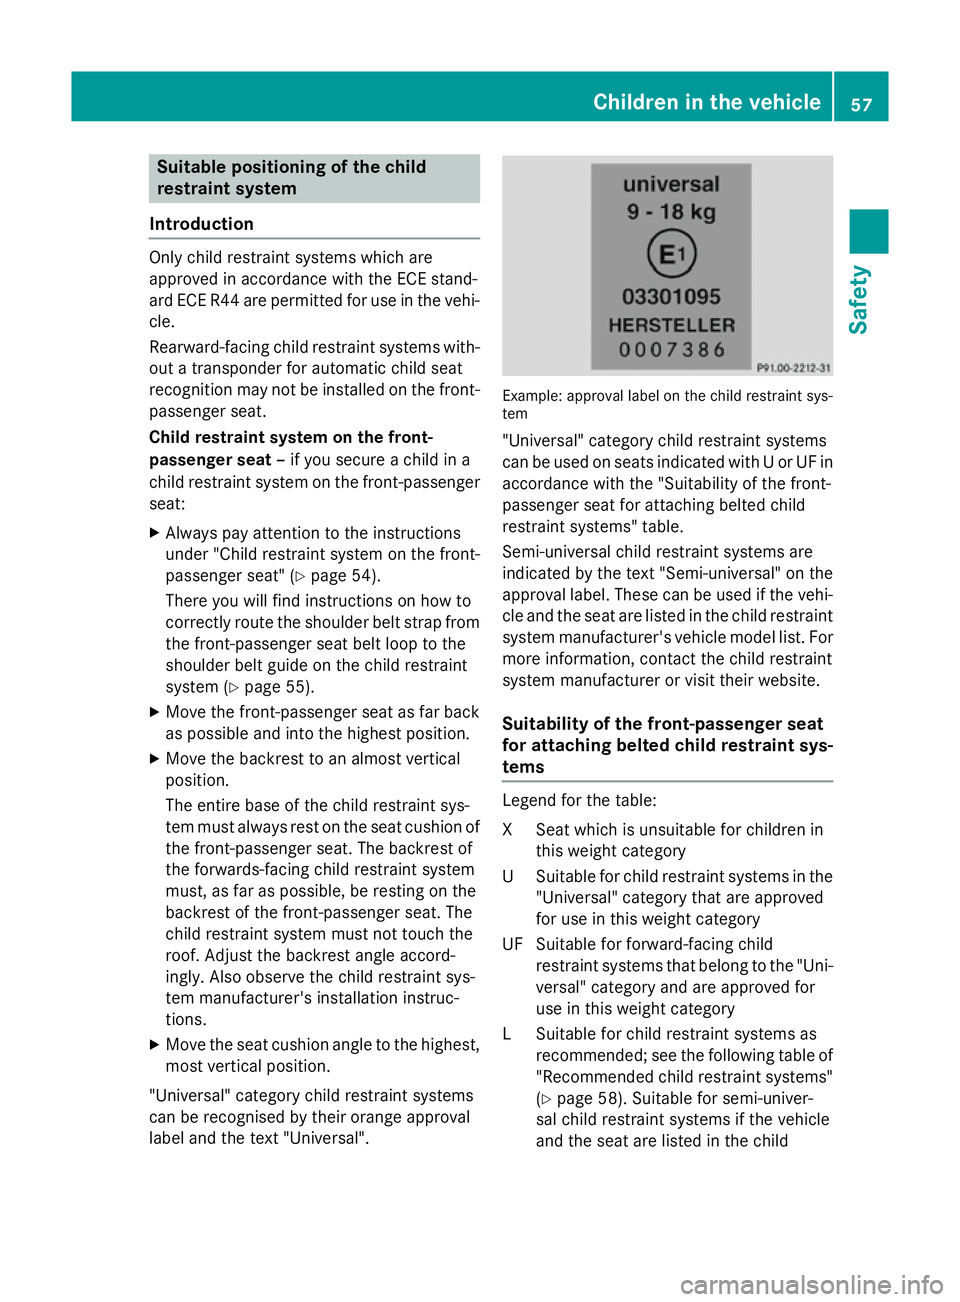
"Universal" category child restraint systems
can be recognised by their orange approval
label and the text "Universal". Example: approval label on the child restraint sys-
tem
"Universal" category child restraint systems
can be used on seats indicated with U or UF in
accordance with the "Suitability of the front-
passenger seat for attaching belted child
restraint systems" table.
Semi-universal child restraint systems are
indicated by the text "Semi-universal" on the
approval label. These can be used if the vehi- cle and the seat are listed in the child restraint
system manufacturer's vehicle model list. For more information, contact the child restraint
system manufacturer or visit their website.
Suitability of the front-passenger seat
for attaching belted child restraint sys-
tems Legend for the table:
XS
eat which is unsuitable for children in
this weight category
US uitable for child restraint systems in the
"Universal" category that are approved
for use in this weight category
UF Suitable for forward-facing child restraint systems that belong to the "Uni-
versal" category and are approved for
use in this weight category
LS uitable for child restraint systems as
recommended; see the following table of
"Recommended child restraint systems" (Y page 58). Suitable for semi-univer-
sal child restraint systems if the vehicle
and the seat are listed in the child Children in the vehicle
57Safety Z
Page 61 of 357
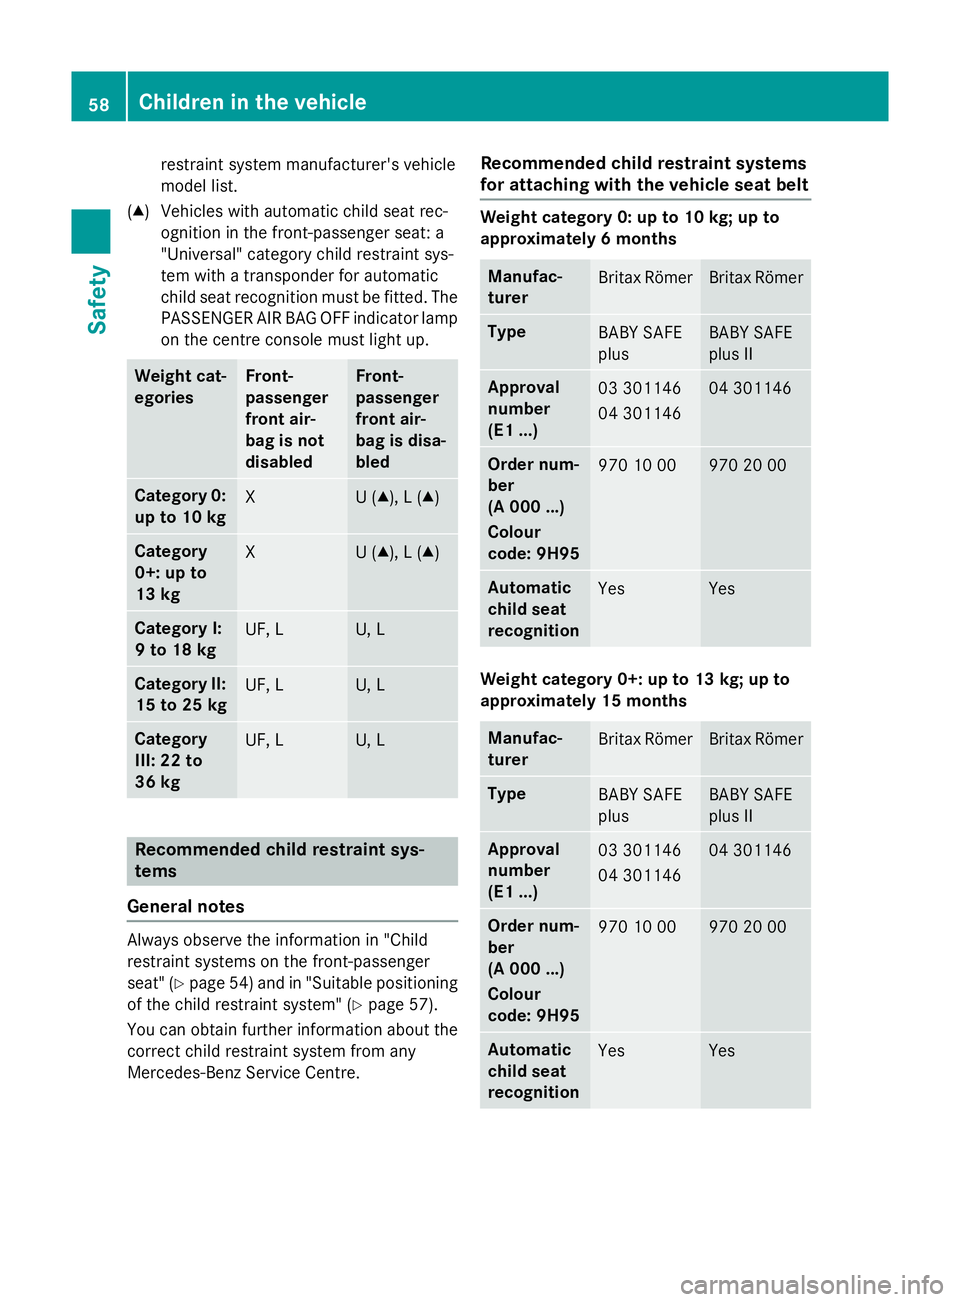
restraint system manufacturer's vehicle
model list.
(▲) Vehicles with automatic child seat rec- ognition in the front-passenger seat: a
"Universal" category child restraint sys-
tem with a transponder for automatic
child seat recognition must be fitted. The
PASSENGER AIR BAG OFF indicator lamp
on the centre console must light up. Weight cat-
egories Front-
passenger
front air-
bag is not
disabled Front-
passenger
front air-
bag is disa-
bled
Category 0:
up to 10 kg X U (▲), L (▲)
Category
0+: up to
13 kg
X U (▲), L (▲)
Category I:
9 to 18 kg
UF, L U, L
Category II:
15 to 25 kg UF, L U, L
Category
III: 22 to
36 kg
UF, L U, L
Recommended child restraint sys-
tems
General notes Always observe the information in "Child
restraint systems on the front-passenger
seat" (Y page 54) and in "Suitable positioning
of the child restraint system" (Y page 57).
You can obtain further information about the correct child restraint system from any
Mercedes-Benz Service Centre. Recommended child restraint systems
for attaching with the vehicle seat belt Weight category 0: up to 10 kg; up to
approximately 6 months
Manufac-
turer
Britax Römer Britax Römer
Type
BABY SAFE
plus BABY SAFE
plus II
Approval
number
(E1 ...)
03 301146
04 301146 04 301146
Order num-
ber
(A 000 ...)
Colour
code: 9H95
970 10 00 970 20 00
Automatic
child seat
recognition
Yes Yes
Weight category 0+: up to 13 kg; up to
approximately 15 months
Manufac-
turer
Britax Römer Britax Römer
Type
BABY SAFE
plus BABY SAFE
plus II
Approval
number
(E1 ...)
03 301146
04 301146 04 301146
Order num-
ber
(A 000 ...)
Colour
code: 9H95
970 10 00 970 20 00
Automatic
child seat
recognition
Yes Yes58
Children in the vehicleSafety
Page 62 of 357
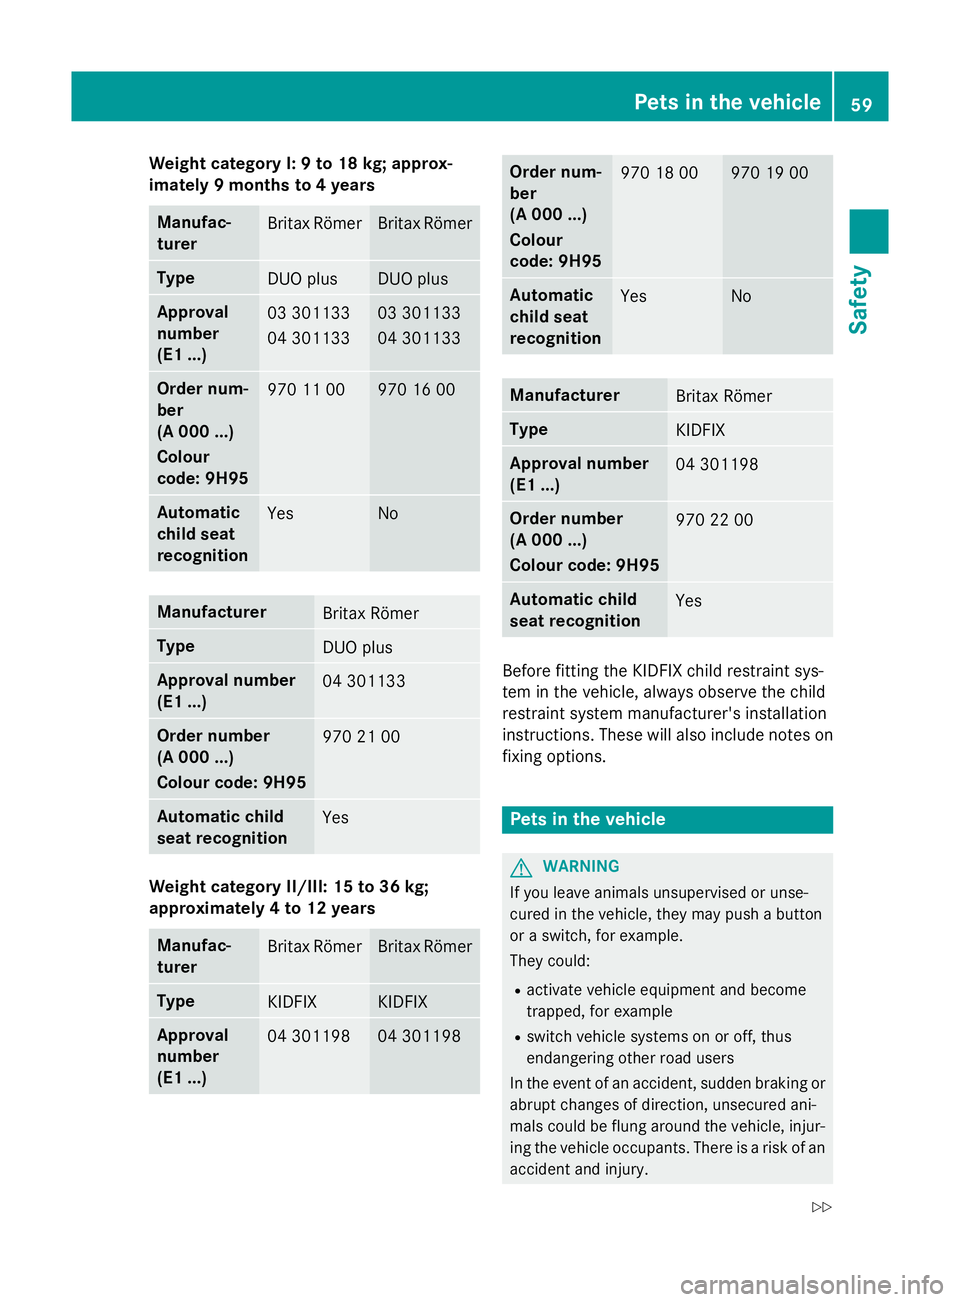
Weight category I: 9 to 18 kg; approx-
imately 9 months to 4 years
Manufac-
turer
Britax Römer Britax Römer
Type
DUO plus DUO plus
Approval
number
(E1 ...)
03 301133
04 301133 03 301133
04 301133
Order num-
ber
(A 000 ...)
Colour
code: 9H95
970 11 00 970 16 00
Automatic
child seat
recognition
Yes No
Manufacturer
Britax Römer
Type
DUO plus
Approval number
(E1 ...)
04 301133
Order number
(A 000 ...)
Colour code: 9H95
970 21 00
Automatic child
seat recognition
Yes
Weight category II/III: 15 to 36 kg;
approximately 4 to 12 years Manufac-
turer
Britax Römer Britax Römer
Type
KIDFIX KIDFIX
Approval
number
(E1 ...)
04 301198 04 301198 Order num-
ber
(A 000 ...)
Colour
code: 9H95
970 18 00 970 19 00
Automatic
child seat
recognition
Yes No
Manufacturer
Britax Römer
Type
KIDFIX
Approval number
(E1 ...)
04 301198
Order number
(A 000 ...)
Colour code: 9H95
970 22 00
Automatic child
seat recognition
Yes
Before fitting the KIDFIX child restraint sys-
tem in the vehicle, always observe the child
restraint system manufacturer's installation
instructions. These will also include notes on
fixing options. Pets in the vehicle
G
WARNING
If you leave animals unsupervised or unse-
cured in the vehicle, they may push a button
or a switch, for example.
They could:
R activate vehicle equipment and become
trapped, for example
R switch vehicle systems on or off, thus
endangering other road users
In the event of an accident, sudden braking or
abrupt changes of direction, unsecured ani-
mals could be flung around the vehicle, injur-
ing the vehicle occupants. There is a risk of an accident and injury. Pets in the vehicle
59Safety
Z
Page 309 of 357
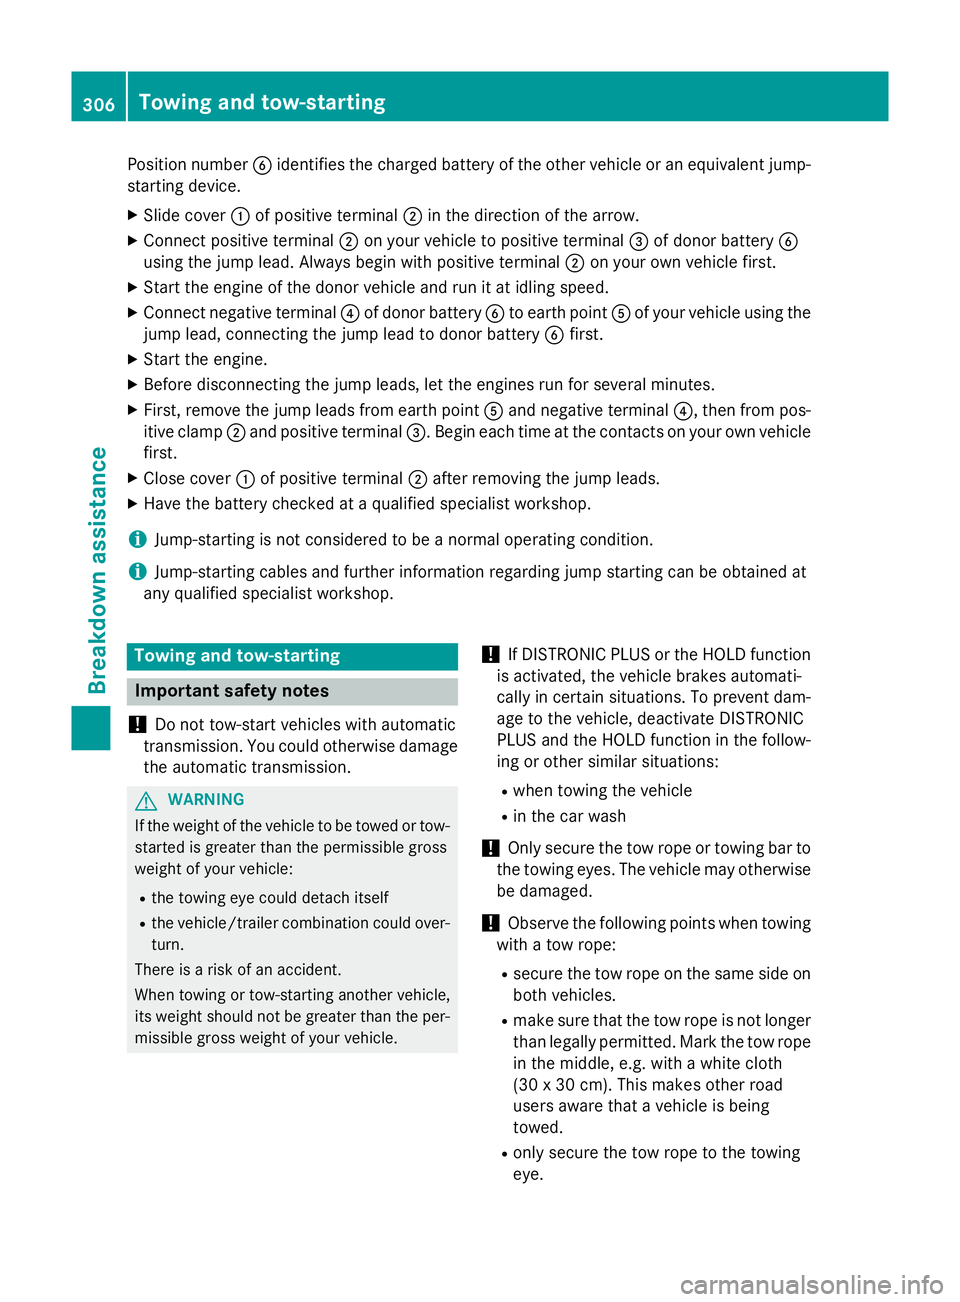
Position number
Bidentifies the charged battery of the other vehicle or an equivalent jump-
starting device.
X Slide cover :of positive terminal ;in the direction of the arrow.
X Connect positive terminal ;on your vehicle to positive terminal =of donor battery B
using the jump lead. Always begin with positive terminal ;on your own vehicle first.
X Start the engine of the donor vehicle and run it at idling speed.
X Connect negative terminal ?of donor battery Bto earth point Aof your vehicle using the
jump lead, connecting the jump lead to donor battery Bfirst.
X Start the engine.
X Before disconnecting the jump leads, let the engines run for several minutes.
X First, remove the jump leads from earth point Aand negative terminal ?, then from pos-
itive clamp ;and positive terminal =. Begin each time at the contacts on your own vehicle
first.
X Close cover :of positive terminal ;after removing the jump leads.
X Have the battery checked at a qualified specialist workshop.
i Jump-starting is not considered to be a normal operating condition.
i Jump-starting cables and further information regarding jump starting can be obtained at
any qualified specialist workshop. Towing and tow-starting
Important safety notes
! Do not tow-start vehicles with automatic
transmission. You could otherwise damage the automatic transmission. G
WARNING
If the weight of the vehicle to be towed or tow- started is greater than the permissible gross
weight of your vehicle:
R the towing eye could detach itself
R the vehicle/trailer combination could over-
turn.
There is a risk of an accident.
When towing or tow-starting another vehicle,
its weight should not be greater than the per-
missible gross weight of your vehicle. !
If DISTRONIC PLUS or the HOLD function
is activated, the vehicle brakes automati-
cally in certain situations. To prevent dam-
age to the vehicle, deactivate DISTRONIC
PLUS and the HOLD function in the follow- ing or other similar situations:
R when towing the vehicle
R in the car wash
! Only secure the tow rope or towing bar to
the towing eyes. The vehicle may otherwise be damaged.
! Observe the following points when towing
with a tow rope:
R secure the tow rope on the same side on
both vehicles.
R make sure that the tow rope is not longer
than legally permitted. Mark the tow rope in the middle, e.g. with a white cloth
(30 x 30 cm). This makes other road
users aware that a vehicle is being
towed.
R only secure the tow rope to the towing
eye. 306
Towing and tow-startingBreakdown assistance
Page 310 of 357
R
observe the brake lamps of the towing
vehicle while driving. Always maintain a
distance so that the tow rope does not
sag.
R do not use steel cables or chains to tow
your vehicle. You could otherwise dam-
age the vehicle.
! Do not use the towing eye for recovery,
this could damage the vehicle. If in doubt,
recover the vehicle with a crane.
! Pull away smoothly when towing away or
tow-starting a vehicle. If the tractive power
is too high, the vehicles could be damaged.
! On vehicles with KEYLESS-GO, use the
key instead of the Start/Stop button. Turn
the key to position 2in the ignition lock and
shift the automatic transmission to N.
Then, turn the key back to 0and leave it in
the ignition lock.
! Make sure that the electric parking brake
is released. If the electric parking brake is
faulty, visit a qualified specialist workshop.
! You may tow the vehicle for a maximum of
50km. A towing speed of 50 km/hm ust not
be exceeded.
For towing distances over 50 km, the entire
vehicle must be lifted up and transported.
! If you tow or tow-start another vehicle, its
weight must not exceed the maximum per- missible gross vehicle weight of your vehi-
cle.
i Information on your vehicle's gross vehi-
cle weight rating can be found on the vehi-
cle identification plate (Y page 342).
Observe the legal requirements for the rele-
vant countries when towing and tow-starting.
It is better to have the vehicle transported
than to have it towed.
Vehicles with automatic transmission:
when towing a vehicle, the automatic trans-
mission must be in position N.The battery must be connected and charged.
Otherwise, you:
R cannot turn the key in the ignition lock to
position 2
R cannot shift the transmission to position N
on vehicles with automatic transmission
Vehicles with automatic transmission:
release the selector lever lock manually to
move it out of position P(Y page 158).
i Deactivate the automatic locking feature
before the vehicle is towed (Y page 216).
You could otherwise be locked out when
pushing or towing the vehicle.
Deactivate tow-away protection before the
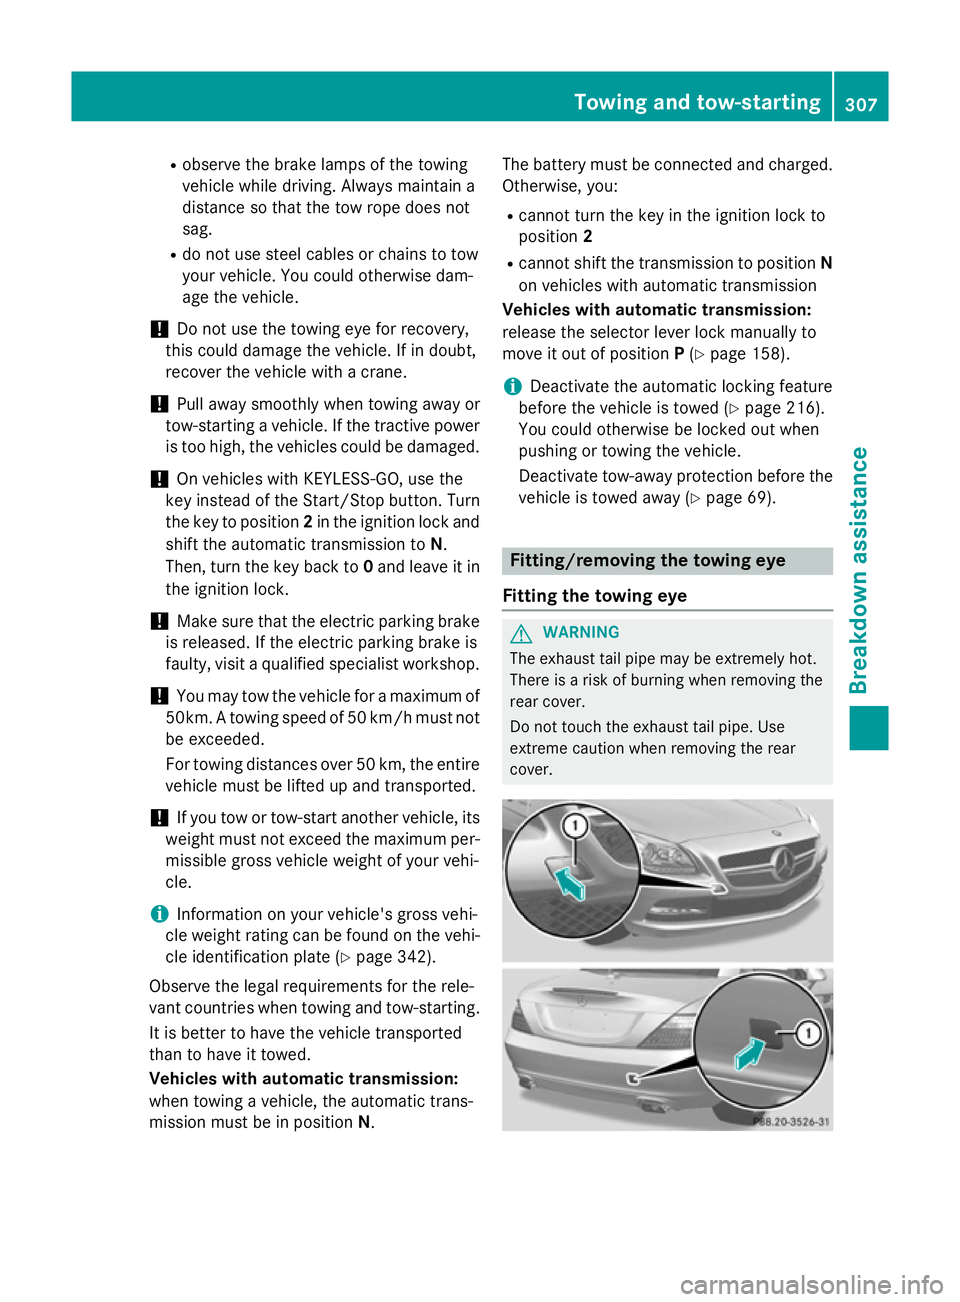
vehicle is towed away (Y page 69). Fitting/removing the towing eye
Fitting the towing eye G
WARNING
The exhaust tail pipe may be extremely hot.
There is a risk of burning when removing the
rear cover.
Do not touch the exhaust tail pipe. Use
extreme caution when removing the rear
cover. Towing and tow-starting
307Breakdown assistance Z
Page 345 of 357
Identification plates
Vehicle identification plate with vehi-
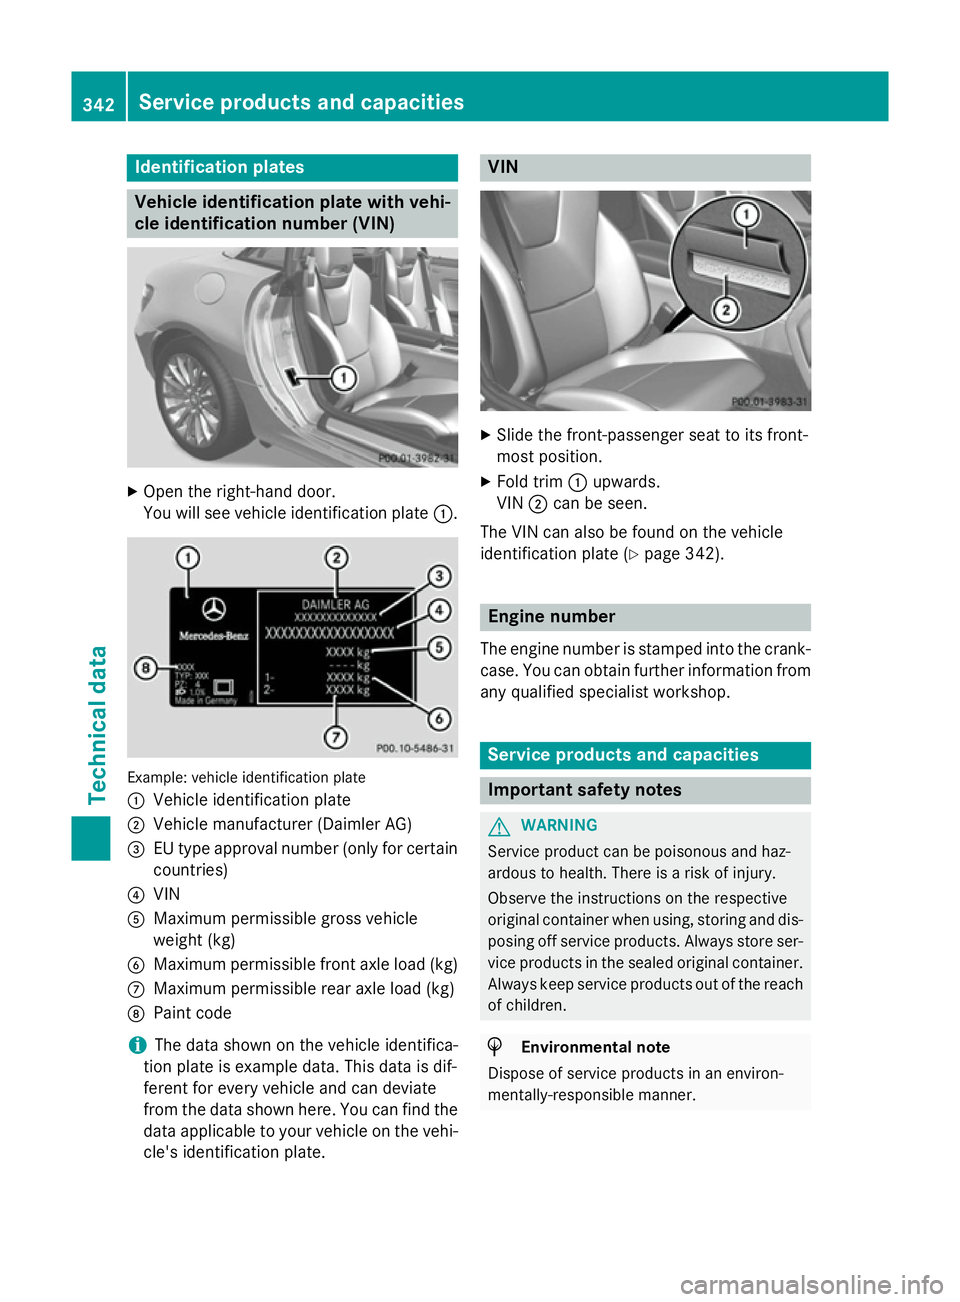
cle identification number (VIN) X
Open the right-hand door.
You will see vehicle identification plate :.Example: vehicle identification plate
:
Vehicle identification plate
; Vehicle manufacturer (Daimler AG)
= EU type approval number (only for certain
countries)
? VIN
A Maximum permissible gross vehicle
weight (kg)
B Maximum permissible front axle load (kg)
C Maximum permissible rear axle load (kg)
D Paint code
i The data shown on the vehicle identifica-
tion plate is example data. This data is dif-
ferent for every vehicle and can deviate
from the data shown here. You can find the
data applicable to your vehicle on the vehi- cle's identification plate. VIN
X
Slide the front-passenger seat to its front-
most position.
X Fold trim :upwards.
VIN ;can be seen.
The VIN can also be found on the vehicle
identification plate (Y page 342). Engine number
The engine number is stamped into the crank- case. You can obtain further information from
any qualified specialist workshop. Service products and capacities
Important safety notes
G
WARNING
Service product can be poisonous and haz-
ardous to health. There is a risk of injury.
Observe the instructions on the respective
original container when using, storing and dis- posing off service products. Always store ser-
vice products in the sealed original container. Always keep service products out of the reach
of children. H
Environmental note
Dispose of service products in an environ-
mentally-responsible manner. 342
Service products and capacitiesTechnical data
Page 352 of 357
i
When the vehicle is first delivered, it is fil-
led with a coolant mixture that ensures
adequate antifreeze and corrosion protec-
tion.
i The coolant is checked at every mainte-
nance interval at a qualified specialist
workshop. Windscreen washer system and head-
lamp cleaning system
Important safety notes G
WARNING
If windscreen washer concentrate comes into contact with hot components of the engine or
the exhaust system, it can ignite. There is a
risk of fire and injury.
Make sure the windscreen washer concen-
trate does not come into contact with the filler neck.
! Only use washer fluid that is suitable for
plastic lamp lenses, e.g. MB SummerFit or
MB WinterFit. Unsuitable washer fluid
could damage the plastic lenses of the
headlamps.
! Do not use distilled or de-ionised water in
the washer fluid reservoir. Otherwise, the
level sensor may be damaged.
! Only the washer fluids SummerFit and
WinterFit can be mixed. Otherwise, the
spraying nozzles could become blocked.
When handling washer fluid, observe the
important safety notes on service products
(Y page 342).
At temperatures above freezing:
X Fill the washer fluid reservoir with a mixture
of water and washer fluid, e.g. MB Sum-
merFit.
X Mix 1 part MB SummerFit to 100 parts
water. At temperatures below freezing:
X Fill the washer fluid reservoir with a mixture
of water and washer fluid, e.g. MB Winter-
Fit.
Adapt the mixing ratio to the outside temper-
ature.
R Down to Ò10 †: mix 1 part MB WinterFit to
2 parts water.
R Down to Ò20 †: mix 1 part MB WinterFit to
1 part water.
R Down to Ò29 †: mix 2 parts MB WinterFit to
1 part water.
i Add washer fluid concentrate, e.g. MB
SummerFit or MB WinterFit, to the washer
fluid all year round. Vehicle data
General notes
Please note that for the specified vehicle
data:
R the heights specified may vary as a result
of:
- tyres
- load
- condition of the suspension
- optional equipment
R optional equipment reduces the maximum
payload.
R vehicle-specific weight information can be
found on the vehicle identification plate
(Y page 342).
R only for certain countries: you can find vehi-
cle-specific vehicle data in the COC docu-
ments (CERTIFICATE OF CONFORMITY).
These documents are delivered with your
vehicle. Vehicle data
349Technical data Z