check engine light MERCEDES-BENZ SLK ROADSTER 2014 Owners Manual
[x] Cancel search | Manufacturer: MERCEDES-BENZ, Model Year: 2014, Model line: SLK ROADSTER, Model: MERCEDES-BENZ SLK ROADSTER 2014Pages: 357, PDF Size: 10.22 MB
Page 8 of 357
ATTENTION ASSIST
Activating/deactivating ................ .212
Display message ............................ 237
Function/notes ............................ .191
ATTENTION ASSIST
see ATTENTION ASSIST
Audio menu (on-board computer) .... 207
Authorised workshop
see Qualified specialist workshop
AUTO lights
Display message ............................ 233
see Lights
Automatic engine start (ECO start/
stop function) ................................... .147
Automatic engine switch-off (ECO
start/stop function) .......................... 146
Automatic headlamp mode .............. 111
Automatic transmission
Accelerator pedal position ............. 153
Automatic drive program .............. .155
Changing gear ............................... 153
Display message ............................ 245
Driving tips ................................... .153
Emergency running mode .............. 158
Kickdown ....................................... 153
Manual drive program .................... 155
Manual drive program (vehicles
with Sports package AMG) ............ 156
Overview ........................................ 152
Problem (fault) ............................... 158
Program selector button ................ 154
Pulling away ................................... 144
Releasing the parking lock man-
ually ............................................... 158
Selector lever ................................ 152
Starting the engine ........................ 144
Steering wheel gearshift paddle s... 154
Transmission position display ........ 152
Transmission positions .................. 153
Automatic transmission emer-
gency running mode ......................... 158B
BAS (Brake Assist System) ................. 61
BAS PLUS (Brake Assist System
PLUS) .................................................... 61 Battery (key)
Checking .......................................... 75
Important safety notes .................... 75
Replacing ......................................... 75
Battery (vehicle)
Charging ........................................ 303
Display message ............................ 235
Important safety notes .................. 300
Jump starting ................................. 304
Overview ........................................ 300
Belt
see Seat belts
Belt tensioner
Activation ......................................... 47
Blind Spot Assist
Activating/deactivating ................. 212
Display message ............................ 239
Notes/function .............................. 194
Bonnet
Active bonnet (pedestrian protec-tion) ............................................... 280
Closing ........................................... 281
Display message ............................ 247
Important safety notes .................. 280
Opening ......................................... 281
Boot
Emergency release .......................... 83
Important safety notes .................... 81
Opening (automatically from out-
side) ................................................. 82
Opening/closing (manually from
outside) ............................................ 82
Overview .......................................... 81
Boot lid
Display message ............................ 247
Opening dimensions ...................... 349
Opening/closing .............................. 81
Boot load (maximum) ........................ 349
Boot separator
Display message ............................ 248
General notes .................................. 89
Opening/closing .............................. 90
Bottle holders .................................... 267
Brake
EBD .................................................. 66
Brake Assist
see BAS (Brake Assist System) Index
5
Page 10 of 357
Convenience opening/closing
(air-recirculation mode) ................
.134
Cooling with air dehumidification .. 129
Demisting the windows .................. 133
Demisting the windscreen ............. 133
Indicator lamp ................................ 131
Information on using
THERMOTRONIC automatic cli-
mate control .................................. 128
Notes on using the air-condition-
ing system ..................................... 127
Overview of systems ..................... .126
Problem with the rear window
heating .......................................... 134
Problems with cooling with air
dehumidification ............................ 131
Setting the air distribution ............. 132
Setting the air vents ..................... .135
Setting the airflow ......................... 132
Setting the temperature ................ 131
Switching air-recirculation mode
on/off ............................................ 134
Switching on/off ........................... 129
Switching residual heat on/off ...... 135
Switching the rear window heat-
ing on/off ...................................... 133
Switching the ZONE function on/
off ................................................. .132
THERMOTRONIC (2-zone) auto-
matic climate control ..................... 128
Cockpit
Overview .......................................... 28
see Instrument cluster
Collapsible emergency spare
wheel
see Emergency spare wheel
COMAND display
Cleaning ......................................... 290
Combination switch .......................... 113
Consumption statistics (on-board
computer) .......................................... 204
Convenience closing feature .............. 85
Convenience opening feature
see Side windows
Convenience opening/closing (air-
recirculation mode) ........................... 134
Coolant (engine)
Checking the level ......................... 283 Display message ............................ 234
Important safety notes .................. 348
Temperature (on-board com-
puter) ............................................. 219
Temperature gauge ........................ 200
Warning lamp ................................. 258
Cooling
see Climate control
Copyright ............................................. 26
Cornering light function
Display message ............................ 231
Function/notes ............................ .114
Crash-responsive emergency light-
ing ....................................................... 117
Cruise control
Cruise control lever ....................... 169
Deactivating ................................... 171
Display message ............................ 241
Driving system ............................... 168
Important safety notes .................. 169
LIM indicator lamp ......................... 169
Selecting ........................................ 169
Setting a speed .............................. 170
Storing and maintaining current
speed ............................................. 170
Cup holder
Centre console .............................. 267
Important safety notes .................. 267 D
Dashboard see Instrument cluster
Data
see Technical data
Daytime driving lights
Display message ............................ 233
Function/notes ............................ .111
Switching on/off (on-board com-
puter) ............................................. 214
Dealership
see Qualified specialist workshop
Declarations of conformity ................. 23
Delayed switch-off
Exterior lighting (on-board com-
puter) ............................................. 215
Interior lighting .............................. 216
Diagnostics connection ......................23 Index
7
Page 13 of 357
Problem (fault) ...............................1
50
Engine oil
Additives ........................................ 347
Checking the oil level ..................... 282
Checking the oil level using the
dipstick .......................................... 282
Display message ............................ 236
Filling capacity ............................... 347
Notes about oil grades ................... 346
Notes on oil level/consumption .... 282
Temperature (on-board com-
puter) ............................................. 219
Topping up ..................................... 282
Viscosity ........................................ 347
Environmental protection
Returning an end-of-life vehicle ....... 21
ESP® (Electronic Stability Pro-
gram)
AMG menu (on-board computer) ... 219
Characteristics ................................. 63
Deactivating/activating (AMG
vehicles) .......................................... 64
Deactivating/activating (notes;
except AMG vehicles) ..................... .64
Display message ............................ 223
ETS .................................................. 63
Function/note s................................ 62
General notes .................................. 62
Important safety guidelines ............. 63
Warning lamp ................................. 254
ETS (Electronic Traction System) ....... 63
Exhaust pipe (cleaning instruc-
tions) .................................................. 290
Exterior lighting
Settings options ............................. 110
see Lights
Exterior mirrors
Adjusting ....................................... 103
Anti-dazzle mode (automatic) ........ 104
Folding in when locking (on-board computer) ...................................... 218
Folding in/out (automatically )....... 104
Folding in/out (electrically) ........... 104
Out of position (troubleshooting) ... 104
Parking position ............................. 105
Resetting ....................................... 104
Storing settings (memory func-
tion) ............................................... 106 F
Fault message see Display messages
Filler cap
see Fuel filler flap
Fire extinguisher ............................... 295
First-aid kit ......................................... 294
Fitting a wheel
Fitting a wheel ............................... 327
Lowering the vehicle ...................... 328
Preparing the vehicle ..................... 324
Raising the vehicl e......................... 325
Removing a whee l.......................... 327
Securing the vehicle against roll-
ing away ........................................ 325
Flat tyre
MOExtended tyre s......................... 296
Preparing the vehicle ..................... 296
TIREFIT kit ...................................... 297
see Emergency spare wheel
Floormat ............................................. 276
Foglamps
Extended rang e.............................. 115
Switching on/of f........................... 111
Frequencies
Garage door opener ....................... 273
Mobile phone ................................. 340
Two-way radio ................................ 340
Front foglamps
Display message ............................ 233
Fuel
Additives ........................................ 345
Consumption information .............. 346
Consumption statistics .................. 204
Displaying the current consump-
tion ................................................ 204
Displaying the range ...................... 204
Driving tips .................................... 165
E10 ................................................ 344
Fuel gaug e....................................... 30
Grade (petrol) ................................ 344
Important safety notes .................. 343
Low outside temperature s............. 346
Notes for AMG vehicles ................. 344
Problem (malfunction) ................... 161
Quality (diesel )............................... 345
Refuelling ....................................... 158 10
Index
Page 15 of 357
Display message ............................ 233
Overview ........................................ 114
Setting the dipped-beam head-
lamps for driving on the right/left .. 214
Interior lighting
Automatic control syste m.............. 117
Delayed switch-off (on-board
computer) ...................................... 216
Emergency lighting ........................ 117
Manual control ............................... 117
Overview ........................................ 116
Reading lamp ................................. 116
Setting the ambient lighting
brightness (on-board computer) .... 215
Interior motion sensor
Deactivating ..................................... 70
Function ........................................... 69
Priming ............................................ 70
Switching off .................................... 70 J
Jack Storage location ............................ 295
Using ............................................. 325
Jump starting (engine) ...................... 304K
Key Changing the battery ....................... 75
Checking the battery ....................... 75
Convenience opening feature .......... 85
Display message ............................ 249
Door central locking/unlocking ....... 73
Emergency key element ................... 74
Important safety notes .................... 72
Loss ................................................. 77
Modifying the programming ............. 74
Opening/closing the roo f................ 89
Overview .......................................... 72
Positions (ignition lock) ................. 141
Problem (malfunction) ..................... 77
Starting the engine ........................ 144
Key positions
Key ................................................ 141
KEYLESS GO .................................. 141
KEYLESS-GO
Convenience closing ........................ 85 Display message ............................ 249
Locking ............................................ 73
Removing the Start/Stop button ... 143
Start/Stop button .......................... 141
Starting the engine ........................ 144
Unlocking ......................................... 73
Kickdown
Driving tip s.................................... 153
Manual drive progra m.................... 157 L
Lamps see Warning and indicator lamps
Lane Keeping Assist
Activating/deactivating ................. 212
Display message ............................ 238
Function/information .................... 195
Lap time (RACETIMER) ...................... 219
Licence plate lamp (display mes-
sage) ................................................... 232
Light sensor (display message) ....... 233
Lighting
see Lights
Lights
Activating/deactivating the Intel-
ligent Light System ........................ 214
Activating/deactivating the inte-
rior lighting delayed switch-off ....... 216
Active light function ....................... 114
Automatic headlamp mode ............ 111
Cornering light function ................. 114
Dipped-beam headlamp s............... 111
Driving abroad ............................... 110
Foglamps ....................................... 111
Foglamps (extended range) ........... 115
Hazard warning lamps ................... 113
Headlamp flashe r........................... 113
Headlamp range ............................ 112
Light switch ................................... 110
Main-beam headlamp s................... 113
Misted up headlamp s.................... 116
Motorway mode ............................. 114
Parking lamps ................................ 112
Rear foglamp ................................. 112
Setting the ambient lighting
brightness (on-board computer) .... 215
Side lamps ..................................... 112 12
Index
Page 44 of 357
well as on child restraint systems
(Y
page 51). Important safety notes
G
WARNING
If the restraint system is modified, it may no
longer work as intended. The restraint system
may then not perform its intended protective function by failing in an accident or triggering
unexpectedly, for example. There is an
increased risk of injury, possibly even fatal.
Never modify parts of the restraint system. Do not attempt to modify the wiring as well as
electronic components or their software.
If it is necessary to modify an airbag system
for a person with physical disabilities, contact a Mercedes-Benz Service Centre for details. Restraint system warning lamp
The functions of the restraint system are
checked after the ignition is switched on and at regular intervals while the engine is run-
ning. Therefore, malfunctions can be detec-
ted in good time.
The 6 restraint system warning lamp in
the instrument cluster lights up when the igni- tion is switched on. It goes out no later than afew seconds after the engine is started. The
components of the restraint system are in
operational readiness.
A malfunction has occurred if the 6
restraint system warning lamp:
R does not light up after the ignition is
switched on
R does not go out after a few seconds with
the engine running
R lights up again while the engine is running G
WARNING
If the restraint system is malfunctioning,
restraint system components may be trig-
gered unintentionally or might not be trig- gered at all in the event of an accident with a
high rate of vehicle deceleration. This can
effect belt tensioners or airbags, for example. There is an increased risk of serious or even
fatal injuries.
Have the restraint system checked and
repaired immediately at a qualified specialist
workshop. PASSENGER AIR BAG OFF indicator
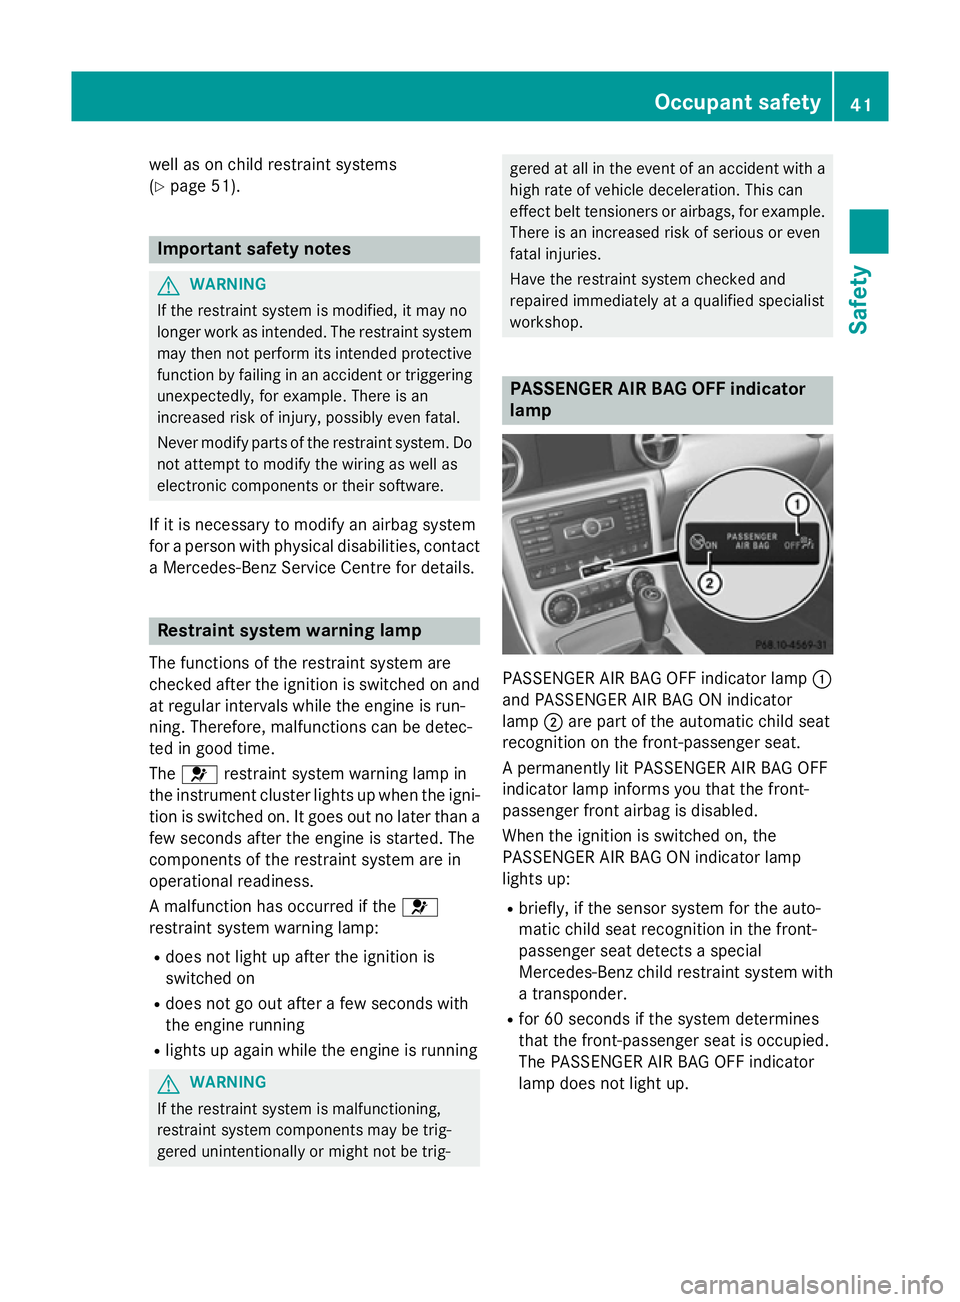
lamp PASSENGER AIR BAG OFF indicator lamp
:
and PASSENGER AIR BAG ON indicator
lamp ;are part of the automatic child seat
recognition on the front-passenger seat.
A permanently lit PASSENGER AIR BAG OFF
indicator lamp informs you that the front-
passenger front airbag is disabled.
When the ignition is switched on, the
PASSENGER AIR BAG ON indicator lamp
lights up:
R briefly, if the sensor system for the auto-
matic child seat recognition in the front-
passenger seat detects a special
Mercedes-Benz child restraint system with
a transponder.
R for 60 seconds if the system determines
that the front-passenger seat is occupied.
The PASSENGER AIR BAG OFF indicator
lamp does not light up. Occupant safety
41Safety Z
Page 63 of 357
Never leave animals unattended in the vehi-
cle. Always secure animals correctly during a journey, e.g. in an animal transport box. Driving safety systems
Driving safety systems overview
In this section, you will find information about the following driving safety systems:
R ABS ( Anti-lock BrakingSystem)
(Y page 60)
R BAS ( Brake Assist System) (Y page 61)
R BAS PLUS ( BrakeAssist System PLUS)
(Y page 61)
R Adaptive brake lamps (Y page 62)
R ESP ®
(Electronic StabilityProgram)
(Y page 62)
R EBD ( electronic brake force distribution)
(Y page 66)
R ADAPTIVE BRAKE (Y page 66)
R PRE-SAFE ®
Brake (Y page 66) Important safety notes
If you fail to adapt your driving style or if you
are inattentive, the driving safety systems can neither reduce the risk of an accident nor
override the laws of physics. Driving safety
systems are merely aids designed to assist
driving. You are responsible for the distance
to the vehicle in front, for vehicle speed and
for braking in good time. Always adapt your
driving style to suit the prevailing road and
weather conditions and maintain a safe dis-
tance from the vehicle in front. Drive care-
fully.
i The driving safety systems described only
work as effectively as possible when there
is adequate contact between the tyres and the road surface. Please pay special atten-tion to the notes on tyres, recommended
minimum tyre tread depths etc.
(Y page 314). In wintry driving conditions, always use
winter tyres (M+S tyres) and, if necessary,
snow chains. Only in this way will the driv-
ing safety systems described in this section
work as effectively as possible. ABS (Anti-lock Braking System)
General notes ABS regulates brake pressure in such a way
that the wheels do not lock when you brake.
This allows you to continue steering the vehi-
cle when braking.
The yellow !ABS warning lamp in the
instrument cluster lights up when the ignition is switched on. It goes out when the engine is
running.
Important safety notes i
Observe the "Important safety notes" sec-
tion (Y page 60). G
WARNING
If ABS is faulty, the wheels could lock when
braking. The steerability and braking charac-
teristics may be severely impaired. Addition-
ally, further driving safety systems are deac-
tivated. There is an increased danger of skid- ding and accidents.
Drive on carefully. Have ABS checked imme-
diately at a qualified specialist workshop.
If ABS is malfunctioning, other systems,
including driving safety systems, will also
become inoperative. Observe the information on the ABS warning lamp (Y page 252) and
display messages which may be shown in the
instrument cluster (Y page 223).
ABS works from a speed of about
8 km/hupwards, regardless of road-surface
conditions. ABS works on slippery surfaces,
even when you only brake gently. 60
Driving safety systemsSafety
Page 66 of 357
ESP
®
monitors driving stability and traction,
i.e. power transmission between the tyres
and the road surface.
If ESP ®
detects that the vehicle is deviating
from the direction desired by the driver, one
or more wheels are braked to stabilise the
vehicle. The engine output is also modified to keep the vehicle on the desired course within
physical limits. ESP ®
assists the driver when
pulling away on wet or slippery roads. ESP ®
can also stabilise the vehicle during braking.
ETS (Electronic Traction System) i
Observe the "Important safety notes" sec-
tion (Y page 60).
ETS traction control is part of ESP ®
.
ETS brakes the drive wheels individually if
they spin. This enables you to pull away and
accelerate on slippery surfaces, for example
if the road surface is slippery on one side. In
addition, more drive torque is transferred to
the wheel or wheels with traction.
ETS remains active when you deactivate
ESP ®
.
i AMG vehicles:
your vehicle may be
equipped with 20-inch tyres on the rear
axle. If replaced with a 19-inch tyre, ETS
may intervene noticeably sooner for the
first few kilometres. After approximately
10 km ETS will function as usual again.
Information on the dimensions and types of
wheels and tyres for your vehicle can be
found under "Wheel/tyre combinations"
(Y page 328).
Important safety notes G
WARNING
If ESP ®
is malfunctioning, ESP ®
is unable to
stabilise the vehicle. In addition, other driving
safety systems are switched off. This increa-
ses the risk of skidding and an accident.
Drive on carefully. Have ESP ®
checked at a
qualified specialist workshop. !
When testing the electric parking brake
on a braking dynamometer, switch off the
ignition. Application of the brakes by ESP ®
may otherwise destroy the brake system.
When towing your vehicle with the rear axle
raised, observe the notes on
ESP ®
(Y page 308).
ESP ®
is deactivated if the åwarning lamp
in the instrument cluster lights up continu-
ously when the engine is running.
If the ÷ warning lamp and the åwarn-
ing lamp are lit continuously, ESP ®
is not
available due to a malfunction.
Observe the information on warning lamps
(Y page 254) and display messages which
may be shown in the instrument cluster
(Y page 223).
i Only use wheels with the recommended
tyre sizes. Only then will ESP ®
function
properly.
Characteristics of ESP ® General notes
If the
÷ ESP warning lamp goes out before
beginning the journey, ESP ®
is automatically
active.
If ESP ®
intervenes, the ÷ESP®
warning
lamp flashes in the instrument cluster.
If ESP ®
intervenes:
X Do not deactivate ESP ®
under any circum-
stances.
X When pulling away, only depress the accel-
erator pedal as far as is necessary.
X Adapt your driving style to suit the prevail-
ing road and weather conditions.
ECO start/stop function
The ECO start/stop function switches the
engine off automatically if the vehicle stops
moving. When pulling away again, the engine
starts automatically. ESP ®
remains in its pre-
viously selected status. Example:if ESP®
was deactivated before the engine was Driving safety systems
63Safety Z
Page 76 of 357
Key functions
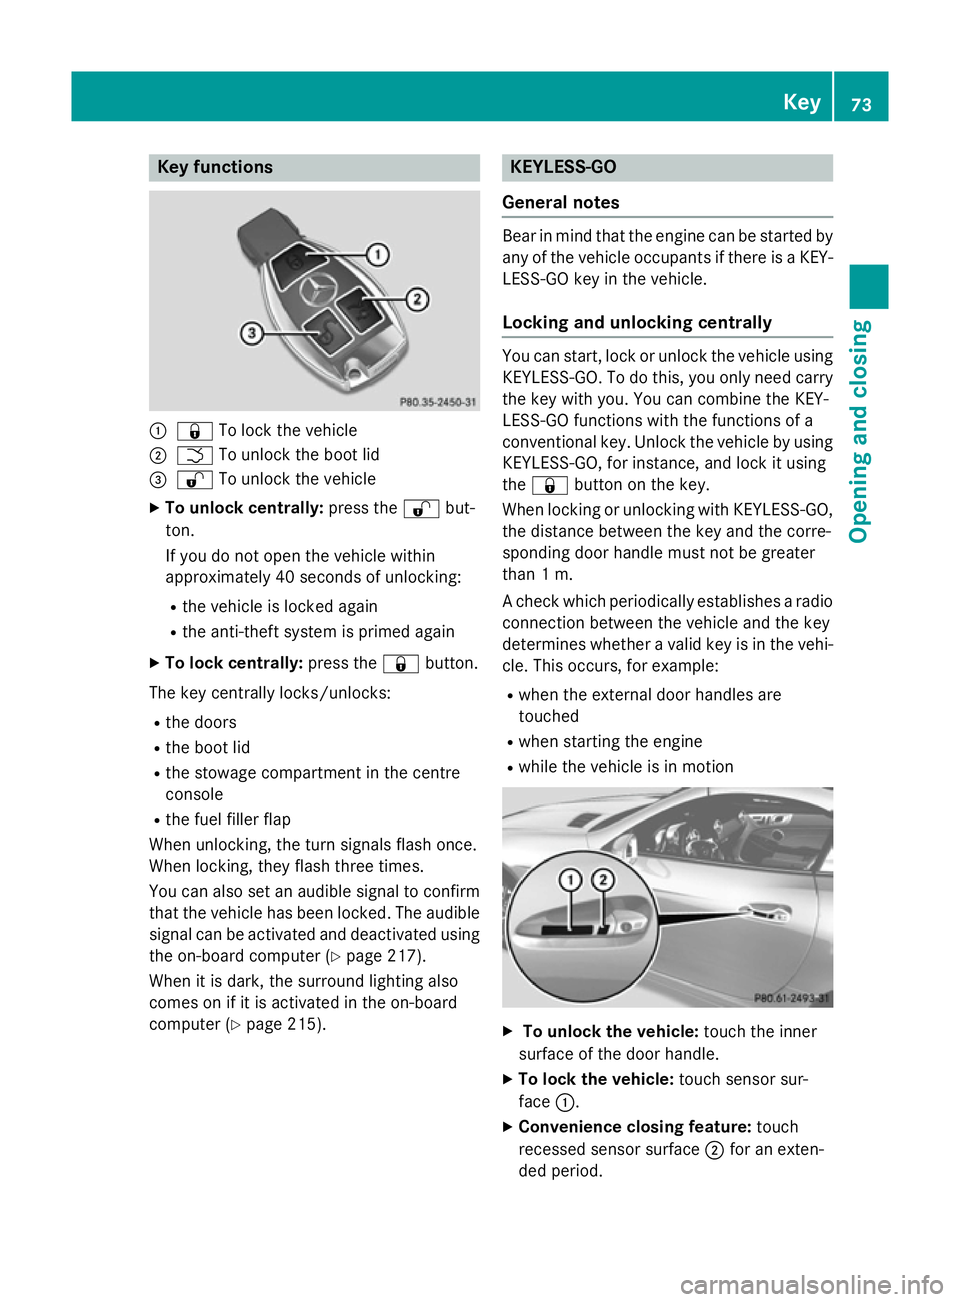
:
& To lock the vehicle
; F To unlock the boot lid
= % To unlock the vehicle
X To unlock centrally: press the%but-
ton.
If you do not open the vehicle within
approximately 40 seconds of unlocking:
R the vehicle is locked again
R the anti-theft system is primed again
X To lock centrally: press the&button.
The key centrally locks/unlocks: R the doors
R the boot lid
R the stowage compartment in the centre
console
R the fuel filler flap
When unlocking, the turn signals flash once.
When locking, they flash three times.
You can also set an audible signal to confirm
that the vehicle has been locked. The audible signal can be activated and deactivated using
the on-board computer (Y page 217).
When it is dark, the surround lighting also
comes on if it is activated in the on-board
computer (Y page 215). KEYLESS-GO
General notes Bear in mind that the engine can be started by
any of the vehicle occupants if there is a KEY-LESS-GO key in the vehicle.
Locking and unlocking centrally You can start, lock or unlock the vehicle using
KEYLESS-GO. To do this, you only need carry
the key with you. You can combine the KEY-
LESS-GO functions with the functions of a
conventional key. Unlock the vehicle by using KEYLESS-GO, for instance, and lock it using
the & button on the key.
When locking or unlocking with KEYLESS-GO,
the distance between the key and the corre-
sponding door handle must not be greater
than 1 m.
A check which periodically establishes a radio
connection between the vehicle and the key
determines whether a valid key is in the vehi-
cle. This occurs, for example:
R when the external door handles are
touched
R when starting the engine
R while the vehicle is in motion X
To unlock the vehicle: touch the inner
surface of the door handle.
X To lock the vehicle: touch sensor sur-
face :.
X Convenience closing feature: touch
recessed sensor surface ;for an exten-
ded period. Key
73Opening and closing Z
Page 81 of 357
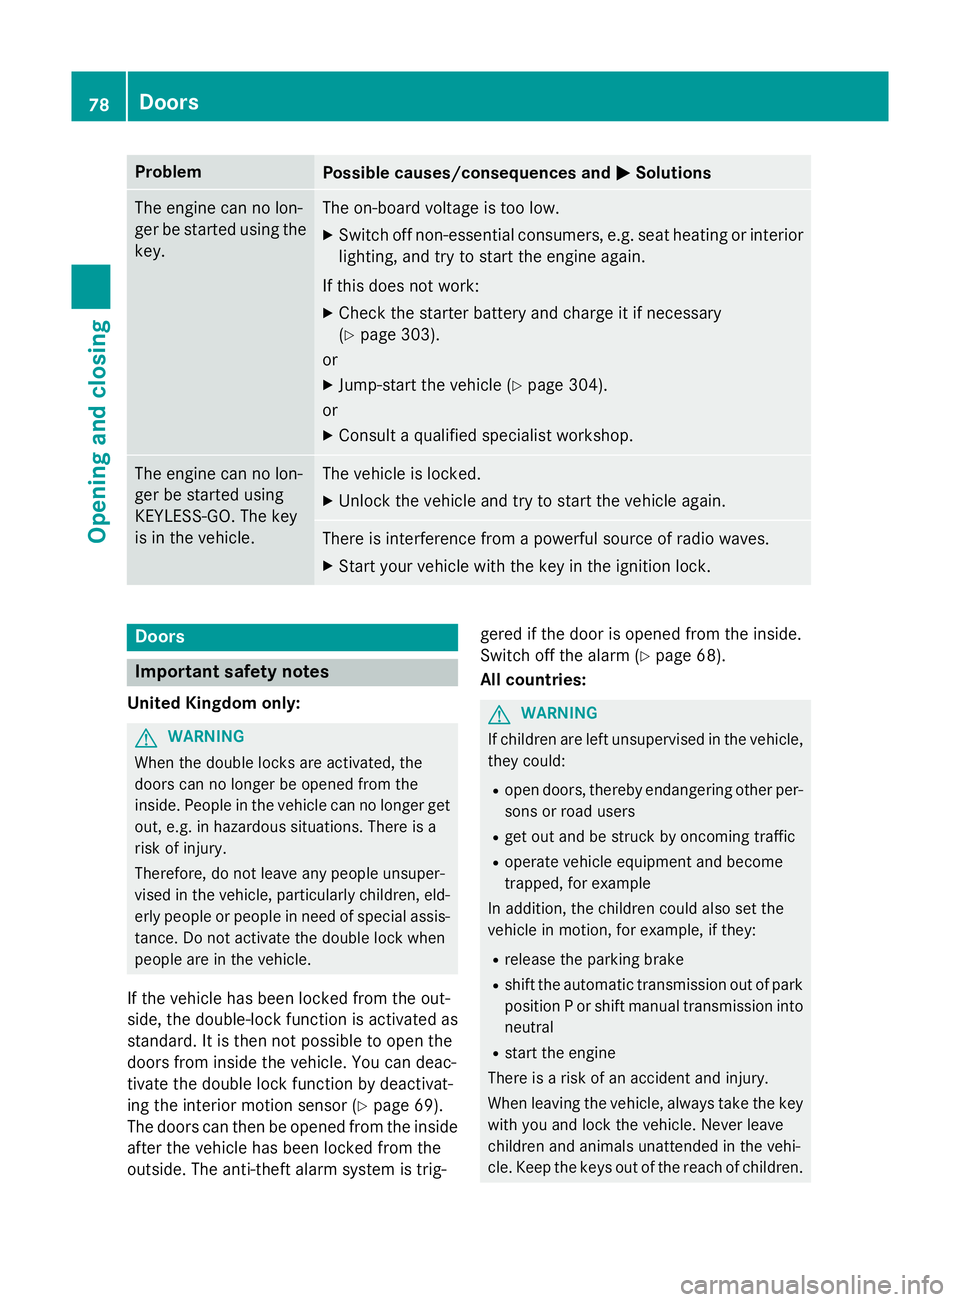
Problem
Possible causes/consequences and
M
MSolutions The engine can no lon-
ger be started using the key. The on-board voltage is too low.
X Switch off non-essential consumers, e.g. seat heating or interior
lighting, and try to start the engine again.
If this does not work:
X Check the starter battery and charge it if necessary
(Y page 303).
or
X Jump-start the vehicle (Y page 304).
or
X Consult a qualified specialist workshop. The engine can no lon-
ger be started using
KEYLESS-GO. The key
is in the vehicle. The vehicle is locked.
X Unlock the vehicle and try to start the vehicle again. There is interference from a powerful source of radio waves.
X Start your vehicle with the key in the ignition lock. Doors
Important safety notes
United Kingdom only: G
WARNING
When the double locks are activated, the
doors can no longer be opened from the
inside. People in the vehicle can no longer get out, e.g. in hazardous situations. There is a
risk of injury.
Therefore, do not leave any people unsuper-
vised in the vehicle, particularly children, eld-
erly people or people in need of special assis-
tance. Do not activate the double lock when
people are in the vehicle.
If the vehicle has been locked from the out-
side, the double-lock function is activated as
standard. It is then not possible to open the
doors from inside the vehicle. You can deac-
tivate the double lock function by deactivat-
ing the interior motion sensor (Y page 69).
The doors can then be opened from the inside after the vehicle has been locked from the
outside. The anti-theft alarm system is trig- gered if the door is opened from the inside.
Switch off the alarm (Y page 68).
All countries: G
WARNING
If children are left unsupervised in the vehicle, they could:
R open doors, thereby endangering other per-
sons or road users
R get out and be struck by oncoming traffic
R operate vehicle equipment and become
trapped, for example
In addition, the children could also set the
vehicle in motion, for example, if they:
R release the parking brake
R shift the automatic transmission out of park
position P or shift manual transmission into
neutral
R start the engine
There is a risk of an accident and injury.
When leaving the vehicle, always take the key with you and lock the vehicle. Never leave
children and animals unattended in the vehi-
cle. Keep the keys out of the reach of children. 78
DoorsOpening and closing
Page 120 of 357
except for when the key is in position
2in the
ignition lock.
The colour and brightness of the ambient
lighting may be set using the on-board com-
puter (Y page 215).
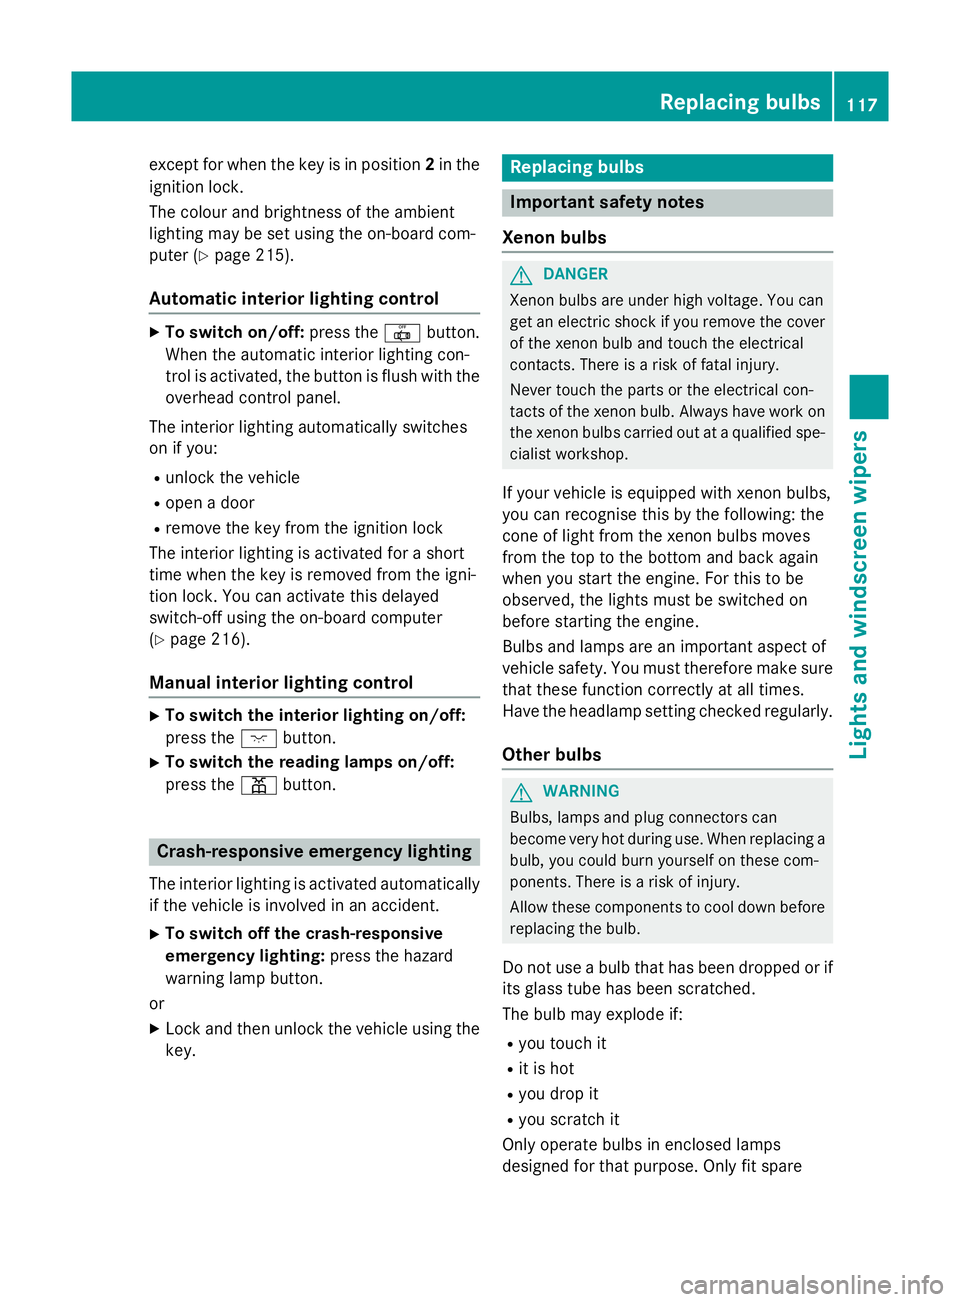
Automatic interior lighting control X
To switch on/off: press the|button.
When the automatic interior lighting con-
trol is activated, the button is flush with the overhead control panel.
The interior lighting automatically switches
on if you:
R unlock the vehicle
R open a door
R remove the key from the ignition lock
The interior lighting is activated for a short
time when the key is removed from the igni-
tion lock. You can activate this delayed
switch-off using the on-board computer
(Y page 216).
Manual interior lighting control X
To switch the interior lighting on/off:
press the cbutton.
X To switch the reading lamps on/off:
press the pbutton. Crash-responsive emergency lighting
The interior lighting is activated automatically
if the vehicle is involved in an accident.
X To switch off the crash-responsive
emergency lighting: press the hazard
warning lamp button.
or X Lock and then unlock the vehicle using the
key. Replacing bulbs
Important safety notes
Xenon bulbs G
DANGER
Xenon bulbs are under high voltage. You can
get an electric shock if you remove the cover
of the xenon bulb and touch the electrical
contacts. There is a risk of fatal injury.
Never touch the parts or the electrical con-
tacts of the xenon bulb. Always have work on the xenon bulbs carried out at a qualified spe- cialist workshop.
If your vehicle is equipped with xenon bulbs,
you can recognise this by the following: the
cone of light from the xenon bulbs moves
from the top to the bottom and back again
when you start the engine. For this to be
observed, the lights must be switched on
before starting the engine.
Bulbs and lamps are an important aspect of
vehicle safety. You must therefore make sure
that these function correctly at all times.
Have the headlamp setting checked regularly.
Other bulbs G
WARNING
Bulbs, lamps and plug connectors can
become very hot during use. When replacing a bulb, you could burn yourself on these com-
ponents. There is a risk of injury.
Allow these components to cool down beforereplacing the bulb.
Do not use a bulb that has been dropped or if
its glass tube has been scratched.
The bulb may explode if:
R you touch it
R it is hot
R you drop it
R you scratch it
Only operate bulbs in enclosed lamps
designed for that purpose. Only fit spare Replacing bulbs
117Lights and windscreen wipers Z