center console MERCEDES-BENZ SLK55AMG 2011 R170 Owner's Manual
[x] Cancel search | Manufacturer: MERCEDES-BENZ, Model Year: 2011, Model line: SLK55AMG, Model: MERCEDES-BENZ SLK55AMG 2011 R170Pages: 312, PDF Size: 5.64 MB
Page 25 of 312
Exterior view
....................................... 24
Cockpit ................................................. 25
Instrument cluster ..............................26
Multifunction steering wheel .............27
Center console .................................... 28
Overhead control panel ......................30
Door control panel .............................. 30 23At a glance
171_AKB; 3; 60, en-US
d2ureepe,
Version: 2.11.8.1 2009-05-11T16:00:23+02:00 - Seite 23
Page 27 of 312
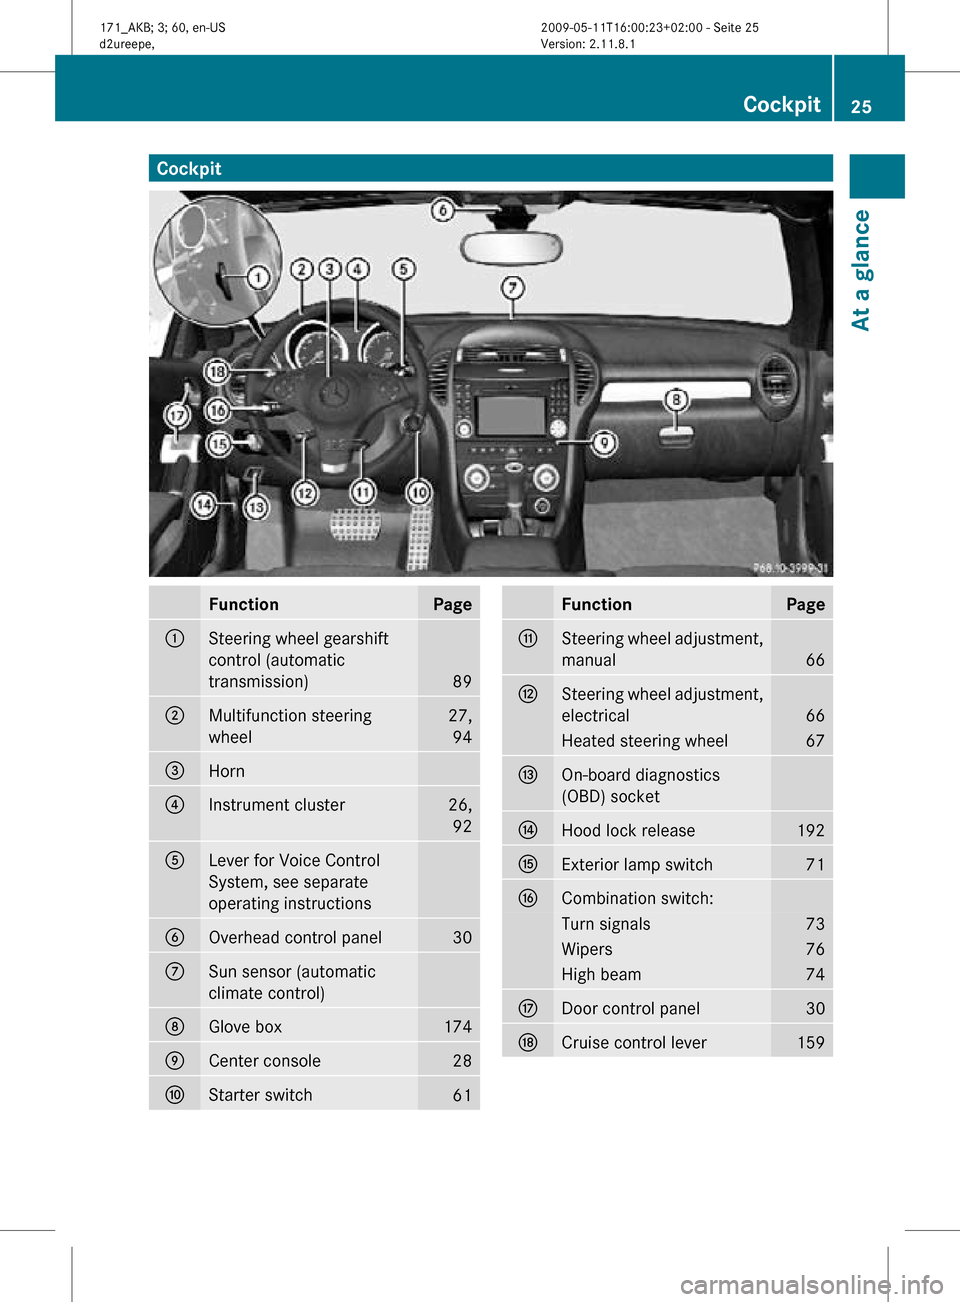
Cockpit
Function Page
:
Steering wheel gearshift
control (automatic
transmission)
89
;
Multifunction steering
wheel 27,
94 =
Horn
?
Instrument cluster 26,
92 A
Lever for Voice Control
System, see separate
operating instructions
B
Overhead control panel 30
C
Sun sensor (automatic
climate control)
D
Glove box 174
E
Center console 28
F
Starter switch
61 Function Page
G
Steering wheel adjustment,
manual
66
H
Steering wheel adjustment,
electrical
66
Heated steering wheel 67
I
On-board diagnostics
(OBD) socket
J
Hood lock release 192
K
Exterior lamp switch 71
L
Combination switch:
Turn signals 73
Wipers 76
High beam 74
M
Door control panel 30
N
Cruise control lever 159Cockpit
25At a glance
171_AKB; 3; 60, en-US
d2ureepe, Version: 2.11.8.1 2009-05-11T16:00:23+02:00 - Seite 25 Z
Page 30 of 312
Function Page
Press button & or *
briefly: to move within a menu
to select previous or next
track, scene or stored
station within Audio/DVD
menu
100
to switch to the phone book
and select a name or
number within Telephone
menu
110
Press and hold button
& or *:
to select previous or next
track with quick search or
to select previous or next
station in station list or
wave band within
Audio/
DVD menu 100
to start the quick search in
the phone book within
Telephone
menu 110 Center console
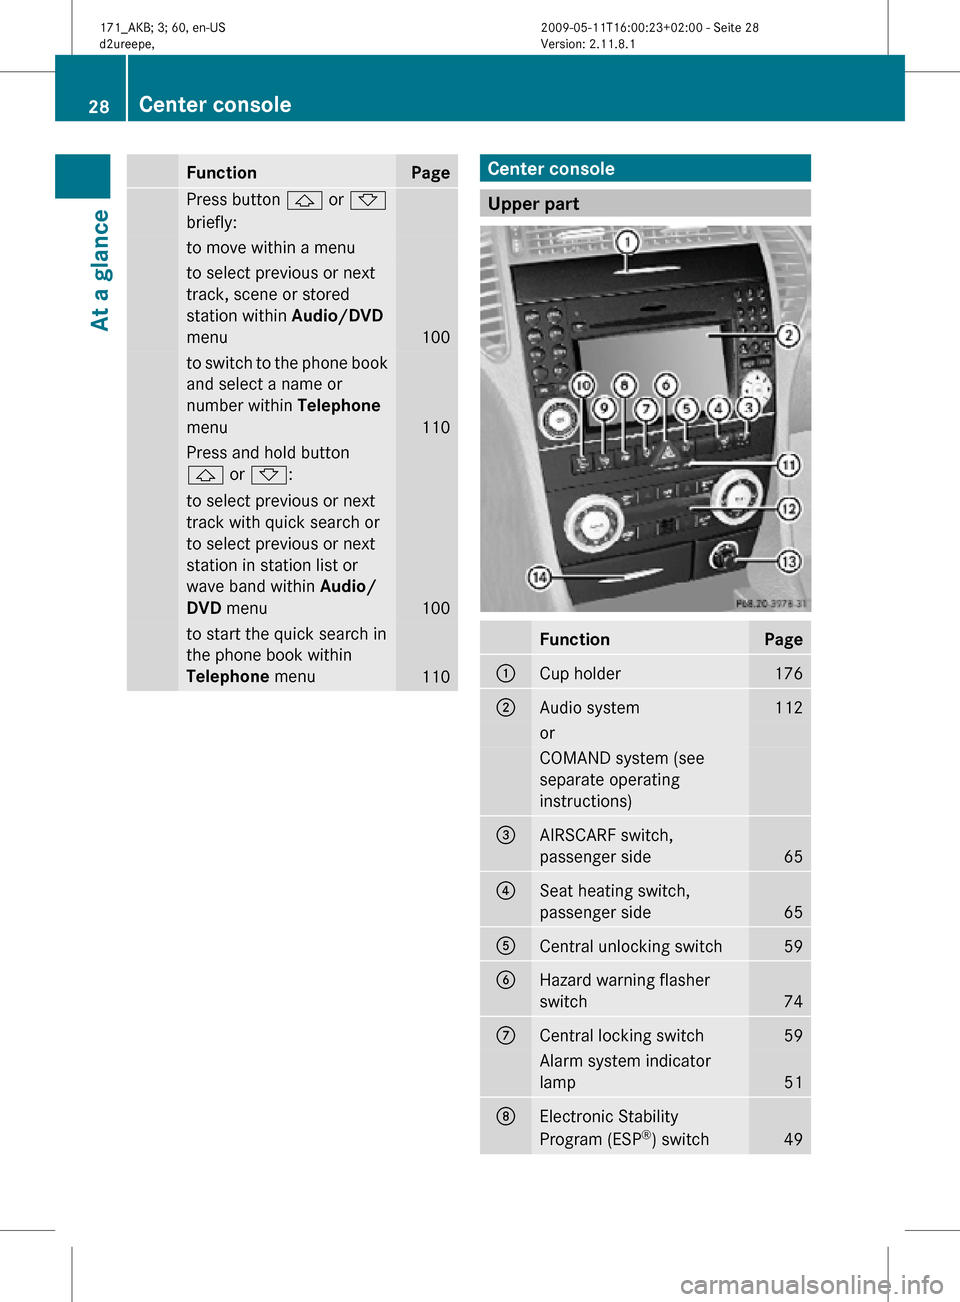
Upper part
Function Page
:
Cup holder 176
;
Audio system 112
or
COMAND system (see
separate operating
instructions)
=
AIRSCARF switch,
passenger side
65
?
Seat heating switch,
passenger side
65
A
Central unlocking switch 59
B
Hazard warning flasher
switch
74
C
Central locking switch 59
Alarm system indicator
lamp
51
D
Electronic Stability
Program (ESP
®
) switch 4928
Center consoleAt a glance
171_AKB; 3; 60, en-US
d2ureepe,
Version: 2.11.8.1 2009-05-11T16:00:23+02:00 - Seite 28
Page 31 of 312
Function Page
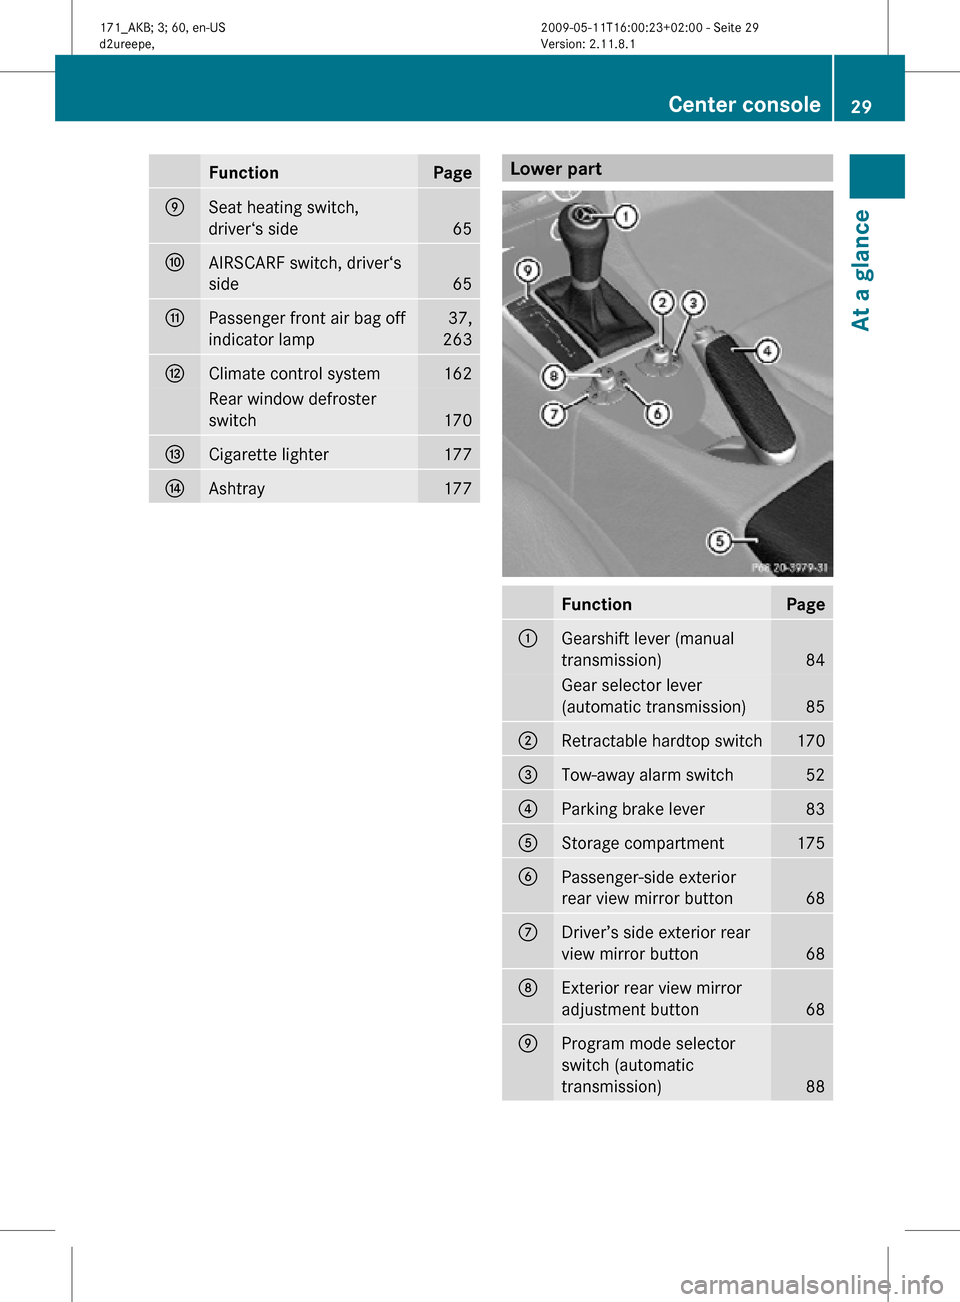
E
Seat heating switch,
driver‘s side
65
F
AIRSCARF switch, driver‘s
side
65
G
Passenger front air bag off
indicator lamp 37,
263 H
Climate control system 162
Rear window defroster
switch
170
I
Cigarette lighter 177
J
Ashtray 177 Lower part
Function Page
:
Gearshift lever (manual
transmission)
84
Gear selector lever
(automatic transmission)
85
;
Retractable hardtop switch 170
=
Tow-away alarm switch 52
?
Parking brake lever 83
A
Storage compartment 175
B
Passenger-side exterior
rear view mirror button
68
C
Driver’s side exterior rear
view mirror button
68
D
Exterior rear view mirror
adjustment button
68
E
Program mode selector
switch (automatic
transmission)
88Center console
29At a glance
171_AKB; 3; 60, en-US
d2ureepe, Version: 2.11.8.1 2009-05-11T16:00:23+02:00 - Seite 29 Z
Page 38 of 312
Driver and passenger front air bags and knee
bags are deployed
R
in the event of certain frontal impacts
R if the system determines that air bag
deployment can offer additional protection
to that provided by the seat belt
R depending on whether the respective seat
belt is in use
R independently of the head-thorax air bags
The front air bags in this vehicle have been
designed to inflate in two stages. This allows
the air bags to have different rates of inflation.
The rate of inflation is based on the vehicle
deceleration rate as assessed by the air bag
control unit.
The passenger front air bag deployment is
additionally influenced by the passenger’s
weight category as identified by the Occupant
Classification System (OCS) ( Y page 37).
The lighter the passenger-side occupant, the
higher the vehicle deceleration rate required
for second stage inflation of the passenger
front air bag.
The air bags will not deploy in impacts which
do not exceed the system’s preset
deployment thresholds. You will then be
protected by the fastened seat belts.
The front air bags will not deploy in the event
of a rollover unless the vehicle’s rate of
longitudinal deceleration or acceleration
exceeds the preset deployment threshold for
the front air bags.
The passenger air bag will only be deployed if
R the system, based on OCS weight sensor
readings, detects that the passenger seat
is occupied
R the 04 indicator lamp in the
center console is not lit (Y page 37)
R the impact exceeds a preset deployment
threshold Knee bags
The knee bags are designed to provide
increased protection for the driver and
passenger against the risk of injuries to the
knees, thighs and lower legs.
Driver side knee bag ? is located on the
driver side lower instrument panel. Passenger
side knee bag = is located on the passenger
side below the glove box. They are designed
to operate together with the front air bags in
certain frontal impacts if the system
determines that air bag deployment can offer
additional protection to that provided by the
seat belt. The knee bags operate best in
conjunction with properly positioned and
fastened seat belts.
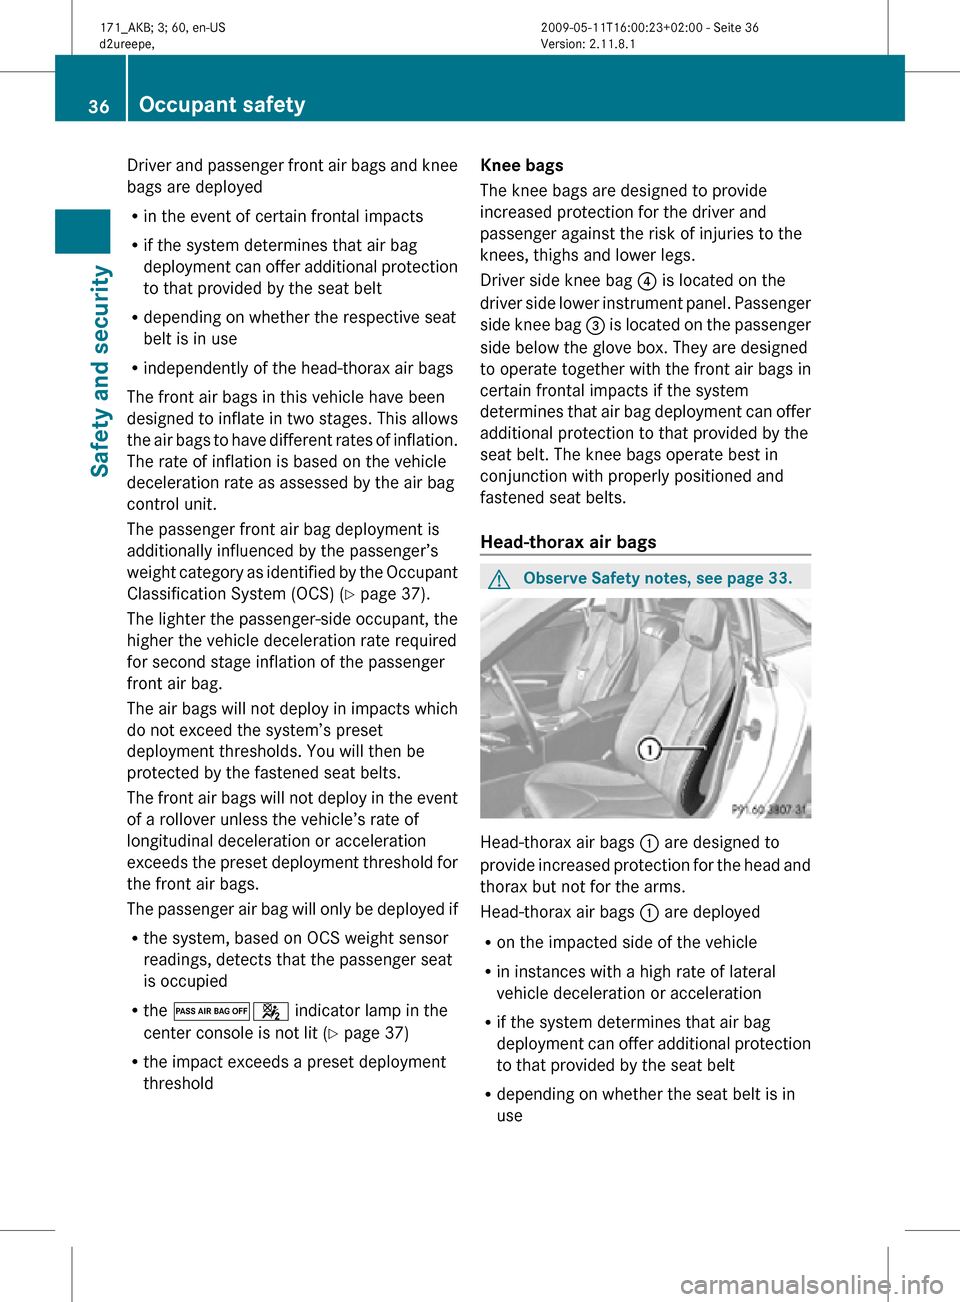
Head-thorax air bags G
Observe Safety notes, see page 33. Head-thorax air bags
: are designed to
provide increased protection for the head and
thorax but not for the arms.
Head-thorax air bags : are deployed
R on the impacted side of the vehicle
R in instances with a high rate of lateral
vehicle deceleration or acceleration
R if the system determines that air bag
deployment can offer additional protection
to that provided by the seat belt
R depending on whether the seat belt is in
use 36
Occupant safetySafety and security
171_AKB; 3; 60, en-US
d2ureepe,
Version: 2.11.8.1 2009-05-11T16:00:23+02:00 - Seite 36
Page 95 of 312
Activating the instrument cluster
The instrument cluster is activated when you
R open the driver’s door
R switch on the ignition
R press reset button .
R switch on the exterior lamps
i Opening the driver’s door or pressing the
reset button . without switching on the
ignition or the exterior lamps activates the
instrument cluster illumination only for
30 seconds. Adjusting the instrument cluster
illumination
X To brighten illumination: Press knob :
briefly.
X To dim illumination: Press knob ;
briefly.
The illumination brightness for the instrument
cluster changes each time you press
knob :
or ;. Several settings are possible.
i The instrument cluster illumination is
dimmed or brightened automatically to suit
ambient light conditions.
You can only adjust the brightness of the
instrument cluster illumination when it is
dark outside.
i With the exterior lighting switched on, the
brightness of the switches in the center
console will also be adjusted when using
knob : or ;. Resetting trip odometer
X Make sure you are viewing the standard
display
(Y page 96) in the multifunction
display.
X Press and hold reset button .
until the trip
odometer is reset. Tachometer
The red marking on the tachometer
(Y
page 26) denotes excessive engine speed.
! Avoid driving at excessive engine speeds,
as it may result in serious engine damage
that is not covered by the Mercedes-Benz
Limited Warranty.
To help protect the engine, the fuel supply is
interrupted if the engine is operated within
the red marking. Clock
In vehicles with the audio system, the clock
can be set via the control system
(Y page 105).
For setting the time with the COMAND
system, see separate COMAND system
operating instructions. Control system
Introduction
The
control system is activated as soon as the
starter switch is in position 1.
The control system enables you to call up
information about your vehicle and to change
vehicle settings.
For example, you can use the control system
to find out when your vehicle is next due for
maintenance service, to set the language for
messages in the instrument cluster display,
and much more. G
Warning!
A driver’s attention to the road and traffic
conditions must always be his/her primary
focus when driving.
For your safety and the safety of others,
selecting features through the multifunction
steering wheel should only be done by the
driver
when traffic and road conditions permit
it to be done safely. Control system
93
Controls in detail
171_AKB; 3; 60, en-US
d2ureepe, Version: 2.11.8.1 2009-05-11T16:00:23+02:00 - Seite 93 Z
Page 241 of 312
Display messages
Possible causes/consequences and
X SolutionsFront-
passenger
Airbag
Enabled
See
Operator’s
Manual The passenger front air bag and the passenger-side knee bag
are activated while driving even though a child, small
individual, or object below the system’s weight threshold is
on the passenger seat, or the passenger seat is empty.
Objects on the seat or forces acting on the seat may make
the system sense supplemental weight.
X
Stop the vehicle in a safe location as soon as possible.
X Engage the parking brake.
X Switch off the ignition.
X Open the passenger door.
X Remove child and child restraint from passenger seat.
X Make sure no objects which apply supplemental weight to
the seat are present. The system may recognize such
supplemental weight and sense that an occupant on the
passenger
seat is of a greater weight than actually present.
X Keep the seat unoccupied, close the passenger door and
switch on the ignition.
Monitor the 04 indicator lamp in the center
console (Y page 39) and the multifunction display in the
instrument cluster
(Y page 26) for the following:
With the seat unoccupied and the ignition switched on,
R the 04 indicator lamp in the center console
should illuminate and remain illuminated, indicating that
the OCS (Y page 37) has deactivated the passenger front
air bag and the passenger-side knee bag.
R the message Front-passenger Airbag Enabled See
Operator’s Manual or the message Front-passenger
Airbag Disabled See Operator’s Manual should not
appear in the multifunction display at any time the seat is
unoccupied. Wait at least 60 seconds for the system to
complete the necessary check cycles and to make sure
neither message appears in the multifunction display.
If above conditions are met, you can occupy the passenger
seat again. Depending on the passenger classification sensed
by the OCS, the 04 indicator lamp will remain
illuminated or go out.
If above conditions are not met, the system is not working
properly. Have the system checked at an authorized
Mercedes-Benz Center as soon as possible. Vehicle status messages in the multifunction display
239
Practical hints
171_AKB; 3; 60, en-US
d2ureepe,Version: 2.11.8.1 2009-05-11T16:00:23+02:00 - Seite 239 Z
Page 242 of 312
G
Warning!
If the 04 indicator lamp remains out even after performing the above corrective
steps, do not have any children 12 years old and under and other small individuals use the
passenger seat until the system has been repaired. Display messages
Possible causes/consequences and
X SolutionsFront-
passenger
Airbag
Disabled
See
Operator’s
Manual The passenger front air bag and the passenger-side knee bag
are deactivated while driving even though an adult or
someone larger than a small individual is occupying the
passenger seat. Forces acting on the seat may make the
system sense a decrease in weight.
X
Stop the vehicle in a safe location as soon as possible.
X Engage the parking brake.
X Switch off the ignition.
X Have the passenger vacate the seat and exit the vehicle.
X Keep the seat unoccupied, close the passenger door and
switch on the ignition.
Monitor the 04 indicator lamp in the center
console (Y page 39) and the multifunction display in the
instrument cluster
(Y page 26) for the following:
With the seat unoccupied and the ignition switched on,
R the 04 indicator lamp in the center console
should illuminate and remain illuminated, indicating that
the OCS (Y page 37) has deactivated the passenger front
air bag and the passenger-side knee bag.
R the message Front-passenger Airbag Enabled See
Operator’s Manual or the message Front-passenger
Airbag Disabled See Operator’s Manual should not
appear in the multifunction display at any time the seat is
unoccupied. Wait at least 60 seconds for the system to
complete the necessary check cycles and to make sure
neither message appears in the multifunction display.
If above conditions are met, you can occupy the passenger
seat again. Depending on the passenger classification sensed
by the OCS, the 04 indicator lamp will remain
illuminated or go out.
If above conditions are not met, the system is not working
properly. Have the system checked at an authorized
Mercedes-Benz Center as soon as possible. 240
Vehicle status messages in the multifunction displayPractical hints
171_AKB; 3; 60, en-US
d2ureepe,
Version: 2.11.8.1 2009-05-11T16:00:23+02:00 - Seite 240
Page 265 of 312
G
Warning!
Each tire, including the spare (if provided),
should be checked at least once a month
when cold and inflated to the inflation
pressure recommended by the vehicle
manufacturer on the Tire and Loading
Information placard on the driver’s door B-
pillar
or the tire inflation pressure label on the
inside of the fuel filler flap. If your vehicle has
tires of a different size than the size indicated
on the Tire and Loading Information placard
or the tire inflation pressure label, you should
determine the proper tire inflation pressure
for those tires.
As an added safety feature, your vehicle has
been equipped with a tire pressure monitoring
system (TPMS) that illuminates a low tire
pressure telltale when one or more of your
tires are significantly underinflated.
Accordingly, when the low tire pressure
telltale illuminates, you should stop and check
your tires as soon as possible, and inflate
them to the proper pressure. Driving on a
significantly underinflated tire causes the tire
to overheat and can lead to tire failure.
Underinflation also reduces fuel efficiency
and tire tread life, and may affect the vehicle’s
handling and stopping ability. Please note that
the TPMS is not a substitute for proper tire maintenance, and it is the driver’s
responsibility to maintain correct tire
pressure, even if underinflation has not
reached
the level to trigger illumination of the
TPMS low tire pressure telltale.
Your vehicle has also been equipped with a
TPMS malfunction indicator to indicate when
the system is not operating properly. The
TPMS malfunction indicator is combined with
the low tire pressure telltale. When the
system detects a malfunction, the telltale will
flash for approximately 1 minute and then
remain continuously illuminated. This
sequence will continue upon subsequent
vehicle start-ups as long as the malfunction
exists. When the malfunction indicator is
illuminated, the system may not be able to
detect or signal low tire pressure as intended.
TPMS malfunctions may occur for a variety of
reasons, including the installation of
incompatible replacement or alternate tires
or wheels on the vehicle that prevent the
TPMS from functioning properly. Always
check the TPMS malfunction telltale after
replacing one or more tires or wheels on your
vehicle to ensure that the replacement or
alternate tires and wheels allow the TPMS to
continue to function properly. Lamp in center console
Problem
Possible causes/consequences and
X Solutions04
The passenger front air
bag off indicator lamp
illuminates and
remains illuminated
with the weight of a
typical adult or
someone larger than a
small individual on the
passenger seat.
The system is malfunctioning.
X
Have the system checked as soon as possible at an authorized
Mercedes-Benz Center.
X Read and observe messages in the multifunction display and
follow corrective steps (Y page 236). What to do if …
263
Practical hints
171_AKB; 3; 60, en-US
d2ureepe, Version: 2.11.8.1 2009-05-11T16:00:23+02:00 - Seite 263 Z
Page 268 of 312
i
This procedure does not arm the anti-
theft alarm system, nor does it lock the fuel
filler flap and the storage compartments. Manually unlocking the gear selector
lever
If the vehicle’s electrical system is
malfunctioning, the gear selector lever could
remain locked in park position P. In this case
the gear selector lever can be unlocked
manually, e.g. to tow the vehicle.
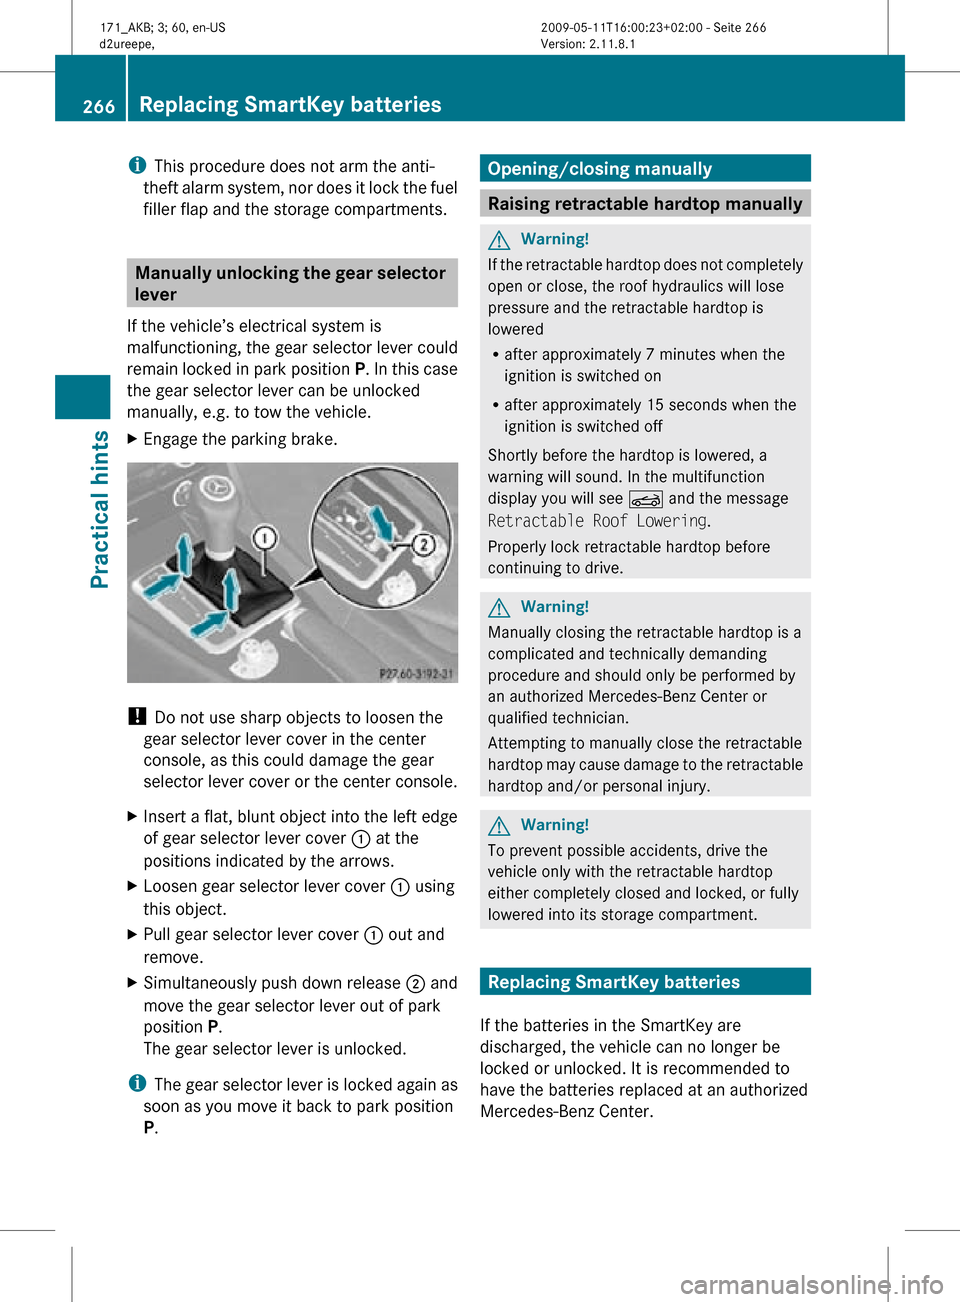
X Engage the parking brake. !
Do not use sharp objects to loosen the
gear selector lever cover in the center
console, as this could damage the gear
selector lever cover or the center console.
X Insert a flat, blunt object into the left edge
of gear selector lever cover : at the
positions indicated by the arrows.
X Loosen gear selector lever cover : using
this object.
X Pull gear selector lever cover : out and
remove.
X Simultaneously push down release ; and
move the gear selector lever out of park
position P.
The gear selector lever is unlocked.
i The gear selector lever is locked again as
soon as you move it back to park position
P. Opening/closing manually
Raising retractable hardtop manually
G
Warning!
If the retractable hardtop does not completely
open or close, the roof hydraulics will lose
pressure and the retractable hardtop is
lowered
R after approximately 7 minutes when the
ignition is switched on
R after approximately 15 seconds when the
ignition is switched off
Shortly before the hardtop is lowered, a
warning will sound. In the multifunction
display you will see K and the message
Retractable Roof Lowering.
Properly lock retractable hardtop before
continuing to drive. G
Warning!
Manually closing the retractable hardtop is a
complicated and technically demanding
procedure and should only be performed by
an authorized Mercedes-Benz Center or
qualified technician.
Attempting to manually close the retractable
hardtop may cause damage to the retractable
hardtop and/or personal injury. G
Warning!
To prevent possible accidents, drive the
vehicle only with the retractable hardtop
either completely closed and locked, or fully
lowered into its storage compartment. Replacing SmartKey batteries
If the batteries in the SmartKey are
discharged, the vehicle can no longer be
locked or unlocked. It is recommended to
have the batteries replaced at an authorized
Mercedes-Benz Center. 266
Replacing SmartKey batteriesPractical hints
171_AKB; 3; 60, en-US
d2ureepe,
Version: 2.11.8.1 2009-05-11T16:00:23+02:00 - Seite 266