MERCEDES-BENZ SLS 2011 C197 Owner's Manual
Manufacturer: MERCEDES-BENZ, Model Year: 2011, Model line: SLS, Model: MERCEDES-BENZ SLS 2011 C197Pages: 436, PDF Size: 20.86 MB
Page 361 of 436
Therefore, the vehicle’s brake system
should always be warmed-up before it is
parked after cleaning. Drive your vehicle for
several minutes to allow the brakes to dry.
When applying Mercedes-Benz approved
Tire Care and Mercedes-Benz approved
Wheel Care products, take care not to
spray them on the brake disks.
Plastic and rubber partsXUse a gentle dishwashing detergent or mild
detergent for delicate fabrics as a washing
solution.XWipe with a cloth moistened in a lukewarm
solution.
The surface may temporarily change color.
If this is the case, wait for it to dry.GWarning!
Do not use cleaners or cockpit care sprays
containing solvents to clean the cockpit or the
steering wheel. Cleaners containing solvents
will make the surface porous and vehicle
occupants could suffer serious injuries from
plastic parts coming loose in the event of air
bag deployment.
! Do not use oil, wax or scouring agents.
Otherwise you may scratch or damage the
surface.
Hard plastic trim items
XUse Mercedes-Benz approved Interior Care
on a soft, lint-free cloth and apply with light
pressure.
COMAND display
! You must switch off the COMAND display
and allow it to cool prior to cleaning.
! Do not use any liquids or cleaning agents.
These can damage or even destroy the
COMAND display screen.
XUse a standard microfiber cloth and apply
with light pressure.Steering wheel and gear selector leverXWipe with a damp cloth and dry thoroughly
or clean with Mercedes-Benz approved
Leather Care.
Carpets
XUse Mercedes-Benz approved Carpet and
Fabric Care for cleaning the carpets.
Headliner
XUse a soft bristle brush or a dry-shampoo
cleaner in case of excessive dirt.
Seat belts
XOnly use clear, lukewarm water and soap.
! The seat belts must not be treated with
chemical cleaning agents. Do not dry the
seat belts at temperatures above 176‡
(80†) or in direct sunlight.
GWarning!
Do not bleach or dye seat belts as this may
severely weaken them. In a crash they may
not be able to provide adequate protection.
Upholstery
Using aftermarket seat covers or wearing
clothing that have the tendency to give off
coloring (e.g. when wet, etc.) may cause the
upholstery to become permanently
discolored. By lining the seats with a proper
intermediate cover, contact-discoloration will
be prevented.
GWarning!
Only use seat covers which have been tested
and approved by Mercedes-Benz for your
vehicle model. Using other seat covers may
interfere with or prevent the deployment of
the side impact air bags. Contact an
authorized Mercedes-Benz Center for
availability.
Vehicle care359OperationBA 197 USA, CA Edition A 2011; 1; 27, en-UShereepeVersion: 3.0.3.52010-03-24T15:31:10+01:00 - Seite 359Z
Page 362 of 436
Leather upholstery
Please note that leather upholstery is a
natural product and is therefore subject to a
natural aging process. Leather upholstery
may also react to certain ambient influences
such as high humidity or high temperature by
showing wrinkles for example.
XWipe leather upholstery with a damp cloth
and dry thoroughly or clean with Mercedes-
Benz approved Leather Care.
! To avoid damage to leather upholstery:
RWipe with light pressure only.
RDo not clean with abrasive cleaning
agents such as scouring milk or powder.
RDo not soak the leather upholstery.
As leather is a natural product, it could
otherwise harden or become porous.
RExercise particular care when cleaning
perforated leather as its underside
should not become wet.
Chrome-plated exhaust tip
Regular cleaning and care of chrome-plated
exhaust tips will help to maintain their shine
and the classy appearance.
XUse Mercedes-Benz approved Chrome
Polishing Paste each time the vehicle has
been washed, especially during the winter.
! Do not use alkaline cleaners such as
wheel cleaners as they could cause
corrosion.
Trunk Wing
You can extend and retract the Trunk Wing
manually for cleaning.
GWarning!
Make sure that nobody can become trapped
when you retract the Trunk Wing manually. If
there is a risk of entrapment, release the
Trunk Wing switch to stop the retraction
process. The Trunk Wing will then extend
again.
Never leave children unattended in the
vehicle. They could inadvertently retract the
extended Trunk Wing. Somebody could
become trapped and be seriously injured.
! Do not enter an automatic car wash with
the Trunk Wing extended. Otherwise, the
Trunk Wing could be damaged.
Only extend the Trunk Wing in order to
clean it by hand. Retract it again after
cleaning.
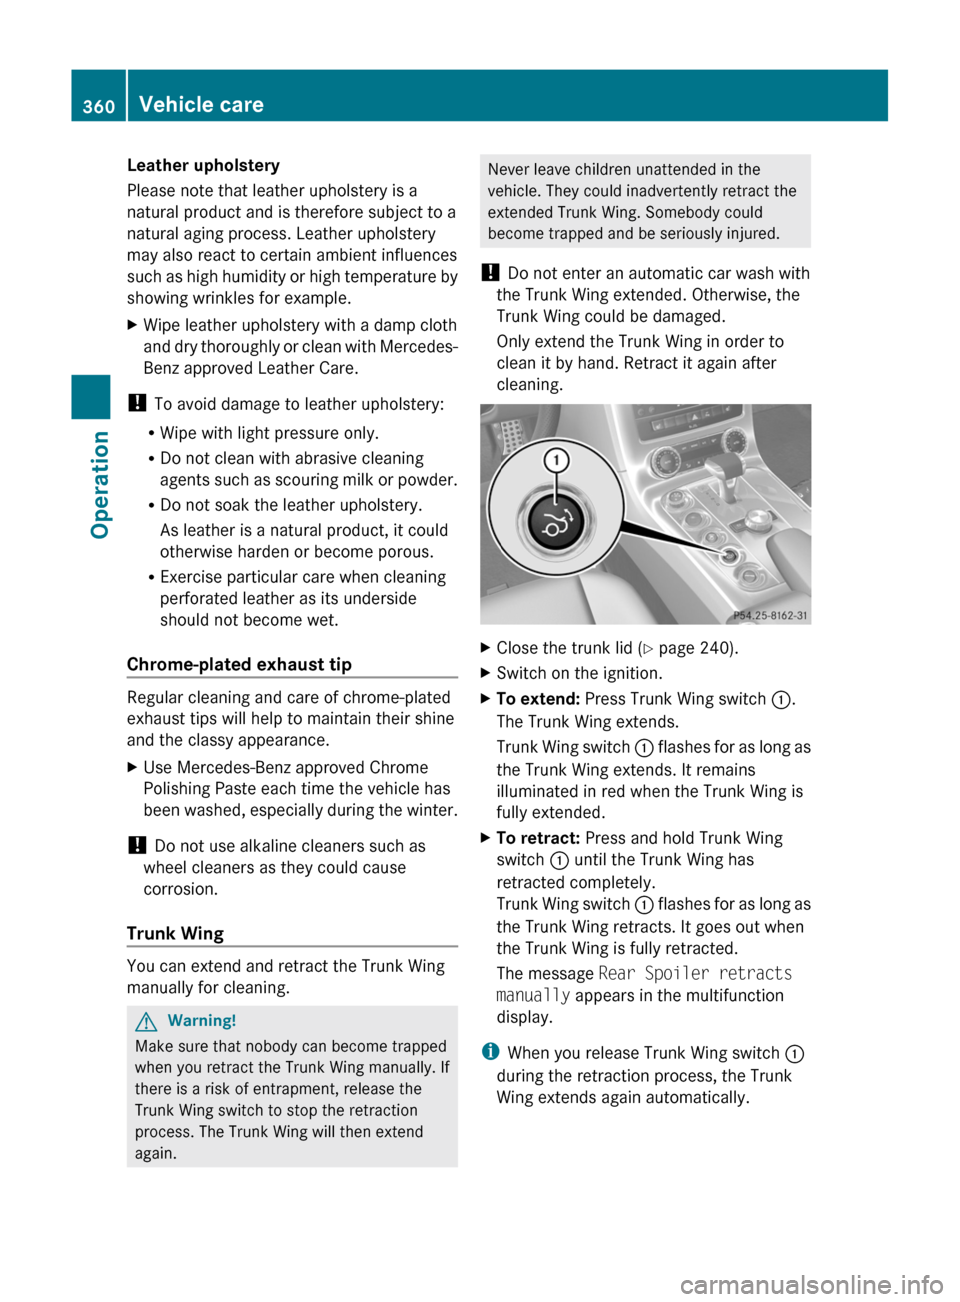
XClose the trunk lid (Y page 240).XSwitch on the ignition.XTo extend: Press Trunk Wing switch :.
The Trunk Wing extends.
Trunk Wing switch : flashes for as long as
the Trunk Wing extends. It remains
illuminated in red when the Trunk Wing is
fully extended.
XTo retract: Press and hold Trunk Wing
switch : until the Trunk Wing has
retracted completely.
Trunk Wing switch : flashes for as long as
the Trunk Wing retracts. It goes out when
the Trunk Wing is fully retracted.
The message Rear Spoiler retracts
manually appears in the multifunction
display.
iWhen you release Trunk Wing switch :
during the retraction process, the Trunk
Wing extends again automatically.
360Vehicle careOperation
BA 197 USA, CA Edition A 2011; 1; 27, en-UShereepeVersion: 3.0.3.52010-03-24T15:31:10+01:00 - Seite 360
Page 363 of 436
Vehicle equipment ............................362
Where will I find...? ...........................362
Vehicle status messages in the
multifunction display .......................364
What to do if... ................................... 388
Unlocking/locking manually ...........397
Replacing SmartKey battery ............399
Replacing bulbs ................................. 400
Replacing wiper blades ....................400
Flat tire .............................................. 402
Wheel change .................................... 405
Battery ............................................... 410
Jump starting .................................... 413
Towing the vehicle ............................415
Fuses .................................................. 417361Practical hintsBA 197 USA, CA Edition A 2011; 1; 27, en-UShereepeVersion: 3.0.3.52010-03-24T15:31:10+01:00 - Seite 361
Page 364 of 436
Vehicle equipment
iThis Operator’s Manual describes all
features, standard or optional, potentially
available for your vehicle at the time of
purchase. Please be aware that your
vehicle might not be equipped with all
features described in this manual.
Where will I find...?
First aid kit
iCheck expiration dates and contents for
completeness at least once a year and
replace missing/expired items.
The first aid kit is located in the storage
compartment on the driver’s side in the trunk.
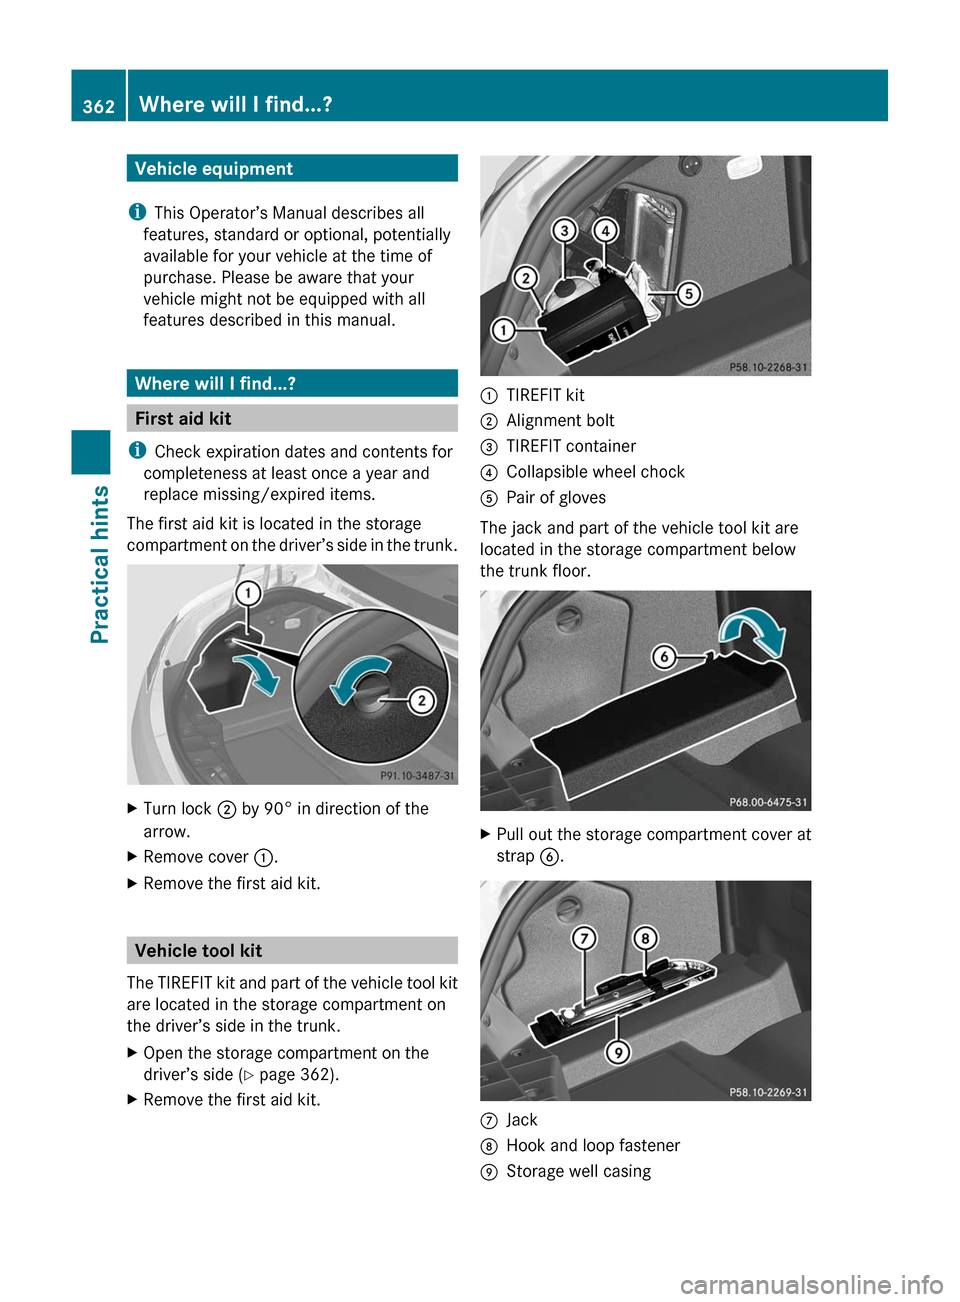
XTurn lock ; by 90° in direction of the
arrow.
XRemove cover :.XRemove the first aid kit.
Vehicle tool kit
The TIREFIT kit and part of the vehicle tool kit
are located in the storage compartment on
the driver’s side in the trunk.
XOpen the storage compartment on the
driver’s side (Y page 362).
XRemove the first aid kit.:TIREFIT kit;Alignment bolt=TIREFIT container?Collapsible wheel chockAPair of gloves
The jack and part of the vehicle tool kit are
located in the storage compartment below
the trunk floor.
XPull out the storage compartment cover at
strap B.CJackDHook and loop fastenerEStorage well casing362Where will I find...?Practical hints
BA 197 USA, CA Edition A 2011; 1; 27, en-UShereepeVersion: 3.0.3.52010-03-24T15:31:10+01:00 - Seite 362
Page 365 of 436
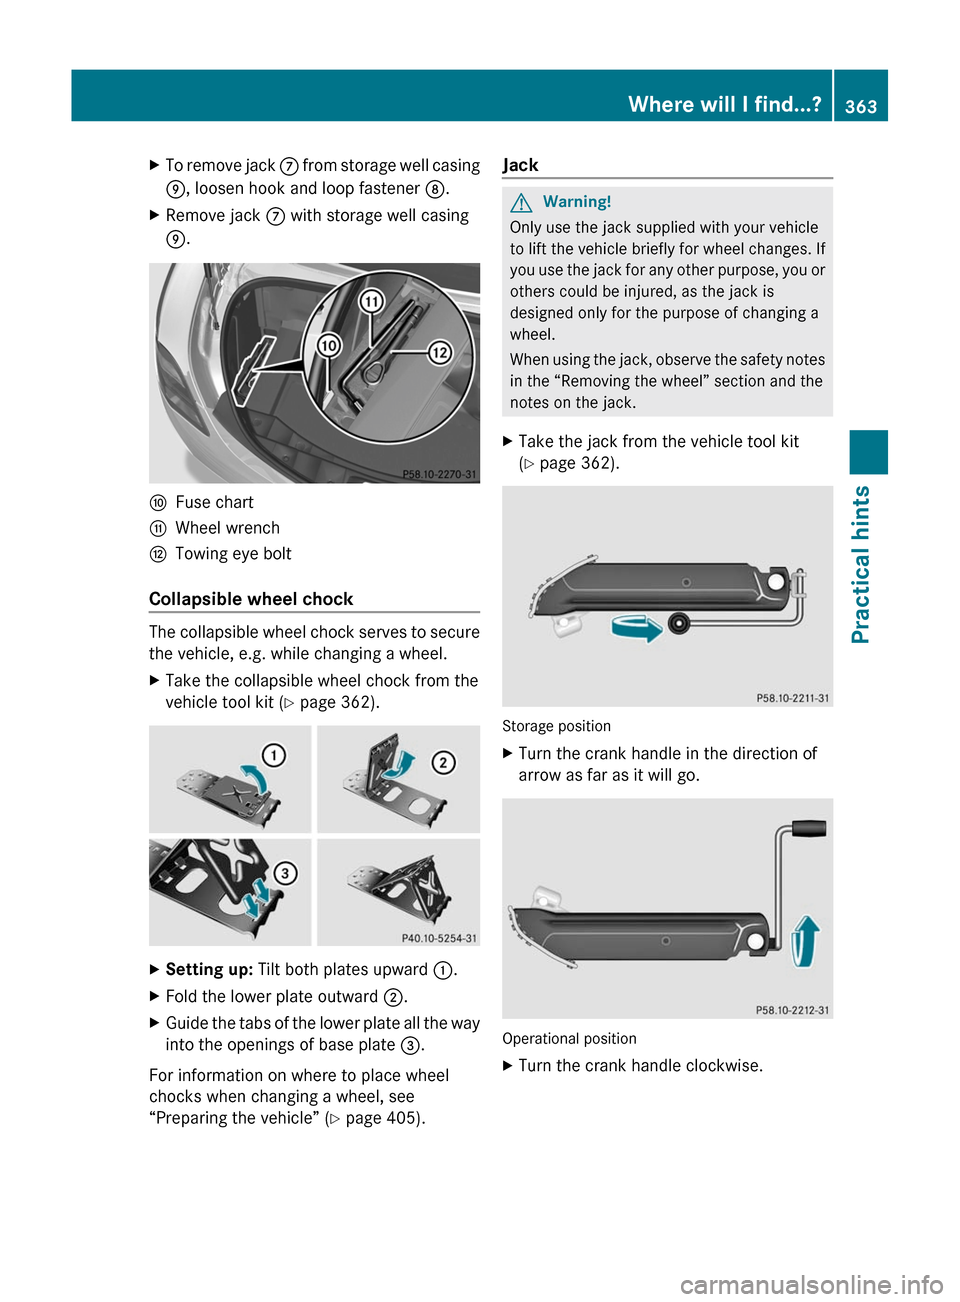
XTo remove jack C from storage well casing
E, loosen hook and loop fastener D.
XRemove jack C with storage well casing
E.
FFuse chartGWheel wrenchHTowing eye bolt
Collapsible wheel chock
The collapsible wheel chock serves to secure
the vehicle, e.g. while changing a wheel.
XTake the collapsible wheel chock from the
vehicle tool kit (Y page 362).
XSetting up: Tilt both plates upward :.XFold the lower plate outward ;.XGuide the tabs of the lower plate all the way
into the openings of base plate =.
For information on where to place wheel
chocks when changing a wheel, see
“Preparing the vehicle” (Y page 405).
Jack GWarning!
Only use the jack supplied with your vehicle
to lift the vehicle briefly for wheel changes. If
you use the jack for any other purpose, you or
others could be injured, as the jack is
designed only for the purpose of changing a
wheel.
When using the jack, observe the safety notes
in the “Removing the wheel” section and the
notes on the jack.
XTake the jack from the vehicle tool kit
(Y page 362).
Storage position
XTurn the crank handle in the direction of
arrow as far as it will go.
Operational position
XTurn the crank handle clockwise.Where will I find...?363Practical hintsBA 197 USA, CA Edition A 2011; 1; 27, en-UShereepeVersion: 3.0.3.52010-03-24T15:31:10+01:00 - Seite 363Z
Page 366 of 436
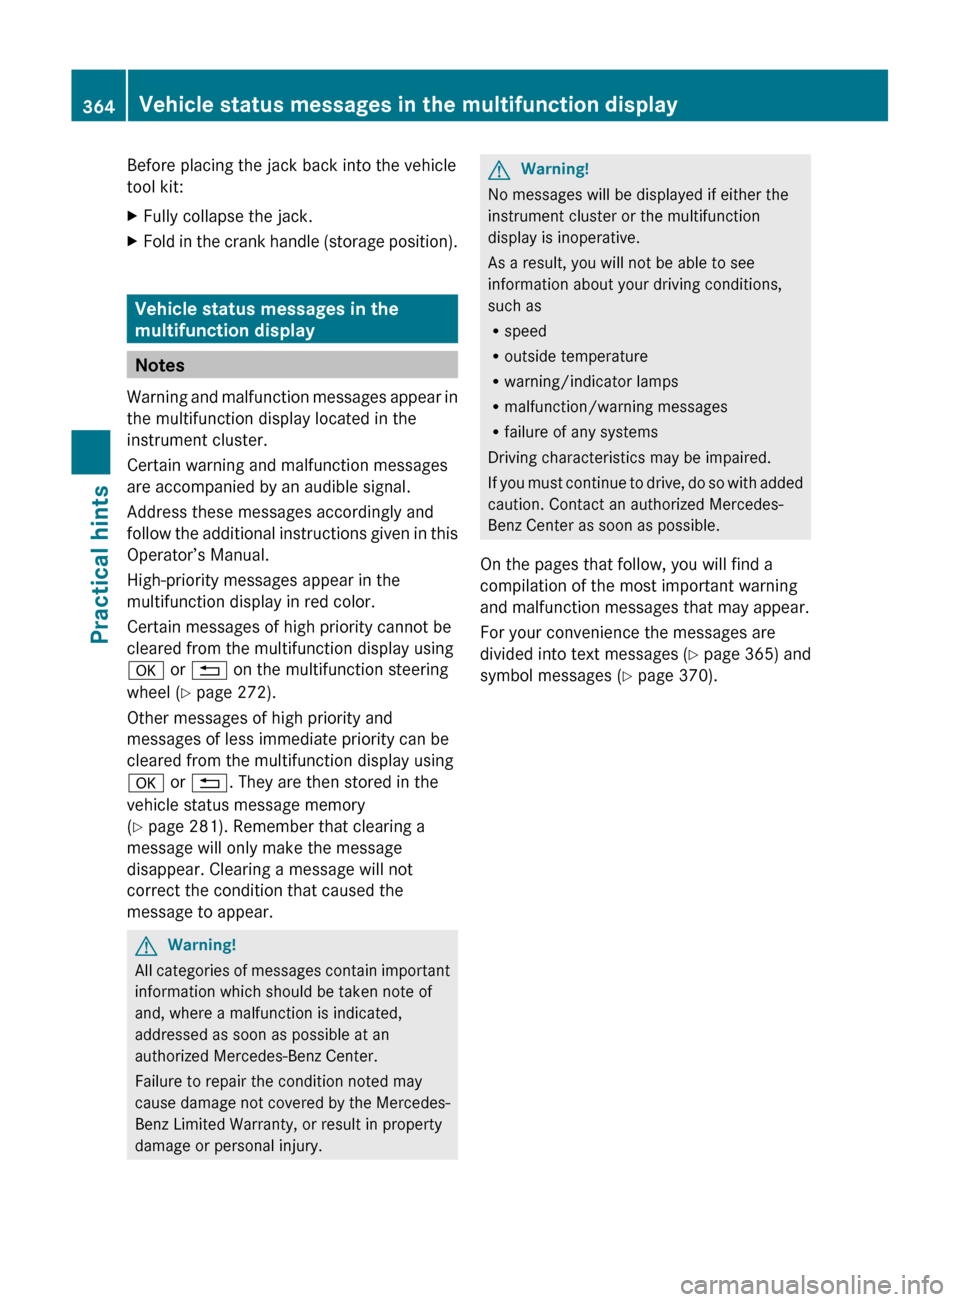
Before placing the jack back into the vehicle
tool kit:XFully collapse the jack.XFold in the crank handle (storage position).
Vehicle status messages in the
multifunction display
Notes
Warning and malfunction messages appear in
the multifunction display located in the
instrument cluster.
Certain warning and malfunction messages
are accompanied by an audible signal.
Address these messages accordingly and
follow the additional instructions given in this
Operator’s Manual.
High-priority messages appear in the
multifunction display in red color.
Certain messages of high priority cannot be
cleared from the multifunction display using
a or % on the multifunction steering
wheel ( Y page 272).
Other messages of high priority and
messages of less immediate priority can be
cleared from the multifunction display using
a or % . They are then stored in the
vehicle status message memory
( Y page 281). Remember that clearing a
message will only make the message
disappear. Clearing a message will not
correct the condition that caused the
message to appear.
GWarning!
All categories of messages contain important
information which should be taken note of
and, where a malfunction is indicated,
addressed as soon as possible at an
authorized Mercedes-Benz Center.
Failure to repair the condition noted may
cause damage not covered by the Mercedes-
Benz Limited Warranty, or result in property
damage or personal injury.
GWarning!
No messages will be displayed if either the
instrument cluster or the multifunction
display is inoperative.
As a result, you will not be able to see
information about your driving conditions,
such as
R speed
R outside temperature
R warning/indicator lamps
R malfunction/warning messages
R failure of any systems
Driving characteristics may be impaired.
If you must continue to drive, do so with added
caution. Contact an authorized Mercedes-
Benz Center as soon as possible.
On the pages that follow, you will find a
compilation of the most important warning
and malfunction messages that may appear.
For your convenience the messages are
divided into text messages ( Y page 365) and
symbol messages ( Y page 370).
364Vehicle status messages in the multifunction displayPractical hints
BA 197 USA, CA Edition A 2011; 1; 27, en-UShereepeVersion: 3.0.3.52010-03-24T15:31:10+01:00 - Seite 364
Page 367 of 436
Text messages
Safety systemsDisplay messagesPossible causes/consequences and M SolutionsFront Passenger
Airbag Enabled See
Operator's ManualThe passenger front air bag and the passenger-side knee bag are
activated while driving even though a child, small individual, or
object below the system’s weight threshold is on the passenger
seat, or the passenger seat is empty. Objects on the seat or forces
acting on the seat may make the system sense supplemental
weight. XStop the vehicle in a safe location as soon as possible.XEngage the electronic parking brake.XSwitch off the ignition.XOpen the passenger door.XRemove child and child restraint from passenger seat.XMake sure no objects which apply supplemental weight to the
seat are present. The system may recognize such supplemental
weight and sense that an occupant on the passenger seat is of
a greater weight than actually present.XKeep the seat unoccupied, close the passenger door and switch
on the ignition.
Monitor the 4 5 indicator lamp in the center console
( Y page 38) and the multifunction display in the instrument cluster
( Y page 273) for the following:
With the seat unoccupied and the ignition switched on,
R the 4 5 indicator lamp in the center console should
illuminate and remain illuminated, indicating that the OCS
( Y page 49) has deactivated the passenger front air bag.
R the message Front Passenger Airbag Enabled See
Operator's Manual or the message Front Passenger
Airbag Disabled See Operator's Manual should not
appear in the multifunction display at any time the seat is
unoccupied. Wait at least 60 seconds for the system to
complete the necessary check cycles and to make sure neither
message appears in the multifunction display.
If above conditions are met, you can occupy the passenger seat
again. Depending on the passenger classification sensed by the
OCS, the 4 5 indicator lamp will remain illuminated or go
out.
If above conditions are not met, the system is not working
properly. Have the system checked at an authorized Mercedes-
Benz Center as soon as possible.
Vehicle status messages in the multifunction display365Practical hintsBA 197 USA, CA Edition A 2011; 1; 27, en-UShereepeVersion: 3.0.3.52010-03-24T15:31:10+01:00 - Seite 365Z
Page 368 of 436
GWarning!
If the 4 5 indicator lamp remains out even after performing the above corrective steps,
do not have any children 12 years old and under and other small individuals use the passenger
seat until the system has been repaired.
Display messagesPossible causes/consequences and M SolutionsFront Passenger
Airbag Disabled
See Operator's
ManualThe passenger front air bag and the passenger-side knee bag are
deactivated while driving even though an adult or someone larger
than a small individual is occupying the passenger seat. Forces
acting on the seat may make the system sense a decrease in
weight.XStop the vehicle in a safe location as soon as possible.XEngage the electronic parking brake.XSwitch off the ignition.XHave the passenger vacate the seat and exit the vehicle.XKeep the seat unoccupied, close the passenger door and switch
on the ignition.
Monitor the 4 5 indicator lamp in the center console
( Y page 38) and the multifunction display in the instrument cluster
( Y page 273) for the following:
With the seat unoccupied and the ignition switched on,
R the 4 5 indicator lamp in the center console should
illuminate and remain illuminated, indicating that the OCS
( Y page 49) has deactivated the passenger front air bag.
R the message Front Passenger Airbag Enabled See
Operator's Manual or the message Front Passenger
Airbag Disabled See Operator's Manual should not
appear in the multifunction display at any time the seat is
unoccupied. Wait at least 60 seconds for the system to
complete the necessary check cycles and to make sure neither
message appears in the multifunction display.
If above conditions are met, you can occupy the passenger seat
again. Depending on the passenger classification sensed by the
OCS, the 4 5 indicator lamp will remain illuminated or go
out.
If above conditions are not met, the system is not working
properly. Have the system checked at an authorized Mercedes-
Benz Center as soon as possible.
GWarning!
If the 4 5 indicator lamp remains illuminated with an adult occupant on the passenger
seat even after performing the above corrective steps, do not have any passenger use the
passenger seat until the system has been repaired.
366Vehicle status messages in the multifunction displayPractical hints
BA 197 USA, CA Edition A 2011; 1; 27, en-UShereepeVersion: 3.0.3.52010-03-24T15:31:10+01:00 - Seite 366
Page 369 of 436
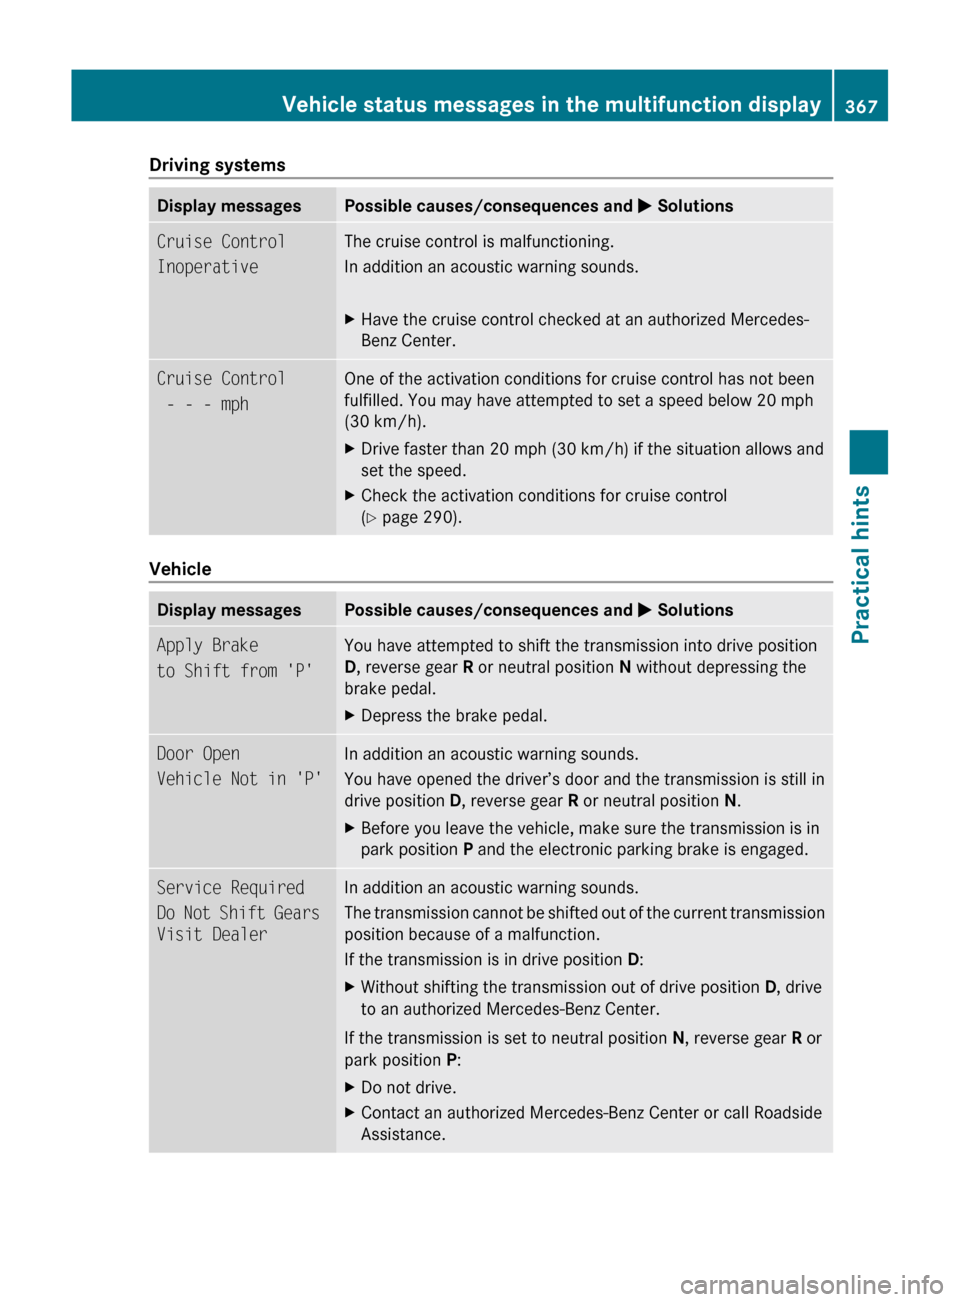
Driving systemsDisplay messagesPossible causes/consequences and M SolutionsCruise Control
InoperativeThe cruise control is malfunctioning.
In addition an acoustic warning sounds.XHave the cruise control checked at an authorized Mercedes-
Benz Center.Cruise Control
- - - mph One of the activation conditions for cruise control has not been
fulfilled. You may have attempted to set a speed below 20 mph
(30 km/h). XDrive faster than 20 mph (30 km/h) if the situation allows and
set the speed.XCheck the activation conditions for cruise control
( Y page 290).
Vehicle
Display messagesPossible causes/consequences and M SolutionsApply Brake
to Shift from 'P'You have attempted to shift the transmission into drive position
D , reverse gear R or neutral position N without depressing the
brake pedal.XDepress the brake pedal.Door Open
Vehicle Not in 'P'In addition an acoustic warning sounds.
You have opened the driver’s door and the transmission is still in
drive position D, reverse gear R or neutral position N.XBefore you leave the vehicle, make sure the transmission is in
park position P and the electronic parking brake is engaged.Service Required
Do Not Shift Gears
Visit DealerIn addition an acoustic warning sounds.
The transmission cannot be shifted out of the current transmission
position because of a malfunction.
If the transmission is in drive position D:XWithout shifting the transmission out of drive position D, drive
to an authorized Mercedes-Benz Center.
If the transmission is set to neutral position N, reverse gear R or
park position P:
XDo not drive.XContact an authorized Mercedes-Benz Center or call Roadside
Assistance.Vehicle status messages in the multifunction display367Practical hintsBA 197 USA, CA Edition A 2011; 1; 27, en-UShereepeVersion: 3.0.3.52010-03-24T15:31:10+01:00 - Seite 367Z
Page 370 of 436
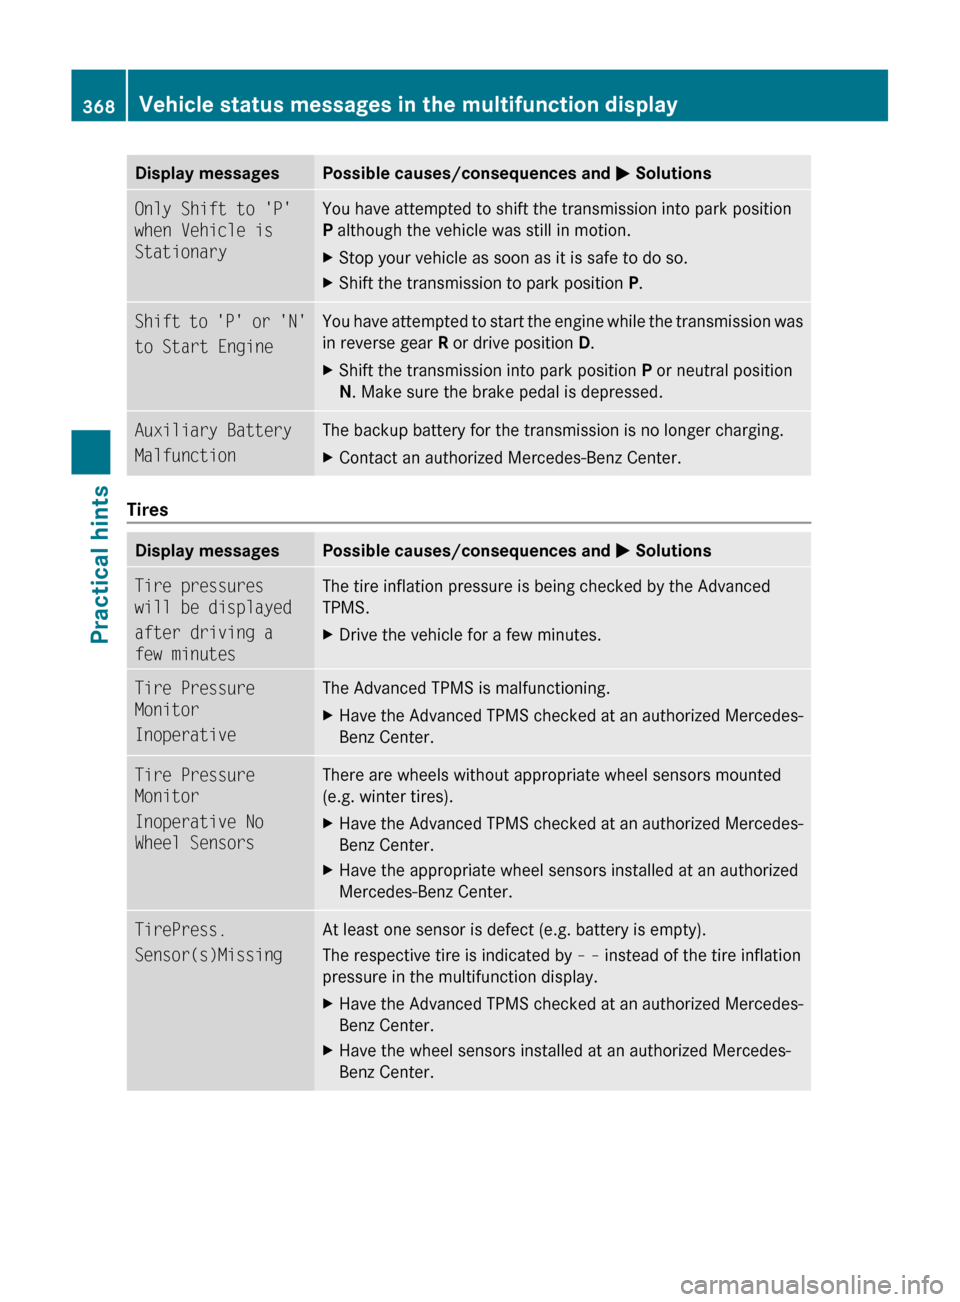
Display messagesPossible causes/consequences and M SolutionsOnly Shift to 'P'
when Vehicle is
StationaryYou have attempted to shift the transmission into park position
P although the vehicle was still in motion.XStop your vehicle as soon as it is safe to do so.XShift the transmission to park position P.Shift to 'P' or 'N'
to Start EngineYou have attempted to start the engine while the transmission was
in reverse gear R or drive position D.XShift the transmission into park position P or neutral position
N . Make sure the brake pedal is depressed.Auxiliary Battery
MalfunctionThe backup battery for the transmission is no longer charging. XContact an authorized Mercedes-Benz Center.
Tires
Display messagesPossible causes/consequences and M SolutionsTire pressures
will be displayed
after driving a
few minutesThe tire inflation pressure is being checked by the Advanced
TPMS.XDrive the vehicle for a few minutes.Tire Pressure
Monitor
InoperativeThe Advanced TPMS is malfunctioning. XHave the Advanced TPMS checked at an authorized Mercedes-
Benz Center.Tire Pressure
Monitor
Inoperative No
Wheel SensorsThere are wheels without appropriate wheel sensors mounted
(e.g. winter tires).XHave the Advanced TPMS checked at an authorized Mercedes-
Benz Center.XHave the appropriate wheel sensors installed at an authorized
Mercedes-Benz Center.TirePress.
Sensor(s)MissingAt least one sensor is defect (e.g. battery is empty).
The respective tire is indicated by – – instead of the tire inflation
pressure in the multifunction display.XHave the Advanced TPMS checked at an authorized Mercedes-
Benz Center.XHave the wheel sensors installed at an authorized Mercedes-
Benz Center.368Vehicle status messages in the multifunction displayPractical hints
BA 197 USA, CA Edition A 2011; 1; 27, en-UShereepeVersion: 3.0.3.52010-03-24T15:31:10+01:00 - Seite 368