recommended oil MERCEDES-BENZ SLS COUPE 2010 Owners Manual
[x] Cancel search | Manufacturer: MERCEDES-BENZ, Model Year: 2010, Model line: SLS COUPE, Model: MERCEDES-BENZ SLS COUPE 2010Pages: 361, PDF Size: 6.32 MB
Page 274 of 361
wheels which have been approved by
Mercedes-Ben
zspecifically for your vehi-
cle. These tyres have been specially adap-
ted for use with the driving safety systems,
such as ABS or ESP ®
.Ify ou use other tyres
and wheels, Mercedes-Benz cannot accept
any responsibility for damage that may
result from this. Further information about
tyres, wheels and approved combinations
can be obtained from any Mercedes-Benz
Service Centre.
If you use tyres other than those tested and
recommended for Mercedes-Benz vehi-
cles, characteristics such as handling, vehi-
cle noise emissions and fuel consumption
may be adversely affected. In addition, the
wheels may come into contact with the
body or axle components when heavily loa-
ded or when driving with snow chains. This
could result in damage to the tyres or the
vehicle.
! Retreaded tyres are neither tested nor
recommended by Mercedes-Benz, since
previous damage cannot always be detec-
ted on retreaded tyres. As a result,
Mercedes-Benz cannot guarantee vehicle
safety if retreaded tyres are fitted. Do not
fit used tyres if you have no information
about their previous usage. G
Risk of accident
Tyres, wheels or accessories which have not
been approved by Mercedes-Benz for your
vehicle or are not used as they should be, can
impair driving safety. As a result, you could
cause an accident .Before purchasing and
using them, enquire about their suitability,
legal stipulations and factory recommenda-
tions at a Mercedes-Benz Service Centre.
Modification work on the brake system and
wheels is not permitted, nor is the use of
spacer plates or brake dust shields. This inva-
lidates the General Operating Permit for the
vehicle. Notes on selecting, fitting and replacing
tyres R
Only fit tyres and wheels of the same type
and make.
R Only fit tyres of the correct size onto the
wheels.
R After fitting new tyres, run them in at mod-
erate speeds for the first 100 km as they
only reach their full performance after this
distance.
R Fit new tyres on the front wheels first if
tyres of the same size are required on the
fron tand rea rwheels.
R Replace the tyres after six years at the lat-
est, regardless of wear. This also applies to
the collapsible emergency spare wheel* 17
.
R Do not drive with tyres which have too little
tread depth, as this significantly reduces
the traction on wet roads (aquaplaning).
! Store tyres that are not being used in a
cool, dry and preferably dark place. Protect
the tyres against oil, grease, petrol and die-
sel.
Notes on regularly inspecting wheels
and tyres R
Regularly check the wheels and tyres of
your vehicle for damage (e.g. cuts, punctu-
res, tears, bulges on tyres and deformation,
cracks or severe corrosion on wheels), at
least every 14 days, as well as after driving
off-road or on rough roads. Damaged
wheels can cause a loss of tyre pressure.
R Regularly check the tyre tread depth and
the condition of the tread across the whole
width of the tyre (Y page 272). If neces-
sary, turn the front wheels to full lock in
order to inspect the inner side of the tyre
surface.
R All wheels must have a valve cap to protect
the valve against dirt and moisture. Do not
fit anything onto the valve (such as tyre
pressure monitoring systems) other than
17 Only for certain countries. Tyres and wheels
271Operation
*optional
BA 197 ECE RE 2010/6a; 1; 2, en-GB
sabbaeu
Version: 3.0.3.6 2010-05-07T14:19:43+02:00 - Seite 271 Z
Page 286 of 361
Cleaning paintwork
Scratches, corrosive deposits, areas affected
by corrosio nand damage caused by inade-
quate care canno talways be completely
repaired. In such cases, visit a qualified spe-
cialist workshop immediately, e.g. a
Mercedes-Benz Service Centre.
X Remove the following types of dirt immedi-
ately, whilst avoiding rubbin gtoo hard.
Soak:
R insect remains with insect remover
R bird droppings with water
and rinse off the treated surface after-
wards.
Remove:
R tree resin, oils, fuels and greases by rub-
bing gently with a cloth soaked in petro-
leum ether or lighter fluid
R tar stain with tar remover
R wax with silicone remover
! Do not affix:
R stickers
R films
R magnetic plates or similar items
to painted surfaces. Otherwise, you could
damage the paintwork.
Cleaning the windows X
Clean the inside and outside of the win-
dows with a damp cloth and a cleaning
product approved and recommended by
Mercedes-Benz.
! Clean the water drainage channels of the
windscreen and the rear window at regular
intervals. Under certain circumstances,
deposits such as leaves, petals and pollen
may prevent water from draining away
leading to corrosion damage. Cleaning wiper blades G
Risk of injury
Before cleaning the windscreen or wiper
blades, turn the key to position 0in the igni-
tion lock or press the Start/Stop button
repeatedly until all indicator lamps in the
instrument cluster have gone out. The wind-
screen wipers could otherwise move and
injure you.
! Only fold the windscreen wipers away
from the windscreen when vertical. Other-
wise, you will damage the bonnet.
! Do not clean the wiper blades too often
and do not rub them too hard, as this will
result in damage to the graphite coating.
This could cause wiper noise.
X Switch off the engine.
X Take your foot off the brake pedal.
X Set the windscreen wipers to posi-
tion 0014 on the combination switch.
X Press the Start/Stop button repeatedly
until the windscreen wipers start.
X When the wiper arms have reached a ver-
tical position: press the Start/Stop button.
X Fold the wiper arm away from the wind-
screen until it engages.
X Set the wiper blade at right angles to the
wiper arm.
X Clean the wiper blades carefully using a
damp cloth.
X Fold the windscreen wipers back again
before switching on the ignition.
Cleaning the headlamps X
Clean the plastic lenses of the headlamps
and rear lighting with a damp sponge and
windscreen washer fluid or cleaning cloths.
! Only use windscreen washer fluid or
cleaning cloths which are suitable for plas-
tic lamp lenses. Unsuitable windscreen
washer fluid or cleaning cloths could Care
283Operation
BA 197 ECE RE 2010/6a; 1; 2, en-GB
sabbaeu Version: 3.0.3.6 2010-05-07T14:19:43+02:00 - Seite 283 Z
Page 287 of 361
scratch or damage the plastic lamp lenses
of the headlamps and rear lighting.
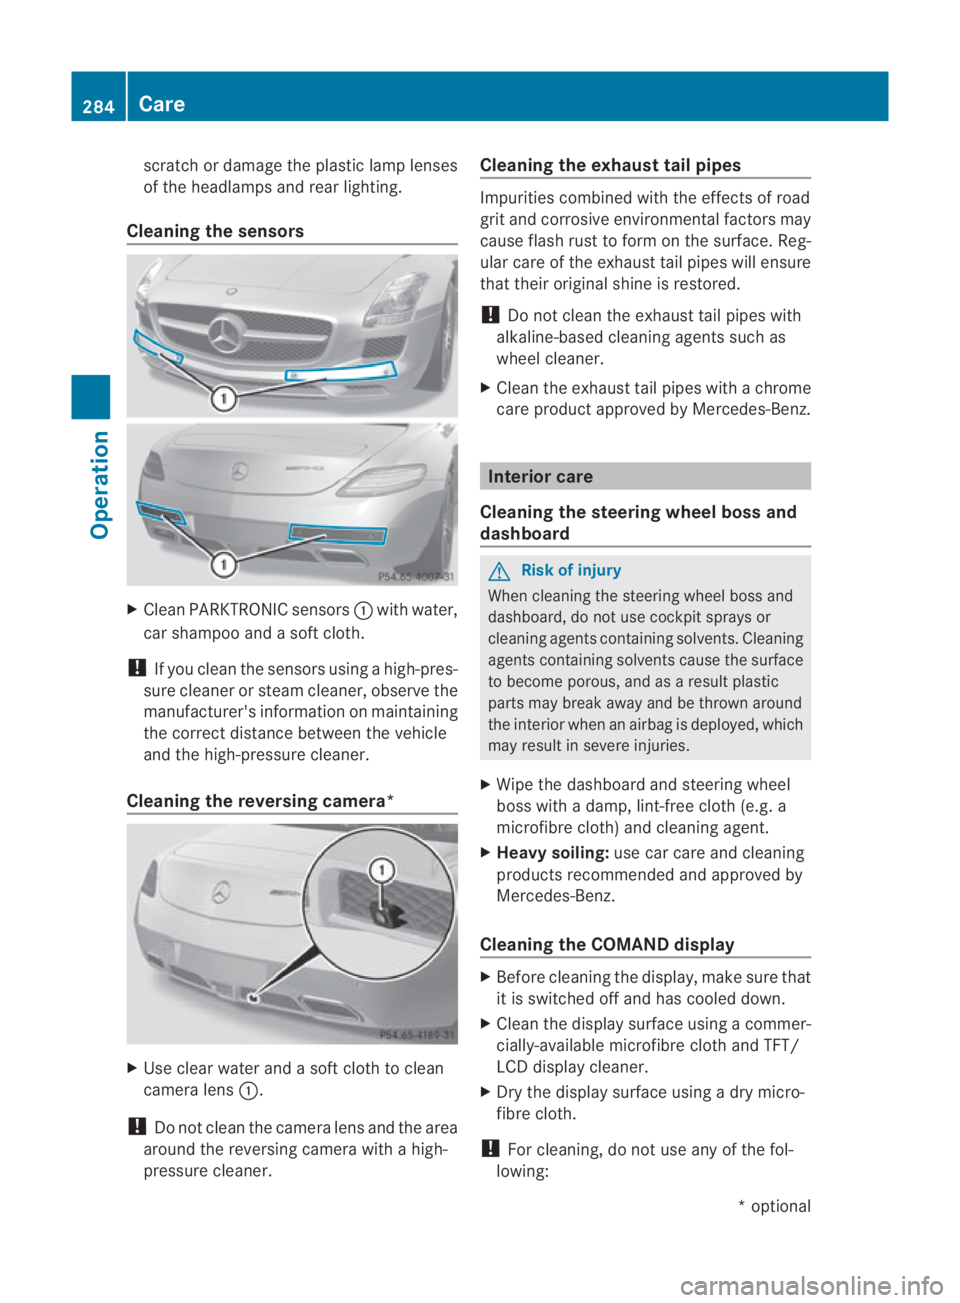
Cleaning the sensors X
CleanP ARKTRONIC sensors 0001with water,
car shampoo and a sof tcloth.
! If you clean the sensors using a high-pres-
sure cleaner or steam cleaner, observe the
manufacturer' sinformation on maintaining
the correct distance between the vehicle
and the high-pressure cleaner.
Cleaning the reversing camera* X
Use clear water and a sof tcloth to clean
camera lens 0001.
! Do not clean the camera lens and the area
around the reversing camera with a high-
pressure cleaner. Cleaning the exhaust tail pipes Impurities combined with the effects of road
grit and corrosive environmental factors may
cause flash rust to for monthe surface. Reg-
ular care of the exhaust tail pipes will ensure
that their original shine is restored.
! Do not clean the exhaust tail pipes with
alkaline-based cleaning agents such as
wheel cleaner.
X Cleant he exhaust tail pipes with a chrome
care product approved by Mercedes-Benz. Interior care
Cleaning the steering wheel boss and
dashboard G
Risk of injury
When cleaning the steering wheel boss and
dashboard, do not use cockpit sprays or
cleaning agents containing solvents. Cleaning
agents containing solvents cause the surface
to become porous, and as aresult plastic
parts may break away and be thrown around
the interior when an airbag is deployed, which
may result in severe injuries.
X Wipe the dashboard and steerin gwheel
boss with a damp, lint-free cloth (e.g. a
microfibre cloth) and cleaning agent.
X Heavy soiling: use car care and cleaning
products recommended and approved by
Mercedes-Benz.
Cleaning the COMAND display X
Before cleaning the display, make sure that
it is switched off and has cooled down.
X Cleant he display surface using a commer-
cially-available microfibre cloth and TFT/
LCD display cleaner.
X Dry the display surface using a dry micro-
fibre cloth.
! For cleaning, do not use any of the fol-
lowing: 284
CareOperation
*o
ptional
BA 197 ECE RE 2010/6a; 1; 2, en-GB
sabbaeu
Version: 3.0.3.6 2010-05-07T14:19:43+02:00 - Seite 284
Page 288 of 361
R
alcohol-based solvents or petrol
R abrasive cleaning agents
R commercially-available household clean-
ing agents
These may damage the display surface. Do
no te xert pressure when cleaning the dis-
play surface as this ma ylead to irreversible
damage.
Cleaning the seat covers !
Do not use microfibre cloths to clean gen-
uine leather covers, as these are too
aggressive and, if used often, may damage
the cover.
! Clean genuine leather cover swith a damp
cloth, the nwipe the covers down with a dry
cloth. Make sure that the leathe rdoes not
become soaked. Only use leather care
agents that have been tested and approved
by Mercedes-Benz. You can obtain these
from any Mercedes-Benz Service Centre.
i Note that regular care is essential to
ensure that the quality (both appearance
and comfort) of the covers is retained over
time.
Cleaning the plastic trim !
Do not affix to plastic surfaces:
R stickers
R films
R scented oil bottles or similar items
You can otherwise damage the plastic.
! Ensure that cosmetics, insect repellent
and suntan lotion do not come into contact
with the vehicle's trim. This will protec tthe
vehicle's high-quality trim and help retain
its overall appearance.
X Wipe the plastic trim with a damp, lint-free
cloth (e.g. a microfibre cloth).
X Heavy soiling: use car care and cleaning
products recommended and approved by
Mercedes-Benz. Cleaning trim strips X
Wipe the trim strips with a damp, lint-free
cloth (e.g. a microfibre cloth).
X Heavy soiling: use car care and cleaning
products recommended and approved by
Mercedes-Benz. Care
285Operation
BA 197 ECE RE 2010/6a; 1; 2, en-GB
sabbaeu Version: 3.0.3.6 2010-05-07T14:19:43+02:00 - Seite 285 Z
Page 354 of 361
Capacities
The following values refer to an oil change
including the oil filter. Engine with oil filter
9.5 l
Coolant
The coolan tis a mixture of water and anti-
freeze/corrosion inhibitor. It performs the
following tasks:
R anti-corrosion protection
R antifreeze protection
R raising the boiling point
i When the vehicle is first delivered, it is fil-
led with a coolant mixture that ensures
adequate antifreeze and corrosion protec-
tion.
! Only top up with coolant that has been
premixed with the desired antifreeze pro-
tection. You could otherwise damage the
engine.
Further information on coolants and on fill-
ing can be found in the Mercedes-Benz
Specifications for Service Products, MB
Approval 310.1, e.g. on the Internet at
http://bevo.daimler.com. You can also
consult a Mercedes-Benz Service Centre.
! Always use a suitable coolant mixture,
even in countries where high temperatures
prevail.
Otherwise, the engine cooling system is not
sufficiently protected from corrosion and
the boiling point will be too low.
If antifreeze/corrosion inhibitor is present in
the correct concentration, the boiling point of
the coolant will be around 130 †. The antifreeze/corrosion inhibitor concentra-
tion in the engine cooling system should:
R
be at least 50%. This will protect the engine
cooling system against freezing down to
around -37 †.
R not exceed 55% (antifreeze protection
down to -45 †); otherwise, heat will not be
dissipated as effectively.
If the vehicle has lost coolant, top it up with
equal amounts of water and antifreeze/cor-
rosion inhibitor. Mercedes-Benz recom-
mends an antifreeze/corrosion inhibitor
which has been approved for Mercedes-Benz.
! The engine cooling system is filled with
coolant which must be renewed after 15
years, or after 250,000 km at the latest.
The warranty is only valid if you top up with
an antifreeze/corrosion inhibitor which
has been approved by Mercedes-Benz and
if the recommended mixture ratio is
observed. Brake fluid
Over a period of time, the brake fluid absorbs
moisture from the air; this lowers its boiling
point. G
Risk of accident
If the boiling point of the brake fluid is too low,
vapour pockets may form in the brake system
when the brakes are applied hard (e.g. when
driving downhill).T his would impair braking
efficiency.
Have the brake fluid renewed every two years
with brake fluid that has been approved by
Mercedes-Benz
i There is usually a notice in the engine
compartmentt o remind you when the next
brake fluid change is due. Service products and capacities
351Technical data
BA 197 ECE RE 2010/6a; 1; 2, en-GB
sabbaeu Version: 3.0.3.6 2010-05-07T14:19:43+02:00 - Seite 351 Z