height MERCEDES-BENZ SPRINTER 2006 User Guide
[x] Cancel search | Manufacturer: MERCEDES-BENZ, Model Year: 2006, Model line: SPRINTER, Model: MERCEDES-BENZ SPRINTER 2006Pages: 2305, PDF Size: 48.12 MB
Page 1026 of 2305
(8) Remove the seat belt turning loop height
adjuster from the inner B-pillar.
INSTALLATION
WARNING: To avoid personal injury or death, on
vehicles equipped with airbags, disable the supple-
mental restraint system before attempting any
steering wheel, steering column, airbag, seat belt
tensioner, or instrument panel component diagno-
sis or service. Disconnect and isolate the battery
negative (ground) cable, then wait two minutes for
the system capacitor to discharge before perform-
ing further diagnosis or service. This is the only
sure way to disable the supplemental restraint sys-
tem. Failure to take the proper precautions could
result in accidental airbag deployment.
WARNING: To avoid personal injury or death, during
and following any seat belt service, carefully
inspect all seat belts, buckles, mounting hardware,
retractors, and anchors for proper installation, oper-
ation, or damage. Replace any belt that is cut,
frayed, or torn. Straighten any belt that is twisted.
Tighten any loose fasteners. Replace any belt that
has a damaged or inoperative buckle or retractor.
Replace any belt that has a bent or damaged latch
plate or anchor plate. Never attempt to repair a seat
belt component. Always replace damaged or faulty
seat belt components with the correct, new and
unused replacement parts listed in the
DaimlerChrysler Mopar Parts Catalog.
(1) Position the seat belt turning loop height
adjuster onto the inner B-pillar (Fig. 42).
(2) Install and tighten the two screws that secure
the seat belt turning loop height adjuster to the
upper inner B-pillar. Tighten the screws to 35 N´m
(26 ft. lbs.).
(3) Position the front seat belt turning loop onto
the height adjuster on the upper B-pillar (Fig. 41).
(4) Install and tighten the nut that secures the
front seat belt turning loop to the height adjuster.
Tighten the nut to 35 N´m (26 ft. lbs.).
(5) Position the height adjuster trim to the upper
B-pillar so that the driver on the back of the trim
engages the lug of the height adjuster (Fig. 40).
(6) Reinstall the trim panel onto the inside of the
B-pillar. (Refer to 23 - BODY/INTERIOR/B-PILLAR
TRIM - INSTALLATION).
(7) Reconnect the battery negative cable.
SIDE CURTAIN AIRBAG
DESCRIPTION
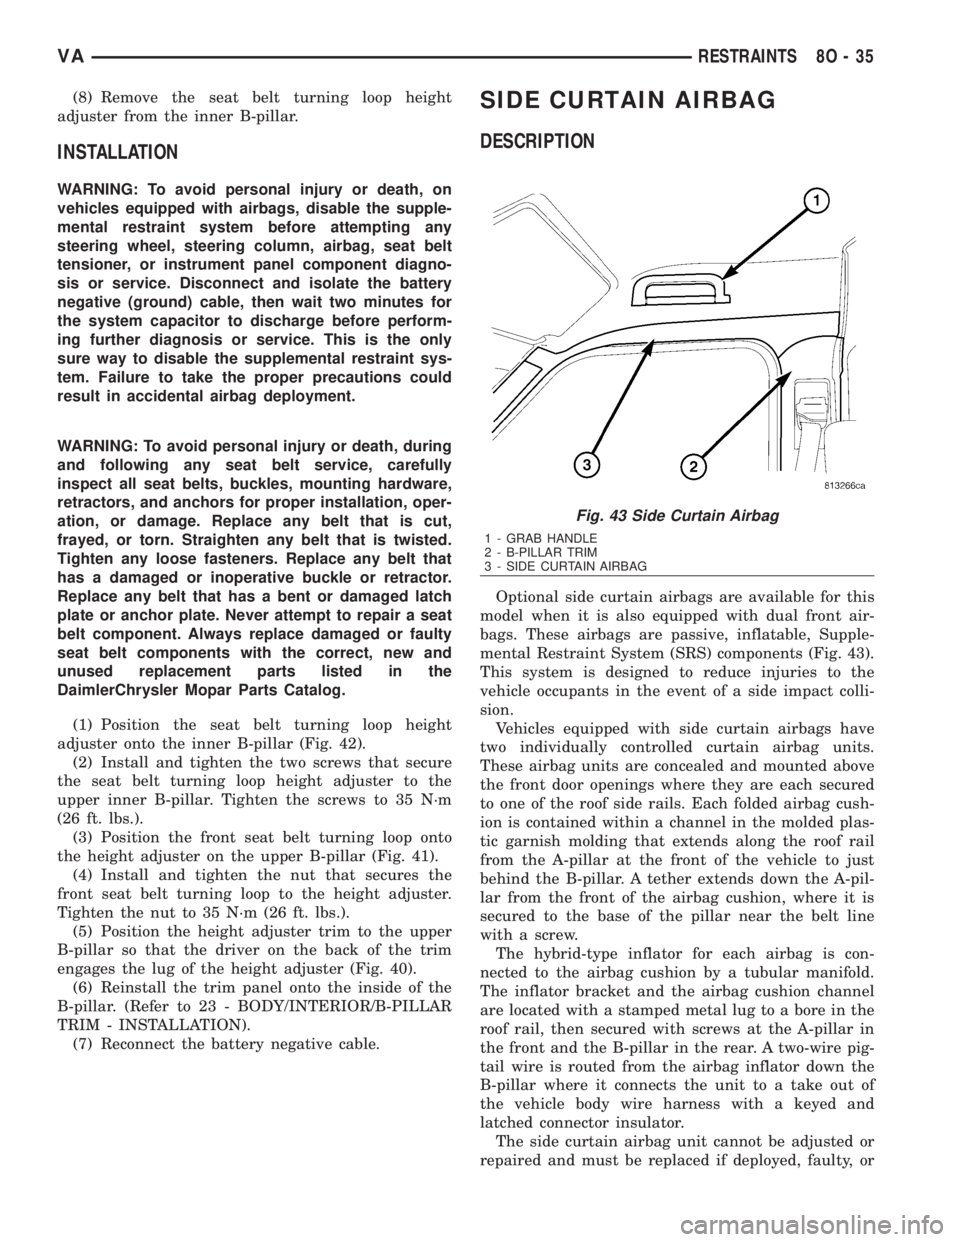
Optional side curtain airbags are available for this
model when it is also equipped with dual front air-
bags. These airbags are passive, inflatable, Supple-
mental Restraint System (SRS) components (Fig. 43).
This system is designed to reduce injuries to the
vehicle occupants in the event of a side impact colli-
sion.
Vehicles equipped with side curtain airbags have
two individually controlled curtain airbag units.
These airbag units are concealed and mounted above
the front door openings where they are each secured
to one of the roof side rails. Each folded airbag cush-
ion is contained within a channel in the molded plas-
tic garnish molding that extends along the roof rail
from the A-pillar at the front of the vehicle to just
behind the B-pillar. A tether extends down the A-pil-
lar from the front of the airbag cushion, where it is
secured to the base of the pillar near the belt line
with a screw.
The hybrid-type inflator for each airbag is con-
nected to the airbag cushion by a tubular manifold.
The inflator bracket and the airbag cushion channel
are located with a stamped metal lug to a bore in the
roof rail, then secured with screws at the A-pillar in
the front and the B-pillar in the rear. A two-wire pig-
tail wire is routed from the airbag inflator down the
B-pillar where it connects the unit to a take out of
the vehicle body wire harness with a keyed and
latched connector insulator.
The side curtain airbag unit cannot be adjusted or
repaired and must be replaced if deployed, faulty, or
Fig. 43 Side Curtain Airbag
1 - GRAB HANDLE
2 - B-PILLAR TRIM
3 - SIDE CURTAIN AIRBAG
VARESTRAINTS 8O - 35
Page 1597 of 2305
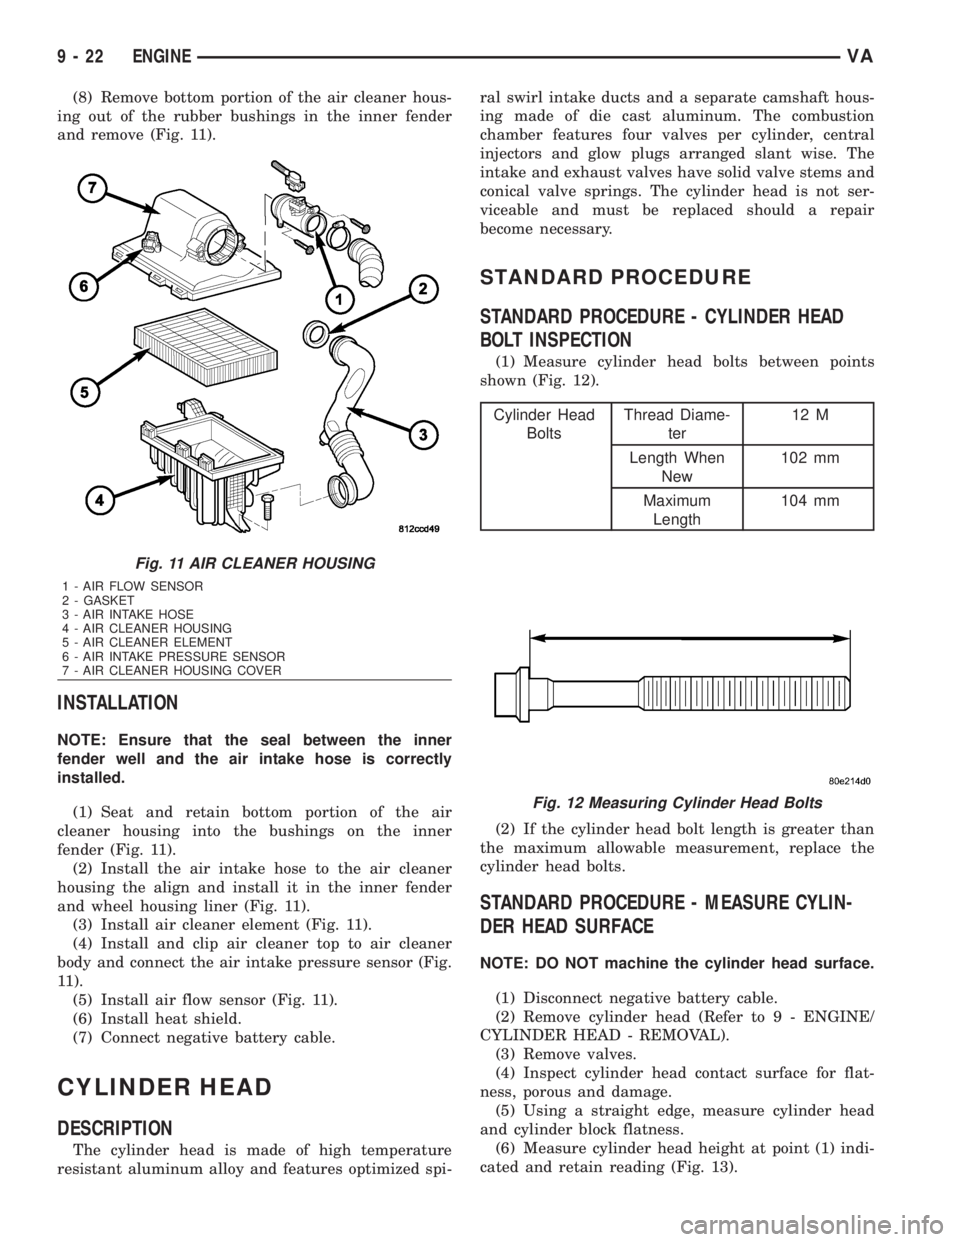
(8) Remove bottom portion of the air cleaner hous-
ing out of the rubber bushings in the inner fender
and remove (Fig. 11).
INSTALLATION
NOTE: Ensure that the seal between the inner
fender well and the air intake hose is correctly
installed.
(1) Seat and retain bottom portion of the air
cleaner housing into the bushings on the inner
fender (Fig. 11).
(2) Install the air intake hose to the air cleaner
housing the align and install it in the inner fender
and wheel housing liner (Fig. 11).
(3) Install air cleaner element (Fig. 11).
(4) Install and clip air cleaner top to air cleaner
body and connect the air intake pressure sensor (Fig.
11).
(5) Install air flow sensor (Fig. 11).
(6) Install heat shield.
(7) Connect negative battery cable.
CYLINDER HEAD
DESCRIPTION
The cylinder head is made of high temperature
resistant aluminum alloy and features optimized spi-ral swirl intake ducts and a separate camshaft hous-
ing made of die cast aluminum. The combustion
chamber features four valves per cylinder, central
injectors and glow plugs arranged slant wise. The
intake and exhaust valves have solid valve stems and
conical valve springs. The cylinder head is not ser-
viceable and must be replaced should a repair
become necessary.
STANDARD PROCEDURE
STANDARD PROCEDURE - CYLINDER HEAD
BOLT INSPECTION
(1) Measure cylinder head bolts between points
shown (Fig. 12).
Cylinder Head
BoltsThread Diame-
ter12 M
Length When
New102 mm
Maximum
Length104 mm
(2) If the cylinder head bolt length is greater than
the maximum allowable measurement, replace the
cylinder head bolts.
STANDARD PROCEDURE - MEASURE CYLIN-
DER HEAD SURFACE
NOTE: DO NOT machine the cylinder head surface.
(1) Disconnect negative battery cable.
(2) Remove cylinder head (Refer to 9 - ENGINE/
CYLINDER HEAD - REMOVAL).
(3) Remove valves.
(4) Inspect cylinder head contact surface for flat-
ness, porous and damage.
(5) Using a straight edge, measure cylinder head
and cylinder block flatness.
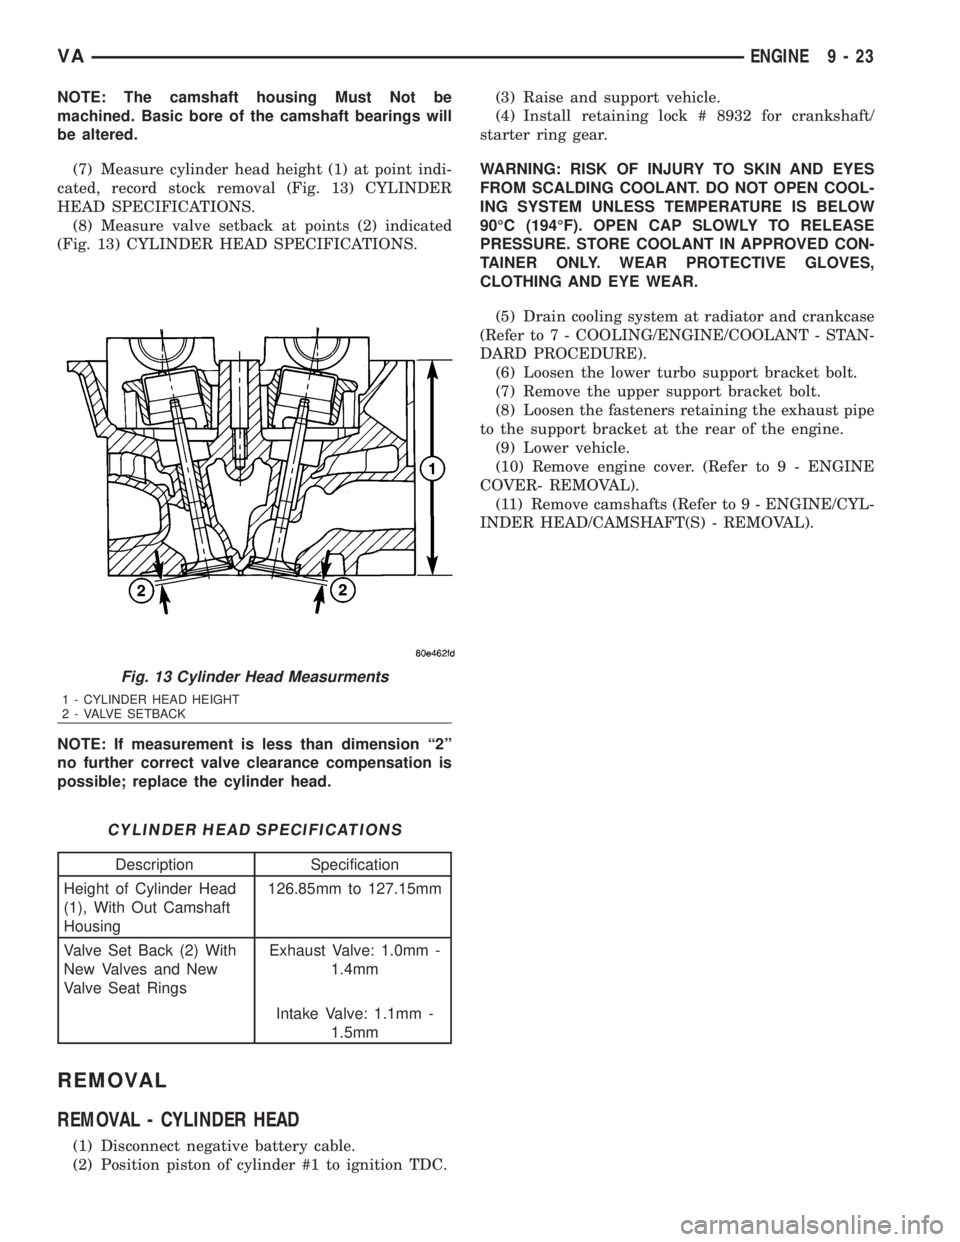
(6) Measure cylinder head height at point (1) indi-
cated and retain reading (Fig. 13).
Fig. 11 AIR CLEANER HOUSING
1 - AIR FLOW SENSOR
2 - GASKET
3 - AIR INTAKE HOSE
4 - AIR CLEANER HOUSING
5 - AIR CLEANER ELEMENT
6 - AIR INTAKE PRESSURE SENSOR
7 - AIR CLEANER HOUSING COVER
Fig. 12 Measuring Cylinder Head Bolts
9 - 22 ENGINEVA
Page 1598 of 2305
NOTE: The camshaft housing Must Not be
machined. Basic bore of the camshaft bearings will
be altered.
(7) Measure cylinder head height (1) at point indi-
cated, record stock removal (Fig. 13) CYLINDER
HEAD SPECIFICATIONS.
(8) Measure valve setback at points (2) indicated
(Fig. 13) CYLINDER HEAD SPECIFICATIONS.
NOTE: If measurement is less than dimension ª2º
no further correct valve clearance compensation is
possible; replace the cylinder head.
CYLINDER HEAD SPECIFICATIONS
Description Specification
Height of Cylinder Head
(1), With Out Camshaft
Housing126.85mm to 127.15mm
Valve Set Back (2) With
New Valves and New
Valve Seat RingsExhaust Valve: 1.0mm -
1.4mm
Intake Valve: 1.1mm -
1.5mm
REMOVAL
REMOVAL - CYLINDER HEAD
(1) Disconnect negative battery cable.
(2) Position piston of cylinder #1 to ignition TDC.(3) Raise and support vehicle.
(4) Install retaining lock # 8932 for crankshaft/
starter ring gear.
WARNING: RISK OF INJURY TO SKIN AND EYES
FROM SCALDING COOLANT. DO NOT OPEN COOL-
ING SYSTEM UNLESS TEMPERATURE IS BELOW
90ÉC (194ÉF). OPEN CAP SLOWLY TO RELEASE
PRESSURE. STORE COOLANT IN APPROVED CON-
TAINER ONLY. WEAR PROTECTIVE GLOVES,
CLOTHING AND EYE WEAR.
(5) Drain cooling system at radiator and crankcase
(Refer to 7 - COOLING/ENGINE/COOLANT - STAN-
DARD PROCEDURE).
(6) Loosen the lower turbo support bracket bolt.
(7) Remove the upper support bracket bolt.
(8) Loosen the fasteners retaining the exhaust pipe
to the support bracket at the rear of the engine.
(9) Lower vehicle.
(10) Remove engine cover. (Refer to 9 - ENGINE
COVER- REMOVAL).
(11) Remove camshafts (Refer to 9 - ENGINE/CYL-
INDER HEAD/CAMSHAFT(S) - REMOVAL).
Fig. 13 Cylinder Head Measurments
1 - CYLINDER HEAD HEIGHT
2 - VALVE SETBACK
VAENGINE 9 - 23
Page 1621 of 2305
STANDARD PROCEDURE
STANDARD PROCEDURE - CHECKING AND
REPAIRING CONNECTING RODS
NOTE: Connecting rods with blue discoloration,
cross scores or notches must be replaced. Com-
pensate for different weights by milling off the bal-
ancing weight.
(1) Inspect connecting rod for discoloring, cross
scores and notches.
NOTE: Connecting rod and bearing cap are marked
in sets and attached with two sleeves.
(2) Bolt connecting rod bearing cap to connecting
rod. Tighten connecting rod bearing caps to initialspecification (Refer to 9 - ENGINE/ENGINE BLOCK/
PISTON & CONNECTING ROD - INSTALLATION).
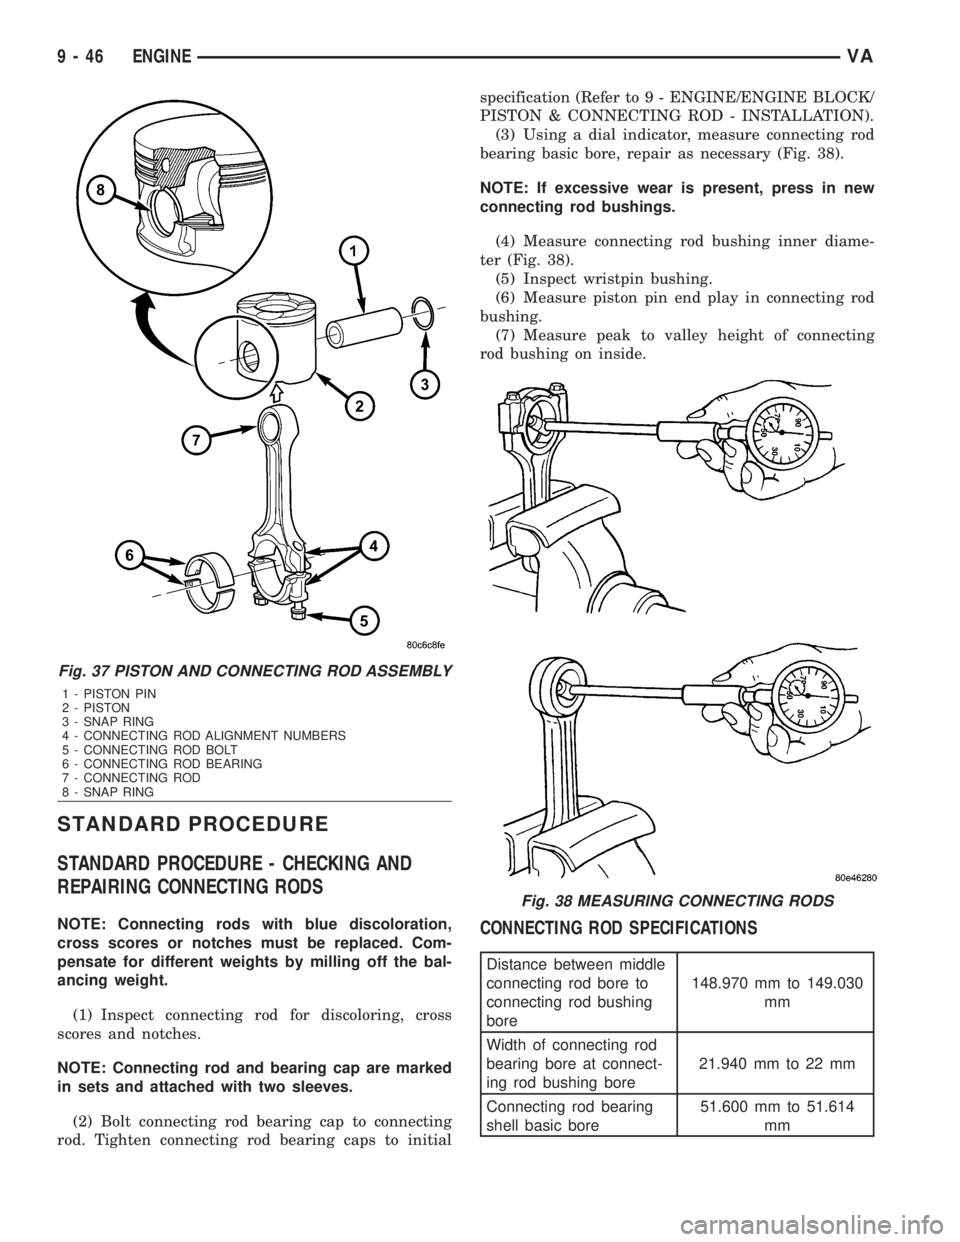
(3) Using a dial indicator, measure connecting rod
bearing basic bore, repair as necessary (Fig. 38).
NOTE: If excessive wear is present, press in new
connecting rod bushings.
(4) Measure connecting rod bushing inner diame-
ter (Fig. 38).
(5) Inspect wristpin bushing.
(6) Measure piston pin end play in connecting rod
bushing.
(7) Measure peak to valley height of connecting
rod bushing on inside.CONNECTING ROD SPECIFICATIONS
Distance between middle
connecting rod bore to
connecting rod bushing
bore148.970 mm to 149.030
mm
Width of connecting rod
bearing bore at connect-
ing rod bushing bore21.940 mm to 22 mm
Connecting rod bearing
shell basic bore51.600 mm to 51.614
mm
Fig. 37 PISTON AND CONNECTING ROD ASSEMBLY
1 - PISTON PIN
2 - PISTON
3 - SNAP RING
4 - CONNECTING ROD ALIGNMENT NUMBERS
5 - CONNECTING ROD BOLT
6 - CONNECTING ROD BEARING
7 - CONNECTING ROD
8 - SNAP RING
Fig. 38 MEASURING CONNECTING RODS
9 - 46 ENGINEVA
Page 1622 of 2305
Distance between middle
connecting rod bore to
connecting rod bushing
bore148.970 mm to 149.030
mm
Allowable out-of-round-
ness and taper of basic
bore.020 mm
Allowable twist of con-
necting rod bearing bore
to connecting rod bush-
ing bore over a length of
100 mm.100 mm
Allowable variation of
axial parallelism of con-
necting rod bearing bore
to connecting rod bush-
ing bore over a length of
100 mm.045 mm
Allowable difference in
weight of complete con-
necting rod of an engine2g
Connecting rod inner
bushing30.018 to 30.024 mm
Connecting rod outer
bushing32.575 mm to 32.600
mm
Connecting rod basic
bore32.500 mm to 32.525
mm
Piston pin play in con-
necting rod.018 mm to.024 mm
Peak-to-Valley height
(Rz) of connecting rod
bushing on inside5
Connecting rod bolt
threadM8x1
STANDARD PROCEDURE - MEASURING PIS-
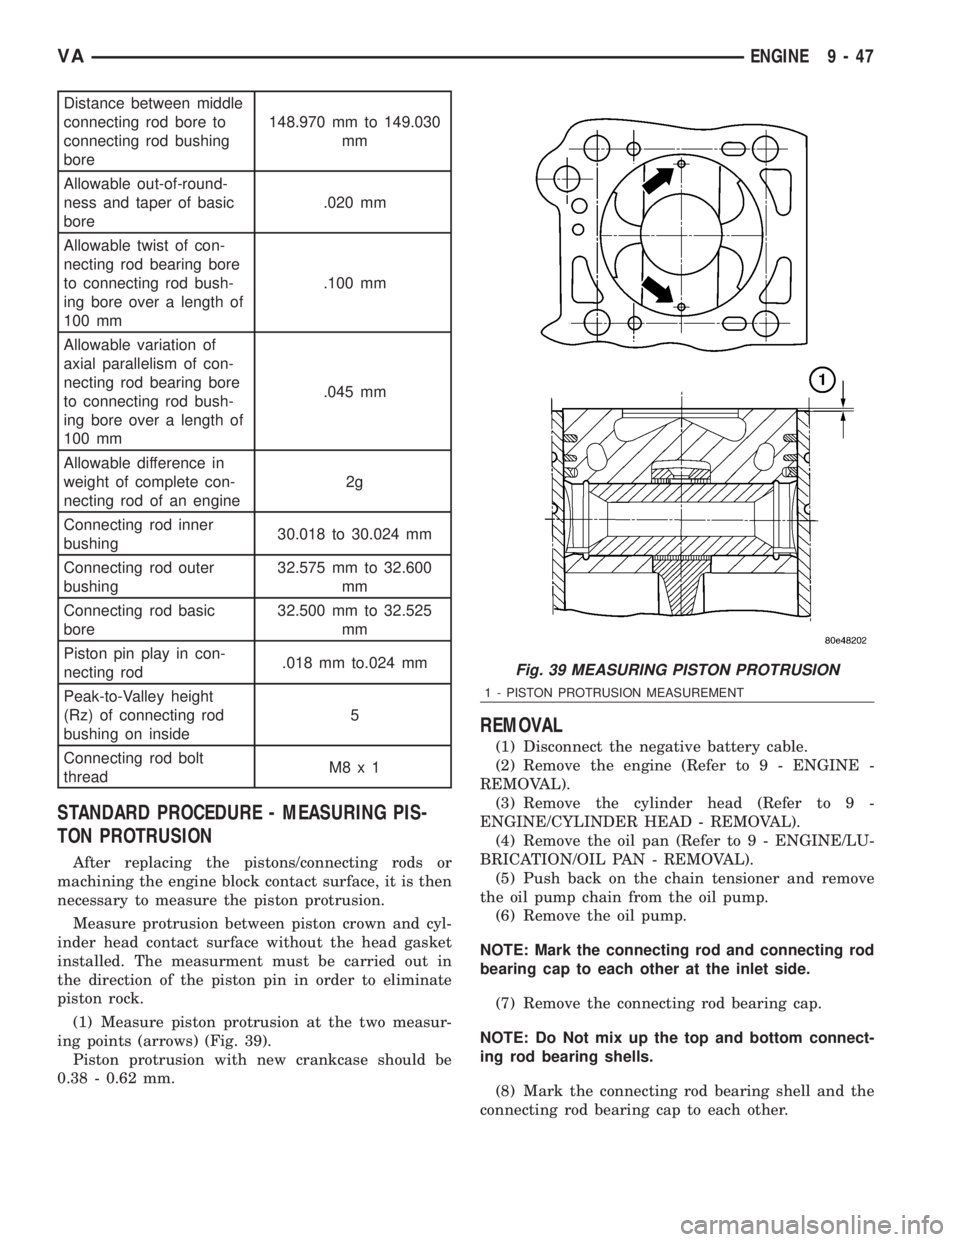
TON PROTRUSION
After replacing the pistons/connecting rods or
machining the engine block contact surface, it is then
necessary to measure the piston protrusion.
Measure protrusion between piston crown and cyl-
inder head contact surface without the head gasket
installed. The measurment must be carried out in
the direction of the piston pin in order to eliminate
piston rock.
(1) Measure piston protrusion at the two measur-
ing points (arrows) (Fig. 39).
Piston protrusion with new crankcase should be
0.38 - 0.62 mm.
REMOVAL
(1) Disconnect the negative battery cable.
(2) Remove the engine (Refer to 9 - ENGINE -
REMOVAL).
(3) Remove the cylinder head (Refer to 9 -
ENGINE/CYLINDER HEAD - REMOVAL).
(4) Remove the oil pan (Refer to 9 - ENGINE/LU-
BRICATION/OIL PAN - REMOVAL).
(5) Push back on the chain tensioner and remove
the oil pump chain from the oil pump.
(6) Remove the oil pump.
NOTE: Mark the connecting rod and connecting rod
bearing cap to each other at the inlet side.
(7) Remove the connecting rod bearing cap.
NOTE: Do Not mix up the top and bottom connect-
ing rod bearing shells.
(8) Mark the connecting rod bearing shell and the
connecting rod bearing cap to each other.
Fig. 39 MEASURING PISTON PROTRUSION
1 - PISTON PROTRUSION MEASUREMENT
VAENGINE 9 - 47
Page 1876 of 2305
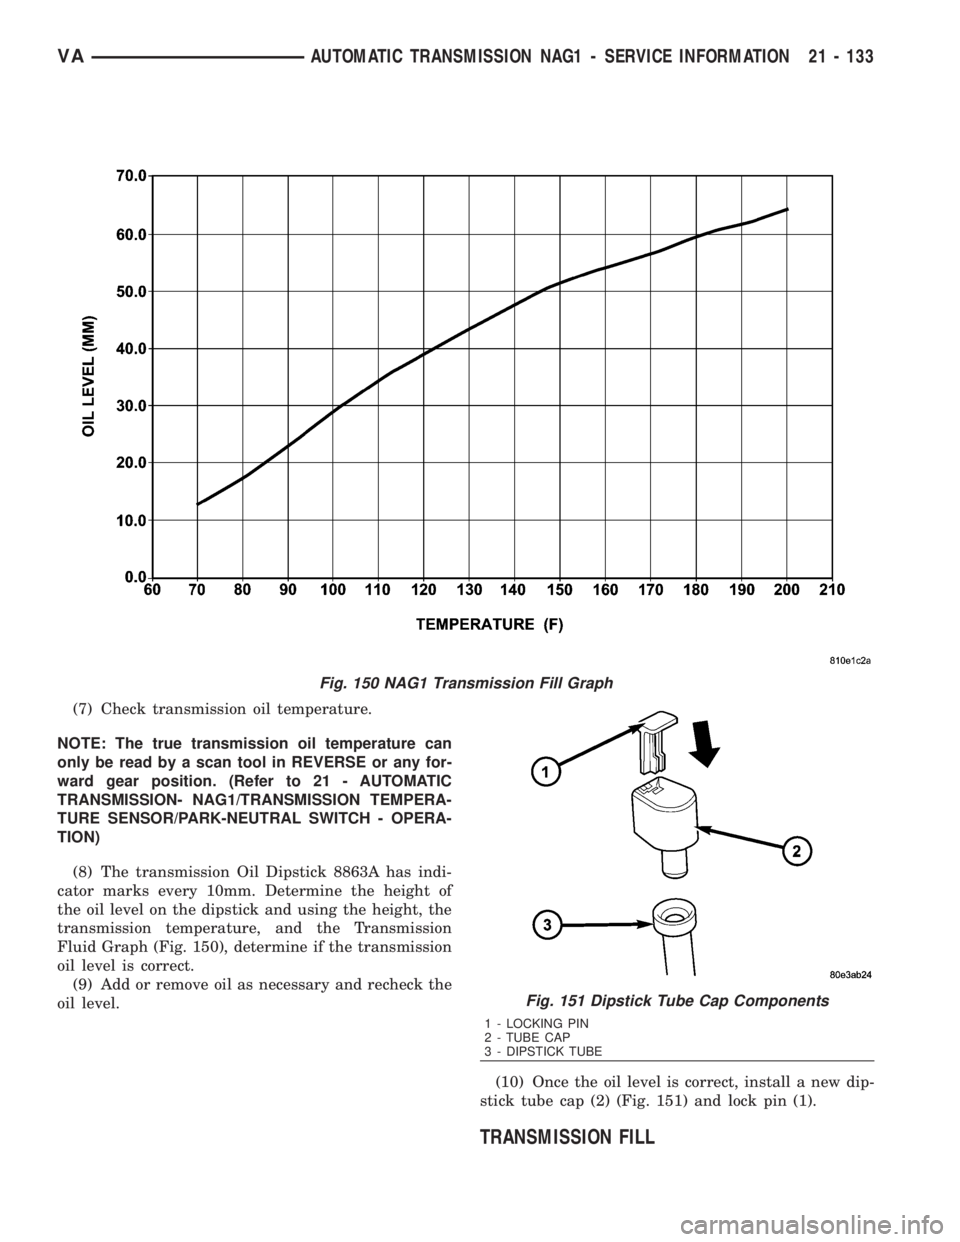
(7) Check transmission oil temperature.
NOTE: The true transmission oil temperature can
only be read by a scan tool in REVERSE or any for-
ward gear position. (Refer to 21 - AUTOMATIC
TRANSMISSION- NAG1/TRANSMISSION TEMPERA-
TURE SENSOR/PARK-NEUTRAL SWITCH - OPERA-
TION)
(8) The transmission Oil Dipstick 8863A has indi-
cator marks every 10mm. Determine the height of
the oil level on the dipstick and using the height, the
transmission temperature, and the Transmission
Fluid Graph (Fig. 150), determine if the transmission
oil level is correct.
(9) Add or remove oil as necessary and recheck the
oil level.
(10) Once the oil level is correct, install a new dip-
stick tube cap (2) (Fig. 151) and lock pin (1).
TRANSMISSION FILL
Fig. 150 NAG1 Transmission Fill Graph
Fig. 151 Dipstick Tube Cap Components
1 - LOCKING PIN
2 - TUBE CAP
3 - DIPSTICK TUBE
VAAUTOMATIC TRANSMISSION NAG1 - SERVICE INFORMATION 21 - 133
Page 2029 of 2305
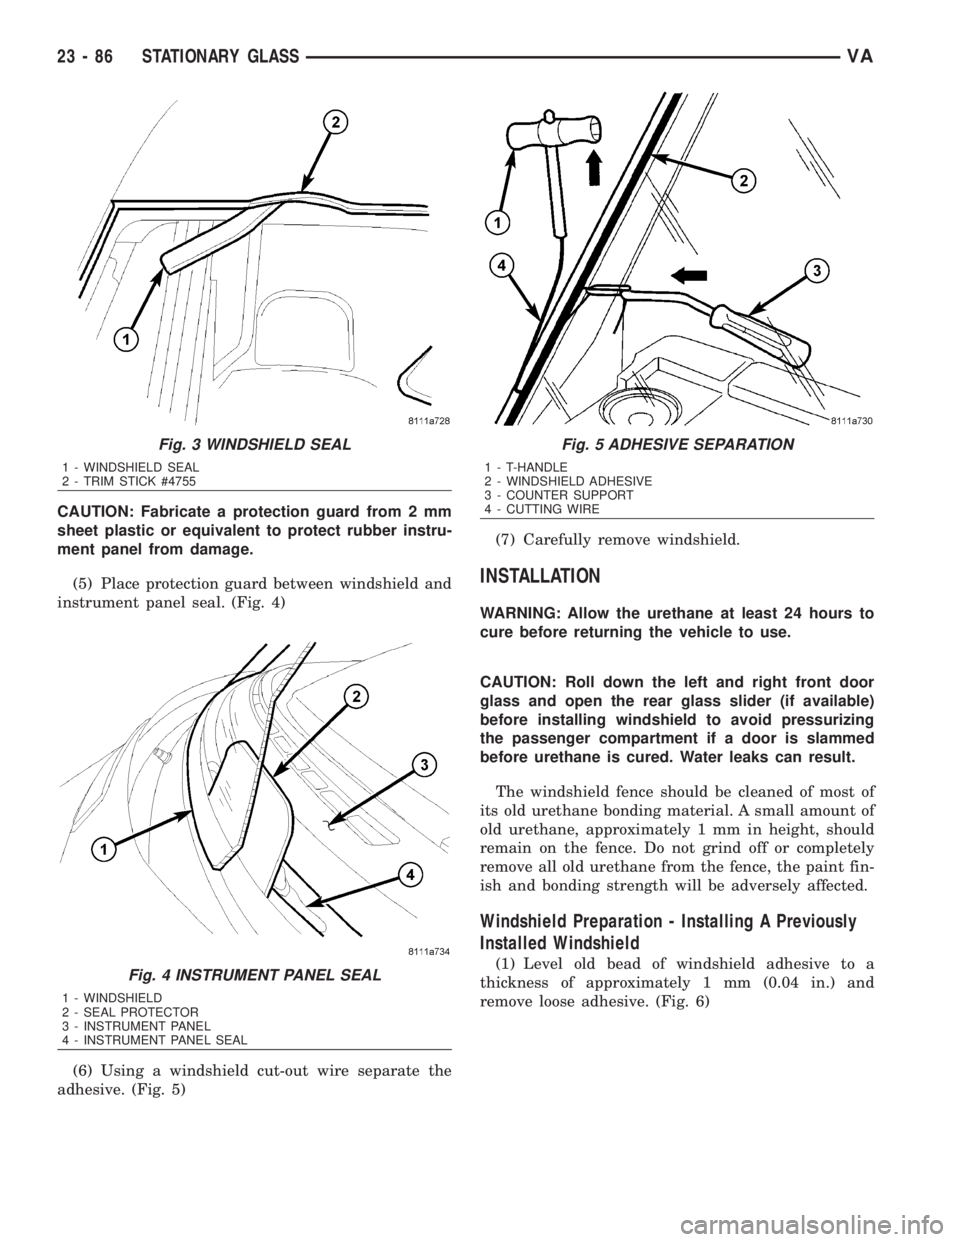
CAUTION: Fabricate a protection guard from 2 mm
sheet plastic or equivalent to protect rubber instru-
ment panel from damage.
(5) Place protection guard between windshield and
instrument panel seal. (Fig. 4)
(6) Using a windshield cut-out wire separate the
adhesive. (Fig. 5)(7) Carefully remove windshield.
INSTALLATION
WARNING: Allow the urethane at least 24 hours to
cure before returning the vehicle to use.
CAUTION: Roll down the left and right front door
glass and open the rear glass slider (if available)
before installing windshield to avoid pressurizing
the passenger compartment if a door is slammed
before urethane is cured. Water leaks can result.
The windshield fence should be cleaned of most of
its old urethane bonding material. A small amount of
old urethane, approximately 1 mm in height, should
remain on the fence. Do not grind off or completely
remove all old urethane from the fence, the paint fin-
ish and bonding strength will be adversely affected.
Windshield Preparation - Installing A Previously
Installed Windshield
(1) Level old bead of windshield adhesive to a
thickness of approximately 1 mm (0.04 in.) and
remove loose adhesive. (Fig. 6)
Fig. 3 WINDSHIELD SEAL
1 - WINDSHIELD SEAL
2 - TRIM STICK #4755
Fig. 4 INSTRUMENT PANEL SEAL
1 - WINDSHIELD
2 - SEAL PROTECTOR
3 - INSTRUMENT PANEL
4 - INSTRUMENT PANEL SEAL
Fig. 5 ADHESIVE SEPARATION
1 - T-HANDLE
2 - WINDSHIELD ADHESIVE
3 - COUNTER SUPPORT
4 - CUTTING WIRE
23 - 86 STATIONARY GLASSVA