transmission MERCEDES-BENZ SPRINTER 2010 MY10 Operator’s Manual
[x] Cancel search | Manufacturer: MERCEDES-BENZ, Model Year: 2010, Model line: SPRINTER, Model: MERCEDES-BENZ SPRINTER 2010Pages: 292, PDF Size: 6.75 MB
Page 140 of 292
Vehicle equipment
i Diese Betriebsanleitung beschreibt alle
Modelle, Serien- und
Sonderausstattungen
Ihres Fahrzeugs, die zum Zeitpunkt des
Redaktionsschlusses dieser
Betriebsanleitung erhältlich waren.
Länderspezifische Abweichungen sind
möglich. Beachten Sie, dass Ihr Fahrzeug
nicht mit allen beschriebenen Funktionen
ausgestattet sein könnte. Dies betrifft auch
sicherheitsrelevante Systeme und
Funktionen. Driving tips
Breaking-in
It is of decisive importance for the operating
life, reliability and
economy of the vehicle that
the engine is not subjected to its full rated
load during the breaking-in period.
Up to 1000 miles (1500 km)
R Run the vehicle in carefully. Drive at varying
road and engine speeds.
R Avoid heavy loads (driving at full throttle)
and high engine speeds. Do not exceed ¾
of the maximum speed for each gear.
R Do not change down a gear manually in
order to brake.
R Avoid depressing the accelerator pedal
beyond the pressure point (kickdown) and
only engage gear 4, 3, 2 or 1 while driving
slowly.
After 1000 miles (1500 km)
R Gradually bring the vehicle up to full road
and engine speeds.
i These instructions must also be observed
if you have the engine, the transmission, or
the rear axle differential of your vehicle
replaced. Driving abroad
An extensive network of authorized Sprinter
Dealers is also
at your disposal when you are
traveling abroad. The respective workshop
directories are available from any authorized
Sprinter Dealer.
In some countries, only fuels with a lower
octane rating or a higher sulfur content are
available.
You will find information about fuel in the
"Service products" section (Y page 153).
If you are traveling in countries where
vehicles are driven on the opposite side of the
road to that in which the vehicle is registered,
you must have the headlamps:
R partially masked (halogen headlamps)
R switched over (Bi-Xenon headlamps) G
Warning
Masking the headlamps incorrectly can
impair your visibility when driving with the
headlamps switched on. You could also
impede other road users. Oncoming traffic
may be dazzled.
Always have the headlamps masked/
switched over at a qualified specialist
workshop which has
the necessary specialist
knowledge and tools to carry out the work
required.
For this we recommend an authorized
Sprinter Dealer. All work relevant to safety or
on safety-related systems must be carried out
at a qualified specialist workshop. Driving off-road
When driving the vehicle, particularly on
rough terrain, ensure that the driven wheels
always have sufficient traction.
Avoid letting the drive wheels spin. Spinning
drive wheels can damage the differential.
! Always observe the ground clearance of
the vehicle and avoid obstacles, e.g. deep
ruts. 138
Driving tips
Operation
Page 141 of 292
Obstacles could damage the vehicle, for
example:
R
the axles
R the propeller shafts
and the transmission
R the tanks and supply reservoirs
For this reason, you should always drive
slowly when driving off-road. If you have to
drive over obstacles, have the co-driver
direct you. G
Warning
If you drive too fast off-road, you may not
recognize obstacles in good time or you may
underestimate the roughness of the ground.
When driving off-road, always drive slowly to
avoid damaging the vehicle.
The vehicle may slip to the side, tip and roll
over. Always drive along the line of fall when
you are on
a slope. Never drive across a slope.
Never turn the vehicle around on a slope. If
the vehicle cannot manage an uphill slope,
drive back down the slope in reverse gear.
You could lose control of the vehicle if you
shift the transmission to neutral or disengage
the clutch on an incline and then try to brake
the vehicle using only the service brake.
Never let the vehicle roll.
Overloading the vehicle will increase the risk
of the vehicle tipping over. Never exceed the
maximum permissible axle loads under any
circumstances. Keep the vehicle's center of
gravity as low as possible when the vehicle is
laden.
If the vehicle is frequently or mainly operated
in muddy or marshy terrain, substances that
impair braking efficiency, such as sand or oil
mixed with water, could get into the brake
system. This may lead to excessive wear and
a reduction in braking efficiency. In an
emergency, there is a risk that full braking
power may no longer be available.
After driving off-road, always carry out a short
brake test. If you detect a reduced braking
effect or hear grinding noises, have the brake
system checked at a qualified specialist workshop, for example at an authorized
Sprinter Dealer.
G
Warning
When driving off-road, your body is subject to
forces from all directions, due to the uneven
surface. There is a danger that you could be
thrown out of
your seat and be injured. Always
wear a seat belt, even when driving off-road.
Rules for driving off-road G
Warning
If you drive over obstacles or in ruts, the
steering wheel may jerk out of your grip and
you could injure the thumbs on both hands.
Always hold the steering wheel cross firmly
with both hands.
When driving over obstacles,
you must expect steering forces to increase
briefly and suddenly.
R Before driving off-road, stop the vehicle and
shift to a low gear.
R Only drive off-road with the engine running
and a gear engaged.
R Drive slowly and smoothly. Walking pace is
necessary in many situations.
R Make sure that the wheels always remain
in contact with the ground.
R Drive with extreme care over unknown
terrain where you can only see for a short
distance. As a precaution, get out of the
vehicle to take a look at the route to be
taken first.
R Check the water depth before fording.
R Watch out for obstacles (e.g. rocks, holes,
tree stumps and ruts).
R Avoid edges where the surface could
crumble or break away. Driving tips
139
Operation Z
Page 153 of 292
X
Make sure that the automatic transmission
is set to position P.
X Engage the vehicle's parking brake.
X Close the rear doors.
X Couple the trailer.
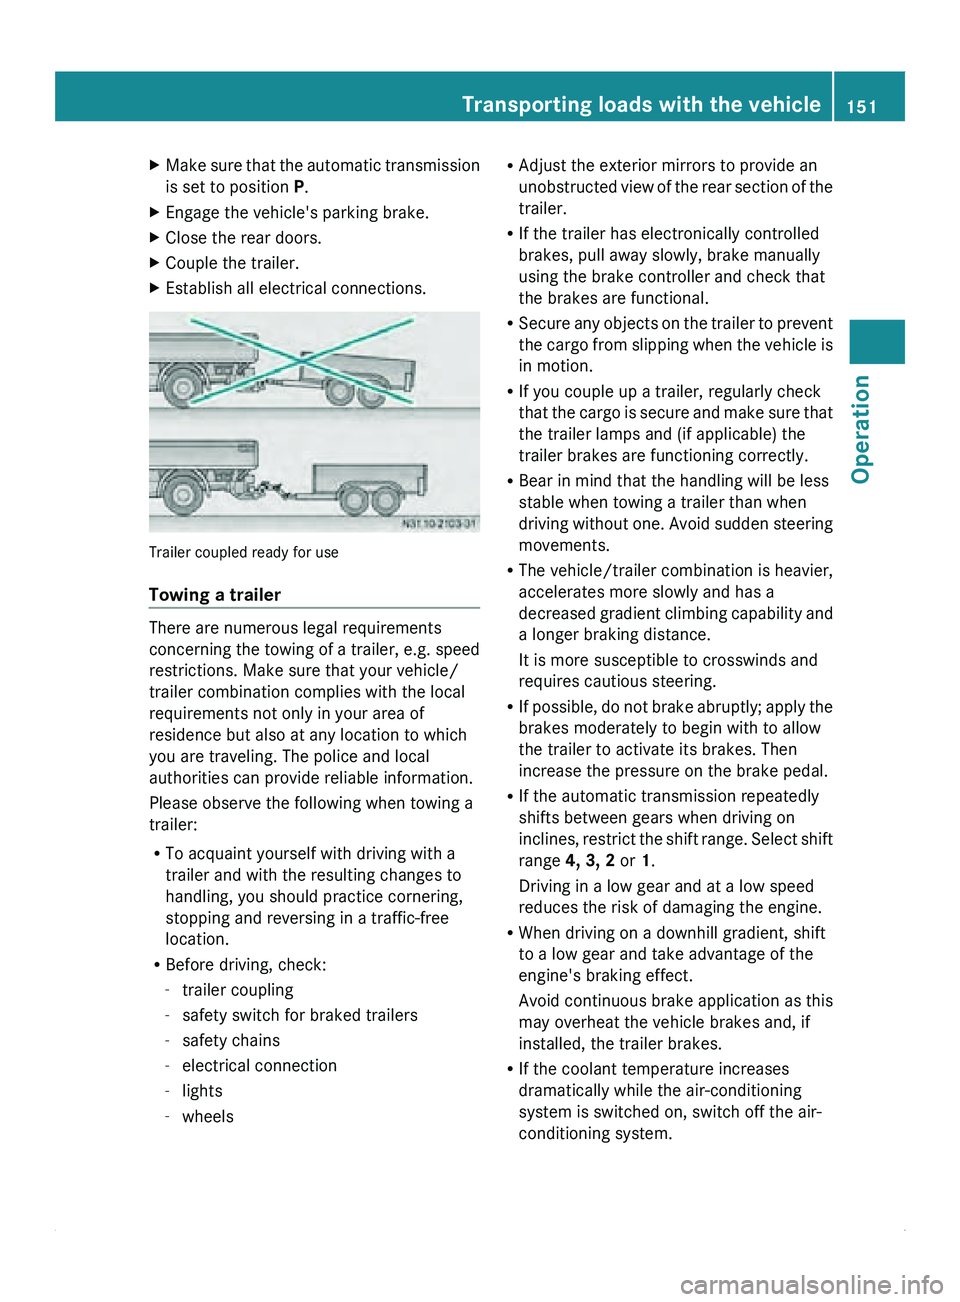
X Establish all electrical connections. Trailer coupled ready for use
Towing a trailer
There are numerous legal requirements
concerning the
towing
of a trailer, e.g. speed
restrictions. Make sure that your vehicle/
trailer combination complies with the local
requirements not only in your area of
residence but also at any location to which
you are traveling. The police and local
authorities can provide reliable information.
Please observe the following when towing a
trailer:
R To acquaint yourself with driving with a
trailer and with the resulting changes to
handling, you should practice cornering,
stopping and reversing in a traffic-free
location.
R Before driving, check:
-trailer coupling
- safety switch for braked trailers
- safety chains
- electrical connection
- lights
- wheels R
Adjust the exterior mirrors to provide an
unobstructed view of
the rear section of the
trailer.
R If the trailer has electronically controlled
brakes, pull away slowly, brake manually
using the brake controller and check that
the brakes are functional.
R Secure any objects on the trailer to prevent
the cargo from slipping when the vehicle is
in motion.
R If you couple up a trailer, regularly check
that the cargo is secure and make sure that
the trailer lamps and (if applicable) the
trailer brakes are functioning correctly.
R Bear in mind that the handling will be less
stable when towing a trailer than when
driving without one. Avoid sudden steering
movements.
R The vehicle/trailer combination is heavier,
accelerates more slowly and has a
decreased gradient climbing capability and
a longer braking distance.
It is more susceptible to crosswinds and
requires cautious steering.
R If possible, do not brake abruptly; apply the
brakes moderately to begin with to allow
the trailer to activate its brakes. Then
increase the pressure on the brake pedal.
R If the automatic transmission repeatedly
shifts between gears when driving on
inclines, restrict the shift range. Select shift
range 4, 3, 2 or 1.
Driving in a low gear and at a low speed
reduces the risk of damaging the engine.
R When driving on a downhill gradient, shift
to a low gear and take advantage of the
engine's braking effect.
Avoid continuous brake application as this
may overheat the vehicle brakes and, if
installed, the trailer brakes.
R If the coolant temperature increases
dramatically while the air-conditioning
system is switched on, switch off the air-
conditioning system. Transporting loads with the vehicle
151
Operation Z
Page 154 of 292
Coolant heat can additionally be dissipated
by opening
the
windows and by setting the
blower fan and the interior temperature to
maximum.
R When overtaking, pay particular attention
to the extended length of your vehicle/
trailer combination.
Due to the length of your vehicle/trailer
combination, you will have to travel an
additional distance beyond the vehicle you
are overtaking before returning to the
original lane.
If the trailer begins to swing from side to side:
X do not accelerate.
X do not counter-steer.
X brake if necessary. G
Warning
Under no circumstances try to straighten the
vehicle/trailer combination by
increasing the
speed.
i You can reduce the risk of the trailer
swinging and snaking by retrofitting anti-
roll bars or trailer stability programs. You
can obtain further information from an
authorized Sprinter Dealer.
Uncoupling a trailer X
Make sure that the automatic transmission
is set to position P.
X Engage the vehicle's parking brake.
X Remove the trailer cable and uncouple the
trailer.
X Engage the trailer's parking brake.
Load distribution The Gross Trailer Weight (GTW) is the
combined weight of the trailer together with
the cargo and equipment loaded on the
trailer. The maximum permissible gross
weight is
vehicle-specific
and depends on the
equipment level: 5000 lbs (2268 kg) or
7500 lbs (3402 kg). The permissible Trailer drawbar Weight
Rating (TWR) is the maximum weight
permitted on the trailer drawbar: 750 lbs
(340 kg) or 500 lbs (227 kg) is the limit for
trailer couplings approved by the vehicle
distributor named on the inside of the front
cover.
The Gross Combined Weight Rating (GCWR)
is
the
sum of the Gross Trailer Weight and the
vehicle weight, including a driver weight of
approximately 150 lbs (68 kg). The
permissible GCWR is vehicle-specific and
depends on the equipment level.
When driving with a trailer, you should not
exceed the permitted Gross Combination
Weight Rating (GCWR).
You must distribute the load on the vehicle
and trailer so that the permitted maximum
values for the vehicle (GCWR) and trailer
(GTW) weight as well as permitted axle loads
(GAWR) and noseweight (TWR) of your vehicle
are not exceeded.
i Take into account that the vehicle's
permissible payload must be reduced to
compensate for the noseweight.
The applicable permissible values, which
must not be exceeded, can be found in your
vehicle documents and on the type plates for
the trailer tow hitch, trailer and vehicle
(Y page 277). You will also find a list of the
permissible values in the "Technical data"
(Y page 284) section. Where the values
differ, the lowest is valid.
! The permissible gross combination
weight is less than the sum of the
permissible gross vehicle weight plus the
permissible trailer load. Exceeding the
permissible gross combination weight can
lead to damage to the drivetrain, to the
transmission or to the trailer tow hitch.
For this reason, applicable values for the
permissible gross vehicle weight or the
permissible trailer load are reduced
accordingly if either the vehicle or the
trailer is fully loaded. In this case, the trailer
or the vehicle may only be partially loaded. 152
Transporting loads with the vehicle
Operation
Page 160 of 292
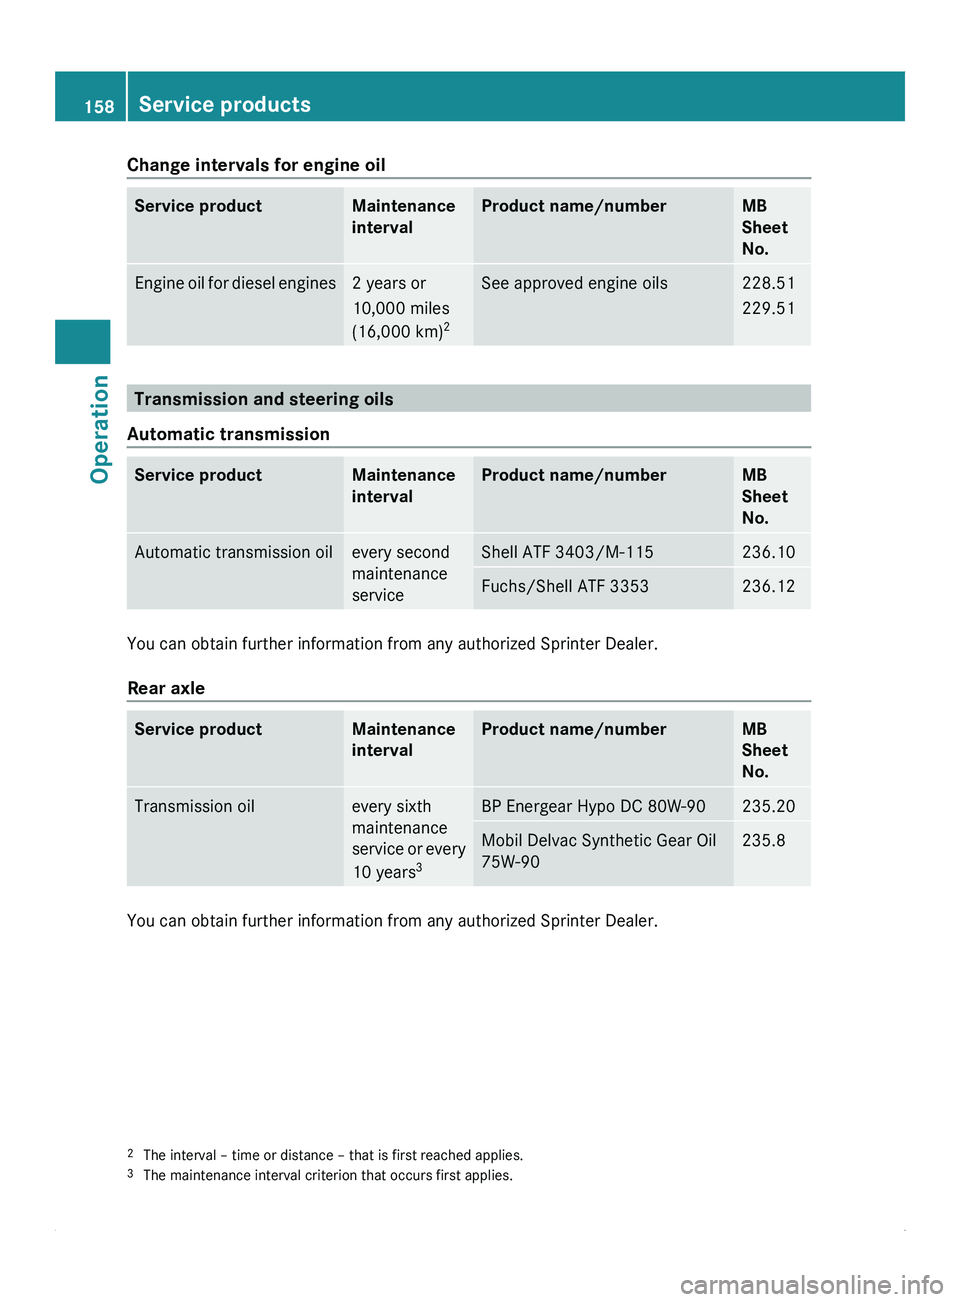
Change intervals for engine oil
Service product Maintenance
interval Product name/number MB
Sheet
No.
Engine oil for diesel engines 2 years or
10,000 miles
(16,000 km)
2 See approved engine oils 228.51
229.51
Transmission and steering oils
Automatic transmission Service product Maintenance
interval Product name/number MB
Sheet
No.
Automatic transmission oil every second
maintenance
service Shell ATF 3403/M-115 236.10
Fuchs/Shell ATF 3353 236.12
You can obtain further information from any authorized Sprinter Dealer.
Rear axle
Service product Maintenance
interval Product name/number MB
Sheet
No.
Transmission oil every sixth
maintenance
service or
every
10 years 3 BP Energear Hypo DC 80W-90 235.20
Mobil Delvac Synthetic Gear Oil
75W-90 235.8
You can obtain further information from any authorized Sprinter Dealer.
2
The interval – time or distance – that is first reached applies.
3 The maintenance interval criterion that occurs first applies.158
Service productsOperation
Page 176 of 292
X
To install the air filter: insert the filter
mat.
X Put cover 0046 on. Vehicle assemblies
Check the assemblies regularly for leaks. If
fluid is being lost (e.g. there are oil stains
where the vehicle is parked), have the cause
found and rectified
immediately at a qualified
specialist workshop, e.g. an authorized
Sprinter Dealer.
0040Environmental note
When used improperly, service products are
harmful to the environment.
Do not allow service products to enter the
sewage system, surface
waters, ground water
or soil. Replacing the wiper blades
G
Warning
If the windshield wipers are set to intermittent
wipe or the rain/light sensor is active, the
windshield wipers could start moving at any
time and injure you or others.
Always remove the
key from the ignition lock
before replacing the wiper blades. G
Warning
Wiper blades are wear parts. Change the
wiper blades every six months, ideally in the
spring and fall.
Otherwise, the windshield and
rear window will not be wiped properly. This
may prevent you from observing the traffic
conditions, thereby causing an accident.
! Do not open the hood when a wiper arm
is folded away from the windshield.
Otherwise, you could damage the hood.
Do not fold the wiper arms back onto the
windshield without wiper blades fitted as
this could scratch the windshield. !
Only touch the windshield wiper where it
connects to the wiper arm. You could
otherwise damage the
wiper blade inserts.
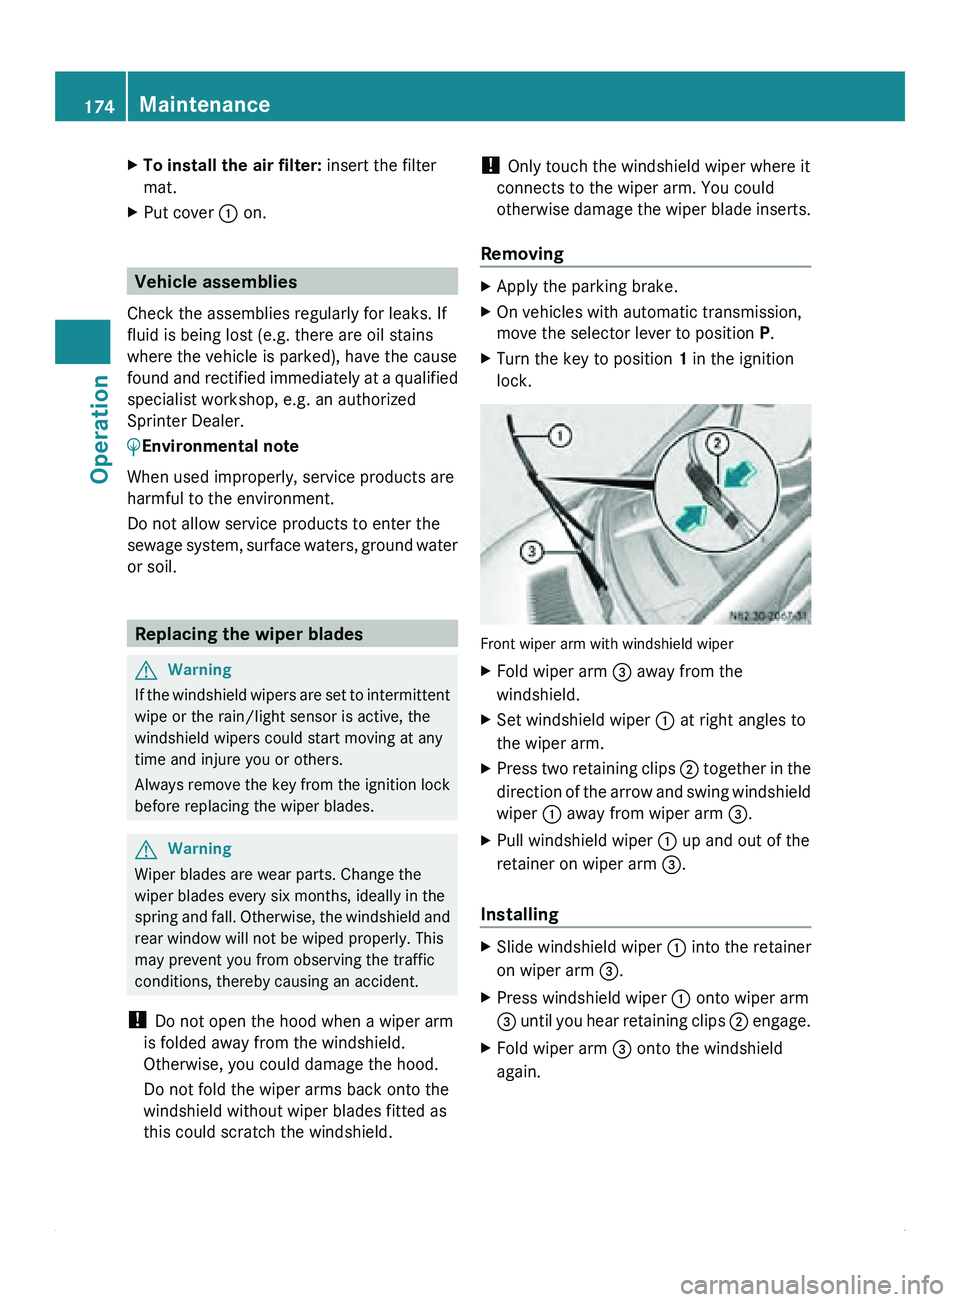
Removing X
Apply the parking brake.
X On vehicles with automatic transmission,
move the selector lever to position P.
X Turn the key to position 1 in the ignition
lock. Front wiper arm with windshield wiper
X
Fold wiper arm 008A away from the
windshield.
X Set windshield wiper 0046 at right angles to
the wiper arm.
X Press two retaining clips 0047 together
in
the
direction of the arrow and swing windshield
wiper 0046 away from wiper arm 008A.
X Pull windshield wiper 0046 up and out of the
retainer on wiper arm 008A.
Installing X
Slide windshield wiper 0046 into the retainer
on wiper arm 008A.
X Press windshield wiper 0046 onto wiper arm
008A until you
hear retaining clips 0047 engage.
X Fold wiper arm 008A onto the windshield
again. 174
Maintenance
Operation
Page 183 of 292
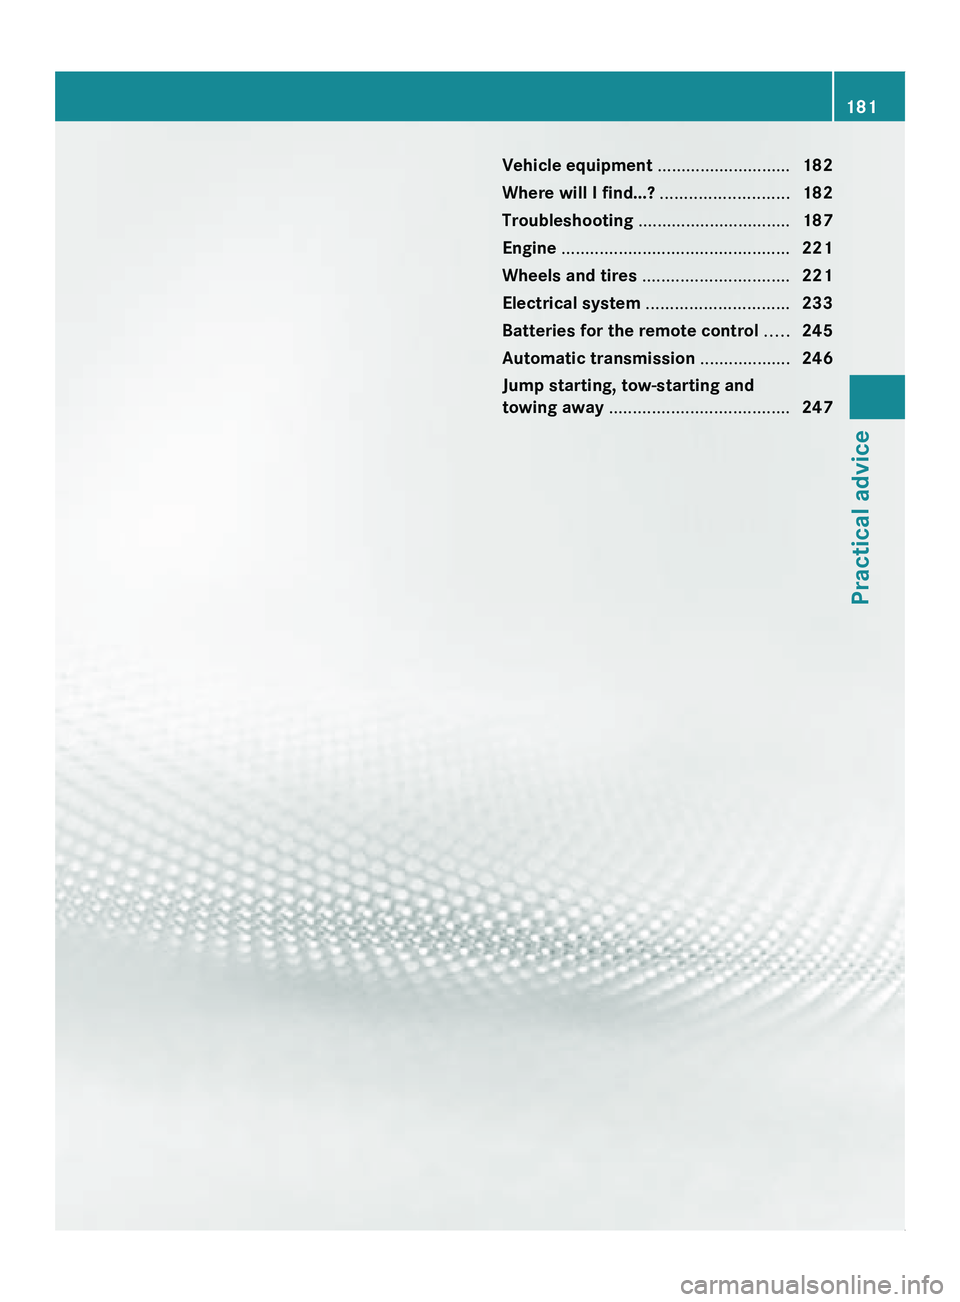
Vehicle equipment ............................
182
Where will I find...? ........................... 182
Troubleshooting ................................ 187
Engine ................................................ 221
Wheels and tires ............................... 221
Electrical system .............................. 233
Batteries for the remote control .....245
Automatic transmission ................... 246
Jump starting, tow-starting and
towing away ...................................... 247 181Practical advice
Page 216 of 292
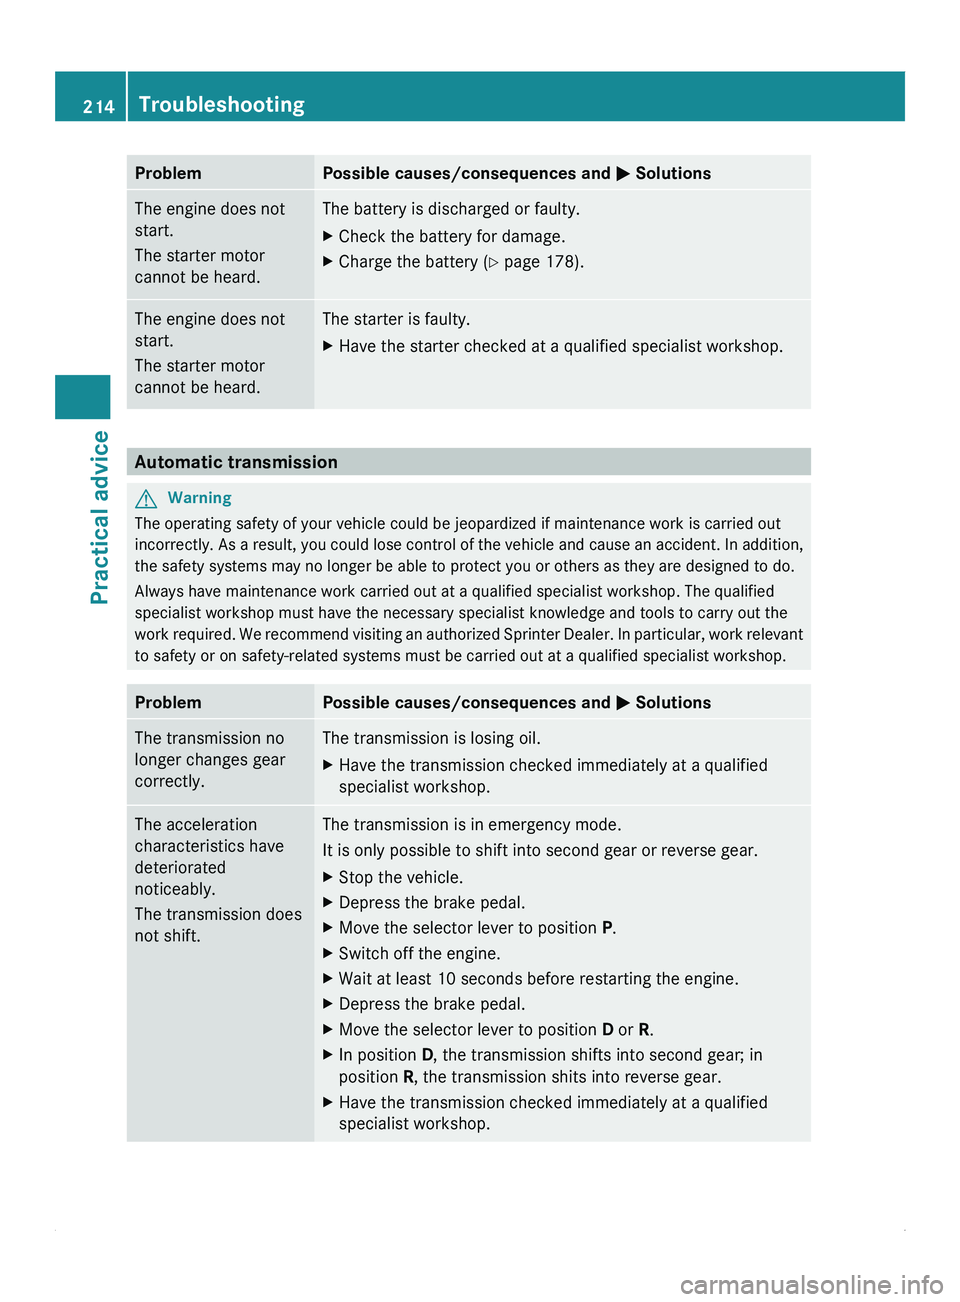
Problem Possible causes/consequences and
0050 SolutionsThe engine does not
start.
The starter motor
cannot be heard. The battery is discharged or faulty.
X
Check the battery for damage.
X Charge the battery ( Y page 178).The engine does not
start.
The starter motor
cannot be heard. The starter is faulty.
X
Have the starter checked at a qualified specialist workshop. Automatic transmission
G
Warning
The operating safety of your vehicle could be jeopardized if maintenance work is carried out
incorrectly. As a
result, you could lose control of the vehicle and cause an accident. In addition,
the safety systems may no longer be able to protect you or others as they are designed to do.
Always have maintenance work carried out at a qualified specialist workshop. The qualified
specialist workshop must have the necessary specialist knowledge and tools to carry out the
work required. We recommend visiting an authorized Sprinter Dealer. In particular, work relevant
to safety or on safety-related systems must be carried out at a qualified specialist workshop. Problem Possible causes/consequences and
0050 SolutionsThe transmission no
longer changes gear
correctly. The transmission is losing oil.
X
Have the transmission checked immediately at a qualified
specialist workshop. The acceleration
characteristics have
deteriorated
noticeably.
The transmission does
not shift. The transmission is in emergency mode.
It is only possible to shift into second gear or reverse gear.
X
Stop the vehicle.
X Depress the brake pedal.
X Move the selector lever to position P.
X Switch off the engine.
X Wait at least 10 seconds before restarting the engine.
X Depress the brake pedal.
X Move the selector lever to position D or R.
X In position D, the transmission shifts into second gear; in
position R, the transmission shits into reverse gear.
X Have the transmission checked immediately at a qualified
specialist workshop.214
Troubleshooting
Practical advice
Page 223 of 292
Engine
Draining the fuel filter
If the 00BA
indicator lamp lights up, you must
drain the fuel filter.
! When the 00BA indicator lamp lights up,
drain the fuel filter with water separator
immediately. Otherwise, the engine may be
damaged.
0040Environmental note
When handling, storing and disposing of
diesel and diesel mixtures, please observe
the relevant regulations.
To this end, have the fuel filter with water
separator drained at a qualified specialist
workshop which
has
the necessary specialist
knowledge and tools to carry out the work
required, e.g. an authorized Sprinter Dealer.
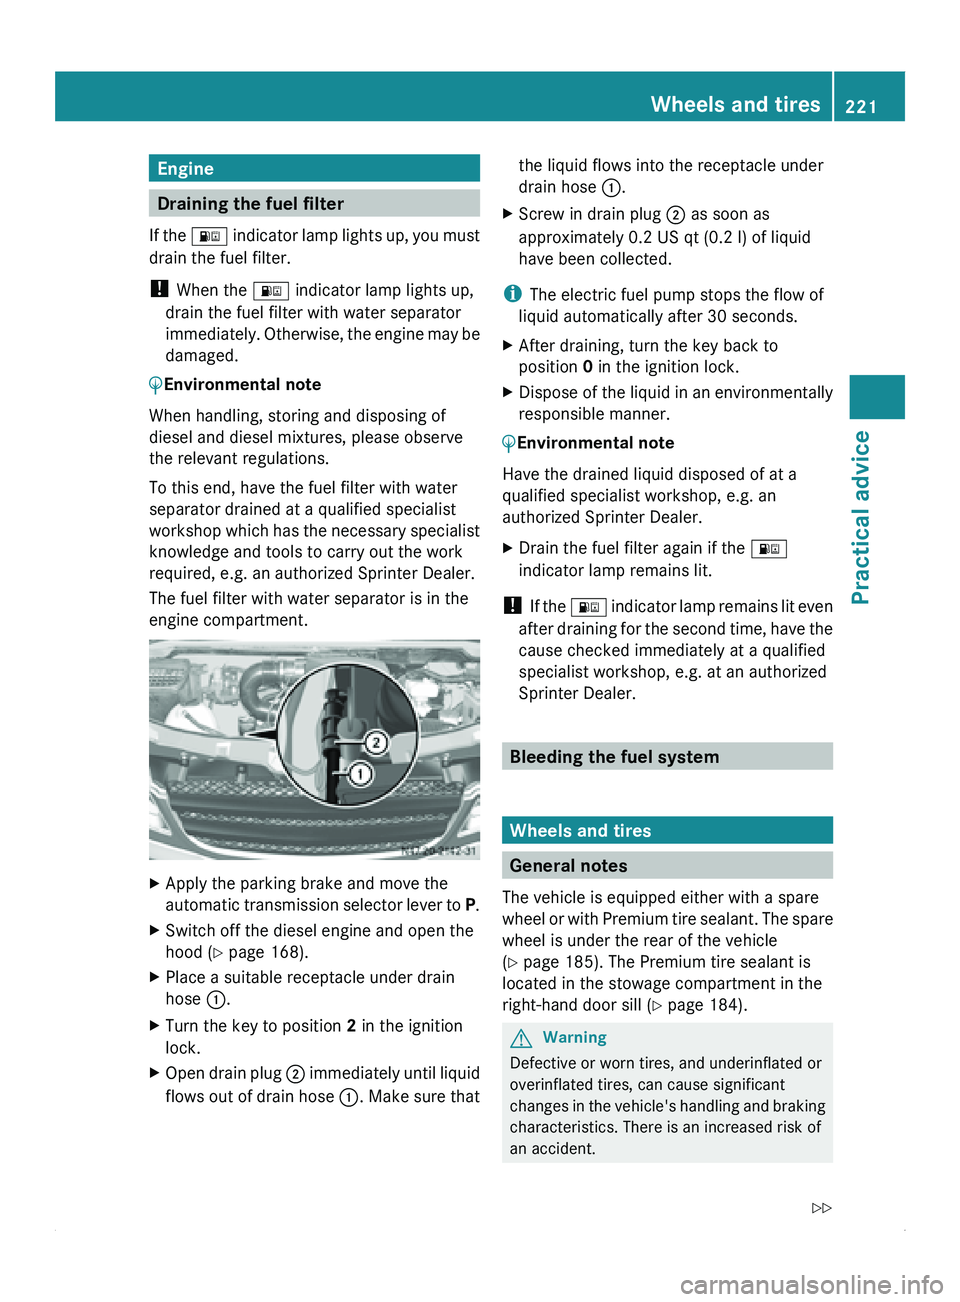
The fuel filter with water separator is in the
engine compartment. X
Apply the parking brake and move the
automatic
transmission selector
lever to P.
X Switch off the diesel engine and open the
hood ( Y page 168).
X Place a suitable receptacle under drain
hose 0046.
X Turn the key to position 2 in the ignition
lock.
X Open drain plug 0047
immediately until
liquid
flows out of drain hose 0046. Make sure that the liquid flows into the receptacle under
drain hose
0046.
X Screw in drain plug 0047 as soon as
approximately 0.2 US qt (0.2 l) of liquid have been collected.
i The electric fuel pump stops the flow of
liquid automatically after 30 seconds.
X After draining, turn the key back to
position
0 in the ignition lock.
X Dispose of the liquid in an environmentally
responsible manner.
0040Environmental note
Have the drained liquid disposed of at a
qualified specialist workshop, e.g. an
authorized Sprinter Dealer.
X Drain the fuel filter again if the 00BA
indicator lamp remains lit.
! If the
00BA
indicator lamp remains lit even
after draining for the second time, have the
cause checked immediately at a qualified
specialist workshop, e.g. at an authorized
Sprinter Dealer. Bleeding the fuel system
Wheels and tires
General notes
The vehicle is equipped either with a spare
wheel or with
Premium tire sealant. The spare
wheel is under the rear of the vehicle
(Y page 185). The Premium tire sealant is
located in the stowage compartment in the
right-hand door sill ( Y page 184). G
Warning
Defective or worn tires, and underinflated or
overinflated tires, can cause significant
changes in the
vehicle's handling and braking
characteristics. There is an increased risk of
an accident. Wheels and tires
221
Practical advice
Z
Page 224 of 292
Replace the tires, including the spare wheel,
at least every six years. They should be
replaced regardless of the degree of tread
wear. Check the tire pressure on the spare
wheel at regular intervals.
If you replace
a tire, we also recommend that
you replace the tire valve. G
Warning!
Only for vehicles without a tire pressure
monitor:
For safety reasons, we recommend that you
only use tire valves manufactured by
Schrader. These have been tested for use on
your vehicle.
Use only tire valves of type:
R TR 600 for the vehicle types 2500
R TR 418 for the vehicle types 3500
Using other tire inflation valves or valves
made by other manufacturers can result in
tire pressure loss and thereby impair the
operating safety of the vehicle.
You will find safety-relevant information on
tires and wheels in the "Tires and wheels"
section ( Y page 252).Preparing the vehicle
X Stop the vehicle as far away as possible
from traffic and
on a level, firm and non-slip
surface.
X Switch on the hazard warning lamps.
X Apply the parking brake.
X Move the selector lever of the automatic
transmission to position P.
X Any passengers should leave the vehicle,
ensuring that they are not endangered as
they do so.
X Place the warning triangle or hazard
warning lights at a suitable distance.
Observe legal requirements. Using tire sealant
You can use
the Premium tire sealant to seal
small punctures, particularly those in the tire
tread. Tire sealant can be used at outside
temperatures down to –22 ‡ (–30 †). G
Warning
Smoking, fire
and naked flames are prohibited
when handling tire sealant. Avoid creating
sparks. The tire
sealant could otherwise ignite
and cause a fire. G
Warning
Your safety is at particular risk and the tire
sealant is unable to repair a tire in the
following situations:
R if there are cuts or punctures in the tire
larger than 0.23 inches (6 mm)
R if the rim is damaged
R if you have driven with very low tire
pressures or with flat tires
Do not drive any further. Consult a qualified
specialist workshop which
has the necessary
specialist knowledge and tools to carry out
the work required.
For this reason, we recommend an authorized
Sprinter Dealer. In particular, work relevant to
safety or on safety-related systems must be
carried out at a qualified specialist workshop.
X Prepare the vehicle as described
(Y page 222).
X Before using Premium tire sealant, you
should stop the
vehicle so that the damage
on the tire is at the bottom.
X It is beneficial to the sealing process if you
remove the foreign body that has pierced
the tire, e.g. a screw or a nail.
X Remove the Premium tire sealant, the
accompanying "max. 50 mph" ("max.
80 km/h") sticker and the tire inflation
compressor from the stowage222
Wheels and tires
Practical advice