tire pressure MERCEDES-BENZ SPRINTER 2012 MY12 Operator’s Manual
[x] Cancel search | Manufacturer: MERCEDES-BENZ, Model Year: 2012, Model line: SPRINTER, Model: MERCEDES-BENZ SPRINTER 2012Pages: 292, PDF Size: 6.75 MB
Page 197 of 292
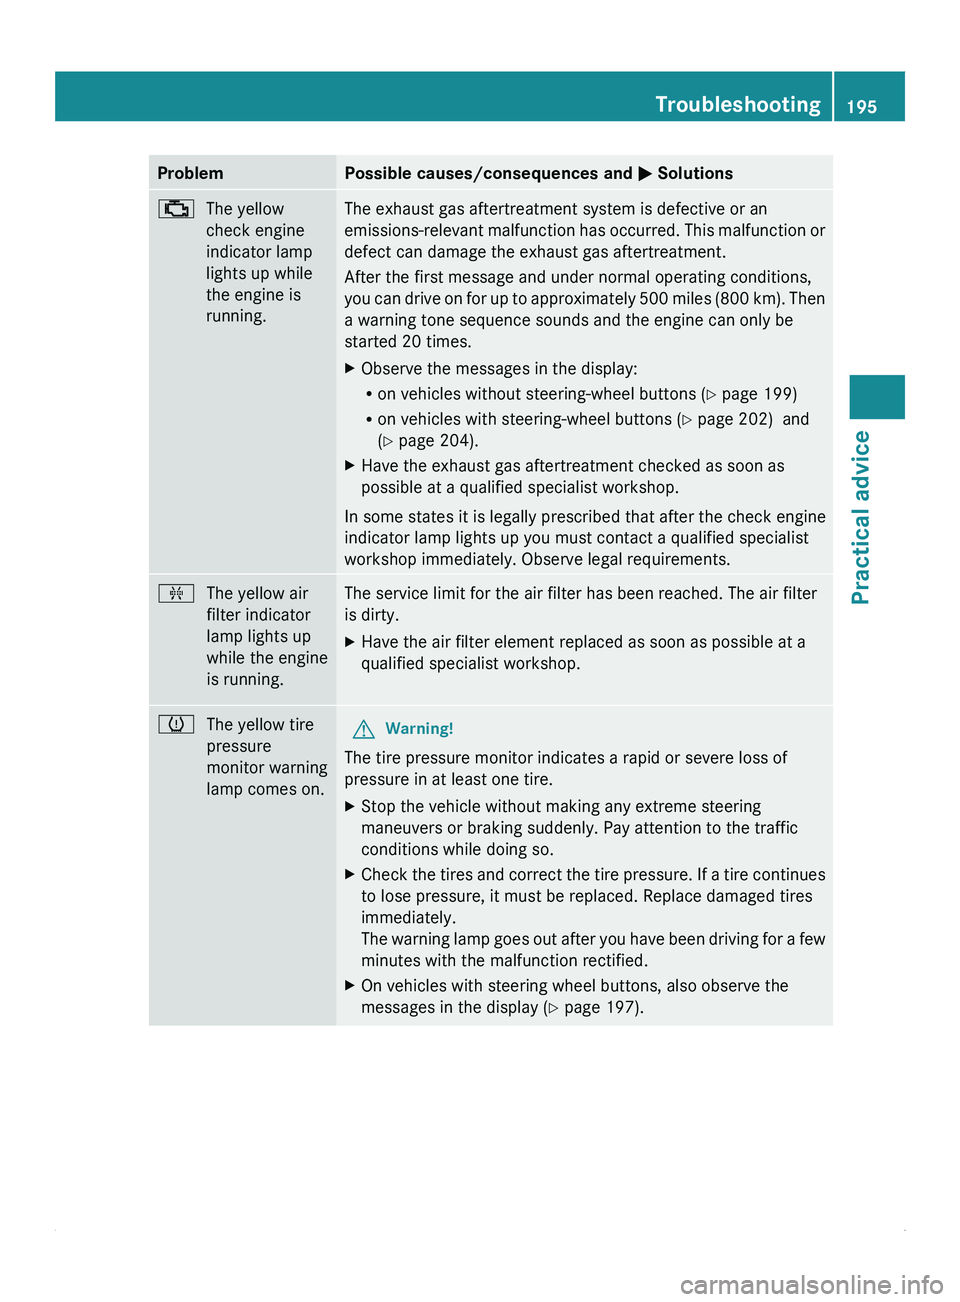
Problem Possible causes/consequences and
0050 Solutions00BB
The yellow
check engine
indicator lamp
lights up while
the engine is
running. The exhaust gas aftertreatment system is defective or an
emissions-relevant malfunction has
occurred. This malfunction or
defect can damage the exhaust gas aftertreatment.
After the first message and under normal operating conditions,
you can drive on for up to approximately 500 miles (800 km). Then
a warning tone sequence sounds and the engine can only be
started 20 times.
X Observe the messages in the display:
R
on vehicles without steering-wheel buttons (Y page 199)
R on vehicles with steering-wheel buttons (Y page 202) and
(Y page 204).
X Have the exhaust gas aftertreatment checked as soon as
possible at a qualified specialist workshop.
In some states it is legally prescribed that after the check engine
indicator lamp lights up you must contact a qualified specialist
workshop immediately. Observe legal requirements. 00AB
The yellow air
filter indicator
lamp lights up
while the engine
is running. The service limit for the air filter has been reached. The air filter
is dirty.
X
Have the air filter element replaced as soon as possible at a
qualified specialist workshop. 0077
The yellow tire
pressure
monitor warning
lamp comes on. G
Warning!
The tire pressure monitor indicates a rapid or severe loss of
pressure in at least one tire.
X Stop the vehicle without making any extreme steering
maneuvers or braking suddenly. Pay attention to the traffic
conditions while doing so.
X Check the tires and correct the tire pressure. If a tire continues
to lose pressure, it must be replaced. Replace damaged tires
immediately.
The warning lamp
goes out after you have been driving for a few
minutes with the malfunction rectified.
X On vehicles with steering wheel buttons, also observe the
messages in the display ( Y page 197). Troubleshooting
195
Practical advice Z
Page 198 of 292
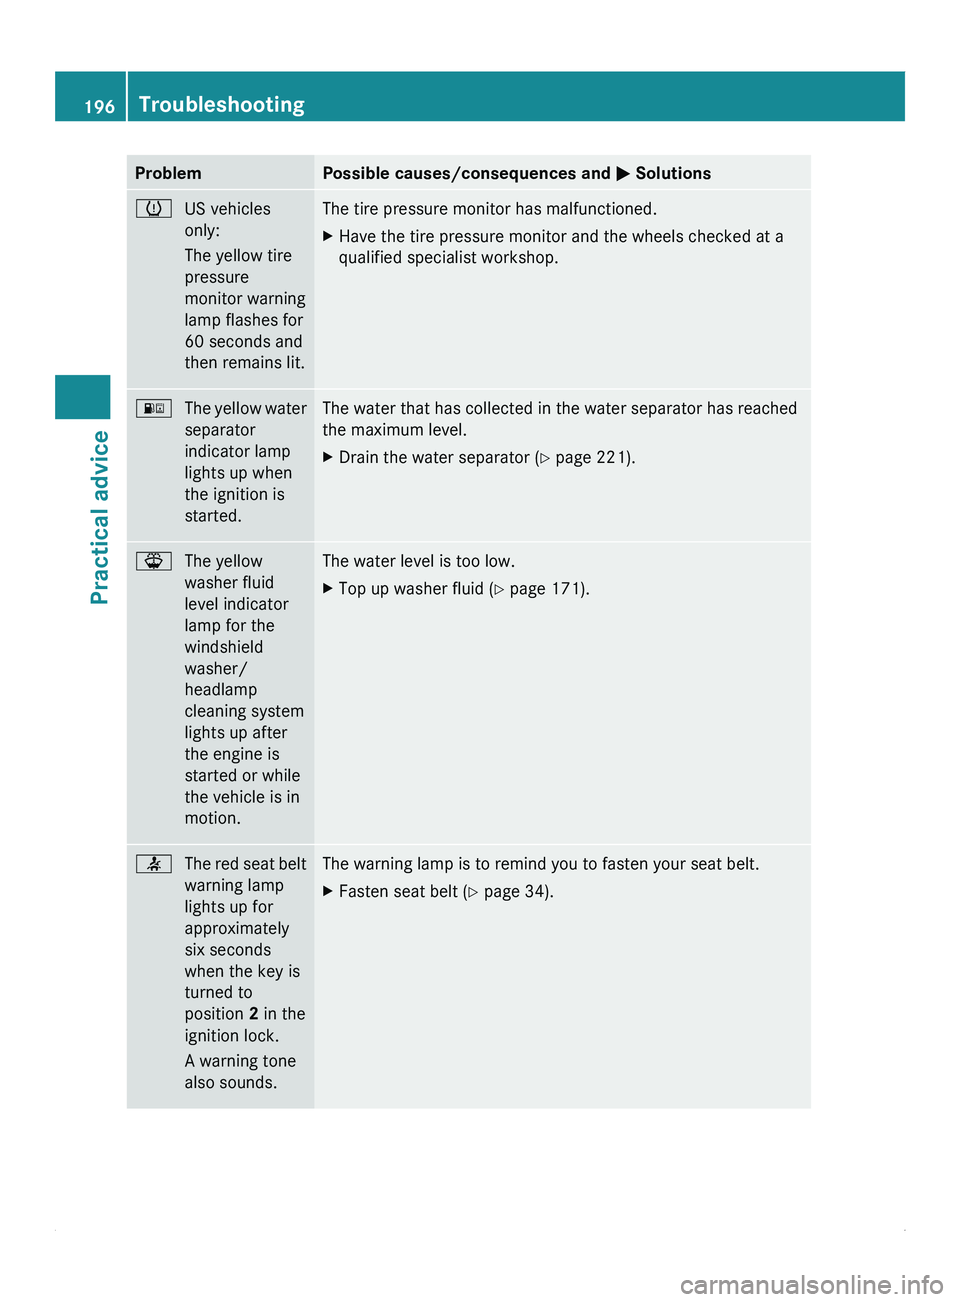
Problem Possible causes/consequences and
0050 Solutions0077
US vehicles
only:
The yellow tire
pressure
monitor warning
lamp flashes for
60 seconds and
then remains lit. The tire pressure monitor has malfunctioned.
X
Have the tire pressure monitor and the wheels checked at a
qualified specialist workshop. 00BA
The yellow water
separator
indicator lamp
lights up when
the ignition is
started. The water that has collected in the water separator has reached
the maximum level.
X
Drain the water separator ( Y page 221).00BD
The yellow
washer fluid
level indicator
lamp for the
windshield
washer/
headlamp
cleaning system
lights up after
the engine is
started or while
the vehicle is in
motion. The water level is too low.
X
Top up washer fluid ( Y page 171).0082
The red seat belt
warning lamp
lights up for
approximately
six seconds
when the key is
turned to
position 2 in the
ignition lock.
A warning tone
also sounds. The warning lamp is to remind you to fasten your seat belt.
X
Fasten seat belt (Y page 34).196
TroubleshootingPractical advice
Page 201 of 292
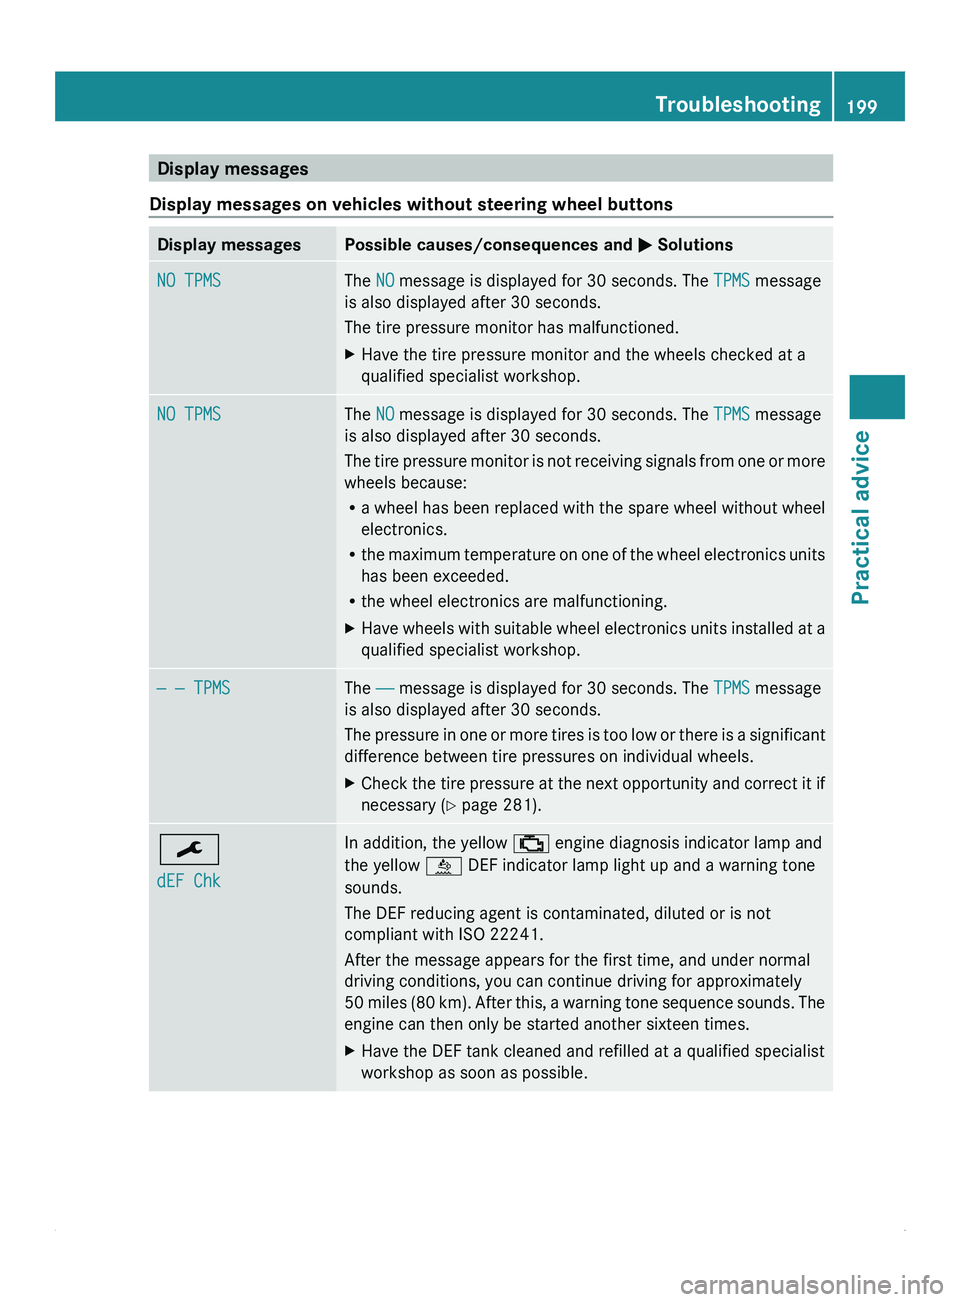
Display messages
Display messages on vehicles without steering wheel buttons Display messages Possible causes/consequences and
0050 SolutionsNO TPMS The NO message is displayed for 30 seconds. The
TPMS message
is also displayed after 30 seconds.
The tire pressure monitor has malfunctioned.
X Have the tire pressure monitor and the wheels checked at a
qualified specialist workshop. NO TPMS The NO message is displayed for 30 seconds. The
TPMS message
is also displayed after 30 seconds.
The tire pressure
monitor is not receiving signals from one or more
wheels because:
R a wheel has been replaced with the spare wheel without wheel
electronics.
R the maximum temperature on one of the wheel electronics units
has been exceeded.
R the wheel electronics are malfunctioning.
X Have wheels with suitable wheel electronics units installed at a
qualified specialist workshop. — — TPMS The ——
message is displayed for 30 seconds. The
TPMS message
is also displayed after 30 seconds.
The pressure in
one or more tires is too low or there is a significant
difference between tire pressures on individual wheels.
X Check the tire pressure at the next opportunity and correct it if
necessary ( Y page 281). 009B
dEF Chk In addition, the yellow
00BB engine diagnosis indicator lamp and
the yellow 00E4
DEF indicator lamp light up and a warning tone
sounds.
The DEF reducing agent is contaminated, diluted or is not
compliant with ISO 22241 .
After the message appears for the first time, and under normal
driving conditions, you can continue driving for approximately
50 miles
(80 km). After this, a warning tone sequence sounds. The
engine can then only be started another sixteen times.
X Have the DEF tank cleaned and refilled at a qualified specialist
workshop as soon as possible. Troubleshooting
199
Practical advice Z
Page 205 of 292
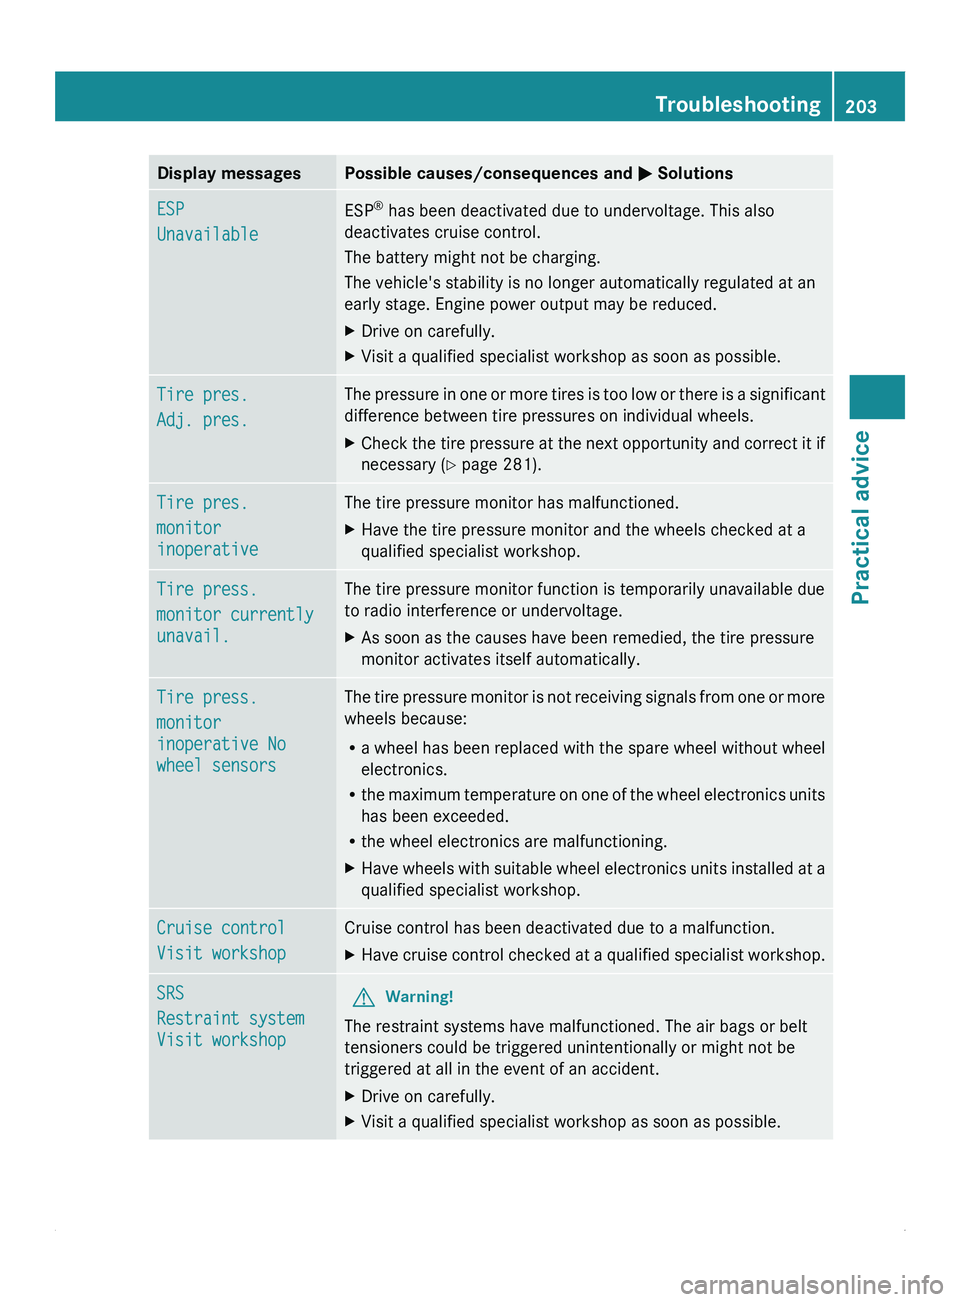
Display messages Possible causes/consequences and
0050 SolutionsESP
Unavailable
ESP
®
has been deactivated due to undervoltage. This also
deactivates cruise control.
The battery might not be charging.
The vehicle's stability is no longer automatically regulated at an
early stage. Engine power output may be reduced.
X Drive on carefully.
X Visit a qualified specialist workshop as soon as possible. Tire pres.
Adj. pres. The pressure in one or more tires is too low or there is a significant
difference between tire pressures on individual wheels.
X
Check the tire pressure at the next opportunity and correct it if
necessary ( Y page 281). Tire pres.
monitor
inoperative The tire pressure monitor has malfunctioned.
X
Have the tire pressure monitor and the wheels checked at a
qualified specialist workshop. Tire press.
monitor currently
unavail. The tire pressure monitor function is temporarily unavailable due
to radio interference or undervoltage.
X
As soon as the causes have been remedied, the tire pressure
monitor activates itself automatically. Tire press.
monitor
inoperative No
wheel sensors The tire pressure monitor is not receiving signals from one or more
wheels because:
R
a wheel has
been replaced with the spare wheel without wheel
electronics.
R the maximum temperature on one of the wheel electronics units
has been exceeded.
R the wheel electronics are malfunctioning.
X Have wheels with suitable wheel electronics units installed at a
qualified specialist workshop. Cruise control
Visit workshop Cruise control has been deactivated due to a malfunction.
X
Have cruise control checked at a qualified specialist workshop. SRS
Restraint system
Visit workshop
G
Warning!
The restraint systems have malfunctioned. The air bags or belt
tensioners could be triggered unintentionally or might not be
triggered at all in the event of an accident.
X Drive on carefully.
X Visit a qualified specialist workshop as soon as possible. Troubleshooting
203
Practical advice Z
Page 210 of 292
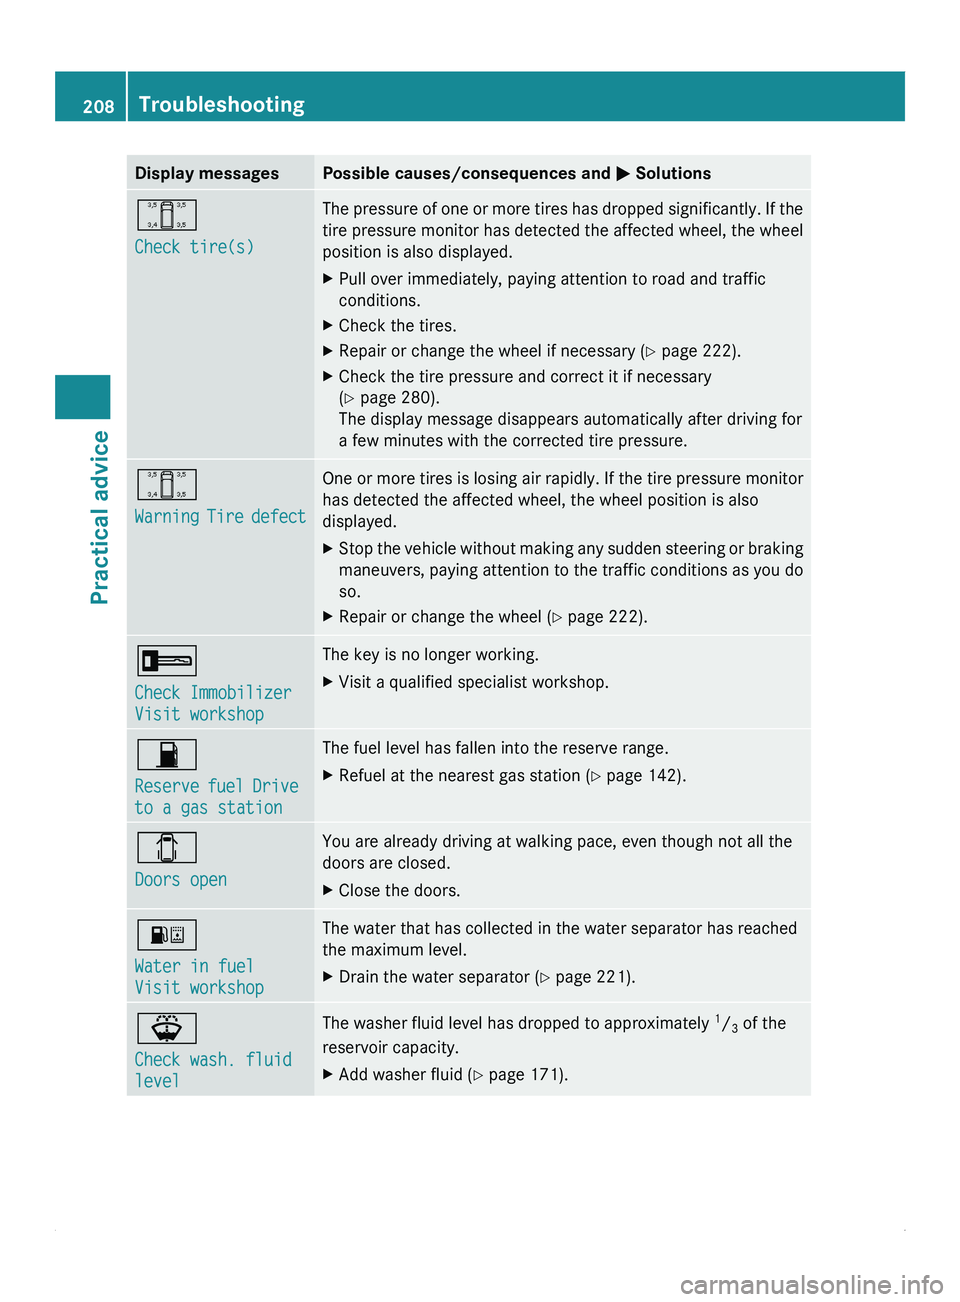
Display messages Possible causes/consequences and
0050 Solutions0063
Check tire(s) The pressure of one or more tires has dropped significantly. If the
tire pressure monitor
has detected the affected wheel, the wheel
position is also displayed.
X Pull over immediately, paying attention to road and traffic
conditions.
X Check the tires.
X Repair or change the wheel if necessary ( Y page 222).
X Check the tire pressure and correct it if necessary
(Y page 280).
The display message disappears automatically after driving for
a few minutes with the corrected tire pressure. 0063
Warning Tire
defect One or more tires is losing air rapidly. If the tire pressure monitor
has detected the affected wheel, the wheel position is also
displayed.
X
Stop the vehicle without making any sudden steering or braking
maneuvers, paying attention
to the traffic conditions as you do
so.
X Repair or change the wheel (Y page 222). 0039
Check Immobilizer
Visit workshop The key is no longer working.
X
Visit a qualified specialist workshop. 00B7
Reserve fuel
Drive
to a gas station The fuel level has fallen into the reserve range.
X
Refuel at the nearest gas station ( Y page 142).003E
Doors open You are already driving at walking pace, even though not all the
doors are closed.
X
Close the doors. 00BA
Water in fuel
Visit workshop The water that has collected in the water separator has reached
the maximum level.
X
Drain the water separator ( Y page 221).00BD
Check wash. fluid
level The washer fluid level has dropped to approximately
1
/ 3 of the
reservoir capacity.
X Add washer fluid ( Y page 171).208
Troubleshooting
Practical advice
Page 224 of 292
Replace the tires, including the spare wheel,
at least every six years. They should be
replaced regardless of the degree of tread
wear. Check the tire pressure on the spare
wheel at regular intervals.
If you replace
a tire, we also recommend that
you replace the tire valve. G
Warning!
Only for vehicles without a tire pressure
monitor:
For safety reasons, we recommend that you
only use tire valves manufactured by
Schrader. These have been tested for use on
your vehicle.
Use only tire valves of type:
R TR 600 for the vehicle types 2500
R TR 418 for the vehicle types 3500
Using other tire inflation valves or valves
made by other manufacturers can result in
tire pressure loss and thereby impair the
operating safety of the vehicle.
You will find safety-relevant information on
tires and wheels in the "Tires and wheels"
section ( Y page 252).Preparing the vehicle
X Stop the vehicle as far away as possible
from traffic and
on a level, firm and non-slip
surface.
X Switch on the hazard warning lamps.
X Apply the parking brake.
X Move the selector lever of the automatic
transmission to position P.
X Any passengers should leave the vehicle,
ensuring that they are not endangered as
they do so.
X Place the warning triangle or hazard
warning lights at a suitable distance.
Observe legal requirements. Using tire sealant
You can use
the Premium tire sealant to seal
small punctures, particularly those in the tire
tread. Tire sealant can be used at outside
temperatures down to –22 ‡ (–30 †). G
Warning
Smoking, fire
and naked flames are prohibited
when handling tire sealant. Avoid creating
sparks. The tire
sealant could otherwise ignite
and cause a fire. G
Warning
Your safety is at particular risk and the tire
sealant is unable to repair a tire in the
following situations:
R if there are cuts or punctures in the tire
larger than 0.23 inches (6 mm)
R if the rim is damaged
R if you have driven with very low tire
pressures or with flat tires
Do not drive any further. Consult a qualified
specialist workshop which
has the necessary
specialist knowledge and tools to carry out
the work required.
For this reason, we recommend an authorized
Sprinter Dealer. In particular, work relevant to
safety or on safety-related systems must be
carried out at a qualified specialist workshop.
X Prepare the vehicle as described
(Y page 222).
X Before using Premium tire sealant, you
should stop the
vehicle so that the damage
on the tire is at the bottom.
X It is beneficial to the sealing process if you
remove the foreign body that has pierced
the tire, e.g. a screw or a nail.
X Remove the Premium tire sealant, the
accompanying "max. 50 mph" ("max.
80 km/h") sticker and the tire inflation
compressor from the stowage222
Wheels and tires
Practical advice
Page 225 of 292
compartment in the right-hand doorway
(Y page 184).
X Affix the sticker within the driver's field of
vision. G
Warning
It is essential to comply with the
manufacturer's safety notice
on the sticker on
the electric air pump and the tire sealant
bottle. You could otherwise fail to recognize
dangers and injure yourself and others. G
Warning
Tire sealant must not come into contact with
your skin, eyes or clothing. Do not inhale the
fumes.
R If tire sealant
comes into contact with your
eyes or skin, immediately rinse thoroughly
with clean water.
R Immediately change out of clothing that
has been in contact with tire sealant.
R If an allergic reaction occurs, consult a
doctor immediately.
Keep tire sealant away from children.
R If tire sealant is swallowed, immediately
rinse your mouth out thoroughly and drink
plenty of water.
R Do not induce vomiting. Consult a doctor
immediately.
i The tire sealant is water-soluble. If tire
sealant escapes, you can wash it away with
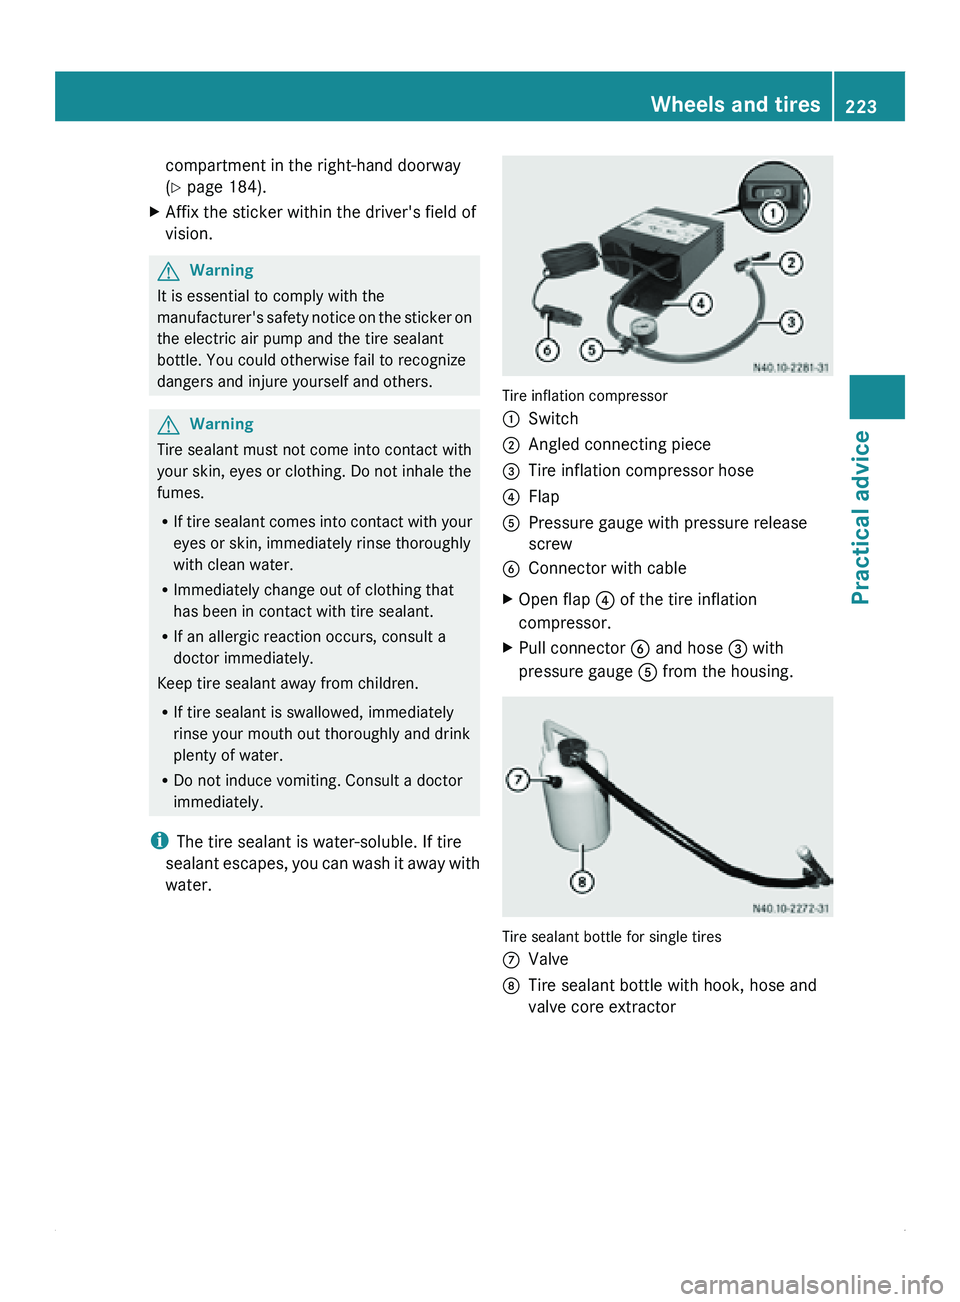
water. Tire inflation compressor
0046
Switch
0047 Angled connecting piece
008A Tire inflation compressor hose
0088 Flap
0086 Pressure gauge with pressure release
screw
0087 Connector with cable
X Open flap 0088 of the tire inflation
compressor.
X Pull connector 0087 and hose 008A with
pressure gauge 0086 from the housing. Tire sealant bottle for single tires
006E
Valve
006F Tire sealant bottle with hook, hose and
valve core extractor Wheels and tires
223
Practical advice Z
Page 226 of 292
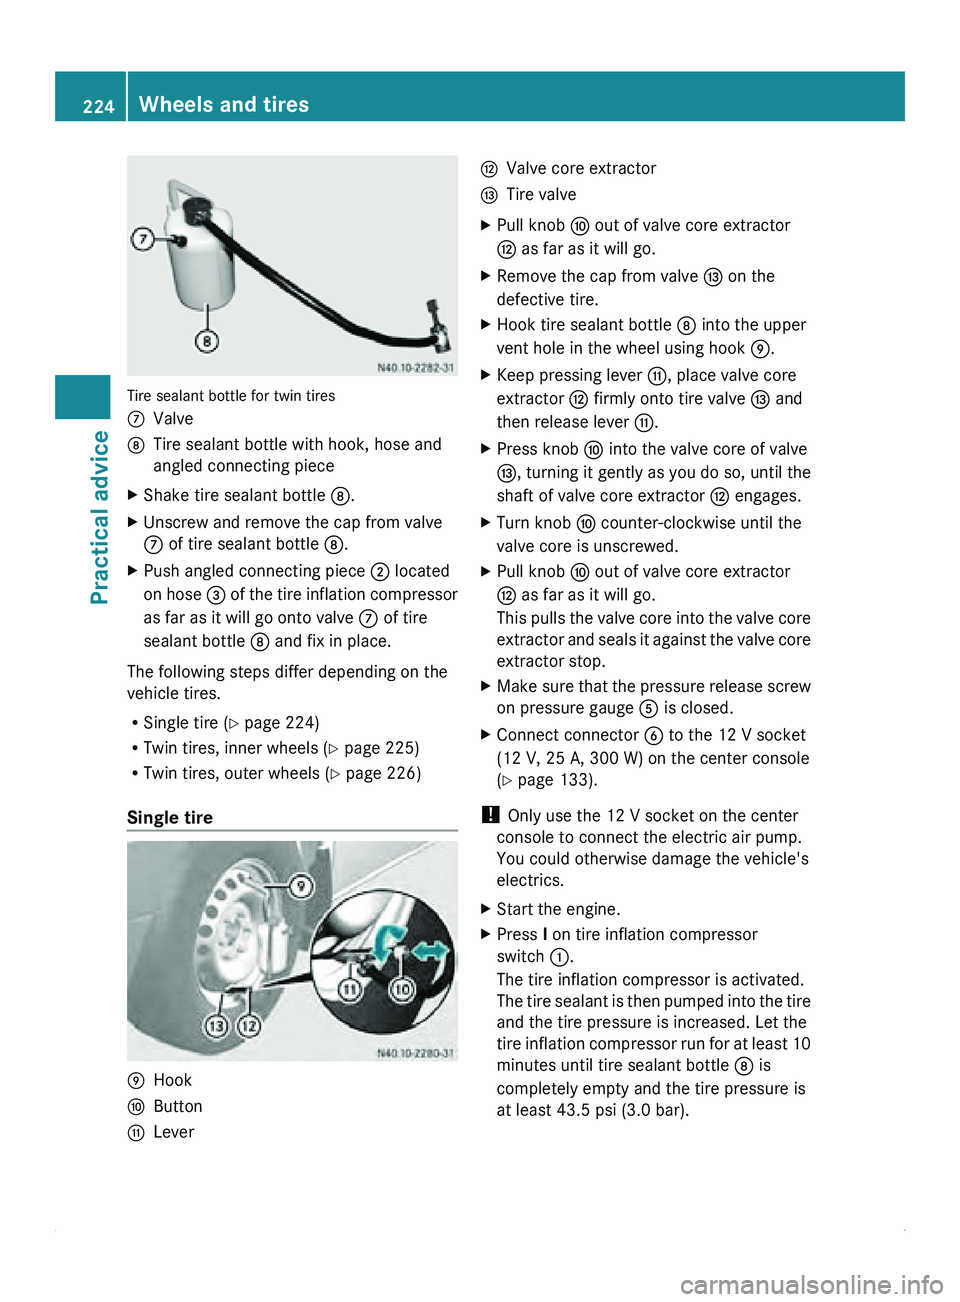
Tire sealant bottle for twin tires
006E
Valve
006F Tire sealant bottle with hook, hose and
angled connecting piece
X Shake tire sealant bottle 006F.
X Unscrew and remove the cap from valve
006E of tire sealant bottle 006F.
X Push angled connecting piece 0047 located
on hose 008A
of the tire inflation compressor
as far as it will go onto valve 006E of tire
sealant bottle 006F and fix in place.
The following steps differ depending on the
vehicle tires.
R Single tire (Y page 224)
R Twin tires, inner wheels ( Y page 225)
R Twin tires, outer wheels (
Y page 226)
Single tire 0070
Hook
0071 Button
0072 Lever 0073
Valve core extractor
0074 Tire valve
X Pull knob 0071 out of valve core extractor
0073 as far as it will go.
X Remove the cap from valve 0074 on the
defective tire.
X Hook tire sealant bottle 006F into the upper
vent hole in the wheel using hook 0070.
X Keep pressing lever 0072, place valve core
extractor 0073 firmly onto tire valve 0074 and
then release lever 0072.
X Press knob 0071 into the valve core of valve
0074, turning it gently as you do so, until the
shaft of valve core extractor 0073 engages.
X Turn knob 0071 counter-clockwise until the
valve core is unscrewed.
X Pull knob 0071 out of valve core extractor
0073 as far as it will go.
This pulls
the
valve core into the valve core
extractor and seals it against the valve core
extractor stop.
X Make sure that the pressure release screw
on pressure gauge 0086 is closed.
X Connect connector 0087 to the 12 V socket
(12 V, 25 A, 300 W) on the center console
(Y page 133).
! Only use the 12 V socket on the center
console to connect the electric air pump.
You could otherwise damage the vehicle's
electrics.
X Start the engine.
X Press I on tire inflation compressor
switch 0046.
The tire inflation compressor is activated.
The tire sealant
is then pumped into the tire
and the tire pressure is increased. Let the
tire inflation compressor run for at least 10
minutes until tire sealant bottle 006F is
completely empty and the tire pressure is
at least 43.5 psi (3.0 bar). 224
Wheels and tires
Practical advice
Page 227 of 292
!
Do not run
the electric air pump for longer
than 20 minutes without a break; otherwise
it may overheat.
The air pump can be used again once it has
cooled down.
X Inflate the tire using the tire inflation
compressor until the recommended tire
pressure ( Y page 281) is reached.
X Then, press 0 on tire inflation compressor
switch 0046.
The tire inflation compressor is
deactivated.
X Slide knob 0071 quickly to the stop in valve
core extractor 0073.
X Turn knob 0071 clockwise
until
the valve core
is firmly screwed into tire valve 0074.
i Do not pull the valve core extractor from
the tire valve while the valve core is
unscrewed from
the
tire valve. Tire sealant
could otherwise escape and make you
dirty.
The tire sealant is water-soluble. If tire
sealant escapes, you can wash it away with
water.
X Press lever 0072 and pull
valve core extractor
0073 from tire valve 0074.
X Screw the valve cap onto tire valve 0074.
After filling with tire sealant, ( Y page 228).
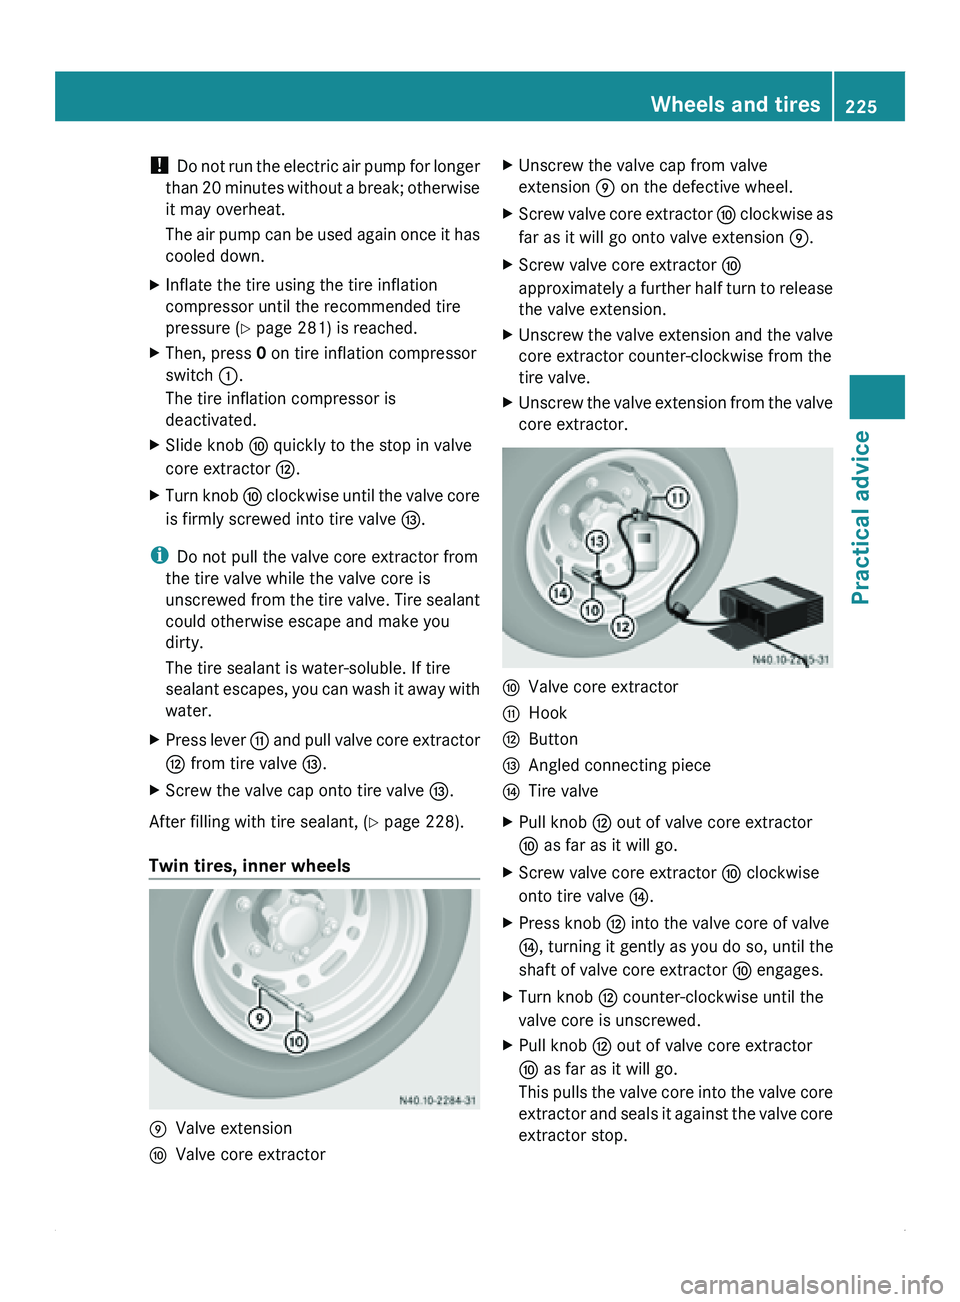
Twin tires, inner wheels 0070
Valve extension
0071 Valve core extractor X
Unscrew the valve cap from valve
extension 0070 on the defective wheel.
X Screw valve core extractor 0071
clockwise as
far as it will go onto valve extension 0070
.
X Screw valve core extractor 0071
approximately a
further
half turn to release
the valve extension.
X Unscrew the valve extension and the valve
core extractor counter-clockwise from the
tire valve.
X Unscrew the valve extension from the valve
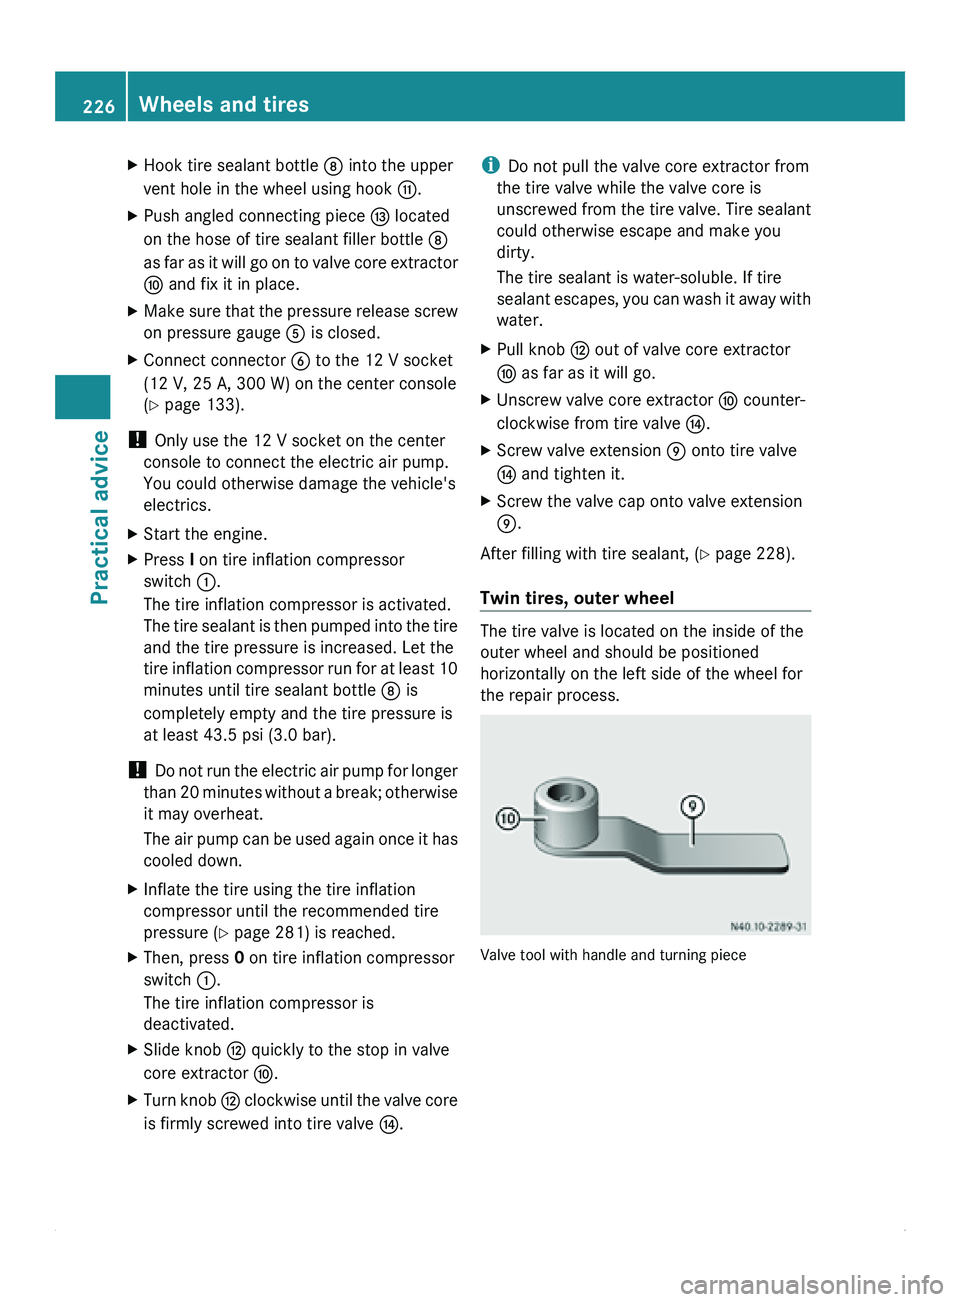
core extractor. 0071
Valve core extractor
0072 Hook
0073 Button
0074 Angled connecting piece
0075 Tire valve
X Pull knob 0073 out of valve core extractor
0071 as far as it will go.
X Screw valve core extractor 0071 clockwise
onto tire valve 0075.
X Press knob 0073 into the valve core of valve
0075, turning it gently as you do so, until the
shaft of valve core extractor 0071 engages.
X Turn knob 0073 counter-clockwise until the
valve core is unscrewed.
X Pull knob 0073 out of valve core extractor
0071 as far as it will go.
This pulls
the
valve core into the valve core
extractor and seals it against the valve core
extractor stop. Wheels and tires
225
Practical advice Z
Page 228 of 292
X
Hook tire sealant bottle 006F into the upper
vent hole in the wheel using hook 0072.
X Push angled connecting piece 0074 located
on the hose of tire sealant filler bottle 006F
as far
as
it will go on to valve core extractor
0071 and fix it in place.
X Make sure that the pressure release screw
on pressure gauge 0086 is closed.
X Connect connector 0087 to the 12 V socket
(12 V, 25 A, 300 W) on the center console
(Y page 133).
! Only use the 12 V socket on the center
console to connect the electric air pump.
You could otherwise damage the vehicle's
electrics.
X Start the engine.
X Press I on tire inflation compressor
switch 0046.
The tire inflation compressor is activated.
The tire
sealant
is then pumped into the tire
and the tire pressure is increased. Let the
tire inflation compressor run for at least 10
minutes until tire sealant bottle 006F is
completely empty and the tire pressure is
at least 43.5 psi (3.0 bar).
! Do not
run
the electric air pump for longer
than 20 minutes without a break; otherwise
it may overheat.
The air pump can be used again once it has
cooled down.
X Inflate the tire using the tire inflation
compressor until the recommended tire
pressure ( Y page 281) is reached.
X Then, press 0 on tire inflation compressor
switch 0046.
The tire inflation compressor is
deactivated.
X Slide knob 0073 quickly to the stop in valve
core extractor 0071.
X Turn knob 0073 clockwise
until
the valve core
is firmly screwed into tire valve 0075.i
Do not pull the valve core extractor from
the tire valve while the valve core is
unscrewed from the
tire valve. Tire sealant
could otherwise escape and make you
dirty.
The tire sealant is water-soluble. If tire
sealant escapes, you can wash it away with
water.
X Pull knob 0073 out of valve core extractor
0071 as far as it will go.
X Unscrew valve core extractor 0071 counter-
clockwise from tire valve 0075.
X Screw valve extension 0070 onto tire valve
0075 and tighten it.
X Screw the valve cap onto valve extension
0070.
After filling with tire sealant, ( Y page 228).
Twin tires, outer wheel The tire valve is located on the inside of the
outer wheel and should be positioned
horizontally on the left side of the wheel for
the repair process.
Valve tool with handle and turning piece226
Wheels and tires
Practical advice