fuel MERCEDES-BENZ SPRINTER 2014 MY14 Operator’s Manual
[x] Cancel search | Manufacturer: MERCEDES-BENZ, Model Year: 2014, Model line: SPRINTER, Model: MERCEDES-BENZ SPRINTER 2014Pages: 338, PDF Size: 6.78 MB
Page 260 of 338
X
Turn the key to position 2in the ignition
lock.
X Open drain plug 0044immediately until the
water/fuel mixture flows out of drain
hose 0043.
X Screw in drain plug 0044as soon as approx-
imately 0.2 US qt (0.2 l) of the water/fuel
mixture have been collected.
i The electrical fuel pump halts the flow of
the water/fuel mixture after 30 seconds.
X After draining, turn the key back to posi-
tion 0in the ignition lock.
X Dispose of the collected water/fuel mix-
ture in an environmentally responsible
manner, e.g. at a qualified specialist work-
shop.
X Check drain plug 0044. The drain plug must
be closed.
When the engine is running and drain
hose 0044is open, fuel is lost through drain
hose 0043.
X Close the hood.
If the 00B8 indicator lamp does not go out
after draining:
X Drain the fuel filter again.
X If the 00B8 indicator lamp does not go out
after draining for the second time, have the
cause checked immediately at a qualified
specialist workshop. Vehicle interior
Air filter for the rear-compartment air
conditioning
! Regularly check the air filters for visible
dirt. Clean or replace a dirty filter mat. The
dirt may otherwise lead to damage to the
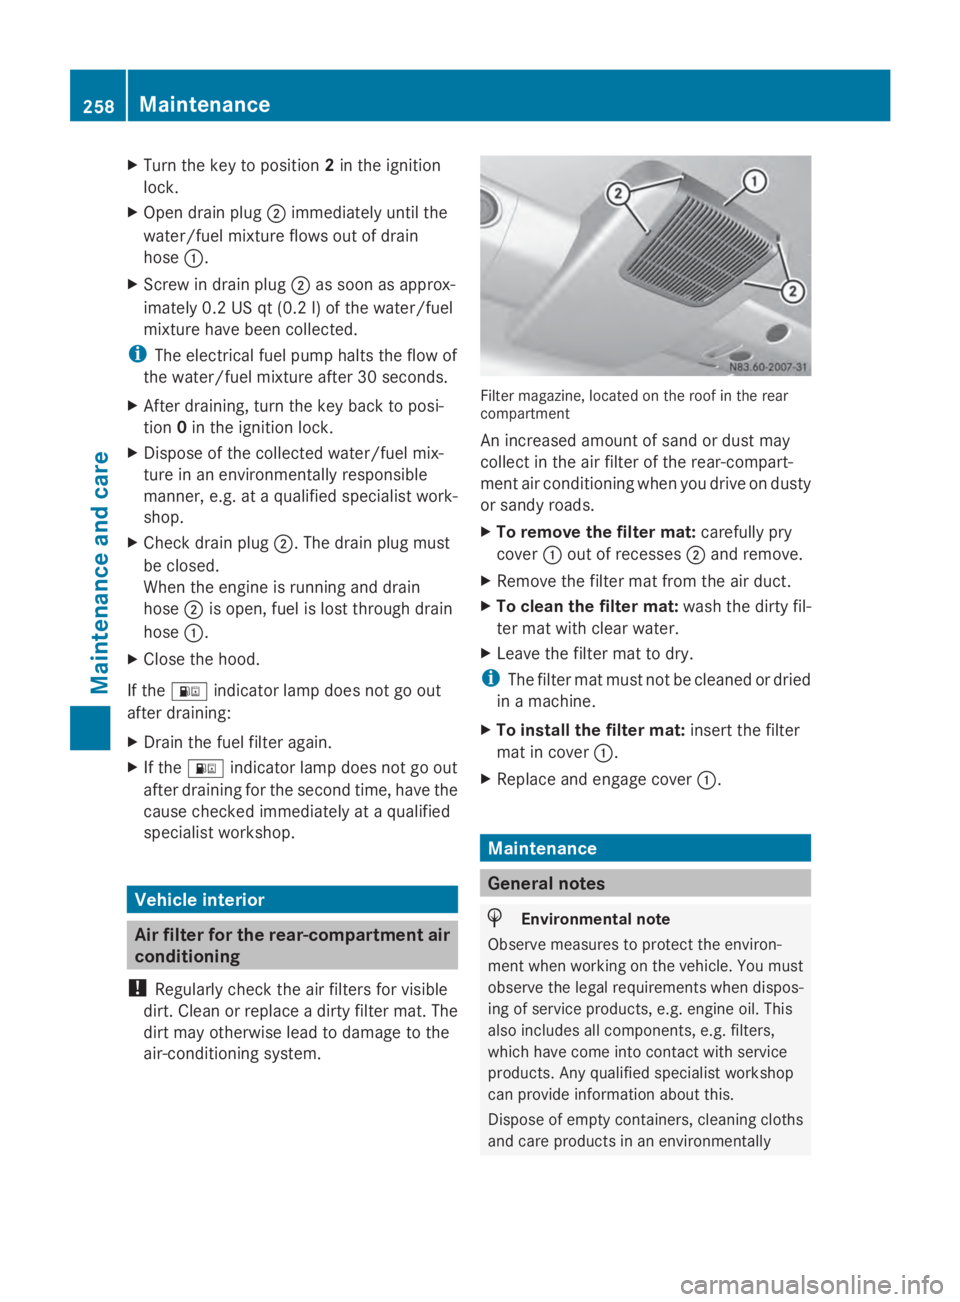
air-conditioning system. Filter magazine, located on the roof in the rear
compartment
An increased amount of sand or dust may
collect in the air filter of the rear-compart-
ment air conditioning when you drive on dusty
or sandy roads.
X
To remove the filter mat: carefully pry
cover 0043out of recesses 0044and remove.
X Remove the filter mat from the air duct.
X To clean the filter mat: wash the dirty fil-
ter mat with clear water.
X Leave the filter mat to dry.
i The filter mat must not be cleaned or dried
in a machine.
X To install the filter mat: insert the filter
mat in cover 0043.
X Replace and engage cover 0043. Maintenance
General notes
H
Environmental note
Observe measures to protect the environ-
ment when working on the vehicle. You must
observe the legal requirements when dispos-
ing of service products, e.g. engine oil. This
also includes all components, e.g. filters,
which have come into contact with service
products. Any qualified specialist workshop
can provide information about this.
Dispose of empty containers, cleaning cloths
and care products in an environmentally 258
MaintenanceMaintenance and care
Page 268 of 338
Installing and removing the auxiliary
battery (base of the driver's seat)
Removing the auxiliary battery X
Disconnect the battery (Y page 265).
X Loosen the bolts holding the retainer that
prevents the battery from moving around in
the base of the driver's seat.
X Remove the battery holder and take out the
battery.
Installing the auxiliary battery X
Insert the battery into the battery case.
X Insert the battery holder.
X Tighten the bolts holding the retainer that
prevents the battery from moving around in
the base of the driver's seat.
X Connect the battery (Y page 265).Charging
G
WARNING
During charging and jump-starting, explosive
gases can escape from the battery. There is a
risk of an explosion.
Particularly avoid fire, open flames, creating
sparks and smoking. Ensure there is sufficient
ventilation while charging and jump-starting.
Do not lean over a battery. G
WARNING
Battery acid is caustic. There is a risk of injury.
Avoid contact with the skin, eyes or clothing.
Do not inhale any battery gases. Do not lean
over the battery. Keep children away from
batteries. Wash battery acid immediately with
water and seek medical attention.
! Only charge the installed battery with a
battery charger that has been tested and
approved by the distributor named on the
inside of the front cover. This device allows
the battery to be charged when it is instal- led in the vehicle. The vehicle's electronics
may otherwise be damaged.
X Recharge the removed battery. Observe
the notes in the operating instructions for
your battery charger.
X Install the battery. Observe the notes on
reconnecting the battery.
i If batteries are not being used, you should
charge them once a month.
It is also possible to charge the starter bat-
tery using the jump-starting connection
point in the engine compartment
(Y page 278). Care
! Dirty battery clamps and battery surfaces
cause leak currents which lead to the bat-
teries discharging.
! Do not use cleaning agents containing
fuel. Cleaning agents containing fuel cor-
rode the battery housing.
! If dirt gets into the battery cell, battery
self-discharge will increase and the battery
may be damaged.
The following points on battery care must be
observed:
X Regularly check the battery terminals and
the fastening of the negative cable to the
chassis to ensure that they are firmly
seated.
X Always keep the battery terminals and bat-
tery surfaces clean and dry.
X Lightly grease the undersides of the battery
terminals with acid-resistant grease.
X Only clean the batteries when the caps are
screwed on.
Otherwise, dirt could get into the battery
cells.
X Unscrew the caps and clean blocked
breathers with a suitable tool such as a
piece of wire. 266
BatteryMaintenance and care
Page 271 of 338

Cleaning the engine
!
Water must not enter intake or ventilation
openings. When cleaning with high pres-
sure water or steam cleaners, the spray
must not be aimed directly at electrical
components or the terminals of electrical
lines.
Preserve the engine after the engine has
been cleaned. Protect the belt drive system
from exposure to the preservative agent.
Also observe the information in the section
"Power washer" (Y page 268).
Cleaning the paintwork !
Do not affix:
R stickers
R films
R magnetic plates or similar items
to painted surfaces. You could otherwise
damage the paintwork.
Scratches, corrosive deposits, areas affected
by corrosion and damage caused by inade-
quate care cannot always be completely
repaired. In such cases, visit a qualified spe-
cialist workshop.
X Remove impurities immediately, where
possible, whilst avoiding rubbing too hard.
X Soak insect remains with insect remover
and rinse off the treated areas afterwards.
X Soak bird droppings with water and rinse
off the treated areas afterwards.
X Remove coolant, brake fluid, tree resin,
oils, fuels and greases by rubbing gently
with a cloth soaked in petroleum ether or
lighter fluid.
X Use tar remover to remove tar stains.
X Use silicone remover to remove wax.
Cleaning the windows G
WARNING
You could become trapped by the windshield
wipers if they start moving while cleaning the windshield or wiper blades. There is a risk of
injury.
Always switch off the windshield wipers and
the ignition before cleaning the windshield or
wiper blades.
! Do not fold the windshield wipers away
from the windshield unless the hood is
closed. Otherwise, you could damage the
hood.
! Hold the wiper arm securely when folding
back. The windshield could be damaged if
the wiper arm smacks against it suddenly.
! Do not use dry cloths, abrasive products,
solvents or cleaning agents containing sol-
vents to clean the inside of the windows.
Do not touch the insides of the windows
with hard objects, e.g. an ice scraper or
ring. There is otherwise a risk of damaging
the windows.
Before cleaning the windshield
X Turn the key to position 0in the ignition
lock or remove it.
X Fold the windshield wiper arms away from
the windshield until you feel them engage.
Before switching the ignition on again, fold
the windshield wipers back into position.
Cleaning the windows
X Clean the inside and outside of the win-
dows with a damp cloth and a cleaning
agent that is recommended and approved
for Sprinter vehicles. Exterior
Cleaning the wheels !
Do not use any acidic or alkaline cleaning
agents. They can cause corrosion on the
wheel bolts (wheel nuts) or the retainer
springs for the wheel-balancing weights.
! Do not park the vehicle for an extended
period straight after cleaning it, particularly
after having cleaned the wheels with wheel Care
269Maintenance and care Z
Page 294 of 338
ing properties and the driving characteristics.
There is a risk of an accident.
Avoid tire pressures that are too low in all the
tires, including the spare wheel.
Underinflated tires can:
R fail from being overheated
R adversely affect handling
R wear excessively and/or unevenly
R have an adverse effect on fuel consumption
Overinflated tires G
WARNING
Tires with excessively high pressure can burst
because they are damaged more easily by
road debris, potholes etc. In addition, they
also suffer from irregular wear, which can
severely impair the braking properties and the
driving characteristics. There is a risk of an
accident.
Avoid tire pressures that are too high in all the
tires, including the spare wheel.
Overinflated tires can:
R increase the braking distance
R adversely affect handling
R wear excessively and/or unevenly
R adversely affect ride comfort
R be more susceptible to damage
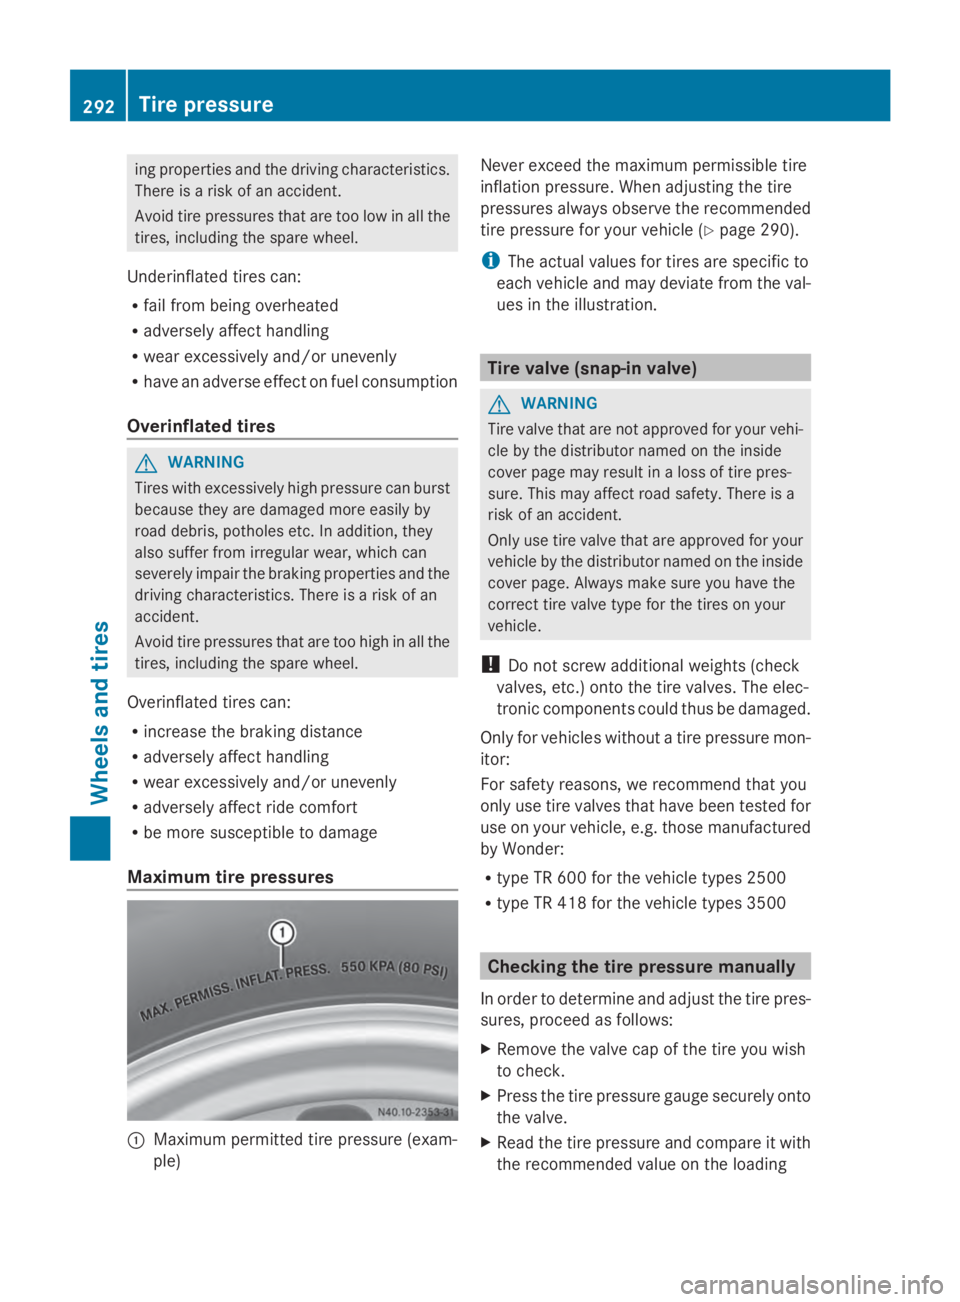
Maximum tire pressures 0043
Maximum permitted tire pressure (exam-
ple) Never exceed the maximum permissible tire
inflation pressure. When adjusting the tire
pressures always observe the recommended
tire pressure for your vehicle (Y
page 290).
i The actual values for tires are specific to
each vehicle and may deviate from the val-
ues in the illustration. Tire valve (snap-in valve)
G
WARNING
Tire valve that are not approved for your vehi-
cle by the distributor named on the inside
cover page may result in a loss of tire pres-
sure. This may affect road safety. There is a
risk of an accident.
Only use tire valve that are approved for your
vehicle by the distributor named on the inside
cover page. Always make sure you have the
correct tire valve type for the tires on your
vehicle.
! Do not screw additional weights (check
valves, etc.) onto the tire valves. The elec-
tronic components could thus be damaged.
Only for vehicles without a tire pressure mon-
itor:
For safety reasons, we recommend that you
only use tire valves that have been tested for
use on your vehicle, e.g. those manufactured
by Wonder:
R type TR 600 for the vehicle types 2500
R type TR 418 for the vehicle types 3500 Checking the tire pressure manually
In order to determine and adjust the tire pres-
sures, proceed as follows:
X Remove the valve cap of the tire you wish
to check.
X Press the tire pressure gauge securely onto
the valve.
X Read the tire pressure and compare it with
the recommended value on the loading 292
Tire pressureWheels and tires
Page 295 of 338
information table or the tire pressure table
(Y
page 290).
X If the tire pressure is too low, increase it to
the recommended value.
X If the tire pressure is too high, release air
by pressing down the metal pin in the valve.
Use the tip of a pen, for example. Then,
check the tire pressure again using the tire
pressure gauge.
X Screw the valve cap onto the valve.
X Repeat the steps for the other tires. Tire pressure monitor
Important safety notes G
WARNING
Each tire, including the spare (if provided),
should be checked at least once a month
when cold and inflated to the pressure rec-
ommended by the vehicle manufacturer on
the Tire and Loading Information placard on
the driver's door B-pillar or the tire pressure
label on the inside of the fuel filler flap. If your
vehicle has tires of a different size than the
size indicated on the Tire and Loading Infor-
mation placard or the tire pressure label, you
should determine the proper tire pressure for
those tires.
As an added safety feature, your vehicle has
been equipped with a tire pressure monitoring
system (TPMS) that illuminates a low tire pres-
sure telltale when one or more of your tires
are significantly underinflated. Accordingly,
when the low tire pressure telltale illuminates,
you should stop and check your tires as soon
as possible, and inflate them to the proper
pressure. Driving on a significantly underin-
flated tire causes the tire to overheat and can
lead to tire failure. Underinflation also
reduces fuel efficiency and tire tread life, and
may affect the vehicle's handling and stop-
ping ability.
Please note that the TPMS is not a substitute
for proper tire maintenance, and it is the driv-
er's responsibility to maintain correct tire pressure, even if underinflation has not
reached the level to trigger illumination of the
TPMS low tire pressure telltale.
USA only:
Your vehicle has also been equipped with a
TPMS malfunction indicator to indicate if the
system is not operating properly. The TPMS
malfunction indicator is combined with the
low tire pressure telltale. When the system
detects a malfunction, the warning lamp will
flash for approximately a minute and then
remain continuously illuminated. This
sequence will be repeated every time the vehi-
cle is started as long as the malfunction
exists.
When the malfunction indicator is illuminated,
the system may not be able to detect or signal
low tire pressure as intended. TPMS malfunc-
tions may occur for a variety of reasons,
including the mounting of incompatible
replacement or alternate tires or wheels on
the vehicle that prevent the TPMS from func-
tioning properly. Always check the TPMS mal-
function telltale after replacing one or more
tires or wheels on your vehicle to ensure that
the replacement or alternate tires and wheels
allow the TPMS to continue to function prop-
erly.
Vehicles with a tire pressure monitor are
equipped with sensors in the wheels that
monitor the tire pressure of all four tires. The
tire pressure monitor monitors the pressure
in all four tires; you set this pressure when
you activate the tire pressure monitor. The
tire pressure monitor warns you when the
pressure drops in one or more of the tires. The
tire pressure monitor only functions if the
corresponding sensors are installed to all
wheels.
You should always adjust the tire pressure
according to the vehicle load. Restart the tire
pressure monitor if you change the tire pres-
sure.
The tire pressure monitor does not warn you
if a tire pressure is incorrect. Observe the Tire pressure
293Wheels and tires Z
Page 300 of 338
Loading the vehicle
Instruction labels for tires and loads
G
WARNING
Overloaded tires can overheat, causing a
blowout. Overloaded tires can also impair the
steering and driving characteristics and lead
to brake failure. There is a risk of accident.
Observe the load rating of the tires. The load
rating must be at least half of the GAWR of
your vehicle. Never overload the tires by
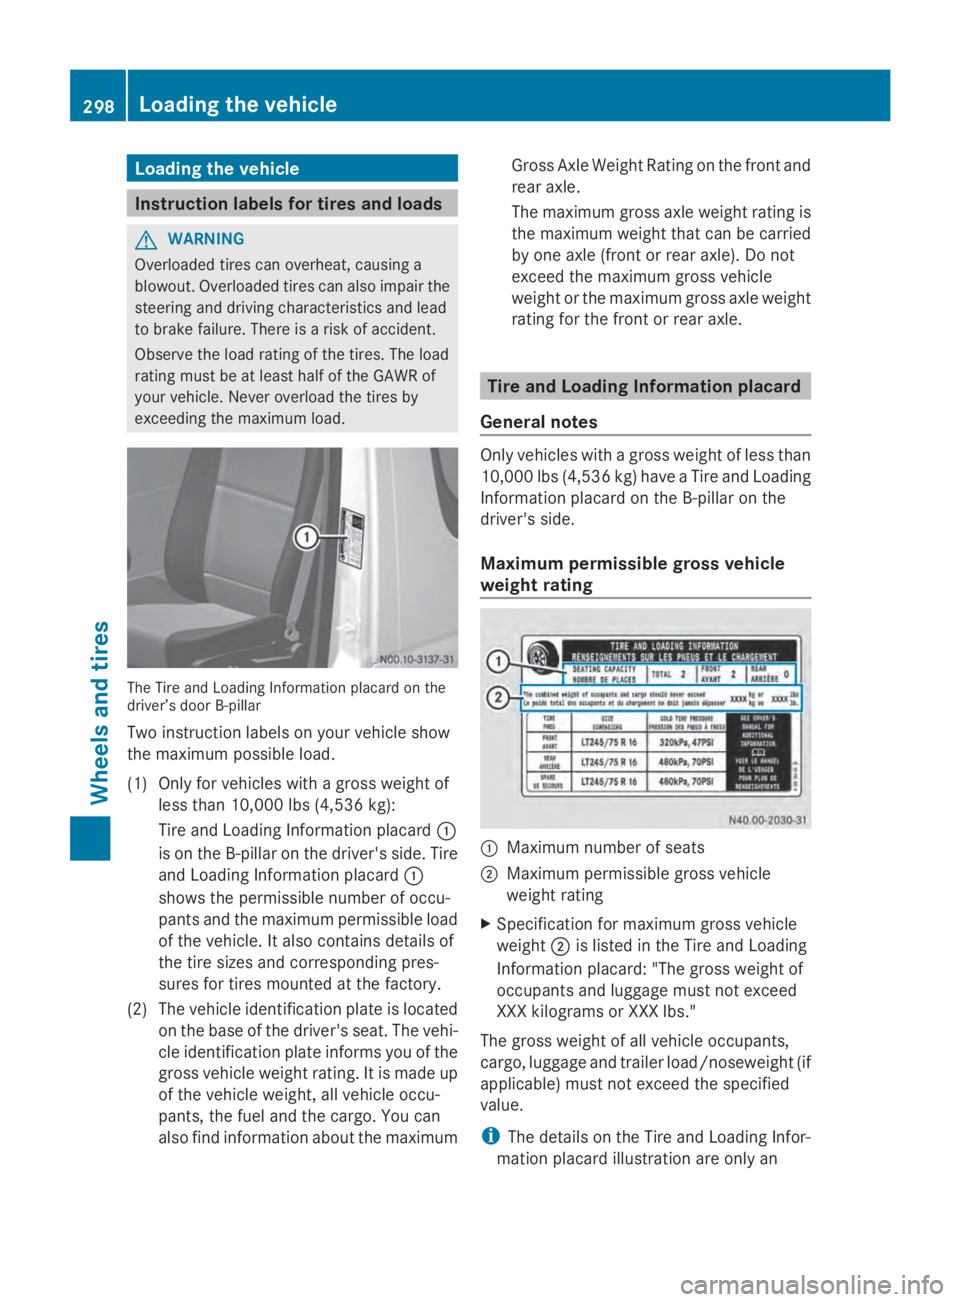
exceeding the maximum load. The Tire and Loading Information placard on the
driver’s door B-pillar
Two instruction labels on your vehicle show
the maximum possible load.
(1) Only for vehicles with a gross weight of
less than 10,000 lbs (4,536 kg):
Tire and Loading Information placard 0043
is on the B-pillar on the driver's side. Tire
and Loading Information placard 0043
shows the permissible number of occu-
pants and the maximum permissible load
of the vehicle. It also contains details of
the tire sizes and corresponding pres-
sures for tires mounted at the factory.
(2) The vehicle identification plate is located on the base of the driver's seat. The vehi-
cle identification plate informs you of the
gross vehicle weight rating. It is made up
of the vehicle weight, all vehicle occu-
pants, the fuel and the cargo. You can
also find information about the maximum Gross Axle Weight Rating on the front and
rear axle.
The maximum gross axle weight rating is
the maximum weight that can be carried
by one axle (front or rear axle). Do not
exceed the maximum gross vehicle
weight or the maximum gross axle weight
rating for the front or rear axle.
Tire and Loading Information placard
General notes Only vehicles with a gross weight of less than
10,000 lbs (4,536 kg) have a Tire and Loading
Information placard on the B-pillar on the
driver's side.
Maximum permissible gross vehicle
weight rating
0043
Maximum number of seats
0044 Maximum permissible gross vehicle
weight rating
X Specification for maximum gross vehicle
weight 0044is listed in the Tire and Loading
Information placard: "The gross weight of
occupants and luggage must not exceed
XXX kilograms or XXX lbs."
The gross weight of all vehicle occupants,
cargo, luggage and trailer load/noseweight (if
applicable) must not exceed the specified
value.
i The details on the Tire and Loading Infor-
mation placard illustration are only an 298
Loading the vehicleWheels and tires
Page 307 of 338
DOT (Department of Transportation)
DOT marked tires fulfill the requirements of
the United States Department of Transporta-
tion.
Average weight of vehicle occupants
The number of occupants for which the vehi-
cle is designed multiplied by 68 kilograms
(150 lbs).
Uniform Tire Quality Grading Standards
A uniform standard to grade the quality of
tires with regard to tread quality, traction and
temperature characteristics. The quality
grading assessment is made by the manufac-
turer following specifications from the U.S
government. The quality grade of a tire is
imprinted on the sidewall of the tire.
Recommended tire pressure
The recommended tire pressure are the pres-
sures specified for the tires mounted on the
vehicle at the factory.
The Tire and Loading Information placard 7
contains the recommended tire pressure for
cold tires, the maximum permissible load and
the maximum permissible vehicle speed.
The tire pressure table contains the recom-
mended tire pressure for cold tires under var-
ious operating conditions, i.e. loading and/or
speed of the vehicle.
Increased vehicle weight due to optional
equipment
The combined weight of all standard and
optional equipment available for the vehicle,
regardless of whether it is actually installed
on the vehicle or not.
Wheel rim
The part of the wheel on which the tire is
mounted.
GAWR (Gross Axle Weight Rating)
GAWR is the maximum gross axle weight rat-
ing. The actual load on an axle must never
exceed the gross axle weight rating. The Gross Axle Weight Rating can be found on the
vehicle identification plate on the driver seat
frame (Y
page 319).
Speed index
The speed index is part of the tire identifica-
tion. It specifies the speed range for which the
tire is approved.
GTW (Gross Trailer Weight)
GTW is the total of weight of a trailer and the
weight of the load, accessories etc. on the
trailer.
GVW (Gross Vehicle Weight)
The gross vehicle weight includes the weight
of the vehicle including fuel, tools, spare
wheel, accessories installed, occupants, lug-
gage and the drawbar noseweight if applica-
ble. The gross vehicle weight may never
exceed the gross vehicle weight rating
(GVWR) specified on the vehicle identification
plate at the base of the driver's seat
(Y page 319).
GVWR (Gross Vehicle Weight Rating)
The GVWR is the maximum permitted gross
weight of the fully laden vehicle (weight of the
vehicle including all accessories, occupants,
fuel, luggage and the drawbar noseweight if
applicable). The Gross Vehicle Weight Rating
is specified on the vehicle identification plate
on the driver seat frame (Y page 319).
Maximum weight of the laden vehicle
The maximum weight is the sum of:
R the curb weight of the vehicle
R the weight of the accessories
R the load limit
R the weight of the factory installed optional
equipment
Kilopascal (kPa)
Metric unit for tire pressure. 6.9 kPa are the
equivalent of 1 psi. Another tire pressure unit
7 Only for vehicles with a gross weight of less than 10,000 lbs (4,536 kg). What you should know about wheels and ti
res
305Wheels and tires Z
Page 308 of 338
is bar. 100 kilopascals (kPa) are the equiva-
lent of 1 bar.
Load index
In addition to the load bearing index, a load
index can be stamped onto the sidewall of the
tire. It specifies the load-bearing capacity of
the tire more precisely.
Curb weight
The weight of a vehicle with standard equip-
ment including the maximum filling capacity
of fuel, oil, and coolant. It also includes the
air-conditioning system and optional equip-
ment if these are installed on the vehicle, but
does not include passengers or luggage.
Maximum tire load
The maximum tire load in kilograms or
pounds is the maximum weight for which a
tire is approved.
Maximum permissible tire pressure
Maximum permissible tire pressure for one
tire.
Maximum load on one tire
Maximum load on one tire. This is calculated
by dividing the maximum axle load of one axle
by two.
PSI (Pounds per square inch)
Standard unit of measurement for tire pres-
sure.
Aspect ratio
Relationship between tire height and width in
percent.
Tire pressure
Pressure inside the tire applying an outward
force to every square inch of the tire's sur-
face. Tire pressure is specified in pounds per
square inch (psi), in kilopascal (kPa) or in bar.
Tire pressure should only be corrected when
the tires are cold. Cold tire pressure
The tires are cold:
R
if the vehicle has been parked for at least
three hours without direct sunlight on the
tires, and
R if the vehicle has not been driven further
than 1 mile (1.6 km)
Tire tread
The part of the tire that comes into contact
with the road.
Tire bead
The tire bead ensures that the tire sits
securely on the wheel. There are several steel
wires in the bead to prevent the tire from
coming loose from the wheel rim.
Sidewall
The part of the tire between the tread and the
tire bead.
Weight of optional extras
The combined weight of those optional extras
that weigh more than the replaced standard
parts and more than 2.3 kg (5 lbs). These
optional extras, such as high-performance
brakes, level control, a roof rack or a high-
performance battery, are not included in the
curb weight and the weight of the accesso-
ries.
TIN (Tire Identification Number)
A unique identification number which can be
used by a tire manufacturer to identify tires,
for example for a product recall, and thus
identify the purchasers. The TIN is composed
of the manufacturer identification code, tire
size, tire model code and manufacturing date.
Load bearing index
The load bearing index (also load index) is a
code that contains the maximum load bearing
capacity of a tire. 306
What you should know about wheels and tiresWheels and tires
Page 310 of 338
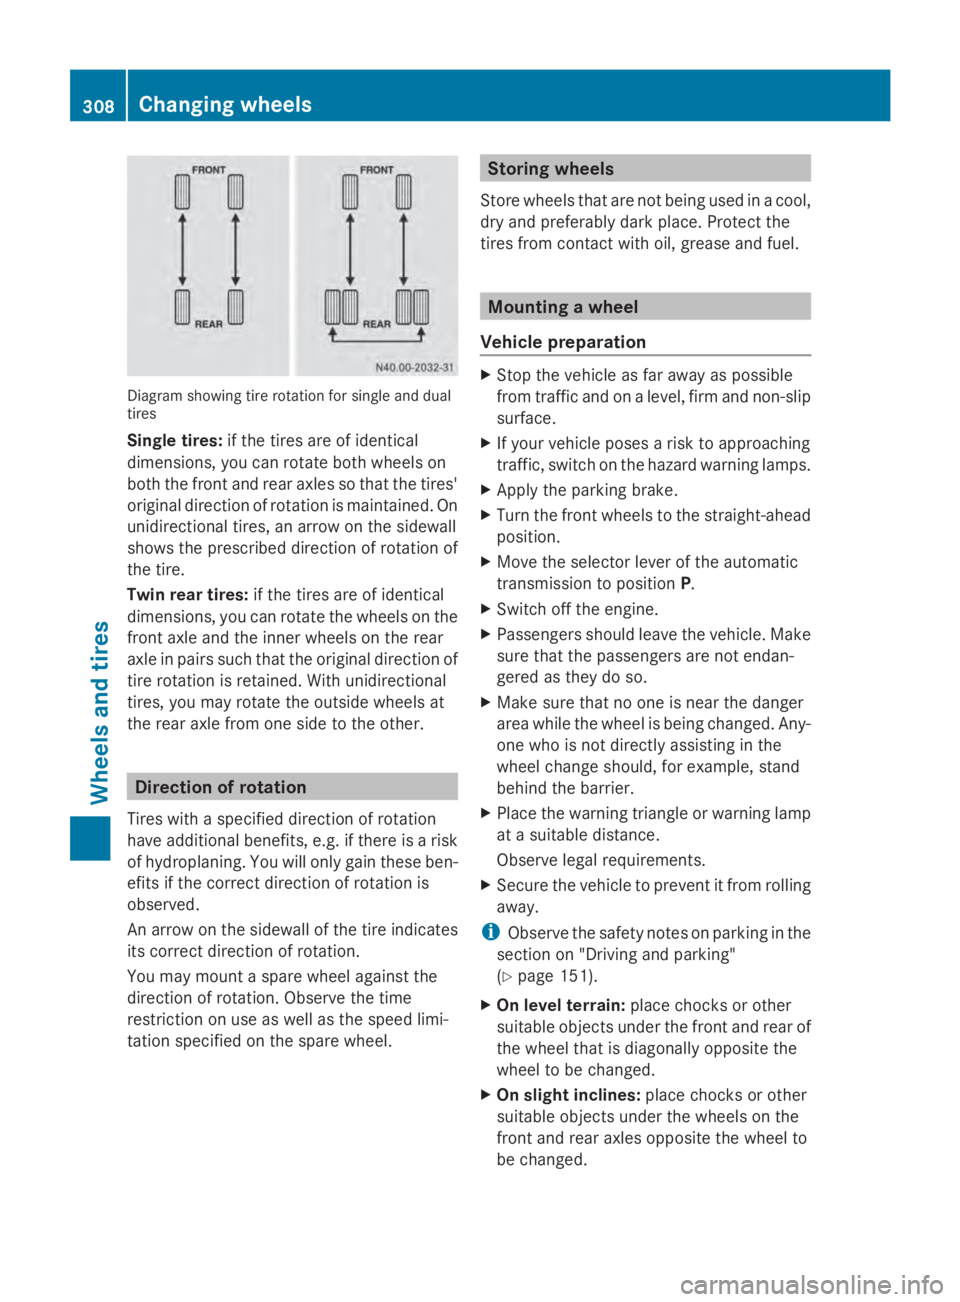
Diagram showing tire rotation for single and dual
tires
Single tires: if the tires are of identical
dimensions, you can rotate both wheels on
both the front and rear axles so that the tires'
original direction of rotation is maintained. On
unidirectional tires, an arrow on the sidewall
shows the prescribed direction of rotation of
the tire.
Twin rear tires: if the tires are of identical
dimensions, you can rotate the wheels on the
front axle and the inner wheels on the rear
axle in pairs such that the original direction of
tire rotation is retained. With unidirectional
tires, you may rotate the outside wheels at
the rear axle from one side to the other. Direction of rotation
Tires with a specified direction of rotation
have additional benefits, e.g. if there is a risk
of hydroplaning. You will only gain these ben-
efits if the correct direction of rotation is
observed.
An arrow on the sidewall of the tire indicates
its correct direction of rotation.
You may mount a spare wheel against the
direction of rotation. Observe the time
restriction on use as well as the speed limi-
tation specified on the spare wheel. Storing wheels
Store wheels that are not being used in a cool,
dry and preferably dark place. Protect the
tires from contact with oil, grease and fuel. Mounting a wheel
Vehicle preparation X
Stop the vehicle as far away as possible
from traffic and on a level, firm and non-slip
surface.
X If your vehicle poses a risk to approaching
traffic, switch on the hazard warning lamps.
X Apply the parking brake.
X Turn the front wheels to the straight-ahead
position.
X Move the selector lever of the automatic
transmission to position P.
X Switch off the engine.
X Passengers should leave the vehicle. Make
sure that the passengers are not endan-
gered as they do so.
X Make sure that no one is near the danger
area while the wheel is being changed. Any-
one who is not directly assisting in the
wheel change should, for example, stand
behind the barrier.
X Place the warning triangle or warning lamp
at a suitable distance.
Observe legal requirements.
X Secure the vehicle to prevent it from rolling
away.
i Observe the safety notes on parking in the
section on "Driving and parking"
(Y page 151).
X On level terrain: place chocks or other
suitable objects under the front and rear of
the wheel that is diagonally opposite the
wheel to be changed.
X On slight inclines: place chocks or other
suitable objects under the wheels on the
front and rear axles opposite the wheel to
be changed. 308
Changing wheelsWheels and tires
Page 323 of 338
Service products include the following:
R Fuels, e.g. diesel
R Additives for the exhaust gas aftertreat-
ment, e.g. Diesel Exhaust Fluid (DEF)
R Lubricants, e.g. engine oil, transmission oil
R Coolant
R Brake fluid
R Washer fluid
R Climate control system refrigerants
Approved service products comply with the
highest quality standards and are listed in the
MB Specifications for Service Products. Only
use service products approved for the vehi-
cle. This is an important condition for the war-
ranty.
You will recognize the approved service prod-
ucts by the inscription on the container: MB
Approval (e.g. MB Approval 228.5)
Other identifications and recommendations
refer to quality level or a specification accord-
ing to an MB Sheet Number (e.g. MB 228.5).
They are therefore not necessarily approved.
Further information can be obtained at any
qualified specialist workshop.
Additives for approved service products are
neither required nor permitted. Approved fuel
additives are the exception. Additives can
cause engine damage and must therefore not
be added to the service products.
The use of additives is always the responsi-
bility of the vehicle operator. The use of addi-
tives may result in the restriction or loss of
your Limited Warranty entitlements. Fuel
Important safety notes G
WARNING
Fuel is highly flammable. Improper handling
of fuel creates a risk of fire and explosion. Avoid fire, open flames, smoking and creating
sparks under all circumstances. Switch off the
engine and, if applicable, the auxiliary heating
before refueling.
G
WARNING
Fuel is poisonous and hazardous to health.
There is a risk of injury.
You must make sure that fuel does not come
into contact with your skin, eyes or clothing
and that it is not swallowed. Do not inhale fuel
vapors. Keep fuel away from children.
If you or others come into contact with fuel,
observe the following:
R Wash away fuel from skin immediately
using soap and water.
R If fuel comes into contact with your eyes,
immediately rinse them thoroughly with
clean water. Seek medical assistance with-
out delay.
R If fuel is swallowed, seek medical assis-
tance without delay. Do not induce vomit-
ing.
R Immediately change out of clothing which
has come into contact with fuel.
When handling, storing and disposing of fuels,
please observe the relevant regulations. Service products and capacities
321Technical data Z