check engine light MERCEDES-BENZ SPRINTER 2015 MY15 Operator’s Manual
[x] Cancel search | Manufacturer: MERCEDES-BENZ, Model Year: 2015, Model line: SPRINTER, Model: MERCEDES-BENZ SPRINTER 2015Pages: 334, PDF Size: 5.94 MB
Page 59 of 334
As a result, they could:
R activate vehicle equipment and become
trapped, for example
R activate or deactivate systems, thereby
endangering other road users
Unsecured animals could also be flung around the vehicle in the event of an accident or sud-
den steering or braking, thereby injuring vehi- cle occupants. There is a risk of an accident
and injury.
Never leave animals unattended in the vehi-
cle. Always secure animals properly during
the journey, e.g. use a suitable animal trans-
port box. Driving safety systems
Overview
In this section, you will find information about the following driving safety systems:
R ABS ( Anti-lock BrakingSystem)
R ASR (A cceleration SkidControl)
R BAS (B rakeAssist System)
R EBD ( Electronic Brake Force Distribution)
R ESP ®
(E lectronic StabilityProgram) Important safety notes
If you fail to adapt your driving style or if you
are inattentive, the driving safety systems can
neither reduce the risk of accident nor over-
ride the laws of physics. Driving safety sys-
tems are merely aids designed to assist driv- ing. You are responsible for the distance to
the vehicle in front, for vehicle speed, braking in good time and for staying in your lane.
Always adapt your driving style to the prevail-
ing road and weather conditions and maintain a sufficient, safe distance from other road
users. Drive carefully.
The driving safety systems described can only
attain their maximum effectiveness when
there is optimum contact between the tires and the road can. Pay particular attention to
the information regarding tires, recommen-
ded minimum tire tread depth etc. under
"Wheels and tires" (Y page 284).
In wintry driving conditions, always use winter
tires (M+S tires) and if necessary, snow
chains. This is the only way to get the full
benefit from the driving safety systems
described. ABS (Anti-lock Braking System)
Important safety notes Observe the important safety guidelines for
the driving safety system (Y
page 57). G
WARNING
If ABS is faulty, the wheels could lock when
braking. The steerability and braking charac-
teristics may be severely impaired. Addition-
ally, further driving safety systems are deac-
tivated. There is an increased danger of skid- ding and accidents.
Drive on carefully. Have ABS checked imme-
diately at a qualified specialist workshop.
If ABS is malfunctioning, other systems will
also fail, including driving safety systems.
Observe the information relating to the 0025
warning lamp (Y page 218).
ABS regulates brake pressure in such a way
that the wheels do not lock when you brake.
This allows you to continue steering the vehi-
cle when braking.
ABS works from a speed of about 5 mph
(8 km/h), regardless of road-surface condi-
tions. ABS works on slippery surfaces, even
when you only brake gently.
The yellow 0025warning lamp in the instru-
ment cluster lights up when the ignition is
switched on. The lamp goes out when the
engine starts running. Driving safety systems
57Safety Z
Page 61 of 334
If you deactivate ASR:
R engine torque is not limited and the drive
wheels are able to spin. The spinning
wheels will then achieve a cutting effect for
better traction.
R traction control remains active through
brake intervention. If a drive wheel attains
its tire traction limit because one side of the
road is slippery, for example, that wheel is
braked. The traction is then increased in
this situation.
R active brake intervention by ESP ®
to
increase driving stability remains active.
The 0072 warning lamp in the instrument
cluster flashes when ESP ®
is intervening. BAS (Brake Assist System)
G
WARNING
If BAS is malfunctioning, the braking distance
in an emergency braking situation is
increased. There is a risk of an accident.
In an emergency braking situation, depress
the brake pedal with full force. ABS prevents
the wheels from locking.
Vehicles without steering wheel buttons: if
the BAS driving safety system is malfunction-
ing, the 003Dwarning lamp lights up while the
engine is running (Y page 218).
BAS operates in emergency braking situa-
tions. If you depress the brake quickly, BAS
automatically increases the brake pressure,
thereby reducing the stopping distance.
The brakes will function as usual once you
release the brake pedal. BAS is deactivated. EBD (electronic brake force distribu-
tion) G
WARNING
If EBD is malfunctioning, the rear wheels can
lock, e.g. under full braking. This increases the risk of skidding and an accident. You should therefore adapt your driving style
to the different handling characteristics. Have
the brake system checked at a qualified spe-
cialist workshop.
EBD monitors and controls the brake pres-
sure to the rear wheels. This enables EBD to
improve handling during braking.
Observe the information on warning and indi- cator lamps (Y page 218). ESP
®
(Electronic Stability Program)
Important safety notes Observe the important safety guidelines for
the driving safety system (Y
page 57). G
WARNING
If ESP ®
is malfunctioning it will not provide
any vehicle stabilization. There is an increased
risk of skidding or of an accident.
Exercise caution when continuing to drive.
Have ESP ®
checked at a qualified specialist
workshop.
! Do not run the vehicle on a roller dyna-
mometer (e.g. for performance tests). If
you must operate the vehicle on a roller
dynamometer, please consult a qualified
specialist workshop in advance. You could
otherwise damage the drive train or the
brake system.
If ESP ®
is malfunctioning, the 0089warning
lamp lights up while the engine is running and
the engine power may be reduced
(Y page 218).
Only use wheels with the recommended tire
sizes. Only then will ESP ®
function properly.
Crosswind Assist Crosswind Assist does not work if ESP
®
is
deactivated or disabled because of a mal-
function. Driving safety systems
59Safety Z
Page 72 of 334
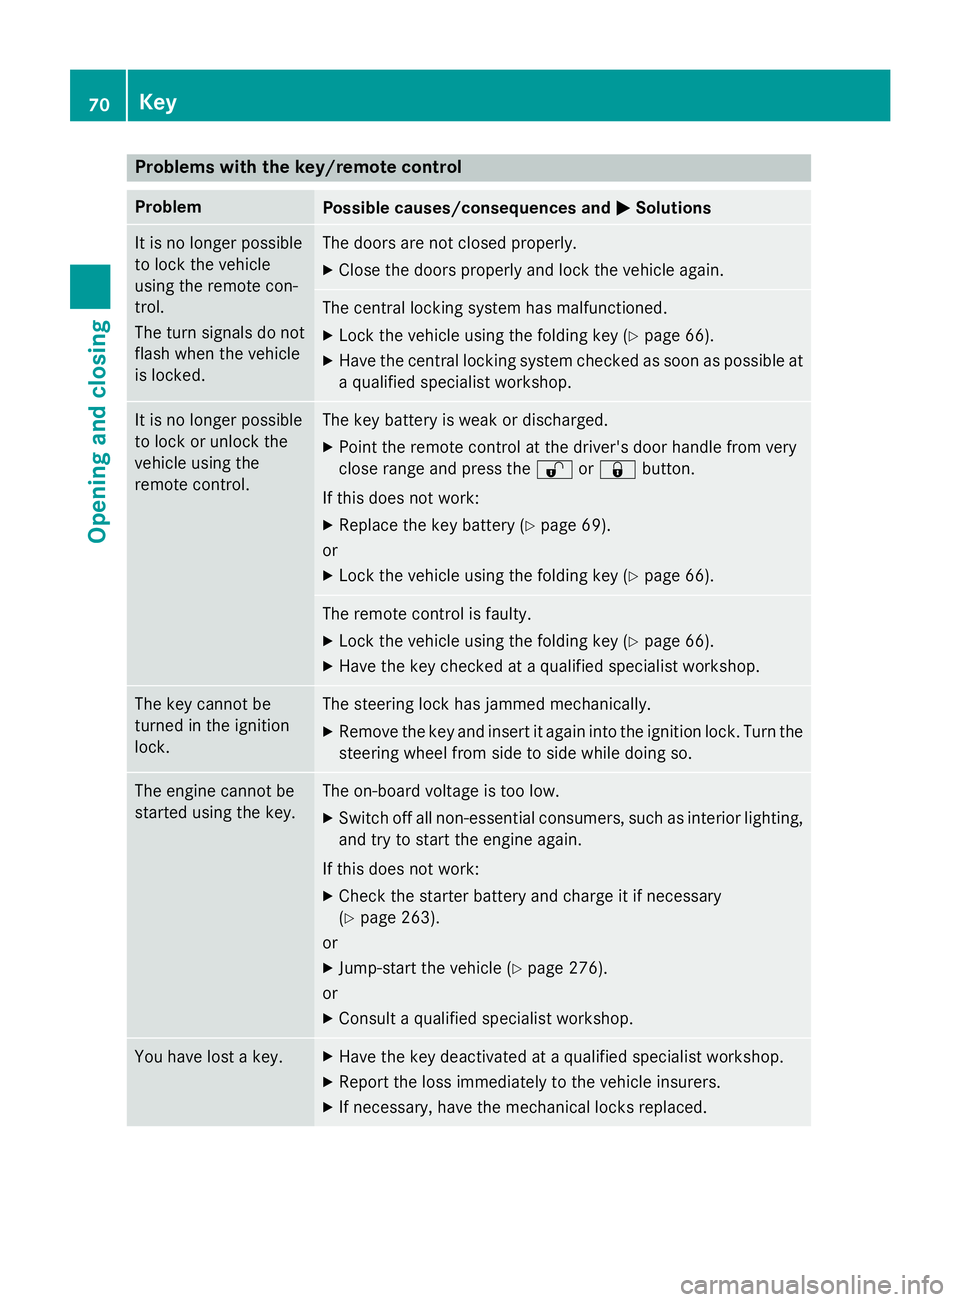
Problems with the key/remote control
Problem
Possible causes/consequences and
0050
0050Solutions It is no longer possible
to lock the vehicle
using the remote con-
trol.
The turn signals do not
flash when the vehicle
is locked. The doors are not closed properly.
X Close the doors properly and lock the vehicle again. The central locking system has malfunctioned.
X Lock the vehicle using the folding key (Y page 66).
X Have the central locking system checked as soon as possible at
a qualified specialist workshop. It is no longer possible
to lock or unlock the
vehicle using the
remote control. The key battery is weak or discharged.
X Point the remote control at the driver's door handle from very
close range and press the 0036or0037 button.
If this does not work:
X Replace the key battery (Y page 69).
or
X Lock the vehicle using the folding key (Y page 66). The remote control is faulty.
X Lock the vehicle using the folding key (Y page 66).
X Have the key checked at a qualified specialist workshop. The key cannot be
turned in the ignition
lock. The steering lock has jammed mechanically.
X Remove the key and insert it again into the ignition lock. Turn the
steering wheel from side to side while doing so. The engine cannot be
started using the key. The on-board voltage is too low.
X Switch off all non-essential consumers, such as interior lighting,
and try to start the engine again.
If this does not work: X Check the starter battery and charge it if necessary
(Y page 263).
or
X Jump-start the vehicle (Y page 276).
or
X Consult a qualified specialist workshop. You have lost a key. X
Have the key deactivated at a qualified specialist workshop.
X Report the loss immediately to the vehicle insurers.
X If necessary, have the mechanical locks replaced. 70
KeyOpening and closing
Page 94 of 334
Useful information
This Operator's Manual describes all models
as well as standard and optional equipment of your vehicle that were available at the time of going to print. Country-specific variations are
possible. Note that your vehicle may not be
equipped with all of the described functions.
This also applies to systems and functions
relevant to safety.
Read the information on qualified specialist
workshops (Y page 25). Exterior lighting
Important safety notes
For reasons of safety, we recommend that
you drive with the lights switched on even
during the daytime. There may be differences
in operation due to legal requirements and
voluntary recommendations in some coun-
tries. Bulb failure indicator
The bulb failure indicator is only an aid. You
are responsible for the proper functioning of
the vehicle lighting. Insufficient or non-func-
tioning vehicle lighting puts the operating
safety of the vehicle at risk.
For this reason, check the condition and func-
tion of your vehicle's lighting system and, if
necessary, that of the trailer before each jour- ney.
The bulb failure indicator monitors all of the
exterior lighting lamps, except the perimeter
lamp and the trailer lighting. If a bulb fails,
either the 0049(Ypage 35) indicator lamp
lights up, or you will see a corresponding
message in the display (Y page 208).
i Depending on the equipment, the bulb
failure indicator can fail for all lamps with
the exception of the turn signal lamps. Light switch
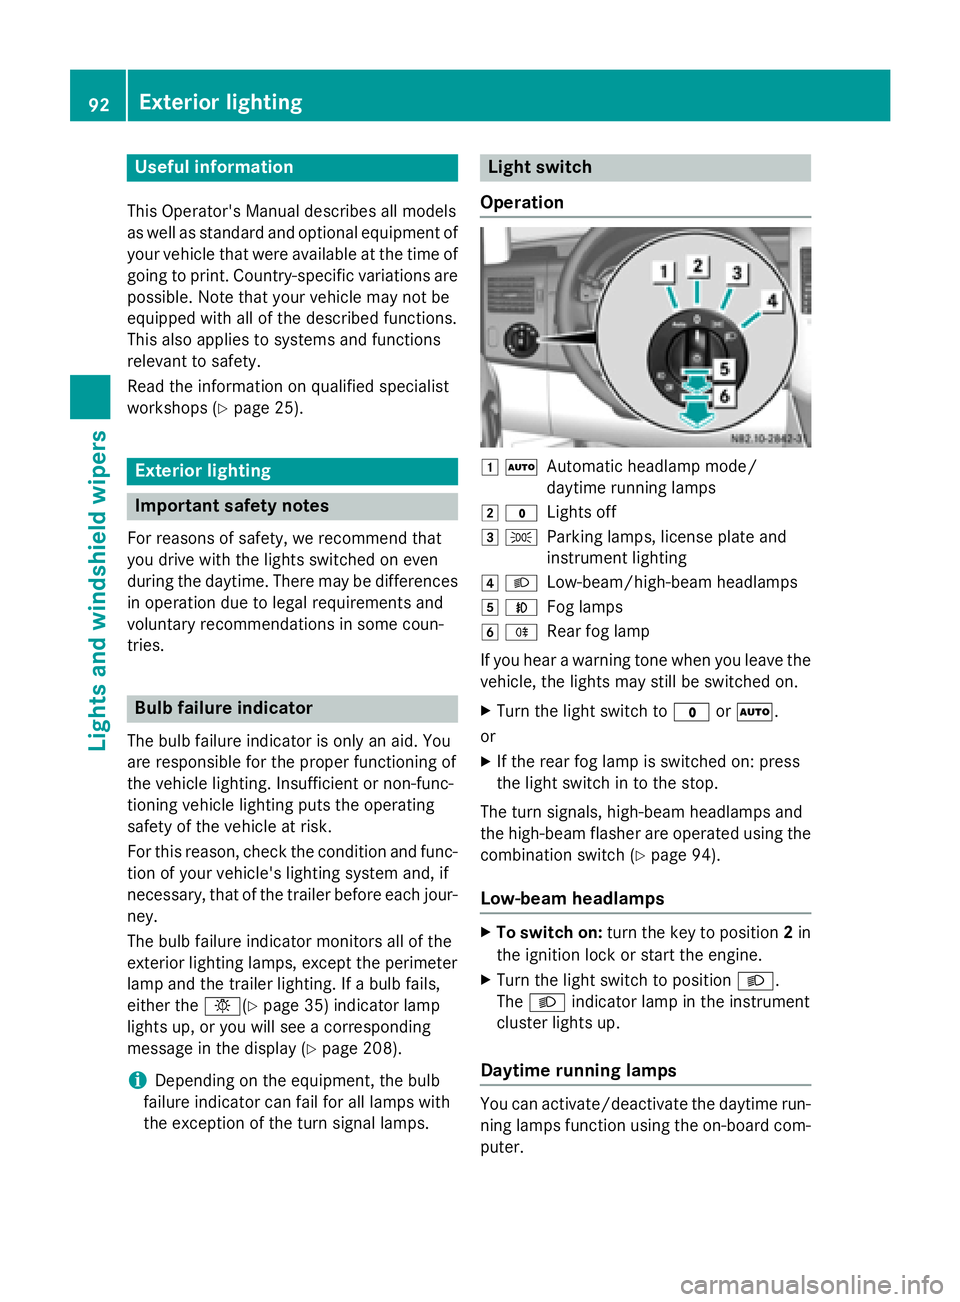
Operation 0047
0058
Automatic headlamp mode/
daytime running lamps
0048 003F
Lights off
0049 0060
Parking lamps, license plate and
instrument lighting
004A 0058
Low-beam/high-beam headlamps
004B 005A
Fog lamps
004C 005E
Rear fog lamp
If you hear a warning tone when you leave the
vehicle, the lights may still be switched on.
X Turn the light switch to 003For0058.
or
X If the rear fog lamp is switched on: press
the light switch in to the stop.
The turn signals, high-beam headlamps and
the high-beam flasher are operated using the combination switch (Y page 94).
Low-beam headlamps X
To switch on: turn the key to position 2in
the ignition lock or start the engine.
X Turn the light switch to position 0058.
The 0058 indicator lamp in the instrument
cluster lights up.
Daytime running lamps You can activate/deactivate the daytime run-
ning lamps function using the on-board com-
puter. 92
Exterior lightingLights and windshield wipers
Page 101 of 334
Motion detector
G
WARNING
The motion detector sends the invisible infra- red radiation emitted by LEDs (light emitting
diodes).
These LEDs are classified as class 1M lasers
and can damage the retina if you:
R look directly into the unfiltered laser beam
of the motion detector for an extended
period
R look directly into the laser beam of the
motion detector using optical instruments,
e.g. eyeglasses or a magnifying glass.
There is a risk of injury.
Never look directly into the motion detector.
The cargo compartment lighting is also
switched on by the motion detector in the
cargo compartment of Cargo Vans equipped
with this feature.
If the motion detector detects a movement in the cargo compartment when the vehicle is
stationary, the cargo compartment lighting
switches on for approximately two minutes.
The cargo compartment lighting can be
switched on by the motion detector within
four seconds if:
R the rear interior light switch (Y page 98) is
set to automatic control.
R the vehicle is stationary, the parking brake
is applied and the brake pedal is not being
depressed
Or
R the selector lever is in position Pon vehi-
cles with automatic transmission and the
brake pedal is not being depressed and
R the vehicle has not been locked from the
outside using the key
The motion detector switches off automati-
cally if no change is detected in the vehicle for
several hours, e.g. if a door is opened, if the
ignition key is turned, etc. This prevents the
battery from becoming discharged. Changing bulbs
Important safety notes
G
DANGER
Xenon bulbs carry a high voltage. You can get an electric shock if you remove the cover of
the Xenon bulb and touch the electrical con-
tacts. There is a risk of fatal injury.
Never touch the parts or the electrical con-
tacts of the Xenon bulb. Always have work on
the Xenon bulbs carried out at a qualified spe-
cialist workshop. G
WARNING
Bulbs, lamps and connectors can get very hot when operating. If you change a bulb, you
could burn yourself on these components.
There is a risk of injury.
Allow these components to cool down before changing a bulb.
! Make sure the bulbs are always securely
installed.
If your vehicle is equipped with Bi-Xenon
bulbs, you can recognize this by the following: the cone of light from the Xenon bulbs moves
from the top to the bottom and back again
when you start the engine. For this to be
observed, the low-beam headlamps must be
switched on before starting the engine.
The bulbs and lamps are an essential compo- nent of vehicle safety. You must therefore
make sure that these function correctly at all
times. Have the headlamp setting checked
regularly.
R Always switch off the vehicle's lighting sys-
tem before changing a bulb.
This will prevent a short circuit.
R Do not touch the glass tube of new bulbs
with your bare hands. Always use a clean,
lint-free cloth or only touch the base of the bulb when installing.
Even minor contamination can burn into
the glass surface and reduce the service life
of the bulbs. Changing bulbs
99Lights and windshield wipers Z
Page 140 of 334
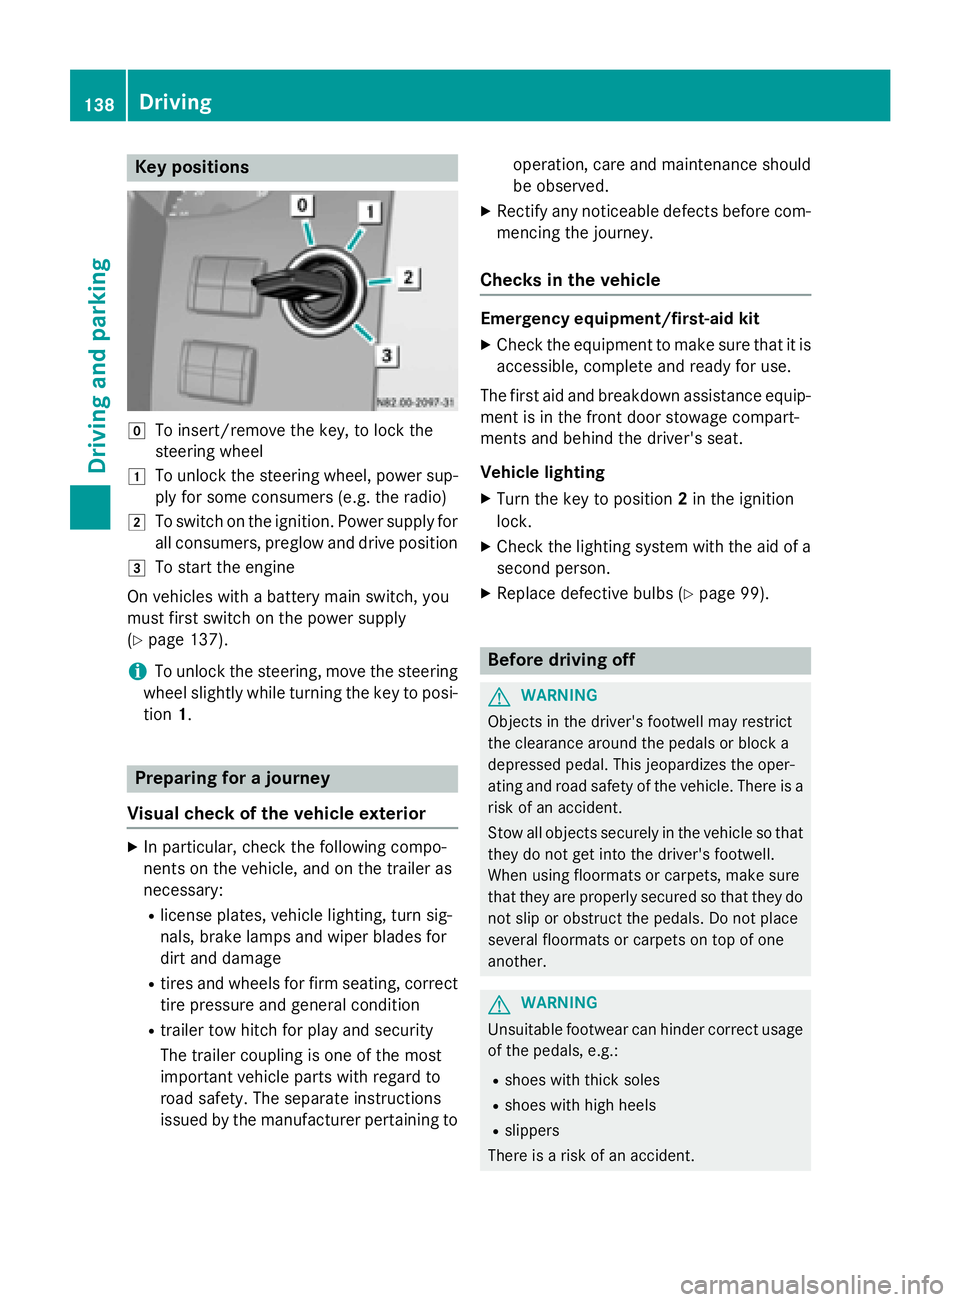
Key positions
005A
To insert/remove the key, to lock the
steering wheel
0047 To unlock the steering wheel, power sup-
ply for some consumers (e.g. the radio)
0048 To switch on the ignition. Power supply for
all consumers, preglow and drive position
0049 To start the engine
On vehicles with a battery main switch, you
must first switch on the power supply
(Y page 137).
i To unlock the steering, move the steering
wheel slightly while turning the key to posi- tion 1. Preparing for a journey
Visual check of the vehicle exterior X
In particular, check the following compo-
nents on the vehicle, and on the trailer as
necessary:
R license plates, vehicle lighting, turn sig-
nals, brake lamps and wiper blades for
dirt and damage
R tires and wheels for firm seating, correct
tire pressure and general condition
R trailer tow hitch for play and security
The trailer coupling is one of the most
important vehicle parts with regard to
road safety. The separate instructions
issued by the manufacturer pertaining to operation, care and maintenance should
be observed.
X Rectify any noticeable defects before com-
mencing the journey.
Checks in the vehicle Emergency equipment/first-aid kit
X Check the equipment to make sure that it is
accessible, complete and ready for use.
The first aid and breakdown assistance equip-
ment is in the front door stowage compart-
ments and behind the driver's seat.
Vehicle lighting
X Turn the key to position 2in the ignition
lock.
X Check the lighting system with the aid of a
second person.
X Replace defective bulbs (Y page 99). Before driving off
G
WARNING
Objects in the driver's footwell may restrict
the clearance around the pedals or block a
depressed pedal. This jeopardizes the oper-
ating and road safety of the vehicle. There is a risk of an accident.
Stow all objects securely in the vehicle so that
they do not get into the driver's footwell.
When using floormats or carpets, make sure
that they are properly secured so that they do not slip or obstruct the pedals. Do not place
several floormats or carpets on top of one
another. G
WARNING
Unsuitable footwear can hinder correct usage of the pedals, e.g.:
R shoes with thick soles
R shoes with high heels
R slippers
There is a risk of an accident. 138
DrivingDriving and pa
rking
Page 157 of 334
You must depress the brake pedal more
firmly. Maintain a longer distance to the vehi- cle in front.
While paying attention to the traffic condi-
tions, you should brake the vehicle firmly
after driving on a wet road surface or through
a car wash. This heats the brake discs, so that they dry more quickly, which protects them
against corrosion.
Limited braking performance on salt-
treated roads When driving on salted roads, salt may start
to build up on the brake disks and brake pads.
This can increase braking distances consid-
erably.
Maintain a greater distance to the vehicle in
front.
To remove any build up of salt that may have
formed:
X Apply the brakes at the start of the journey,
occasionally during journey and at the end
of the journey. Make sure that you do not
endanger other road users when doing so.
Parking brake G
WARNING
If you must brake the vehicle with the parking brake, the braking distance is considerably
longer and the wheels could lock. There is an
increased danger of skidding and accidents.
Only use the parking brake to brake the vehi- cle when the service brake is faulty. Do not
apply the parking brake too firmly. If the
wheels lock, release the parking brake until
the wheels begin turning again.
When driving on wet roads or dirt-covered
surfaces, road salt and/or dirt may get into
the parking brake. This causes corrosion and a reduction of braking force.
In order to prevent this, drive with the parking
brake lightly applied from time to time. When
doing so, drive for a distance of approximately 110 yds (100 m) at a maximum speed of
12 mph (20 km/h).
The brake lamps are not illuminated when you
brake the vehicle using the parking brake. Driving in wet conditions
Hydroplaning G
WARNING
There is a danger of hydroplaning occurring,
even if you are driving slowly and your tires
have sufficient tread depth, depending on the depth of water on the road. There is a risk of
an accident.
For this reason, avoid tire ruts and brake care- fully.
Therefore, in heavy rain or other conditions in which hydroplaning can occur, drive as fol-
lows:
R reduce your speed
R avoid tire ruts
R apply the brakes with care
Driving on flooded roads !
Do not drive through flooded areas.
Check the depth of any water before driving
through it. Drive slowly through standing
water. Otherwise, water may enter the
vehicle interior or the engine compartment.
This can damage the electronic compo-
nents in the engine or the automatic trans- mission. Water can also be drawn in by the engine's air suction nozzles and this can
cause engine damage.
If you have to drive on stretches of road on
which water has collected, please bear in
mind that:
R the water level of standing water should not
be above the lower edge of the front
bumper
R do not drive faster than walking speed Driving tips
155Driving and parking Z
Page 164 of 334
Up to a speed of about 45 mph (70 km/h), the
distance warning function can also react to
stationary obstacles, such as stopped or
parked vehicles.
If you approach an obstacle and the distance
warning function detects a risk of a collision,
the system will alert you both visually and
acoustically.
In particular, the detection of obstacles can
be impaired in the case of:
R there is dirt on the sensors or anything else
covering the sensors
R it is snowing or raining heavily
R there is interference from other radar sour-
ces
R there are strong radar reflections, for
example in parking garages
R a narrow vehicle traveling in front, e.g. a
motorbike
R a vehicle traveling in front on a different line
Following damage to the front end of the vehi-
cle, have the configuration and operation of
the radar sensor checked at a qualified spe-
cialist workshop. This also applies to colli-
sions at slow speeds where there is no visible
damage to the front of the vehicle.
Activating/deactivating the distance
warning function
When you switch on the engine, the distance
warning function switches on after a few sec-
onds.
X To deactivate: press the00D4button
(Y page 37).
Vehicles without steering wheel but-
tons: the00C7 warning lamp in the instru-
ment cluster lights up and the OFF
OFF message
flashes.
Vehicles with steering wheel buttons:
the 00C7 warning lamp in the instrument cluster lights up and the
Distance Warn‐ Distance Warn‐
ing Deactivated
ing Deactivated message appears.
X To activate: press the00D4button again
(Y page 37).
Vehicles without steering wheel but-
tons: the00C7 warning lamp in the instru-
ment cluster goes out and the ON
ON message
flashes.
Vehicles with steering wheel buttons:
the 00C7 warning lamp in the instrument
cluster goes out and the Distance Warn‐ Distance Warn‐
ing Activated
ing Activated message appears in the
multifunction display.
Adaptive Brake Assist i
Observe the "Important safety notes" sec-
tion for driving safety systems (Y page 57). G
WARNING
Adaptive Brake Assist cannot always clearly
identify objects and complex traffic situa-
tions.
In such cases, Adaptive Brake Assist can:
R intervene unnecessarily
R not intervene
There is a risk of an accident.
Always pay careful attention to the traffic sit- uation and be ready to brake. Terminate the
intervention in a non-critical driving situation. G
WARNING
Adaptive Brake Assist does not react:
R to people or animals
R to oncoming vehicles
R to crossing traffic
R to stationary obstacles
R when cornering
As a result, the Adaptive Brake Assist may not intervene in all critical conditions. There is a
risk of an accident.
Always pay careful attention to the traffic sit- uation and be ready to brake. 162
Driving systemsDriving and parking
Page 174 of 334
The camera is in the middle of the roof above
the high-mounted brake lamp (Y page 269).
The rear view camera may show obstacles in perspectival distortion, incorrectly or not at
all. The rear view camera cannot display all
objects located very near and/or under the
rear bumper. It does not warn you of a colli-
sion, persons or objects.
The area behind the vehicle is displayed in a
mirrored fashion, as in the rear-view mirror or
the exterior mirrors.
The function of the rear view camera may be
partially or completely impaired in the follow-
ing circumstances:
R it is raining very heavily or snowing, or it is
foggy.
R the parking space is located in a very dark
place.
R the camera is exposed to very strong white
light. White stripes may appear on the dis-
play.
R the surrounding area is illuminated with flu-
orescent light. The display may flicker.
R if the temperature changes very quickly, for
example if you drive into a heated garage in the winter.
R ambient temperatures are very high.
R the camera lens is dirty or obstructed.
R the rear of the vehicle is damaged. In this
case, have the position and setting
checked at a specialist workshop.
The rear view camera is activated when you
engage reverse gear R.
You can find information on cleaning the cam-
era in the "Maintenance and care" section
(Y page 269). Working mode
ADR (working speed governor)
General notes When activated, ADR automatically increases
the engine speed to a preset speed or a speed
you have set.
i After a cold start, the idling speed of the
engine is increased automatically. If the
preset working speed is lower than the
increased idling speed, the working speed
is only reached once the engine has com-
pleted the warm-up phase.
It is only possible to activate ADR with the
vehicle stationary and the parking brake
applied.
The selector lever of the automatic trans-
mission must be in position P.
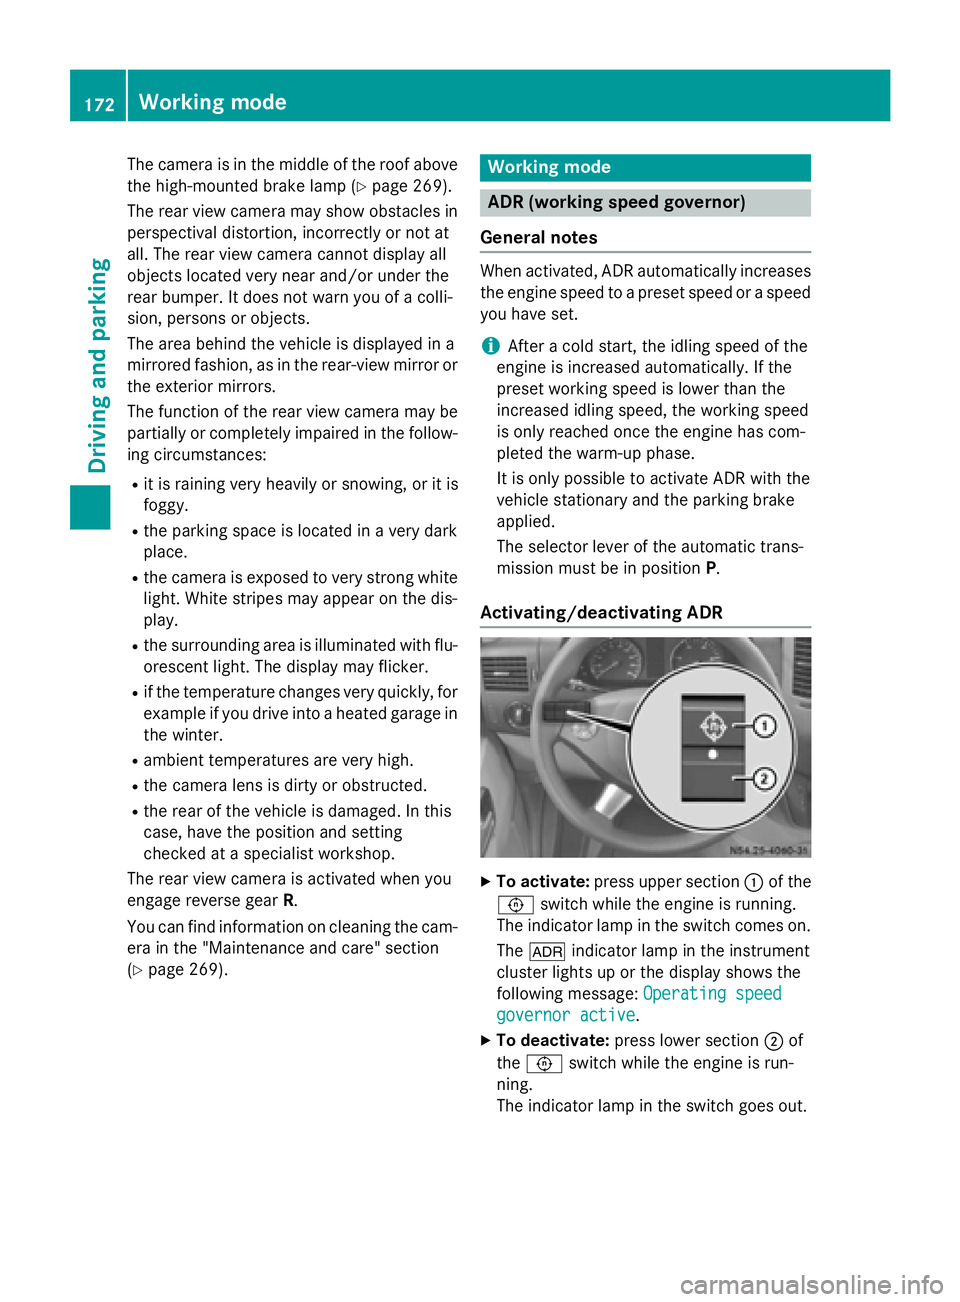
Activating/deactivating ADR X
To activate: press upper section 0043of the
0091 switch while the engine is running.
The indicator lamp in the switch comes on.
The 004E indicator lamp in the instrument
cluster lights up or the display shows the
following message: Operating speed Operating speed
governor active
governor active.
X To deactivate: press lower section 0044of
the 0091 switch while the engine is run-
ning.
The indicator lamp in the switch goes out. 172
Working modeDriving and parking
Page 184 of 334
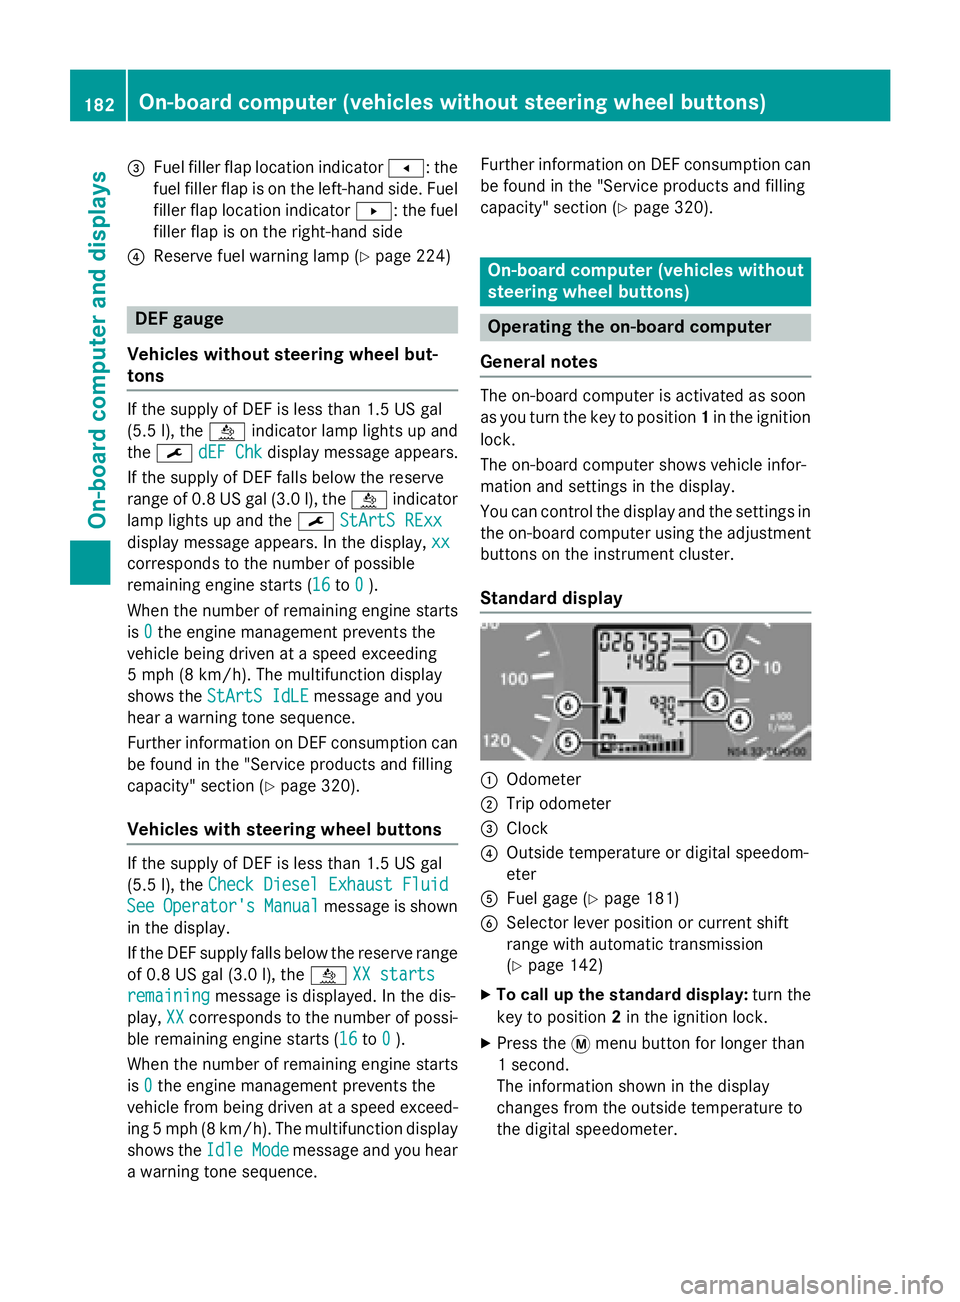
0087
Fuel filler flap location indicator 007F: the
fuel filler flap is on the left-hand side. Fuel filler flap location indicator 0080: the fuel
filler flap is on the right-hand side
0085 Reserve fuel warning lamp (Y page 224)DEF gauge
Vehicles without steering wheel but-
tons If the supply of DEF is less than 1.5 US gal
(5.5 l), the 00E2indicator lamp lights up and
the 0099 dEF Chk
dEF Chk display message appears.
If the supply of DEF falls below the reserve
range of 0.8 US gal (3.0 l), the 00E2indicator
lamp lights up and the 0099StArtS RExx StArtS RExx
display message appears. In the display, xx
xx
corresponds to the number of possible
remaining engine starts (16 16to0
0).
When the number of remaining engine starts
is 0
0 the engine management prevents the
vehicle being driven at a speed exceeding
5 mph (8 km/h). The multifunction display
shows the StArtS IdLE
StArtS IdLE message and you
hear a warning tone sequence.
Further information on DEF consumption can be found in the "Service products and filling
capacity" section (Y page 320).
Vehicles with steering wheel buttons If the supply of DEF is less than 1.5 US gal
(5.5 l), the Check Diesel Exhaust Fluid
Check Diesel Exhaust Fluid
See
See Operator's
Operator's Manual
Manualmessage is shown
in the display.
If the DEF supply falls below the reserve range
of 0.8 US ga l(3.0 l), the 00E2XX starts XX starts
remaining
remaining message is displayed. In the dis-
play, XX
XXcorresponds to the number of possi-
ble remaining engine starts (16 16to0
0).
When the number of remaining engine starts
is 0
0 the engine management prevents the
vehicle from being driven at a speed exceed- ing 5 mph (8 km/h). The multifunction display
shows the Idle Mode
Idle Mode message and you hear
a warning tone sequence. Further information on DEF consumption can
be found in the "Service products and filling
capacity" section (Y page 320). On-board computer (vehicles without
steering wheel buttons)
Operating the on-board computer
General notes The on-board computer is activated as soon
as you turn the key to position 1in the ignition
lock.
The on-board computer shows vehicle infor-
mation and settings in the display.
You can control the display and the settings in the on-board computer using the adjustment
buttons on the instrument cluster.
Standard display 0043
Odometer
0044 Trip odometer
0087 Clock
0085 Outside temperature or digital speedom-
eter
0083 Fuel gage (Y page 181)
0084 Selector lever position or current shift
range with automatic transmission
(Ypage 142)
X To call up the standard display: turn the
key to position 2in the ignition lock.
X Press the 0079menu button for longer than
1 second.
The information shown in the display
changes from the outside temperature to
the digital speedometer. 182
On-board computer (vehicles without steering wheel buttons)On-board computer and displays