engine components MERCEDES-BENZ SPRINTER 2015 MY15 Operator’s Manual
[x] Cancel search | Manufacturer: MERCEDES-BENZ, Model Year: 2015, Model line: SPRINTER, Model: MERCEDES-BENZ SPRINTER 2015Pages: 334, PDF Size: 5.94 MB
Page 255 of 334
X
Replace cap 0085on the filler neck and
tighten.
When doing so, make sure that the cap
engages correctly.
X Check the oil level with the oil dipstick
(Y page 251) or on the display
(Y page 250).
X Close the hood. Coolant
G
WARNING
The engine cooling system is pressurized, par- ticularly when the engine is warm. When
opening the cap, you could be scalded by hotcoolant spraying out. There is a risk of injury.
Let the engine cool down before opening the
cap. Wear eye and hand protection when
opening the cap. Open the cap slowly half a
turn to allow pressure to escape.
Only check the coolant level and/or fill the
coolant if the vehicle is on a level surface and the engine has cooled down. The coolant tem-
perature must be below 122 ‡ (50 †).
! Check the engine cooling and heating sys-
tem regularly for leaks.
If a large quantity of coolant is lost, have the
cause traced and rectified at a qualified
specialist workshop. G
WARNING
Coolant contains glycol and is therefore toxic. Do not swallow the coolant. See a doctor
immediately if you swallow coolant.
Make sure that coolant does not come into
contact with skin, eyes or clothing. In case of
contact with eyes, rinse immediately with
plenty of clean water. Clean affected areas of skin and clothing with soap and water imme-
diately. Change any affected clothing imme-
diately. G
WARNING
If antifreeze comes into contact with hot com- ponents in the engine compartment, it may
ignite. There is a risk of fire and injury.
Let the engine cool down before you add anti-
freeze. Make sure that antifreeze is not spilled
next to the filler neck. Thoroughly clean the
antifreeze from components before starting
the engine.
! Take care not to spill any coolant on pain-
ted surfaces. You could otherwise damage
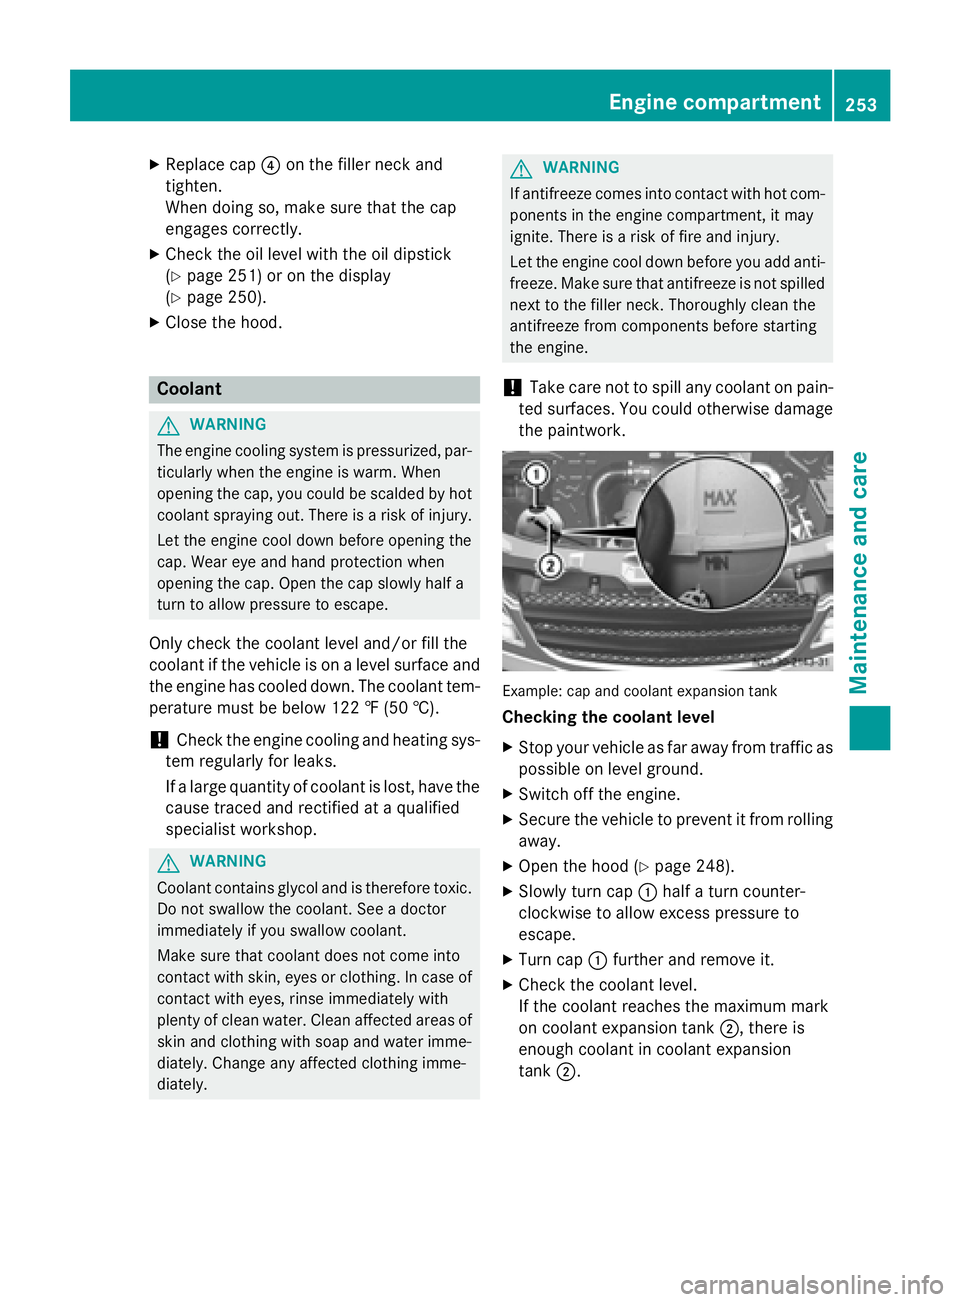
the paintwork. Example: cap and coolant expansion tank
Checking the coolant level
X Stop your vehicle as far away from traffic as
possible on level ground.
X Switch off the engine.
X Secure the vehicle to prevent it from rolling
away.
X Open the hood (Y page 248).
X Slowly turn cap 0043half a turn counter-
clockwise to allow excess pressure to
escape.
X Turn cap 0043further and remove it.
X Check the coolant level.
If the coolant reaches the maximum mark
on coolant expansion tank 0044, there is
enough coolant in coolant expansion
tank 0044. Engine compartment
253Maintenance and care Z
Page 258 of 334
X
Turn the key to position 2in the ignition
lock.
X Open drain plug 0044immediately until the
water/fuel mixture flows out of drain
hose 0043.
X Screw in drain plug 0044as soon as approx-
imately 0.2 US quarts(0.2 liters) of the
water/fuel mixture have been collected.
The electrical fuel pump automatically halts
the flow of the water/fuel mixture after
30 seconds.
X After draining, turn the key back to posi-
tion 0in the ignition lock.
X Dispose of the collected water/fuel mix-
ture in an environmentally responsible
manner, e.g. at a qualified specialist work-
shop.
X Check drain plug 0044. The drain plug must
be closed.
When the engine is running and drain
hose 0044is open, fuel is lost through drain
hose 0043.
X Close the hood (Y page 249).
If the 00B8 indicator lamp does not go out
after draining:
X Drain the fuel filter again.
X If the 00B8 indicator lamp does not go out
after draining for the second time, have the
cause checked immediately at a qualified
specialist workshop. Vehicle interior
Air filter for the rear-compartment air
conditioning
! Regularly check the air filters for visible
dirt. Clean or replace a dirty filter mat. The
dirt may otherwise lead to damage to the
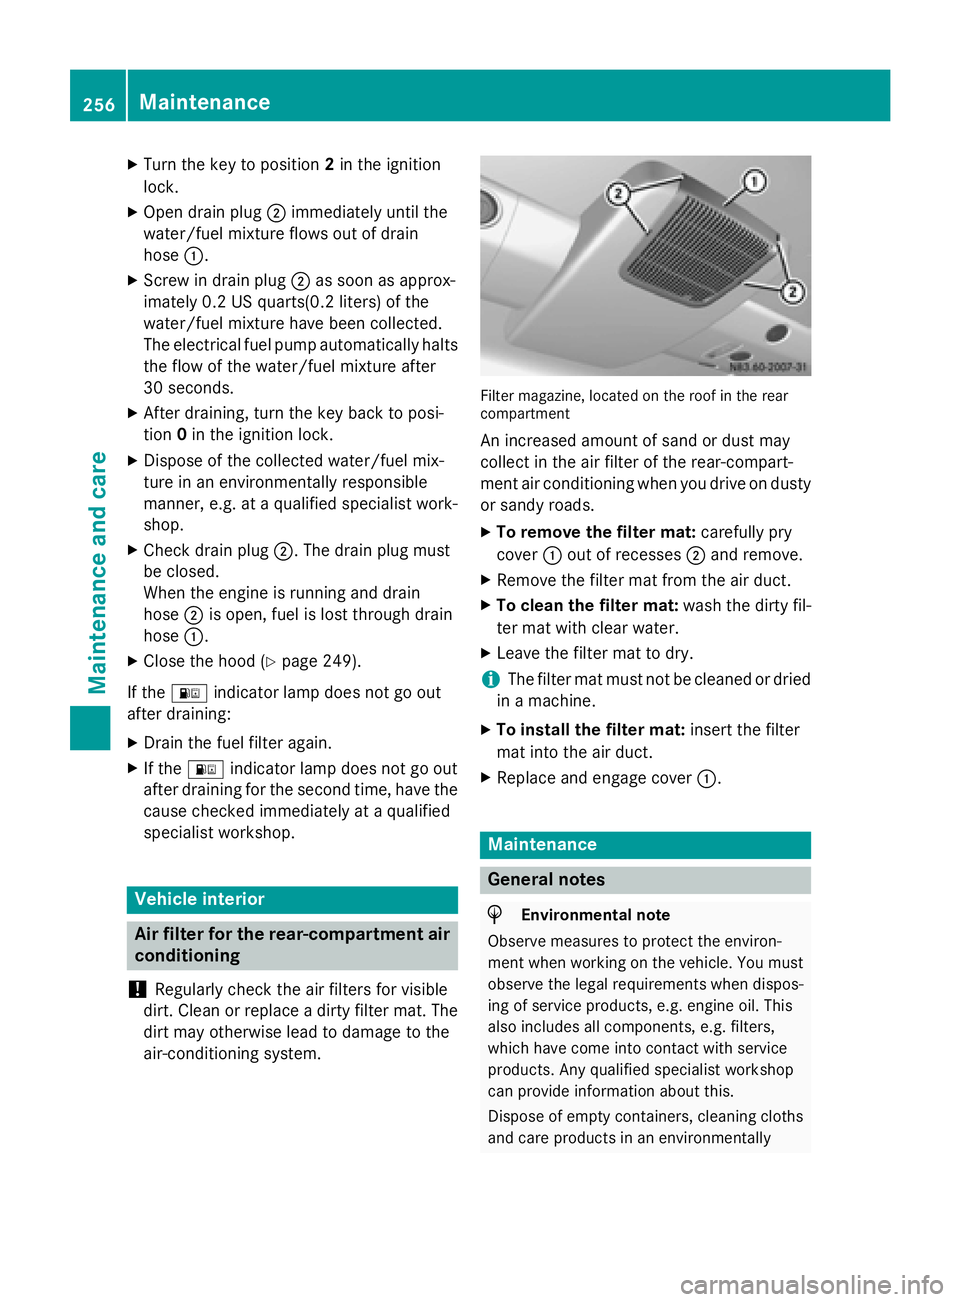
air-conditioning system. Filter magazine, located on the roof in the rear
compartment
An increased amount of sand or dust may
collect in the air filter of the rear-compart-
ment air conditioning when you drive on dusty
or sandy roads.
X To remove the filter mat: carefully pry
cover 0043out of recesses 0044and remove.
X Remove the filter mat from the air duct.
X To clean the filter mat: wash the dirty fil-
ter mat with clear water.
X Leave the filter mat to dry.
i The filter mat must not be cleaned or dried
in a machine.
X To install the filter mat: insert the filter
mat into the air duct.
X Replace and engage cover 0043. Maintenance
General notes
H
Environmental note
Observe measures to protect the environ-
ment when working on the vehicle. You must
observe the legal requirements when dispos-
ing of service products, e.g. engine oil. This
also includes all components, e.g. filters,
which have come into contact with service
products. Any qualified specialist workshop
can provide information about this.
Dispose of empty containers, cleaning cloths and care products in an environmentally 256
MaintenanceMaintenance and care
Page 263 of 334
otherwise destroy electronic components
such as the alternator.
Always disconnect the starter battery in the battery case in the driver's footwell first.
! Always disconnect the battery in
the order described below. Never swap the
terminal clamps. You may otherwise dam-
age the vehicle electronics.
If the vehicle is expected to be out of use for over 3 weeks, disconnect the batteries. This
will prevent battery discharge caused by off-
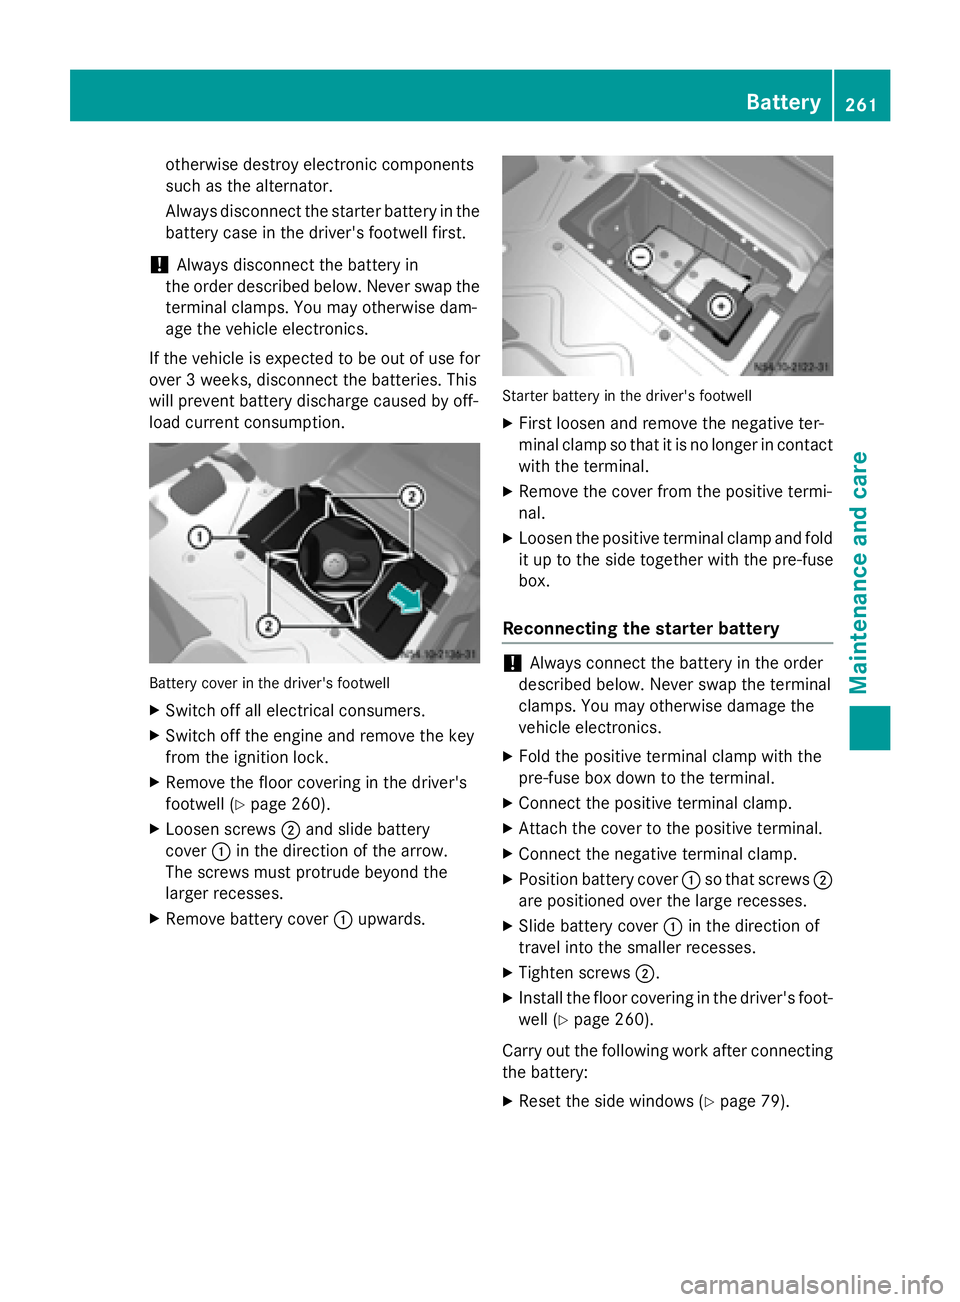
load current consumption. Battery cover in the driver's footwell
X Switch off all electrical consumers.
X Switch off the engine and remove the key
from the ignition lock.
X Remove the floor covering in the driver's
footwell (Y page 260).
X Loosen screws 0044and slide battery
cover 0043in the direction of the arrow.
The screws must protrude beyond the
larger recesses.
X Remove battery cover 0043upwards. Starter battery in the driver's footwell
X First loosen and remove the negative ter-
minal clamp so that it is no longer in contact
with the terminal.
X Remove the cover from the positive termi-
nal.
X Loosen the positive terminal clamp and fold
it up to the side together with the pre-fuse
box.
Reconnecting the starter battery !
Always connect the battery in the order
described below. Never swap the terminal
clamps. You may otherwise damage the
vehicle electronics.
X Fold the positive terminal clamp with the
pre-fuse box down to the terminal.
X Connect the positive terminal clamp.
X Attach the cover to the positive terminal.
X Connect the negative terminal clamp.
X Position battery cover 0043so that screws 0044
are positioned over the large recesses.
X Slide battery cover 0043in the direction of
travel into the smaller recesses.
X Tighten screws 0044.
X Install the floor covering in the driver's foot-
well (Y page 260).
Carry out the following work after connecting
the battery:
X Reset the side windows (Y page 79). Battery
261Maintenance and care Z
Page 265 of 334
R
It is particularly important to observe the
described order when connecting and dis-
connecting the jumper cables.
R Never connect or disconnect the battery
terminals while the engine is running.
Disconnecting the additional battery !
Switch off the engine and remove the key
from the ignition lock before you loosen or disconnect the terminal clamps. You may
otherwise destroy electronic components
such as the alternator.
Always disconnect the starter battery in the
battery case in the driver's footwell first.
! Always disconnect the battery in
the order described below. Never swap the terminal clamps. You may otherwise dam-
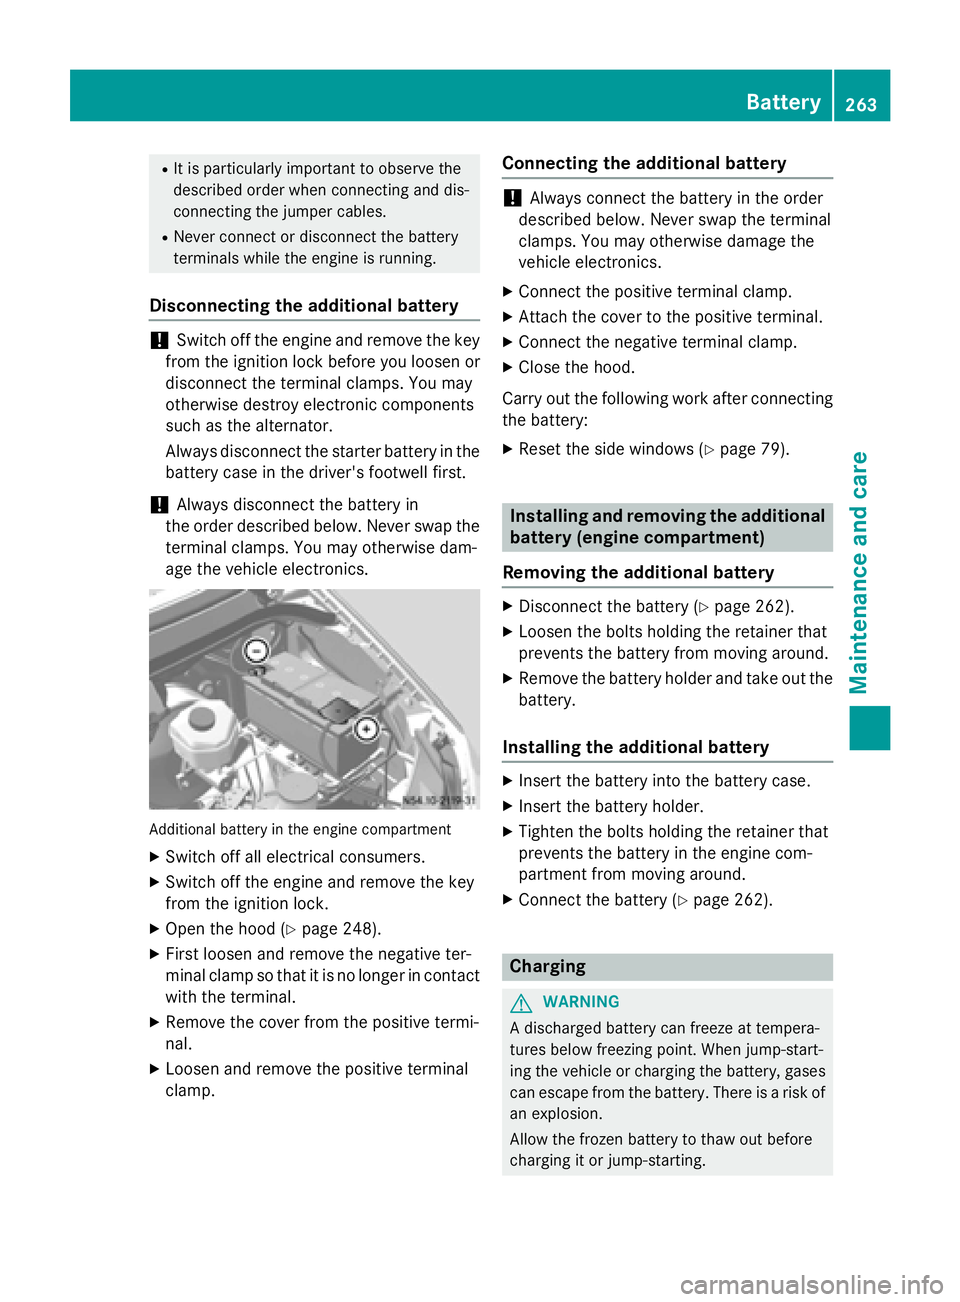
age the vehicle electronics. Additional battery in the engine compartment
X Switch off all electrical consumers.
X Switch off the engine and remove the key
from the ignition lock.
X Open the hood (Y page 248).
X First loosen and remove the negative ter-
minal clamp so that it is no longer in contact
with the terminal.
X Remove the cover from the positive termi-
nal.
X Loosen and remove the positive terminal
clamp. Connecting the additional battery !
Always connect the battery in the order
described below. Never swap the terminal
clamps. You may otherwise damage the
vehicle electronics.
X Connect the positive terminal clamp.
X Attach the cover to the positive terminal.
X Connect the negative terminal clamp.
X Close the hood.
Carry out the following work after connecting
the battery:
X Reset the side windows (Y page 79). Installing and removing the additional
battery (engine compartment)
Removing the additional battery X
Disconnect the battery (Y page 262).
X Loosen the bolts holding the retainer that
prevents the battery from moving around.
X Remove the battery holder and take out the
battery.
Installing the additional battery X
Insert the battery into the battery case.
X Insert the battery holder.
X Tighten the bolts holding the retainer that
prevents the battery in the engine com-
partment from moving around.
X Connect the battery (Y page 262). Charging
G
WARNING
A discharged battery can freeze at tempera-
tures below freezing point. When jump-start-
ing the vehicle or charging the battery, gases can escape from the battery. There is a risk of
an explosion.
Allow the frozen battery to thaw out before
charging it or jump-starting. Battery
263Maintenance and care Z
Page 268 of 334
The vehicle could otherwise be damaged.
You can wash the vehicle in an automatic car
wash from the very start.
Wash off excess dirt before cleaning the vehi- cle in an automatic car wash.
After putting the vehicle through an auto-
matic car wash, wipe off wax from:
R the rear view camera lens (Y page 269)
R the windshield
R the windshield wiper blades
This will prevent smears and reduce wiping noises caused by residue on the wind-
shield.
Washing by hand In some countries, washing by hand is only
allowed at specially equipped washing bays.
Observe the legal requirements of the coun-
try you are currently in when washing by
hand.
X Do not use hot water and do not wash the
vehicle in direct sunlight.
X Use a soft car sponge.
X Use a mild cleaning agent, e.g. a car sham-
poo approved for use with Sprinter vehi-
cles.
X Thoroughly hose down the vehicle with a
gentle jet of water.
X Do not point the water jet directly towards
the air inlets.
X Use plenty of water and rinse out the
sponge frequently.
X Rinse the vehicle with clean water and dry
thoroughly with a chamois.
X Do not let the cleaning agents dry on the
paintwork.
When using the vehicle in winter, remove all
traces of road salt deposits carefully and as
soon as possible. Power washers G
WARNING
The water jet from a circular jet nozzle (dirt
blasters) can cause invisible exterior damage to the tires or chassis components. Compo-
nents damaged in this way may fail unexpect-edly. There is a risk of an accident.
Do not use power washers with circular jet
nozzles to clean the vehicle. Have damaged
tires or chassis components replaced imme-
diately.
! Under no circumstances use power wash-
ers in the vehicle interior. The pressurized
water and associated spray produced by
the power washer could cause extensive
damage to the vehicle.
! Observe the minimum distance to be
maintained between the nozzle of the
power washer and object to be cleaned, as
outlined below:
R approximately 2.2 ft(70 cm) when using
round-jet nozzles
R approximately 1 ft (30 cm) when using
25°flat-spray jets and dirt blasters
Keep the water jet moving while cleaning.
To avoid causing damage, do not point the
water jet directly at:
R door joints
R brake hoses
R electrical components
R electrical connections
R seals
R drive train, especially not at the inter-
mediate bearing of the propeller shaft
R rear view camera (camera lens and
microphone opening on the bottom)
Keep a minimum distance of
1.6 ft(50 cm).
Cleaning the engine !
Water must not enter intake or ventilation
openings. When cleaning with high pres- 266
CareMaintenance and care
Page 269 of 334
sure water or steam cleaners, the spray
must not be aimed directly at electrical
components or the terminals of electrical
lines.
Preserve the engine after the engine has
been cleaned. Protect the belt drive system from exposure to the preservative agent.
Also observe the information under "Power
washers" (Y page 266).
Cleaning the paintwork !
Do not affix:
R stickers
R films
R magnetic plates or similar items
to painted surfaces. You could otherwise
damage the paintwork.
Scratches, corrosive deposits, areas affected
by corrosion and damage caused by inade-
quate care cannot always be completely
repaired. In such cases, visit a qualified spe-
cialist workshop.
X Remove impurities immediately, where
possible, whilst avoiding rubbing too hard.
X Soak insect remains with insect remover
and rinse off the treated areas afterwards.
X Soak bird droppings with water and rinse
off the treated areas afterwards.
X Remove coolant, brake fluid, tree resin,
oils, fuels and greases by rubbing gently
with a cloth soaked in petroleum ether or
lighter fluid.
X Use tar remover to remove tar stains.
X Use silicone remover to remove wax.
Cleaning the windows G
WARNING
You could become trapped by the windshield wipers if they start moving while cleaning the
windshield or wiper blades. There is a risk of
injury. Always switch off the windshield wipers and
the ignition before cleaning the windshield or
wiper blades.
! Do not fold the windshield wipers away
from the windshield unless the hood is
closed. Otherwise, you could damage the
hood.
! Hold the wiper arm securely when folding
back. The windshield could be damaged if
the wiper arm smacks against it suddenly.
! Do not use dry cloths, abrasive products,
solvents or cleaning agents containing sol- vents to clean the inside of the windows. Do
not touch the insides of the windows with
hard objects, e.g. an ice scraper or ring.
There is otherwise a risk of damaging the
windows.
Before cleaning the windshield
X Turn the key to position 0in the ignition
lock or remove it.
X Fold the windshield wiper arms away from
the windshield until you feel them engage.
Before switching the ignition on again, fold
the windshield wipers back into position.
Cleaning the windows X Clean the inside and outside of the win-
dows with a damp cloth and a cleaning
agent that is recommended and approved
for Sprinter vehicles. Exterior
Cleaning the wheels !
Do not use any acidic or alkaline cleaning
agents. They can cause corrosion on the
wheel bolts (wheel nuts) or the retainer
springs for the wheel-balancing weights.
! Do not park the vehicle for an extended
period straight after cleaning it, particularly after having cleaned the wheels with wheel cleaner. Wheel cleaners could cause
increased corrosion of the brake discs and Care
267Maintenance and care Z
Page 282 of 334
i
Only have the propeller shafts fitted/
removed by qualified, skilled personnel.
Before towing the vehicle, observe the fol-
lowing:
R the information on towing in the event of
malfunctions (Y page 279) and
R the important safety notes (Y page 277).
Towing You may only tow the vehicle a maximum dis-
tance of 30 miles (50 km). For a towing dis-
tance of over 30 miles (50 km), the propeller
shafts to the driven axles must be removed.
X Turn the key to position 2in the ignition
lock.
X Depress the brake pedal and keep it
depressed.
X Shift the automatic transmission to posi-
tion N.
X Release the brake pedal.
X Release the parking brake.
X Leave the key in position 2in the ignition
lock.
X Switch on the hazard warning lamps
(Y page 95).
X Do not exceed the towing speed of 30 mph
(50 km/h) and the towing distance of
30 miles (50 km). Recovering a vehicle that is stuck
! When recovering a vehicle that has
become stuck, pull it as smoothly and
evenly as possible. Excessive tractive
power could damage the vehicles.
If the drive wheels get trapped on loose or
muddy ground, recover the vehicle with the
utmost care. This is especially the case if the
vehicle is laden.
Never attempt to recover a vehicle with a
trailer attached. Pull out the vehicle backwards, if possible,
using the tracks it made when it became
stuck. Transporting the vehicle
! You may only secure the vehicle by the
wheels, not by parts of the vehicle such as
axle or steering components. Otherwise,
the vehicle could be damaged. Tow-starting (emergency engine
starting)
Vehicles with automatic transmission !
Vehicles with automatic transmission
must not be tow-started. You could other-
wise damage the automatic transmission.
You can find information on jump-starting
under "Jump-starting“ (Y page 276). Electrical fuses
G
WARNING
If you manipulate or bridge a faulty fuse or if
you replace it with a fuse with a higher amper- age, the electric cables could be overloaded.
This could result in a fire. There is a risk of an
accident and injury.
Always replace faulty fuses with the specified
new fuses having the correct amperage.
! Only use fuses that have been approved
for Sprinter vehicles and that have the
required fuse rating for the systems con-
cerned. Components or systems could oth- erwise be damaged.
The fuses in your vehicle switch off defective power circuits. If a fuse blows, all the com-
ponents on the circuit and their functions will
cease to operate.
Blown fuses must be replaced with fuses of
the same rating, which you can recognize by
the color and fuse rating. Observe the infor- 280
Electrical fusesRoadside Assistance
Page 318 of 334
Vehicle electronics
Tampering with the engine electron-
ics G
WARNING
Always have work on the engine electronics
and related components carried out at a quali- fied specialist workshop. Otherwise, the vehi-cle's operating safety could be affected.
! Only have engine electronics and the cor-
responding parts, such as control units,
sensors or connector leads, serviced in a
qualified specialist workshop. Otherwise,
the vehicle parts may wear more quickly.
This can lead to loss of the New Vehicle
Limited Warranty. Installing electrical or electronic
equipment
G
WARNING
You and others may damage your health due
to excessive electromagnetic radiation. By
using an external antenna, the possible health risks of electromagnetic fields, which are
under discussion among the scientific com-
munity, should be largely prevented.
Therefore, only have the exterior antenna
installed at a qualified specialist workshop.
Electrical and electronic devices may have a
detrimental effect on both the comfort and
the operating safety of the vehicle. If equip-
ment of this kind is installed, its electromag-
netic compatibility must be checked and veri-
fied.
If these devices are linked to functions asso-
ciated with resistance to interference, they
must have type approval. This applies to the
device or its interfaces to the vehicle elec-
tronics, e.g. charging brackets.
A telephone or two-way radio to be installed in
the vehicle must be approved. Further infor-
mation can be obtained from any Sprinter
Dealer. For operation of mobile phones and two-way
radios, Mercedes Benz recommends connec- tion to an approved exterior antenna. This is
the only way to ensure optimum reception
quality inside the vehicle and to minimize
mutual interference between the vehicle elec-
tronics, mobile phones and two-way radios.
The transmission output of the mobile phone
or two-way radio may not exceed the follow-
ing maximum transmission output (PEAK): Frequency range Maximum trans-
mission output
(PEAK) Shortwave
(f < 50 MHz) 100 W
4 m waveband 30 W
2 m waveband 50 W
Trunked radio/Tetra 35 W
70 cm waveband 35 W
GSM/UMTS/LTE 10 W
Identification plates
Vehicle identification plate with vehi-
cle identification number (VIN)
Vehicle identification plate for vehicles or chassis
on the base of the driver's seat
X Open the driver’s door.
You will see vehicle identification plate 0043
with the vehicle identification number 316
Identification platesTechnical data
Page 321 of 334
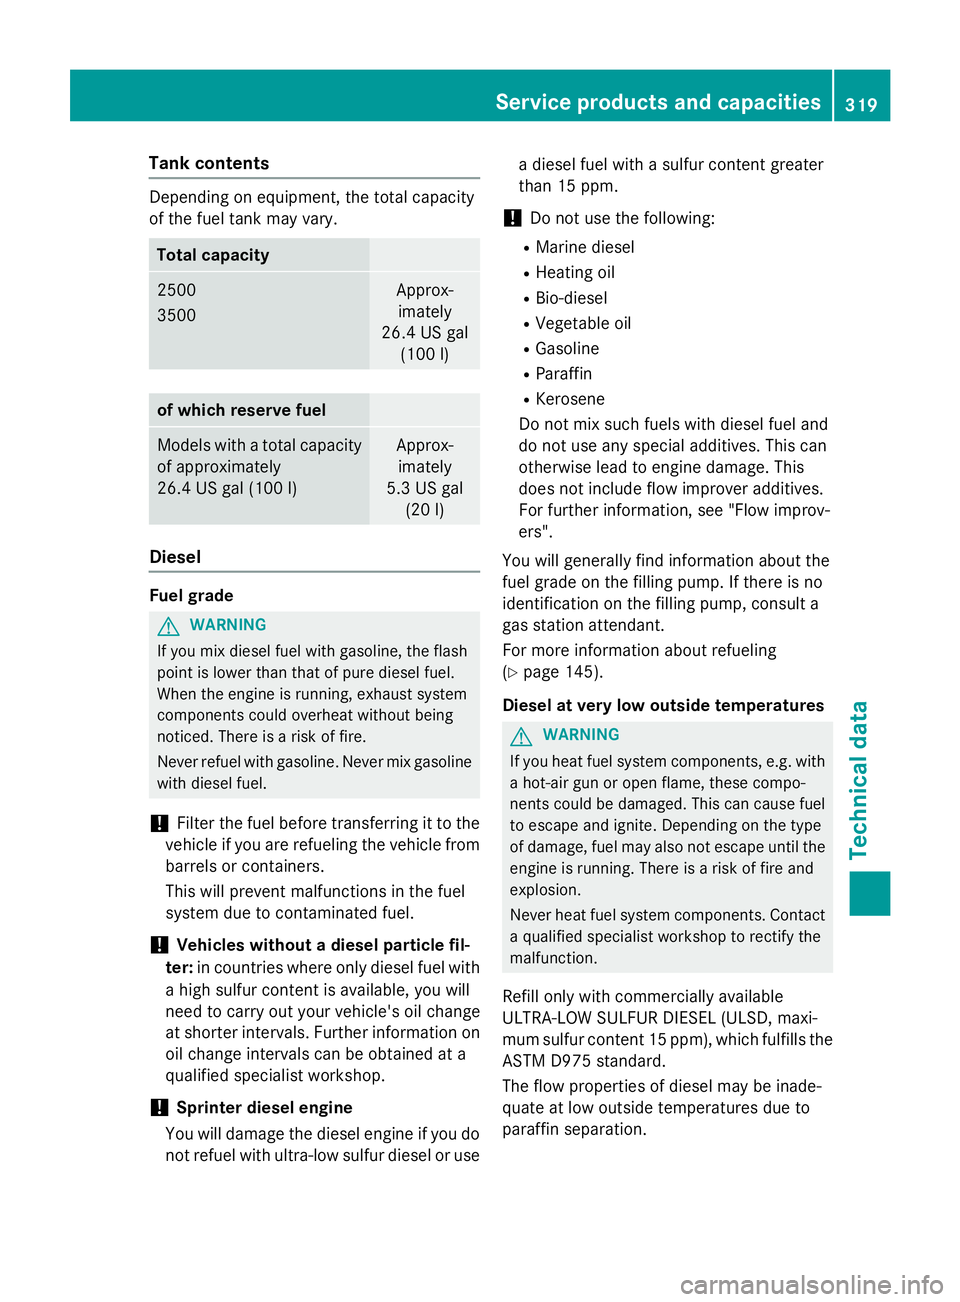
Tank contents
Depending on equipment, the total capacity
of the fuel tank may vary.
Total capacity
2500
3500 Approx-
imately
26.4 US gal (100 l) of which reserve fuel
Models with a total capacity
of approximately
26.4 US gal (100 l) Approx-
imately
5.3 US gal (20 l) Diesel
Fuel grade
G
WARNING
If you mix diesel fuel with gasoline, the flash
point is lower than that of pure diesel fuel.
When the engine is running, exhaust system
components could overheat without being
noticed. There is a risk of fire.
Never refuel with gasoline. Never mix gasoline with diesel fuel.
! Filter the fuel before transferring it to the
vehicle if you are refueling the vehicle from
barrels or containers.
This will prevent malfunctions in the fuel
system due to contaminated fuel.
! Vehicles without a diesel particle fil-
ter: in countries where only diesel fuel with
a high sulfur content is available, you will
need to carry out your vehicle's oil change
at shorter intervals. Further information on
oil change intervals can be obtained at a
qualified specialist workshop.
! Sprinter diesel engine
You will damage the diesel engine if you do not refuel with ultra-low sulfur diesel or use a diesel fuel with a sulfur content greater
than 15 ppm.
! Do not use the following:
R Marine diesel
R Heating oil
R Bio-diesel
R Vegetable oil
R Gasoline
R Paraffin
R Kerosene
Do not mix such fuels with diesel fuel and
do not use any special additives. This can
otherwise lead to engine damage. This
does not include flow improver additives.
For further information, see "Flow improv-
ers".
You will generally find information about the
fuel grade on the filling pump. If there is no
identification on the filling pump, consult a
gas station attendant.
For more information about refueling
(Y page 145).
Diesel at very low outside temperatures G
WARNING
If you heat fuel system components, e.g. with a hot-air gun or open flame, these compo-
nents could be damaged. This can cause fuel to escape and ignite. Depending on the type
of damage, fuel may also not escape until the
engine is running. There is a risk of fire and
explosion.
Never heat fuel system components. Contact a qualified specialist workshop to rectify the
malfunction.
Refill only with commercially available
ULTRA-LOW SULFUR DIESEL (ULSD, maxi-
mum sulfur content 15 ppm), which fulfills the
ASTM D975 standard.
The flow properties of diesel may be inade-
quate at low outside temperatures due to
paraffin separation. Service products and capacities
319Technical data Z
Page 322 of 334
i
Malfunctions resulting from paraffin sep-
aration can only be rectified by heating the
entire fuel system. Park the vehicle in a
heated garage, for example.
To prevent operating problems, diesel with
better flow qualities is available during the
winter months. You can obtain information at the gas station or from your fuel supplier.
Your vehicle is equipped with a fuel preheat-
ing system. This improves the flow properties
of the diesel by approximately 46 ‡ (8 †).
ULTRA-LOW SULFUR DIESEL can be used
without risk of malfunction down to an out-
side temperature of approximately 14 ‡
(00F810 †).
Fuel additives
! Do not add gasoline or kerosene to diesel
fuel to improve its flow characteristics.
Gasoline or kerosene impairs the lubricat-
ing properties of the diesel fuel. This can
result in damage to the fuel injection sys-
tem, for example.
Information on fuel consumption H
Environmental note
CO 2(carbon dioxide) is the gas which scien-
tists believe to be principally responsible for
global warming (the greenhouse effect). Your
vehicle's CO 2emissions are directly related to
fuel consumption and therefore depend on:
R efficient use of the fuel by the engine
R driving style
R other non-technical factors, such as envi-
ronmental influences, road conditions or
traffic flow
You can minimize your vehicle's CO 2emis-
sions by driving carefully and having it serv-
iced regularly.
Fuel consumption depends on: R the vehicle version
R the style of driving R
the operating conditions
R the type or quality of the fuel used
The vehicle will use more fuel than usual in the following situations:
R at very low outside temperatures
R in city traffic
R during short journeys
R on mountainous terrain
R when towing a trailer
To keep fuel consumption low, observe the
advice in the "Protection of the environment" section (Y page 23).
The following components of the different
vehicle versions influence fuel consumption:
R tire sizes, tire tread, tire pressure, tire con-
dition
R body
R transmission ratios for the drive assem-
blies
R additional equipment (e.g. air-conditioning
system, auxiliary heating system)
For these reasons, the actual consumption
figures for your vehicle may deviate from the
consumption figures determined according
to EU Directive 80/1268/EEC.
Data concerning fuel consumption are recor- ded in the on-board computer; use the steer-
ing wheel buttons to call up the Trip com-
puter menu (Y page 195).
Diesel Exhaust Fluid (DEF) General notes
! Only use DEF in accordance with
ISO 22241. The exhaust gas aftertreatment system may otherwise be damaged.
Observe the MB Specifications for Service
Products, Sheet No. 352.0.
Damage caused by the use of other reduc-
ing agents will invalidate the New Vehicle
Limited Warranty. 320
Service products and capacitiesTechnical data